
The cheat sheet is a useful command reference for this module.
| Command | Description |
man <tool> | Opens man pages for the specified tool. |
<tool> -h | Prints the help page of the tool. |
apropos <keyword> | Searches through man pages' descriptions for instances of a given keyword. |
cat | Concatenate and print files. |
whoami | Displays current username. |
id | Returns users identity. |
hostname | Sets or prints the name of the current host system. |
uname | Prints operating system name. |
pwd | Returns working directory name. |
ifconfig | The ifconfig utility is used to assign or view an address to a network interface and/or configure network interface parameters. |
ip | Ip is a utility to show or manipulate routing, network devices, interfaces, and tunnels. |
netstat | Shows network status. |
ss | Another utility to investigate sockets. |
ps | Shows process status. |
who | Displays who is logged in. |
env | Prints environment or sets and executes a command. |
lsblk | Lists block devices. |
lsusb | Lists USB devices. |
lsof | Lists opened files. |
lspci | Lists PCI devices. |
sudo | Execute command as a different user. |
su | The su utility requests appropriate user credentials via PAM and switches to that user ID (the default user is the superuser). A shell is then executed. |
useradd | Creates a new user or update default new user information. |
userdel | Deletes a user account and related files. |
usermod | Modifies a user account. |
addgroup | Adds a group to the system. |
delgroup | Removes a group from the system. |
passwd | Changes user password. |
dpkg | Install, remove and configure Debian-based packages. |
apt | High-level package management command-line utility. |
aptitude | Alternative to apt. |
snap | Install, remove and configure snap packages. |
gem | Standard package manager for Ruby. |
pip | Standard package manager for Python. |
git | Revision control system command-line utility. |
systemctl | Command-line based service and systemd control manager. |
ps | Prints a snapshot of the current processes. |
journalctl | Query the systemd journal. |
kill | Sends a signal to a process. |
bg | Puts a process into background. |
jobs | Lists all processes that are running in the background. |
fg | Puts a process into the foreground. |
curl | Command-line utility to transfer data from or to a server. |
wget | An alternative to curl that downloads files from FTP or HTTP(s) server. |
python3 -m http.server | Starts a Python3 web server on TCP port 8000. |
ls | Lists directory contents. |
cd | Changes the directory. |
clear | Clears the terminal. |
touch | Creates an empty file. |
mkdir | Creates a directory. |
tree | Lists the contents of a directory recursively. |
mv | Move or rename files or directories. |
cp | Copy files or directories. |
nano | Terminal based text editor. |
which | Returns the path to a file or link. |
find | Searches for files in a directory hierarchy. |
updatedb | Updates the locale database for existing contents on the system. |
locate | Uses the locale database to find contents on the system. |
more | Pager that is used to read STDOUT or files. |
less | An alternative to more with more features. |
head | Prints the first ten lines of STDOUT or a file. |
tail | Prints the last ten lines of STDOUT or a file. |
sort | Sorts the contents of STDOUT or a file. |
grep | Searches for specific results that contain given patterns. |
cut | Removes sections from each line of files. |
tr | Replaces certain characters. |
column | Command-line based utility that formats its input into multiple columns. |
awk | Pattern scanning and processing language. |
sed | A stream editor for filtering and transforming text. |
wc | Prints newline, word, and byte counts for a given input. |
chmod | Changes permission of a file or directory. |
chown | Changes the owner and group of a file or directory. |
Many events led up to creating the first Linux kernel and, ultimately, the Linux operating system (OS), starting with the Unix operating system's release by Ken Thompson and Dennis Ritchie (whom both worked for AT\&T at the time) in 1970. The Berkeley Software Distribution (BSD) was released in 1977, but since it contained the Unix code owned by AT\&T, a resulting lawsuit limited the development of BSD. Richard Stallman started the GNU project in 1983. His goal was to create a free Unix-like operating system, and part of his work resulted in the GNU General Public License (GPL) being created. Projects by others over the years failed to result in a working, free kernel that would become widely adopted until the creation of the Linux kernel.
At first, Linux was a personal project started in 1991 by a Finnish student named Linus Torvalds. His goal was to create a new, free operating system kernel. Over the years, the Linux kernel has gone from a small number of files written in C under licensing that prohibited commercial distribution to the latest version with over 23 million source code lines (comments excluded), licensed under the GNU General Public License v2.
Linux is available in over 600 distributions (or an operating system based on the Linux kernel and supporting software and libraries). Some of the most popular and well-known being Ubuntu, Debian, Fedora, OpenSUSE, elementary, Manjaro, Gentoo Linux, RedHat, and Linux Mint.
Linux is generally considered more secure than other operating systems, and while it has had many kernel vulnerabilities in the past, it is becoming less and less frequent. It is less susceptible to malware than Windows operating systems and is very frequently updated. Linux is also very stable and generally affords very high performance to the end-user. However, it can be more difficult for beginners and does not have as many hardware drivers as Windows.
Since Linux is free and open-source, the source code can be modified and distributed commercially or non-commercially by anyone. Linux-based operating systems run on servers, mainframes, desktops, embedded systems such as routers, televisions, video game consoles, and more. The overall Android operating system that runs on smartphones and tablets is based on the Linux kernel, and because of this, Linux is the most widely installed operating system.
Linux is an operating system like Windows, iOS, Android, or macOS. An OS is software that manages all of the hardware resources associated with our computer. That means that an OS manages the whole communication between software and hardware. Also, there exist many different distributions (distro). It is like a version of Windows operating systems.
With the interactive instances, we get access to the Pwnbox, a customized version of Parrot OS. This will be the primary OS we will work with through the modules. Parrot OS is a Debian-based Linux distribution that focuses on security, privacy, and development.
Linux follows five core principles:
| Principle | Description |
|---|---|
Everything is a file |
All configuration files for the various services running on the Linux operating system are stored in one or more text files. |
Small, single-purpose programs |
Linux offers many different tools that we will work with, which can be combined to work together. |
Ability to chain programs together to perform complex tasks |
The integration and combination of different tools enable us to carry out many large and complex tasks, such as processing or filtering specific data results. |
Avoid captive user interfaces |
Linux is designed to work mainly with the shell (or terminal), which gives the user greater control over the operating system. |
Configuration data stored in a text file |
An example of such a file is the /etc/passwd file, which stores all users registered on the system. |
| Component | Description |
Bootloader | A piece of code that runs to guide the booting process to start the operating system. Parrot Linux uses the GRUB Bootloader. |
OS Kernel | The kernel is the main component of an operating system. It manages the resources for system's I/O devices at the hardware level. |
Daemons | Background services are called "daemons" in Linux. Their purpose is to ensure that key functions such as scheduling, printing, and multimedia are working correctly. These small programs load after we booted or log into the computer. |
OS Shell | The operating system shell or the command language interpreter (also known as the command line) is the interface between the OS and the user. This interface allows the user to tell the OS what to do. The most commonly used shells are Bash, Tcsh/Csh, Ksh, Zsh, and Fish. |
Graphics server | This provides a graphical sub-system (server) called "X" or "X-server" that allows graphical programs to run locally or remotely on the X-windowing system. |
Window Manager | Also known as a graphical user interface (GUI). There are many options, including GNOME, KDE, MATE, Unity, and Cinnamon. A desktop environment usually has several applications, including file and web browsers. These allow the user to access and manage the essential and frequently accessed features and services of an operating system. |
Utilities | Applications or utilities are programs that perform particular functions for the user or another program. |
The Linux operating system can be broken down into layers:
| Layer | Description |
Hardware | Peripheral devices such as the system's RAM, hard drive, CPU, and others. |
Kernel | The core of the Linux operating system whose function is to virtualize and control common computer hardware resources like CPU, allocated memory, accessed data, and others. The kernel gives each process its own virtual resources and prevents/mitigates conflicts between different processes. |
Shell | A command-line interface (CLI), also known as a shell that a user can enter commands into to execute the kernel's functions. |
System Utility | Makes available to the user all of the operating system's functionality. |
The Linux operating system is structured in a tree-like hierarchy and is documented in the Filesystem Hierarchy Standard (FHS). Linux is structured with the following standard top-level directories:
| Path | Description |
/ | The top-level directory is the root filesystem and contains all of the files required to boot the operating system before other filesystems are mounted as well as the files required to boot the other filesystems. After boot, all of the other filesystems are mounted at standard mount points as subdirectories of the root. |
/bin | Contains essential command binaries. |
/boot | Consists of the static bootloader, kernel executable, and files required to boot the Linux OS. |
/dev | Contains device files to facilitate access to every hardware device attached to the system. |
/etc | Local system configuration files. Configuration files for installed applications may be saved here as well. |
/home | Each user on the system has a subdirectory here for storage. |
/lib | Shared library files that are required for system boot. |
/media | External removable media devices such as USB drives are mounted here. |
/mnt | Temporary mount point for regular filesystems. |
/opt | Optional files such as third-party tools can be saved here. |
/root | The home directory for the root user. |
/sbin | This directory contains executables used for system administration (binary system files). |
/tmp | The operating system and many programs use this directory to store temporary files. This directory is generally cleared upon system boot and may be deleted at other times without any warning. |
/usr | Contains executables, libraries, man files, etc. |
/var | This directory contains variable data files such as log files, email in-boxes, web application related files, cron files, and more. |
\ Linux distributions - or distros - are operating systems based on the Linux kernel. They are used for various purposes, from servers and embedded devices to desktop computers and mobile phones. Each Linux distribution is different, with its own set of features, packages, and tools. Some popular examples include:
Many users choose Linux for their desktop computers because it is free, open source, and highly customizable. Ubuntu and Fedora are two popular choices for desktop Linux and beginners. It is also widely used as a server operating system because it is secure, stable, and reliable and comes with frequent and regular updates. Finally, we, as cybersecurity specialists, often prefer Linux because it is open source, meaning its source code is available for scrutiny and customization. Because of such customization, we can optimize and customize our Linux distribution the way we want and configure it for specific use cases only if necessary.
We can use those distros everywhere, including (web) servers, mobile devices, embedded systems, cloud computing, and desktop computing. For cyber security specialists, some of the most popular Linux distributions are but are not limited to:
| ParrotOS | Ubuntu | Debian |
| Raspberry Pi OS | CentOS | BackBox |
| BlackArch | Pentoo |
The main differences between the various Linux distributions are the included packages, the user interface, and the tools available. Kali Linux is the most popular distribution for cyber security specialists, including a wide range of security-focused tools and packages. Ubuntu is widespread for desktop users, while Debian is popular for servers and embedded systems. Finally, red Hat Enterprise Linux and CentOS are popular for enterprise-level computing.
Debian is a widely used and well-respected Linux distribution known for its stability and reliability. It is used for various purposes, including desktop computing, servers, and embedded system. It uses an Advanced Package Tool (apt) package management system to handle software updates and security patches. The package management system helps keep the system up-to-date and secure by automatically downloading and installing security updates as soon as they are available. This can be executed manually or set up automatically.
Debian can have a steeper learning curve than other distributions, but it is widely regarded as one of the most flexible and customizable Linux distros. The configuration and setup can be complex, but it also provides excellent control over the system, which can be good for advanced users. The more control we have over a Linux system, the more complex it feels to become. However, it just feels that way compared to the options and possibilities we get. Without learning it with the required depth, we might spend way more time configuring “easy” tasks and processes than when we would learn to use a few commands and tools more in-depth. We will see it in the Filter Contents and Find Files and Directories sections.
Stability and reliability are key strengths of Debian. The distribution is known for its long-term support releases, which can provide updates and security patches for up to five years. This can be especially important for servers and other systems that must be up and running 24/7. It has had some vulnerabilities, but the development community has quickly released patches and security updates. In addition, Debian has a strong commitment to security and privacy, and the distribution has a well-established security track record. Debian is a versatile and reliable Linux distribution that is widely used for a range of purposes. Its stability, reliability, and commitment to security make it an attractive choice for various use cases, including cyber security.
\
It is crucial to learn how to use the Linux shell, as there are many servers based on Linux. These are often used because Linux is less error-prone as opposed to Windows servers. For example, web servers are often based on Linux. Knowing how to use the operating system to control it effectively requires understanding and mastering Linux’s essential part, the Shell. When we first switched from Windows to Linux, does it look something like this:

A Linux terminal, also called a shell or command line, provides a text-based input/output (I/O) interface between users and the kernel for a computer system. The term console is also typical but does not refer to a window but a screen in text mode. In the terminal window, commands can be executed to control the system.
We can think of a shell as a text-based GUI in which we enter commands to perform actions like navigating to other directories, working with files, and obtaining information from the system but with way more capabilities.
Terminal emulation is software that emulates the function of a terminal. It allows the use of text-based programs within a graphical user interface (GUI). There are also so-called command-line interfaces (CLI) that run as additional terminals in one terminal. In short, a terminal serves as an interface to the shell interpreter.
Terminal emulators and multiplexers are beneficial extensions for the terminal. They provide us with different methods and functions to work with the terminal, such as splitting the terminal into one window, working in multiple directories, creating different workspaces, and much more. An example of the use of such a multiplexer called Tmux could look something like this:
The most commonly used shell in Linux is the Bourne-Again Shell (BASH), and is part of the GNU project. Everything we do through the GUI we can do with the shell. The shell gives us many more possibilities to interact with programs and processes to get information faster. Besides, many processes can be easily automated with smaller or larger scripts that make manual work much easier.
Besides Bash, there also exist other shells like Tcsh/Csh, Ksh, Zsh, Fish shell and others.
The bash prompt is easy to understand and, by default, includes information such as the user, hostname, and current working directory. It is a string of characters displayed on the terminal screen that indicates that the system is ready for our input. It typically includes information such as the current user, the computer’s hostname, and the current working directory. The prompt is usually displayed on a new line, and the cursor is positioned after the prompt, ready for the user to start typing a command.
It can be customized to provide useful information to the user. The format can look something like this:
<username>@<hostname><current working directory>$
The home directory for a user is marked with a tilde <~> and is the default folder when we log in.
<username>@<hostname>[~]$
The dollar sign, in this case, stands for a user. As soon as we log in as root, the character changes to a hash <#> and looks like this:
root@htb[/htb]#
For example, when we upload and run a shell on the target system, we may not see the username, hostname, and current working directory. This may be due to the PS1 variable in the environment not being set correctly. In this case, we would see the following prompts:
In addition to providing basic information like the current user and working directory, we can customize to display other information in the prompt, such as the IP address, date, time, the exit status of the last command, and more. This is especially useful for us during our penetration tests because we can use various tools and possibilities like script or the .bash_history to filter and print all the commands we used and sort them by date and time. For example, the prompt could be set to display the full path of the current working directory instead of just the current directory name, which can also include the target’s IP address if we work organized.
The prompt can be customized using special characters and variables in the shell’s configuration file (.bashrc for the Bash shell). For example, we can use: the \u character to represent the current username, \h for the hostname, and \w for the current working directory.
| Special Character | Description |
\d | Date (Mon Feb 6) |
\D{%Y-%m-%d} | Date (YYYY-MM-DD) |
\H | Full hostname |
\j | Number of jobs managed by the shell |
| Newline | |
| Carriage return | |
\s | Name of the shell |
| Current time 24-hour (HH:MM:SS) | |
| Current time 12-hour (HH:MM:SS) | |
\@ | Current time |
\u | Current username |
\w | Full path of the current working directory |
Customizing the prompt can be a useful way to make your terminal experience more personalized and efficient. It can also be a helpful tool for troubleshooting and problem-solving, as it can provide important information about the system’s state at any given time.
In addition to customizing the prompt, we can customize their terminal environment with different color schemes, fonts, and other settings to make their work environment more visually appealing and easier to use.
However, we see the same as when working on the Windows GUI here. We are logged in as a user on a computer with a specific name, and we know which directory we are in when we navigate through our system. Bash prompt can also be customized and changed to our own needs. The adjustment of the bash prompt is outside the scope of this module. However, we can look at the bash-prompt-generator and powerline, which gives us the possibility to adapt our prompt to our needs.
We will always stumble across tools whose optional parameters we do not know from memory or tools we have never seen before. Therefore it is vital to know how we can help ourselves to get familiar with those tools. The first two ways are the man pages and the help functions. It is always a good idea to familiarize ourselves with the tool we want to try first. We will also learn some possible tricks with some of the tools that we thought were not possible. In the man pages, we will find the detailed manuals with detailed explanations.
Syntax:
root@htb[/htb]$ man <tool>
Let us have a look at an example:
Example:
root@htb[/htb]$ man curl
curl(1)                                                             Curl Manual                                                            curl(1)

NAME
       curl - transfer a URL

SYNOPSIS
       curl [options] [URL...]

DESCRIPTION
       curl  is  a tool to transfer data from or to a server, using one of the supported protocols (DICT, FILE, FTP, FTPS, GOPHER, HTTP, HTTPS,
       IMAP, IMAPS,  LDAP,  LDAPS,  POP3,  POP3S,  RTMP, RTSP, SCP, SFTP, SMB, SMBS, SMTP, SMTPS, TELNET, and TFTP). The command is designed to work without user interaction.

       curl offers a busload of useful tricks like proxy support, user authentication, FTP upload, HTTP post, SSL connections, cookies, file transfer resume, Metalink,  and more. As we will see below, the number of features will make our head spin!

       curl is powered by libcurl for all transfer-related features.  See libcurl(3) for details.

Manual page curl(1) line 1 (press h for help or q to quit)
After looking at some examples, we can also quickly look at the optional parameters without browsing through the complete documentation. We have several ways to do that.
Syntax:
root@htb[/htb]$ <tool> --help
Example:
root@htb[/htb]$ curl --help

Usage: curl [options...] <url>
     --abstract-unix-socket <path> Connect via abstract Unix domain socket
     --anyauth       Pick any authentication method
 -a, --append        Append to target file when uploading
     --basic         Use HTTP Basic Authentication
     --cacert <file> CA certificate to verify peer against
     --capath <dir>  CA directory to verify peer against
 -E, --cert <certificate[:password]> Client certificate file and password
<SNIP>
We can also use the short version of it:
Syntax:
root@htb[/htb]$ <tool> -h
Example:
root@htb[/htb]$ curl -h

Usage: curl [options...] <url>
     --abstract-unix-socket <path> Connect via abstract Unix domain socket
     --anyauth       Pick any authentication method
 -a, --append        Append to target file when uploading
     --basic         Use HTTP Basic Authentication
     --cacert <file> CA certificate to verify peer against
     --capath <dir>  CA directory to verify peer against
 -E, --cert <certificate[:password]> Client certificate file and password
<SNIP>
As we can see, the results from each other do not differ in this example. Another tool that can be useful in the beginning is apropos. Each manual page has a short description available within it. This tool searches the descriptions for instances of a given keyword.
Syntax:
root@htb[/htb]$ apropos <keyword>
Example:
root@htb[/htb]$ apropos sudo

sudo (8)             - execute a command as another user
sudo.conf (5)        - configuration for sudo front end
sudo_plugin (8)      - Sudo Plugin API
sudo_root (8)        - How to run administrative commands
sudoedit (8)         - execute a command as another user
sudoers (5)          - default sudo security policy plugin
sudoreplay (8)       - replay sudo session logs
visudo (8)           - edit the sudoers file
Another useful resource to get help if we have issues to understand a long command is: https://explainshell.com/\
Since we will be working with many different Linux systems, we need to learn the structure and the information about the system, its processes, network configurations, users, directories, user settings, and the corresponding parameters. Here is a list of the necessary tools that will help us get the above information. Most of them are installed by default.
| Command | Description |
whoami | Displays current username. |
id | Returns users identity |
hostname | Sets or prints the name of current host system. |
uname | Prints basic information about the operating system name and system hardware. |
pwd | Returns working directory name. |
ifconfig | The ifconfig utility is used to assign or to view an address to a network interface and/or configure network interface parameters. |
ip | Ip is a utility to show or manipulate routing, network devices, interfaces and tunnels. |
netstat | Shows network status. |
ss | Another utility to investigate sockets. |
ps | Shows process status. |
who | Displays who is logged in. |
env | Prints environment or sets and executes command. |
lsblk | Lists block devices. |
lsusb | Lists USB devices |
lsof | Lists opened files. |
lspci | Lists PCI devices. |
Let us look at a few examples.
Hostname
The hostname command is pretty self-explanatory and will just print the name of the computer that we are logged into
root@htb[/htb]$ hostname

nixfund
Whoami
This quick and easy command can be used on both Windows and Linux systems to get our current username. During a security assessment, we obtain reverse shell access on a host, and one of the first bits of situational awareness we should do is figuring out what user we are running as. From there, we can figure out if the user has any special privileges/access.
cry0l1t3@htb[/htb]$ whoami

cry0l1t3
Id
The id command expands on the whoami command and prints out our effective group membership and IDs. This can be of interest to penetration testers looking to see what access a user may have and sysadmins looking to audit account permissions and group membership. In this output, the hackthebox group is of interest because it is non-standard, the adm group means that the user can read log files in /var/log and could potentially gain access to sensitive information, membership in the sudo group is of particular interest as this means our user can run some or all commands as the all-powerful root user. Sudo rights could help us escalate privileges or could be a sign to a sysadmin that they may need to audit permissions and group memberships to remove any access that is not required for a given user to carry out their day-to-day tasks.
cry0l1t3@htb[/htb]$ id

uid=1000(cry0l1t3) gid=1000(cry0l1t3) groups=1000(cry0l1t3),1337(hackthebox),4(adm),24(cdrom),27(sudo),30(dip),46(plugdev),116(lpadmin),126(sambashare)
Uname
Let's dig into the uname command a bit more. If we type man uname in our terminal, we will bring up the man page for the command, which will show the possible options we can run with the command and the results
UNAME(1)                                    User Commands                                   UNAME(1)

NAME
       uname - print system information

SYNOPSIS
       uname [OPTION]...

DESCRIPTION
       Print certain system information.  With no OPTION, same as -s.

       -a, --all
              print all information, in the following order, except omit -p and -i if unknown:

       -s, --kernel-name
              print the kernel name

       -n, --nodename
              print the network node hostname

       -r, --kernel-release
              print the kernel release

       -v, --kernel-version
              print the kernel version

       -m, --machine
              print the machine hardware name

       -p, --processor
              print the processor type (non-portable)

       -i, --hardware-platform
              print the hardware platform (non-portable)

       -o, --operating-system
Running uname -a will print all information about the machine in a specific order: kernel name, hostname, the kernel release, kernel version, machine hardware name, and operating system. The -a flag will omit -p (processor type) and -i (hardware platform) if they are unknown.
cry0l1t3@htb[/htb]$ uname -a

Linux box 4.15.0-99-generic #100-Ubuntu SMP Wed Apr 22 20:32:56 UTC 2020 x86_64 x86_64 x86_64 GNU/Linux
From the above command, we can see that the kernel name is Linux, the hostname is box, the kernel release is 4.15.0-99-generic, the kernel version is #100-Ubuntu SMP Wed Apr 22 20:32:56 UTC 2020, and so on. Running any of these options on their own will give us the specific bit output we are interested in.
Uname to Obtain Kernel Release
Suppose we want to print out the kernel release to search for potential kernel exploits quickly. We can type uname -r to obtain this information.
cry0l1t3@htb[/htb]$ uname -r

4.15.0-99-generic
With this info, we could go and search for "4.15.0-99-generic exploit," and the first result immediately appears useful to us.
It is highly recommended to study the commands and understand what they are for and what information they can provide. Though a bit tedious, we can learn much from studying the manpages for common commands. We may even find out things that we did not even know were possible with a given command. This information is not only used for working with Linux. However, it will also be used later to discover vulnerabilities and misconfigurations on the Linux system that may contribute to privilege escalation. Here are a few optional exercises that we can solve for practice purposes, which will help us become familiar with some of the commands.
Secure Shell (SSH) refers to a protocol that allows clients to access and execute commands or actions on remote computers. On Linux-based hosts and servers running or another Unix-like operating system, SSH is one of the permanently installed standard tools and is the preferred choice for many administrators to configure and maintain a computer through remote access. It is an older and very proven protocol that does not require or offer a graphical user interface (GUI). For this reason, it works very efficiently and occupies very few resources. We use this type of connection in the following sections and in most of the other modules to offer the possibility to try out the learned commands and actions in a safe environment. We can connect to our targets with the following command:
root@htb[/htb]$ ssh [username]@[IP address]
Navigation is essential, like working with the mouse as a standard Windows user. With it, we move across the system and work in directories and with files, we need and want. Therefore, we use different commands and tools to print out information about a directory or a file and can use advanced options to optimize the output to our needs.
One of the best ways to learn something new is to experiment with it. Here we cover the sections on navigating through Linux, creating, moving, editing, and deleting files and folders, finding them on the operating system, different types of redirects, and what file descriptors are. We will also find shortcuts to make our work with the shell much easier and more comfortable. We recommend experimenting on our locally hosted VM. Ensure we have created a snapshot for our VM in case our system gets unexpectedly damaged.
Let us start with the navigation. Before we move through the system, we have to find out in which directory we are. We can find out where we are with the command pwd.
cry0l1t3@htb[~]$ pwd

/home/cry0l1t3
Only the ls command is needed to list all the contents inside a directory. It has many additional options that can complement the display of the content in the current folder.
cry0l1t3@htb[~]$ ls

Desktop  Documents  Downloads  Music  Pictures  Public  Templates  Videos
Using it without any additional options will display the directories and files only. However, we can also add the -l option to display more information on those directories and files.
cry0l1t3@htb[~]$ ls -l

total 32
drwxr-xr-x 2 cry0l1t3 htbacademy 4096 Nov 13 17:37 Desktop
drwxr-xr-x 2 cry0l1t3 htbacademy 4096 Nov 13 17:34 Documents
drwxr-xr-x 3 cry0l1t3 htbacademy 4096 Nov 15 03:26 Downloads
drwxr-xr-x 2 cry0l1t3 htbacademy 4096 Nov 13 17:34 Music
drwxr-xr-x 2 cry0l1t3 htbacademy 4096 Nov 13 17:34 Pictures
drwxr-xr-x 2 cry0l1t3 htbacademy 4096 Nov 13 17:34 Public
drwxr-xr-x 2 cry0l1t3 htbacademy 4096 Nov 13 17:34 Templates
drwxr-xr-x 2 cry0l1t3 htbacademy 4096 Nov 13 17:34 Videos
First, we see the total amount of blocks (512-byte) used by the files and directories listed in the current directory, which indicates the total size used. That means it used 32 * 512-byte = 16384 bytes of disk space. Next, we see a few columns that are structured as follows:
| Column Content | Description |
drwxr-xr-x | Type and permissions |
2 | Number of hard links to the file/directory |
cry0l1t3 | Owner of the file/directory |
htbacademy | Group owner of the file/directory |
4096 | Size of the file or the number of blocks used to store the directory information |
Nov 13 17:37 | Date and time |
Desktop | Directory name |
However, we will not see everything that is in this folder. A directory can also have hidden files that start with a dot at the beginning of its name (e.g., .bashrc or .bash_history). Therefore, we need to use the command ls -la to list all files of a directory:
cry0l1t3@htb[~]$ ls -la

total 403188
drwxr-xr-x 2 cry0l1t3 htbacademy 4096 Nov 13 17:37 .bash_history
drwxr-xr-x 2 cry0l1t3 htbacademy 4096 Nov 13 17:37 .bashrc
...SNIP...
drwxr-xr-x 2 cry0l1t3 htbacademy 4096 Nov 13 17:37 Desktop
drwxr-xr-x 2 cry0l1t3 htbacademy 4096 Nov 13 17:34 Documents
drwxr-xr-x 3 cry0l1t3 htbacademy 4096 Nov 15 03:26 Downloads
drwxr-xr-x 2 cry0l1t3 htbacademy 4096 Nov 13 17:34 Music
drwxr-xr-x 2 cry0l1t3 htbacademy 4096 Nov 13 17:34 Pictures
drwxr-xr-x 2 cry0l1t3 htbacademy 4096 Nov 13 17:34 Public
drwxr-xr-x 2 cry0l1t3 htbacademy 4096 Nov 13 17:34 Templates
drwxr-xr-x 2 cry0l1t3 htbacademy 4096 Nov 13 17:34 Videos
To list the contents of a directory, we do not necessarily need to navigate there first. We can also use “ls” to specify the path where we want to know the contents.
cry0l1t3@htb[~]$ ls -l /var/

total 52
drwxr-xr-x  2 root root     4096 Mai 15 18:54 backups
drwxr-xr-x 18 root root     4096 Nov 15 16:55 cache
drwxrwsrwt  2 root whoopsie 4096 Jul 25  2018 crash
drwxr-xr-x 66 root root     4096 Mai 15 03:08 lib
drwxrwsr-x  2 root staff    4096 Nov 24  2018 local
<SNIP>
We can do the same thing to navigate to the directory. To move through the directories, we use the command cd. Let us change to the /dev/shm directory. Of course, we can go to the /dev directory first and then /shm. Nevertheless, we can also enter the full path and jump there.
cry0l1t3@htb[~]$ cd /dev/shm

cry0l1t3@htb[/dev/shm]$
Since we were in the home directory before, we can quickly jump back to the directory we were last in.
cry0l1t3@htb[/dev/shm]$ cd -

cry0l1t3@htb[~]$
The shell also offers us the auto-complete function, which makes navigation easier. If we now type cd /dev/s and press [TAB] twice, we will get all entries starting with the letter “s” in the directory of /dev/.
cry0l1t3@htb[~]$ cd /dev/s [TAB 2x]

shm/ snd/
If we add the letter “h” to the letter “s,” the shell will complete the input since otherwise there will be no folders in this directory beginning with the letters “sh”. If we now display all contents of the directory, we will only see the following contents.
cry0l1t3@htb[/dev/shm]$ ls -la /dev/shm

total 0
drwxrwxrwt  2 root root   40 Mai 15 18:31 .
drwxr-xr-x 17 root root 4000 Mai 14 20:45 ..
The first entry with a single dot (.) indicates the current directory we are currently in. The second entry with two dots (..) represents the parent directory /dev. This means we can jump to the parent directory with the following command.
cry0l1t3@htb[/dev/shm]$ cd ..

cry0l1t3@htb[/dev]$
Since our shell is filled with some records, we can clean the shell with the command clear. First, however, let us return to the directory /dev/shm before and then execute the clear command to clean up our terminal.
cry0l1t3@htb[/dev]$ cd shm && clear
Another way to clean up our terminal is to use the shortcut [Ctrl] + [L]. We can also use the arrow keys (↑ or ↓) to scroll through the command history, which will show us the commands that we have used before. But we also can search through the command history using the shortcut [Ctrl] + [R] and type some of the text that we are looking for.
The main difference between working with files in Linux and Windows is the way we can access the files. For example, we usually have to open Explorer to find and edit files in Windows. In Linux, on the other hand, we have a terminal where we can access and edit files using commands. Moreover, we can even edit the files interactively without using an editor, such as vim or nano.
The terminal in Linux is a more efficient and faster tool because you can access the files directly with a few commands and edit and modify them selectively with regular expressions (regex). You can also run several commands simultaneously and redirect the output to a file. This saves time and is very handy when we want to edit many files at once.
Next, let us work with files and directories and learn how to create, rename, move, copy, and delete. First, let us create an empty file and a directory. We can use touch to create an empty file and mkdir to create a directory.
The syntax for this is the following:
Syntax - touch
root@htb[/htb]$ touch <name>
Syntax - mkdir
root@htb[/htb]$ mkdir <name>
In this example, we name the file info.txt and the directory Storage. To create these, we follow the commands and their syntax shown above.
Create an Empty File
root@htb[/htb]$ touch info.txt
Create a Directory
root@htb[/htb]$ mkdir Storage
We may want to have specific directories in the directory, and it would be very time-consuming to create this command for every single directory. The command mkdir has an option marked -p to add parent directories.
root@htb[/htb]$ mkdir -p Storage/local/user/documents
We can look at the whole structure after creating the parent directories with the tool tree.
root@htb[/htb]$ tree .

.
├── info.txt
└── Storage
    └── local
        └── user
            └── documents

4 directories, 1 file
We can also create files directly in the directories by specifying the path where the file should be stored. The trick is to use the single dot (.) to tell the system that we want to start from the current directory. So the command for creating another empty file looks like this:
Create userinfo.txt
root@htb[/htb]$ touch ./Storage/local/user/userinfo.txt
root@htb[/htb]$ tree .

.
├── info.txt
└── Storage
    └── local
        └── user
            ├── documents
            └── userinfo.txt

4 directories, 2 files
With the command mv, we can move and also rename files and directories. The syntax for this looks like this:
Syntax - mv
root@htb[/htb]$ mv <file/directory> <renamed file/directory>
First, let us rename the file info.txt to information.txt and then move it to the directory Storage.
Rename File
root@htb[/htb]$ mv info.txt information.txt
Now let us create a file named readme.txt in the current directory and then copy the files information.txt and readme.txt into the Storage/ directory.
Create readme.txt
root@htb[/htb]$ touch readme.txt
Move Files to Specific Directory
root@htb[/htb]$ mv information.txt readme.txt Storage/
root@htb[/htb]$ tree .

.
└── Storage
    ├── information.txt
    ├── local
    │   └── user
    │       ├── documents
    │       └── userinfo.txt
    └── readme.txt

4 directories, 3 files
Let us assume we want to have the readme.txt in the local/ directory. Then we can copy them there with the paths specified.
Copy readme.txt
root@htb[/htb]$ cp Storage/readme.txt Storage/local/
Now we can check if the file is thereby using the tool tree again.
root@htb[/htb]$ tree .

.
└── Storage
    ├── information.txt
    ├── local
    │   ├── readme.txt
    │   └── user
    │       ├── documents
    │       └── userinfo.txt
    └── readme.txt

4 directories, 4 files
\
There are several ways to edit a file. One of the most common text editors for this is Vi and Vim. More rarely, there is the Nano editor. We will first deal with the Nano editor here, as it is a bit easier to understand. We can create a new file directly with the Nano editor by specifying the file's name directly as the first parameter. In this case, we create a new file named notes.txt.
root@htb[/htb]$ nano notes.txt
Now we should see a so-called "pager" open, and we can freely enter or insert any text. Our shell should then look something like this.
Nano Editor
  GNU nano 2.9.3                                    notes.txt

Here we can type everything we want and make our notes.▓


^G Get Help    ^O Write Out   ^W Where Is    ^K Cut Text    ^J Justify     ^C Cur Pos     M-U Undo
^X Exit        ^R Read File   ^\ Replace     ^U Uncut Text  ^T To Spell    ^_ Go To Line  M-E Redo
Below we see two lines with short descriptions. The caret (^) stands for our "[CTRL]" key. For example, if we press [CTRL + W], a "Search:" line appears at the bottom of the editor, where we can enter the word or words we are looking for. If we now search for the word "we" and press [ENTER], the cursor will move to the first word that matches.
GNU nano 2.9.3                                    notes.txt

Here ▓we can type everything we want and make our notes.

Search:   notes
^G Get Help    M-C Case Sens  M-B Backwards  M-J FullJstify ^W Beg of Par  ^Y First Line  ^P PrevHstory
^C Cancel      M-R Regexp     ^R Replace     ^T Go To Line  ^O End of Par  ^V Last Line   ^N NextHstory
To jump to the next match with the cursor, we press [CTRL + W] again and confirm with [ENTER] without any additional information.
GNU nano 2.9.3                                    notes.txt

Here we can type everything ▓we want and make our notes.

Search [we]:
^G Get Help    M-C Case Sens  M-B Backwards  M-J FullJstify ^W Beg of Par  ^Y First Line  ^P PrevHstory
^C Cancel      M-R Regexp     ^R Replace     ^T Go To Line  ^O End of Par  ^V Last Line   ^N NextHstory
Now we can save the file by pressing [CTRL + O] and confirm the file name with [ENTER].
GNU nano 2.9.3                                    notes.txt

Here we can type everything we want and make our notes.

File Name to Write: notes.txt▓
^G Get Help    M-C Case Sens  M-B Backwards  M-J FullJstify ^W Beg of Par  ^Y First Line  ^P PrevHstory
^C Cancel      M-R Regexp     ^R Replace     ^T Go To Line  ^O End of Par  ^V Last Line   ^N NextHstory
After we have saved the file, we can leave the editor with [CTRL + X].
Back on the Shell
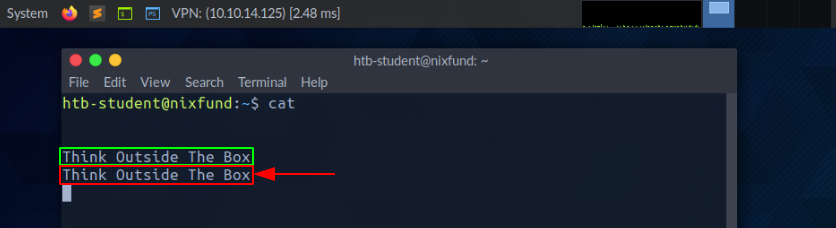
To view the contents of the file, we can use the command cat.
root@htb[/htb]$ cat notes.txt

Here we can type everything we want and make our notes.
There are many files on Linux systems that can play an essential role for us as penetration testers whose rights have not been correctly set by the administrators. Such files may include the file "/etc/passwd".
Vim is an open-source editor for all kinds of ASCII text, just like Nano. It is an improved clone of the previous Vi. It is an extremely powerful editor that focuses on the essentials, namely editing text. For tasks that go beyond that, Vim provides an interface to external programs, such as grep, awk, sed, etc., which can handle their specific tasks much better than a corresponding function directly implemented in an editor usually can. This makes the editor small and compact, fast, powerful, flexible, and less error-prone.
Vim follows the Unix principle here: many small specialized programs that are well tested and proven, when combined and communicating with each other, resulting in a flexible and powerful system.
Vim
root@htb[/htb]$ vim
  1 $
~
~                              VIM - Vi IMproved
~
~                               version 8.0.1453
~                           by Bram Moolenaar et al.
~           Modified by pkg-vim-maintainers@lists.alioth.debian.org
~                 Vim is open source and freely distributable
~
~                           Sponsor Vim development!
~                type  :help sponsor<Enter>    for information
~
~                type  :q<Enter>               to exit
~                type  :help<Enter>  or  <F1>  for on-line help
~                type  :help version8<Enter>   for version info
~

                                                                    0,0-1         All
In contrast to Nano, Vim is a modal editor that can distinguish between text and command input. Vim offers a total of six fundamental modes that make our work easier and make this editor so powerful:
| Mode | Description |
Normal | In normal mode, all inputs are considered as editor commands. So there is no insertion of the entered characters into the editor buffer, as is the case with most other editors. After starting the editor, we are usually in the normal mode. |
Insert | With a few exceptions, all entered characters are inserted into the buffer. |
Visual | The visual mode is used to mark a contiguous part of the text, which will be visually highlighted. By positioning the cursor, we change the selected area. The highlighted area can then be edited in various ways, such as deleting, copying, or replacing it. |
Command | It allows us to enter single-line commands at the bottom of the editor. This can be used for sorting, replacing text sections, or deleting them, for example. |
Replace | In replace mode, the newly entered text will overwrite existing text characters unless there are no more old characters at the current cursor position. Then the newly entered text will be added. |
When we have the Vim editor open, we can go into command mode by typing ":" and then typing "q" to close Vim.
  1 $
~
~                              VIM - Vi IMproved
~
~                               version 8.0.1453
~                           by Bram Moolenaar et al.
~           Modified by pkg-vim-maintainers@lists.alioth.debian.org
~                 Vim is open source and freely distributable
~
~                           Sponsor Vim development!
~                type  :help sponsor<Enter>    for information
~
~                type  :q<Enter>               to exit
~                type  :help<Enter>  or  <F1>  for on-line help
~                type  :help version8<Enter>   for version info
~
:q▓
Vim offers an excellent opportunity called vimtutor to practice and get familiar with the editor. It may seem very difficult and complicated at first, but it will only feel that way for a short time. The efficiency we gain from Vim once we get used to it is enormous. Entering the tutor mode can be done using the Command mode :Tutor.
VimTutor
root@htb[/htb]$ vimtutor
===============================================================================
=    W e l c o m e   t o   t h e   V I M   T u t o r    -    Version 1.7      =
===============================================================================

     Vim is a very powerful editor that has many commands, too many to
     explain in a tutor such as this.  This tutor is designed to describe
     enough of the commands that you will be able to easily use Vim as
     an all-purpose editor.

     The approximate time required to complete the tutor is 25-30 minutes,
     depending upon how much time is spent with experimentation.

     ATTENTION:
     The commands in the lessons will modify the text.  Make a copy of this
     file to practice on (if you started "vimtutor" this is already a copy).

     It is important to remember that this tutor is set up to teach by
     use.  That means that you need to execute the commands to learn them
     properly.  If you only read the text, you will forget the commands!

     Now, make sure that your Caps-Lock key is NOT depressed and press
     the   j   key enough times to move the cursor so that lesson 1.1
     completely fills the screen.
~~~~~~~~~~~~~~~~~~~~~~~~~~~~~~~~~~~~~~~~~~~~~~~~~~~~~~~~~~~~~~~~~~~~~~~~~~~~~~
It is crucial to be able to find the files and folders we need. Once we have gained access to a Linux based system, it will be essential to find configuration files, scripts created by users or the administrator, and other files and folders. We do not have to manually browse through every single folder and check when modified for the last time. There are some tools we can use to make this work easier.
One of the common tools is which. This tool returns the path to the file or link that should be executed. This allows us to determine if specific programs, like cURL, netcat, wget, python, gcc, are available on the operating system. Let us use it to search for Python in our interactive instance.
root@htb[/htb]$ which python

/usr/bin/python
If the program we search for does not exist, no results will be displayed.
Another handy tool is find. Besides the function to find files and folders, this tool also contains the function to filter the results. We can use filter parameters like the size of the file or the date. We can also specify if we only search for files or folders.
Syntax - find
root@htb[/htb]$ find <location> <options>
Let us look at an example of what such a command with multiple options would look like.
root@htb[/htb]$ find / -type f -name *.conf -user root -size +20k -newermt 2020-03-03 -exec ls -al {} \; 2>/dev/null

-rw-r--r-- 1 root root 136392 Apr 25 20:29 /usr/src/linux-headers-5.5.0-1parrot1-amd64/include/config/auto.conf
-rw-r--r-- 1 root root 82290 Apr 25 20:29 /usr/src/linux-headers-5.5.0-1parrot1-amd64/include/config/tristate.conf
-rw-r--r-- 1 root root 95813 May  7 14:33 /usr/share/metasploit-framework/data/jtr/repeats32.conf
-rw-r--r-- 1 root root 60346 May  7 14:33 /usr/share/metasploit-framework/data/jtr/dynamic.conf
-rw-r--r-- 1 root root 96249 May  7 14:33 /usr/share/metasploit-framework/data/jtr/dumb32.conf
-rw-r--r-- 1 root root 54755 May  7 14:33 /usr/share/metasploit-framework/data/jtr/repeats16.conf
-rw-r--r-- 1 root root 22635 May  7 14:33 /usr/share/metasploit-framework/data/jtr/korelogic.conf
-rwxr-xr-x 1 root root 108534 May  7 14:33 /usr/share/metasploit-framework/data/jtr/john.conf
-rw-r--r-- 1 root root 55285 May  7 14:33 /usr/share/metasploit-framework/data/jtr/dumb16.conf
-rw-r--r-- 1 root root 21254 May  2 11:59 /usr/share/doc/sqlmap/examples/sqlmap.conf
-rw-r--r-- 1 root root 25086 Mar  4 22:04 /etc/dnsmasq.conf
-rw-r--r-- 1 root root 21254 May  2 11:59 /etc/sqlmap/sqlmap.conf
Now let us take a closer look at the options we used in the previous command. If we hover the mouse over the respective options, a small window will appear with an explanation. These explanations will also be found in other modules, which should help us if we are not yet familiar with one of the tools.
| Option | Description |
-type f | Hereby, we define the type of the searched object. In this case, 'f' stands for 'file'. |
-name .conf | With '-name', we indicate the name of the file we are looking for. The asterisk (.conf' extension. |
-user root | This option filters all files whose owner is the root user. |
-size +20k | We can then filter all the located files and specify that we only want to see the files that are larger than 20 KiB. |
-newermt 2020-03-03 | With this option, we set the date. Only files newer than the specified date will be presented. |
-exec ls -al {} \; | This option executes the specified command, using the curly brackets as placeholders for each result. The backslash escapes the next character from being interpreted by the shell because otherwise, the semicolon would terminate the command and not reach the redirection. |
2>/dev/null | This is a STDERR redirection to the 'null device', which we will come back to in the next section. This redirection ensures that no errors are displayed in the terminal. This redirection must not be an option of the 'find' command. |
It will take much time to search through the whole system for our files and directories to perform many different searches. The command locate offers us a quicker way to search through the system. In contrast to the find command, locate works with a local database that contains all information about existing files and folders. We can update this database with the following command.
root@htb[/htb]$ sudo updatedb
If we now search for all files with the ".conf" extension, you will find that this search produces results much faster than using find.
Find Files and Directories
root@htb[/htb]$ locate *.conf

/etc/GeoIP.conf
/etc/NetworkManager/NetworkManager.conf
/etc/UPower/UPower.conf
/etc/adduser.conf
<SNIP>
However, this tool does not have as many filter options that we can use. So it is always worth considering whether we can use the locate command or instead use the find command. It always depends on what we are looking for.
A file descriptor (FD) in Unix/Linux operating systems is an indicator of connection maintained by the kernel to perform Input/Output (I/O) operations. In Windows-based operating systems, it is called filehandle. It is the connection (generally to a file) from the Operating system to perform I/O operations (Input/Output of Bytes). By default, the first three file descriptors in Linux are:
STDIN – 0STDOUT – 1STDERR – 2STDIN and STDOUT
Let us see an example with cat. When running cat, we give the running program our standard input (STDIN - FD 0), marked green, wherein this case "SOME INPUT" is. As soon as we have confirmed our input with [ENTER], it is returned to the terminal as standard output (STDOUT - FD 1), marked red.
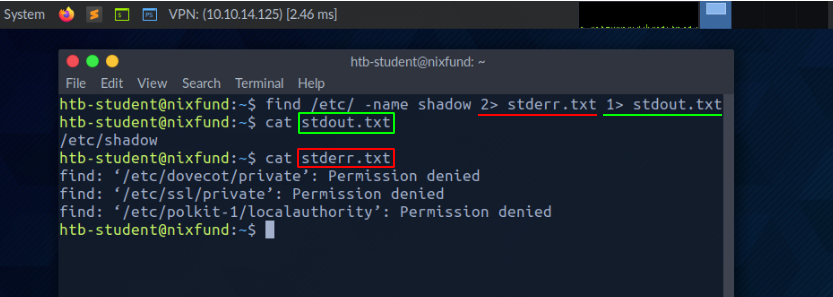
STDOUT and STDERR
In the next example, by using the find command, we will see the standard output (STDOUT - FD 1) marked in green and standard error (STDERR - FD 2) marked in red.
root@htb[/htb]$ find /etc/ -name shadow
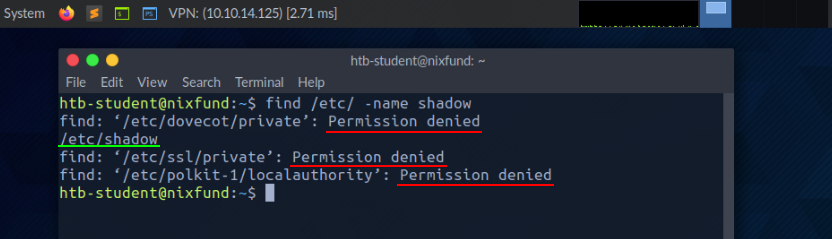
In this case, the error is marked and displayed with "Permission denied". We can check this by redirecting the file descriptor for the errors (FD 2 - STDERR) to "/dev/null." This way, we redirect the resulting errors to the "null device," which discards all data.
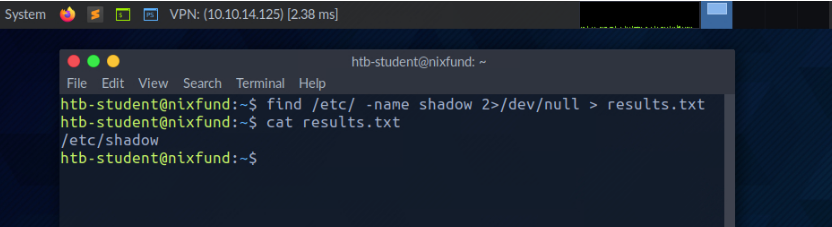
root@htb[/htb]$ find /etc/ -name shadow 2>/dev/null

Redirect STDOUT to a File
Now we can see that all errors (STDERR) previously presented with "Permission denied" are no longer displayed. The only result we see now is the standard output (STDOUT), which we can also redirect to a file with the name results.txt that will only contain standard output without the standard errors.
root@htb[/htb]$ find /etc/ -name shadow 2>/dev/null > results.txt
Redirect STDOUT and STDERR to Separate Files
We should have noticed that we did not use a number before the greater-than sign (>) in the last example. That is because we redirected all the standard errors to the "null device" before, and the only output we get is the standard output (FD 1 - STDOUT). To make this more precise, we will redirect standard error (FD 2 - STDERR) and standard output (FD 1 - STDOUT) to different files.
root@htb[/htb]$ find /etc/ -name shadow 2> stderr.txt 1> stdout.txt
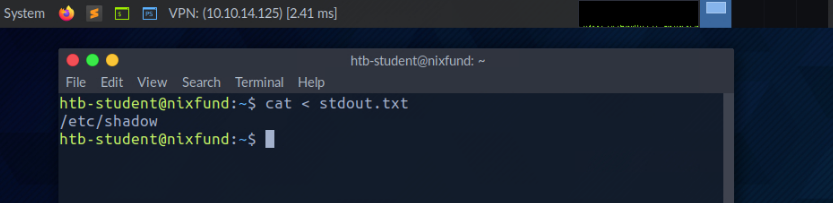
Redirect STDIN
As we have already seen, in combination with the file descriptors, we can redirect errors and output with greater-than character (>). This also works with the lower-than sign (<). However, the lower-than sign serves as standard input (FD 0 - STDIN). These characters can be seen as "direction" in the form of an arrow that tells us "from where" and "where to" the data should be redirected. We use the cat command to use the contents of the file "stdout.txt" as STDIN.
root@htb[/htb]$ cat < stdout.txt
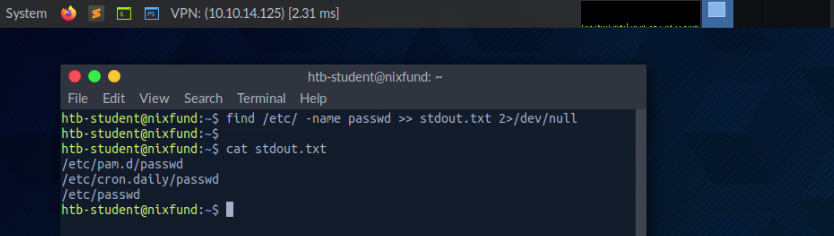
Redirect STDOUT and Append to a File
When we use the greater-than sign (>) to redirect our STDOUT, a new file is automatically created if it does not already exist. If this file exists, it will be overwritten without asking for confirmation. If we want to append STDOUT to our existing file, we can use the double greater-than sign (>>).
root@htb[/htb]$ find /etc/ -name passwd >> stdout.txt 2>/dev/null
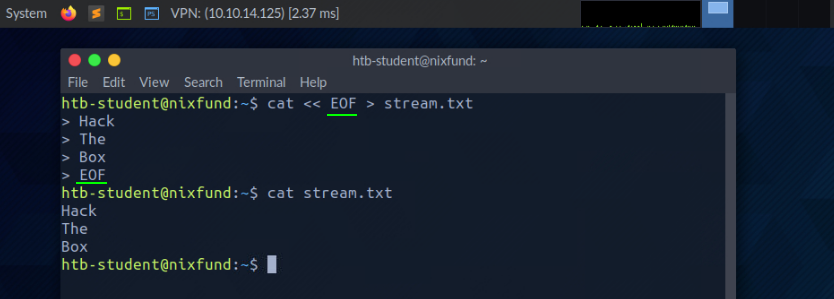
Redirect STDIN Stream to a File
We can also use the double lower-than characters (<<) to add our standard input through a stream. We can use the so-called End-Of-File (EOF) function of a Linux system file, which defines the input's end. In the next example, we will use the cat command to read our streaming input through the stream and direct it to a file called "stream.txt."
root@htb[/htb]$ cat << EOF > stream.txt
Pipes
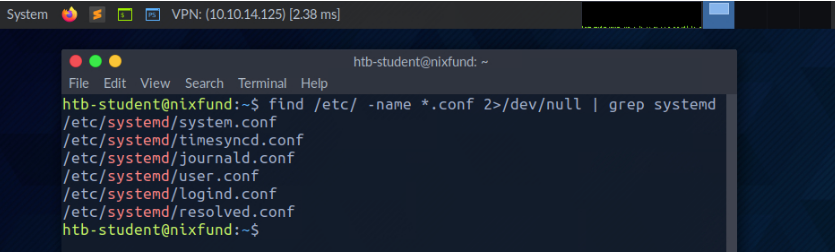
Another way to redirect STDOUT is to use pipes (|). These are useful when we want to use the STDOUT from one program to be processed by another. One of the most commonly used tools is grep, which we will use in the next example. Grep is used to filter STDOUT according to the pattern we define. In the next example, we use the find command to search for all files in the "/etc/" directory with a ".conf" extension. Any errors are redirected to the "null device" (/dev/null). Using grep, we filter out the results and specify that only the lines containing the pattern "systemd" should be displayed.
root@htb[/htb]$ find /etc/ -name *.conf 2>/dev/null | grep systemd
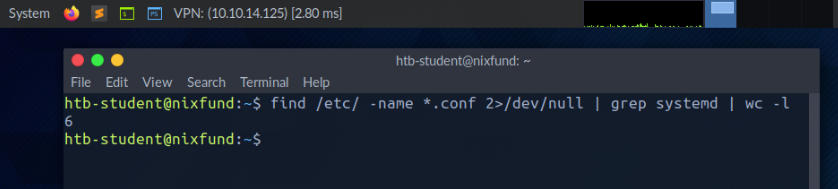
The redirections work, not only once. We can use the obtained results to redirect them to another program. For the next example, we will use the tool called wc, which should count the total number of obtained results.
root@htb[/htb]$ find /etc/ -name *.conf 2>/dev/null | grep systemd | wc -l
In the last section, we learned about the redirections we can use to redirect results from one program to another for processing. To read files, we do not necessarily have to use an editor for that. There are two tools called more and less, which are very identical. These are fundamental pagers that allow us to scroll through the file in an interactive view. Let us have a look at some examples.
root@htb[/htb]$ more /etc/passwd
After we read the content using cat and redirected it to more, the already mentioned pager opens, and we will automatically start at the beginning of the file.
Filter Contents
root:x:0:0:root:/root:/bin/bash
daemon:x:1:1:daemon:/usr/sbin:/usr/sbin/nologin
bin:x:2:2:bin:/bin:/usr/sbin/nologin
sys:x:3:3:sys:/dev:/usr/sbin/nologin
sync:x:4:65534:sync:/bin:/bin/sync
<SNIP>
--More--
With the [Q] key, we can leave this pager. We will notice that the output remains in the terminal.
If we now take a look at the tool less, we will notice on the man page that it contains many more features than more.
root@htb[/htb]$ less /etc/passwd
The presentation is almost the same as with more.
root:x:0:0:root:/root:/bin/bash
daemon:x:1:1:daemon:/usr/sbin:/usr/sbin/nologin
bin:x:2:2:bin:/bin:/usr/sbin/nologin
sys:x:3:3:sys:/dev:/usr/sbin/nologin
sync:x:4:65534:sync:/bin:/bin/sync
<SNIP>
:
When closing less with the [Q] key, we will notice that the output we have seen, unlike more, does not remain in the terminal.
Sometimes we will only be interested in specific issues either at the beginning of the file or the end. If we only want to get the first lines of the file, we can use the tool head. By default, head prints the first ten lines of the given file or input, if not specified otherwise.
root@htb[/htb]$ head /etc/passwd

root:x:0:0:root:/root:/bin/bash
daemon:x:1:1:daemon:/usr/sbin:/usr/sbin/nologin
bin:x:2:2:bin:/bin:/usr/sbin/nologin
sys:x:3:3:sys:/dev:/usr/sbin/nologin
sync:x:4:65534:sync:/bin:/bin/sync
games:x:5:60:games:/usr/games:/usr/sbin/nologin
man:x:6:12:man:/var/cache/man:/usr/sbin/nologin
lp:x:7:7:lp:/var/spool/lpd:/usr/sbin/nologin
mail:x:8:8:mail:/var/mail:/usr/sbin/nologin
news:x:9:9:news:/var/spool/news:/usr/sbin/nologin
If we only want to see the last parts of a file or results, we can use the counterpart of head called tail, which returns the last ten lines.
root@htb[/htb]$ tail /etc/passwd

miredo:x:115:65534::/var/run/miredo:/usr/sbin/nologin
usbmux:x:116:46:usbmux daemon,,,:/var/lib/usbmux:/usr/sbin/nologin
rtkit:x:117:119:RealtimeKit,,,:/proc:/usr/sbin/nologin
nm-openvpn:x:118:120:NetworkManager OpenVPN,,,:/var/lib/openvpn/chroot:/usr/sbin/nologin
nm-openconnect:x:119:121:NetworkManager OpenConnect plugin,,,:/var/lib/NetworkManager:/usr/sbin/nologin
pulse:x:120:122:PulseAudio daemon,,,:/var/run/pulse:/usr/sbin/nologin
beef-xss:x:121:124::/var/lib/beef-xss:/usr/sbin/nologin
lightdm:x:122:125:Light Display Manager:/var/lib/lightdm:/bin/false
do-agent:x:998:998::/home/do-agent:/bin/false
user6:x:1000:1000:,,,:/home/user6:/bin/bash
Depending on which results and files are dealt with, they are rarely sorted. Often it is necessary to sort the desired results alphabetically or numerically to get a better overview. For this, we can use a tool called sort.
root@htb[/htb]$ cat /etc/passwd | sort

_apt:x:104:65534::/nonexistent:/usr/sbin/nologin
backup:x:34:34:backup:/var/backups:/usr/sbin/nologin
bin:x:2:2:bin:/bin:/usr/sbin/nologin
cry0l1t3:x:1001:1001::/home/cry0l1t3:/bin/bash
daemon:x:1:1:daemon:/usr/sbin:/usr/sbin/nologin
dnsmasq:x:107:65534:dnsmasq,,,:/var/lib/misc:/usr/sbin/nologin
dovecot:x:114:117:Dovecot mail server,,,:/usr/lib/dovecot:/usr/sbin/nologin
dovenull:x:115:118:Dovecot login user,,,:/nonexistent:/usr/sbin/nologin
ftp:x:113:65534::/srv/ftp:/usr/sbin/nologin
games:x:5:60:games:/usr/games:/usr/sbin/nologin
gnats:x:41:41:Gnats Bug-Reporting System (admin):/var/lib/gnats:/usr/sbin/nologin
htb-student:x:1002:1002::/home/htb-student:/bin/bash
<SNIP>
As we can see now, the output no longer starts with root but is now sorted alphabetically.
More often, we will only search for specific results that contain patterns we have defined. One of the most used tools for this is grep, which offers many different features. Accordingly, we can search for users who have the default shell "/bin/bash" set as an example.
root@htb[/htb]$ cat /etc/passwd | grep "/bin/bash"

root:x:0:0:root:/root:/bin/bash
mrb3n:x:1000:1000:mrb3n:/home/mrb3n:/bin/bash
cry0l1t3:x:1001:1001::/home/cry0l1t3:/bin/bash
htb-student:x:1002:1002::/home/htb-student:/bin/bash
Another possibility is to exclude specific results. For this, the option "-v" is used with grep. In the next example, we exclude all users who have disabled the standard shell with the name "/bin/false" or "/usr/bin/nologin".
root@htb[/htb]$ cat /etc/passwd | grep -v "false\|nologin"

root:x:0:0:root:/root:/bin/bash
sync:x:4:65534:sync:/bin:/bin/sync
postgres:x:111:117:PostgreSQL administrator,,,:/var/lib/postgresql:/bin/bash
user6:x:1000:1000:,,,:/home/user6:/bin/bash
Specific results with different characters may be separated as delimiters. Here it is handy to know how to remove specific delimiters and show the words on a line in a specified position. One of the tools that can be used for this is cut. Therefore we use the option "-d" and set the delimiter to the colon character (:) and define with the option "-f" the position in the line we want to output.
Filter Contents
root@htb[/htb]$ cat /etc/passwd | grep -v "false\|nologin" | cut -d":" -f1

root
sync
mrb3n
cry0l1t3
htb-student
Another possibility to replace certain characters from a line with characters defined by us is the tool tr. As the first option, we define which character we want to replace, and as a second option, we define the character we want to replace it with. In the next example, we replace the colon character with space.
root@htb[/htb]$ cat /etc/passwd | grep -v "false\|nologin" | tr ":" " "

root x 0 0 root /root /bin/bash
sync x 4 65534 sync /bin /bin/sync
mrb3n x 1000 1000 mrb3n /home/mrb3n /bin/bash
cry0l1t3 x 1001 1001  /home/cry0l1t3 /bin/bash
htb-student x 1002 1002  /home/htb-student /bin/bash
Since search results can often have an unclear representation, the tool column is well suited to display such results in tabular form using the "-t."
root@htb[/htb]$ cat /etc/passwd | grep -v "false\|nologin" | tr ":" " " | column -t

root         x  0     0      root               /root        /bin/bash
sync         x  4     65534  sync               /bin         /bin/sync
mrb3n        x  1000  1000   mrb3n              /home/mrb3n  /bin/bash
cry0l1t3     x  1001  1001   /home/cry0l1t3     /bin/bash
htb-student  x  1002  1002   /home/htb-student  /bin/bash
As we may have noticed, the user "postgres" has one row too many. To keep it as simple as possible to sort out such results, the (g)awk programming is beneficial, which allows us to display the first ($1) and last ($NF) result of the line.
root@htb[/htb]$ cat /etc/passwd | grep -v "false\|nologin" | tr ":" " " | awk '{print $1, $NF}'

root /bin/bash
sync /bin/sync
mrb3n /bin/bash
cry0l1t3 /bin/bash
htb-student /bin/bash
There will come moments when we want to change specific names in the whole file or standard input. One of the tools we can use for this is the stream editor called sed. One of the most common uses of this is substituting text. Here, sed looks for patterns we have defined in the form of regular expressions (regex) and replaces them with another pattern that we have also defined. Let us stick to the last results and say we want to replace the word "bin" with "HTB."
The "s" flag at the beginning stands for the substitute command. Then we specify the pattern we want to replace. After the slash (/), we enter the pattern we want to use as a replacement in the third position. Finally, we use the "g" flag, which stands for replacing all matches.
root@htb[/htb]$ cat /etc/passwd | grep -v "false\|nologin" | tr ":" " " | awk '{print $1, $NF}' | sed 's/bin/HTB/g'

root /HTB/bash
sync /HTB/sync
mrb3n /HTB/bash
cry0l1t3 /HTB/bash
htb-student /HTB/bash
Last but not least, it will often be useful to know how many successful matches we have. To avoid counting the lines or characters manually, we can use the tool wc. With the "-l" option, we specify that only the lines are counted.
root@htb[/htb]$ cat /etc/passwd | grep -v "false\|nologin" | tr ":" " " | awk '{print $1, $NF}' | wc -l

5
It may be a bit overwhelming at first to deal with so many different tools and their functions if we are not familiar with them. Take your time and experiment with the tools. Have a look at the man pages (man <tool>) or call the help for it (<tool> -h / <tool> --help). The best way to become familiar with all the tools is to practice. Try to use them as often as possible, and we will be able to filter many things intuitively after a short time.
Here are a few optional exercises we can use to improve our filtering skills and get more familiar with the terminal and the commands. The file we will need to work with is the /etc/passwd file on our target and we can use any shown command above. Our goal is to filter and display only specific contents. Read the file and filter its contents in such a way that we see only:
| 1. | A line with the username cry0l1t3. |
| 2. | The usernames. |
| 3. | The username cry0l1t3 and his UID. |
| 4. | The username cry0l1t3 and his UID separated by a comma (,). |
| 5. | The username cry0l1t3, his UID, and the set shell separated by a comma (,). |
| 6. | All usernames with their UID and set shells separated by a comma (,). |
| 7. | All usernames with their UID and set shells separated by a comma (,) and exclude the ones that contain nologin or false. |
| 8. | All usernames with their UID and set shells separated by a comma (,) and exclude the ones that contain nologin and count all lines of the filtered output. |
Regular expressions (RegEx) are an art of expression language to search for patterns in text and files. They can be used to find and replace text, analyze data, validate input, perform searches, and more. In simple terms, they are a filter criterion that can be used to analyze and manipulate strings. They are available in various programming languages and programs and are used in many different ways and functions.
A regular expression is a sequence of letters and symbols that form a search pattern. In addition, regular expressions can be created with patterns called metacharacters. Meta characters are symbols that define the search pattern but have no literal meaning. We can use it in tools like grep or sed or others. Often regex is implemented in web applications for the validation of user input.
Among other things, regex offers us the possibility to group the desired search patterns. Basically, regex follows three different concepts, which are distinguished by the three different brackets:
| Operators | Description | |
| 1 | (a) | The round brackets are used to group parts of a regex. Within the brackets, you can define further patterns which should be processed together. |
| 2 | [a-z] | The square brackets are used to define character classes. Inside the brackets, you can specify a list of characters to search for. |
| 3 | {1,10} | The curly brackets are used to define quantifiers. Inside the brackets, you can specify a number or a range that indicates how often a previous pattern should be repeated. |
| 4 | | | Also called the OR operator and shows results when one of the two expressions matches |
| 5 | .* | Also called the AND operator and displayed results only if both expressions match |
Suppose we use the OR operator. The regex searches for one of the given search parameters. In the next example, we search for lines containing the word my or false. To use these operators, you need to apply the extended regex using the -E option in grep.
OR operator
cry0l1t3@htb:~$ grep -E "(my|false)" /etc/passwd

lxd:x:105:65534::/var/lib/lxd/:/bin/false
pollinate:x:109:1::/var/cache/pollinate:/bin/false
mysql:x:116:120:MySQL Server,,:/nonexistent:/bin/false
Since one of the two search parameters always occurs in the three lines, all three lines are displayed accordingly. However, if we use the AND operator, we will get a different result for the same search parameters.
AND operator
cry0l1t3@htb:~$ grep -E "(my.*false)" /etc/passwd

mysql:x:116:120:MySQL Server,,:/nonexistent:/bin/false
Basically, what we are saying with this command is that we are looking for a line where we want to see both my and false. A simplified example would also be to use grep twice and look like this:
cry0l1t3@htb:~$ grep -E "my" /etc/passwd | grep -E "false"

mysql:x:116:120:MySQL Server,,:/nonexistent:/bin/false
Here are some optional tasks to practice regex that can help us to handle it better and more efficiently. For all exercises, we will use the /etc/ssh/sshd_config file on our Pwnbox instance.
| 1 | Show all lines that do not contain the # character. |
| 2 | Search for all lines that contain a word that starts with Permit. |
| 3 | Search for all lines that contain a word ending with Authentication. |
| 4 | Search for all lines containing the word Key. |
| 5 | Search for all lines beginning with Password and containing yes. |
| 6 | Search for all lines that end with yes. |
Under Linux, permissions are assigned to users and groups. Each user can be a member of different groups, and membership in these groups gives the user specific, additional permissions. Each file and directory belongs to a specific user and a specific group. So the permissions for users and groups that defined a file are also defined for the respective owners. When we create new files or directories, they belong to the group we belong to and us.
When a user wants to access the contents of a Linux directory, they must first traverse the directory, which means navigating to that directory, requiring the user to have execute permissions on the directory. Without this permission, the user cannot access the directory's contents and will instead be presented with a “Permission Denied" error message.
cry0l1t3@htb[/htb]$ ls -l

drw-rw-r-- 3 cry0l1t3 cry0l1t3   4096 Jan 12 12:30 scripts


cry0l1t3@htb[/htb]$ ls -al mydirectory/

ls: cannot access 'mydirectory/script.sh': Permission denied
ls: cannot access 'mydirectory/..': Permission denied
ls: cannot access 'mydirectory/subdirectory': Permission denied
ls: cannot access 'mydirectory/.': Permission denied
total 0
d????????? ? ? ? ?            ? .
d????????? ? ? ? ?            ? ..
-????????? ? ? ? ?            ? script.sh
d????????? ? ? ? ?            ? subdirectory
It is important to note that execute permissions are necessary to traverse a directory, no matter the user's level of access. Also, execute permissions on a directory do not allow a user to execute or modify any files or contents within the directory, only to traverse and access the content of the directory.
To execute files within the directory, a user needs execute permissions on the corresponding file. To modify the contents of a directory (create, delete, or rename files and subdirectories), the user needs write permissions on the directory.
The whole permission system on Linux systems is based on the octal number system, and basically, there are three different types of permissions a file or directory can be assigned:
r) - Readw) - Writex) - ExecuteThe permissions can be set for the owner, group, and others like presented in the next example with their corresponding permissions.
cry0l1t3@htb[/htb]$ ls -l /etc/passwd

- rwx rw- r--   1 root root 1641 May  4 23:42 /etc/passwd
- --- --- ---   |  |    |    |   |__________|
|  |   |   |    |  |    |    |        |_ Date
|  |   |   |    |  |    |    |__________ File Size
|  |   |   |    |  |    |_______________ Group
|  |   |   |    |  |____________________ User
|  |   |   |    |_______________________ Number of hard links
|  |   |   |_ Permission of others (read)
|  |   |_____ Permissions of the group (read, write)
|  |_________ Permissions of the owner (read, write, execute)
|____________ File type (- = File, d = Directory, l = Link, ... )
We can modify permissions using the chmod command, permission group references (u - owner, g - Group, o - others, a - All users), and either a [+] or a [-] to add remove the designated permissions. In the following example, a user creates a new shell script owned by that user, not executable, and set with read/write permissions for all users.
cry0l1t3@htb[/htb]$ ls -l shell

-rwxr-x--x   1 cry0l1t3 htbteam 0 May  4 22:12 shell
We can then apply read permissions for all users and see the result.
cry0l1t3@htb[/htb]$ chmod a+r shell && ls -l shell

-rwxr-xr-x   1 cry0l1t3 htbteam 0 May  4 22:12 shell
We can also set the permissions for all other users to read only using the octal value assignment.
cry0l1t3@htb[/htb]$ chmod 754 shell && ls -l shell

-rwxr-xr--   1 cry0l1t3 htbteam 0 May  4 22:12 shell
Let us look at all the representations associated with it to understand better how the permission assignment is calculated.
Binary Notation:                4 2 1  |  4 2 1  |  4 2 1
----------------------------------------------------------
Binary Representation:          1 1 1  |  1 0 1  |  1 0 0
----------------------------------------------------------
Octal Value:                      7    |    5    |    4
----------------------------------------------------------
Permission Representation:      r w x  |  r - x  |  r - -
If we sum the set bits from the Binary Representation assigned to the values from Binary Notation together, we get the Octal Value. The Permission Representation represents the bits set in the Binary Representation by using the three characters, which only recognizes the set permissions easier.
To change the owner and/or the group assignments of a file or directory, we can use the chown command. The syntax is like following:
Syntax - chown
cry0l1t3@htb[/htb]$ chown <user>:<group> <file/directory>
In this example, "shell" can be replaced with any arbitrary file or folder.
cry0l1t3@htb[/htb]$ chown root:root shell && ls -l shell

-rwxr-xr--   1 root root 0 May  4 22:12 shell
Besides assigning direct user and group permissions, we can also configure special permissions for files by setting the Set User ID (SUID) and Set Group ID (SGID) bits. These SUID/SGID bits allow, for example, users to run programs with the rights of another user. Administrators often use this to give their users special rights for certain applications or files. The letter "s" is used instead of an "x". When executing such a program, the SUID/SGID of the file owner is used.
It is often the case that administrators are not familiar with the applications but still assign the SUID/SGID bits, which leads to a high-security risk. Such programs may contain functions that allow the execution of a shell from the pager, such as the application "journalctl."
If the administrator sets the SUID bit to "journalctl," any user with access to this application could execute a shell as root. More information about this and other such applications can be found at GTFObins.
Sticky bits are a type of file permission in Linux that can be set on directories. This type of permission provides an extra layer of security when controlling the deletion and renaming of files within a directory. It is typically used on directories that are shared by multiple users to prevent one user from accidentally deleting or renaming files that are important to others.
For example, in a shared home directory, where multiple users have access to the same directory, a system administrator can set the sticky bit on the directory to ensure that only the owner of the file, the owner of the directory, or the root user can delete or rename files within the directory. This means that other users cannot delete or rename files within the directory as they do not have the required permissions. This provides an added layer of security to protect important files, as only those with the necessary access can delete or rename files. Setting the sticky bit on a directory ensures that only the owner, the directory owner, or the root user can change the files within the directory.
When a sticky bit is set on a directory, it is represented by the letter “t" in the execute permission of the directory's permissions. For example, if a directory has permissions “rwxrwxrwt", it means that the sticky bit is set, giving the extra level of security so that no one other than the owner or root user can delete or rename the files or folders in the directory.
cry0l1t3@htb[/htb]$ ls -l

drw-rw-r-t 3 cry0l1t3 cry0l1t3   4096 Jan 12 12:30 scripts
drw-rw-r-T 3 cry0l1t3 cry0l1t3   4096 Jan 12 12:32 reports
In this example, we see that both directories have the sticky bit set. However, the reports folder has an uppercase T, and the scripts folder has a lowercase t.
If the sticky bit is capitalized (T), then this means that all other users do not have execute (x) permissions and, therefore, cannot see the contents of the folder nor run any programs from it. The lowercase sticky bit (t) is the sticky bit where the execute (x) permissions have been set.
User management is an essential part of Linux administration. Sometimes we need to create new users or add other users to specific groups. Another possibility is to execute commands as a different user. After all, it is not too rare that users of only one specific group have the permissions to view or edit specific files or directories. This, in turn, allows us to collect more information locally on the machine, which can be very important. Let us take a look at the following example of how to execute code as a different user.
Execution as a user
root@htb[/htb]$ cat /etc/shadow

cat: /etc/shadow: Permission denied
Execution as root
root@htb[/htb]$ sudo cat /etc/shadow

root:<SNIP>:18395:0:99999:7:::
daemon:*:17737:0:99999:7:::
bin:*:17737:0:99999:7:::
<SNIP>
Here is a list that will help us to better understand and deal with user management.
| Command | Description |
sudo | Execute command as a different user. |
su | The su utility requests appropriate user credentials via PAM and switches to that user ID (the default user is the superuser). A shell is then executed. |
useradd | Creates a new user or update default new user information. |
userdel | Deletes a user account and related files. |
usermod | Modifies a user account. |
addgroup | Adds a group to the system. |
delgroup | Removes a group from the system. |
passwd | Changes user password. |
User management is essential in any operating system, and the best way to become familiar with it is to try out the individual commands in conjunction with their various options.
Whether working as a system administrator, maintaining our own Linux machines at home, or building/upgrading/maintaining our penetration testing distribution of choice, it is crucial to have a firm grasp on the available Linux package managers and the various ways to utilize them to install, update, or remove packages. Packages are archives that contain binaries of software, configuration files, information about dependencies and keep track of updates and upgrades. The features that most package management systems provide are:
We can use many different package management systems that cover different types of files like ".deb", ".rpm", and others. The package management requirement is that the software to be installed is available as a corresponding package. Typically this is created, offered, and maintained centrally under Linux distributions. In this way, the software is integrated directly into the system, and its various directories are distributed throughout the system. The package management software retrieves the necessary changes for system installation from the package itself and then implements these changes to install the package successfully. If the package management software recognizes that additional packages are required for the proper functioning of the package that has not yet been installed, a dependency is included and either warns the administrator or tries to reload the missing software from a repository, for example, and install it in advance.
If an installed software has been deleted, the package management system then retakes the package's information, modifies it based on its configuration, and deletes files. There are different package management programs that we can use for this. Here is a list of examples of such programs:
| Command | Description |
dpkg | The dpkg is a tool to install, build, remove, and manage Debian packages. The primary and more user-friendly front-end for dpkg is aptitude. |
apt | Apt provides a high-level command-line interface for the package management system. |
aptitude | Aptitude is an alternative to apt and is a high-level interface to the package manager. |
snap | Install, configure, refresh, and remove snap packages. Snaps enable the secure distribution of the latest apps and utilities for the cloud, servers, desktops, and the internet of things. |
gem | Gem is the front-end to RubyGems, the standard package manager for Ruby. |
pip | Pip is a Python package installer recommended for installing Python packages that are not available in the Debian archive. It can work with version control repositories (currently only Git, Mercurial, and Bazaar repositories), logs output extensively, and prevents partial installs by downloading all requirements before starting installation. |
git | Git is a fast, scalable, distributed revision control system with an unusually rich command set that provides both high-level operations and full access to internals. |
It is highly recommended to set up our virtual machine (VM) locally to experiment with it. Let us experiment a bit in our local VM and extend it with a few additional packages. First, let us install git by using apt.
Advanced Package Manager (APT)
Debian-based Linux distributions use the APT package manager. A package is an archive file containing multiple ".deb" files. The dpkg utility is used to install programs from the associated ".deb" file. APT makes updating and installing programs easier because many programs have dependencies. When installing a program from a standalone ".deb" file, we may run into dependency issues and need to download and install one or multiple additional packages. APT makes this easier and more efficient by packaging together all of the dependencies needed to install a program.
Each Linux distribution uses software repositories that are updated often. When we update a program or install a new one, the system queries these repositories for the desired package. Repositories can be labeled as stable, testing, or unstable. Most Linux distributions utilize the most stable or "main" repository. This can be checked by viewing the contents of the /etc/apt/sources.list file. The repository list for Parrot OS is at /etc/apt/sources.list.d/parrot.list.
root@htb[/htb]$ cat /etc/apt/sources.list.d/parrot.list

# parrot repository
# this file was automatically generated by parrot-mirror-selector
deb http://htb.deb.parrot.sh/parrot/ rolling main contrib non-free
#deb-src https://deb.parrot.sh/parrot/ rolling main contrib non-free
deb http://htb.deb.parrot.sh/parrot/ rolling-security main contrib non-free
#deb-src https://deb.parrot.sh/parrot/ rolling-security main contrib non-free
APT uses a database called the APT cache. This is used to provide information about packages installed on our system offline. We can search the APT cache, for example, to find all Impacket related packages.
root@htb[/htb]$ apt-cache search impacket

impacket-scripts - Links to useful impacket scripts examples
polenum - Extracts the password policy from a Windows system
python-pcapy - Python interface to the libpcap packet capture library (Python 2)
python3-impacket - Python3 module to easily build and dissect network protocols
python3-pcapy - Python interface to the libpcap packet capture library (Python 3)
We can then view additional information about a package.
root@htb[/htb]$ apt-cache show impacket-scripts

Package: impacket-scripts
Version: 1.4
Architecture: all
Maintainer: Kali Developers <devel@kali.org>
Installed-Size: 13
Depends: python3-impacket (>= 0.9.20), python3-ldap3 (>= 2.5.0), python3-ldapdomaindump
Breaks: python-impacket (<< 0.9.18)
Replaces: python-impacket (<< 0.9.18)
Priority: optional
Section: misc
Filename: pool/main/i/impacket-scripts/impacket-scripts_1.4_all.deb
Size: 2080
<SNIP>
We can also list all installed packages.
root@htb[/htb]$ apt list --installed

Listing... Done
accountsservice/rolling,now 0.6.55-2 amd64 [installed,automatic]
adapta-gtk-theme/rolling,now 3.95.0.11-1 all [installed]
adduser/rolling,now 3.118 all [installed]
adwaita-icon-theme/rolling,now 3.36.1-2 all [installed,automatic]
aircrack-ng/rolling,now 1:1.6-4 amd64 [installed,automatic]
<SNIP>
If we are missing some packages, we can search for it and install it using the following command.
root@htb[/htb]$ sudo apt install impacket-scripts -y

Reading package lists... Done
Building dependency tree
Reading state information... Done
The following NEW packages will be installed:
  impacket-scripts
0 upgraded, 1 newly installed, 0 to remove and 0 not upgraded.
Need to get 2,080 B of archives.
After this operation, 13.3 kB of additional disk space will be used.
Get:1 https://euro2-emea-mirror.parrot.sh/mirrors/parrot rolling/main amd64 impacket-scripts all 1.4 [2,080 B]
Fetched 2,080 B in 0s (15.2 kB/s)
Selecting previously unselected package impacket-scripts.
(Reading database ... 378459 files and directories currently installed.)
Preparing to unpack .../impacket-scripts_1.4_all.deb ...
Unpacking impacket-scripts (1.4) ...
Setting up impacket-scripts (1.4) ...
Scanning application launchers
Removing duplicate launchers from Debian
Launchers are updated
Now that we have git installed, we can use it to download useful tools from Github. One such project is called 'Nishang'. We will deal with and work with the project itself later. First, we need to navigate to the project's repository and copy the Github link before using git to download it.
Nevertheless, before we download the project and its scripts and lists, we should create a particular folder.
root@htb[/htb]$ mkdir ~/nishang/ && git clone https://github.com/samratashok/nishang.git ~/nishang

Cloning into '/opt/nishang/'...
remote: Enumerating objects: 15, done.
remote: Counting objects: 100% (15/15), done.
remote: Compressing objects: 100% (13/13), done.
remote: Total 1691 (delta 4), reused 6 (delta 2), pack-reused 1676
Receiving objects: 100% (1691/1691), 7.84 MiB | 4.86 MiB/s, done.
Resolving deltas: 100% (1055/1055), done.
We can also download the programs and tools from the repositories separately. In this example, we download 'strace' for Ubuntu 18.04 LTS.
root@htb[/htb]$ wget http://archive.ubuntu.com/ubuntu/pool/main/s/strace/strace_4.21-1ubuntu1_amd64.deb

--2020-05-15 03:27:17--  http://archive.ubuntu.com/ubuntu/pool/main/s/strace/strace_4.21-1ubuntu1_amd64.deb
Resolving archive.ubuntu.com (archive.ubuntu.com)... 91.189.88.142, 91.189.88.152, 2001:67c:1562::18, ...
Connecting to archive.ubuntu.com (archive.ubuntu.com)|91.189.88.142|:80... connected.
HTTP request sent, awaiting response... 200 OK
Length: 333388 (326K) [application/x-debian-package]
Saving to: ‘strace_4.21-1ubuntu1_amd64.deb’

strace_4.21-1ubuntu1_amd64.deb       100%[===================================================================>] 325,57K  --.-KB/s    in 0,1s

2020-05-15 03:27:18 (2,69 MB/s) - ‘strace_4.21-1ubuntu1_amd64.deb’ saved [333388/333388]
Furthermore, now we can use both apt and dpkg to install the package. Since we have already worked with apt, we will turn to dpkg in the next example.
root@htb[/htb]$ sudo dpkg -i strace_4.21-1ubuntu1_amd64.deb

(Reading database ... 154680 files and directories currently installed.)
Preparing to unpack strace_4.21-1ubuntu1_amd64.deb ...
Unpacking strace (4.21-1ubuntu1) over (4.21-1ubuntu1) ...
Setting up strace (4.21-1ubuntu1) ...
Processing triggers for man-db (2.8.3-2ubuntu0.1) ...
With this, we have already installed the tool and can test if it works properly.
root@htb[/htb]$ strace -h

usage: strace [-CdffhiqrtttTvVwxxy] [-I n] [-e expr]...
              [-a column] [-o file] [-s strsize] [-P path]...
              -p pid... / [-D] [-E var=val]... [-u username] PROG [ARGS]
   or: strace -c[dfw] [-I n] [-e expr]... [-O overhead] [-S sortby]
              -p pid... / [-D] [-E var=val]... [-u username] PROG [ARGS]

Output format:
  -a column      alignment COLUMN for printing syscall results (default 40)
  -i             print instruction pointer at time of syscall
In general, there are two types of services: internal, the relevant services that are required at system startup, which for example, perform hardware-related tasks, and services that are installed by the user, which usually include all server services. Such services run in the background without any user interaction. These are also called daemons and are identified by the letter 'd' at the end of the program name, for example, sshd or systemd.
Most Linux distributions have now switched to systemd. This daemon is an Init process started first and thus has the process ID (PID) 1. This daemon monitors and takes care of the orderly starting and stopping of other services. All processes have an assigned PID that can be viewed under /proc/ with the corresponding number. Such a process can have a parent process ID (PPID), and if so, it is known as the child process.
Besides systemctl we can also use update-rc.d to manage SysV init script links. Let us have a look at some examples. We will use the OpenSSH server in these examples. If we do not have this installed, please install it before proceeding to this section.
After installing OpenSSH on our VM, we can start the service with the following command.
root@htb[/htb]$ systemctl start ssh
After we have started the service, we can now check if it runs without errors.
root@htb[/htb]$ systemctl status ssh

● ssh.service - OpenBSD Secure Shell server
   Loaded: loaded (/lib/systemd/system/ssh.service; enabled; vendor preset: enabled)
   Active: active (running) since Thu 2020-05-14 15:08:23 CEST; 24h ago
   Main PID: 846 (sshd)
   Tasks: 1 (limit: 4681)
   CGroup: /system.slice/ssh.service
           └─846 /usr/sbin/sshd -D

Mai 14 15:08:22 inlane systemd[1]: Starting OpenBSD Secure Shell server...
Mai 14 15:08:23 inlane sshd[846]: Server listening on 0.0.0.0 port 22.
Mai 14 15:08:23 inlane sshd[846]: Server listening on :: port 22.
Mai 14 15:08:23 inlane systemd[1]: Started OpenBSD Secure Shell server.
Mai 14 15:08:30 inlane systemd[1]: Reloading OpenBSD Secure Shell server.
Mai 14 15:08:31 inlane sshd[846]: Received SIGHUP; restarting.
Mai 14 15:08:31 inlane sshd[846]: Server listening on 0.0.0.0 port 22.
Mai 14 15:08:31 inlane sshd[846]: Server listening on :: port 22.
To add OpenSSH to the SysV script to tell the system to run this service after startup, we can link it with the following command:
root@htb[/htb]$ systemctl enable ssh

Synchronizing state of ssh.service with SysV service script with /lib/systemd/systemd-sysv-install.
Executing: /lib/systemd/systemd-sysv-install enable ssh
Once we reboot the system, the OpenSSH server will automatically run. We can check this with a tool called ps.
root@htb[/htb]$ ps -aux | grep ssh

root       846  0.0  0.1  72300  5660 ?        Ss   Mai14   0:00 /usr/sbin/sshd -D
We can also use systemctl to list all services.
root@htb[/htb]$ systemctl list-units --type=service

UNIT                                                       LOAD   ACTIVE SUB     DESCRIPTION
accounts-daemon.service                                    loaded active running Accounts Service
acpid.service                                              loaded active running ACPI event daemon
apache2.service                                            loaded active running The Apache HTTP Server
apparmor.service                                           loaded active exited  AppArmor initialization
apport.service                                             loaded active exited  LSB: automatic crash repor
avahi-daemon.service                                       loaded active running Avahi mDNS/DNS-SD Stack
bolt.service                                               loaded active running Thunderbolt system service
It is quite possible that the services do not start due to an error. To see the problem, we can use the tool journalctl to view the logs.
root@htb[/htb]$ journalctl -u ssh.service --no-pager

-- Logs begin at Wed 2020-05-13 17:30:52 CEST, end at Fri 2020-05-15 16:00:14 CEST. --
Mai 13 20:38:44 inlane systemd[1]: Starting OpenBSD Secure Shell server...
Mai 13 20:38:44 inlane sshd[2722]: Server listening on 0.0.0.0 port 22.
Mai 13 20:38:44 inlane sshd[2722]: Server listening on :: port 22.
Mai 13 20:38:44 inlane systemd[1]: Started OpenBSD Secure Shell server.
Mai 13 20:39:06 inlane sshd[3939]: Connection closed by 10.22.2.1 port 36444 [preauth]
Mai 13 20:39:27 inlane sshd[3942]: Accepted password for master from 10.22.2.1 port 36452 ssh2
Mai 13 20:39:27 inlane sshd[3942]: pam_unix(sshd:session): session opened for user master by (uid=0)
Mai 13 20:39:28 inlane sshd[3942]: pam_unix(sshd:session): session closed for user master
Mai 14 02:04:49 inlane sshd[2722]: Received signal 15; terminating.
Mai 14 02:04:49 inlane systemd[1]: Stopping OpenBSD Secure Shell server...
Mai 14 02:04:49 inlane systemd[1]: Stopped OpenBSD Secure Shell server.
-- Reboot --
A process can be in the following states:
Processes can be controlled using kill, pkill, pgrep, and killall. To interact with a process, we must send a signal to it. We can view all signals with the following command:
root@htb[/htb]$ kill -l

 1) SIGHUP       2) SIGINT       3) SIGQUIT      4) SIGILL       5) SIGTRAP
 6) SIGABRT      7) SIGBUS       8) SIGFPE       9) SIGKILL     10) SIGUSR1
11) SIGSEGV     12) SIGUSR2     13) SIGPIPE     14) SIGALRM     15) SIGTERM
16) SIGSTKFLT   17) SIGCHLD     18) SIGCONT     19) SIGSTOP     20) SIGTSTP
21) SIGTTIN     22) SIGTTOU     23) SIGURG      24) SIGXCPU     25) SIGXFSZ
26) SIGVTALRM   27) SIGPROF     28) SIGWINCH    29) SIGIO       30) SIGPWR
31) SIGSYS      34) SIGRTMIN    35) SIGRTMIN+1  36) SIGRTMIN+2  37) SIGRTMIN+3
38) SIGRTMIN+4  39) SIGRTMIN+5  40) SIGRTMIN+6  41) SIGRTMIN+7  42) SIGRTMIN+8
43) SIGRTMIN+9  44) SIGRTMIN+10 45) SIGRTMIN+11 46) SIGRTMIN+12 47) SIGRTMIN+13
48) SIGRTMIN+14 49) SIGRTMIN+15 50) SIGRTMAX-14 51) SIGRTMAX-13 52) SIGRTMAX-12
53) SIGRTMAX-11 54) SIGRTMAX-10 55) SIGRTMAX-9  56) SIGRTMAX-8  57) SIGRTMAX-7
58) SIGRTMAX-6  59) SIGRTMAX-5  60) SIGRTMAX-4  61) SIGRTMAX-3  62) SIGRTMAX-2
63) SIGRTMAX-1  64) SIGRTMAX
The most commonly used are:
| Signal | Description |
1 | SIGHUP - This is sent to a process when the terminal that controls it is closed. |
2 | SIGINT - Sent when a user presses [Ctrl] + C in the controlling terminal to interrupt a process. |
3 | SIGQUIT - Sent when a user presses [Ctrl] + D to quit. |
9 | SIGKILL - Immediately kill a process with no clean-up operations. |
15 | SIGTERM - Program termination. |
19 | SIGSTOP - Stop the program. It cannot be handled anymore. |
20 | SIGTSTP - Sent when a user presses [Ctrl] + Z to request for a service to suspend. The user can handle it afterward. |
For example, if a program were to freeze, we could force to kill it with the following command:
root@htb[/htb]$ kill 9 <PID>
Sometimes it will be necessary to put the scan or process we just started in the background to continue using the current session to interact with the system or start other processes. As we have already seen, we can do this with the shortcut [Ctrl + Z]. As mentioned above, we send the SIGTSTP signal to the kernel, which suspends the process.
root@htb[/htb]$ ping -c 10 www.hackthebox.eu

root@htb[/htb]$ vim tmpfile
[Ctrl + Z]
[2]+  Stopped                 vim tmpfile
Now all background processes can be displayed with the following command.
root@htb[/htb]$ jobs

[1]+  Stopped                 ping -c 10 www.hackthebox.eu
[2]+  Stopped                 vim tmpfile
The [Ctrl] + Z shortcut suspends the processes, and they will not be executed further. To keep it running in the background, we have to enter the command bg to put the process in the background
root@htb[/htb]$ bg

root@htb[/htb]$
--- www.hackthebox.eu ping statistics ---
10 packets transmitted, 0 received, 100% packet loss, time 113482ms

[ENTER]
[1]+  Exit 1                  ping -c 10 www.hackthebox.eu
Another option is to automatically set the process with an AND sign (&) at the end of the command.
root@htb[/htb]$ ping -c 10 www.hackthebox.eu &

[1] 10825
PING www.hackthebox.eu (172.67.1.1) 56(84) bytes of data.
Once the process finishes, we will see the results.
root@htb[/htb]$

--- www.hackthebox.eu ping statistics ---
10 packets transmitted, 0 received, 100% packet loss, time 9210ms

[ENTER]
[1]+  Exit 1                  ping -c 10 www.hackthebox.eu
After that, we can use the jobs command to list all background processes. Backgrounded processes do not require user interaction, and we can use the same shell session without waiting until the process finishes first. Once the scan or process finishes its work, we will get notified by the terminal that the process is finished.
root@htb[/htb]$ jobs

[1]+  Running                 ping -c 10 www.hackthebox.eu &
If we want to get the background process into the foreground and interact with it again, we can use the fg <ID> command.
root@htb[/htb]$ fg 1
ping -c 10 www.hackthebox.eu

--- www.hackthebox.eu ping statistics ---
10 packets transmitted, 0 received, 100% packet loss, time 9206ms
There are three possibilities to run several commands, one after the other. These are separated by:
;)ampersand characters (&&)|)The difference between them lies in the previous processes' treatment and depends on whether the previous process was completed successfully or with errors. The semicolon (;) is a command separator and executes the commands by ignoring previous commands' results and errors.
root@htb[/htb]$ echo '1'; echo '2'; echo '3'

1
2
3
For example, if we execute the same command but replace it in second place, the command ls with a file that does not exist, we get an error, and the third command will be executed nevertheless.
root@htb[/htb]$ echo '1'; ls MISSING_FILE; echo '3'

1
ls: cannot access 'MISSING_FILE': No such file or directory
3
However, it looks different if we use the double AND characters (&&) to run the commands one after the other. If there is an error in one of the commands, the following ones will not be executed anymore, and the whole process will be stopped.
root@htb[/htb]$ echo '1' && ls MISSING_FILE && echo '3'

1
ls: cannot access 'MISSING_FILE': No such file or directory
Pipes (|) depend not only on the correct and error-free operation of the previous processes but also on the previous processes' results.
Task scheduling is a feature in Linux systems that allows users to schedule and automate tasks. It allows administrators and users to run tasks at a specific time or within specific frequencies without having to start them manually. It can be used in Linux systems such as Ubuntu, Redhat Linux, and Solaris to manage a variety of tasks. Examples include automatically updating software, running scripts, cleaning databases, and automating backups. This also allows users to schedule regular and repetitive tasks to ensure they are run regularly. In addition, alerts can be set up to display when certain events occur or to contact administrators or users. There are many different use cases for automation of this type, but these cover most cases.
Systemd is a service used in Linux systems such as Ubuntu, Redhat Linux, and Solaris to start processes and scripts at a specific time. With it, we can set up processes and scripts to run at a specific time or time interval and can also specify specific events and triggers that will trigger a specific task. To do this, we need to take some steps and precautions before our scripts or processes are automatically executed by the system.
Create a Timer
To create a timer for systemd, we need to create a directory where the timer script will be stored.
root@htb[/htb]$ sudo mkdir /etc/systemd/system/mytimer.timer.d
root@htb[/htb]$ sudo vim /etc/systemd/system/mytimer.timer
Next, we need to create a script that configures the timer. The script must contain the following options: "Unit", "Timer" and "Install". The "Unit" option specifies a description for the timer. The "Timer" option specifies when to start the timer and when to activate it. Finally, the "Install" option specifies where to install the timer.
Mytimer.timer
[Unit]
Description=My Timer

[Timer]
OnBootSec=3min
OnUnitActiveSec=1hour

[Install]
WantedBy=timers.target
Here it depends on how we want to use our script. For example, if we want to run our script only once after the system boot, we should use OnBootSec setting in Timer. However, if we want our script to run regularly, then we should use the OnUnitActiveSec to have the system run the script at regular intervals. Next, we need to create our service.
Create a Service
root@htb[/htb]$ sudo vim /etc/systemd/system/mytimer.service
Here we set a description and specify the full path to the script we want to run. The "multi-user.target" is the unit system that is activated when starting a normal multi-user mode. It defines the services that should be started on a normal system startup.
[Unit]
Description=My Service

[Service]
ExecStart=/full/path/to/my/script.sh

[Install]
WantedBy=multi-user.target
After that, we have to let systemd read the folders again to include the changes.
Reload Systemd
root@htb[/htb]$ sudo systemctl daemon-reload
After that, we can use systemctl to start the service manually and enable the autostart.
Start the Timer & Service
root@htb[/htb]$ sudo systemctl start mytimer.service
root@htb[/htb]$ sudo systemctl enable mytimer.service
Cron is another tool that can be used in Linux systems to schedule and automate processes. It allows users and administrators to execute tasks at a specific time or within specific intervals. For the above examples, we can also use Cron to automate the same tasks. We just need to create a script and then tell the cron daemon to call it at a specific time.
With Cron, we can automate the same tasks, but the process for setting up the Cron daemon is a little different than Systemd. To set up the cron daemon, we need to store the tasks in a file called crontab and then tell the daemon when to run the tasks. Then we can schedule and automate the tasks by configuring the cron daemon accordingly. The structure of Cron consists of the following components:
| Time Frame | Description |
| Minutes (0-59) | This specifies in which minute the task should be executed. |
| Hours (0-23) | This specifies in which hour the task should be executed. |
| Days of month (1-31) | This specifies on which day of the month the task should be executed. |
| Months (1-12) | This specifies in which month the task should be executed. |
| Days of the week (0-7) | This specifies on which day of the week the task should be executed. |
For example, such a crontab could look like this:
# System Update
* */6 * * /path/to/update_software.sh

# Execute scripts
0 0 1 * * /path/to/scripts/run_scripts.sh

# Cleanup DB
0 0 * * 0 /path/to/scripts/clean_database.sh

# Backups
0 0 * * 7 /path/to/scripts/backup.sh
The "System Update" should be executed every sixth hour. This is indicated by the entry */6 in the hour column. The task is executed by the script update_software.sh, whose path is given in the last column.
The task execute scripts is to be executed every first day of the month at midnight. This is indicated by the entries 0 and 0 in the minute and hour columns and 1 in the days-of-the-month column. The task is executed by the run_scripts.sh script, whose path is given in the last column.
The third task, Cleanup DB, is to be executed every Sunday at midnight. This is specified by the entries 0 and 0 in the minute and hour columns and 0 in the days-of-the-week column. The task is executed by the clean_database.sh script, whose path is given in the last column.
The fourth task, backups, is to be executed every Sunday at midnight. This is indicated by the entries 0 and 0 in the minute and hour columns and 7 in the days-of-the-week column. The task is executed by the backup.sh script, whose path is given in the last column.
It is also possible to receive notifications when a task is executed successfully or unsuccessfully. In addition, we can create logs to monitor the execution of the tasks.
Systemd and Cron are both tools that can be used in Linux systems to schedule and automate processes. The key difference between these two tools is how they are configured. With Systemd, you need to create a timer and services script that tells the operating system when to run the tasks. On the other hand, with Cron, you need to create a crontab file that tells the cron daemon when to run the tasks.
When we work with Linux, we also have to deal with different network services. The competence to work with these network services is essential for many reasons. Among other things, we need this knowledge and ability to communicate with other computers over the network, connect, transfer files, analyze network traffic, and learn how to configure such services to identify potential vulnerabilities in our later penetration tests. This knowledge also pushes our understanding of network security as we learn what options each service and its configuration entails.
Let's imagine that we are performing a penetration test and come across a Linux host that we are probing for vulnerabilities. Listening to the network, we can see that a user from this Linux host connects to another server via an unencrypted FTP server. Accordingly, we can detect the credentials of the user in clear text. Of course, the likelihood of this scenario occurring would be much lower if the user knew that FTP does not encrypt the connections and the data sent. And as a Linux administrator, this could be a fatal error, as it tells us not only a lot about the security measures on the network but also about the administrator(s) who are responsible for the security of their network.
We will not be able to cover all network services, but we will focus on and cover the most important ones. Because not only from the perspective of an administrator and user, it is of great benefit but also as a penetration tester for the interaction between other hosts and our machine.
Secure Shell (SSH) is a network protocol that allows the secure transmission of data and commands over a network. It is widely used to securely manage remote systems and securely access remote systems to execute commands or transfer files. In order to connect to our or a remote Linux host via SSH, a corresponding SSH server must be available and running.
The most commonly used SSH server is the OpenSSH server. OpenSSH is a free and open-source implementation of the Secure Shell (SSH) protocol that allows the secure transmission of data and commands over a network.
Administrators use OpenSSH to securely manage remote systems by establishing an encrypted connection to a remote host. With OpenSSH, administrators can execute commands on remote systems, securely transfer files, and establish a secure remote connection without the transmission of data and commands being intercepted by third parties.
Install OpenSSH
root@htb[/htb]$ sudo apt install openssh-server -y
To check if the server is running, we can use the following command:
Server Status
root@htb[/htb]$ systemctl status ssh

● ssh.service - OpenBSD Secure Shell server
     Loaded: loaded (/lib/system/system/ssh.service; enabled; vendor preset: enabled)
     Active: active (running) since Sun 2023-02-12 21:15:27 GMT; 1min 22s ago
       Docs: man:sshd(8)
             man:sshd_config(5)
   Main PID: 7740 (sshd)
      Tasks: 1 (limit: 9458)
     Memory: 2.5M
        CPU: 236ms
     CGroup: /system.slice/ssh.service
             └─7740 sshd: /usr/sbin/sshd -D [listener] 0 of 10-100 startups
As penetration testers, we use OpenSSH to securely access remote systems when performing a network audit. To do this, we can use the following command:
SSH - Logging In
root@htb[/htb]$ ssh cry0l1t3@10.129.17.122

The authenticity of host '10.129.17.122 (10.129.17.122)' can't be established.
ECDSA key fingerprint is SHA256:bKzhv+n2pYqr2r...Egf8LfqaHNxk.

Are you sure you want to continue connecting (yes/no/[fingerprint])? yes

Warning: Permanently added '10.129.17.122' (ECDSA) to the list of known hosts.

cry0l1t3@10.129.17.122's password: ***********
OpenSSH can be configured and customized by editing the file /etc/ssh/sshd_config with a text editor. Here we can adjust settings such as the maximum number of concurrent connections, the use of passwords or keys for logins, host key checking, and more. However, it is important for us to note that changes to the OpenSSH configuration file must be done carefully.
For example, we can use SSH to securely log in to a remote system and execute commands or use tunneling and port forwarding to tunnel data over an encrypted connection to verify network settings and other system settings without the possibility of third parties intercepting the transmission of data and commands.
Network File System (NFS) is a network protocol that allows us to store and manage files on remote systems as if they were stored on the local system. It enables easy and efficient management of files across networks. For example, administrators use NFS to store and manage files centrally (for Linux and Windows systems) to enable easy collaboration and management of data. For Linux, there are several NFS servers, including NFS-UTILS (Ubuntu), NFS-Ganesha (Solaris), and OpenNFS (Redhat Linux).
It can also be used to share and manage resources efficiently, e.g., to replicate file systems between servers. It also offers features such as access controls, real-time file transfer, and support for multiple users accessing data simultaneously. We can use this service just like FTP in case there is no FTP client installed on the target system, or NFS is running instead of FTP.
We can install NFS on Linux with the following command:
Install NFS
root@htb[/htb]$ sudo apt install nfs-kernel-server -y
To check if the server is running, we can use the following command:
Server Status
root@htb[/htb]$ systemctl status nfs-kernel-server

● nfs-server.service - NFS server and services
     Loaded: loaded (/lib/system/system/nfs-server.service; enabled; vendor preset: enabled)
     Active: active (exited) since Sun 2023-02-12 21:35:17 GMT; 13s ago
    Process: 9234 ExecStartPre=/usr/sbin/exportfs -r (code=exited, status=0/SUCCESS)
    Process: 9235 ExecStart=/usr/sbin/rpc.nfsd $RPCNFSDARGS (code=exited, status=0/SUCCESS)
   Main PID: 9235 (code=exited, status=0/SUCCESS)
        CPU: 10ms
We can configure NFS via the configuration file /etc/exports. This file specifies which directories should be shared and the access rights for users and systems. It is also possible to configure settings such as the transfer speed and the use of encryption. NFS access rights determine which users and systems can access the shared directories and what actions they can perform. Here are some important access rights that can be configured in NFS:
| Permissions | Description |
rw | Gives users and systems read and write permissions to the shared directory. |
ro | Gives users and systems read-only access to the shared directory. |
no_root_squash | Prevents the root user on the client from being restricted to the rights of a normal user. |
root_squash | Restricts the rights of the root user on the client to the rights of a normal user. |
sync | Synchronizes the transfer of data to ensure that changes are only transferred after they have been saved on the file system. |
async | Transfers data asynchronously, which makes the transfer faster, but may cause inconsistencies in the file system if changes have not been fully committed. |
For example, we can create a new folder and share it temporarily in NFS. We would do this as follows:
Create NFS Share
cry0l1t3@htb:~$ mkdir nfs_sharing
cry0l1t3@htb:~$ echo '/home/cry0l1t3/nfs_sharing hostname(rw,sync,no_root_squash)' >> /etc/exports
cry0l1t3@htb:~$ cat /etc/exports | grep -v "#"

/home/cry0l1t3/nfs_sharing hostname(rw,sync,no_root_squash)
If we have created an NFS share and want to work with it on the target system, we have to mount it first. We can do this with the following command:
Mount NFS Share
cry0l1t3@htb:~$ mkdir ~/target_nfs
cry0l1t3@htb:~$ mount 10.129.12.17:/home/john/dev_scripts ~/target_nfs
cry0l1t3@htb:~$ tree ~/target_nfs

target_nfs/
├── css.css
├── html.html
├── javascript.js
├── php.php
└── xml.xml

0 directories, 5 files
So we have mounted the NFS share (dev_scripts) from our target (10.129.12.17) locally to our system in the mount point target_nfs over the network and can view the contents just as if we were on the target system. There are even some methods that can be used in specific cases to escalate our privileges on the remote system using NFS.
As penetration testers, we need to understand how web servers work because they are a critical part of web applications and often serve as targets for us to attack. A web server is a type of software that provides data and documents or other applications and functions over the Internet. They use the Hypertext Transfer Protocol (HTTP) to send data to clients such as web browsers and receive requests from those clients. These are then rendered in the form of Hypertext Markup Language (HTML) in the client's browser. This type of communication allows the client to create dynamic web pages that respond to the client's requests. Therefore, it is important that we understand the various functions of the web server in order to create secure and efficient web applications and also ensure the security of the system. Some of the most popular web servers for Linux servers are Apache, Nginx, Lighttpd, and Caddy. Apache is one of the most popular and widely used web servers and is available on a variety of operating systems, including Ubuntu, Solaris, and Redhat Linux.
As penetration testers, we can use web servers for a variety of purposes. For example, we can use a web server to perform file transfers, allowing us to log in and interact with a target system through an incoming HTTP or HTTPS port. Finally, we can use a web server to perform phishing attacks by hosting a copy of the target page on our own server and then attempting to steal user credentials. In addition, there is a variety of other possibilities.
Apache web server has a variety of features that allow us to host a secure and efficient web application. Moreover, we can also configure logging to get information about the traffic on our server, which helps us analyze attacks. We can install Apache using the following command:
Install Apache Web Server
root@htb[/htb]$ sudo apt install apache2 -y
For Apache2, to specify which folders can be accessed, we can edit the file /etc/apache2/apache2.conf with a text editor. This file contains the global settings. We can change the settings to specify which directories can be accessed and what actions can be performed on those directories.
Apache Configuration
<Directory /var/www/html>
        Options Indexes FollowSymLinks
        AllowOverride All
        Require all granted
</directory>
This section specifies that the default /var/www/html folder is accessible, that users can use the Indexes and FollowSymLinks options, that changes to files in this directory can be overridden with AllowOverride All, and that Require all granted grants all users access to this directory. For example, if we want to transfer files to one of our target systems using a web server, we can put the appropriate files in the /var/www/html folder and use wget or curl or other applications to download these files on the target system.
It is also possible to customize individual settings at the directory level by using the .htaccess file, which we can create in the directory in question. This file allows us to configure certain directory-level settings, such as access controls, without having to customize the Apache configuration file. We can also add modules to get features like mod_rewrite, mod_security, and mod_ssl that help us improve the security of our web application.
Python Web Server is a simple, fast alternative to Apache and can be used to host a single folder with a single command to transfer files to another system. To install Python Web Server, we need to install Python3 on our system and then run the following command:
Install Python & Web Server
root@htb[/htb]$ sudo apt install python3 -y
root@htb[/htb]$ python3 -m http.server
When we run this command, our Python Web Server will be started on the TCP/8000 port, and we can access the folder we are currently in. We can also host another folder with the following command:
root@htb[/htb]$ python3 -m http.server --directory /home/cry0l1t3/target_files
This will start a Python web server on the TCP/8000 port, and we can access the /home/cry0l1t3/target_files folder from the browser, for example. When we access our Python web server, we can transfer files to the other system by typing the link in our browser and downloading the files. We can also host our Python web server on a port other than the default port by using the -p option:
root@htb[/htb]$ python3 -m http.server 443
This will host our Python web server on port 443 instead of the default TCP/8000 port. We can access this web server by typing the link in our browser.
Virtual Private Network (VPN) is a technology that allows us to connect securely to another network as if we were directly in it. This is done by creating an encrypted tunnel connection between the client and the server, which means that all data transmitted over this connection is encrypted.
VPNs are mainly used by companies to provide their employees with secure access to the internal network without having to be physically located at the corporate network. This allows employees to access the internal network and its resources and applications from any location. In addition, VPNs can also be used to anonymize traffic and prevent outside access.
Some of the most popular VPN servers for Linux servers are OpenVPN, L2TP/IPsec, PPTP, SSTP, and SoftEther. OpenVPN is a popular open-source VPN server available for various operating systems, including Ubuntu, Solaris, and Redhat Linux. OpenVPN is used by administrators for various purposes, including enabling secure remote access to the corporate network, encrypting network traffic, and anonymizing traffic.
OpenVPN can also be used by us as a penetration tester to connect to internal networks. It can happen that a VPN access is created by the customer so that we can test the internal network for security vulnerabilities. This is an alternative for cases when the penetration tester is too far away from the customer. OpenVPN provides us with a variety of features, including encryption, tunneling, traffic shaping, network routing, and the ability to adapt to dynamically changing networks. We can install the server and client with the following command:
Install OpenVPN
root@htb[/htb]$ sudo apt install openvpn -y
OpenVPN can be customized and configured by editing the configuration file /etc/openvpn/server.conf. This file contains the settings for the OpenVPN server. We can change the settings to configure certain features such as encryption, tunneling, traffic shaping, etc.
If we want to connect to an OpenVPN server, we can use the .ovpn file we received from the server and save it on our system. We can do this with the following command on the command line:
Connect to VPN
root@htb[/htb]$ sudo openvpn --config internal.ovpn
After the connection is established, we can communicate with the internal hosts on the internal network.
Another essential component is the communication with the web servers. There are many different ways to set up web servers on Linux operating systems. One of the most used and widespread web servers, besides IIS and Nginx, is Apache. For an Apache web server, we can use appropriate modules, which can encrypt the communication between browser and web server (mod_ssl), use as a proxy server (mod_proxy), or perform complex manipulations of HTTP header data (mod_headers) and URLs (mod_rewrite).
Apache offers the possibility to create web pages dynamically using server-side scripting languages. Commonly used scripting languages are PHP, Perl, or Ruby. Other languages are Python, JavaScript, Lua, and .NET, which can be used for this. We can install the Apache webserver with the following command.
root@htb[/htb]$ apt install apache2 -y

Reading package lists... Done
Building dependency tree
Reading state information... Done
Suggested packages:
  apache2-doc apache2-suexec-pristine | apache2-suexec-custom
The following NEW packages will be installed:
  apache2
0 upgraded, 1 newly installed, 0 to remove and 17 not upgraded.
Need to get 95,1 kB of archives.
After this operation, 535 kB of additional disk space will be used.
Get:1 http://de.archive.ubuntu.com/ubuntu bionic-updates/main amd64 apache2 amd64 2.4.29-1ubuntu4.13 [95,1 kB]
Fetched 95,1 kB in 0s (270 kB/s)
<SNIP>
After we have started it, we can navigate using our browser to the default page (http://localhost).
This is the default page after installation and serves to confirm that the webserver is working correctly.
cURL is a tool that allows us to transfer files from the shell over protocols like HTTP, HTTPS, FTP, SFTP, FTPS, or SCP. This tool gives us the possibility to control and test websites remotely. Besides the remote servers' content, we can also view individual requests to look at the client's and server's communication. Usually, cURL is already installed on most Linux systems. This is another critical reason to familiarize ourselves with this tool, as it can make some processes much easier later on.
Working with Web Services
root@htb[/htb]$ curl http://localhost

<!DOCTYPE html PUBLIC "-//W3C//DTD XHTML 1.0 Transitional//EN" "http://www.w3.org/TR/xhtml1/DTD/xhtml1-transitional.dtd">
<html xmlns="http://www.w3.org/1999/xhtml">
  <!--
    Modified from the Debian original for Ubuntu
    Last updated: 2016-11-16
    See: https://launchpad.net/bugs/1288690
  -->
  <head>
    <meta http-equiv="Content-Type" content="text/html; charset=UTF-8" />
    <title>Apache2 Ubuntu Default Page: It works</title>
    <style type="text/css" media="screen">
...SNIP...
In the title tag, we can see that it is the same text as from our browser. This allows us to inspect the source code of the website and get information from it. Nevertheless, we will come back to this in another module.
An alternative to curl is the tool wget. With this tool, we can download files from FTP or HTTP servers directly from the terminal, and it serves as a good download manager. If we use wget in the same way, the difference to curl is that the website content is downloaded and stored locally, as shown in the following example.
root@htb[/htb]$ wget http://localhost

--2020-05-15 17:43:52--  http://localhost/
Resolving localhost (localhost)... 127.0.0.1
Connecting to localhost (localhost)|127.0.0.1|:80... connected.
HTTP request sent, awaiting response... 200 OK
Length: 10918 (11K) [text/html]
Saving to: 'index.html'

index.html                 100%[=======================================>]  10,66K  --.-KB/s    in 0s

2020-05-15 17:43:52 (33,0 MB/s) - ‘index.html’ saved [10918/10918]
Another option that is often used when it comes to data transfer is the use of Python 3. In this case, the web server's root directory is where the command is executed to start the server. For this example, we are in a directory where WordPress is installed and contains a "readme.html." Now, let us start the Python 3 web server and see if we can access it using the browser.
root@htb[/htb]$ python3 -m http.server

Serving HTTP on 0.0.0.0 port 8000 (http://0.0.0.0:8000/) ...

We can see what requests were made if we now look at our Python 3 web server's events.
root@htb[/htb]$ python3 -m http.server

Serving HTTP on 0.0.0.0 port 8000 (http://0.0.0.0:8000/) ...
127.0.0.1 - - [15/May/2020 17:56:29] "GET /readme.html HTTP/1.1" 200 -
127.0.0.1 - - [15/May/2020 17:56:29] "GET /wp-admin/css/install.css?ver=20100228 HTTP/1.1" 200 -
127.0.0.1 - - [15/May/2020 17:56:29] "GET /wp-admin/images/wordpress-logo.png HTTP/1.1" 200 -
127.0.0.1 - - [15/May/2020 17:56:29] "GET /wp-admin/images/wordpress-logo.svg?ver=20131107 HTTP/1.1" 200 -
Linux systems offer a variety of software tools for backing up and restoring data. These tools are designed to be efficient and secure, ensuring that data is protected while also allowing us to easily access the data we need.
When backing up data on an Ubuntu system, we can utilize tools such as:
Rsync is an open-source tool that allows us to quickly and securely back up files and folders to a remote location. It is particularly useful for transferring large amounts of data over the network, as it only transmits the changed parts of a file. It can also be used to create backups locally or on remote servers. If we need to back up large amounts of data over the network, Rsync might be the better option.
Duplicity is another graphical backup tool for Ubuntu that provides users with comprehensive data protection and secure backups. It also uses Rsync as a backend and additionally offers the possibility to encrypt backup copies and store them on remote storage media, such as FTP servers, or cloud storage services, such as Amazon S3.
Deja Dup is a graphical backup tool for Ubuntu that simplifies the backup process, allowing us to quickly and easily back up our data. It provides a user-friendly interface to create backup copies of data on local or remote storage media. It uses Rsync as a backend and also supports data encryption.
In order to ensure the security and integrity of backups, we should take steps to encrypt their backups. Encrypting backups ensures that sensitive data is protected from unauthorized access. Alternatively, we can encrypt backups on Ubuntu systems by utilizing tools such as GnuPG, eCryptfs, and LUKS.
Backing up and restoring data on Ubuntu systems is an essential part of data protection. By utilizing the tools discussed, we can ensure that our data is securely backed up and can be easily restored when needed.
In order to install Rsync on Ubuntu, we can use the apt package manager:
Install Rsync
root@htb[/htb]$ sudo apt install rsync -y
This will install the latest version of Rsync on the system. Once the installation is complete, we can begin using the tool to back up and restore data. To backup an entire directory using rsync, we can use the following command:
Rsync - Backup a local Directory to our Backup-Server
root@htb[/htb]$ rsync -av /path/to/mydirectory user@backup_server:/path/to/backup/directory
This command will copy the entire directory (/path/to/mydirectory) to a remote host (backup_server), to the directory /path/to/backup/directory. The option archive (-a) is used to preserve the original file attributes, such as permissions, timestamps, etc., and using the verbose (-v) option provides a detailed output of the progress of the rsync operation.
We can also add additional options to customize the backup process, such as using compression and incremental backups. We can do this like the following:
root@htb[/htb]$ rsync -avz --backup --backup-dir=/path/to/backup/folder --delete /path/to/mydirectory user@backup_server:/path/to/backup/directory
With this, we back up the mydirectory to the remote backup_server, preserving the original file attributes, timestamps, and permissions, and enabled compression (-z) for faster transfers. The --backup option creates incremental backups in the directory /path/to/backup/folder, and the --delete option removes files from the remote host that is no longer present in the source directory.
If we want to restore our directory from our backup server to our local directory, we can use the following command:
Rsync - Restore our Backup
root@htb[/htb]$ rsync -av user@remote_host:/path/to/backup/directory /path/to/mydirectory
To ensure the security of our rsync file transfer between our local host and our backup server, we can combine the use of SSH and other security measures. By using SSH, we are able to encrypt our data as it is being transferred, making it much more difficult for any unauthorized individual to access it. Additionally, we can also use firewalls and other security protocols to ensure that our data is kept safe and secure during the transfer. By taking these steps, we can be confident that our data is protected and our file transfer is secure. Therefore we tell rsync to use SSH like the following:
Secure Transfer of our Backup
root@htb[/htb]$ rsync -avz -e ssh /path/to/mydirectory user@backup_server:/path/to/backup/directory
The data transfer between our local host and the backup server occurs over the encrypted SSH connection, which provides confidentiality and integrity protection for the data being transferred. This encryption process ensures that the data is protected from any potential malicious actors who would otherwise be able to access and modify the data without authorization. The encryption key itself is also safeguarded by a comprehensive set of security protocols, making it even more difficult for any unauthorized person to gain access to the data. In addition, the encrypted connection is designed to be highly resistant to any attempts to breach security, allowing us to have confidence in the protection of the data being transferred.
To enable auto-synchronization using rsync, you can use a combination of cron and rsync to automate the synchronization process. Scheduling the cron job to run at regular intervals ensures that the contents of the two systems are kept in sync. This can be especially beneficial for organizations that need to keep their data synchronized across multiple machines. Furthermore, setting up auto-synchronization with rsync can be a great way to save time and effort, as it eliminates the need for manual synchronization. It also helps to ensure that the files and data stored in the systems are kept up-to-date and consistent, which helps to reduce errors and improve efficiency.
Therefore we create a new script called RSYNC_Backup.sh, which will trigger the rsync command to sync our local directory with the remote one.
RSYNC_Backup.sh
#!/bin/bash

rsync -avz -e ssh /path/to/mydirectory user@backup_server:/path/to/backup/directory
Then, in order to ensure that the script is able to execute properly, we must provide the necessary permissions. Additionally, it's also important to make sure that the script is owned by the correct user, as this will ensure that only the correct user has access to the script and that the script is not tampered with by any other user.
root@htb[/htb]$ chmod +x RSYNC_Backup.sh
After that, we can create a crontab that tells cron to run the script every hour at the 0th minute. We can adjust the timing to suit our needs. To do so, the crontab needs the following content:
Auto-Sync - Crontab
0 * * * * /path/to/RSYNC_Backup.sh
With this setup, cron will be responsible for executing the script at the desired interval, ensuring that the rsync command is run and the contents of the local directory are synchronized with the remote host.
File system management on Linux is a complex process that involves organizing and maintaining the data stored on a disk or other storage device. Linux is a powerful operating system that supports a wide range of file systems, including ext2, ext3, ext4, XFS, Btrfs, NTFS, and more. Each of these file systems offers unique features and benefits, and the best choice for any given situation will depend upon the specific requirements of the application or user. For example, ext2 is suitable for basic file system management tasks, while Btrfs offers robust data integrity and snapshot capabilities. Additionally, NTFS is useful when compatibility with Windows is required. No matter the situation, it is important to properly analyze the needs of the application or user before selecting a file system.
The Linux file system is based on the Unix file system, which is a hierarchical structure that is composed of various components. At the top of this structure is the inode table, the basis for the entire file system. The inode table is a table of information associated with each file and directory on a Linux system. Inodes contain metadata about the file or directory, such as its permissions, size, type, owner, and so on. The inode table is like a database of information about every file and directory on a Linux system, allowing the operating system to quickly access and manage files. Files can be stored in the Linux file system in one of two ways:
Regular files are the most common type of file, and they are stored in the root directory of the file system. Directories are used to store collections of files. When a file is stored in a directory, the directory is known as the parent directory for the files. In addition to regular files and directories, Linux also supports symbolic links, which are references to other files or directories. Symbolic links can be used to quickly access files that are located in different parts of the file system. Each file and directory needs to be managed in terms of permissions. Permissions control who has access to files and directories. Each file and directory has an associated set of permissions that determines who can read, write, and execute the file. The same permissions apply to all users, so if the permissions of one user are changed, all other users will also be affected.
root@htb[/htb]$ ls -il

total 0
10678872 -rw-r--r--  1 cry0l1t3  htb  234123 Feb 14 19:30 myscript.py
10678869 -rw-r--r--  1 cry0l1t3  htb   43230 Feb 14 11:52 notes.txt
Disk management on Linux involves managing physical storage devices, including hard drives, solid-state drives, and removable storage devices. The main tool for disk management on Linux is the fdisk, which allows us to create, delete, and manage partitions on a drive. It can also display information about the partition table, including the size and type of each partition. Partitioning a drive on Linux involves dividing the physical storage space into separate, logical sections. Each partition can then be formatted with a specific file system, such as ext4, NTFS, or FAT32, and can be mounted as a separate file system. The most common partitioning tool on Linux is also fdisk, gpart, and GParted.
Fdisk
root@htb[/htb]$ sudo fdisk -l

Disk /dev/vda: 160 GiB, 171798691840 bytes, 335544320 sectors
Units: sectors of 1 * 512 = 512 bytes
Sector size (logical/physical): 512 bytes / 512 bytes
I/O size (minimum/optimal): 512 bytes / 512 bytes
Disklabel type: dos
Disk identifier: 0x5223435f

Device     Boot     Start       End   Sectors  Size Id Type
/dev/vda1  *         2048 158974027 158971980 75.8G 83 Linux
/dev/vda2       158974028 167766794   8792767  4.2G 82 Linux swap / Solaris

Disk /dev/vdb: 452 KiB, 462848 bytes, 904 sectors
Units: sectors of 1 * 512 = 512 bytes
Sector size (logical/physical): 512 bytes / 512 bytes
I/O size (minimum/optimal): 512 bytes / 512 bytes
Each logical partition or drive needs to be assigned to a specific directory on Linux. This process is called mounting. Mounting involves attaching a drive to a specific directory, making it accessible to the file system hierarchy. Once a drive is mounted, it can be accessed and manipulated just like any other directory on the system. The mount tool is used to mount file systems on Linux, and the /etc/fstab file is used to define the default file systems that are mounted at boot time.
Mounted File systems at Boot
root@htb[/htb]$ cat /etc/fstab

# /etc/fstab: static file system information.
#
# Use 'blkid' to print the universally unique identifier for a device; this may
# be used with UUID= as a more robust way to name devices that works even if
# disks are added and removed. See fstab(5).
#
# <file system>                      <mount point>  <type>  <options>  <dump>  <pass>
UUID=3d6a020d-...SNIP...-9e085e9c927a /              btrfs   subvol=@,defaults,noatime,nodiratime,nodatacow,space_cache,autodefrag 0 1
UUID=3d6a020d-...SNIP...-9e085e9c927a /home          btrfs   subvol=@home,defaults,noatime,nodiratime,nodatacow,space_cache,autodefrag 0 2
UUID=21f7eb94-...SNIP...-d4f58f94e141 swap           swap    defaults,noatime 0 0
To view the currently mounted file systems, we can use the "mount" command without any arguments. The output will show a list of all the currently mounted file systems, including the device name, file system type, mount point, and options.
List Mounted Drives
root@htb[/htb]$ mount

sysfs on /sys type sysfs (rw,nosuid,nodev,noexec,relatime)
proc on /proc type proc (rw,nosuid,nodev,noexec,relatime)
udev on /dev type devtmpfs (rw,nosuid,relatime,size=4035812k,nr_inodes=1008953,mode=755,inode64)
devpts on /dev/pts type devpts (rw,nosuid,noexec,relatime,gid=5,mode=620,ptmxmode=000)
tmpfs on /run type tmpfs (rw,nosuid,nodev,noexec,relatime,size=814580k,mode=755,inode64)
/dev/vda1 on / type btrfs (rw,noatime,nodiratime,nodatasum,nodatacow,space_cache,autodefrag,subvolid=257,subvol=/@)
To mount a file system, we can use the mount command followed by the device name and the mount point. For example, to mount a USB drive with the device name /dev/sdb1 to the directory /mnt/usb, we would use the following command:
Mount a USB drive
root@htb[/htb]$ sudo mount /dev/sdb1 /mnt/usb
root@htb[/htb]$ cd /mnt/usb && ls -l

total 32
drwxr-xr-x 1 root root   18 Oct 14  2021 'Account Takeover'
drwxr-xr-x 1 root root   18 Oct 14  2021 'API Key Leaks'
drwxr-xr-x 1 root root   18 Oct 14  2021 'AWS Amazon Bucket S3'
drwxr-xr-x 1 root root   34 Oct 14  2021 'Command Injection'
drwxr-xr-x 1 root root   18 Oct 14  2021 'CORS Misconfiguration'
drwxr-xr-x 1 root root   52 Oct 14  2021 'CRLF Injection'
drwxr-xr-x 1 root root   30 Oct 14  2021 'CSRF Injection'
drwxr-xr-x 1 root root   18 Oct 14  2021 'CSV Injection'
drwxr-xr-x 1 root root 1166 Oct 14  2021 'CVE Exploits'
...SNIP...
To unmount a file system in Linux, we can use the umount command followed by the mount point of the file system we want to unmount. The mount point is the location in the file system where the file system is mounted and is accessible to us. For example, to unmount the USB drive that was previously mounted to the directory /mnt/usb, we would use the following command:
Unmount
root@htb[/htb]$ sudo umount /mnt/usb
It is important to note that we must have sufficient permissions to unmount a file system. We also cannot unmount a file system that is in use by a running process. To ensure that there are no running processes that are using the file system, we can use the lsof command to list the open files on the file system.
cry0l1t3@htb:~$ lsof | grep cry0l1t3

vncserver 6006        cry0l1t3  mem       REG      0,24       402274 /usr/bin/perl (path dev=0,26)
vncserver 6006        cry0l1t3  mem       REG      0,24      1554101 /usr/lib/locale/aa_DJ.utf8/LC_COLLATE (path dev=0,26)
vncserver 6006        cry0l1t3  mem       REG      0,24       402326 /usr/lib/x86_64-linux-gnu/perl-base/auto/POSIX/POSIX.so (path dev=0,26)
vncserver 6006        cry0l1t3  mem       REG      0,24       402059 /usr/lib/x86_64-linux-gnu/perl/5.32.1/auto/Time/HiRes/HiRes.so (path dev=0,26)
vncserver 6006        cry0l1t3  mem       REG      0,24      1444250 /usr/lib/x86_64-linux-gnu/libnss_files-2.31.so (path dev=0,26)
vncserver 6006        cry0l1t3  mem       REG      0,24       402327 /usr/lib/x86_64-linux-gnu/perl-base/auto/Socket/Socket.so (path dev=0,26)
vncserver 6006        cry0l1t3  mem       REG      0,24       402324 /usr/lib/x86_64-linux-gnu/perl-base/auto/IO/IO.so (path dev=0,26)
...SNIP...
If we find any processes that are using the file system, we need to stop them before we can unmount the file system. Additionally, we can also unmount a file system automatically when the system is shut down by adding an entry to the /etc/fstab file. The /etc/fstab file contains information about all the file systems that are mounted on the system, including the options for automatic mounting at boot time and other mount options. To unmount a file system automatically at shutdown, we need to add the noauto option to the entry in the /etc/fstab file for that file system. This would look like, for example, the following:
Fstab File
/dev/sda1 / ext4 defaults 0 0
/dev/sda2 /home ext4 defaults 0 0
/dev/sdb1 /mnt/usb ext4 rw,noauto,user 0 0
192.168.1.100:/nfs /mnt/nfs nfs defaults 0 0
Swap space is a crucial aspect of memory management in Linux, and it plays an important role in ensuring that the system runs smoothly, even when the available physical memory is depleted. When the system runs out of physical memory, the kernel transfers inactive pages of memory to the swap space, freeing up physical memory for use by active processes. This process is known as swapping.
Swap space can be created either during the installation of the operating system or at any time afterward using the mkswap and swapon commands. The mkswap command is used to set up a Linux swap area on a device or in a file, while the swapon command is used to activate a swap area. The size of the swap space is a matter of personal preference and depends on the amount of physical memory installed in the system and the type of usage the system will be subjected to. When creating a swap space, it is important to ensure that it is placed on a dedicated partition or file, separate from the rest of the file system. This helps to prevent fragmentation of the swap space and ensures that the system has adequate swap space available when it is needed. It is also important to ensure that the swap space is encrypted, as sensitive data may be stored in the swap space temporarily.
In addition to being used as an extension of physical memory, swap space can also be used for hibernation, which is a power management feature that allows the system to save its state to disk and then power off instead of shutting down completely. When the system is later powered on, it can restore its state from the swap space, returning to the state it was in before it was powered off.
Containerization is a process of packaging and running applications in isolated environments, such as a container, virtual machine, or serverless environment. Technologies like Docker, Docker Compose, and Linux Containers make this process possible in Linux systems. These technologies allow users to create, deploy, and manage applications quickly, securely, and efficiently. With these tools, users can configure their applications in various ways, allowing them to tailor the application to their needs. Additionally, containers are incredibly lightweight, perfect for running multiple applications simultaneously and providing scalability and portability. Containerization is a great way to ensure that applications are managed and deployed efficiently and securely.
Container security is an important aspect of containerization. They provide users a secure environment for running their applications since they are isolated from the host system and other containers. This isolation helps protect the host system from any malicious activities in the container while providing an additional layer of security for the applications running on the containers. Additionally, containers have the advantage of being lightweight, which makes them more difficult to compromise than traditional virtual machines. Furthermore, containers are easy to configure, making them ideal for running applications securely.
In addition to providing a secure environment, containers provide users with many other advantages because they make applications easier to deploy and manage and more efficient for running multiple applications simultaneously. However, methods still exist to escalate our privileges on containers and escape those.
Docker is an open-source platform for automating the deployment of applications as self-contained units called containers. It uses a layered filesystem and resource isolation features to provide flexibility and portability. Additionally, it provides a robust set of tools for creating, deploying, and managing applications, which helps streamline the containerization process.
Install Docker-Engine
Installing Docker is relatively straightforward. We can use the following script to install it on a Ubuntu host:
#!/bin/bash

# Preparation
sudo apt update -y
sudo apt install ca-certificates curl gnupg lsb-release -y
sudo mkdir -m 0755 -p /etc/apt/keyrings
curl -fsSL https://download.docker.com/linux/ubuntu/gpg | sudo gpg --dearmor -o /etc/apt/keyrings/docker.gpg
echo "deb [arch=$(dpkg --print-architecture) signed-by=/etc/apt/keyrings/docker.gpg] https://download.docker.com/linux/ubuntu $(lsb_release -cs) stable" | sudo tee /etc/apt/sources.list.d/docker.list > /dev/null

# Install Docker Engine
sudo apt update -y
sudo apt install docker-ce docker-ce-cli containerd.io docker-buildx-plugin docker-compose-plugin -y

# Add user htb-student to the Docker group
sudo usermod -aG docker htb-student
echo '[!] You need to log out and log back in for the group changes to take effect.'

# Test Docker installation
docker run hello-world
The Docker engine and specific Docker images are needed to run a container. These can be obtained from the Docker Hub, a repository of pre-made images, or created by the user. The Docker Hub is a cloud-based registry for software repositories or a library for Docker images. It is divided into a public and a private area. The public area allows users to upload and share images with the community. It also contains official images from the Docker development team and established open-source projects. Images uploaded to a private area of the registry are not publicly accessible. They can be shared within a company or with teams and acquaintances.
Creating a Docker image is done by creating a Dockerfile, which contains all the instructions the Docker engine needs to create the container. We can use Docker containers as our “file hosting” server when transferring specific files to our target systems. Therefore, we must create a Dockerfile based on Ubuntu 22.04 with Apache and SSH server running. With this, we can use scp to transfer files to the docker image, and Apache allows us to host files and use tools like curl, wget, and others on the target system to download the required files. Such a Dockerfile could look like the following:
Dockerfile
# Use the latest Ubuntu 22.04 LTS as the base image
FROM ubuntu:22.04

# Update the package repository and install the required packages
RUN apt-get update && \
    apt-get install -y \
        apache2 \
        openssh-server \
        && \
    rm -rf /var/lib/apt/lists/*

# Create a new user called "student"
RUN useradd -m docker-user && \
    echo "docker-user:password" | chpasswd

# Give the htb-student user full access to the Apache and SSH services
RUN chown -R docker-user:docker-user /var/www/html && \
    chown -R docker-user:docker-user /var/run/apache2 && \
    chown -R docker-user:docker-user /var/log/apache2 && \
    chown -R docker-user:docker-user /var/lock/apache2 && \
    usermod -aG sudo docker-user && \
    echo "docker-user ALL=(ALL) NOPASSWD: ALL" >> /etc/sudoers

# Expose the required ports
EXPOSE 22 80

# Start the SSH and Apache services
CMD service ssh start && /usr/sbin/apache2ctl -D FOREGROUND
After we have defined our Dockerfile, we need to convert it into an image. With the build command, we take the directory with the Dockerfile, execute the steps from the Dockerfile, and store the image in our local Docker Engine. If one of the steps fails due to an error, the container creation will be aborted. With the option -t, we give our container a tag, so it is easier to identify and work with later.
Docker Build
root@htb[/htb]$ docker build -t FS_docker .
Once the Docker image has been created, it can be executed through the Docker engine, making it a very efficient and easy way to run a container. It is similar to the virtual machine concept, based on images. Still, these images are read-only templates and provide the file system necessary for runtime and all parameters. A container can be considered a running process of an image. When a container is to be started on a system, a package with the respective image is first loaded if unavailable locally. We can start the container by the following command docker run:
Docker Run - Syntax
root@htb[/htb]$ docker run -p <host port>:<docker port> -d <docker container name>
Docker Run
root@htb[/htb]$ docker run -p 8022:22 -p 8080:80 -d FS_docker
In this case, we start a new container from the image FS_docker and map the host ports 8022 and 8080 to container ports 22 and 80, respectively. The container runs in the background, allowing us to access the SSH and HTTP services inside the container using the specified host ports.
Docker Management
When managing Docker containers, Docker provides a comprehensive suite of tools that enable us to easily create, deploy, and manage containers. With these powerful tools, we can list, start and stop containers and effectively manage them, ensuring seamless execution of applications. Some of the most commonly used Docker management commands are:
| Command | Description |
|---|---|
docker ps |
List all running containers |
docker stop |
Stop a running container. |
docker start |
Start a stopped container. |
docker restart |
Restart a running container. |
docker rm |
Remove a container. |
docker rmi |
Remove a Docker image. |
docker logs |
View the logs of a container. |
It is worth noting that these commands, used in Docker, can be combined with various options to provide additional functionality. For example, we can specify which ports to expose, mount volumes, or set environment variables. This allows us to customize our Docker containers to suit our needs and requirements. When working with Docker images, it's important to note that any changes made to an existing image are not permanent. Instead, we need to create a new image that inherits from the original and includes the desired changes.
This is done by creating a new Dockerfile that starts with the FROM statement, which specifies the base image, and then adds the necessary commands to make the desired changes. Once the Dockerfile is created, we can use the docker build command to build the new image, tagging it with a unique name to help identify it. This process ensures that the original image remains intact while allowing us to create a new image with the desired changes.
It is important to note that Docker containers are designed to be immutable, meaning that any changes made to a container during runtime are lost when the container is stopped. Therefore, it is recommended to use container orchestration tools such as Docker Compose or Kubernetes to manage and scale containers in a production environment.
Linux Containers (LXC) is a virtualization technology that allows multiple isolated Linux systems to run on a single host. It uses resource isolation features, such as cgroups and namespaces, to provide a lightweight virtualization solution. LXC also provides a rich set of tools and APIs for managing and configuring containers, contributing to its popularity as a containerization technology. By combining the advantages of LXC with the power of Docker, users can achieve a fully-fledged containerization experience in Linux systems.
Both LXC and Docker are containerization technologies that allow for applications to be packaged and run in isolated environments. However, there are some differences between the two that can be distinguished based on the following categories:
LXC is a lightweight virtualization technology that uses resource isolation features of the Linux kernel to provide an isolated environment for applications. In LXC, images are manually built by creating a root filesystem and installing the necessary packages and configurations. Those containers are tied to the host system, may not be easily portable, and may require more technical expertise to configure and manage. LXC also provides some security features but may not be as robust as Docker.
On the other hand, Docker is an application-centric platform that builds on top of LXC and provides a more user-friendly interface for containerization. Its images are built using a Dockerfile, which specifies the base image and the steps required to build the image. Those images are designed to be portable so they can be easily moved from one environment to another. Docker provides a more user-friendly interface for containerization, with a rich set of tools and APIs for managing and configuring containers with a more secure environment for running applications.
To install LXC on a Linux distribution, we can use the distribution's package manager. For example, on Ubuntu, we can use the apt package manager to install LXC with the following command:
Install LXC
root@htb[/htb]$ sudo apt-get install lxc lxc-utils -y
Once LXC is installed, we can start creating and managing containers on the Linux host. It is worth noting that LXC requires the Linux kernel to support the necessary features for containerization. Most modern Linux kernels have built-in support for containerization, but some older kernels may require additional configuration or patching to enable support for LXC.
Creating an LXC Container
To create a new LXC container, we can use the lxc-create command followed by the container's name and the template to use. For example, to create a new Ubuntu container named linuxcontainer, we can use the following command:
root@htb[/htb]$ sudo lxc-create -n linuxcontainer -t ubuntu
Managing LXC Containers
When working with LXC containers, several tasks are involved in managing them. These tasks include creating new containers, configuring their settings, starting and stopping them as necessary, and monitoring their performance. Fortunately, there are many command-line tools and configuration files available that can assist with these tasks. These tools enable us to quickly and easily manage our containers, ensuring they are optimized for our specific needs and requirements. By leveraging these tools effectively, we can ensure that our LXC containers run efficiently and effectively, allowing us to maximize our system's performance and capabilities.
| Command | Description |
|---|---|
lxc-ls |
List all existing containers |
lxc-stop -n <container> |
Stop a running container. |
lxc-start -n <container> |
Start a stopped container. |
lxc-restart -n <container> |
Restart a running container. |
lxc-config -n <container name> -s storage |
Manage container storage |
lxc-config -n <container name> -s network |
Manage container network settings |
lxc-config -n <container name> -s security |
Manage container security settings |
lxc-attach -n <container> |
Connect to a container. |
lxc-attach -n <container> -f /path/to/share |
Connect to a container and share a specific directory or file. |
As penetration testers, we may encounter situations where we must test software or systems with dependencies or configurations that are difficult to reproduce on our machines. This is where Linux containers come in handy. Since a Linux container is a lightweight, standalone executable package containing all the necessary dependencies and configuration files to run a specific software or system, it provides an isolated environment that can be run on any Linux machine, regardless of the host's configuration.
Containers are useful, especially because they allow us to quickly spin up an isolated environment specific to our testing needs. For example, we might need to test a web application requiring a specific database or web server version. Rather than setting up these components on our machine, which can be time-consuming and error-prone, we can create a container that contains the exact configuration we need.
We can also use them to test exploits or malware in a controlled environment where we create a container that simulates a vulnerable system or network and then use that container to safely test exploits without risking damaging our machines or networks. However, it is important to configure LXC container security to prevent unauthorized access or malicious activities inside the container. This can be achieved by implementing several security measures, such as:
LXC containers can be accessed using various methods, such as SSH or console. It is recommended to restrict access to the container by disabling unnecessary services, using secure protocols, and enforcing strong authentication mechanisms. For example, we can disable SSH access to the container by removing the openssh-server package or by configuring SSH only to allow access from trusted IP addresses. Those containers also share the same kernel as the host system, meaning they can access all the resources available on the system. We can use resource limits or quotas to prevent containers from consuming excessive resources. For example, we can use cgroups to limit the amount of CPU, memory, or disk space that a container can use.
Securing LXC
Let us limit the resources to the container. In order to configure cgroups for LXC and limit the CPU and memory, a container can create a new configuration file in the /usr/share/lxc/config/<container name>.conf directory with the name of our container. For example, to create a configuration file for a container named linuxcontainer, we can use the following command:
root@htb[/htb]$ sudo vim /usr/share/lxc/config/linuxcontainer.conf
In this configuration file, we can add the following lines to limit the CPU and memory the container can use.
lxc.cgroup.cpu.shares = 512
lxc.cgroup.memory.limit_in_bytes = 512M
When working with containers, it is important to understand the lxc.cgroup.cpu.shares parameter. This parameter determines the CPU time a container can use in relation to the other containers on the system. By default, this value is set to 1024, meaning the container can use up to its fair share of CPU time. However, if we set this value to 512, for example, the container can only use half of the CPU time available on the system. This can be a useful way to manage resources and ensure all containers have the necessary access to CPU time.
One of the key parameters in controlling the resource allocation of a container is the lxc.cgroup.memory.limit_in_bytes parameter. This parameter allows you to set the maximum amount of memory a container can use. It's important to note that this value can be specified in a variety of units, including bytes, kilobytes (K), megabytes (M), gigabytes (G), or terabytes (T), allowing for a high degree of granularity in defining container resource limits. After adding these two lines, we can save and close the file by typing:
[Esc]:wqTo apply these changes, we must restart the LXC service.
root@htb[/htb]$ sudo systemctl restart lxc.service
LXC use namespaces to provide an isolated environment for processes, networks, and file systems from the host system. Namespaces are a feature of the Linux kernel that allows for creating isolated environments by providing an abstraction of system resources.
Namespaces are a crucial aspect of containerization as they provide a high degree of isolation for the container's processes, network interfaces, routing tables, and firewall rules. Each container is allocated a unique process ID (pid) number space, isolated from the host system's process IDs. This ensures that the container's processes cannot interfere with the host system's processes, enhancing system stability and reliability. Additionally, each container has its own network interfaces (net), routing tables, and firewall rules, which are completely separate from the host system's network interfaces. Any network-related activity within the container is cordoned off from the host system's network, providing an extra layer of network security.
Moreover, containers come with their own root file system (mnt), which is entirely different from the host system's root file system. This separation between the two ensures that any changes or modifications made within the container's file system do not affect the host system's file system. However, it is important to remember that while namespaces provide a high level of isolation, they do not provide complete security. Therefore, it is always advisable to implement additional security measures to further protect the container and the host system from potential security breaches.
Here are 9 optional exercises to practice LXC:
| 1 | Install LXC on your machine and create your first container. |
| 2 | Configure the network settings for your LXC container. |
| 3 | Create a custom LXC image and use it to launch a new container. |
| 4 | Configure resource limits for your LXC containers (CPU, memory, disk space). |
| 5 | Explore the lxc-* commands for managing containers. |
| 6 | Use LXC to create a container running a specific version of a web server (e.g., Apache, Nginx). |
| 7 | Configure SSH access to your LXC containers and connect to them remotely. |
| 8 | Create a container with persistence, so changes made to the container are saved and can be reused. |
| 9 | Use LXC to test software in a controlled environment, such as a vulnerable web application or malware. |
As a penetration tester, one of the key skills required is configuring and managing network settings on Linux systems. This skill is valuable in setting up testing environments, controlling network traffic, or identifying and exploiting vulnerabilities. By understanding Linux's network configuration options, we can tailor our testing approach to suit our specific needs and optimize our results.
One of the primary network configuration tasks is configuring network interfaces. This includes assigning IP addresses, configuring network devices such as routers and switches, and setting up network protocols. It is essential to thoroughly understand the network protocols and their specific use cases, such as TCP/IP, DNS, DHCP, and FTP. Additionally, we should be familiar with different network interfaces, including wireless and wired connections, and be able to troubleshoot connectivity issues.
Network access control is another critical component of network configuration. As penetration testers, we should be familiar with the importance of NAC for network security and the different NAC technologies available. These include:
We should also understand the different NAC enforcement mechanisms and know how to configure Linux network devices for NAC. This includes setting up SELinux policies, configuring AppArmor profiles, and using TCP wrappers to control access.
Monitoring network traffic is also an essential part of network configuration. Therefore, we should know how to configure network monitoring and logging and be able to analyze network traffic for security purposes. Tools such as syslog, rsyslog, ss, lsof, and the ELK stack can be used to monitor network traffic and identify security issues.
Moreover, good knowledge of network troubleshooting tools is crucial for identifying vulnerabilities and interacting with other networks and hosts. In addition to the tools we mentioned, we can use ping, nslookup, and nmap to diagnose and enumerate networks. These tools can provide valuable insight into network traffic, packet loss, latency, DNS resolution, etc. By understanding how to use these tools effectively, we can quickly pinpoint the root cause of any network problem and take the necessary steps to resolve it.
When working with Ubuntu, you can configure local network interfaces using the ifconfig or the ip command. These powerful commands allow us to view and configure our system's network interfaces. Whether we're looking to make changes to our existing network setup or need to check on the status of our interfaces, these commands can greatly simplify the process. Moreover, developing a firm grasp on the intricacies of network interfaces is an essential ability in the modern, interconnected world. With the rapid advancement of technology and the increasing reliance on digital communication, having a comprehensive knowledge of how to work with network interfaces can enable you to navigate the diverse array of networks that exist nowadays effectively.
One way to obtain information regarding network interfaces, such as IP addresses, netmasks, and status, is by using the ifconfig command. By executing this command, we can view the available network interfaces and their respective attributes in a clear and organized manner. This information can be particularly useful when troubleshooting network connectivity issues or setting up a new network configuration. It should be noted that the ifconfig command has been deprecated in newer versions of Linux and replaced by the ip command, which offers more advanced features. Nevertheless, the ifconfig command is still widely used in many Linux distributions and continues to be a reliable tool for network management.
Network Settings
cry0l1t3@htb:~$ ifconfig

eth0: flags=4163<UP,BROADCAST,RUNNING,MULTICAST>  mtu 1500
        inet 178.62.32.126  netmask 255.255.192.0  broadcast 178.62.63.255
        inet6 fe80::88d9:faff:fecf:797a  prefixlen 64  scopeid 0x20<link>
        ether 8a:d9:fa:cf:79:7a  txqueuelen 1000  (Ethernet)
        RX packets 7910  bytes 717102 (700.2 KiB)
        RX errors 0  dropped 0  overruns 0  frame 0
        TX packets 7072  bytes 24215666 (23.0 MiB)
        TX errors 0  dropped 0 overruns 0  carrier 0  collisions 0

eth1: flags=4163<UP,BROADCAST,RUNNING,MULTICAST>  mtu 1500
        inet 10.106.0.66  netmask 255.255.240.0  broadcast 10.106.15.255
        inet6 fe80::b8ab:52ff:fe32:1f33  prefixlen 64  scopeid 0x20<link>
        ether ba:ab:52:32:1f:33  txqueuelen 1000  (Ethernet)
        RX packets 14  bytes 1574 (1.5 KiB)
        RX errors 0  dropped 0  overruns 0  frame 0
        TX packets 15  bytes 1700 (1.6 KiB)
        TX errors 0  dropped 0 overruns 0  carrier 0  collisions 0

lo: flags=73<UP,LOOPBACK,RUNNING>  mtu 65536
        inet 127.0.0.1  netmask 255.0.0.0
        inet6 ::1  prefixlen 128  scopeid 0x10<host>
        loop  txqueuelen 1000  (Local Loopback)
        RX packets 15948  bytes 24561302 (23.4 MiB)
        RX errors 0  dropped 0  overruns 0  frame 0
        TX packets 15948  bytes 24561302 (23.4 MiB)
        TX errors 0  dropped 0 overruns 0  carrier 0  collisions 0


cry0l1t3@htb:~$ ip addr

1: lo: <LOOPBACK,UP,LOWER_UP> mtu 65536 qdisc noqueue state UNKNOWN group default qlen 1000
    link/loopback 00:00:00:00:00:00 brd 00:00:00:00:00:00
    inet 127.0.0.1/8 scope host lo
       valid_lft forever preferred_lft forever
    inet6 ::1/128 scope host
       valid_lft forever preferred_lft forever
2: eth0: <BROADCAST,MULTICAST,UP,LOWER_UP> mtu 1500 qdisc fq_codel state UP group default qlen 1000
    link/ether 8a:d9:fa:cf:79:7a brd ff:ff:ff:ff:ff:ff
    altname enp0s3
    altname ens3
    inet 178.62.32.126/18 brd 178.62.63.255 scope global dynamic eth0
       valid_lft 85274sec preferred_lft 85274sec
    inet6 fe80::88d9:faff:fecf:797a/64 scope link
       valid_lft forever preferred_lft forever
3: eth1: <BROADCAST,MULTICAST,UP,LOWER_UP> mtu 1500 qdisc fq_codel state UP group default qlen 1000
    link/ether ba:ab:52:32:1f:33 brd ff:ff:ff:ff:ff:ff
    altname enp0s4
    altname ens4
    inet 10.106.0.66/20 brd 10.106.15.255 scope global dynamic eth1
       valid_lft 85274sec preferred_lft 85274sec
    inet6 fe80::b8ab:52ff:fe32:1f33/64 scope link
       valid_lft forever preferred_lft forever
When it comes to activating network interfaces, ifconfig and ip commands are two commonly used tools. These commands allow users to modify and activate settings for a specific interface, such as eth0. We can adjust the network settings to suit our needs by using the appropriate syntax and specifying the interface name.
Activate Network Interface
root@htb[/htb]$ sudo ifconfig eth0 up     # OR
root@htb[/htb]$ sudo ip link set eth0 up
One way to allocate an IP address to a network interface is by utilizing the ifconfig command. We must specify the interface's name and IP address as arguments to do this. This is a crucial step in setting up a network connection. The IP address serves as a unique identifier for the interface and enables the communication between devices on the network.
Assign IP Address to an Interface
root@htb[/htb]$ sudo ifconfig eth0 192.168.1.2
To set the netmask for a network interface, we can run the following command with the name of the interface and the netmask:
Assign a Netmask to an Interface
root@htb[/htb]$ sudo ifconfig eth0 netmask 255.255.255.0
When we want to set the default gateway for a network interface, we can use the route command with the add option. This allows us to specify the gateway's IP address and the network interface to which it should be applied. By setting the default gateway, we are designating the IP address of the router that will be used to send traffic to destinations outside the local network. Ensuring that the default gateway is set correctly is important, as incorrect configuration can lead to connectivity issues.
Assign the Route to an Interface
root@htb[/htb]$ sudo route add default gw 192.168.1.1 eth0
When configuring a network interface, it is often necessary to set Domain Name System (DNS) servers to ensure proper network functionality. DNS servers translate domain names into IP addresses, allowing devices to connect with each other on the internet. By setting those, we can ensure that their devices can communicate with other devices and access websites and other online resources. Without proper DNS server configuration, devices may experience network connectivity issues and be unable to access certain online resources. This can be achieved by updating the /etc/resolv.conf file with the appropriate DNS server information. The /etc/resolv.conf file is a plain text file containing the system's DNS information. The system can properly resolve domain names to IP addresses by adding the required DNS servers to this file. It is important to note that any changes made to this file will only apply to the current session and must be updated if the system is restarted or the network configuration is changed.
Editing DNS Settings
root@htb[/htb]$ sudo vim /etc/resolv.conf
/etc/resolv.conf
nameserver 8.8.8.8
nameserver 8.8.4.4
After completing the necessary modifications to the network configuration, it is essential to ensure that these changes are saved to persist across reboots. This can be achieved by editing the /etc/network/interfaces file, which defines network interfaces for Linux-based operating systems. Thus, it is vital to save any changes made to this file to avoid any potential issues with network connectivity.
Editing Interface
root@htb[/htb]$ sudo vim /etc/network/interfaces
This will open the interfaces file in the vim editor. We can add the network configuration settings to the file like this:
/etc/network/interfaces
auto eth0
iface eth0 inet static
  address 192.168.1.2
  netmask 255.255.255.0
  gateway 192.168.1.1
  dns-nameservers 8.8.8.8 8.8.4.4
By setting the eth0 network interface to use a static IP address of 192.168.1.2, with a netmask of 255.255.255.0 and a default gateway of 192.168.1.1, we can ensure that your network connection remains stable and reliable. Additionally, by specifying DNS servers of 8.8.8.8 and 8.8.4.4, we can ensure that our computer can easily access the internet and resolve domain names. Once we have made these changes to the configuration file, saving the file and exiting the editor is important. After that, we must restart the networking service to apply the changes.
Restart Networking Service
root@htb[/htb]$ sudo systemctl restart networking
Network access control (NAC) is a crucial component of network security, especially in today's era of increasing cyber threats. As a penetration tester, it is vital to understand the significance of NAC in protecting the network and the various NAC technologies that can be utilized to enhance security measures. NAC is a security system that ensures that only authorized and compliant devices are granted access to the network, preventing unauthorized access, data breaches, and other security threats. By implementing NAC, organizations can be confident in their ability to protect their assets and data from cybercriminals who always seek to exploit system vulnerabilities. The following are the different NAC technologies that can be used to enhance security measures:
These technologies are designed to provide different levels of access control and security. Each technology has its unique characteristics and is suitable for different use cases. As a penetration tester, it is essential to understand these technologies and their specific use cases to test and evaluate the network's security effectively.
Discretionary Access Control
DAC is a crucial component of modern security systems as it helps organizations provide access to their resources while managing the associated risks of unauthorized access. It is a widely used access control system that enables users to manage access to their resources by granting resource owners the responsibility of controlling access permissions to their resources. This means that users and groups who own a specific resource can decide who has access to their resources and what actions they are authorized to perform. These permissions can be set for reading, writing, executing, or deleting the resource.
Mandatory Access Control
MAC is used in infrastructure that provides more fine-grained control over resource access than DAC systems. Those systems define rules that determine resource access based on the resource's security level and the user's security level or process requesting access. Each resource is assigned a security label that identifies its security level, and each user or process is assigned a security clearance that identifies its security level. Access to a resource is only granted if the user's or process's security level is equal to or greater than the security level of the resource. MAC is often used in operating systems and applications that require a high level of security, such as military or government systems, financial systems, and healthcare systems. MAC systems are designed to prevent unauthorized access to resources and minimize the impact of security breaches.
Role-based Access Control
RBAC assigns permissions to users based on their roles within an organization. Users are assigned roles based on their job responsibilities or other criteria, and each role is granted a set of permissions that determine the actions they can perform. RBAC simplifies the management of access permissions, reduces the risk of errors, and ensures that users can access only the resources necessary to perform their job functions. It can restrict access to sensitive resources and data, limit the impact of security breaches, and ensure compliance with regulatory requirements. Compared to Discretionary Access Control (DAC) systems, RBAC provides a more flexible and scalable approach to managing resource access. In an RBAC system, each user is assigned one or more roles, and each role is assigned a set of permissions that define the user's actions. Resource access is granted based on the user's assigned role rather than their identity or ownership of the resource. RBAC systems are typically used in environments with many users and resources, such as large organizations, government agencies, and financial institutions.
Network monitoring involves capturing, analyzing, and interpreting network traffic to identify security threats, performance issues, and suspicious behavior. The primary goal of analyzing and monitoring network traffic is identifying security threats and vulnerabilities. For example, as penetration testers, we can capture credentials when someone uses an unencrypted connection and tries to log in to an FTP server. As a result, we will obtain this user’s credentials that might help us to infiltrate the network even further or escalate our privileges to a higher level. In short, by analyzing network traffic, we can gain insights into network behavior and identify patterns that may indicate security threats. Such analysis includes detecting suspicious network activity, identifying malicious traffic, and identifying potential security risks. However, we cover this vast topic in the Intro to Network Traffic Analysis module, where we use several tools for network monitoring on Linux systems like Ubuntu and Windows systems, like Wireshark, tshark, and Tcpdump.
Network troubleshooting is an essential process that involves diagnosing and resolving network issues that can adversely affect the performance and reliability of the network. This process is critical for ensuring the network operates optimally and avoiding disruptions that could impact business operations during our penetration tests. It also involves identifying, analyzing, and implementing solutions to resolve problems. Such problems include connectivity problems, slow network speeds, and network errors. Various tools can help us identify and resolve issues regarding network troubleshooting on Linux systems. Some of the most commonly used tools include:
By using these tools and others like them, we can better understand how the network functions and quickly diagnose any issues that may arise. For example, ping is a command-line tool used to test connectivity between two devices. It sends packets to a remote host and measures the time to return them. To use ping, we can enter the following command:
Ping
root@htb[/htb]$ ping <remote_host>
For example, pinging the Google DNS server will send ICMP packets to the Google DNS server and display the response times.
root@htb[/htb]$ ping 8.8.8.8

PING 8.8.8.8 (8.8.8.8) 56(84) bytes of data.
64 bytes from 8.8.8.8: icmp_seq=1 ttl=119 time=1.61 ms
64 bytes from 8.8.8.8: icmp_seq=2 ttl=119 time=1.06 ms
64 bytes from 8.8.8.8: icmp_seq=3 ttl=119 time=0.636 ms
64 bytes from 8.8.8.8: icmp_seq=4 ttl=119 time=0.685 ms
^C
--- 8.8.8.8 ping statistics ---
4 packets transmitted, 4 received, 0% packet loss, time 3017ms
rtt min/avg/max/mdev = 0.636/0.996/1.607/0.388 ms
Another tool is the traceroute, which traces the route packets take to reach a remote host. It sends packets with increasing Time-to-Live (TTL) values to a remote host and displays the IP addresses of the devices that the packets pass through. For example, to trace the route to the Google DNS server, we would enter the following command:
Traceroute
root@htb[/htb]$ traceroute www.inlanefreight.com

traceroute to www.inlanefreight.com (134.209.24.248), 30 hops max, 60 byte packets
 1  * * *
 2  10.80.71.5 (10.80.71.5)  2.716 ms  2.700 ms  2.730 ms
 3  * * *
 4  10.80.68.175 (10.80.68.175)  7.147 ms  7.132 ms 10.80.68.161 (10.80.68.161)  7.393 ms
This will display the IP addresses of the devices that the packets pass through to reach the Google DNS server. The output of a traceroute command shows how it is used to trace the path of packets to the website www.inlanefreight.com, which has an IP address of 134.209.24.248. Each line of the output contains valuable information.
When setting up a network connection, it's important to specify the destination host and IP address. In this example, the destination host is 134.209.24.248, and the maximum number of hops allowed is 30. This ensures that the connection is established efficiently and reliably. By providing this information, the system can route traffic to the correct destination and limit the number of intermediate stops the data needs to make.
The second line shows the first hop in the traceroute, which is the local network gateway with the IP address 10.80.71.5, followed by the next three columns show the time it took for each of the three packets sent to reach the gateway in milliseconds (2.716 ms, 2.700 ms, and 2.730 ms).
Next, we see the second hop in the traceroute. However, there was no response from the device at that hop, indicated by the three asterisks instead of the IP address. This could mean the device is down, blocking ICMP traffic, or a network issue caused the packets to drop.
In the fourth line, we can see the third hop in the traceroute, consisting of two devices with IP addresses 10.80.68.175 and 10.80.68.161, and again the next three columns show the time it took for each of the three packets to reach the first device (7.147 ms, 7.132 ms, and 7.393 ms).
Netstat
Netstat is used to display active network connections and their associated ports. It can be used to identify network traffic and troubleshoot connectivity issues. To use netstat, we can enter the following command:
root@htb[/htb]$ netstat -a

Active Internet connections (servers and established)
Proto Recv-Q Send-Q Local Address           Foreign Address         State
tcp        0      0 localhost:5901          0.0.0.0:*               LISTEN
tcp        0      0 0.0.0.0:sunrpc          0.0.0.0:*               LISTEN
tcp        0      0 0.0.0.0:http            0.0.0.0:*               LISTEN
tcp        0      0 0.0.0.0:ssh             0.0.0.0:*               LISTEN
...SNIP...
We can expect to receive detailed information about each connection when using this tool. This includes the protocol used, the number of bytes received and sent, IP addresses, port numbers of both local and remote devices, and the current connection state. The output provides valuable insights into the network activity on the system, highlighting four specific connections currently active and listening on specific ports. These connections include the VNC remote desktop software, the Sun Remote Procedure Call service, the HTTP protocol for web traffic, and the SSH protocol for secure remote shell access. By knowing which ports are used by which services, users can quickly identify any network issues and troubleshoot accordingly. The most common network issues we will encounter during our penetration tests include the following:
Each issue, along with common causes that may include misconfigured firewalls or routers, damaged network cables or connectors, incorrect network settings, hardware failure, incorrect DNS server settings, DNS server failure, misconfigured DNS records, network congestion, outdated network hardware, incorrectly configured network settings, unpatched software or firmware, and lack of proper security controls. Understanding these common network issues and their causes is important for effectively identifying and exploiting vulnerabilities in network systems during our testing.
Several mechanisms are highly effective in securing Linux systems in keeping our and other companies' data safe. Three such mechanisms are SELinux, AppArmor, and TCP wrappers. These tools are designed to safeguard Linux systems against various security threats, from unauthorized access to malicious attacks, especially while conducting a penetration test. There is almost no worse scenario than when a company is compromised due to a penetration test. By implementing these security measures and ensuring that we set up corresponding protection against potential attackers, we can significantly reduce the risk of data leaks and ensure our systems remain secure. While these tools share some similarities, they also have important differences.
SELinux is a MAC system that is built into the Linux kernel. It is designed to provide fine-grained access control over system resources and applications. SELinux works by enforcing a policy that defines the access controls for each process and file on the system. It provides a higher level of security by limiting the damage that a compromised process can do.
AppArmor is also a MAC system that provides a similar level of control over system resources and applications, but it works slightly differently. AppArmor is implemented as a Linux Security Module (LSM) and uses application profiles to define the resources that an application can access. AppArmor is typically easier to use and configure than SELinux but may not provide the same level of fine-grained control.
TCP wrappers are a host-based network access control mechanism that can be used to restrict access to network services based on the IP address of the client system. It works by intercepting incoming network requests and comparing the IP address of the client system to the access control rules. These are useful for limiting access to network services from unauthorized systems.
Regarding similarities, the three security mechanisms share the common goal of ensuring the safety and security of Linux systems. In addition to providing extra protection, they can restrict access to resources and services, thus reducing the risk of unauthorized access and data breaches. It's also worth noting that these mechanisms are readily available as part of most Linux distributions, making them accessible to us to enhance their systems' security. Furthermore, these mechanisms can be easily customized and configured using standard tools and utilities, making them a convenient choice for Linux users.
In terms of differences, SELinux and AppArmor are both MAC systems that provide fine-grained access control over system resources but work in different ways. SELinux is built into the kernel and is more complex to configure and use, while AppArmor is implemented as a module and is typically easier to use. On the other hand, TCP wrappers are a host-based network access control mechanism designed to restrict access to network services based on the IP address of the client system. It is a simpler mechanism than SELinux and AppArmor but is useful for limiting access to network services from unauthorized systems.
As we navigate the world of Linux, we inevitably encounter a wide range of technologies, applications, and services that we need to become familiar with. This is a crucial skill, particularly if we work in cybersecurity and strive to improve our expertise continuously. For this reason, we highly recommend dedicating time to learning about configuring important security measures such as SELinux, AppArmor, and TCP wrappers on your own. By taking on this (optional but highly efficient) challenge, you'll deepen your understanding of these technologies, build up your problem-solving skills, and gain valuable experience that will serve you well in the future. We highly recommend to use a personal VM and make snapshots before making changes.
When it comes to implementing cybersecurity measures, there is no one-size-fits-all approach. It is important to consider the specific information you want to protect and the tools you will use to do so. However, you can practice and implement several optional tasks with others in the Discord channel to increase your knowledge and skills in this area. By taking advantage of the helpfulness of others and sharing your own expertise, you can deepen your understanding of cybersecurity and help others do the same. Remember, explaining concepts to others is essential to teaching and learning.
SELinux
| 1. | Install SELinux on your VM. |
| 2. | Configure SELinux to prevent a user from accessing a specific file. |
| 3. | Configure SELinux to allow a single user to access a specific network service but deny access to all others. |
| 4. | Configure SELinux to deny access to a specific user or group for a specific network service. |
AppArmor
| 5. | Configure AppArmor to prevent a user from accessing a specific file. |
| 6. | Configure AppArmor to allow a single user to access a specific network service but deny access to all others. |
| 7. | Configure AppArmor to deny access to a specific user or group for a specific network service. |
TCP Wrappers
| 8. | Configure TCP wrappers to allow access to a specific network service from a specific IP address. |
| 9. | Configure TCP wrappers to deny access to a specific network service from a specific IP address. |
| 10. | Configure TCP wrappers to allow access to a specific network service from a range of IP addresses. |
Remote desktop protocols are used in Windows, Linux, and macOS to provide graphical remote access to a system. The administrators can utilize remote desktop protocols in many scenarios like troubleshooting, software or system upgrading, and remote systems administration. The administrator needs to connect to the remote system they will administer remotely, and therefore, they use the appropriate protocol accordingly. In addition, they can log in using different protocols if they want to install an application on their remote system. The most common protocols for this usage are RDP (Windows) and VNC (Linux).
The XServer is the user-side part of the X Window System network protocol (X11 / X). The X11 is a fixed system that consists of a collection of protocols and applications that allow us to call application windows on displays in a graphical user interface. X11 is predominant on Unix systems, but X servers are also available for other operating systems. Nowadays, the XServer is a part of almost every desktop installation of Ubuntu and its derivatives and does not need to be installed separately.
When a desktop is started on a Linux computer, the communication of the graphical user interface with the operating system happens via an X server. The computer's internal network is used, even if the computer should not be in a network. The practical thing about the X protocol is network transparency. This protocol mainly uses TCP/IP as a transport base but can also be used on pure Unix sockets. The ports that are utilized for X server are typically located in the range of TCP/6001-6009, allowing communication between the client and server. When starting a new desktop session via X server the TCP port 6000 would be opened for the first X display :0. This range of ports enables the server to perform its tasks such as hosting applications, as well as providing services to clients. They are often used to provide remote access to a system, allowing users to access applications and data from anywhere in the world. Additionally, these ports are also essential for the secure sharing of files and data, making them an integral part of the Open X Server. Thus an X server is not dependent on the local computer, it can be used to access other computers, and other computers can use the local X server. Provided that both local and remote computers contain Unix/Linux systems, additional protocols such as VNC and RDP are superfluous. VNC and RDP generate the graphical output on the remote computer and transport it over the network. Whereas with X11, it is rendered on the local computer. This saves traffic and a load on the remote computer. However, X11's significant disadvantage is the unencrypted data transmission. However, this can be overcome by tunneling the SSH protocol.
For this, we have to allow X11 forwarding in the SSH configuration file (/etc/ssh/sshd_config) on the server that provides the application by changing this option to yes.
X11Forwarding
root@htb[/htb]$ cat /etc/ssh/sshd_config | grep X11Forwarding

X11Forwarding yes
With this we can start the application from our client with the following command:
root@htb[/htb]$ ssh -X htb-student@10.129.23.11 /usr/bin/firefox

htb-student@10.129.14.130's password: ********
<SKIP>
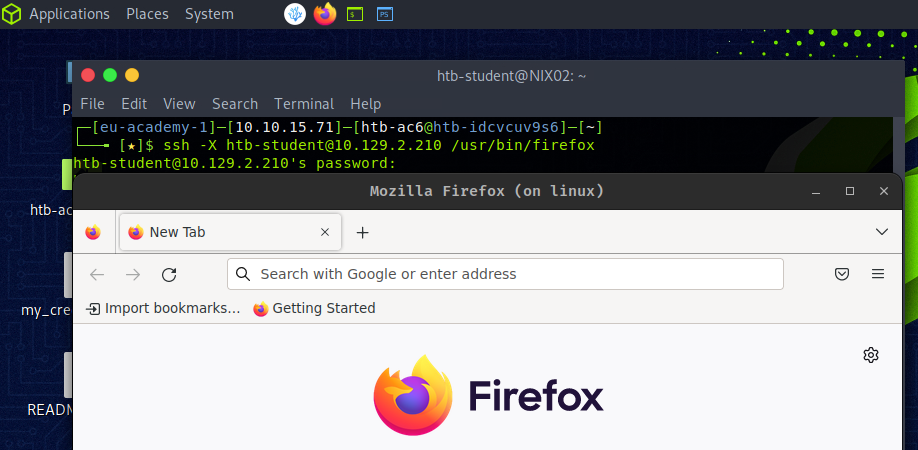
X11 Security
X11 is not a secure protocol without suitable security measures since X11 communication is entirely unencrypted. A completely open X server lets anyone on the network read the contents of its windows, for example, and this goes unnoticed by the user sitting in front of it. Therefore, it is not even necessary to sniff the network. This standard X11 functionality is realized with simple X11 tools like xwd and xgrabsc. In short, as penetration testers, we could read users' keystrokes, obtain screenshots, move the mouse cursor and send keystrokes from the server over the network.
A good example is several security vulnerabilities found in XServer, where a local attacker can exploit vulnerabilities in XServer to execute arbitrary code with user privileges and gain user privileges. The operating systems affected by these vulnerabilities were UNIX and Linux, Red Hat Enterprise Linux, Ubuntu Linux, and SUSE Linux. These vulnerabilities are known as CVE-2017-2624, CVE-2017-2625, and CVE-2017-2626.
The X Display Manager Control Protocol (XDMCP) protocol is used by the X Display Manager for communication through UDP port 177 between X terminals and computers operating under Unix/Linux. It is used to manage remote X Window sessions on other machines and is often used by Linux system administrators to provide access to remote desktops. XDMCP is an insecure protocol and should not be used in any environment that requires high levels of security. With this, it is possible to redirect an entire graphical user interface (GUI) (such as KDE or Gnome) to a corresponding client. For a Linux system to act as an XDMCP server, an X system with a GUI must be installed and configured on the server. After starting the computer, a graphical interface should be available locally to the user.
One potential way that XDMCP could be exploited is through a man-in-the-middle attack. In this type of attack, an attacker intercepts the communication between the remote computer and the X Window System server, and impersonates one of the parties in order to gain unauthorized access to the server. The attacker could then use the server to run arbitrary commands, access sensitive data, or perform other actions that could compromise the security of the system.
Virtual Network Computing (VNC) is a remote desktop sharing system based on the RFB protocol that allows users to control a computer remotely. It allows a user to view and interact with a desktop environment remotely over a network connection. The user can control the remote computer as if sitting in front of it. This is also one of the most common protocols for remote graphical connections for Linux hosts.
VNC is generally considered to be secure. It uses encryption to ensure the data is safe while in transit and requires authentication before a user can gain access. Administrators make use of VNC to access computers that are not physically accessible. This could be used to troubleshoot and maintain servers, access applications on other computers, or provide remote access to workstations. VNC can also be used for screen sharing, allowing multiple users to collaborate on a project or troubleshoot a problem.
There are two different concepts for VNC servers. The usual server offers the actual screen of the host computer for user support. Because the keyboard and mouse remain usable at the remote computer, an arrangement is recommended. The second group of server programs allows user login to virtual sessions, similar to the terminal server concept.
Server and viewer programs for VNC are available for all common operating systems. Therefore, many IT services are performed with VNC. The proprietary TeamViewer, and RDP have similar uses.
Traditionally, the VNC server listens on TCP port 5900. So it offers its display 0 there. Other displays can be offered via additional ports, mostly 590[x], where x is the display number. Adding multiple connections would be assigned to a higher TCP port like 5901, 5902, 5903, etc.
For these VNC connections, many different tools are used. Among them are for example:
The most used tools for such kinds of connections are UltraVNC and RealVNC because of their encryption and higher security.
In this example, we set up a TigerVNC server, and for this, we need, among other things, also the XFCE4 desktop manager since VNC connections with GNOME are somewhat unstable. Therefore we need to install the necessary packages and create a password for the VNC connection.
TigerVNC Installation
htb-student@ubuntu:~$ sudo apt install xfce4 xfce4-goodies tigervnc-standalone-server -y
htb-student@ubuntu:~$ vncpasswd

Password: ******
Verify: ******
Would you like to enter a view-only password (y/n)? n
During installation, a hidden folder is created in the home directory called .vnc. Then, we have to create two additional files, xstartup and config. The xstartup determines how the VNC session is created in connection with the display manager, and the config determines its settings.
Configuration
htb-student@ubuntu:~$ touch ~/.vnc/xstartup ~/.vnc/config
htb-student@ubuntu:~$ cat <<EOT >> ~/.vnc/xstartup

#!/bin/bash
unset SESSION_MANAGER
unset DBUS_SESSION_BUS_ADDRESS
/usr/bin/startxfce4
[ -x /etc/vnc/xstartup ] && exec /etc/vnc/xstartup
[ -r $HOME/.Xresources ] && xrdb $HOME/.Xresources
x-window-manager &
EOT
htb-student@ubuntu:~$ cat <<EOT >> ~/.vnc/config

geometry=1920x1080
dpi=96
EOT
Additionally, the xstartup executable needs rights to be started by the service.
htb-student@ubuntu:~$ chmod +x ~/.vnc/xstartup
Now we can start the VNC server.
Start the VNC server
htb-student@ubuntu:~$ vncserver

New 'linux:1 (htb-student)' desktop at :1 on machine linux

Starting applications specified in /home/htb-student/.vnc/xstartup
Log file is /home/htb-student/.vnc/linux:1.log

Use xtigervncviewer -SecurityTypes VncAuth -passwd /home/htb-student/.vnc/passwd :1 to connect to the VNC server.
In addition, we can also display the entire sessions with the associated ports and the process ID.
List Sessions
htb-student@ubuntu:~$ vncserver -list

TigerVNC server sessions:

X DISPLAY #     RFB PORT #      PROCESS ID
:1              5901            79746
To encrypt the connection and make it more secure, we can create an SSH tunnel over which the whole connection is tunneled. How tunneling works in detail we will learn in the Pivoting, Tunneling, and Port Forwarding module.
Setting Up an SSH Tunnel
root@htb[/htb]$ ssh -L 5901:127.0.0.1:5901 -N -f -l htb-student 10.129.14.130

htb-student@10.129.14.130's password: *******
Finally, we can connect to the server through the SSH tunnel using the xtightvncviewer.
Connecting to the VNC Server
root@htb[/htb]$ xtightvncviewer localhost:5901

Connected to RFB server, using protocol version 3.8
Performing standard VNC authentication

Password: ******

Authentication successful
Desktop name "linux:1 (htb-student)"
VNC server default format:
  32 bits per pixel.
  Least significant byte first in each pixel.
  True colour: max red 255 green 255 blue 255, shift red 16 green 8 blue 0
Using default colormap which is TrueColor.  Pixel format:
  32 bits per pixel.
  Least significant byte first in each pixel.
  True colour: max red 255 green 255 blue 255, shift red 16 green 8 blue 0
Same machine: preferring raw encoding
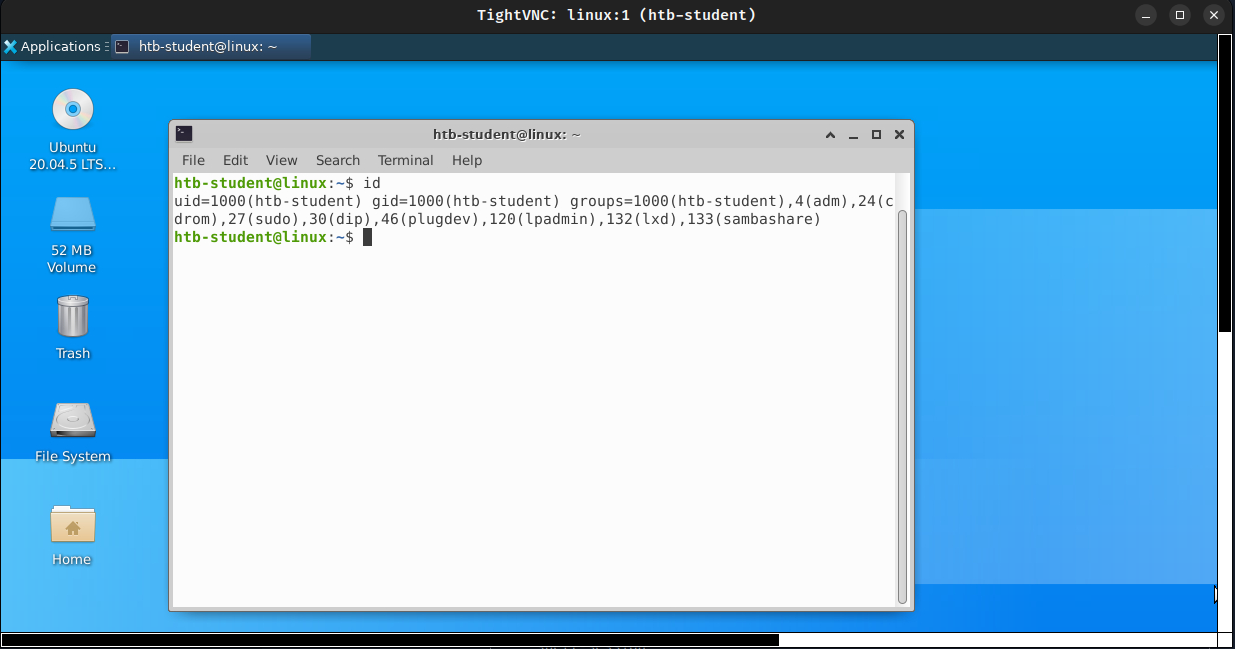
All computer systems have an inherent risk of intrusion. Some present more of a risk than others, such as an internet-facing web server hosting multiple complex web applications. Linux systems are also less prone to viruses that affect Windows operating systems and do not present as large an attack surface as Active Directory domain-joined hosts. Regardless, it is essential to have certain fundamentals in place to secure any Linux system.
One of the Linux operating systems' most important security measures is keeping the OS and installed packages up to date. This can be achieved with a command such as:
root@htb[/htb]$ apt update && apt dist-upgrade
If firewall rules are not appropriately set at the network level, we can use the Linux firewall and/or iptables to restrict traffic into/out of the host.
If SSH is open on the server, the configuration should be set up to disallow password login and disallow the root user from logging in via SSH. It is also important to avoid logging into and administering the system as the root user whenever possible and adequately managing access control. Users' access should be determined based on the principle of least privilege. For example, if a user needs to run a command as root, then that command should be specified in the sudoers configuration instead of giving them full sudo rights. Another common protection mechanism that can be used is fail2ban. This tool counts the number of failed login attempts, and if a user has reached the maximum number, the host that tried to connect will be handled as configured.
It is also important to periodically audit the system to ensure that issues do not exist that could facilitate privilege escalation, such as an out-of-date kernel, user permission issues, world-writable files, and misconfigured cron jobs, or misconfigured services. Many administrators forget about the possibility that some kernel versions have to be updated manually.
An option for further locking down Linux systems is Security-Enhanced Linux (SELinux) or AppArmor. This is a kernel security module that can be used for security access control policies. In SELinux, every process, file, directory, and system object is given a label. Policy rules are created to control access between these labeled processes and objects and are enforced by the kernel. This means that access can be set up to control which users and applications can access which resources. SELinux provides very granular access controls, such as specifying who can append to a file or move it.
Besides, there are different applications and services such as Snort, chkrootkit, rkhunter, Lynis, and others that can contribute to Linux's security. In addition, some security settings should be made, such as:
This list is incomplete, as safety is not a product but a process. This means that specific steps must always be taken to protect the systems better, and it depends on the administrators how well they know their operating systems. The better the administrators are familiar with the system, and the more they are trained, the better and more secure their security precautions and security measures will be.
TCP wrapper is a security mechanism used in Linux systems that allows the system administrator to control which services are allowed access to the system. It works by restricting access to certain services based on the hostname or IP address of the user requesting access. When a client attempts to connect to a service the system will first consult the rules defined in the TCP wrappers configuration files to determine the IP address of the client. If the IP address matches the criteria specified in the configuration files, the system will then grant the client access to the service. However, if the criteria are not met, the connection will be denied, providing an additional layer of security for the service. TCP wrappers use the following configuration files:
/etc/hosts.allow/etc/hosts.denyIn short, the /etc/hosts.allow file specifies which services and hosts are allowed access to the system, whereas the /etc/hosts.deny file specifies which services and hosts are not allowed access. These files can be configured by adding specific rules to the files.
/etc/hosts.allow
root@htb[/htb]$ cat /etc/hosts.allow

# Allow access to SSH from the local network
sshd : 10.129.14.0/24

# Allow access to FTP from a specific host
ftpd : 10.129.14.10

# Allow access to Telnet from any host in the inlanefreight.local domain
telnetd : .inlanefreight.local
/etc/hosts.deny
root@htb[/htb]$ cat /etc/hosts.deny

# Deny access to all services from any host in the inlanefreight.com domain
ALL : .inlanefreight.com

# Deny access to SSH from a specific host
sshd : 10.129.22.22

# Deny access to FTP from hosts with IP addresses in the range of 10.129.22.0 to 10.129.22.255
ftpd : 10.129.22.0/24
It is important to remember that the order of the rules in the files is important. The first rule that matches the requested service and host is the one that will be applied. It is also important to note that TCP wrappers are not a replacement for a firewall, as they are limited by the fact that they can only control access to services and not to ports.
The primary goal of firewalls is to provide a security mechanism for controlling and monitoring network traffic between different network segments, such as internal and external networks or different network zones. Firewalls play a crucial role in protecting computer networks from unauthorized access, malicious traffic, and other security threats. Linux, being a popular operating system used in servers and other network devices, provides built-in firewall capabilities that can be used to control network traffic. In other words, they can filter incoming and outgoing traffic based on pre-defined rules, protocols, ports, and other criteria to prevent unauthorized access and mitigate security threats. The specific goal of a firewall implementation can vary depending on the specific needs of the organization, such as ensuring the confidentiality, integrity, and availability of network resources.
An example from the history of Linux firewalls is the development of the iptables tool, which replaced the earlier ipchains and ipfwadm tools. The iptables utility was first introduced in the Linux 2.4 kernel in 2000 and provided a flexible and efficient mechanism for filtering network traffic. iptables became the de facto standard firewall solution for Linux systems, and it has been widely adopted by many organizations and users.
The iptables utility provided a simple yet powerful command-line interface for configuring firewall rules, which could be used to filter traffic based on various criteria such as IP addresses, ports, protocols, and more. iptables was designed to be highly customizable and could be used to create complex firewall rulesets that could protect against various security threats such as denial-of-service (DoS) attacks, port scans, and network intrusion attempts.
In Linux, the firewall functionality is typically implemented using the Netfilter framework, which is an integral part of the kernel. Netfilter provides a set of hooks that can be used to intercept and modify network traffic as it passes through the system. The iptables utility is commonly used to configure the firewall rules on Linux systems.
The iptables utility provides a flexible set of rules for filtering network traffic based on various criteria such as source and destination IP addresses, port numbers, protocols, and more. There also exist other solutions like nftables, ufw, and firewalld. Nftables provides a more modern syntax and improved performance over iptables. However, the syntax of nftables rules is not compatible with iptables, so migration to nftables requires some effort. UFW stands for “Uncomplicated Firewall” and provides a simple and user-friendly interface for configuring firewall rules. UFW is built on top of the iptables framework like nftables and provides an easier way to manage firewall rules. Finally, FirewallD provides a dynamic and flexible firewall solution that can be used to manage complex firewall configurations, and it supports a rich set of rules for filtering network traffic and can be used to create custom firewall zones and services. It consists of several components that work together to provide a flexible and powerful firewall solution. The main components of iptables are:
| Component | Description |
Tables | Tables are used to organize and categorize firewall rules. |
Chains | Chains are used to group a set of firewall rules applied to a specific type of network traffic. |
Rules | Rules define the criteria for filtering network traffic and the actions to take for packets that match the criteria. |
Matches | Matches are used to match specific criteria for filtering network traffic, such as source or destination IP addresses, ports, protocols, and more. |
Targets | Targets specify the action for packets that match a specific rule. For example, targets can be used to accept, drop, or reject packets or modify the packets in another way. |
Tables
When working with firewalls on Linux systems, it is important to understand how tables work in iptables. Tables in iptables are used to categorize and organize firewall rules based on the type of traffic that they are designed to handle. These tables are used to organize and categorize firewall rules. Each table is responsible for performing a specific set of tasks.
| Table Name | Description | Built-in Chains |
filter | Used to filter network traffic based on IP addresses, ports, and protocols. | INPUT, OUTPUT, FORWARD |
nat | Used to modify the source or destination IP addresses of network packets. | PREROUTING, POSTROUTING |
mangle | Used to modify the header fields of network packets. | PREROUTING, OUTPUT, INPUT, FORWARD, POSTROUTING |
In addition to the built-in tables, iptables provides a fourth table called the raw table, which is used to configure special packet processing options. The raw table contains two built-in chains: PREROUTING and OUTPUT.
Chains
In iptables, chains organize rules that define how network traffic should be filtered or modified. There are two types of chains in iptables:
The built-in chains are pre-defined and automatically created when a table is created. Each table has a different set of built-in chains. For example, the filter table has three built-in chains:
These chains are used to filter incoming and outgoing network traffic, as well as traffic that is being forwarded between different network interfaces. The nat table has two built-in chains:
The PREROUTING chain is used to modify the destination IP address of incoming packets before the routing table processes them. The POSTROUTING chain is used to modify the source IP address of outgoing packets after the routing table has processed them. The mangle table has five built-in chains:
These chains are used to modify the header fields of incoming and outgoing packets and packets being processed by the corresponding chains.
User-defined chains can simplify rule management by grouping firewall rules based on specific criteria, such as source IP address, destination port, or protocol. They can be added to any of the three main tables. For example, if an organization has multiple web servers that all require similar firewall rules, the rules for each server could be grouped in a user-defined chain. Another example is when a user-defined chain could filter traffic destined for a specific port, such as port 80 (HTTP). The user could then add rules to this chain that specifically filter traffic destined for port 80.
Rules and Targets
Iptables rules are used to define the criteria for filtering network traffic and the actions to take for packets that match the criteria. Rules are added to chains using the -A option followed by the chain name, and they can be modified or deleted using various other options.
Each rule consists of a set of criteria or matches and a target specifying the action for packets that match the criteria. The criteria or matches match specific fields in the IP header, such as the source or destination IP address, protocol, source, destination port number, and more. The target specifies the action for packets that match the criteria. They specify the action to take for packets that match a specific rule. For example, targets can accept, drop, reject, or modify the packets. Some of the common targets used in iptables rules include the following:
| Target Name | Description |
ACCEPT | Allows the packet to pass through the firewall and continue to its destination |
DROP | Drops the packet, effectively blocking it from passing through the firewall |
REJECT | Drops the packet and sends an error message back to the source address, notifying them that the packet was blocked |
LOG | Logs the packet information to the system log |
SNAT | Modifies the source IP address of the packet, typically used for Network Address Translation (NAT) to translate private IP addresses to public IP addresses |
DNAT | Modifies the destination IP address of the packet, typically used for NAT to forward traffic from one IP address to another |
MASQUERADE | Similar to SNAT but used when the source IP address is not fixed, such as in a dynamic IP address scenario |
REDIRECT | Redirects packets to another port or IP address |
MARK | Adds or modifies the Netfilter mark value of the packet, which can be used for advanced routing or other purposes |
Let us illustrate a rule and consider that we want to add a new entry to the INPUT chain that allows incoming TCP traffic on port 22 (SSH) to be accepted. The command for that would look like the following:
root@htb[/htb]$ sudo iptables -A INPUT -p tcp --dport 22 -j ACCEPT
Matches
Matches are used to specify the criteria that determine whether a firewall rule should be applied to a particular packet or connection. Matches are used to match specific characteristics of network traffic, such as the source or destination IP address, protocol, port number, and more.
| Match Name | Description |
-p or --protocol | Specifies the protocol to match (e.g. tcp, udp, icmp) |
--dport | Specifies the destination port to match |
--sport | Specifies the source port to match |
-s or --source | Specifies the source IP address to match |
-d or --destination | Specifies the destination IP address to match |
-m state | Matches the state of a connection (e.g. NEW, ESTABLISHED, RELATED) |
-m multiport | Matches multiple ports or port ranges |
-m tcp | Matches TCP packets and includes additional TCP-specific options |
-m udp | Matches UDP packets and includes additional UDP-specific options |
-m string | Matches packets that contain a specific string |
-m limit | Matches packets at a specified rate limit |
-m conntrack | Matches packets based on their connection tracking information |
-m mark | Matches packets based on their Netfilter mark value |
-m mac | Matches packets based on their MAC address |
-m iprange | Matches packets based on a range of IP addresses |
In general, matches are specified using the '-m' option in iptables. For example, the following command adds a rule to the 'INPUT' chain in the 'filter' table that matches incoming TCP traffic on port 80:
root@htb[/htb]$ sudo iptables -A INPUT -p tcp -m tcp --dport 80 -j ACCEPT
This example rule matches incoming TCP traffic (-p tcp) on port 80 (--dport 80) and jumps to the accept target (-j ACCEPT) if the match is successful.
| 1. | Launch a web server on TCP/8080 port on your target and use iptables to block incoming traffic on that port. |
| 2. | Change iptables rules to allow incoming traffic on the TCP/8080 port. |
| 3. | Block traffic from a specific IP address. |
| 4. | Allow traffic from a specific IP address. |
| 5. | Block traffic based on protocol. |
| 6. | Allow traffic based on protocol. |
| 7. | Create a new chain. |
| 8. | Forward traffic to a specific chain. |
| 9. | Delete a specific rule. |
| 10. | List all existing rules. |
System logs on Linux are a set of files that contain information about the system and the activities taking place on it. These logs are important for monitoring and troubleshooting the system, as they can provide insights into system behavior, application activity, and security events. These system logs can be a valuable source of information for identifying potential security weaknesses and vulnerabilities within a Linux system as well. By analyzing the logs on our target systems, we can gain insights into the system's behavior, network activity, and user activity and can use this information to identify any abnormal activity, such as unauthorized logins, attempted attacks, clear text credentials, or unusual file access, which could indicate a potential security breach.
We, as penetration testers, can also use system logs to monitor the effectiveness of our security testing activities. By reviewing the logs after performing security testing, we can determine if our activities triggered any security events, such as intrusion detection alerts or system warnings. This information can help us refine our testing strategies and improve the overall security of the system.
In order to ensure the security of a Linux system, it is important to configure system logs properly. This includes setting the appropriate log levels, configuring log rotation to prevent log files from becoming too large, and ensuring that the logs are stored securely and protected from unauthorized access. In addition, it is important to regularly review and analyze the logs to identify potential security risks and respond to any security events in a timely manner. There are several different types of system logs on Linux, including:
Kernel logs
These logs contain information about the system's kernel, including hardware drivers, system calls, and kernel events. They are stored in the /var/log/kern.log file. For example, kernel logs can reveal the presence of vulnerable or outdated drivers that could be targeted by attackers to gain access to the system. They can also provide insights into system crashes, resource limitations, and other events that could lead to a denial of service or other security issues. In addition, kernel logs can help us identify suspicious system calls or other activities that could indicate the presence of malware or other malicious software on the system. By monitoring the /var/log/kern.log file, we can detect any unusual behavior and take appropriate action to prevent further damage to the system.
System logs
These logs contain information about system-level events, such as service starts and stops, login attempts, and system reboots. They are stored in the /var/log/syslog file. By analyzing login attempts, service starts and stops, and other system-level events, we can detect any possible access or activities on the system. This can help us identify any vulnerabilities that could be exploited and help us recommend security measures to mitigate these risks. In addition, we can use the syslog to identify potential issues that could impact the availability or performance of the system, such as failed service starts or system reboots. Here is an example of how such syslog file could look like:
Syslog
Feb 28 2023 15:00:01 server CRON[2715]: (root) CMD (/usr/local/bin/backup.sh)
Feb 28 2023 15:04:22 server sshd[3010]: Failed password for htb-student from 10.14.15.2 port 50223 ssh2
Feb 28 2023 15:05:02 server kernel: [  138.303596] ata3.00: exception Emask 0x0 SAct 0x0 SErr 0x0 action 0x6 frozen
Feb 28 2023 15:06:43 server apache2[2904]: 127.0.0.1 - - [28/Feb/2023:15:06:43 +0000] "GET /index.html HTTP/1.1" 200 13484 "-" "Mozilla/5.0 (Windows NT 10.0; Win64; x64) AppleWebKit/537.36 (KHTML, like Gecko) Chrome/80.0.3987.149 Safari/537.36"
Feb 28 2023 15:07:19 server sshd[3010]: Accepted password for htb-student from 10.14.15.2 port 50223 ssh2
Feb 28 2023 15:09:54 server kernel: [  367.543975] EXT4-fs (sda1): re-mounted. Opts: errors=remount-ro
Feb 28 2023 15:12:07 server systemd[1]: Started Clean PHP session files.
Authentication logs
These logs contain information about user authentication attempts, including successful and failed attempts. They are stored in the /var/log/auth.log file. It is important to note that while the /var/log/syslog file may contain similar login information, the /var/log/auth.log file specifically focuses on user authentication attempts, making it a more valuable resource for identifying potential security threats. Therefore, it is essential for penetration testers to review the logs stored in the /var/log/auth.log file to ensure that the system is secure and has not been compromised.
Auth.log
Feb 28 2023 18:15:01 sshd[5678]: Accepted publickey for admin from 10.14.15.2 port 43210 ssh2: RSA SHA256:+KjEzN2cVhIW/5uJpVX9n5OB5zVJ92FtCZxVzzcKjw
Feb 28 2023 18:15:03 sudo:   admin : TTY=pts/1 ; PWD=/home/admin ; USER=root ; COMMAND=/bin/bash
Feb 28 2023 18:15:05 sudo:   admin : TTY=pts/1 ; PWD=/home/admin ; USER=root ; COMMAND=/usr/bin/apt-get install netcat-traditional
Feb 28 2023 18:15:08 sshd[5678]: Disconnected from 10.14.15.2 port 43210 [preauth]
Feb 28 2023 18:15:12 kernel: [  778.941871] firewall: unexpected traffic allowed on port 22
Feb 28 2023 18:15:15 auditd[9876]: Audit daemon started successfully
Feb 28 2023 18:15:18 systemd-logind[1234]: New session 4321 of user admin.
Feb 28 2023 18:15:21 CRON[2345]: pam_unix(cron:session): session opened for user root by (uid=0)
Feb 28 2023 18:15:24 CRON[2345]: pam_unix(cron:session): session closed for user root
In this example, we can see in the first line that a successful public key has been used for authentication for the user admin. Additionally, we can see that this user is in the sudoers group because he can execute commands using sudo. The kernel message indicates that unexpected traffic was allowed on port 22, which could indicate a potential security breach. After that, we see that a new session was created for user "admin" by systemd-logind and that a cron session opened and closed for the user root.
Application logs
These logs contain information about the activities of specific applications running on the system. They are often stored in their own files, such as /var/log/apache2/error.log for the Apache web server or /var/log/mysql/error.log for the MySQL database server. These logs are particularly important when we are targeting specific applications, such as web servers or databases, as they can provide insights into how these applications are processing and handling data. By examining these logs, we can identify potential vulnerabilities or misconfigurations. For example, access logs can be used to track requests made to a web server, while audit logs can be used to track changes made to the system or to specific files. These logs can be used to identify unauthorized access attempts, data exfiltration, or other suspicious activity.
Besides, access and audit logs are critical logs that record information about the actions of users and processes on the system. They are crucial for security and compliance purposes, and we can use them to identify potential security issues and attack vectors.
For example, access logs keep a record of user and process activity on the system, including login attempts, file accesses, and network connections. Audit logs record information about security-relevant events on the system, such as modifications to system configuration files or attempts to modify system files or settings. These logs help track potential attacks and activities or identify security breaches or other issues. An example entry in an access log file can look like the following:
Access Log Entry
2023-03-07T10:15:23+00:00 servername privileged.sh: htb-student accessed /root/hidden/api-keys.txt
In this log entry, we can see that the user htb-student used the privileged.sh script to access the api-keys.txt file in the /root/hidden/ directory. On Linux systems, most common services have default locations for access logs:
| Service | Description |
|---|---|
Apache |
Access logs are stored in the /var/log/apache2/access.log file (or similar, depending on the distribution). |
Nginx |
Access logs are stored in the /var/log/nginx/access.log file (or similar). |
OpenSSH |
Access logs are stored in the /var/log/auth.log file on Ubuntu and in /var/log/secure on CentOS/RHEL. |
MySQL |
Access logs are stored in the /var/log/mysql/mysql.log file. |
PostgreSQL |
Access logs are stored in the /var/log/postgresql/postgresql-version-main.log file. |
Systemd |
Access logs are stored in the /var/log/journal/ directory. |
Security logs
These security logs and their events are often recorded in a variety of log files, depending on the specific security application or tool in use. For example, the Fail2ban application records failed login attempts in the /var/log/fail2ban.log file, while the UFW firewall records activity in the /var/log/ufw.log file. Other security-related events, such as changes to system files or settings, may be recorded in more general system logs such as /var/log/syslog or /var/log/auth.log. As penetration testers, we can use log analysis tools and techniques to search for specific events or patterns of activity that may indicate a security issue and use that information to further test the system for vulnerabilities or potential attack vectors.
It is important to be familiar with the default locations for access logs and other log files on Linux systems, as this information can be useful when performing a security assessment or penetration test. By understanding how security-related events are recorded and stored, we can more effectively analyze log data and identify potential security issues.
All these logs can be accessed and analyzed using a variety of tools, including the log file viewers built into most Linux desktop environments, as well as command-line tools such as the tail, grep, and sed commands. Proper analysis of system logs can help identify and troubleshoot system issues, as well as detect security breaches and other events of interest.
Solaris is a Unix-based operating system developed by Sun Microsystems (later acquired by Oracle Corporation) in the 1990s. It is known for its robustness, scalability, and support for high-end hardware and software systems. Solaris is widely used in enterprise environments for mission-critical applications, such as database management, cloud computing, and virtualization. For example, it includes a built-in hypervisor called Oracle VM Server for SPARC, which allows multiple virtual machines to run on a single physical server. Overall, it is designed to handle large amounts of data and provide reliable and secure services to users and is often used in enterprise environments where security, performance, and stability are key requirements.
The goal of Solaris is to provide a highly stable, secure, and scalable platform for enterprise computing. It has built-in features for high availability, fault tolerance, and system management, making it ideal for mission-critical applications. It is widely used in the banking, finance, and government sectors, where security, reliability, and performance are paramount. It is also used in large-scale data centers, cloud computing environments, and virtualization platforms. Companies such as Amazon, IBM, and Dell use Solaris in their products and services, highlighting its importance in the industry.
Solaris and Linux distributions are two types of operating systems that differ significantly. Firstly, Solaris is a proprietary operating system owned and developed by Oracle Corporation, and its source code is not available to the general public. In contrast, most Linux distributions are open-source, meaning that their source code is available for anyone to modify and use. Additionally, Linux distributions commonly use the Zettabyte File System (ZFS), which is a highly advanced file system that offers features such as data compression, snapshots, and high scalability. On the other hand, Solaris uses a Service Management Facility (SMF), which is a highly advanced service management framework that provides better reliability and availability for system services.
| Directory | Description |
|---|---|
/ |
The root directory contains all other directories and files in the file system. |
/bin |
It contains essential system binaries that are required for booting and basic system operations. |
/boot |
The boot directory contains boot-related files such as boot loader and kernel images. |
/dev |
The dev directory contains device files that represent physical and logical devices attached to the system. |
/etc |
The etc directory contains system configuration files, such as system startup scripts and user authentication data. |
/home |
Users’ home directories. |
/kernel |
This directory contains kernel modules and other kernel-related files. |
/lib |
Directory for libraries required by the binaries in /bin and /sbin directories. |
/lost+found |
This directory is used by the file system consistency check and repair tool to store recovered files. |
/mnt |
Directory for mounting file systems temporarily. |
/opt |
This directory contains optional software packages that are installed on the system. |
/proc |
The proc directory provides a view into the system's process and kernel status as files. |
/sbin |
This directory contains system binaries required for system administration tasks. |
/tmp |
Temporary files created by the system and applications are stored in this directory. |
/usr |
The usr directory contains system-wide read-only data and programs, such as documentation, libraries, and executables. |
/var |
This directory contains variable data files, such as system logs, mail spools, and printer spools. |
Solaris has a number of unique features that set it apart from other operating systems. One of its key strengths is its support for high-end hardware and software systems. It is designed to work with large-scale data centers and complex network infrastructures, and it can handle large amounts of data without any performance issues.
In terms of package management, Solaris uses the Image Packaging System (IPS) package manager, which provides a powerful and flexible way to manage packages and updates. Solaris also provides advanced security features, such as Role-Based Access Control (RBAC) and mandatory access controls, which are not available in all Linux distributions.
Let's dive deeper into the differences between Solaris and Linux distributions. One of the most important differences is that the source code is not open source and is only known in closed circles. This means that unlike Ubuntu or many other distributions, the source code cannot be viewed and analyzed by the public. In summary, the main differences can be grouped into the following categories:
To better understand the differences, let's take a look at a few examples and commands.
System Information
On Ubuntu, we use the uname command to display information about the system, such as the kernel name, hostname, and operating system. This might look like this:
root@htb[/htb]$ uname -a

Linux ubuntu 5.4.0-1045 #48-Ubuntu SMP Fri Jan 15 10:47:29 UTC 2021 x86_64 x86_64 x86_64 GNU/Linux
On the other hand, in Solaris, the showrev command can be used to display system information, including the version of Solaris, hardware type, and patch level. Here is an example output:
$ showrev -a

Hostname: solaris
Kernel architecture: sun4u
OS version: Solaris 10 8/07 s10s_u4wos_12b SPARC
Application architecture: sparc
Hardware provider: Sun_Microsystems
Domain: sun.com
Kernel version: SunOS 5.10 Generic_139555-08
The main difference between the two commands is that showrev provides more detailed information about the Solaris system, such as the patch level and hardware provider, while uname only provides basic information about the Linux system.
Installing Packages
On Ubuntu, the apt-get command is used to install packages. This could look like the following:
root@htb[/htb]$ sudo apt-get install apache2
However, in Solaris, we need to use pkgadd to install packages like SUNWapchr.
$ pkgadd -d SUNWapchr
The main difference between the two commands is the syntax, and the package manager used. Ubuntu uses the Advanced Packaging Tool (APT) to manage packages, while Solaris uses the Solaris Package Manager (SPM). Also, note that we do not use sudo in this case. This is because Solaris used the RBAC privilege management tool, which allowed the assignment of granular permissions to users. However, sudo has been supported since Solaris 11.
Permission Management
On Linux systems like Ubuntu but also on Solaris, the chmod command is used to change the permissions of files and directories. Here is an example command to give read, write, and execute permissions to the owner of the file:
root@htb[/htb]$ chmod 700 filename
To find files with specific permissions in Ubuntu, we use the find command. Let us take a look at an example of a file with the SUID bit set:
root@htb[/htb]$ find / -perm 4000
To find files with specific permissions, like with the SUID bit set on Solaris, we can use the find command, too, but with a small adjustment.
$ find / -perm -4000
The main difference between these two commands is the use of the - before the permission value in the Solaris command. This is because Solaris uses a different permission system than Linux.
NFS in Solaris
Solaris has its own implementation of NFS, which is slightly different from Linux distributions like Ubuntu. In Solaris, the NFS server can be configured using the share command, which is used to share a directory over the network, and it also allows us to specify various options such as read/write permissions, access restrictions, and more. To share a directory over NFS in Solaris, we can use the following command:
$ share -F nfs -o rw /export/home
This command shares the /export/home directory with read and writes permissions over NFS. An NFS client can mount the NFS file system using the mount command, the same way as with Ubuntu. To mount an NFS file system in Solaris, we need to specify the server name and the path to the shared directory. For example, to mount an NFS share from a server with the IP address 10.129.15.122 and the shared directory /nfs_share, we use the following command:
root@htb[/htb]$ mount -F nfs 10.129.15.122:/nfs_share /mnt/local
In Solaris, the configuration for NFS is stored in the /etc/dfs/dfstab file. This file contains entries for each shared directory, along with the various options for NFS sharing.
# cat /etc/dfs/dfstab

share -F nfs -o rw /export/home
Process Mapping
Process mapping is an essential aspect of system administration and troubleshooting. The lsof command is a powerful utility that lists all the files opened by a process, including network sockets and other file descriptors that we can use in Debian distributions like Ubuntu. We can use lsof to list all the files opened by a process. For example, to list all the files opened by the Apache web server process, we can use the following command:
root@htb[/htb]$ sudo lsof -c apache2
In Solaris, the pfiles command can be used to list all the files opened by a process. For example, to list all the files opened by the Apache web server process, we can use the following command:
$ pfiles `pgrep httpd`
This command lists all the files opened by the Apache web server process. The output of the pfiles command is similar to the output of the lsof command and provides information about the type of file descriptor, the file descriptor number, and the file name.
Executable Access
In Solaris, truss is used, which is a highly useful utility for developers and system administrators who need to debug complex software issues on the Solaris operating system. By tracing the system calls made by a process, truss can help identify the source of errors, performance issues, and other problems but can also reveal some sensitive information that may arise during application development or system maintenance. The utility can also provide detailed information about system calls, including the arguments passed to them and their return values, allowing users to better understand the behavior of their applications and the underlying operating system.
Strace is an alternative to truss but for Ubuntu, and it is an essential tool for system administrators and developers alike, helping them diagnose and troubleshoot issues in real-time. It enables users to analyze the interactions between the operating system and applications running on it, which is especially useful in highly complex and mission-critical environments. With truss, users can quickly identify and isolate issues related to application performance, network connectivity, and system resource utilization, among others.
For example, to trace the system calls made by the Apache web server process, we can use the following command:
root@htb[/htb]$ sudo strace -p `pgrep apache2`
Here's an example of how to use truss to trace the system calls made by the ls command in Solaris:
$ truss ls

execve("/usr/bin/ls", 0xFFBFFDC4, 0xFFBFFDC8)  argc = 1
...SNIP...
The output is similar to strace, but the format is slightly different. One difference between strace and truss is that truss can also trace the signals sent to a process, while strace cannot. Another difference is that truss has the ability to trace the system calls made by child processes, while strace can only trace the system calls made by the process specified on the command line.
There are many shortcuts that we can use to make working with Linux easier and faster. After we have familiarized ourselves with the most important of them and have made them a habit, we will save ourselves much typing. Some of them will even help us to avoid using our mouse in the terminal.
Auto-Complete
[TAB] - Initiates auto-complete. This will suggest to us different options based on the STDIN we provide. These can be specific suggestions like directories in our current working environment, commands starting with the same number of characters we already typed, or options.
Cursor Movement
[CTRL] + A - Move the cursor to the beginning of the current line.
[CTRL] + E - Move the cursor to the end of the current line.
[CTRL] + [←] / [→] - Jump at the beginning of the current/previous word.
[ALT] + B / F - Jump backward/forward one word.
Erase The Current Line
[CTRL] + U - Erase everything from the current position of the cursor to the beginning of the line.
[Ctrl] + K - Erase everything from the current position of the cursor to the end of the line.
[Ctrl] + W - Erase the word preceding the cursor position.
Paste Erased Contents
[Ctrl] + Y - Pastes the erased text or word.
Ends Task
[CTRL] + C - Ends the current task/process by sending the SIGINT signal. For example, this can be a scan that is running by a tool. If we are watching the scan, we can stop it / kill this process by using this shortcut. While not configured and developed by the tool we are using. The process will be killed without asking us for confirmation.
End-of-File (EOF)
[CTRL] + D - Close STDIN pipe that is also known as End-of-File (EOF) or End-of-Transmission.
Clear Terminal
[CTRL] + L - Clears the terminal. An alternative to this shortcut is the clear command you can type to clear our terminal.
Background a Process
[CTRL] + Z - Suspend the current process by sending the SIGTSTP signal.
Search Through Command History
[CTRL] + R - Search through command history for commands we typed previously that match our search patterns.
[↑] / [↓] - Go to the previous/next command in the command history.
Switch Between Applications
[ALT] + [TAB] - Switch between opened applications.
Zoom
[CTRL] + [+] - Zoom in.
[CTRL] + [-] - Zoom out.