The cheat sheet is a useful command reference for this module.
Web reconnaissance is the first step in any security assessment or penetration testing engagement. It's akin to a detective's initial investigation, meticulously gathering clues and evidence about a target before formulating a plan of action. In the digital realm, this translates to accumulating information about a website or web application to identify potential vulnerabilities, security misconfigurations, and valuable assets.
The primary goals of web reconnaissance revolve around gaining a comprehensive understanding of the target's digital footprint. This includes:
Identifying Assets: Discovering all associated domains, subdomains, and IP addresses provides a map of the target's online presence.Uncovering Hidden Information: Web reconnaissance aims to uncover directories, files, and technologies that are not readily apparent and could serve as entry points for an attacker.Analyzing the Attack Surface: By identifying open ports, running services, and software versions, you can assess the potential vulnerabilities and weaknesses of the target.Gathering Intelligence: Collecting information about employees, email addresses, and technologies used can aid in social engineering attacks or identifying specific vulnerabilities associated with certain software.Web reconnaissance can be conducted using either active or passive techniques, each with its own advantages and drawbacks:
| Type | Description | Risk of Detection | Examples |
|---|---|---|---|
| Active Reconnaissance | Involves directly interacting with the target system, such as sending probes or requests. | Higher | Port scanning, vulnerability scanning, network mapping |
| Passive Reconnaissance | Gathers information without directly interacting with the target, relying on publicly available data. | Lower | Search engine queries, WHOIS lookups, DNS enumeration, web archive analysis, social media |
WHOIS is a query and response protocol used to retrieve information about domain names, IP addresses, and other internet resources. It's essentially a directory service that details who owns a domain, when it was registered, contact information, and more. In the context of web reconnaissance, WHOIS lookups can be a valuable source of information, potentially revealing the identity of the website owner, their contact information, and other details that could be used for further investigation or social engineering attacks.
For example, if you wanted to find out who owns the domain example.com, you could run the following command in your terminal:
Code: bash
whois example.com
This would return a wealth of information, including the registrar, registration, and expiration dates, nameservers, and contact information for the domain owner.
However, it's important to note that WHOIS data can be inaccurate or intentionally obscured, so it's always wise to verify the information from multiple sources. Privacy services can also mask the true owner of a domain, making it more difficult to obtain accurate information through WHOIS.
The Domain Name System (DNS) functions as the internet's GPS, translating user-friendly domain names into the numerical IP addresses computers use to communicate. Like GPS converting a destination's name into coordinates, DNS ensures your browser reaches the correct website by matching its name with its IP address. This eliminates memorizing complex numerical addresses, making web navigation seamless and efficient.
The dig command allows you to query DNS servers directly, retrieving specific information about domain names. For instance, if you want to find the IP address associated with example.com, you can execute the following command:
Code: bash
dig example.com A
This command instructs dig to query the DNS for the A record (which maps a hostname to an IPv4 address) of example.com. The output will typically include the requested IP address, along with additional details about the query and response. By mastering the dig command and understanding the various DNS record types, you gain the ability to extract valuable information about a target's infrastructure and online presence.
DNS servers store various types of records, each serving a specific purpose:
| Record Type | Description |
|---|---|
| A | Maps a hostname to an IPv4 address. |
| AAAA | Maps a hostname to an IPv6 address. |
| CNAME | Creates an alias for a hostname, pointing it to another hostname. |
| MX | Specifies mail servers responsible for handling email for the domain. |
| NS | Delegates a DNS zone to a specific authoritative name server. |
| TXT | Stores arbitrary text information. |
| SOA | Contains administrative information about a DNS zone. |
Subdomains are essentially extensions of a primary domain name, often used to organize different sections or services within a website. For example, a company might use mail.example.com for their email server or blog.example.com for their blog.
From a reconnaissance perspective, subdomains are incredibly valuable. They can expose additional attack surfaces, reveal hidden services, and provide clues about the internal structure of a target's network. Subdomains might host development servers, staging environments, or even forgotten applications that haven't been properly secured.
The process of discovering subdomains is known as subdomain enumeration. There are two main approaches to subdomain enumeration:
| Approach | Description | Examples |
|---|---|---|
Active Enumeration |
Directly interacts with the target's DNS servers or utilizes tools to probe for subdomains. | Brute-forcing, DNS zone transfers |
Passive Enumeration |
Collects information about subdomains without directly interacting with the target, relying on public sources. | Certificate Transparency (CT) logs, search engine queries |
Active enumeration can be more thorough but carries a higher risk of detection. Conversely, passive enumeration is stealthier but may not uncover all subdomains. Combining both techniques can significantly increase the likelihood of discovering a comprehensive list of subdomains associated with your target, expanding your understanding of their online presence and potential vulnerabilities.
Subdomain brute-forcing is a proactive technique used in web reconnaissance to uncover subdomains that may not be readily apparent through passive methods. It involves systematically generating many potential subdomain names and testing them against the target's DNS server to see if they exist. This approach can unveil hidden subdomains that may host valuable information, development servers, or vulnerable applications.
One of the most versatile tools for subdomain brute-forcing is dnsenum. This powerful command-line tool combines various DNS enumeration techniques, including dictionary-based brute-forcing, to uncover subdomains associated with your target.
To use dnsenum for subdomain brute-forcing, you'll typically provide it with the target domain and a wordlist containing potential subdomain names. The tool will then systematically query the DNS server for each potential subdomain and report any that exist.
For example, the following command would attempt to brute-force subdomains of example.com using a wordlist named subdomains.txt:
Code: bash
dnsenum example.com -f subdomains.txt
DNS zone transfers, also known as AXFR (Asynchronous Full Transfer) requests, offer a potential goldmine of information for web reconnaissance. A zone transfer is a mechanism for replicating DNS data across servers. When a zone transfer is successful, it provides a complete copy of the DNS zone file, which contains a wealth of details about the target domain.
This zone file lists all the domain's subdomains, their associated IP addresses, mail server configurations, and other DNS records. This is akin to obtaining a blueprint of the target's DNS infrastructure for a reconnaissance expert.
To attempt a zone transfer, you can use the dig command with the axfr (full zone transfer) option. For example, to request a zone transfer from the DNS server ns1.example.com for the domain example.com, you would execute:
Code: bash
dig @ns1.example.com example.com axfr
However, zone transfers are not always permitted. Many DNS servers are configured to restrict zone transfers to authorized secondary servers only. Misconfigured servers, though, may allow zone transfers from any source, inadvertently exposing sensitive information.
Virtual hosting is a technique that allows multiple websites to share a single IP address. Each website is associated with a unique hostname, which is used to direct incoming requests to the correct site. This can be a cost-effective way for organizations to host multiple websites on a single server, but it can also create a challenge for web reconnaissance.
Since multiple websites share the same IP address, simply scanning the IP won't reveal all the hosted sites. You need a tool that can test different hostnames against the IP address to see which ones respond.
Gobuster is a versatile tool that can be used for various types of brute-forcing, including virtual host discovery. Its vhost mode is designed to enumerate virtual hosts by sending requests to the target IP address with different hostnames. If a virtual host is configured for a specific hostname, Gobuster will receive a response from the web server.
To use Gobuster to brute-force virtual hosts, you'll need a wordlist containing potential hostnames. Here's an example command:
Code: bash
gobuster vhost -u http://192.0.2.1 -w hostnames.txt
In this example, -u specifies the target IP address, and -w specifies the wordlist file. Gobuster will then systematically try each hostname in the wordlist and report any that results in a valid response from the web server.
Certificate Transparency (CT) logs offer a treasure trove of subdomain information for passive reconnaissance. These publicly accessible logs record SSL/TLS certificates issued for domains and their subdomains, serving as a security measure to prevent fraudulent certificates. For reconnaissance, they offer a window into potentially overlooked subdomains.
The crt.sh website provides a searchable interface for CT logs. To efficiently extract subdomains using crt.sh within your terminal, you can use a command like this:
Code: bash
curl -s "https://crt.sh/?q=%25.example.com&output=json" | jq -r '.[].name_value' | sed 's/\*\.//g' | sort -u
This command fetches JSON-formatted data from crt.sh for example.com (the % is a wildcard), extracts domain names using jq, removes any wildcard prefixes (*.) with sed, and finally sorts and deduplicates the results.
Web crawling is the automated exploration of a website's structure. A web crawler, or spider, systematically navigates through web pages by following links, mimicking a user's browsing behavior. This process maps out the site's architecture and gathers valuable information embedded within the pages.
A crucial file that guides web crawlers is robots.txt. This file resides in a website's root directory and dictates which areas are off-limits for crawlers. Analyzing robots.txt can reveal hidden directories or sensitive areas that the website owner doesn't want to be indexed by search engines.
Scrapy is a powerful and efficient Python framework for large-scale web crawling and scraping projects. It provides a structured approach to defining crawling rules, extracting data, and handling various output formats.
Here's a basic Scrapy spider example to extract links from example.com:
Code: python
import scrapy

class ExampleSpider(scrapy.Spider):
    name = "example"
    start_urls = ['http://example.com/']

    def parse(self, response):
        for link in response.css('a::attr(href)').getall():
            if any(link.endswith(ext) for ext in self.interesting_extensions):
                yield {"file": link}
            elif not link.startswith("#") and not link.startswith("mailto:"):
                yield response.follow(link, callback=self.parse)
After running the Scrapy spider, you'll have a file containing scraped data (e.g., example_data.json). You can analyze these results using standard command-line tools. For instance, to extract all links:
Code: bash
jq -r '.[] | select(.file != null) | .file' example_data.json | sort -u
This command uses jq to extract links, awk to isolate file extensions, sort to order them, and uniq -c to count their occurrences. By scrutinizing the extracted data, you can identify patterns, anomalies, or sensitive files that might be of interest for further investigation.
Leveraging search engines for reconnaissance involves utilizing their vast indexes of web content to uncover information about your target. This passive technique, often referred to as Open Source Intelligence (OSINT) gathering, can yield valuable insights without directly interacting with the target's systems.
By employing advanced search operators and specialized queries known as "Google Dorks," you can pinpoint specific information buried within search results. Here's a table of some useful search operators for web reconnaissance:
| Operator | Description | Example |
|---|---|---|
site: |
Restricts search results to a specific website. | site:example.com "password reset" |
inurl: |
Searches for a specific term in the URL of a page. | inurl:admin login |
filetype: |
Limits results to files of a specific type. | filetype:pdf "confidential report" |
intitle: |
Searches for a term within the title of a page. | intitle:"index of" /backup |
cache: |
Shows the cached version of a webpage. | cache:example.com |
"search term" |
Searches for the exact phrase within quotation marks. | "internal error" site:example.com |
OR |
Combines multiple search terms. | inurl:admin OR inurl:login |
- |
Excludes specific terms from search results. | inurl:admin -intext:wordpress |
By creatively combining these operators and crafting targeted queries, you can uncover sensitive documents, exposed directories, login pages, and other valuable information that may aid in your reconnaissance efforts.
Web archives are digital repositories that store snapshots of websites across time, providing a historical record of their evolution. Among these archives, the Wayback Machine is the most comprehensive and accessible resource for web reconnaissance.
The Wayback Machine, a project by the Internet Archive, has been archiving the web for over two decades, capturing billions of web pages from across the globe. This massive historical data collection can be an invaluable resource for security researchers and investigators.
| Feature | Description | Use Case in Reconnaissance |
|---|---|---|
Historical Snapshots |
View past versions of websites, including pages, content, and design changes. | Identify past website content or functionality that is no longer available. |
Hidden Directories |
Explore directories and files that may have been removed or hidden from the current version of the website. | Discover sensitive information or backups that were inadvertently left accessible in previous versions. |
Content Changes |
Track changes in website content, including text, images, and links. | Identify patterns in content updates and assess the evolution of a website's security posture. |
By leveraging the Wayback Machine, you can gain a historical perspective on your target's online presence, potentially revealing vulnerabilities that may have been overlooked in the current version of the website.
| Command | Description |
|---|---|
export TARGET="domain.tld" |
Assign target to an environment variable. |
whois $TARGET |
WHOIS lookup for the target. |
| Command | Description |
|---|---|
nslookup $TARGET |
Identify the A record for the target domain. |
nslookup -query=A $TARGET |
Identify the A record for the target domain. |
dig $TARGET @<nameserver/IP> |
Identify the A record for the target domain. |
dig a $TARGET @<nameserver/IP> |
Identify the A record for the target domain. |
nslookup -query=PTR <IP> |
Identify the PTR record for the target IP address. |
dig -x <IP> @<nameserver/IP> |
Identify the PTR record for the target IP address. |
nslookup -query=ANY $TARGET |
Identify ANY records for the target domain. |
dig any $TARGET @<nameserver/IP> |
Identify ANY records for the target domain. |
nslookup -query=TXT $TARGET |
Identify the TXT records for the target domain. |
dig txt $TARGET @<nameserver/IP> |
Identify the TXT records for the target domain. |
nslookup -query=MX $TARGET |
Identify the MX records for the target domain. |
dig mx $TARGET @<nameserver/IP> |
Identify the MX records for the target domain. |
| Resource/Command | Description | |||
|---|---|---|---|---|
VirusTotal |
https://www.virustotal.com/gui/home/url | |||
Censys |
https://censys.io/ | |||
Crt.sh |
https://crt.sh/ | |||
| `curl -s https://sonar.omnisint.io/subdomains/{domain} \ | jq -r '.[]' \ | sort -u` | All subdomains for a given domain. | |
| `curl -s https://sonar.omnisint.io/tlds/{domain} \ | jq -r '.[]' \ | sort -u` | All TLDs found for a given domain. | |
| `curl -s https://sonar.omnisint.io/all/{domain} \ | jq -r '.[]' \ | sort -u` | All results across all TLDs for a given domain. | |
| `curl -s https://sonar.omnisint.io/reverse/{ip} \ | jq -r '.[]' \ | sort -u` | Reverse DNS lookup on IP address. | |
| `curl -s https://sonar.omnisint.io/reverse/{ip}/{mask} \ | jq -r '.[]' \ | sort -u` | Reverse DNS lookup of a CIDR range. | |
| `curl -s "https://crt.sh/?q=${TARGET}&output=json" \ | jq -r '.[] \ | "(.name_value)\n(.common_name)"' \ | sort -u` | Certificate Transparency. |
| `cat sources.txt \ | while read source; do theHarvester -d "${TARGET}" -b $source -f "${source}-${TARGET}";done` | Searching for subdomains and other information on the sources provided in the source.txt list. |
Sources.txt
baidu
bufferoverun
crtsh
hackertarget
otx
projecdiscovery
rapiddns
sublist3r
threatcrowd
trello
urlscan
vhost
virustotal
zoomeye
| Resource/Command | Description |
|---|---|
Netcraft |
https://www.netcraft.com/ |
WayBackMachine |
http://web.archive.org/ |
WayBackURLs |
https://github.com/tomnomnom/waybackurls |
waybackurls -dates https://$TARGET > waybackurls.txt |
Crawling URLs from a domain with the date it was obtained. |
| Resource/Command | Description | |
|---|---|---|
curl -I "http://${TARGET}" |
Display HTTP headers of the target webserver. | |
whatweb -a https://www.facebook.com -v |
Technology identification. | |
Wappalyzer |
https://www.wappalyzer.com/ | |
wafw00f -v https://$TARGET |
WAF Fingerprinting. | |
Aquatone |
https://github.com/michenriksen/aquatone | |
| `cat subdomain.list \ | aquatone -out ./aquatone -screenshot-timeout 1000` | Makes screenshots of all subdomains in the subdomain.list. |
| Resource/Command | Description |
|---|---|
HackerTarget |
https://hackertarget.com/zone-transfer/ |
SecLists |
https://github.com/danielmiessler/SecLists |
nslookup -type=any -query=AXFR $TARGET nameserver.target.domain |
Zone Transfer using Nslookup against the target domain and its nameserver. |
gobuster dns -q -r "${NS}" -d "${TARGET}" -w "${WORDLIST}" -p ./patterns.txt -o "gobuster_${TARGET}.txt" |
Bruteforcing subdomains. |
| Resource/Command | Description | ||
|---|---|---|---|
curl -s http://192.168.10.10 -H "Host: randomtarget.com" |
Changing the HOST HTTP header to request a specific domain. | ||
| `cat ./vhosts.list \ | while read vhost;do echo "\n**\nFUZZING: ${vhost}\n**";curl -s -I http:// |
grep "Content-Length: ";done` | Bruteforcing for possible virtual hosts on the target domain. |
ffuf -w ./vhosts -u http://<IP address> -H "HOST: FUZZ.target.domain" -fs 612 |
Bruteforcing for possible virtual hosts on the target domain using ffuf. |
| Resource/Command | Description |
|---|---|
ZAP |
https://www.zaproxy.org/ |
ffuf -recursion -recursion-depth 1 -u http://192.168.10.10/FUZZ -w /opt/useful/SecLists/Discovery/Web-Content/raft-small-directories-lowercase.txt |
Discovering files and folders that cannot be spotted by browsing the website. |
ffuf -w ./folders.txt:FOLDERS,./wordlist.txt:WORDLIST,./extensions.txt:EXTENSIONS -u http://www.target.domain/FOLDERS/WORDLISTEXTENSIONS |
Mutated bruteforcing against the target web server. |
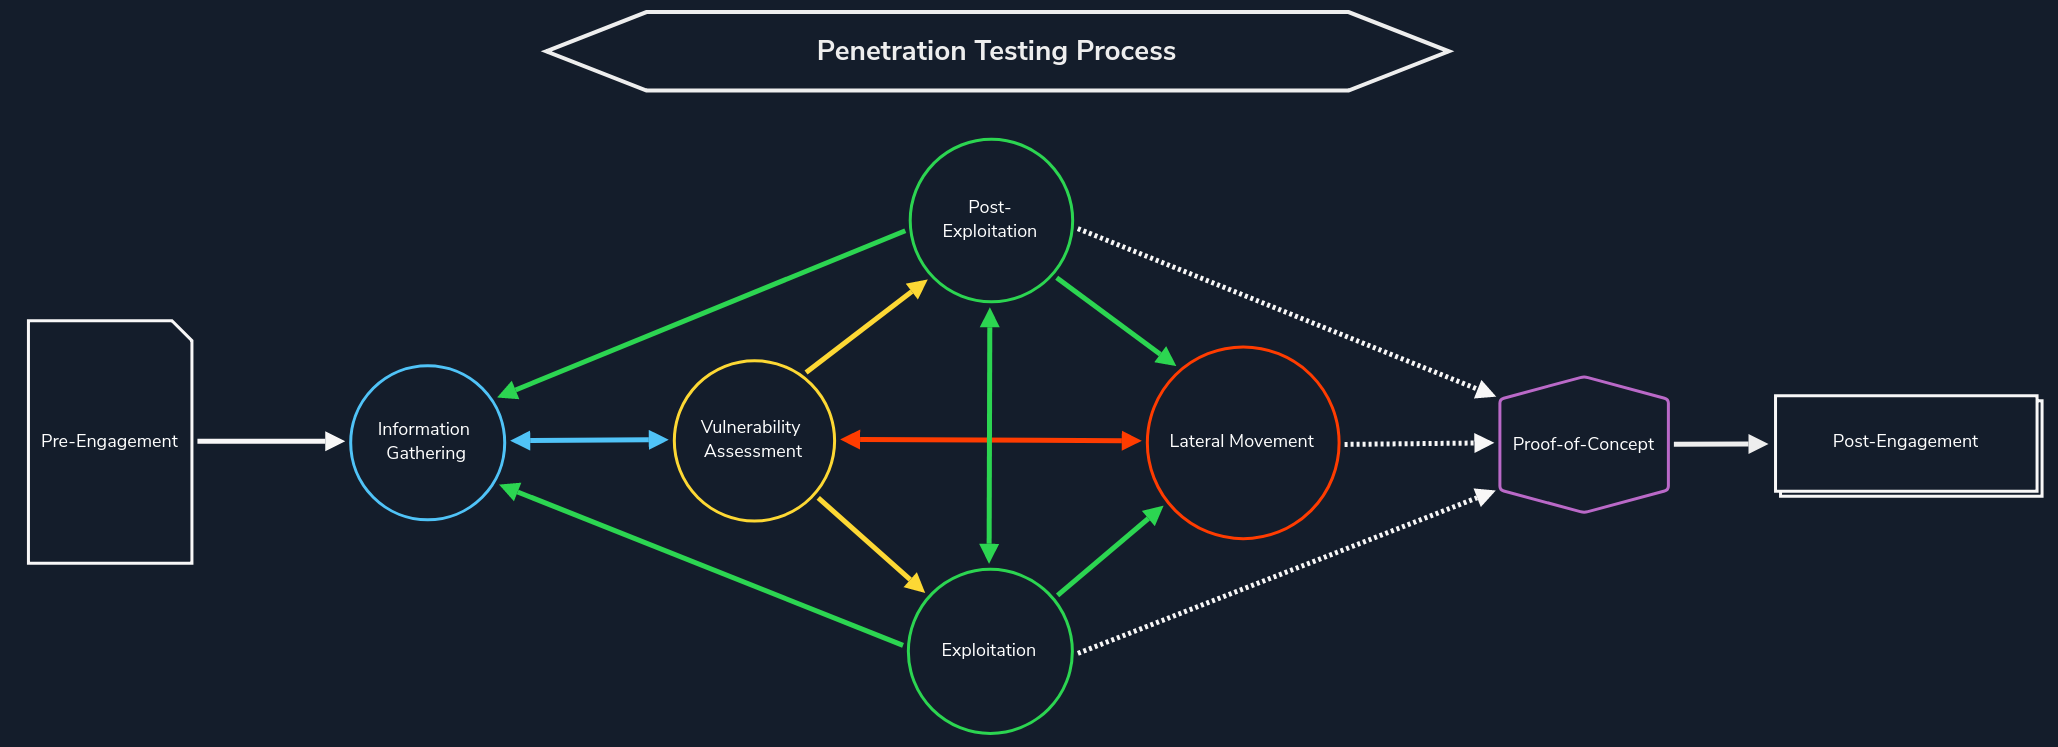
Web Reconnaissance is the foundation of a thorough security assessment. This process involves systematically and meticulously collecting information about a target website or web application. Think of it as the preparatory phase before delving into deeper analysis and potential exploitation. It forms a critical part of the "Information Gathering" phase of the Penetration Testing Process.
The primary goals of web reconnaissance include:
Identifying Assets: Uncovering all publicly accessible components of the target, such as web pages, subdomains, IP addresses, and technologies used. This step provides a comprehensive overview of the target's online presence.Discovering Hidden Information: Locating sensitive information that might be inadvertently exposed, including backup files, configuration files, or internal documentation. These findings can reveal valuable insights and potential entry points for attacks.Analysing the Attack Surface: Examining the target's attack surface to identify potential vulnerabilities and weaknesses. This involves assessing the technologies used, configurations, and possible entry points for exploitation.Gathering Intelligence: Collecting information that can be leveraged for further exploitation or social engineering attacks. This includes identifying key personnel, email addresses, or patterns of behaviour that could be exploited.Attackers leverage this information to tailor their attacks, allowing them to target specific weaknesses and bypass security measures. Conversely, defenders use recon to proactively identify and patch vulnerabilities before malicious actors can leverage them.
Web reconnaissance encompasses two fundamental methodologies: active and passive reconnaissance. Each approach offers distinct advantages and challenges, and understanding their differences is crucial for adequate information gathering.
In active reconnaissance, the attacker directly interacts with the target system to gather information. This interaction can take various forms:
| Technique | Description | Example | Tools | Risk of Detection |
|---|---|---|---|---|
Port Scanning |
Identifying open ports and services running on the target. | Using Nmap to scan a web server for open ports like 80 (HTTP) and 443 (HTTPS). | Nmap, Masscan, Unicornscan | High: Direct interaction with the target can trigger intrusion detection systems (IDS) and firewalls. |
Vulnerability Scanning |
Probing the target for known vulnerabilities, such as outdated software or misconfigurations. | Running Nessus against a web application to check for SQL injection flaws or cross-site scripting (XSS) vulnerabilities. | Nessus, OpenVAS, Nikto | High: Vulnerability scanners send exploit payloads that security solutions can detect. |
Network Mapping |
Mapping the target's network topology, including connected devices and their relationships. | Using traceroute to determine the path packets take to reach the target server, revealing potential network hops and infrastructure. | Traceroute, Nmap | Medium to High: Excessive or unusual network traffic can raise suspicion. |
Banner Grabbing |
Retrieving information from banners displayed by services running on the target. | Connecting to a web server on port 80 and examining the HTTP banner to identify the web server software and version. | Netcat, curl | Low: Banner grabbing typically involves minimal interaction but can still be logged. |
OS Fingerprinting |
Identifying the operating system running on the target. | Using Nmap's OS detection capabilities (-O) to determine if the target is running Windows, Linux, or another OS. |
Nmap, Xprobe2 | Low: OS fingerprinting is usually passive, but some advanced techniques can be detected. |
Service Enumeration |
Determining the specific versions of services running on open ports. | Using Nmap's service version detection (-sV) to determine if a web server is running Apache 2.4.50 or Nginx 1.18.0. |
Nmap | Low: Similar to banner grabbing, service enumeration can be logged but is less likely to trigger alerts. |
Web Spidering |
Crawling the target website to identify web pages, directories, and files. | Running a web crawler like Burp Suite Spider or OWASP ZAP Spider to map out the structure of a website and discover hidden resources. | Burp Suite Spider, OWASP ZAP Spider, Scrapy (customisable) | Low to Medium: Can be detected if the crawler's behaviour is not carefully configured to mimic legitimate traffic. |
Active reconnaissance provides a direct and often more comprehensive view of the target's infrastructure and security posture. However, it also carries a higher risk of detection, as the interactions with the target can trigger alerts or raise suspicion.
In contrast, passive reconnaissance involves gathering information about the target without directly interacting with it. This relies on analysing publicly available information and resources, such as:
| Technique | Description | Example | Tools | Risk of Detection |
|---|---|---|---|---|
Search Engine Queries |
Utilising search engines to uncover information about the target, including websites, social media profiles, and news articles. | Searching Google for "[Target Name] employees" to find employee information or social media profiles. |
Google, DuckDuckGo, Bing, and specialised search engines (e.g., Shodan) | Very Low: Search engine queries are normal internet activity and unlikely to trigger alerts. |
WHOIS Lookups |
Querying WHOIS databases to retrieve domain registration details. | Performing a WHOIS lookup on a target domain to find the registrant's name, contact information, and name servers. | whois command-line tool, online WHOIS lookup services | Very Low: WHOIS queries are legitimate and do not raise suspicion. |
DNS |
Analysing DNS records to identify subdomains, mail servers, and other infrastructure. | Using dig to enumerate subdomains of a target domain. |
dig, nslookup, host, dnsenum, fierce, dnsrecon | Very Low: DNS queries are essential for internet browsing and are not typically flagged as suspicious. |
Web Archive Analysis |
Examining historical snapshots of the target's website to identify changes, vulnerabilities, or hidden information. | Using the Wayback Machine to view past versions of a target website to see how it has changed over time. | Wayback Machine | Very Low: Accessing archived versions of websites is a normal activity. |
Social Media Analysis |
Gathering information from social media platforms like LinkedIn, Twitter, or Facebook. | Searching LinkedIn for employees of a target organisation to learn about their roles, responsibilities, and potential social engineering targets. | LinkedIn, Twitter, Facebook, specialised OSINT tools | Very Low: Accessing public social media profiles is not considered intrusive. |
Code Repositories |
Analysing publicly accessible code repositories like GitHub for exposed credentials or vulnerabilities. | Searching GitHub for code snippets or repositories related to the target that might contain sensitive information or code vulnerabilities. | GitHub, GitLab | Very Low: Code repositories are meant for public access, and searching them is not suspicious. |
Passive reconnaissance is generally considered stealthier and less likely to trigger alarms than active reconnaissance. However, it may yield less comprehensive information, as it relies on what's already publicly accessible.
In this module, we will delve into the essential tools and techniques used in web reconnaissance, starting with WHOIS. Understanding the WHOIS protocol provides a gateway to accessing vital information about domain registrations, ownership details, and the digital infrastructure of targets. This foundational knowledge sets the stage for more advanced recon methods we'll explore later.
WHOIS is a widely used query and response protocol designed to access databases that store information about registered internet resources. Primarily associated with domain names, WHOIS can also provide details about IP address blocks and autonomous systems. Think of it as a giant phonebook for the internet, letting you look up who owns or is responsible for various online assets.
WHOIS
root@htb[/htb]$ whois inlanefreight.com

[...]
Domain Name: inlanefreight.com
Registry Domain ID: 2420436757_DOMAIN_COM-VRSN
Registrar WHOIS Server: whois.registrar.amazon
Registrar URL: https://registrar.amazon.com
Updated Date: 2023-07-03T01:11:15Z
Creation Date: 2019-08-05T22:43:09Z
[...]
Each WHOIS record typically contains the following information:
Domain Name: The domain name itself (e.g., example.com)Registrar: The company where the domain was registered (e.g., GoDaddy, Namecheap)Registrant Contact: The person or organization that registered the domain.Administrative Contact: The person responsible for managing the domain.Technical Contact: The person handling technical issues related to the domain.Creation and Expiration Dates: When the domain was registered and when it's set to expire.Name Servers: Servers that translate the domain name into an IP address.The history of WHOIS is intrinsically linked to the vision and dedication of Elizabeth Feinler, a computer scientist who played a pivotal role in shaping the early internet.
In the 1970s, Feinler and her team at the Stanford Research Institute's Network Information Center (NIC) recognised the need for a system to track and manage the growing number of network resources on the ARPANET, the precursor to the modern internet. Their solution was the creation of the WHOIS directory, a rudimentary yet groundbreaking database that stored information about network users, hostnames, and domain names.
\
WHOIS data serves as a treasure trove of information for penetration testers during the reconnaissance phase of an assessment. It offers valuable insights into the target organisation's digital footprint and potential vulnerabilities:
Identifying Key Personnel: WHOIS records often reveal the names, email addresses, and phone numbers of individuals responsible for managing the domain. This information can be leveraged for social engineering attacks or to identify potential targets for phishing campaigns.Discovering Network Infrastructure: Technical details like name servers and IP addresses provide clues about the target's network infrastructure. This can help penetration testers identify potential entry points or misconfigurations.Historical Data Analysis: Accessing historical WHOIS records through services like WhoisFreaks can reveal changes in ownership, contact information, or technical details over time. This can be useful for tracking the evolution of the target's digital presence.Let's consider three scenarios to help illustrate the value of WHOIS data.
An email security gateway flags a suspicious email sent to multiple employees within a company. The email claims to be from the company's bank and urges recipients to click on a link to update their account information. A security analyst investigates the email and begins by performing a WHOIS lookup on the domain linked in the email.
The WHOIS record reveals the following:
Registration Date: The domain was registered just a few days ago.Registrant: The registrant's information is hidden behind a privacy service.Name Servers: The name servers are associated with a known bulletproof hosting provider often used for malicious activities.This combination of factors raises significant red flags for the analyst. The recent registration date, hidden registrant information, and suspicious hosting strongly suggest a phishing campaign. The analyst promptly alerts the company's IT department to block the domain and warns employees about the scam.
Further investigation into the hosting provider and associated IP addresses may uncover additional phishing domains or infrastructure the threat actor uses.
A security researcher is analysing a new strain of malware that has infected several systems within a network. The malware communicates with a remote server to receive commands and exfiltrate stolen data. To gain insights into the threat actor's infrastructure, the researcher performs a WHOIS lookup on the domain associated with the command-and-control (C2) server.
The WHOIS record reveals:
Registrant: The domain is registered to an individual using a free email service known for anonymity.Location: The registrant's address is in a country with a high prevalence of cybercrime.Registrar: The domain was registered through a registrar with a history of lax abuse policies.Based on this information, the researcher concludes that the C2 server is likely hosted on a compromised or "bulletproof" server. The researcher then uses the WHOIS data to identify the hosting provider and notify them of the malicious activity.
A cybersecurity firm tracks the activities of a sophisticated threat actor group known for targeting financial institutions. Analysts gather WHOIS data on multiple domains associated with the group's past campaigns to compile a comprehensive threat intelligence report.
By analysing the WHOIS records, analysts uncover the following patterns:
Registration Dates: The domains were registered in clusters, often shortly before major attacks.Registrants: The registrants use various aliases and fake identities.Name Servers: The domains often share the same name servers, suggesting a common infrastructure.Takedown History: Many domains have been taken down after attacks, indicating previous law enforcement or security interventions.These insights allow analysts to create a detailed profile of the threat actor's tactics, techniques, and procedures (TTPs). The report includes indicators of compromise (IOCs) based on the WHOIS data, which other organisations can use to detect and block future attacks.
Before using the whois command, you'll need to ensure it's installed on your Linux system. It's a utility available through linux package managers, and if it's not installed, it can be installed simply with
Utilising WHOIS
root@htb[/htb]$ sudo apt update
root@htb[/htb]$ sudo apt install whois -y
The simplest way to access WHOIS data is through the whois command-line tool. Let's perform a WHOIS lookup on facebook.com:
Utilising WHOIS
root@htb[/htb]$ whois facebook.com

   Domain Name: FACEBOOK.COM
   Registry Domain ID: 2320948_DOMAIN_COM-VRSN
   Registrar WHOIS Server: whois.registrarsafe.com
   Registrar URL: http://www.registrarsafe.com
   Updated Date: 2024-04-24T19:06:12Z
   Creation Date: 1997-03-29T05:00:00Z
   Registry Expiry Date: 2033-03-30T04:00:00Z
   Registrar: RegistrarSafe, LLC
   Registrar IANA ID: 3237
   Registrar Abuse Contact Email: abusecomplaints@registrarsafe.com
   Registrar Abuse Contact Phone: +1-650-308-7004
   Domain Status: clientDeleteProhibited https://icann.org/epp#clientDeleteProhibited
   Domain Status: clientTransferProhibited https://icann.org/epp#clientTransferProhibited
   Domain Status: clientUpdateProhibited https://icann.org/epp#clientUpdateProhibited
   Domain Status: serverDeleteProhibited https://icann.org/epp#serverDeleteProhibited
   Domain Status: serverTransferProhibited https://icann.org/epp#serverTransferProhibited
   Domain Status: serverUpdateProhibited https://icann.org/epp#serverUpdateProhibited
   Name Server: A.NS.FACEBOOK.COM
   Name Server: B.NS.FACEBOOK.COM
   Name Server: C.NS.FACEBOOK.COM
   Name Server: D.NS.FACEBOOK.COM
   DNSSEC: unsigned
   URL of the ICANN Whois Inaccuracy Complaint Form: https://www.icann.org/wicf/
>>> Last update of whois database: 2024-06-01T11:24:10Z <<<

[...]
Registry Registrant ID:
Registrant Name: Domain Admin
Registrant Organization: Meta Platforms, Inc.
[...]
The WHOIS output for facebook.com reveals several key details:
Domain Registration:
Registrar: RegistrarSafe, LLCCreation Date: 1997-03-29Expiry Date: 2033-03-30These details indicate that the domain is registered with RegistrarSafe, LLC, and has been active for a considerable period, suggesting its legitimacy and established online presence. The distant expiry date further reinforces its longevity.
Domain Owner:
Registrant/Admin/Tech Organization: Meta Platforms, Inc.Registrant/Admin/Tech Contact: Domain AdminThis information identifies Meta Platforms, Inc. as the organization behind facebook.com, and "Domain Admin" as the point of contact for domain-related matters. This is consistent with the expectation that Facebook, a prominent social media platform, is owned by Meta Platforms, Inc.
Domain Status:
clientDeleteProhibited, clientTransferProhibited, clientUpdateProhibited, serverDeleteProhibited, serverTransferProhibited, and serverUpdateProhibitedThese statuses indicate that the domain is protected against unauthorized changes, transfers, or deletions on both the client and server sides. This highlights a strong emphasis on security and control over the domain.
Name Servers:
A.NS.FACEBOOK.COM, B.NS.FACEBOOK.COM, C.NS.FACEBOOK.COM, D.NS.FACEBOOK.COMThese name servers are all within the facebook.com domain, suggesting that Meta Platforms, Inc. manages its DNS infrastructure. It is common practice for large organizations to maintain control and reliability over their DNS resolution.
Overall, the WHOIS output for facebook.com aligns with expectations for a well-established and secure domain owned by a large organization like Meta Platforms, Inc.
While the WHOIS record provides contact information for domain-related issues, it might not be directly helpful in identifying individual employees or specific vulnerabilities. This highlights the need to combine WHOIS data with other reconnaissance techniques to understand the target's digital footprint comprehensively.
The Domain Name System (DNS) acts as the internet's GPS, guiding your online journey from memorable landmarks (domain names) to precise numerical coordinates (IP addresses). Much like how GPS translates a destination name into latitude and longitude for navigation, DNS translates human-readable domain names (like www.example.com) into the numerical IP addresses (like 192.0.2.1) that computers use to communicate.
Imagine navigating a city by memorizing the exact latitude and longitude of every location you want to visit. It would be incredibly cumbersome and inefficient. DNS eliminates this complexity by allowing us to use easy-to-remember domain names instead. When you type a domain name into your browser, DNS acts as your navigator, swiftly finding the corresponding IP address and directing your request to the correct destination on the internet.
Without DNS, navigating the online world would be akin to driving without a map or GPS – a frustrating and error-prone endeavour.
Imagine you want to visit a website like www.example.com. You type this friendly domain name into your browser, but your computer doesn't understand words – it speaks the language of numbers, specifically IP addresses. So, how does your computer find the website's IP address? Enter DNS, the internet's trusty translator.
Your Computer Asks for Directions (DNS Query): When you enter the domain name, your computer first checks its memory (cache) to see if it remembers the IP address from a previous visit. If not, it reaches out to a DNS resolver, usually provided by your internet service provider (ISP).The DNS Resolver Checks its Map (Recursive Lookup): The resolver also has a cache, and if it doesn't find the IP address there, it starts a journey through the DNS hierarchy. It begins by asking a root name server, which is like the librarian of the internet.Root Name Server Points the Way: The root server doesn't know the exact address but knows who does – the Top-Level Domain (TLD) name server responsible for the domain's ending (e.g., .com, .org). It points the resolver in the right direction.TLD Name Server Narrows It Down: The TLD name server is like a regional map. It knows which authoritative name server is responsible for the specific domain you're looking for (e.g., example.com) and sends the resolver there.Authoritative Name Server Delivers the Address: The authoritative name server is the final stop. It's like the street address of the website you want. It holds the correct IP address and sends it back to the resolver.The DNS Resolver Returns the Information: The resolver receives the IP address and gives it to your computer. It also remembers it for a while (caches it), in case you want to revisit the website soon.Your Computer Connects: Now that your computer knows the IP address, it can connect directly to the web server hosting the website, and you can start browsing.The hosts file is a simple text file used to map hostnames to IP addresses, providing a manual method of domain name resolution that bypasses the DNS process. While DNS automates the translation of domain names to IP addresses, the hosts file allows for direct, local overrides. This can be particularly useful for development, troubleshooting, or blocking websites.
The hosts file is located in C:\Windows\System32\drivers\etc\hosts on Windows and in /etc/hosts on Linux and MacOS. Each line in the file follows the format:
Code: txt
<IP Address> <Hostname> [<Alias> ...]
For example:
Code: txt
127.0.0.1       localhost
192.168.1.10    devserver.local
To edit the hosts file, open it with a text editor using administrative/root privileges. Add new entries as needed, and then save the file. The changes take effect immediately without requiring a system restart.
Common uses include redirecting a domain to a local server for development:
Code: txt
127.0.0.1 myapp.local
testing connectivity by specifying an IP address:
Code: txt
192.168.1.20 testserver.local
or blocking unwanted websites by redirecting their domains to a non-existent IP address:
Code: txt
0.0.0.0 unwanted-site.com
Think of the DNS process as a relay race. Your computer starts with the domain name and passes it along to the resolver. The resolver then passes the request to the root server, the TLD server, and finally, the authoritative server, each one getting closer to the destination. Once the IP address is found, it's relayed back down the chain to your computer, allowing you to access the website.
In the Domain Name System (DNS), a zone is a distinct part of the domain namespace that a specific entity or administrator manages. Think of it as a virtual container for a set of domain names. For example, example.com and all its subdomains (like mail.example.com or blog.example.com) would typically belong to the same DNS zone.
The zone file, a text file residing on a DNS server, defines the resource records (discussed below) within this zone, providing crucial information for translating domain names into IP addresses.
To illustrate, here's a simplified example of what a zone file, for example.com might look like:
Code: zone
$TTL 3600 ; Default Time-To-Live (1 hour)
@       IN SOA   ns1.example.com. admin.example.com. (
                2024060401 ; Serial number (YYYYMMDDNN)
                3600       ; Refresh interval
                900        ; Retry interval
                604800     ; Expire time
                86400 )    ; Minimum TTL

@       IN NS    ns1.example.com.
@       IN NS    ns2.example.com.
@       IN MX 10 mail.example.com.
www     IN A     192.0.2.1
mail    IN A     198.51.100.1
ftp     IN CNAME www.example.com.
This file defines the authoritative name servers (NS records), mail server (MX record), and IP addresses (A records) for various hosts within the example.com domain.
DNS servers store various resource records, each serving a specific purpose in the domain name resolution process. Let's explore some of the most common DNS concepts:
| DNS Concept | Description | Example |
|---|---|---|
Domain Name |
A human-readable label for a website or other internet resource. | www.example.com |
IP Address |
A unique numerical identifier assigned to each device connected to the internet. | 192.0.2.1 |
DNS Resolver |
A server that translates domain names into IP addresses. | Your ISP's DNS server or public resolvers like Google DNS (8.8.8.8) |
Root Name Server |
The top-level servers in the DNS hierarchy. | There are 13 root servers worldwide, named A-M: a.root-servers.net |
TLD Name Server |
Servers responsible for specific top-level domains (e.g., .com, .org). | Verisign for .com, PIR for .org |
Authoritative Name Server |
The server that holds the actual IP address for a domain. | Often managed by hosting providers or domain registrars. |
DNS Record Types |
Different types of information stored in DNS. | A, AAAA, CNAME, MX, NS, TXT, etc. |
Now that we've explored the fundamental concepts of DNS, let's dive deeper into the building blocks of DNS information – the various record types. These records store different types of data associated with domain names, each serving a specific purpose:
| Record Type | Full Name | Description | Zone File Example |
|---|---|---|---|
A |
Address Record | Maps a hostname to its IPv4 address. | www.example.com. IN A 192.0.2.1 |
AAAA |
IPv6 Address Record | Maps a hostname to its IPv6 address. | www.example.com. IN AAAA 2001:db8:85a3::8a2e:370:7334 |
CNAME |
Canonical Name Record | Creates an alias for a hostname, pointing it to another hostname. | blog.example.com. IN CNAME webserver.example.net. |
MX |
Mail Exchange Record | Specifies the mail server(s) responsible for handling email for the domain. | example.com. IN MX 10 mail.example.com. |
NS |
Name Server Record | Delegates a DNS zone to a specific authoritative name server. | example.com. IN NS ns1.example.com. |
TXT |
Text Record | Stores arbitrary text information, often used for domain verification or security policies. | example.com. IN TXT "v=spf1 mx -all" (SPF record) |
SOA |
Start of Authority Record | Specifies administrative information about a DNS zone, including the primary name server, responsible person's email, and other parameters. | example.com. IN SOA ns1.example.com. admin.example.com. 2024060301 10800 3600 604800 86400 |
SRV |
Service Record | Defines the hostname and port number for specific services. | _sip._udp.example.com. IN SRV 10 5 5060 sipserver.example.com. |
PTR |
Pointer Record | Used for reverse DNS lookups, mapping an IP address to a hostname. | 1.2.0.192.in-addr.arpa. IN PTR www.example.com. |
The "IN" in the examples stands for "Internet." It's a class field in DNS records that specifies the protocol family. In most cases, you'll see "IN" used, as it denotes the Internet protocol suite (IP) used for most domain names. Other class values exist (e.g., CH for Chaosnet, HS for Hesiod) but are rarely used in modern DNS configurations.
In essence, "IN" is simply a convention that indicates that the record applies to the standard internet protocols we use today. While it might seem like an extra detail, understanding its meaning provides a deeper understanding of DNS record structure.
DNS is not merely a technical protocol for translating domain names; it's a critical component of a target's infrastructure that can be leveraged to uncover vulnerabilities and gain access during a penetration test:
Uncovering Assets: DNS records can reveal a wealth of information, including subdomains, mail servers, and name server records. For instance, a CNAME record pointing to an outdated server (dev.example.com CNAME oldserver.example.net) could lead to a vulnerable system.Mapping the Network Infrastructure: You can create a comprehensive map of the target's network infrastructure by analysing DNS data. For example, identifying the name servers (NS records) for a domain can reveal the hosting provider used, while an A record for loadbalancer.example.com can pinpoint a load balancer. This helps you understand how different systems are connected, identify traffic flow, and pinpoint potential choke points or weaknesses that could be exploited during a penetration test.Monitoring for Changes: Continuously monitoring DNS records can reveal changes in the target's infrastructure over time. For example, the sudden appearance of a new subdomain (vpn.example.com) might indicate a new entry point into the network, while a TXT record containing a value like _1password=... strongly suggests the organization is using 1Password, which could be leveraged for social engineering attacks or targeted phishing campaigns.Having established a solid understanding of DNS fundamentals and its various record types, let's now transition to the practical. This section will explore the tools and techniques for leveraging DNS for web reconnaissance.
DNS reconnaissance involves utilizing specialized tools designed to query DNS servers and extract valuable information. Here are some of the most popular and versatile tools in the arsenal of web recon professionals:
| Tool | Key Features | Use Cases |
|---|---|---|
dig |
Versatile DNS lookup tool that supports various query types (A, MX, NS, TXT, etc.) and detailed output. | Manual DNS queries, zone transfers (if allowed), troubleshooting DNS issues, and in-depth analysis of DNS records. |
nslookup |
Simpler DNS lookup tool, primarily for A, AAAA, and MX records. | Basic DNS queries, quick checks of domain resolution and mail server records. |
host |
Streamlined DNS lookup tool with concise output. | Quick checks of A, AAAA, and MX records. |
dnsenum |
Automated DNS enumeration tool, dictionary attacks, brute-forcing, zone transfers (if allowed). | Discovering subdomains and gathering DNS information efficiently. |
fierce |
DNS reconnaissance and subdomain enumeration tool with recursive search and wildcard detection. | User-friendly interface for DNS reconnaissance, identifying subdomains and potential targets. |
dnsrecon |
Combines multiple DNS reconnaissance techniques and supports various output formats. | Comprehensive DNS enumeration, identifying subdomains, and gathering DNS records for further analysis. |
theHarvester |
OSINT tool that gathers information from various sources, including DNS records (email addresses). | Collecting email addresses, employee information, and other data associated with a domain from multiple sources. |
Online DNS Lookup Services |
User-friendly interfaces for performing DNS lookups. | Quick and easy DNS lookups, convenient when command-line tools are not available, checking for domain availability or basic information |
The dig command (Domain Information Groper) is a versatile and powerful utility for querying DNS servers and retrieving various types of DNS records. Its flexibility and detailed and customizable output make it a go-to choice.
| Command | Description |
|---|---|
dig domain.com |
Performs a default A record lookup for the domain. |
dig domain.com A |
Retrieves the IPv4 address (A record) associated with the domain. |
dig domain.com AAAA |
Retrieves the IPv6 address (AAAA record) associated with the domain. |
dig domain.com MX |
Finds the mail servers (MX records) responsible for the domain. |
dig domain.com NS |
Identifies the authoritative name servers for the domain. |
dig domain.com TXT |
Retrieves any TXT records associated with the domain. |
dig domain.com CNAME |
Retrieves the canonical name (CNAME) record for the domain. |
dig domain.com SOA |
Retrieves the start of authority (SOA) record for the domain. |
dig @1.1.1.1 domain.com |
Specifies a specific name server to query; in this case 1.1.1.1 |
dig +trace domain.com |
Shows the full path of DNS resolution. |
dig -x 192.168.1.1 |
Performs a reverse lookup on the IP address 192.168.1.1 to find the associated host name. You may need to specify a name server. |
dig +short domain.com |
Provides a short, concise answer to the query. |
dig +noall +answer domain.com |
Displays only the answer section of the query output. |
dig domain.com ANY |
Retrieves all available DNS records for the domain (Note: Many DNS servers ignore ANY queries to reduce load and prevent abuse, as per RFC 8482). |
Caution: Some servers can detect and block excessive DNS queries. Use caution and respect rate limits. Always obtain permission before performing extensive DNS reconnaissance on a target.
Digging DNS
root@htb[/htb]$ dig google.com

; <<>> DiG 9.18.24-0ubuntu0.22.04.1-Ubuntu <<>> google.com
;; global options: +cmd
;; Got answer:
;; ->>HEADER<<- opcode: QUERY, status: NOERROR, id: 16449
;; flags: qr rd ad; QUERY: 1, ANSWER: 1, AUTHORITY: 0, ADDITIONAL: 0
;; WARNING: recursion requested but not available

;; QUESTION SECTION:
;google.com.                    IN      A

;; ANSWER SECTION:
google.com.             0       IN      A       142.251.47.142

;; Query time: 0 msec
;; SERVER: 172.23.176.1#53(172.23.176.1) (UDP)
;; WHEN: Thu Jun 13 10:45:58 SAST 2024
;; MSG SIZE  rcvd: 54
This output is the result of a DNS query using the dig command for the domain google.com. The command was executed on a system running DiG version 9.18.24-0ubuntu0.22.04.1-Ubuntu. The output can be broken down into four key sections:
;; ->>HEADER<<- opcode: QUERY, status: NOERROR, id: 16449: This line indicates the type of query (QUERY), the successful status (NOERROR), and a unique identifier (16449) for this specific query.;; flags: qr rd ad; QUERY: 1, ANSWER: 1, AUTHORITY: 0, ADDITIONAL: 0: This describes the flags in the DNS header:qr: Query Response flag - indicates this is a response.rd: Recursion Desired flag - means recursion was requested.ad: Authentic Data flag - means the resolver considers the data authentic.;; WARNING: recursion requested but not available: This indicates that recursion was requested, but the server does not support it.;google.com. IN A: This line specifies the question: "What is the IPv4 address (A record) for google.com?"google.com. 0 IN A 142.251.47.142: This is the answer to the query. It indicates that the IP address associated with google.com is 142.251.47.142. The '0' represents the TTL (time-to-live), indicating how long the result can be cached before being refreshed.;; Query time: 0 msec: This shows the time it took for the query to be processed and the response to be received (0 milliseconds).;; SERVER: 172.23.176.1#53(172.23.176.1) (UDP): This identifies the DNS server that provided the answer and the protocol used (UDP).;; WHEN: Thu Jun 13 10:45:58 SAST 2024: This is the timestamp of when the query was made.;; MSG SIZE rcvd: 54: This indicates the size of the DNS message received (54 bytes).An opt pseudosection can sometimes exist in a dig query. This is due to Extension Mechanisms for DNS (EDNS), which allows for additional features such as larger message sizes and DNS Security Extensions (DNSSEC) support.
If you just want the answer to the question, without any of the other information, you can query dig using +short:
Digging DNS
root@htb[/htb]$ dig +short hackthebox.com

104.18.20.126
104.18.21.126
When exploring DNS records, we've primarily focused on the main domain (e.g., example.com) and its associated information. However, beneath the surface of this primary domain lies a potential network of subdomains. These subdomains are extensions of the main domain, often created to organise and separate different sections or functionalities of a website. For instance, a company might use blog.example.com for its blog, shop.example.com for its online store, or mail.example.com for its email services.
Subdomains often host valuable information and resources that aren't directly linked from the main website. This can include:
Development and Staging Environments: Companies often use subdomains to test new features or updates before deploying them to the main site. Due to relaxed security measures, these environments sometimes contain vulnerabilities or expose sensitive information.Hidden Login Portals: Subdomains might host administrative panels or other login pages that are not meant to be publicly accessible. Attackers seeking unauthorised access can find these as attractive targets.Legacy Applications: Older, forgotten web applications might reside on subdomains, potentially containing outdated software with known vulnerabilities.Sensitive Information: Subdomains can inadvertently expose confidential documents, internal data, or configuration files that could be valuable to attackers.Subdomain enumeration is the process of systematically identifying and listing these subdomains. From a DNS perspective, subdomains are typically represented by A (or AAAA for IPv6) records, which map the subdomain name to its corresponding IP address. Additionally, CNAME records might be used to create aliases for subdomains, pointing them to other domains or subdomains. There are two main approaches to subdomain enumeration:
This involves directly interacting with the target domain's DNS servers to uncover subdomains. One method is attempting a DNS zone transfer, where a misconfigured server might inadvertently leak a complete list of subdomains. However, due to tightened security measures, this is rarely successful.
A more common active technique is brute-force enumeration, which involves systematically testing a list of potential subdomain names against the target domain. Tools like dnsenum, ffuf, and gobuster can automate this process, using wordlists of common subdomain names or custom-generated lists based on specific patterns.
This relies on external sources of information to discover subdomains without directly querying the target's DNS servers. One valuable resource is Certificate Transparency (CT) logs, public repositories of SSL/TLS certificates. These certificates often include a list of associated subdomains in their Subject Alternative Name (SAN) field, providing a treasure trove of potential targets.
Another passive approach involves utilising search engines like Google or DuckDuckGo. By employing specialised search operators (e.g., site:), you can filter results to show only subdomains related to the target domain.
Additionally, various online databases and tools aggregate DNS data from multiple sources, allowing you to search for subdomains without directly interacting with the target.
Each of these methods has its strengths and weaknesses. Active enumeration offers more control and potential for comprehensive discovery but can be more detectable. Passive enumeration is stealthier but might not uncover all existing subdomains. Combining both approaches provides a more thorough and effective subdomain enumeration strategy.
Subdomain Brute-Force Enumeration is a powerful active subdomain discovery technique that leverages pre-defined lists of potential subdomain names. This approach systematically tests these names against the target domain to identify valid subdomains. By using carefully crafted wordlists, you can significantly increase the efficiency and effectiveness of your subdomain discovery efforts.
The process breaks down into four steps:
Wordlist Selection: The process begins with selecting a wordlist containing potential subdomain names. These wordlists can be:General-Purpose: Containing a broad range of common subdomain names (e.g., dev, staging, blog, mail, admin, test). This approach is useful when you don't know the target's naming conventions.Targeted: Focused on specific industries, technologies, or naming patterns relevant to the target. This approach is more efficient and reduces the chances of false positives.Custom: You can create your own wordlist based on specific keywords, patterns, or intelligence gathered from other sources.Iteration and Querying: A script or tool iterates through the wordlist, appending each word or phrase to the main domain (e.g., example.com) to create potential subdomain names (e.g., dev.example.com, staging.example.com).DNS Lookup: A DNS query is performed for each potential subdomain to check if it resolves to an IP address. This is typically done using the A or AAAA record type.Filtering and Validation: If a subdomain resolves successfully, it's added to a list of valid subdomains. Further validation steps might be taken to confirm the subdomain's existence and functionality (e.g., by attempting to access it through a web browser).There are several tools available that excel at brute-force enumeration:
| Tool | Description |
|---|---|
| dnsenum | Comprehensive DNS enumeration tool that supports dictionary and brute-force attacks for discovering subdomains. |
| fierce | User-friendly tool for recursive subdomain discovery, featuring wildcard detection and an easy-to-use interface. |
| dnsrecon | Versatile tool that combines multiple DNS reconnaissance techniques and offers customisable output formats. |
| amass | Actively maintained tool focused on subdomain discovery, known for its integration with other tools and extensive data sources. |
| assetfinder | Simple yet effective tool for finding subdomains using various techniques, ideal for quick and lightweight scans. |
| puredns | Powerful and flexible DNS brute-forcing tool, capable of resolving and filtering results effectively. |
dnsenum is a versatile and widely-used command-line tool written in Perl. It is a comprehensive toolkit for DNS reconnaissance, providing various functionalities to gather information about a target domain's DNS infrastructure and potential subdomains. The tool offers several key functions:
DNS Record Enumeration: dnsenum can retrieve various DNS records, including A, AAAA, NS, MX, and TXT records, providing a comprehensive overview of the target's DNS configuration.Zone Transfer Attempts: The tool automatically attempts zone transfers from discovered name servers. While most servers are configured to prevent unauthorised zone transfers, a successful attempt can reveal a treasure trove of DNS information.Subdomain Brute-Forcing: dnsenum supports brute-force enumeration of subdomains using a wordlist. This involves systematically testing potential subdomain names against the target domain to identify valid ones.Google Scraping: The tool can scrape Google search results to find additional subdomains that might not be listed in DNS records directly.Reverse Lookup: dnsenum can perform reverse DNS lookups to identify domains associated with a given IP address, potentially revealing other websites hosted on the same server.WHOIS Lookups: The tool can also perform WHOIS queries to gather information about domain ownership and registration details.Let's see dnsenum in action by demonstrating how to enumerate subdomains for our target, inlanefreight.com. In this demonstration, we'll use the subdomains-top1million-5000.txt wordlist from SecLists, which contains the top 5000 most common subdomains.
Code: bash
dnsenum --enum inlanefreight.com -f /usr/share/seclists/Discovery/DNS/subdomains-top1million-110000.txt -r
In this command:
dnsenum --enum inlanefreight.com: We specify the target domain we want to enumerate, along with a shortcut for some tuning options --enum.-f /usr/share/seclists/Discovery/DNS/subdomains-top1million-5000.txt: We indicate the path to the SecLists wordlist we'll use for brute-forcing. Adjust the path if your SecLists installation is different.-r: This option enables recursive subdomain brute-forcing, meaning that if dnsenum finds a subdomain, it will then try to enumerate subdomains of that subdomain.Subdomain Bruteforcing
root@htb[/htb]$ dnsenum --enum inlanefreight.com -f  /usr/share/seclists/Discovery/DNS/subdomains-top1million-20000.txt

dnsenum VERSION:1.2.6

-----   inlanefreight.com   -----


Host's addresses:
__________________

inlanefreight.com.                       300      IN    A        134.209.24.248

[...]

Brute forcing with /usr/share/seclists/Discovery/DNS/subdomains-top1million-20000.txt:
_______________________________________________________________________________________

www.inlanefreight.com.                   300      IN    A        134.209.24.248
support.inlanefreight.com.               300      IN    A        134.209.24.248
[...]


done.
While brute-forcing can be a fruitful approach, there's a less invasive and potentially more efficient method for uncovering subdomains – DNS zone transfers. This mechanism, designed for replicating DNS records between name servers, can inadvertently become a goldmine of information for prying eyes if misconfigured.
A DNS zone transfer is essentially a wholesale copy of all DNS records within a zone (a domain and its subdomains) from one name server to another. This process is essential for maintaining consistency and redundancy across DNS servers. However, if not adequately secured, unauthorised parties can download the entire zone file, revealing a complete list of subdomains, their associated IP addresses, and other sensitive DNS data.
Zone Transfer Request (AXFR): The secondary DNS server initiates the process by sending a zone transfer request to the primary server. This request typically uses the AXFR (Full Zone Transfer) type.SOA Record Transfer: Upon receiving the request (and potentially authenticating the secondary server), the primary server responds by sending its Start of Authority (SOA) record. The SOA record contains vital information about the zone, including its serial number, which helps the secondary server determine if its zone data is current.DNS Records Transmission: The primary server then transfers all the DNS records in the zone to the secondary server, one by one. This includes records like A, AAAA, MX, CNAME, NS, and others that define the domain's subdomains, mail servers, name servers, and other configurations.Zone Transfer Complete: Once all records have been transmitted, the primary server signals the end of the zone transfer. This notification informs the secondary server that it has received a complete copy of the zone data.Acknowledgement (ACK): The secondary server sends an acknowledgement message to the primary server, confirming the successful receipt and processing of the zone data. This completes the zone transfer process.While zone transfers are essential for legitimate DNS management, a misconfigured DNS server can transform this process into a significant security vulnerability. The core issue lies in the access controls governing who can initiate a zone transfer.
In the early days of the internet, allowing any client to request a zone transfer from a DNS server was common practice. This open approach simplified administration but opened a gaping security hole. It meant that anyone, including malicious actors, could ask a DNS server for a complete copy of its zone file, which contains a wealth of sensitive information.
The information gleaned from an unauthorised zone transfer can be invaluable to an attacker. It reveals a comprehensive map of the target's DNS infrastructure, including:
Subdomains: A complete list of subdomains, many of which might not be linked from the main website or easily discoverable through other means. These hidden subdomains could host development servers, staging environments, administrative panels, or other sensitive resources.IP Addresses: The IP addresses associated with each subdomain, providing potential targets for further reconnaissance or attacks.Name Server Records: Details about the authoritative name servers for the domain, revealing the hosting provider and potential misconfigurations.Fortunately, awareness of this vulnerability has grown, and most DNS server administrators have mitigated the risk. Modern DNS servers are typically configured to allow zone transfers only to trusted secondary servers, ensuring that sensitive zone data remains confidential.
However, misconfigurations can still occur due to human error or outdated practices. This is why attempting a zone transfer (with proper authorisation) remains a valuable reconnaissance technique. Even if unsuccessful, the attempt can reveal information about the DNS server's configuration and security posture.
Exploiting Zone Transfers
You can use the dig command to request a zone transfer:
DNS Zone Transfers
root@htb[/htb]$ dig axfr @nsztm1.digi.ninja zonetransfer.me
This command instructs dig to request a full zone transfer (axfr) from the DNS server responsible for zonetransfer.me. If the server is misconfigured and allows the transfer, you'll receive a complete list of DNS records for the domain, including all subdomains.
DNS Zone Transfers
root@htb[/htb]$ dig axfr @nsztm1.digi.ninja zonetransfer.me

; <<>> DiG 9.18.12-1~bpo11+1-Debian <<>> axfr @nsztm1.digi.ninja zonetransfer.me
; (1 server found)
;; global options: +cmd
zonetransfer.me.    7200    IN    SOA    nsztm1.digi.ninja. robin.digi.ninja. 2019100801 172800 900 1209600 3600
zonetransfer.me.    300    IN    HINFO    "Casio fx-700G" "Windows XP"
zonetransfer.me.    301    IN    TXT    "google-site-verification=tyP28J7JAUHA9fw2sHXMgcCC0I6XBmmoVi04VlMewxA"
zonetransfer.me.    7200    IN    MX    0 ASPMX.L.GOOGLE.COM.
...
zonetransfer.me.    7200    IN    A    5.196.105.14
zonetransfer.me.    7200    IN    NS    nsztm1.digi.ninja.
zonetransfer.me.    7200    IN    NS    nsztm2.digi.ninja.
_acme-challenge.zonetransfer.me. 301 IN    TXT    "6Oa05hbUJ9xSsvYy7pApQvwCUSSGgxvrbdizjePEsZI"
_sip._tcp.zonetransfer.me. 14000 IN    SRV    0 0 5060 www.zonetransfer.me.
14.105.196.5.IN-ADDR.ARPA.zonetransfer.me. 7200    IN PTR www.zonetransfer.me.
asfdbauthdns.zonetransfer.me. 7900 IN    AFSDB    1 asfdbbox.zonetransfer.me.
asfdbbox.zonetransfer.me. 7200    IN    A    127.0.0.1
asfdbvolume.zonetransfer.me. 7800 IN    AFSDB    1 asfdbbox.zonetransfer.me.
canberra-office.zonetransfer.me. 7200 IN A    202.14.81.230
...
;; Query time: 10 msec
;; SERVER: 81.4.108.41#53(nsztm1.digi.ninja) (TCP)
;; WHEN: Mon May 27 18:31:35 BST 2024
;; XFR size: 50 records (messages 1, bytes 2085)
zonetransfer.me is a service specifically setup to demonstrate the risks of zone transfers so that the dig command will return the full zone record.
Once the DNS directs traffic to the correct server, the web server configuration becomes crucial in determining how the incoming requests are handled. Web servers like Apache, Nginx, or IIS are designed to host multiple websites or applications on a single server. They achieve this through virtual hosting, which allows them to differentiate between domains, subdomains, or even separate websites with distinct content.
At the core of virtual hosting is the ability of web servers to distinguish between multiple websites or applications sharing the same IP address. This is achieved by leveraging the HTTP Host header, a piece of information included in every HTTP request sent by a web browser.
The key difference between VHosts and subdomains is their relationship to the Domain Name System (DNS) and the web server's configuration.
Subdomains: These are extensions of a main domain name (e.g., blog.example.com is a subdomain of example.com). Subdomains typically have their own DNS records, pointing to either the same IP address as the main domain or a different one. They can be used to organise different sections or services of a website.Virtual Hosts (VHosts): Virtual hosts are configurations within a web server that allow multiple websites or applications to be hosted on a single server. They can be associated with top-level domains (e.g., example.com) or subdomains (e.g., dev.example.com). Each virtual host can have its own separate configuration, enabling precise control over how requests are handled.If a virtual host does not have a DNS record, you can still access it by modifying the hosts file on your local machine. The hosts file allows you to map a domain name to an IP address manually, bypassing DNS resolution.
Websites often have subdomains that are not public and won't appear in DNS records. These subdomains are only accessible internally or through specific configurations. VHost fuzzing is a technique to discover public and non-public subdomains and VHosts by testing various hostnames against a known IP address.
Virtual hosts can also be configured to use different domains, not just subdomains. For example:
Code: apacheconf
# Example of name-based virtual host configuration in Apache
<VirtualHost *:80>
    ServerName www.example1.com
    DocumentRoot /var/www/example1
</VirtualHost>

<VirtualHost *:80>
    ServerName www.example2.org
    DocumentRoot /var/www/example2
</VirtualHost>

<VirtualHost *:80>
    ServerName www.another-example.net
    DocumentRoot /var/www/another-example
</VirtualHost>
Here, example1.com, example2.org, and another-example.net are distinct domains hosted on the same server. The web server uses the Host header to serve the appropriate content based on the requested domain name.
The following illustrates the process of how a web server determines the correct content to serve based on the Host header:
Browser Requests a Website: When you enter a domain name (e.g., www.inlanefreight.com) into your browser, it initiates an HTTP request to the web server associated with that domain's IP address.Host Header Reveals the Domain: The browser includes the domain name in the request's Host header, which acts as a label to inform the web server which website is being requested.Web Server Determines the Virtual Host: The web server receives the request, examines the Host header, and consults its virtual host configuration to find a matching entry for the requested domain name.Serving the Right Content: Upon identifying the correct virtual host configuration, the web server retrieves the corresponding files and resources associated with that website from its document root and sends them back to the browser as the HTTP response.In essence, the Host header functions as a switch, enabling the web server to dynamically determine which website to serve based on the domain name requested by the browser.
There are three primary types of virtual hosting, each with its advantages and drawbacks:
Name-Based Virtual Hosting: This method relies solely on the HTTP Host header to distinguish between websites. It is the most common and flexible method, as it doesn't require multiple IP addresses. It’s cost-effective, easy to set up, and supports most modern web servers. However, it requires the web server to support name-based virtual hosting and can have limitations with certain protocols like SSL/TLS.IP-Based Virtual Hosting: This type of hosting assigns a unique IP address to each website hosted on the server. The server determines which website to serve based on the IP address to which the request was sent. It doesn't rely on the Host header, can be used with any protocol, and offers better isolation between websites. Still, it requires multiple IP addresses, which can be expensive and less scalable.Port-Based Virtual Hosting: Different websites are associated with different ports on the same IP address. For example, one website might be accessible on port 80, while another is on port 8080. Port-based virtual hosting can be used when IP addresses are limited, but it’s not as common or user-friendly as name-based virtual hosting and might require users to specify the port number in the URL.While manual analysis of HTTP headers and reverse DNS lookups can be effective, specialised virtual host discovery tools automate and streamline the process, making it more efficient and comprehensive. These tools employ various techniques to probe the target server and uncover potential virtual hosts.
Several tools are available to aid in the discovery of virtual hosts:
| Tool | Description | Features |
|---|---|---|
| gobuster | A multi-purpose tool often used for directory/file brute-forcing, but also effective for virtual host discovery. | Fast, supports multiple HTTP methods, can use custom wordlists. |
| Feroxbuster | Similar to Gobuster, but with a Rust-based implementation, known for its speed and flexibility. | Supports recursion, wildcard discovery, and various filters. |
| ffuf | Another fast web fuzzer that can be used for virtual host discovery by fuzzing the Host header. |
Customizable wordlist input and filtering options. |
Gobuster is a versatile tool commonly used for directory and file brute-forcing, but it also excels at virtual host discovery. It systematically sends HTTP requests with different Host headers to a target IP address and then analyses the responses to identify valid virtual hosts.
There are a couple of things you need to prepare to brute force Host headers:
Target Identification: First, identify the target web server's IP address. This can be done through DNS lookups or other reconnaissance techniques.Wordlist Preparation: Prepare a wordlist containing potential virtual host names. You can use a pre-compiled wordlist, such as SecLists, or create a custom one based on your target's industry, naming conventions, or other relevant information.The gobuster command to bruteforce vhosts generally looks like this:
Virtual Hosts
root@htb[/htb]$ gobuster vhost -u http://<target_IP_address> -w <wordlist_file> --append-domain
-u flag specifies the target URL (replace <target_IP_address> with the actual IP).-w flag specifies the wordlist file (replace <wordlist_file> with the path to your wordlist).--append-domain flag appends the base domain to each word in the wordlist.In newer versions of Gobuster, the --append-domain flag is required to append the base domain to each word in the wordlist when performing virtual host discovery. This flag ensures that Gobuster correctly constructs the full virtual hostnames, which is essential for the accurate enumeration of potential subdomains. In older versions of Gobuster, this functionality was handled differently, and the --append-domain flag was not necessary. Users of older versions might not find this flag available or needed, as the tool appended the base domain by default or employed a different mechanism for virtual host generation.
Gobuster will output potential virtual hosts as it discovers them. Analyse the results carefully, noting any unusual or interesting findings. Further investigation might be needed to confirm the existence and functionality of the discovered virtual hosts.
There are a couple of other arguments that are worth knowing:
-t flag to increase the number of threads for faster scanning.-k flag can ignore SSL/TLS certificate errors.-o flag to save the output to a file for later analysis.Virtual Hosts
root@htb[/htb]$ gobuster vhost -u http://inlanefreight.htb:81 -w /usr/share/seclists/Discovery/DNS/subdomains-top1million-110000.txt --append-domain
===============================================================
Gobuster v3.6
by OJ Reeves (@TheColonial) & Christian Mehlmauer (@firefart)
===============================================================
[+] Url:             http://inlanefreight.htb:81
[+] Method:          GET
[+] Threads:         10
[+] Wordlist:        /usr/share/seclists/Discovery/DNS/subdomains-top1million-110000.txt
[+] User Agent:      gobuster/3.6
[+] Timeout:         10s
[+] Append Domain:   true
===============================================================
Starting gobuster in VHOST enumeration mode
===============================================================
Found: forum.inlanefreight.htb:81 Status: 200 [Size: 100]
[...]
Progress: 114441 / 114442 (100.00%)
===============================================================
Finished
===============================================================
In the sprawling mass of the internet, trust is a fragile commodity. One of the cornerstones of this trust is the Secure Sockets Layer/Transport Layer Security (SSL/TLS) protocol, which encrypts communication between your browser and a website. At the heart of SSL/TLS lies the digital certificate, a small file that verifies a website's identity and allows for secure, encrypted communication.
However, the process of issuing and managing these certificates isn't foolproof. Attackers can exploit rogue or mis-issued certificates to impersonate legitimate websites, intercept sensitive data, or spread malware. This is where Certificate Transparency (CT) logs come into play.
Certificate Transparency (CT) logs are public, append-only ledgers that record the issuance of SSL/TLS certificates. Whenever a Certificate Authority (CA) issues a new certificate, it must submit it to multiple CT logs. Independent organisations maintain these logs and are open for anyone to inspect.
Think of CT logs as a global registry of certificates. They provide a transparent and verifiable record of every SSL/TLS certificate issued for a website. This transparency serves several crucial purposes:
Early Detection of Rogue Certificates: By monitoring CT logs, security researchers and website owners can quickly identify suspicious or misissued certificates. A rogue certificate is an unauthorized or fraudulent digital certificate issued by a trusted certificate authority. Detecting these early allows for swift action to revoke the certificates before they can be used for malicious purposes.Accountability for Certificate Authorities: CT logs hold CAs accountable for their issuance practices. If a CA issues a certificate that violates the rules or standards, it will be publicly visible in the logs, leading to potential sanctions or loss of trust.Strengthening the Web PKI (Public Key Infrastructure): The Web PKI is the trust system underpinning secure online communication. CT logs help to enhance the security and integrity of the Web PKI by providing a mechanism for public oversight and verification of certificates.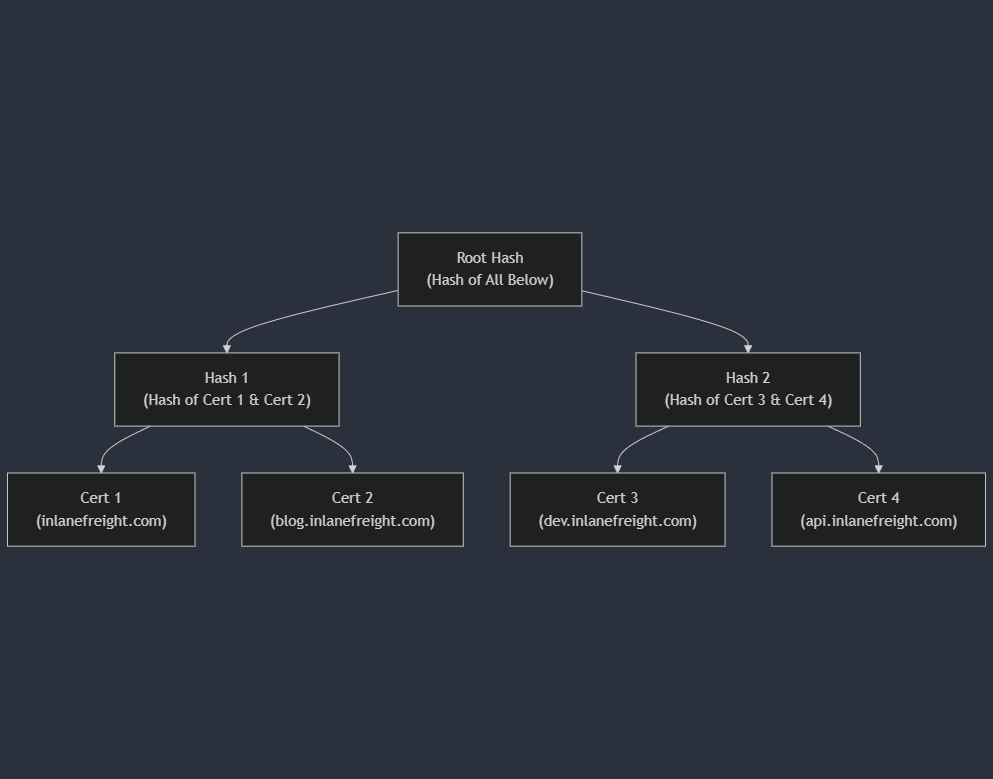 *
1.
2.
3.
*
1.
2.
3.
\
Certificate Transparency logs offer a unique advantage in subdomain enumeration compared to other methods. Unlike brute-forcing or wordlist-based approaches, which rely on guessing or predicting subdomain names, CT logs provide a definitive record of certificates issued for a domain and its subdomains. This means you're not limited by the scope of your wordlist or the effectiveness of your brute-forcing algorithm. Instead, you gain access to a historical and comprehensive view of a domain's subdomains, including those that might not be actively used or easily guessable.
Furthermore, CT logs can unveil subdomains associated with old or expired certificates. These subdomains might host outdated software or configurations, making them potentially vulnerable to exploitation.
In essence, CT logs provide a reliable and efficient way to discover subdomains without the need for exhaustive brute-forcing or relying on the completeness of wordlists. They offer a unique window into a domain's history and can reveal subdomains that might otherwise remain hidden, significantly enhancing your reconnaissance capabilities.
There are two popular options for searching CT logs:
| Tool | Key Features | Use Cases | Pros | Cons |
|---|---|---|---|---|
| crt.sh | User-friendly web interface, simple search by domain, displays certificate details, SAN entries. | Quick and easy searches, identifying subdomains, checking certificate issuance history. | Free, easy to use, no registration required. | Limited filtering and analysis options. |
| Censys | Powerful search engine for internet-connected devices, advanced filtering by domain, IP, certificate attributes. | In-depth analysis of certificates, identifying misconfigurations, finding related certificates and hosts. | Extensive data and filtering options, API access. | Requires registration (free tier available). |
While crt.sh offers a convenient web interface, you can also leverage its API for automated searches directly from your terminal. Let's see how to find all 'dev' subdomains on facebook.com using curl and jq:
Certificate Transparency Logs
root@htb[/htb]$ curl -s "https://crt.sh/?q=facebook.com&output=json" | jq -r '.[]
 | select(.name_value | contains("dev")) | .name_value' | sort -u

*.dev.facebook.com
*.newdev.facebook.com
*.secure.dev.facebook.com
dev.facebook.com
devvm1958.ftw3.facebook.com
facebook-amex-dev.facebook.com
facebook-amex-sign-enc-dev.facebook.com
newdev.facebook.com
secure.dev.facebook.com
curl -s "https://crt.sh/?q=facebook.com&output=json": This command fetches the JSON output from crt.sh for certificates matching the domain facebook.com.jq -r '.[] | select(.name_value | contains("dev")) | .name_value': This part filters the JSON results, selecting only entries where the name_value field (which contains the domain or subdomain) includes the string "dev". The -r flag tells jq to output raw strings.sort -u: This sorts the results alphabetically and removes duplicates.Fingerprinting focuses on extracting technical details about the technologies powering a website or web application. Similar to how a fingerprint uniquely identifies a person, the digital signatures of web servers, operating systems, and software components can reveal critical information about a target's infrastructure and potential security weaknesses. This knowledge empowers attackers to tailor attacks and exploit vulnerabilities specific to the identified technologies.
Fingerprinting serves as a cornerstone of web reconnaissance for several reasons:
Targeted Attacks: By knowing the specific technologies in use, attackers can focus their efforts on exploits and vulnerabilities that are known to affect those systems. This significantly increases the chances of a successful compromise.Identifying Misconfigurations: Fingerprinting can expose misconfigured or outdated software, default settings, or other weaknesses that might not be apparent through other reconnaissance methods.Prioritising Targets: When faced with multiple potential targets, fingerprinting helps prioritise efforts by identifying systems more likely to be vulnerable or hold valuable information.Building a Comprehensive Profile: Combining fingerprint data with other reconnaissance findings creates a holistic view of the target's infrastructure, aiding in understanding its overall security posture and potential attack vectors.There are several techniques used for web server and technology fingerprinting:
Banner Grabbing: Banner grabbing involves analysing the banners presented by web servers and other services. These banners often reveal the server software, version numbers, and other details.Analysing HTTP Headers: HTTP headers transmitted with every web page request and response contain a wealth of information. The Server header typically discloses the web server software, while the X-Powered-By header might reveal additional technologies like scripting languages or frameworks.Probing for Specific Responses: Sending specially crafted requests to the target can elicit unique responses that reveal specific technologies or versions. For example, certain error messages or behaviours are characteristic of particular web servers or software components.Analysing Page Content: A web page's content, including its structure, scripts, and other elements, can often provide clues about the underlying technologies. There may be a copyright header that indicates specific software being used, for example.A variety of tools exist that automate the fingerprinting process, combining various techniques to identify web servers, operating systems, content management systems, and other technologies:
| Tool | Description | Features |
|---|---|---|
Wappalyzer |
Browser extension and online service for website technology profiling. | Identifies a wide range of web technologies, including CMSs, frameworks, analytics tools, and more. |
BuiltWith |
Web technology profiler that provides detailed reports on a website's technology stack. | Offers both free and paid plans with varying levels of detail. |
WhatWeb |
Command-line tool for website fingerprinting. | Uses a vast database of signatures to identify various web technologies. |
Nmap |
Versatile network scanner that can be used for various reconnaissance tasks, including service and OS fingerprinting. | Can be used with scripts (NSE) to perform more specialised fingerprinting. |
Netcraft |
Offers a range of web security services, including website fingerprinting and security reporting. | Provides detailed reports on a website's technology, hosting provider, and security posture. |
wafw00f |
Command-line tool specifically designed for identifying Web Application Firewalls (WAFs). | Helps determine if a WAF is present and, if so, its type and configuration. |
Let's apply our fingerprinting knowledge to uncover the digital DNA of our purpose-built host, inlanefreight.com. We'll leverage both manual and automated techniques to gather information about its web server, technologies, and potential vulnerabilities.
Our first step is to gather information directly from the web server itself. We can do this using the curl command with the -I flag (or --head) to fetch only the HTTP headers, not the entire page content.
Fingerprinting
root@htb[/htb]$ curl -I inlanefreight.com
The output will include the server banner, revealing the web server software and version number:
Fingerprinting
root@htb[/htb]$ curl -I inlanefreight.com

HTTP/1.1 301 Moved Permanently
Date: Fri, 31 May 2024 12:07:44 GMT
Server: Apache/2.4.41 (Ubuntu)
Location: https://inlanefreight.com/
Content-Type: text/html; charset=iso-8859-1
In this case, we see that inlanefreight.com is running on Apache/2.4.41, specifically the Ubuntu version. This information is our first clue, hinting at the underlying technology stack. It's also trying to redirect to https://inlanefreight.com/ so grab those banners too
Fingerprinting
root@htb[/htb]$ curl -I https://inlanefreight.com

HTTP/1.1 301 Moved Permanently
Date: Fri, 31 May 2024 12:12:12 GMT
Server: Apache/2.4.41 (Ubuntu)
X-Redirect-By: WordPress
Location: https://www.inlanefreight.com/
Content-Type: text/html; charset=UTF-8
We now get a really interesting header, the server is trying to redirect us again, but this time we see that it's WordPress that is doing the redirection to https://www.inlanefreight.com/
Fingerprinting
root@htb[/htb]$ curl -I https://www.inlanefreight.com

HTTP/1.1 200 OK
Date: Fri, 31 May 2024 12:12:26 GMT
Server: Apache/2.4.41 (Ubuntu)
Link: <https://www.inlanefreight.com/index.php/wp-json/>; rel="https://api.w.org/"
Link: <https://www.inlanefreight.com/index.php/wp-json/wp/v2/pages/7>; rel="alternate"; type="application/json"
Link: <https://www.inlanefreight.com/>; rel=shortlink
Content-Type: text/html; charset=UTF-8
A few more interesting headers, including an interesting path that contains wp-json. The wp- prefix is common to WordPress.
Web Application Firewalls (WAFs) are security solutions designed to protect web applications from various attacks. Before proceeding with further fingerprinting, it's crucial to determine if inlanefreight.com employs a WAF, as it could interfere with our probes or potentially block our requests.
To detect the presence of a WAF, we'll use the wafw00f tool. To install wafw00f, you can use pip3:
Fingerprinting
root@htb[/htb]$ pip3 install git+https://github.com/EnableSecurity/wafw00f
Once it's installed, pass the domain you want to check as an argument to the tool:
Fingerprinting
root@htb[/htb]$ wafw00f inlanefreight.com

                ______
               /      \
              (  W00f! )
               \  ____/
               ,,    __            404 Hack Not Found
           |`-.__   / /                      __     __
           /"  _/  /_/                       \ \   / /
          *===*    /                          \ \_/ /  405 Not Allowed
         /     )__//                           \   /
    /|  /     /---`                        403 Forbidden
    \\/`   \ |                                 / _ \
    `\    /_\\_              502 Bad Gateway  / / \ \  500 Internal Error
      `_____``-`                             /_/   \_\

                        ~ WAFW00F : v2.2.0 ~
        The Web Application Firewall Fingerprinting Toolkit

[*] Checking https://inlanefreight.com
[+] The site https://inlanefreight.com is behind Wordfence (Defiant) WAF.
[~] Number of requests: 2
The wafw00f scan on inlanefreight.com reveals that the website is protected by the Wordfence Web Application Firewall (WAF), developed by Defiant.
This means the site has an additional security layer that could block or filter our reconnaissance attempts. In a real-world scenario, it would be crucial to keep this in mind as you proceed with further investigation, as you might need to adapt techniques to bypass or evade the WAF's detection mechanisms.
Nikto is a powerful open-source web server scanner. In addition to its primary function as a vulnerability assessment tool, Nikto's fingerprinting capabilities provide insights into a website's technology stack.
Nikto is pre-installed on pwnbox, but if you need to install it, you can run the following commands:
Fingerprinting
root@htb[/htb]$ sudo apt update && sudo apt install -y perl
root@htb[/htb]$ git clone https://github.com/sullo/nikto
root@htb[/htb]$ cd nikto/program
root@htb[/htb]$ chmod +x ./nikto.pl
To scan inlanefreight.com using Nikto, only running the fingerprinting modules, execute the following command:
Fingerprinting
root@htb[/htb]$ nikto -h inlanefreight.com -Tuning b
The -h flag specifies the target host. The -Tuning b flag tells Nikto to only run the Software Identification modules.
Nikto will then initiate a series of tests, attempting to identify outdated software, insecure files or configurations, and other potential security risks.
Fingerprinting
root@htb[/htb]$ nikto -h inlanefreight.com -Tuning b

- Nikto v2.5.0
---------------------------------------------------------------------------
+ Multiple IPs found: 134.209.24.248, 2a03:b0c0:1:e0::32c:b001
+ Target IP:          134.209.24.248
+ Target Hostname:    www.inlanefreight.com
+ Target Port:        443
---------------------------------------------------------------------------
+ SSL Info:        Subject:  /CN=inlanefreight.com
                   Altnames: inlanefreight.com, www.inlanefreight.com
                   Ciphers:  TLS_AES_256_GCM_SHA384
                   Issuer:   /C=US/O=Let's Encrypt/CN=R3
+ Start Time:         2024-05-31 13:35:54 (GMT0)
---------------------------------------------------------------------------
+ Server: Apache/2.4.41 (Ubuntu)
+ /: Link header found with value: ARRAY(0x558e78790248). See: https://developer.mozilla.org/en-US/docs/Web/HTTP/Headers/Link
+ /: The site uses TLS and the Strict-Transport-Security HTTP header is not defined. See: https://developer.mozilla.org/en-US/docs/Web/HTTP/Headers/Strict-Transport-Security
+ /: The X-Content-Type-Options header is not set. This could allow the user agent to render the content of the site in a different fashion to the MIME type. See: https://www.netsparker.com/web-vulnerability-scanner/vulnerabilities/missing-content-type-header/
+ /index.php?: Uncommon header 'x-redirect-by' found, with contents: WordPress.
+ No CGI Directories found (use '-C all' to force check all possible dirs)
+ /: The Content-Encoding header is set to "deflate" which may mean that the server is vulnerable to the BREACH attack. See: http://breachattack.com/
+ Apache/2.4.41 appears to be outdated (current is at least 2.4.59). Apache 2.2.34 is the EOL for the 2.x branch.
+ /: Web Server returns a valid response with junk HTTP methods which may cause false positives.
+ /license.txt: License file found may identify site software.
+ /: A Wordpress installation was found.
+ /wp-login.php?action=register: Cookie wordpress_test_cookie created without the httponly flag. See: https://developer.mozilla.org/en-US/docs/Web/HTTP/Cookies
+ /wp-login.php:X-Frame-Options header is deprecated and has been replaced with the Content-Security-Policy HTTP header with the frame-ancestors directive instead. See: https://developer.mozilla.org/en-US/docs/Web/HTTP/Headers/X-Frame-Options
+ /wp-login.php: Wordpress login found.
+ 1316 requests: 0 error(s) and 12 item(s) reported on remote host
+ End Time:           2024-05-31 13:47:27 (GMT0) (693 seconds)
---------------------------------------------------------------------------
+ 1 host(s) tested
The reconnaissance scan on inlanefreight.com reveals several key findings:
IPs: The website resolves to both IPv4 (134.209.24.248) and IPv6 (2a03:b0c0:1:e0::32c:b001) addresses.Server Technology: The website runs on Apache/2.4.41 (Ubuntu)WordPress Presence: The scan identified a WordPress installation, including the login page (/wp-login.php). This suggests the site might be a potential target for common WordPress-related exploits.Information Disclosure: The presence of a license.txt file could reveal additional details about the website's software components.Headers: Several non-standard or insecure headers were found, including a missing Strict-Transport-Security header and a potentially insecure x-redirect-by header.Crawling, often called spidering, is the automated process of systematically browsing the World Wide Web. Similar to how a spider navigates its web, a web crawler follows links from one page to another, collecting information. These crawlers are essentially bots that use pre-defined algorithms to discover and index web pages, making them accessible through search engines or for other purposes like data analysis and web reconnaissance.
The basic operation of a web crawler is straightforward yet powerful. It starts with a seed URL, which is the initial web page to crawl. The crawler fetches this page, parses its content, and extracts all its links. It then adds these links to a queue and crawls them, repeating the process iteratively. Depending on its scope and configuration, the crawler can explore an entire website or even a vast portion of the web.
Homepage: You start with the homepage containing link1, link2, and link3.
Code: txt
Homepage
├── link1
├── link2
└── link3
Visiting link1: Visiting link1 shows the homepage, link2, and also link4 and link5.
Code: txt
link1 Page
├── Homepage
├── link2
├── link4
└── link5
Continuing the Crawl: The crawler continues to follow these links systematically, gathering all accessible pages and their links.This example illustrates how a web crawler discovers and collects information by systematically following links, distinguishing it from fuzzing which involves guessing potential links.
There are two primary types of crawling strategies.
Breadth-first crawling prioritizes exploring a website's width before going deep. It starts by crawling all the links on the seed page, then moves on to the links on those pages, and so on. This is useful for getting a broad overview of a website's structure and content.
In contrast, depth-first crawling prioritizes depth over breadth. It follows a single path of links as far as possible before backtracking and exploring other paths. This can be useful for finding specific content or reaching deep into a website's structure.
The choice of strategy depends on the specific goals of the crawling process.
Crawlers can extract a diverse array of data, each serving a specific purpose in the reconnaissance process:
Links (Internal and External): These are the fundamental building blocks of the web, connecting pages within a website (internal links) and to other websites (external links). Crawlers meticulously collect these links, allowing you to map out a website's structure, discover hidden pages, and identify relationships with external resources.Comments: Comments sections on blogs, forums, or other interactive pages can be a goldmine of information. Users often inadvertently reveal sensitive details, internal processes, or hints of vulnerabilities in their comments.Metadata: Metadata refers to data about data. In the context of web pages, it includes information like page titles, descriptions, keywords, author names, and dates. This metadata can provide valuable context about a page's content, purpose, and relevance to your reconnaissance goals.Sensitive Files: Web crawlers can be configured to actively search for sensitive files that might be inadvertently exposed on a website. This includes backup files (e.g., .bak, .old), configuration files (e.g., web.config, settings.php), log files (e.g., error_log, access_log), and other files containing passwords, API keys, or other confidential information. Carefully examining the extracted files, especially backup and configuration files, can reveal a trove of sensitive information, such as database credentials, encryption keys, or even source code snippets.Understanding the context surrounding the extracted data is paramount.
A single piece of information, like a comment mentioning a specific software version, might not seem significant on its own. However, when combined with other findings—such as an outdated version listed in metadata or a potentially vulnerable configuration file discovered through crawling—it can transform into a critical indicator of a potential vulnerability.
The true value of extracted data lies in connecting the dots and constructing a comprehensive picture of the target's digital landscape.
For instance, a list of extracted links might initially appear mundane. But upon closer examination, you notice a pattern: several URLs point to a directory named /files/. This triggers your curiosity, and you decide to manually visit the directory. To your surprise, you find that directory browsing is enabled, exposing a host of files, including backup archives, internal documents, and potentially sensitive data. This discovery wouldn't have been possible by merely looking at individual links in isolation; the contextual analysis led you to this critical finding.
Similarly, seemingly innocuous comments can gain significance when correlated with other discoveries. A comment mentioning a "file server" might not raise any red flags initially. However, when combined with the aforementioned discovery of the /files/ directory, it reinforces the possibility that the file server is publicly accessible, potentially exposing sensitive information or confidential data.
Therefore, it's essential to approach data analysis holistically, considering the relationships between different data points and their potential implications for your reconnaissance goals.
Imagine you're a guest at a grand house party. While you're free to mingle and explore, there might be certain rooms marked "Private" that you're expected to avoid. This is akin to how robots.txt functions in the world of web crawling. It acts as a virtual "etiquette guide" for bots, outlining which areas of a website they are allowed to access and which are off-limits.
Technically, robots.txt is a simple text file placed in the root directory of a website (e.g., www.example.com/robots.txt). It adheres to the Robots Exclusion Standard, guidelines for how web crawlers should behave when visiting a website. This file contains instructions in the form of "directives" that tell bots which parts of the website they can and cannot crawl.
The directives in robots.txt typically target specific user-agents, which are identifiers for different types of bots. For example, a directive might look like this:
Code: txt
User-agent: *
Disallow: /private/
This directive tells all user-agents (* is a wildcard) that they are not allowed to access any URLs that start with /private/. Other directives can allow access to specific directories or files, set crawl delays to avoid overloading a server or provide links to sitemaps for efficient crawling.
The robots.txt file is a plain text document that lives in the root directory of a website. It follows a straightforward structure, with each set of instructions, or "record," separated by a blank line. Each record consists of two main components:
User-agent: This line specifies which crawler or bot the following rules apply to. A wildcard (*) indicates that the rules apply to all bots. Specific user agents can also be targeted, such as "Googlebot" (Google's crawler) or "Bingbot" (Microsoft's crawler).Directives: These lines provide specific instructions to the identified user-agent.Common directives include:
| Directive | Description | Example |
|---|---|---|
Disallow |
Specifies paths or patterns that the bot should not crawl. | Disallow: /admin/ (disallow access to the admin directory) |
Allow |
Explicitly permits the bot to crawl specific paths or patterns, even if they fall under a broader Disallow rule. |
Allow: /public/ (allow access to the public directory) |
Crawl-delay |
Sets a delay (in seconds) between successive requests from the bot to avoid overloading the server. | Crawl-delay: 10 (10-second delay between requests) |
Sitemap |
Provides the URL to an XML sitemap for more efficient crawling. | Sitemap: https://www.example.com/sitemap.xml |
While robots.txt is not strictly enforceable (a rogue bot could still ignore it), most legitimate web crawlers and search engine bots will respect its directives. This is important for several reasons:
Avoiding Overburdening Servers: By limiting crawler access to certain areas, website owners can prevent excessive traffic that could slow down or even crash their servers.Protecting Sensitive Information: Robots.txt can shield private or confidential information from being indexed by search engines.Legal and Ethical Compliance: In some cases, ignoring robots.txt directives could be considered a violation of a website's terms of service or even a legal issue, especially if it involves accessing copyrighted or private data.For web reconnaissance, robots.txt serves as a valuable source of intelligence. While respecting the directives outlined in this file, security professionals can glean crucial insights into the structure and potential vulnerabilities of a target website:
Uncovering Hidden Directories: Disallowed paths in robots.txt often point to directories or files the website owner intentionally wants to keep out of reach from search engine crawlers. These hidden areas might house sensitive information, backup files, administrative panels, or other resources that could interest an attacker.Mapping Website Structure: By analyzing the allowed and disallowed paths, security professionals can create a rudimentary map of the website's structure. This can reveal sections that are not linked from the main navigation, potentially leading to undiscovered pages or functionalities.Detecting Crawler Traps: Some websites intentionally include "honeypot" directories in robots.txt to lure malicious bots. Identifying such traps can provide insights into the target's security awareness and defensive measures.Here's an example of a robots.txt file:
Code: txt
User-agent: *
Disallow: /admin/
Disallow: /private/
Allow: /public/

User-agent: Googlebot
Crawl-delay: 10

Sitemap: https://www.example.com/sitemap.xml
This file contains the following directives:
/admin/ and /private/ directories./public/ directory.Googlebot (Google's web crawler) is specifically instructed to wait 10 seconds between requests.https://www.example.com/sitemap.xml, is provided for easier crawling and indexing.By analyzing this robots.txt, we can infer that the website likely has an admin panel located at /admin/ and some private content in the /private/ directory.
The .well-known standard, defined in RFC 8615, serves as a standardized directory within a website's root domain. This designated location, typically accessible via the /.well-known/ path on a web server, centralizes a website's critical metadata, including configuration files and information related to its services, protocols, and security mechanisms.
By establishing a consistent location for such data, .well-known simplifies the discovery and access process for various stakeholders, including web browsers, applications, and security tools. This streamlined approach enables clients to automatically locate and retrieve specific configuration files by constructing the appropriate URL. For instance, to access a website's security policy, a client would request https://example.com/.well-known/security.txt.
The Internet Assigned Numbers Authority (IANA) maintains a registry of .well-known URIs, each serving a specific purpose defined by various specifications and standards. Below is a table highlighting a few notable examples:
| URI Suffix | Description | Status | Reference |
|---|---|---|---|
security.txt |
Contains contact information for security researchers to report vulnerabilities. | Permanent | RFC 9116 |
/.well-known/change-password |
Provides a standard URL for directing users to a password change page. | Provisional | https://w3c.github.io/webappsec-change-password-url/#the-change-password-well-known-uri |
openid-configuration |
Defines configuration details for OpenID Connect, an identity layer on top of the OAuth 2.0 protocol. | Permanent | http://openid.net/specs/openid-connect-discovery-1\_0.html |
assetlinks.json |
Used for verifying ownership of digital assets (e.g., apps) associated with a domain. | Permanent | https://github.com/google/digitalassetlinks/blob/master/well-known/specification.md |
mta-sts.txt |
Specifies the policy for SMTP MTA Strict Transport Security (MTA-STS) to enhance email security. | Permanent | RFC 8461 |
This is just a small sample of the many .well-known URIs registered with IANA. Each entry in the registry offers specific guidelines and requirements for implementation, ensuring a standardized approach to leveraging the .well-known mechanism for various applications.
In web recon, the .well-known URIs can be invaluable for discovering endpoints and configuration details that can be further tested during a penetration test. One particularly useful URI is openid-configuration.
The openid-configuration URI is part of the OpenID Connect Discovery protocol, an identity layer built on top of the OAuth 2.0 protocol. When a client application wants to use OpenID Connect for authentication, it can retrieve the OpenID Connect Provider's configuration by accessing the https://example.com/.well-known/openid-configuration endpoint. This endpoint returns a JSON document containing metadata about the provider's endpoints, supported authentication methods, token issuance, and more:
Code: json
{
  "issuer": "https://example.com",
  "authorization_endpoint": "https://example.com/oauth2/authorize",
  "token_endpoint": "https://example.com/oauth2/token",
  "userinfo_endpoint": "https://example.com/oauth2/userinfo",
  "jwks_uri": "https://example.com/oauth2/jwks",
  "response_types_supported": ["code", "token", "id_token"],
  "subject_types_supported": ["public"],
  "id_token_signing_alg_values_supported": ["RS256"],
  "scopes_supported": ["openid", "profile", "email"]
}
The information obtained from the openid-configuration endpoint provides multiple exploration opportunities:
Endpoint Discovery:Authorization Endpoint: Identifying the URL for user authorization requests.Token Endpoint: Finding the URL where tokens are issued.Userinfo Endpoint: Locating the endpoint that provides user information.JWKS URI: The jwks_uri reveals the JSON Web Key Set (JWKS), detailing the cryptographic keys used by the server.Supported Scopes and Response Types: Understanding which scopes and response types are supported helps in mapping out the functionality and limitations of the OpenID Connect implementation.Algorithm Details: Information about supported signing algorithms can be crucial for understanding the security measures in place.Exploring the IANA Registry and experimenting with the various .well-known URIs is an invaluable approach to uncovering additional web reconnaissance opportunities. As demonstrated with the openid-configuration endpoint above, these standardized URIs provide structured access to critical metadata and configuration details, enabling security professionals to comprehensively map out a website's security landscape.
Web crawling is vast and intricate, but you don't have to embark on this journey alone. A plethora of web crawling tools are available to assist you, each with its own strengths and specialties. These tools automate the crawling process, making it faster and more efficient, allowing you to focus on analyzing the extracted data.
Burp Suite Spider: Burp Suite, a widely used web application testing platform, includes a powerful active crawler called Spider. Spider excels at mapping out web applications, identifying hidden content, and uncovering potential vulnerabilities.OWASP ZAP (Zed Attack Proxy): ZAP is a free, open-source web application security scanner. It can be used in automated and manual modes and includes a spider component to crawl web applications and identify potential vulnerabilities.Scrapy (Python Framework): Scrapy is a versatile and scalable Python framework for building custom web crawlers. It provides rich features for extracting structured data from websites, handling complex crawling scenarios, and automating data processing. Its flexibility makes it ideal for tailored reconnaissance tasks.Apache Nutch (Scalable Crawler): Nutch is a highly extensible and scalable open-source web crawler written in Java. It's designed to handle massive crawls across the entire web or focus on specific domains. While it requires more technical expertise to set up and configure, its power and flexibility make it a valuable asset for large-scale reconnaissance projects.Adhering to ethical and responsible crawling practices is crucial no matter which tool you choose. Always obtain permission before crawling a website, especially if you plan to perform extensive or intrusive scans. Be mindful of the website's server resources and avoid overloading them with excessive requests.
We will leverage Scrapy and a custom spider tailored for reconnaissance on inlanefreight.com. If you are interested in more information on crawling/spidering techniques, refer to the "Using Web Proxies" module, as it forms part of CBBH as well.
Before we begin, ensure you have Scrapy installed on your system. If you don't, you can easily install it using pip, the Python package installer:
Creepy Crawlies
root@htb[/htb]$ pip3 install scrapy
This command will download and install Scrapy along with its dependencies, preparing your environment for building our spider.
First, run this command in your terminal to download the custom scrapy spider, ReconSpider, and extract it to the current working directory.
Creepy Crawlies
root@htb[/htb]$ wget -O ReconSpider.zip https://academy.hackthebox.com/storage/modules/144/ReconSpider.v1.2.zip
root@htb[/htb]$ unzip ReconSpider.zip
With the files extracted, you can run ReconSpider.py using the following command:
Creepy Crawlies
root@htb[/htb]$ python3 ReconSpider.py http://inlanefreight.com
Replace inlanefreight.com with the domain you want to spider. The spider will crawl the target and collect valuable information.
After running ReconSpider.py, the data will be saved in a JSON file, results.json. This file can be explored using any text editor. Below is the structure of the JSON file produced:
Code: json
{
    "emails": [
        "lily.floid@inlanefreight.com",
        "cvs@inlanefreight.com",
        ...
    ],
    "links": [
        "https://www.themeansar.com",
        "https://www.inlanefreight.com/index.php/offices/",
        ...
    ],
    "external_files": [
        "https://www.inlanefreight.com/wp-content/uploads/2020/09/goals.pdf",
        ...
    ],
    "js_files": [
        "https://www.inlanefreight.com/wp-includes/js/jquery/jquery-migrate.min.js?ver=3.3.2",
        ...
    ],
    "form_fields": [],
    "images": [
        "https://www.inlanefreight.com/wp-content/uploads/2021/03/AboutUs_01-1024x810.png",
        ...
    ],
    "videos": [],
    "audio": [],
    "comments": [
        "<!-- #masthead -->",
        ...
    ]
}
Each key in the JSON file represents a different type of data extracted from the target website:
| JSON Key | Description |
|---|---|
emails | Lists email addresses found on the domain. |
links | Lists URLs of links found within the domain. |
external_files | Lists URLs of external files such as PDFs. |
js_files | Lists URLs of JavaScript files used by the website. |
form_fields | Lists form fields found on the domain (empty in this example). |
images | Lists URLs of images found on the domain. |
videos | Lists URLs of videos found on the domain (empty in this example). |
audio | Lists URLs of audio files found on the domain (empty in this example). |
comments | Lists HTML comments found in the source code. |
By exploring this JSON structure, you can gain valuable insights into the web application's architecture, content, and potential points of interest for further investigation.
Search engines serve as our guides in the vast landscape of the internet, helping us navigate through the seemingly endless expanse of information. However, beyond their primary function of answering everyday queries, search engines also hold a treasure trove of data that can be invaluable for web reconnaissance and information gathering. This practice, known as search engine discovery or OSINT (Open Source Intelligence) gathering, involves using search engines as powerful tools to uncover information about target websites, organisations, and individuals.
At its core, search engine discovery leverages the immense power of search algorithms to extract data that may not be readily visible on websites. Security professionals and researchers can delve deep into the indexed web by employing specialised search operators, techniques, and tools, uncovering everything from employee information and sensitive documents to hidden login pages and exposed credentials.
Search engine discovery is a crucial component of web reconnaissance for several reasons:
Open Source: The information gathered is publicly accessible, making it a legal and ethical way to gain insights into a target.Breadth of Information: Search engines index a vast portion of the web, offering a wide range of potential information sources.Ease of Use: Search engines are user-friendly and require no specialised technical skills.Cost-Effective: It's a free and readily available resource for information gathering.The information you can pull together from Search Engines can be applied in several different ways as well:
Security Assessment: Identifying vulnerabilities, exposed data, and potential attack vectors.Competitive Intelligence: Gathering information about competitors' products, services, and strategies.Investigative Journalism: Uncovering hidden connections, financial transactions, and unethical practices.Threat Intelligence: Identifying emerging threats, tracking malicious actors, and predicting potential attacks.However, it's important to note that search engine discovery has limitations. Search engines do not index all information, and some data may be deliberately hidden or protected.
Search operators are like search engines' secret codes. These special commands and modifiers unlock a new level of precision and control, allowing you to pinpoint specific types of information amidst the vastness of the indexed web.
While the exact syntax may vary slightly between search engines, the underlying principles remain consistent. Let's delve into some essential and advanced search operators:
| Operator | Operator Description | Example | Example Description |
|---|---|---|---|
site: |
Limits results to a specific website or domain. | site:example.com |
Find all publicly accessible pages on example.com. |
inurl: |
Finds pages with a specific term in the URL. | inurl:login |
Search for login pages on any website. |
filetype: |
Searches for files of a particular type. | filetype:pdf |
Find downloadable PDF documents. |
intitle: |
Finds pages with a specific term in the title. | intitle:"confidential report" |
Look for documents titled "confidential report" or similar variations. |
intext: or inbody: |
Searches for a term within the body text of pages. | intext:"password reset" |
Identify webpages containing the term “password reset”. |
cache: |
Displays the cached version of a webpage (if available). | cache:example.com |
View the cached version of example.com to see its previous content. |
link: |
Finds pages that link to a specific webpage. | link:example.com |
Identify websites linking to example.com. |
related: |
Finds websites related to a specific webpage. | related:example.com |
Discover websites similar to example.com. |
info: |
Provides a summary of information about a webpage. | info:example.com |
Get basic details about example.com, such as its title and description. |
define: |
Provides definitions of a word or phrase. | define:phishing |
Get a definition of "phishing" from various sources. |
numrange: |
Searches for numbers within a specific range. | site:example.com numrange:1000-2000 |
Find pages on example.com containing numbers between 1000 and 2000. |
allintext: |
Finds pages containing all specified words in the body text. | allintext:admin password reset |
Search for pages containing both "admin" and "password reset" in the body text. |
allinurl: |
Finds pages containing all specified words in the URL. | allinurl:admin panel |
Look for pages with "admin" and "panel" in the URL. |
allintitle: |
Finds pages containing all specified words in the title. | allintitle:confidential report 2023 |
Search for pages with "confidential," "report," and "2023" in the title. |
AND |
Narrows results by requiring all terms to be present. | site:example.com AND (inurl:admin OR inurl:login) |
Find admin or login pages specifically on example.com. |
OR |
Broadens results by including pages with any of the terms. | "linux" OR "ubuntu" OR "debian" |
Search for webpages mentioning Linux, Ubuntu, or Debian. |
NOT |
Excludes results containing the specified term. | site:bank.com NOT inurl:login |
Find pages on bank.com excluding login pages. |
* (wildcard) |
Represents any character or word. | site:socialnetwork.com filetype:pdf user* manual |
Search for user manuals (user guide, user handbook) in PDF format on socialnetwork.com. |
.. (range search) |
Finds results within a specified numerical range. | site:ecommerce.com "price" 100..500 |
Look for products priced between 100 and 500 on an e-commerce website. |
" " (quotation marks) |
Searches for exact phrases. | "information security policy" |
Find documents mentioning the exact phrase "information security policy". |
- (minus sign) |
Excludes terms from the search results. | site:news.com -inurl:sports |
Search for news articles on news.com excluding sports-related content. |
Google Dorking, also known as Google Hacking, is a technique that leverages the power of search operators to uncover sensitive information, security vulnerabilities, or hidden content on websites, using Google Search.
Here are some common examples of Google Dorks, for more examples, refer to the Google Hacking Database:
site:example.com inurl:loginsite:example.com (inurl:login OR inurl:admin)site:example.com filetype:pdfsite:example.com (filetype:xls OR filetype:docx)site:example.com inurl:config.phpsite:example.com (ext:conf OR ext:cnf) (searches for extensions commonly used for configuration files)site:example.com inurl:backupsite:example.com filetype:sql In the fast-paced digital world, websites come and go, leaving only fleeting traces of their existence behind. However, thanks to the Internet Archive's Wayback Machine, we have a unique opportunity to revisit the past and explore the digital footprints of websites as they once were.
The Wayback Machine is a digital archive of the World Wide Web and other information on the Internet. Founded by the Internet Archive, a non-profit organization, it has been archiving websites since 1996.
It allows users to "go back in time" and view snapshots of websites as they appeared at various points in their history. These snapshots, known as captures or archives, provide a glimpse into the past versions of a website, including its design, content, and functionality.
The Wayback Machine operates by using web crawlers to capture snapshots of websites at regular intervals automatically. These crawlers navigate through the web, following links and indexing pages, much like how search engine crawlers work. However, instead of simply indexing the information for search purposes, the Wayback Machine stores the entire content of the pages, including HTML, CSS, JavaScript, images, and other resources.
The Wayback Machine's operation can be visualized as a three-step process:
Crawling: The Wayback Machine employs automated web crawlers, often called "bots," to browse the internet systematically. These bots follow links from one webpage to another, like how you would click hyperlinks to explore a website. However, instead of just reading the content, these bots download copies of the webpages they encounter.Archiving: The downloaded webpages, along with their associated resources like images, stylesheets, and scripts, are stored in the Wayback Machine's vast archive. Each captured webpage is linked to a specific date and time, creating a historical snapshot of the website at that moment. This archiving process happens at regular intervals, sometimes daily, weekly, or monthly, depending on the website's popularity and frequency of updates.Accessing: Users can access these archived snapshots through the Wayback Machine's interface. By entering a website's URL and selecting a date, you can view how the website looked at that specific point. The Wayback Machine allows you to browse individual pages and provides tools to search for specific terms within the archived content or download entire archived websites for offline analysis.The frequency with which the Wayback Machine archives a website varies. Some websites might be archived multiple times a day, while others might only have a few snapshots spread out over several years. Factors that influence this frequency include the website's popularity, its rate of change, and the resources available to the Internet Archive.
It's important to note that the Wayback Machine does not capture every single webpage online. It prioritizes websites deemed to be of cultural, historical, or research value. Additionally, website owners can request that their content be excluded from the Wayback Machine, although this is not always guaranteed.
The Wayback Machine is a treasure trove for web reconnaissance, offering information that can be instrumental in various scenarios. Its significance lies in its ability to unveil a website's past, providing valuable insights that may not be readily apparent in its current state:
Uncovering Hidden Assets and Vulnerabilities: The Wayback Machine allows you to discover old web pages, directories, files, or subdomains that might not be accessible on the current website, potentially exposing sensitive information or security flaws.Tracking Changes and Identifying Patterns: By comparing historical snapshots, you can observe how the website has evolved, revealing changes in structure, content, technologies, and potential vulnerabilities.Gathering Intelligence: Archived content can be a valuable source of OSINT, providing insights into the target's past activities, marketing strategies, employees, and technology choices.Stealthy Reconnaissance: Accessing archived snapshots is a passive activity that doesn't directly interact with the target's infrastructure, making it a less detectable way to gather information.We can view the first archived version of HackTheBox by entering the page we are looking for into the Wayback Machine and selecting the earliest available capture date, being 2017-06-10 @ 04h23:01

While manual reconnaissance can be effective, it can also be time-consuming and prone to human error. Automating web reconnaissance tasks can significantly enhance efficiency and accuracy, allowing you to gather information at scale and identify potential vulnerabilities more rapidly.
Automation offers several key advantages for web reconnaissance:
Efficiency: Automated tools can perform repetitive tasks much faster than humans, freeing up valuable time for analysis and decision-making.Scalability: Automation allows you to scale your reconnaissance efforts across a large number of targets or domains, uncovering a broader scope of information.Consistency: Automated tools follow predefined rules and procedures, ensuring consistent and reproducible results and minimising the risk of human error.Comprehensive Coverage: Automation can be programmed to perform a wide range of reconnaissance tasks, including DNS enumeration, subdomain discovery, web crawling, port scanning, and more, ensuring thorough coverage of potential attack vectors.Integration: Many automation frameworks allow for easy integration with other tools and platforms, creating a seamless workflow from reconnaissance to vulnerability assessment and exploitation.These frameworks aim to provide a complete suite of tools for web reconnaissance:
FinalRecon offers a wealth of recon information:
Header Information: Reveals server details, technologies used, and potential security misconfigurations.Whois Lookup: Uncovers domain registration details, including registrant information and contact details.SSL Certificate Information: Examines the SSL/TLS certificate for validity, issuer, and other relevant details.Crawler:DNS Enumeration: Queries over 40 DNS record types, including DMARC records for email security assessment.Subdomain Enumeration: Leverages multiple data sources (crt.sh, AnubisDB, ThreatMiner, CertSpotter, Facebook API, VirusTotal API, Shodan API, BeVigil API) to discover subdomains.Directory Enumeration: Supports custom wordlists and file extensions to uncover hidden directories and files.Wayback Machine: Retrieves URLs from the last five years to analyse website changes and potential vulnerabilities.Installation is quick and easy:
Automating Recon
root@htb[/htb]$ git clone https://github.com/thewhiteh4t/FinalRecon.git
root@htb[/htb]$ cd FinalRecon
root@htb[/htb]$ pip3 install -r requirements.txt
root@htb[/htb]$ chmod +x ./finalrecon.py
root@htb[/htb]$ ./finalrecon.py --help

usage: finalrecon.py [-h] [--url URL] [--headers] [--sslinfo] [--whois]
                     [--crawl] [--dns] [--sub] [--dir] [--wayback] [--ps]
                     [--full] [-nb] [-dt DT] [-pt PT] [-T T] [-w W] [-r] [-s]
                     [-sp SP] [-d D] [-e E] [-o O] [-cd CD] [-k K]

FinalRecon - All in One Web Recon | v1.1.6

optional arguments:
  -h, --help  show this help message and exit
  --url URL   Target URL
  --headers   Header Information
  --sslinfo   SSL Certificate Information
  --whois     Whois Lookup
  --crawl     Crawl Target
  --dns       DNS Enumeration
  --sub       Sub-Domain Enumeration
  --dir       Directory Search
  --wayback   Wayback URLs
  --ps        Fast Port Scan
  --full      Full Recon

Extra Options:
  -nb         Hide Banner
  -dt DT      Number of threads for directory enum [ Default : 30 ]
  -pt PT      Number of threads for port scan [ Default : 50 ]
  -T T        Request Timeout [ Default : 30.0 ]
  -w W        Path to Wordlist [ Default : wordlists/dirb_common.txt ]
  -r          Allow Redirect [ Default : False ]
  -s          Toggle SSL Verification [ Default : True ]
  -sp SP      Specify SSL Port [ Default : 443 ]
  -d D        Custom DNS Servers [ Default : 1.1.1.1 ]
  -e E        File Extensions [ Example : txt, xml, php ]
  -o O        Export Format [ Default : txt ]
  -cd CD      Change export directory [ Default : ~/.local/share/finalrecon ]
  -k K        Add API key [ Example : shodan@key ]
To get started, you will first clone the FinalRecon repository from GitHub using git clone https://github.com/thewhiteh4t/FinalRecon.git. This will create a new directory named "FinalRecon" containing all the necessary files.
Next, navigate into the newly created directory with cd FinalRecon. Once inside, you will install the required Python dependencies using pip3 install -r requirements.txt. This ensures that FinalRecon has all the libraries and modules it needs to function correctly.
To ensure that the main script is executable, you will need to change the file permissions using chmod +x ./finalrecon.py. This allows you to run the script directly from your terminal.
Finally, you can verify that FinalRecon is installed correctly and get an overview of its available options by running ./finalrecon.py --help. This will display a help message with details on how to use the tool, including the various modules and their respective options:
| Option | Argument | Description |
|---|---|---|
-h, --help |
Show the help message and exit. | |
--url |
URL | Specify the target URL. |
--headers |
Retrieve header information for the target URL. | |
--sslinfo |
Get SSL certificate information for the target URL. | |
--whois |
Perform a Whois lookup for the target domain. | |
--crawl |
Crawl the target website. | |
--dns |
Perform DNS enumeration on the target domain. | |
--sub |
Enumerate subdomains for the target domain. | |
--dir |
Search for directories on the target website. | |
--wayback |
Retrieve Wayback URLs for the target. | |
--ps |
Perform a fast port scan on the target. | |
--full |
Perform a full reconnaissance scan on the target. |
For instance, if we want FinalRecon to gather header information and perform a Whois lookup for inlanefreight.com, we would use the corresponding flags (--headers and --whois), so the command would be:
Automating Recon
root@htb[/htb]$ ./finalrecon.py --headers --whois --url http://inlanefreight.com

 ______  __   __   __   ______   __
/\  ___\/\ \ /\ "-.\ \ /\  __ \ /\ \
\ \  __\\ \ \\ \ \-.  \\ \  __ \\ \ \____
 \ \_\   \ \_\\ \_\\"\_\\ \_\ \_\\ \_____\
  \/_/    \/_/ \/_/ \/_/ \/_/\/_/ \/_____/
 ______   ______   ______   ______   __   __
/\  == \ /\  ___\ /\  ___\ /\  __ \ /\ "-.\ \
\ \  __< \ \  __\ \ \ \____\ \ \/\ \\ \ \-.  \
 \ \_\ \_\\ \_____\\ \_____\\ \_____\\ \_\\"\_\
  \/_/ /_/ \/_____/ \/_____/ \/_____/ \/_/ \/_/

[>] Created By   : thewhiteh4t
 |---> Twitter   : https://twitter.com/thewhiteh4t
 |---> Community : https://twc1rcle.com/
[>] Version      : 1.1.6

[+] Target : http://inlanefreight.com

[+] IP Address : 134.209.24.248

[!] Headers :

Date : Tue, 11 Jun 2024 10:08:00 GMT
Server : Apache/2.4.41 (Ubuntu)
Link : <https://www.inlanefreight.com/index.php/wp-json/>; rel="https://api.w.org/", <https://www.inlanefreight.com/index.php/wp-json/wp/v2/pages/7>; rel="alternate"; type="application/json", <https://www.inlanefreight.com/>; rel=shortlink
Vary : Accept-Encoding
Content-Encoding : gzip
Content-Length : 5483
Keep-Alive : timeout=5, max=100
Connection : Keep-Alive
Content-Type : text/html; charset=UTF-8

[!] Whois Lookup :

   Domain Name: INLANEFREIGHT.COM
   Registry Domain ID: 2420436757_DOMAIN_COM-VRSN
   Registrar WHOIS Server: whois.registrar.amazon.com
   Registrar URL: http://registrar.amazon.com
   Updated Date: 2023-07-03T01:11:15Z
   Creation Date: 2019-08-05T22:43:09Z
   Registry Expiry Date: 2024-08-05T22:43:09Z
   Registrar: Amazon Registrar, Inc.
   Registrar IANA ID: 468
   Registrar Abuse Contact Email: abuse@amazonaws.com
   Registrar Abuse Contact Phone: +1.2024422253
   Domain Status: clientDeleteProhibited https://icann.org/epp#clientDeleteProhibited
   Domain Status: clientTransferProhibited https://icann.org/epp#clientTransferProhibited
   Domain Status: clientUpdateProhibited https://icann.org/epp#clientUpdateProhibited
   Name Server: NS-1303.AWSDNS-34.ORG
   Name Server: NS-1580.AWSDNS-05.CO.UK
   Name Server: NS-161.AWSDNS-20.COM
   Name Server: NS-671.AWSDNS-19.NET
   DNSSEC: unsigned
   URL of the ICANN Whois Inaccuracy Complaint Form: https://www.icann.org/wicf/


[+] Completed in 0:00:00.257780

[+] Exported : /home/htb-ac-643601/.local/share/finalrecon/dumps/fr_inlanefreight.com_11-06-2024_11:07:59