The development of tools has many advantages. Besides the fact that we practice and learn specific programming languages during the development process, we also understand how such programs are developed and how the communication between server and client works. This gives us a better understanding of the structures of programs and some repertoire, which will help us understand the processes faster and easier.
It is necessary to have this understanding to think outside the box and try out potential weaknesses in the program that may be present. Finally, developers also have difficulties with development, which often leads to program vulnerabilities. This could be certain functions, libraries, or even the handling of specific values.
In the next sections, we will get back to DNS and dive a little deeper. Most probably, we have already dealt with some DNS records and know what information they can provide. Working with some tools and resources is a standard approach, but it is always best to use a tool that we have written and know precisely what it does and how.
Before we start to develop our tool, we need the information we want to work with. Therefore it is essential to understand every step of the interaction with the server to track and reproduce it. To get or query this information, we need to understand how the communication between the services, in this case, DNS, works, and how it is structured.
Another significant source of information for us is the Domain Name System (DNS). DNS is also known as the "phone book of the Internet." Like searching a phone book for a name to get the phone number, DNS looks for a computer name (domain name) to get its IP address. The IP address is needed to connect to a server where only the computer name is known. The system makes it easier for the end-user to reach a web server or a host. DNS is generally used to resolve computer names into IP addresses and reversed them. The components of a DNS service consist of:
Name serversZonesDomain namesIP addressesThe name servers contain so-called zones or zone files. In simple terms, zone files are lists of entries for the corresponding domain. We can think of it like a telephone book for a specific city. These zone files contain IP addresses to the specific domains and hosts. Such a zone file exists on every system, whether Linux or Windows and is called the "hosts" file. We can find them on the Pwnbox under "/etc/hosts." This file is our local zone file.
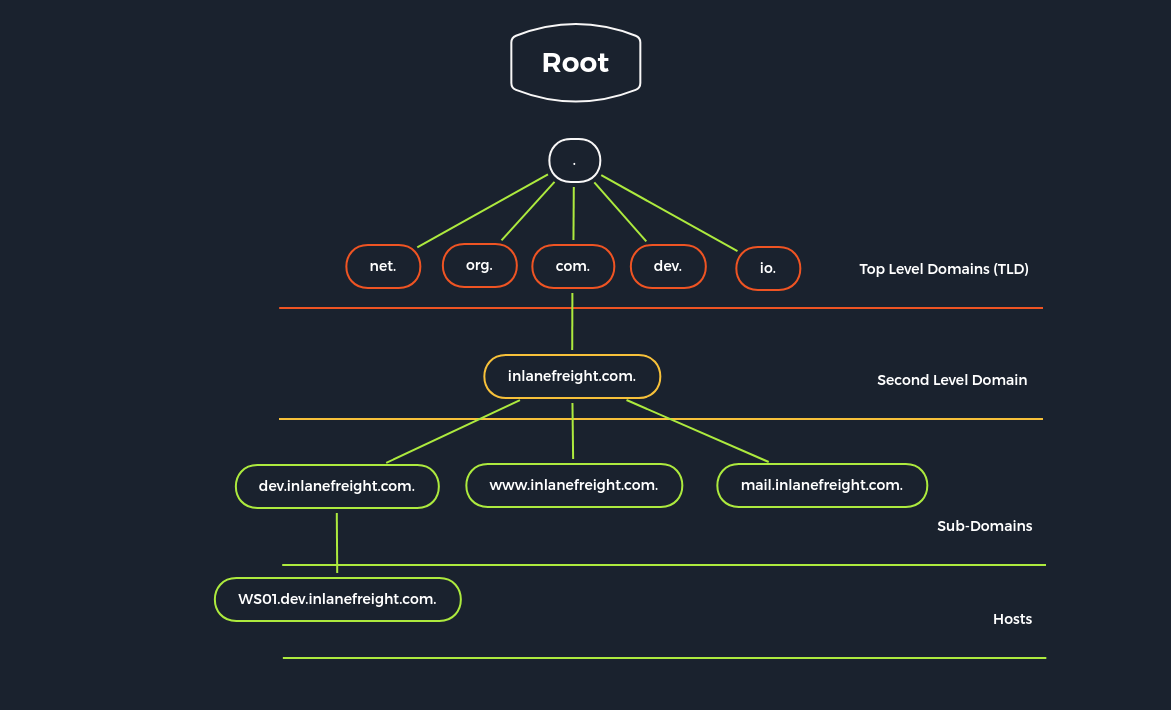
Let us take the following fully qualified domain name (FQDN) as an example:
www.domain-A.comA domain is used to give real names to computer's IP addresses and, at the same time, to divide them into a hierarchical structure. This hierarchical structure looks like a directory tree of an operating system.
.
├── com.
│   ├── domain-A.
│   │   ├── blog.
│   │   ├── ns1.
│   │   └── www.
│   │
│   ├── domain-B.
│   │   └── ...
│   └── domain-C.
│       └── ...
│
└── net.
│   ├── domain-D.
│   │   └── ...
│   ├── domain-E.
│   │   └── ...
│   └── domain-F.
│       └── ...
└── ...
│   ├── ...
│   └── ...
To make it a bit clearer, let us look at a real example of how such a structure can look like the appropriate naming.
Each domain consists of at least two parts:
Top-Level Domain (TLD)Domain NameFrom the last example, the domain name would be "inlanefreight" and the TLD then "com". If we look at the "inlanefreight," we see that it contains some so-called subdomains (dev, www, mail). These subdomains can represent a single host or virtual hosts (vHosts). The DNS servers are divided into four different types:
Recursive resolvers (DNS Recursor)Root name serverTLD name serverAuthoritative name serversThe recursive resolver acts as an agent between the client and the name server. After the recursive resolver receives a DNS query from a web client, it responds to this query with cached data, or it sends a query to a root name server, followed by a query to a TLD name server and finally a final query to an authoritative name server. Once it has received a response from the authoritative name server with the requested IP address, the recursive resolver sends the client's response.
During this process, the recursive resolver stores the received information from authoritative name servers in its cache. When a client requests the IP address of a domain name that was recently requested by another client, the resolver can skip communication with the name servers and retrieve the requested entry from its cache and send it to the client.
Thirteen root name servers can be reached under IPv4 and IPv6 addresses. An international non-profit organization maintains these root name servers called the Internet Corporation for Assigned Names and Numbers (ICANN). The zone files of these contain all domain names and IP addresses of the TLDs. Every recursive resolver knows these 13 root name servers. These are the first stations in the search for DNS entries for each recursive resolver. Each of these root name servers accepts a recursive resolver query that contains a domain name. The domains' extension answers the query and forwards the recursive resolver to the corresponding TLD name server. We find the 13 root name servers on the domain root-servers.net with the corresponding letter as a subdomain.
root@htb[/htb]$ dig ns root-servers.net | grep NS | sort -u

; EDNS: version: 0, flags:; udp: 4096
;; ANSWER SECTION:
;; flags: qr rd ra; QUERY: 1, ANSWER: 13, AUTHORITY: 0, ADDITIONAL: 1
;root-servers.net.        IN    NS
root-servers.net.    6882    IN    NS    a.root-servers.net.
root-servers.net.    6882    IN    NS    b.root-servers.net.
root-servers.net.    6882    IN    NS    c.root-servers.net.
root-servers.net.    6882    IN    NS    d.root-servers.net.
root-servers.net.    6882    IN    NS    e.root-servers.net.
root-servers.net.    6882    IN    NS    f.root-servers.net.
root-servers.net.    6882    IN    NS    g.root-servers.net.
root-servers.net.    6882    IN    NS    h.root-servers.net.
root-servers.net.    6882    IN    NS    i.root-servers.net.
root-servers.net.    6882    IN    NS    j.root-servers.net.
root-servers.net.    6882    IN    NS    k.root-servers.net.
root-servers.net.    6882    IN    NS    l.root-servers.net.
root-servers.net.    6882    IN    NS    m.root-servers.net.
These 13 root name servers represent the 13 different types of root name servers. It does not mean that it only spread over 13 hosts, but over 600 copies of these root name servers worldwide.
A TLD name server manages the information on all domain names that have the same TLD. These TLD name servers are the responsibility of the Internet Assigned Numbers Authority (IANA) and are managed by it. This means that all domains under the TLD ".com" are managed by the corresponding TLD name server. When we look for a domain registered under this TLD, the recursive resolver, after receiving a response from a root name server, sends a query to a TLD name server responsible for that TLD.
Authoritative name servers store DNS record information for domains. These servers are responsible for providing answers to requests from name servers with the IP address and other DNS entries for a web page so the web page can be addressed and accessed by the client. When a recursive resolver receives a TLD name server response, the response refers it to an authoritative name server. The authoritative name server is the last step to get an IP address.
The primary DNS server is the server of the zone file, which contains all authoritative information for a domain and is responsible for administering this zone. The DNS records of a zone can only be edited on the primary DNS server, which then updates the secondary DNS servers.
Secondary DNS servers contain read-only copies of the zone file from the primary DNS server. These servers compare their data with the primary DNS server at regular intervals and thus serve as a backup server. It is useful because a primary name server's failure means that connections without name resolution are no longer possible. To establish connections anyway, the user would have to know the IP addresses of the contacted servers. Nevertheless, this is not the rule.
We already know that the zone files contain the corresponding records and information for the specific domain. Here we distinguish between:
Primary zone (master zone)Secondary zone (slave zone)The secondary zone on the secondary DNS server serves as a substitute for the primary zone on the primary DNS server if the primary DNS server should become unreachable. The creation and transfer of the primary zone copy from the primary DNS server to the secondary DNS server is called a "zone transfer."
The update of the zone files can only be done on the primary DNS server, which then updates the secondary DNS server. Each zone file can have only one primary DNS server and an unlimited number of secondary DNS servers.
We can also consider the TLD ".com," such as a company manager for a specific department, who only knows and manages his team leaders (Zone 1). Each team leader also knows only his manager and his team members (Zone 2 and Zone 3).
Zone 1
.
└── com.
    ├── domain-A.
    ├── domain-B.
    └── domain-C.
Zone 2
com.
└── domain-A.
    ├── blog.
    ├── ns1.
    └── www.
Zone 3
com.
└── domain-B.
    └── www2.
There are two different types of zone transfers.
AXFR - Asynchronous Full Transfer ZoneIXFR - Incremental Zone TransferAn AXFR is a complete transfer of all entries of the zone file. In contrast to full asynchronous transfer, only the changed and new DNS records of the zone file are transferred for an IXFR to the secondary DNS servers.
The problem with DNS servers and zone transfers is that it does not require authentication and can be requested by any client. If the administrator has not set "Trusted Hosts/IP addresses" for the DNS servers, which have permission to receive these zones, we can also query the entire zone file with its contents. This will give us all IP addresses with the respective hosts and significantly increase our attack vector if the agreement does not limit our scope. Even today, it is quite common that the DNS servers are misconfigured and allow this.
DNS works with many different records. DNS records are instructions that are located on authoritative DNS servers and contain information about a domain. These entries are written in the DNS syntax that gives the DNS servers the appropriate instructions. Here are the most common DNS records that we will come across during our Penetration Tests:
| Record | Description |
|---|---|
A |
IP Version 4 Address records |
AAAA |
IP Version 6 Address records |
CNAME |
Canonical Name records |
HINFO |
Host Information records |
ISDN |
Integrated Services Digital Network records |
MX |
Mail exchanger record |
NS |
Name Server records |
PTR |
Reverse-lookup Pointer records |
SOA |
Start of Authority records |
TXT |
Text records |
There are many tools and resources we can work with to send queries to the DNS servers. For example, we can use tools like:
dignslookupWe want to automate the enumeration process for potential zone transfers on misconfigured DNS servers to check for this vulnerability quickly with the tool we are creating. Let us start by enumerating some NS servers and checking if a DNS zone transfer is possible and, if so, get the information about the subdomains from the zone transfer.
NS records stand for name server. These records specify which DNS server is the authoritative server for the corresponding domain that contains the actual DNS records. Often a domain has several NS records that can specify primary and secondary name servers for that domain. Now that we know our target domain, we still need DNS servers we will interact with. For this, we have to find out which DNS servers are responsible for the domain, and for this, we can use the tool called dig. In this example, we use the domain called: inlanefreight.com
DIG - NS Queries
root@htb[/htb]$ dig NS inlanefreight.com

<SNIP>
;; ANSWER SECTION:
inlanefreight.com.    60    IN    NS    ns2.inlanefreight.com.
inlanefreight.com.    60    IN    NS    ns1.inlanefreight.com.

<SNIP>
DIG - SOA Queries
root@htb[/htb]$ dig SOA inlanefreight.com

<SNIP>
;; ANSWER SECTION:
inlanefreight.com.    879    IN    SOA    ns-161.awsdns-20.com. awsdns-hostmaster.amazon.com. 1 7200 900 1209600 86400

<SNIP>
NSLOOKUP - SPF
root@htb[/htb]$ nslookup -type=SPF inlanefreight.com

Non-authoritative answer:
inlanefreight.com    rdata_99 = "v=spf1 include:_spf.google.com include:mail1.inlanefreight.com include:google.com ~all"
NSLOOKUP - DMARC
root@htb[/htb]$ nslookup -type=txt _dmarc.inlanefreight.com

Non-authoritative answer:
_dmarc.inlanefreight.com    text = "v=DMARC1; p=reject; rua=mailto:master@inlanefreight.com; ruf=mailto:master@inlanefreight.com; fo=1;"
Many companies have already recognized DNS's vulnerability and try to close this gap with dedicated DNS servers, regular scans, and vulnerability assessment software. However, beyond that fact, more and more companies recognize the value of the DNS as an active line of defense, embedded in an in-depth and comprehensive security concept.
This makes sense because the DNS is part of every network connection. The DNS is uniquely positioned in the network to act as a central control point to decide whether a benign or malicious request is received.
DNS Threat Intelligence can be integrated with other open-source and other threat intelligence feeds. Analytics systems such as EDR (Endpoint Detection and Response) and SIEM (Security Information and Event Management) can provide a holistic and situation-based picture of the security situation. DNS Security Services support the coordination of incident response by sharing IOCs (Indicators of Compromise) and IOAs (Indicators of Attacks) with other security technologies such as firewalls, network proxies, endpoint security, Network Access Control (NACs), and vulnerability scanners, providing them with information.
Another feed used for the security of DNS servers is Domain Name System Security Extensions (DNSSEC), designed to ensure the authenticity and integrity of data transmitted through the Domain Name System by securing resource records with digital certificates. DNSSEC ensures that the DNS data has not been manipulated and does not originate from any other source. Private keys are used to sign the Resource Records digitally. Resource Records can be signed several times with different private keys, for example, to replace keys that expire in time.
Private Key
The DNS server that manages a zone to be secured signs its sent resource records using its only known private key. Each zone has its zone keys, each consisting of a private and a public key. DNSSEC specifies a new resource record type with the RRSIG. It contains the signature of the respective DNS record, and these used keys have a specific validity period and are provided with a start and end date.
Public Key
The public key can be used to verify the signature of the recipients of the data. For the DNSSEC security mechanisms, it must be supported by the provider of the DNS information and the requesting client system. The requesting clients verify the signatures using the generally known public key of the DNS zone. If a check is successful, manipulating the response is impossible, and the information comes from the requested source.
As with any service we work with and want to find out information, it is essential to understand how DNS works to create a clear structure with the appropriate information. Since DNS can provide much information about the company's infrastructure, we can divide this information into the following categories:
DNS RecordsSubdomains/HostsDNS SecurityThere is a variety of techniques that can be used for this. These include:
The OSINT is an information procurement from publicly available and open sources. In the simplest case, we can also use search engines like Bing, Yahoo, and Google with the corresponding Google Dorks of Google to filter out our results.

Also, we can use public services such as VirusTotal, DNSdumpster, Netcraft, and others to read known entries for the corresponding domain. We can use "Right-Click on the image -> View Image" to make it bigger.
VirusTotal

DNSdumpster

Netcraft

Certificate Transparency (CT) logs contain all certificates issued by a participating Certificate Authority (CA) for a specific domain. Therefore, SSL/TLS certificates from web servers include domain names, subdomain names, and email addresses. Since these logs are public and accessible to everyone, it is a valuable source for understanding the target company's infrastructure better. We can use a tool that outputs all the CT logs for our target domain from different sources and filtered is ctfr.py.
CTFR.py
root@htb[/htb]$ python3 ctfr.py -d inlanefreight.com

          ____ _____ _____ ____
         / ___|_   _|  ___|  _ \
        | |     | | | |_  | |_) |
        | |___  | | |  _| |  _ <
         \____| |_| |_|   |_| \_\

    Made by Sheila A. Berta (UnaPibaGeek)

inlanefreight.com
vc.inlanefreight.com
wlan.inlanefreight.com
afdc0102.inlanefreight.com
autodiscover.inlanefreight.com
kfdcex07.inlanefreight.com
kfdcex08.inlanefreight.com
videoconf.inlanefreight.com
<SNIP>
Zone transfer in DNS refers to the transfer of zones to other DNS servers. This procedure is called the Asynchronous Full Transfer Zone (AXFR), as we have already learned. Since a DNS failure usually has severe consequences for a company, the zone files are almost without exception kept identical on several name servers. In the event of changes, it must be ensured that all servers have the same data stock. Zone transfer involves the mere transfer of files or records and the detection of discrepancies in the databases of the servers involved. DNS servers' configuration requires a great deal of attention because many administrators cannot always fully understand the operating principle from the technical configuration and troubleshooting. This leads to error rate and vulnerability, leading to misconfigurations and endanger the system or even the entire infrastructure by allowing the entire content of the zones to be viewed.
Performing DNS Zone Transfer
root@htb[/htb]$ dig axfr inlanefreight.com @10.129.2.67

; <<>> DiG 9.16.1-Ubuntu <<>> axfr inlanefreight.com @10.129.2.67
;; global options: +cmd
inlanefreight.com.        3600    IN    SOA    ns1.inlanefreight.com. adm.inlanefreight.com. 8 3600 300 86400 600
inlanefreight.com.        3600    IN    A    178.128.39.165
inlanefreight.com.       3600    IN    A    206.189.119.186
inlanefreight.com.        3600    IN    NS    ns1.inlanefreight.com.
inlanefreight.com.        3600    IN    NS    ns2.inlanefreight.com.
adm.inlanefreight.com.    3600    IN    A    134.209.24.248
blog.inlanefreight.com.    3600    IN    A    134.209.24.248
<SNIP>
We have all come across a piece of program code that has confused us more than it has made our work easier. When we open the editor and look at this code, we see a mess of lines of code without any structure:
For programmers, bad programming code leads to many lost hours, and entire development departments are caught in a downward spiral, especially when new software is created in a hurry. The work takes place under high pressure, leaving no time for the necessary code revision.
The management has no programming knowledge and does not understand the risks of writing bad code. The more additional functionality the programmers add, the bigger the chaos becomes. Every change to the code leads to further modifications in other components and new errors. Corrections become an overwhelming problem because the programmers have to understand all of the components.
The programming code becomes a complete mess of branches that cannot be cleaned up over time. In the end, the entire development is paralyzed, and productivity drops many times over. The management then usually appoints additional human resources to increase productivity, thereby making the more serious problem. The new people do not understand the existing program, so more and more chaos follows. This leads to inattention on the programmers' part, which is a further factor in the resulting vulnerabilities. Such a bad code can indicate how structured and efficient this software has been developed.
The following guidelines for clean programming will enable us to distinguish clear code from bad code and convert bad code into good code. This becomes especially important when we work with different code or when we need to adapt or modify it. The following five guidelines alone will help us keep our code simple, structured, and efficient.
| Guideline | Description |
|---|---|
Unique names |
Name variables, functions, and classes with consistent, meaningful, pronounceable, and distinguishable names. These types should be different and clearly identifiable from each other. You can use upper and lower case letters for this. |
Avoid error-prone constructs |
Design control statements in the easiest way. Avoid heavily nested control statements as they are difficult to test and understand. |
One task per function |
Each function should only ever perform one single task. This will later help to understand where the errors occur and to be able to fix them quickly. |
Duplicating lines of code are prohibited |
We must avoid duplicating written code in any case. Otherwise, it will become too big and confusing too fast. Besides, we may also reproduce bugs that will make our code almost impossible to execute until we fix all of them. |
Small number of method arguments |
The fewer arguments have to be used for a function, the easier the function is to understand. Furthermore, the error rate is much lower, and fixing the error is also much more straightforward and, above all, much more time-saving. |
There are guidelines developed especially for Python, known as the Python Enhancement Proposal (PEP8). PEP8 is a document that contains guidelines and best practices for writing Python code and was written in 2001 by Guido van Rossum, Barry Warsaw, and Nick Coghlan. PEP8 's primary focus is to improve the readability and consistency of Python code. When we have more experience in writing Python code, we may start working with others. Writing readable code is crucial because other people who are not familiar with our coding style need to read and understand our code. If we have guidelines that we follow and recognize, others will also find our code easier to read.
PEP8 Guidelines
| Rule | Description |
|---|---|
Indentation |
4 spaces, no tabs! |
Max. Line Length for Code |
79 characters / line |
Max. Line Length for Comments/DocStrings |
72 characters / line |
Encoding |
UTF-8 for Python 3 |
Quotes |
The use of single and double quotes is possible, but we should decide on one of them. |
... |
... |
Before we start coding our tool, we have to determine which modules we need and which are best suited for it. A quick search on Google will bring us to the module called "dnspython". Our goal is to perform a zone transfer, and accordingly, we need to find the appropriate classes and functions to communicate with the DNS servers. Another extension that we can use to develop such tools with Python 3 is IPython. It supports auto-completion and shows the different options in the corresponding classes and modules in an interactive Python shell.
After we have installed the module, we can import it. This module offers us the classes Query, Resolver, and Zone. The dns.zone module contains a "from_xfr" class. We can find this out by using the help() function in Python.
Python Help()
root@htb[/htb]$ ipython

In [1]: import dns.zone as dz

In [2]: help(dz.  #[1x Tab]

                 BadZone       dns           from_text()   generators    NoSOA         PY3           string_types  text_type     Zone
                 BytesIO       from_file()   from_xfr()    NoNS          os            re            sys           UnknownOrigin
Dns.Zone.From_XFR()
In [2]: help(dz.from_xfr)
From_XFR() - Documentation
from_xfr(xfr, zone_factory=<class 'dns.zone.Zone'>, relativize=True, check_origin=True)
    Convert the output of a zone transfer generator into a zone object.

    @param xfr: The xfr generator
    @type xfr: generator of dns.message.Message objects
    @param relativize: should names be relativized?  The default is True.
    It is essential that the relativize setting matches the one specified
    to dns.query.xfr().
    @type relativize: bool
    @param check_origin: should sanity checks of the origin node be done?
    The default is True.
    @type check_origin: bool
    @raises dns.zone.NoSOA: No SOA RR was found at the zone origin
    @raises dns.zone.NoNS: No NS RRset was found at the zone origin
    @rtype: dns.zone.Zone object
We can also find the documentation for this on the documentation page that describes the required parameters for the from_xfr() function. From the parameter "xfr," we will also need the dns.query class. So we should also note this class for later use.
Notes
# Notes
import dns.zone as dz
import dns.query as dq

# axfr = dz.from_xfr(dq.xfr())
We need to take a closer look at the dns.query.xfr() function to determine which parameters are required.
Dns.Query.XFR()
In [3]: help(dq.xfr)
XFR() - Documentation
Help on function xfr in module dns.query:

xfr(where, zone, rdtype=252, rdclass=1, timeout=None, port=53, keyring=None, keyname=None, relativize=True, af=None, lifetime=None, source=None, source_port=0, serial=0, use_udp=False, keyalgorithm=<DNS name HMAC-MD5.SIG-ALG.REG.INT.>)
    Return a generator for the responses to a zone transfer.

    *where*.  If the inference attempt fails, AF_INET is used.  This
    parameter is historical; you need never set it.
<SNIP>
Here we can see that only two variables have no value and therefore need specific parameters to perform this function.
wherezoneWe can also find out the required parameters by executing the function. Because if we do not output any parameters, an error will occur with the description that says which parameters are needed.
Required Parameters
In [4]: dq.xfr()

---------------------------------------------------------------------------
TypeError                                 Traceback (most recent call last)
<ipython-input-14-672b143b8cfc> in <module>
----> 1 dq.xfr()

TypeError: xfr() missing 2 required positional arguments: 'where' and 'zone'
In this case, the variable "where" stands for the DNS server and the variable "zone" for the domain. We note this as well.
Notes
# Notes
import dns.zone as dz
import dns.query as dq

# axfr = dz.from_xfr(dq.xfr(nameserver, domain))
We have to find out how to resolve our requests by using specific DNS servers. The easiest way with the necessary class would be "dns.resolver". In the documentation, we can find the class "Resolver" which allows us to specify the DNS servers we want to send our requests to. Of course, we can also automatically find these DNS servers, so we do not have to change them manually. Nevertheless, we have to be careful because companies often use DNS servers from third party providers for which we usually do not have the permissions to test them. Therefore, we recommend that we specify them manually and preferably in the command line rather than in our code. To make this possible, we import another module called "argparse". Accordingly, we also add this information to our notes.
Notes
# Notes
import dns.zone as dz
import dns.query as dq
import dns.resolver as dr
import argparse

# axfr = dz.from_xfr(dq.xfr(nameserver, domain))

# NS = dr.Resolver()
# NS.nameservers = ['ns1', 'ns2']
We now have to find the "NS" records for this domain, and instead of using the dig tool, we do it with our Python modules. In this example, we still use the domain called:
inlanefreight.comThe corresponding NS servers we found by using the following code:
NS Records - DNS.Resolver
root@htb[/htb]$ python3

>>> import dns.resolver
>>>
>>> nameservers = dns.resolver.query('inlanefreight.com', 'NS')
>>> for ns in nameservers:
...        print('NS:', ns)
...
NS: ns1.inlanefreight.com.
NS: ns2.inlanefreight.com.
In summary, we have the following information now:
Domain = 'inlanefreight.com'
DNS Servers = ['ns1.inlanefreight.com', 'ns2.inlanefreight.com']
Now we can summarize all our information and write the first lines of our code.
DNS-AXFR.py
#!/usr/bin/env python3

# Dependencies:
# python3-dnspython

# Used Modules:
import dns.zone as dz
import dns.query as dq
import dns.resolver as dr
import argparse

# Initialize Resolver-Class from dns.resolver as "NS"
NS = dr.Resolver()

# Target domain
Domain = 'inlanefreight.com'

# Set the nameservers that will be used
NS.nameservers = ['ns1.inlanefreight.com', 'ns2.inlanefreight.com']

# List of found subdomains
Subdomains = []
It is always an advantage if we separate individual processes from each other and build a single function out of it. This makes it easier to debug later when errors occur, and it makes the main function more independent. It may seem irrelevant at first with such a small tool, but if we start to extend the code, and eventually, our tool grows to a size of more than 1000 lines of code, we will see this advantage. We can divide the process into the following sections:
For the functions, we should try to use as few passing arguments as possible. Therefore there should not be more than three arguments, because otherwise there can be a high error-proneness. So in the next example, we use the two arguments domain and nameserver, which we need for the zone transfer.
Again, we should determine how we define the functions and keep this standard. In this case, we define the functions by capitalizing all letters of them. Many people use this capitalization also for classes. Then we should add comments to the function to divide each step in the function into parts.
DNS-AXFR.py - Functions
<SNIP>
# List of found subdomains
Subdomains = []

# Define the AXFR Function
def AXFR(domain, nameserver):

        # Try zone transfer for given domain and namerserver
        # Perform the zone transfer
        # If zone transfer was successful
        # Add found subdomains to global 'Subdomain' list
        # If zone transfer fails

# Main
if __name__=="__main__":

        # For each nameserver
        # Try AXFR
        # Print the results
        # Print each subdomain
If a statement or an expression is written correctly in terms of its syntax, errors may occur during execution. Errors that occur during execution are called exceptions and are not necessarily serious. A try statement can contain more than one except block to define different actions for different exceptions. At most, one except block is executed. A block can only handle the exceptions that occurred in the corresponding try block, but not those that occur in another except the block of the same try statement.
DNS-AXFR.py - Try-Except
<SNIP>
# List of found subdomains
Subdomains = []

# Define the AXFR Function
def AXFR(domain, nameserver):

        # Try zone transfer for given domain and namerserver
        try:
                # Perform the zone transfer
                axfr = dz.from_xfr(dq.xfr(nameserver, domain))

                # If zone transfer was successful
                # Add found subdomains to global 'Subdomain' list

        # If zone transfer fails
        except Exception as error:
                print(error)
                pass
With if-else statements, it depends on how many arguments or values we want to check simultaneously. In the best case, there should be only one value or argument to check at a time. However, if we need to check more than one argument and the line can be very long, it is recommended to write every argument in the brackets in a new line.
If-Else - Few Arguments
# Few arguments
if (arg1 and arg2):
    # Perform specified actions
else:
    pass
If-Else - Many Arguments
# Many arguments
if (arg1
    and arg2
    and arg3
    and arg4):

    # Perform specified actions
else:
    pass
In our DNS.py script, we use only one tested value, and therefore we don't need multiple lines.
DNS-AXFR.py - If-Else
<SNIP>
# List of found subdomains
Subdomains = []

# Define the AXFR Function
def AXFR(domain, nameserver):

        # Try zone transfer for given domain and namerserver
        try:
                # Perform the zone transfer
                axfr = dz.from_xfr(dq.xfr(nameserver, domain))

                # If zone transfer was successful
                if axfr:
                        print('[*] Successful Zone Transfer from {}'.format(nameserver))

                        # Add found subdomains to global 'Subdomain' list

        # If zone transfer fails
        except Exception as error:
                print(error)
                pass
The For loops should always be kept as simple as possible, as they can cause errors with the number of passes, which we then have to debug manually for each entry to understand what went wrong in the loop. Therefore, we will now append each "record" to our predefined "Subdomains" list to store the subdomains we found.
DNS-AXFR.py
<SNIP>
# List of found subdomains
Subdomains = []

# Define the AXFR Function
def AXFR(domain, nameserver):

        # Try zone transfer for given domain and namerserver
        try:
                # Perform the zone transfer
                axfr = dz.from_xfr(dq.xfr(nameserver, domain))

                # If zone transfer was successful
                if axfr:
                        print('[*] Successful Zone Transfer from {}'.format(nameserver))

                        # Add found subdomains to global 'Subdomain' list
                        for record in axfr:
                                Subdomains.append('{}.{}'.format(record.to_text(), domain))

        # If zone transfer fails
        except Exception as error:
                print(error)
                pass
Now we have our function, which only needs the domain and the respective name server as arguments. Next, we need the Main function, which passes the arguments to the AXFR function, executes it, and shows us the results.
The main function is the part of the code where the main program is running. It is essential to keep it as clear as possible, as we will most likely add more functions to our tool later. In this case, we want our tool to try a zone transfer on every DNS server we have specified. We know that the subdomains found will be added to the global subdomain list in the AXFR() function. So if this list is not empty, we want to see all subdomains.
If we start a Python program by calling a py file, and there we call "__name__", the system assigns it to the system variable the identifier "__main__." However, if we import this file into another module, it gets an identifier corresponding to the file name. This construction uses a Python file as a stand-alone program, makes single elements of this file importable, and implements complex module tests. As we did with the AXFR function, we proceed accordingly and define the rough steps that need to be taken as comments.
DNS-AXFR.py
<SNIP>
# Main
if __name__=="__main__":

        # For each nameserver
        # Try AXFR
        # Print the results
        # Print each subdomain
Since our AXFR function requires the two parameters, "domain" and "nameserver," we create a For-loop that executes the AXFR function for each nameserver specified. We use another For-loop combined with the If-Else statement in the area that will output the found subdomains. If the subdomain list, in which the AXFR function stores the found subdomains, is not empty, then every subdomain entry from the subdomain list should be printed.
DNS-AXFR.py
<SNIP>
# Main
if __name__=="__main__":

        # For each nameserver
        for nameserver in NS.nameservers:

                #Try AXFR
                AXFR(Domain, nameserver)

        # Print the results
        if Subdomains is not None:
                print('-------- Found Subdomains:')

                # Print each subdomain
                for subdomain in Subdomains:
                        print('{}'.format(subdomain))

        else:
                print('No subdomains found.')
                exit()
#!/usr/bin/env python3

# Dependencies:
# python3-dnspython

# Used Modules:
import dns.zone as dz
import dns.query as dq
import dns.resolver as dr
import argparse

# Initialize Resolver-Class from dns.resolver as "NS"
NS = dr.Resolver()

# Target domain
Domain = 'inlanefreight.com'

# Set the nameservers that will be used
NS.nameservers = ['ns1.inlanefreight.com', 'ns2.inlanefreight.com']

# List of found subdomains
Subdomains = []

# Define the AXFR Function
def AXFR(domain, nameserver):

        # Try zone transfer for given domain and namerserver
        try:
                # Perform the zone transfer
                axfr = dz.from_xfr(dq.xfr(nameserver, domain))

                # If zone transfer was successful
                if axfr:
                        print('[*] Successful Zone Transfer from {}'.format(nameserver))

                        # Add found subdomains to global 'Subdomain' list
                        for record in axfr:
                                Subdomains.append('{}.{}'.format(record.to_text(), domain))

        # If zone transfer fails
        except Exception as error:
                print(error)
                pass

# Main
if __name__=="__main__":

        # For each nameserver
        for nameserver in NS.nameservers:

                #Try AXFR
                AXFR(Domain, nameserver)

        # Print the results
        if Subdomains is not None:
                print('-------- Found Subdomains:')

                # Print each subdomain
                for subdomain in Subdomains:
                        print('{}'.format(subdomain))

        else:
                print('No subdomains found.')
                exit()
Make the Script Executable & Execute
root@htb[/htb]$ chmod +x dns-axfr.py
root@htb[/htb]$ ./dns-axfr.py

[*] Successful Zone Transfer from ns1.inlanefreight.com
-------- Found Subdomains:
@.inlanefreight.com
admin.inlanefreight.com
app.inlanefreight.com
blog.inlanefreight.com
<SNIP>
After determining that our script works properly, we can extend our code step by step and add more features. With the tool "dig," we have already seen that we can already define specific arguments in the terminal and pass them to the program. To avoid changing the code frequently, we can add the same function to our script and use it again when we need to. To include this function, we can use and import the standard module argparse.
Next, we define the arguments with the desired names in the Main function that our script should take from the terminal. It is highly recommended to test our script immediately if we have added anything new. Because if we add dozens of code lines with different dependencies and functions that affect others, it can significantly increase debugging time.
DNS-AXFR.py
<SNIP>
# Main
if __name__ == "__main__":

    # ArgParser - Define usage
    parser = argparse.ArgumentParser(prog="dns-axfr.py", epilog="DNS Zonetransfer Script", usage="dns-axfr.py [options] -d <DOMAIN>", prefix_chars='-', add_help=True)

<SNIP>
The passed arguments to the class argparse for the function "ArgumentParser" are "prog", "usage", "prefix_chars" and "add_help". The argument "prog" stands for the name of the script, which is then displayed in the help function ("add_help") with the usage example ("usage") if an argument is missing. The arguments are prefixed with the "prefix_chars" and are included in the script.
After initializing the parser, we can define the corresponding parameters, which we will define with our script's respective options. For this, we use the add_argument() method of the ArgumentParser. This method provides us with some parameters that we can use to define the option.
| Parameter | Description |
| name or flag | Either a name or a list of option strings. |
| action | The basic type of action to be taken when this argument is encountered at the command line. |
| nargs | The number of command-line arguments that should be consumed. |
| const | A constant value required by some action and nargs selections. |
| default | The value produced if the argument is absent from the command line. |
| type | The type to which the command-line argument should be converted. |
| choices | A container of the allowable values for the argument. |
| required | Whether or not the command-line option may be omitted (optionals only). |
| help | A brief description of what the argument does. |
| metavar | A name for the argument in usage messages. |
| dest | The name of the attribute to be added to the object returned by parse_args(). |
Source : https://docs.python.org/3/library/argparse.html#the-add-argument-method
Next, we define the target domain parameters and the nameservers on which we want to test the zone transfer. Since we can create another function later, which finds out the nameservers for the corresponding domain by itself, we define only the domain specification as required. Additionally, we add the script version to track later which version of the script we are using or editing. Finally, we assign the given arguments in the variable args.
DNS-AXFR.py
<SNIP>
# Main
if __name__ == "__main__":

    # ArgParser - Define usage
    parser = argparse.ArgumentParser(prog="dns-axfr.py", epilog="DNS Zonetransfer Script", usage="dns-axfr.py [options] -d <DOMAIN>", prefix_chars='-', add_help=True)

    # Positional Arguments
    parser.add_argument('-d', action='store', metavar='Domain', type=str, help='Target Domain.\tExample: inlanefreight.htb', required=True)
    parser.add_argument('-n', action='store', metavar='Nameserver', type=str, help='Nameservers separated by a comma.\tExample: ns1.inlanefreight.htb,ns2.inlanefreight.htb')
    parser.add_argument('-v', action='version', version='DNS-AXFR - v1.0', help='Prints the version of DNS-AXFR.py')

    # Assign given arguments
    args = parser.parse_args()

<SNIP>
Since we have replaced and extended the static definition of variables using argparse, we can remove the variable domain and NS.nameservers from the beginning of the script and adjust them in the main. To do this, we take the parameter d from the stored arguments in args ( = args.d), which stands for the variable Domain, and assign the passed argument to it.
The NS.nameservers variable can have several arguments, which we will separate with a comma (,). Therefore we create a list, which contains the arguments from args.n (nameservers) and separate them using the comma (,), if available.
DNS-AXFR.py
<SNIP>
# Main
if __name__ == "__main__":

    # ArgParser - Define usage
    parser = argparse.ArgumentParser(prog="dns-axfr.py", epilog="DNS Zonetransfer Script", usage="dns-axfr.py [options] -d <DOMAIN>", prefix_chars='-', add_help=True)

    # Positional Arguments
    parser.add_argument('-d', action='store', metavar='Domain', type=str, help='Target Domain.\tExample: inlanefreight.htb', required=True)
    parser.add_argument('-n', action='store', metavar='Nameserver', type=str, help='Nameservers separated by a comma.\tExample: ns1.inlanefreight.htb,ns2.inlanefreight.htb')
    parser.add_argument('-v', action='version', version='DNS-AXFR - v1.0', help='Prints the version of DNS-AXFR.py')

    # Assign given arguments
    args = parser.parse_args()

    # Variables
    Domain = args.d
    NS.nameservers = list(args.n.split(","))

    # Check if URL is given
    if not args.d:
        print('[!] You must specify target Domain.\n')
        print(parser.print_help())
        exit()

    if not args.n:
        print('[!] You must specify target nameservers.\n')
        print(parser.print_help())
        exit()

<SNIP>
The complete code would look like this.
DNS-AXFR.py - Complete Code
#!/usr/bin/env python3

# Dependencies:
# python3-dnspython

# Used Modules:
import dns.zone as dz
import dns.query as dq
import dns.resolver as dr
import argparse

# Initialize Resolver-Class from dns.resolver as "NS"
NS = dr.Resolver()

# List of found subdomains
Subdomains = []

# Define the AXFR Function
def AXFR(domain, nameserver):

    # Try zone transfer for given domain and namerserver
    try:
        # Perform the zone transfer
        axfr = dz.from_xfr(dq.xfr(nameserver, domain))

        # If zone transfer was successful
        if axfr:
            print('[*] Successful Zone Transfer from {}'.format(nameserver))

            # Add found subdomains to global 'Subdomain' list
            for record in axfr:
                Subdomains.append('{}.{}'.format(record.to_text(), domain))

    # If zone transfer fails
    except Exception as error:
        print(error)
        pass

# Main
if __name__ == "__main__":

    # ArgParser - Define usage
    parser = argparse.ArgumentParser(prog="dns-axfr.py", epilog="DNS Zonetransfer Script", usage="dns-axfr.py [options] -d <DOMAIN>", prefix_chars='-', add_help=True)

    # Positional Arguments
    parser.add_argument('-d', action='store', metavar='Domain', type=str, help='Target Domain.\tExample: inlanefreight.htb', required=True)
    parser.add_argument('-n', action='store', metavar='Nameserver', type=str, help='Nameservers separated by a comma.\tExample: ns1.inlanefreight.htb,ns2.inlanefreight.htb')
    parser.add_argument('-v', action='version', version='DNS-AXFR - v1.0', help='Prints the version of DNS-AXFR.py')

    # Assign given arguments
    args = parser.parse_args()

    # Variables
    Domain = args.d
    NS.nameservers = list(args.n.split(","))

    # Check if URL is given
    if not args.d:
        print('[!] You must specify target Domain.\n')
        print(parser.print_help())
        exit()

    if not args.n:
        print('[!] You must specify target nameservers.\n')
        print(parser.print_help())
        exit()

    # For each nameserver
    for nameserver in NS.nameservers:

        # Try AXFR
        AXFR(Domain, nameserver)

    # Print the results
    if Subdomains is not None:
        print('-------- Found Subdomains:')

        # Print each subdomain
        for subdomain in Subdomains:
            print('{}'.format(subdomain))

    else:
        print('No subdomains found.')
        exit()
First of all, we can give this script the appropriate privileges necessary to run it independently. If we now execute this script without passing the needed arguments, we get an error, which tells us which arguments are necessary.
DNS-AXFR.py - Execution without arguments
root@htb[/htb]$ chmod +x dns-axfr.py
root@htb[/htb]$ ./dns-axfr.py

usage: dns-axfr.py [options] -d <DOMAIN>
dns-axfr.py: error: the following arguments are required: -d
So when we test if we have set everything and do not give the script any arguments, we should get the error message as we expected. Next, we can check the help function by using "-h" as an argument.
DNS-AXFR.py - Help Message
root@htb[/htb]$ ./dns-axfr.py -h

usage: dns-axfr.py [options] -d <DOMAIN>

optional arguments:
  -h, --help     show this help message and exit
  -d Domain      Target Domain. Example: inlanefreight.htb
  -n Nameserver  Nameservers separated by a comma. Example:
                 ns1.inlanefreight.htb,ns2.inlanefreight.htb
  -v             Prints the version of DNS-AXFR.py

DNS Zonetransfer Script
Now we can also check if the version for this script is displayed as desired.
DNS-AXFR.py - Version
root@htb[/htb]$ ./dns-axfr.py -v

DNS-AXFR - v1.0
After we have verified that our script works, we can deploy it and test it on our target domain. In this example, our target domain is "inlanefreight.com."
DNS-AXFR.py - Example
root@htb[/htb]$ ./dns-axfr.py -d inlanefreight.com -n ns1.inlanefreight.com,ns2.inlanefreight.com

[*] Successful Zone Transfer from ns1.inlanefreight.com
[*] Successful Zone Transfer from ns2.inlanefreight.com
-------- Found Subdomains:
adm.inlanefreight.com
blog.inlanefreight.com
wlan.inlanefreight.com
afdc0102.inlanefreight.com
autodiscover.inlanefreight.com
kfdcex07.inlanefreight.com
<SNIP>