
Android is a mobile operating system created for touchscreen devices like phones and tablets. Based on a modified version of the Linux Kernel, it was developed by the Open Handset Alliance consortium and commercially sponsored by Google. Most Android devices come pre-installed with Google Mobile Services (GMS), a proprietary software suite that includes apps like Google Play and Google Chrome. Google collaborates with various vendors, such as Samsung and HTC, to allow customization of user interfaces and software features. Beyond smartphones and tablets, Android OS is also used in smart TVs and wearables developed by Google. Android applications are distributed through various app stores, including Google Play Store, Amazon Appstore, Samsung Galaxy Store, Huawei AppGallery, and open-source platforms such as Aptoide, F-Droid, APKPure, and APKMirror.
In October 2003, Andy Rubin, Rich Miner, Nick Sears, and Chris White founded Android Incorporated in Palo Alto, California. In 2005, after Rubin's efforts to attract investors, Google acquired the company for the reported price of around $50 million. After some time, Rubin's team at Google developed the first mobile device powered by the Linux kernel. In 2007, an early prototype with no touchscreen and a physical QWERTY keyboard was created, followed by the HTC Dream (also known as T-Mobile G1, the first commercial Android device released in September 2008.) Android's major releases before version 10 were named after desserts. For example, the first Android versions were called Cupcake, Donut, Eclair, and Froyo.
In 2010, Google launched the Nexus series, and in May 2013, it announced a special version of the Samsung Galaxy S4 that included Google Play, followed by the HTC One Google Play edition and the Moto G Google Play edition. In June 2014, Google introduced Android One, a program aimed at enabling third-party manufacturers to produce high-quality smartphones easily and at low cost. In October 2016, Google replaced the Nexus series with the Pixel and Pixel XL smartphones, the first phones designed and marketed entirely by Google. On September 3, 2019, Google released Android 10 (initially referred to as Android Q) for Pixel devices, officially ending the tradition of naming major Android versions after desserts.
Below is a table showing the correlation between Android codenames, versions, API levels, and release dates.
| Name | Version | API Level | Release Date |
|---|---|---|---|
| Android 1.0 | 1.0 | 1 | September 23, 2008 |
| Android 1.1 | 1.1 | 2 | February 9, 2009 |
| Android Cupcake | 1.5 | 3 | April 27, 2009 |
| Android Donut | 1.6 | 4 | September 15, 2009 |
| Android Eclair | 2.0 | 5 | October 27, 2009 |
| Android Eclair | 2.0.1 | 6 | December 3, 2009 |
| Android Eclair | 2.1 | 7 | January 11, 2010 |
| Android Froyo | 2.2 – 2.2.3 | 8 | May 20, 2010 |
| Android Gingerbread | 2.3 – 2.3.2 | 9 | December 6, 2010 |
| Android Gingerbread | 2.3.3 – 2.3.7 | 10 | February 9, 2011 |
| Android Honeycomb | 3.0 | 11 | February 22, 2011 |
| Android Honeycomb | 3.1 | 12 | May 10, 2011 |
| Android Honeycomb | 3.2 – 3.2.6 | 13 | July 15, 2011 |
| Android Ice Cream Sandwich | 4.0 – 4.0.2 | 14 | October 18, 2011 |
| Android Ice Cream Sandwich | 4.0.3 – 4.0.4 | 15 | December 16, 2011 |
| Android Jelly Bean | 4.1 – 4.1.2 | 16 | July 9, 2012 |
| Android Jelly Bean | 4.2 – 4.2.2 | 17 | November 13, 2012 |
| Android Jelly Bean | test | 18 | July 24, 2013 |
| Android KitKat | 4.4 – 4.4.4 | 19 | October 31, 2013 |
| Android KitKat | 4.4W – 4.4W.2 | 20 | June 25, 2014 |
| Android Lollipop | 5.0 – 5.0.2 | 21 | November 4, 2014 |
| Android Lollipop | 5.1 – 5.1.1 | 22 | March 2, 2015 |
| Android Marshmallow | 6.0 – 6.0.1 | 23 | October 2, 2015 |
| Android Nougat | 7.0 | 24 | August 22, 2016 |
| Android Nougat | 7.1 – 7.1.2 | 25 | October 4, 2016 |
| Android Oreo | 8.0 | 26 | August 21, 2017 |
| Android Oreo | 8.1 | 27 | December 5, 2017 |
| Android Pie | 9 | 28 | August 6, 2018 |
| Android 10 | 10 | 29 | September 3, 2019 |
| Android 11 | 11 | 30 | September 8, 2020 |
| Android 12 | 12 | 31 | October 4, 2021 |
| Android 12L | 12.1 | 32 | March 7, 2022 |
| Android 13 | 13 | 33 | August 15, 2022 |
| Android 14 | 14 | 34 | October 4, 2023 |
| Android 15 | 15 | 35 | September 3, 2024 |
| Android 16 | 16 Beta | 36 | March 13, 2025 |
The Android version of the device, along with other information, can be found under Settings -> About emulated device -> Android version.
Although Android supports a range of hardware architectures, the majority of devices use the ARM (AArch64) architecture. Architectures such as x86 and x86-64 have also been supported, primarily in later Android versions that included Intel processors. The unofficial project Android-x86 provided support for the x86 architecture even before it was officially supported by Android. Non-native architectures like x86 can also run on the Android Emulator included with the SDK, as well as on various third-party emulators. Android devices typically include a variety of hardware components, such as video cameras, GPS, orientation sensors, dedicated gaming controls, accelerometers, gyroscopes, barometers, magnetometers, proximity sensors, pressure sensors, thermometers, and touchscreens. Moving on to the next section, we will discuss the main components of the Android operating system and their attributes.
As we mentioned in the previous section, Android is a Linux-Based OS, and once someone gains access to a shell on the device, Linux commands can be executed. The Linux shell, as we will see in the upcoming sections, will provide a text-based I/O (input/output) interface between users and the system kernel. The example below shows how to navigate the file system and list the contents of the directory /sdcard/.
Android Shell
Android Operating System
emu64x:/ # cd /sdcard/
emu64x:/sdcard # ls -l

total 104
drwxrws--- 2 u0_a143  media_rw 4096 2022-12-28 11:48 Alarms
drwxrws--x 5 media_rw media_rw 4096 2022-12-28 11:47 Android
drwxrws--- 2 u0_a143  media_rw 4096 2022-12-28 11:48 Audiobooks
drwxrws--- 2 u0_a143  media_rw 4096 2022-12-28 11:48 DCIM
drwxrws--- 2 u0_a143  media_rw 4096 2022-12-28 11:48 Documents
drwxrws--- 2 u0_a143  media_rw 4096 2023-04-19 01:18 Download
drwxrws--- 3 u0_a143  media_rw 4096 2022-12-28 11:48 Movies
drwxrws--- 3 u0_a143  media_rw 4096 2022-12-28 11:48 Music
drwxrws--- 2 u0_a143  media_rw 4096 2022-12-28 11:48 Notifications
drwxrws--- 4 u0_a143  media_rw 4096 2022-12-30 15:09 Pictures
drwxrws--- 2 u0_a143  media_rw 4096 2022-12-28 11:48 Podcasts
drwxrws--- 2 u0_a143  media_rw 4096 2022-12-28 11:48 Recordings
drwxrws--- 2 u0_a143  media_rw 4096 2022-12-28 11:48 Ringtones
The Android platform consists of six components, which we will analyze in the following paragraphs. The image below shows the Linux-based software stack Android uses, which contains these components.
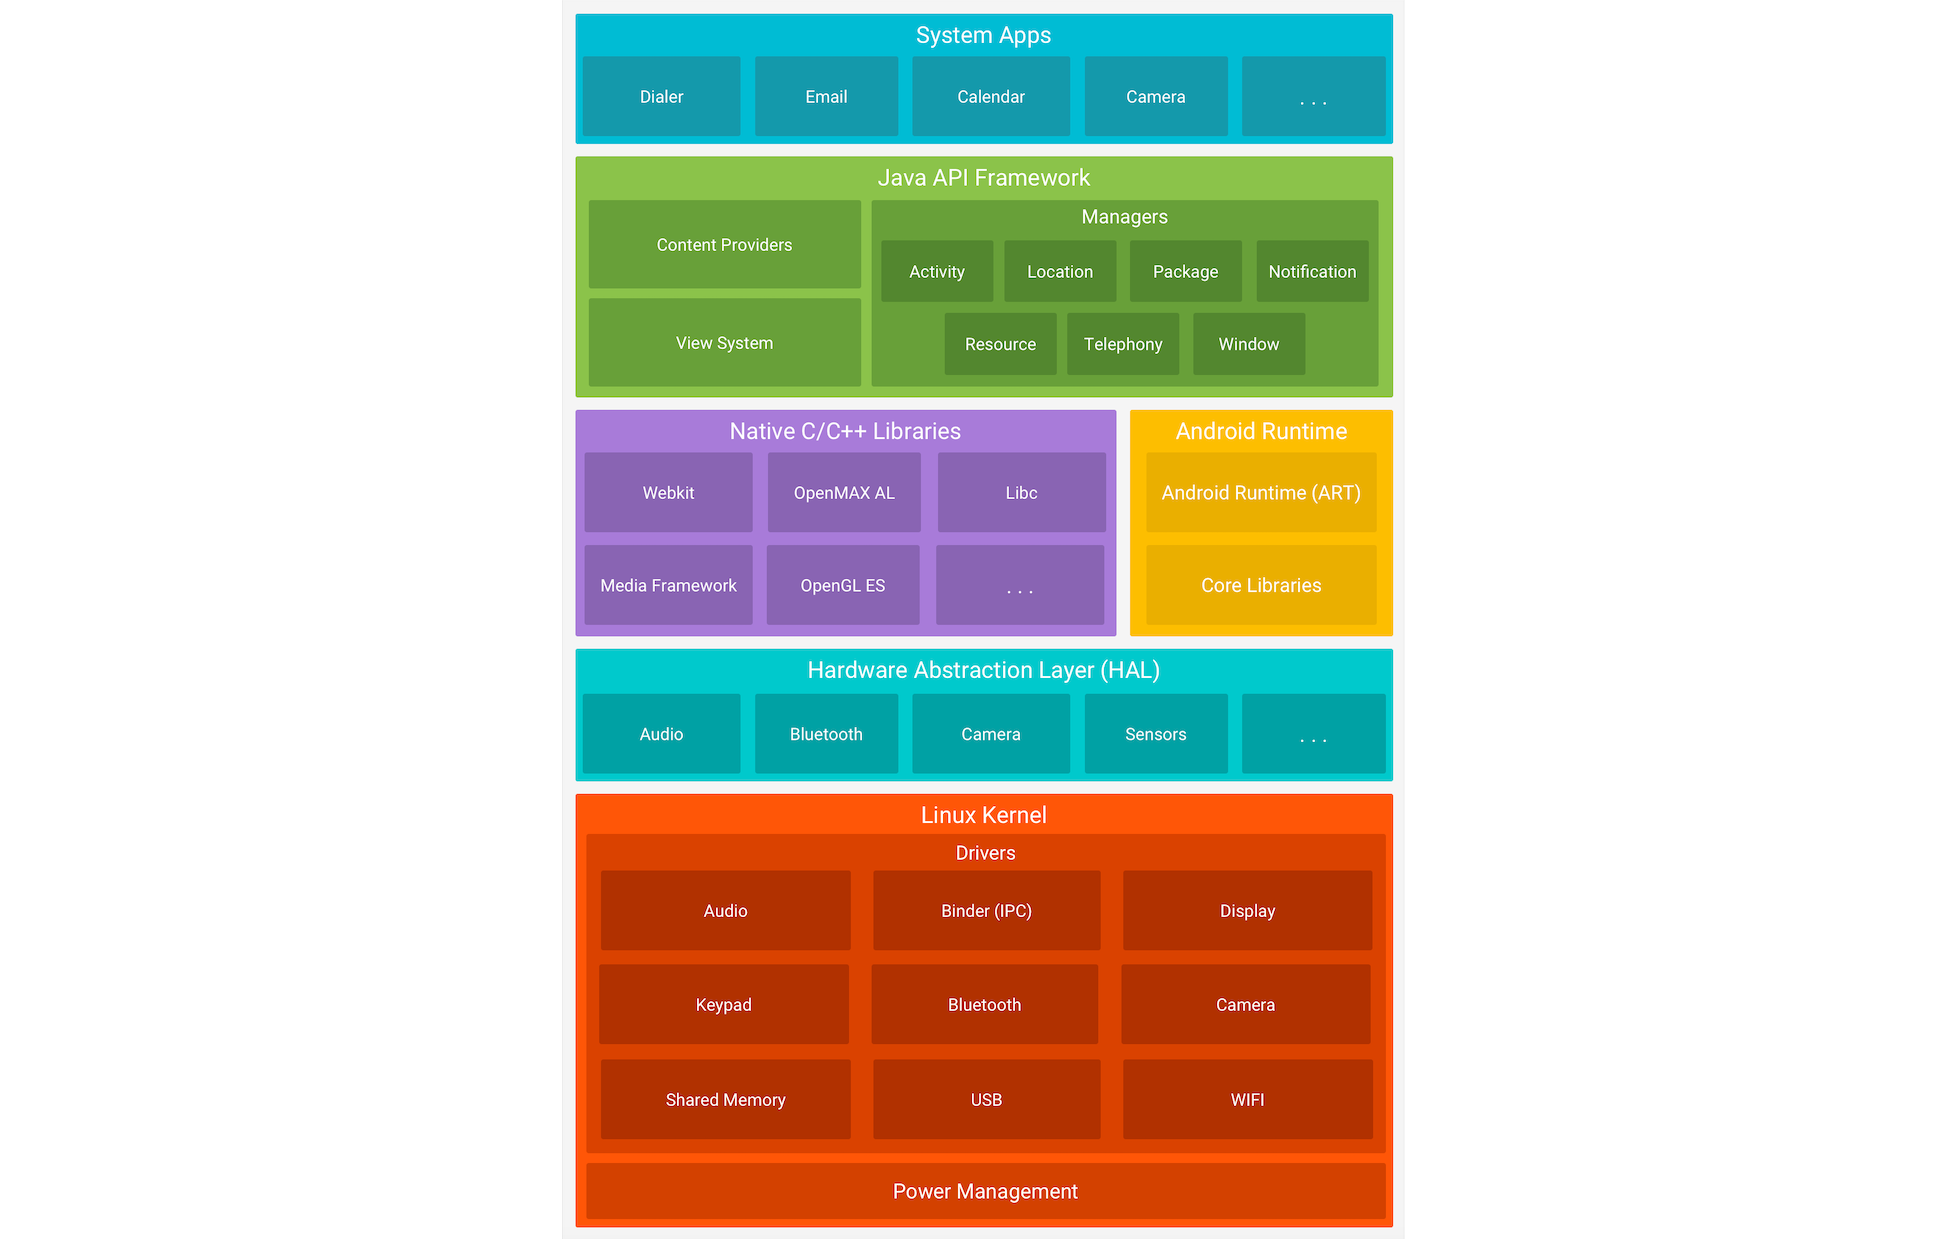
Linux Kernel
The Linux kernel is the foundation of the Android platform, and is responsible for managing device hardware such as the display, camera, bluetooth, wifi, audio, USB, and more. Android Runtime also relies on this layer to perform functionalities like threading and memory management.
Additionally, the Linux kernel allows Android to take advantage of numerous security features (like a user-based permissions model and process isolation) that:
| Kernel-Level Security Features |
|---|
| Prevent users from reading each other's files. |
| Prevent users from exhausting each other's memory. |
| Prevent users from exhausting CPU resources. |
| Prevent users from exhausting devices resources, like telephony, GPS, and Bluetooth. |
Hardware Abstraction Layer (HAL)
The Hardware Abstraction Layer (HAL) is a software layer that provides the Android operating system with a standardized interface for interacting with hardware components, such as cameras, Bluetooth, sensors, and input devices. Acting as a bridge between hardware and the higher-level software layers, HAL ensures consistency in how software accesses hardware features. Because different hardware components may have unique requirements and capabilities, writing portable software that works across devices can be challenging. HAL addresses this by isolating hardware-specific implementation details from the Android framework. It is implemented as a collection of shared libraries that are dynamically loaded by the Android framework at runtime. This architecture allows device manufacturers to implement custom support for their hardware while maintaining compatibility with the broader Android platform.
Android Runtime
Android Runtime (ART) is the managed runtime environment used by the Android operating system to execute applications. Introduced in Android 5.0 Lollipop as a replacement for the Dalvik virtual machine, ART brought significant architectural improvements to app execution. The primary distinction between ART and Dalvik lies in their compilation strategies: ART uses Ahead-of-Time (AOT) compilation, while Dalvik relied on Just-in-Time (JIT) compilation. With AOT, application code is compiled into native machine code at install time, resulting in faster app launch times and improved runtime performance.
ART is capable of running multiple virtual machines concurrently, even on low-memory devices, and it executes applications packaged in the DEX (Dalvik Executable) format. Importantly, ART maintains backward compatibility with applications originally built for Dalvik. Some of the core features and benefits of Android Runtime include:
| ART Features |
|---|
| Improved garbage collection. |
| Better memory management. |
| Better debugging support. |
| Optimized compression of the DEX file. |
Native C/C++ Libraries
The Native C/C++ Libraries component is a set of libraries written in the C and C++ programming languages, and are included in the Android operating system. Developers generally use these libraries to achieve high performance or write low-level code to interact directly with the hardware. Hardening techniques for increasing security can also be implemented using native C++ code.
Android components like ART and HAL are created using native code, and in order for these components to work, access to native libraries is needed. Applications can access these libraries through the Java Native Interface (JNI), while programmers can use the Android NDK to access native libraries directly from their native code.
Java API Framework
Another essential part of the Android platform architecture is Java API Framework. This component provides software tools and interfaces for building Android applications. Below are some of the components tha Java API Framework provides.
| Components |
|---|
| View System |
| Resource Manager |
| Notification Manager |
| Activity Manager |
| Content Providers |
| Location Manager |
| Package Manager |
System Apps
System Apps is the top layer core component of the platform architecture. This component includes all the pre-installed applications that come with the Android operating system. Such apps include:
| Apps |
|---|
| Contacts |
| Messaging |
| Camera |
| Browser |
| Calendar |
| Maps |
| Settings |
Pre-installed apps can only be modified on rooted devices. However, developers can use them in their applications using the provided APIs. For example, a developer could create an app that uses the camera to scan a QR code.
The Dalvik Virtual Machine (DVM) was developed by Google and introduced with the first version of Android in 2008. Android applications written in Java or Kotlin are compiled into Java bytecode and then transformed into Dalvik bytecode, packaged in .dex (Dalvik Executable) or .odex (Optimized Dalvik Executable) file formats. Unlike the Java Virtual Machine (JVM), which is stack-based, the Dalvik VM is a register-based virtual machine. This architectural difference allows for more efficient execution on devices with limited CPU and memory resources, which is ideal for mobile environments.
Dalvik was the default runtime environment in Android versions prior to API level 21 (Lollipop). It was eventually replaced by the Android Runtime (ART), which was introduced as a preview in Android 4.4 (KitKat) and became the default in Android 5.0. ART maintains compatibility by using the same .dex bytecode format as Dalvik, but differs significantly in its execution model. While Dalvik used Just-in-Time (JIT) compilation, ART initially used Ahead-of-Time (AOT) compilation — compiling bytecode into native machine code at install time, resulting in faster startup and improved performance. In later Android versions, ART evolved to include hybrid JIT + AOT and Profile-Guided Optimizations (PGO), further enhancing runtime efficiency and battery performance.
Android separates the flash storage into the following two main partitions.
/system//data/The partition /system/ is used by the operating system, and the partition /data/ is used for user data and application installations. In Android, users don't have root access to the operating system, and some partitions (like /system/) are read-only. However, rooting the device can be achieved by exploiting security flaws. Having a rooted device enhances the capabilities and customizability of the device, and helps with debugging and overall security assessments. Rooted Android devices are also more susceptible to malicious viruses and malware, since the rooting process disables some of the built-in security features of the operating system. In some models like Google Pixel and OnePlus, rooting can also be achieved by unlocking the bootloader via the OEM Unlocking option.
Android's file structure is very similar to other Linux distributions. The directories listed below are some of the most important to consider while conducting Android app assessments.
| Directory | Description |
|---|---|
/data/data |
Contains all the applications that are installed by the user |
/data/user/0 |
Contains data that only the app can access |
/data/app |
Contains the APKs of the applications that are installed by the user |
/system/app |
Contains the pre-installed applications of the device |
/system/bin |
Contains binary files |
/data/local/tmp |
A world-writable directory |
/data/system |
Contains system configuration files |
/etc/apns-conf.xml |
Contains the default Access Point Name (APN) configurations. APN is used in order for the device to connect with our current carrier’s network |
/data/misc/wifi |
Contains WiFi configuration files |
/data/misc/user/0/cacerts-added |
User certificate store. It contains certificates added by the user |
/etc/security/cacerts/ |
System certificate store. Permission to non-root users is not permitted |
/sdcard |
Contains a symbolic link to the directories DCIM, Downloads, Music, Pictures, etc. |
Kotlin and Java are the two primary languages used to develop Android applications. The Android SDK tools compile application source code along with resource files and assets into an Android Package (APK). An APK is an archive file with a .apk extension that contains all the components needed to install and run an Android app, including compiled bytecode (.dex), manifest metadata, resources, and native libraries.
Each Android application runs within its own isolated security sandbox, enforced by the underlying Linux-based architecture. This sandboxing model is supported by several core Android security features:
| Security Features |
|---|
| Android is a multi-user Linux system where each application is treated as a separate user. |
| By default, the system assigns each app a unique Linux user ID (UID). This UID is used by the system for access control, but is not exposed to the app itself. |
| File system permissions ensure that only the app assigned a particular UID can access its own files. |
| Each app runs in its own process, and each process runs in a separate instance of the Android Runtime (ART) virtual machine, ensuring memory isolation. |
| The system launches the app's process as needed and terminates it when no longer required or when reclaiming system resources. |
| Android enforces the principle of least privilege, meaning apps only receive the permissions necessary to perform their core functionality. Additional privileges must be explicitly declared in the app's manifest and approved by the user (or system, depending on the API level). |
Android uses Linux’s user-based security model to isolate applications by assigning each app a unique user ID (UID) and running it in its own process. This creates a kernel-level application sandbox that enforces strict boundaries between apps and the system, preventing unauthorized data access or code execution across app boundaries. Apps cannot interact with each other or access system resources beyond their privileges unless explicit permissions are granted. Because the sandbox is enforced by the Linux kernel, these protections apply uniformly to all code running above the kernel, including native binaries, OS services, libraries, and user applications. Escaping this sandbox requires compromising the kernel itself, typically through a privilege escalation exploit.
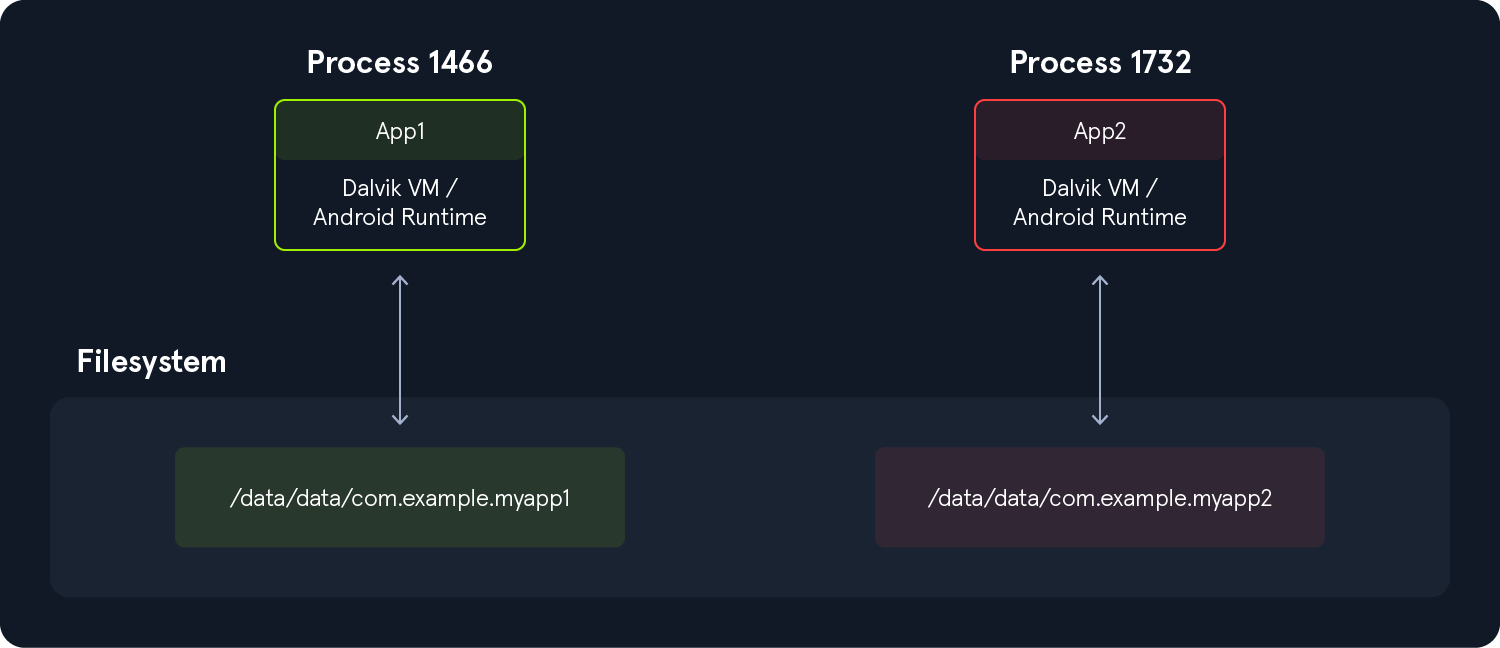
Executing the following command, we can see that all applications have a different UID.
Android Shell
Android Security Features
root:/# ls -l /data/data/

<SNIP>
drwx------  4 system         system         4096 2022-12-28 11:47 android
drwx------  4 bluetooth      bluetooth      4096 2022-12-28 11:47 com.android.bluetooth
drwx------  5 radio          radio          4096 2022-12-28 11:48 com.android.ons
drwx------  5 shell          shell          4096 2022-12-28 11:49 com.android.shell
drwx------ 11 u0_a114        u0_a114        4096 2022-12-30 12:41 com.android.chrome
drwx------  5 u0_a119        u0_a119        4096 2022-12-28 11:49 com.android.camera2
In addition to the UID-based discretionary access control (DAC) sandboxing that Android uses, many other protections have been introduced to strengthen app and system isolation. The following protections were introduced in previous Android releases.
| Additional Protections |
|---|
| SELinux Mandatory Access Control (MAC): Separates the system from the apps. |
| SELinux sandbox extension: Isolates apps across physical users. |
Filter seccomp-bpf: Sets a limit to the syscalls that apps are allowed to use. |
Individual SELinux sandboxes and Mandatory Access Control (MAC): Exists for all non-privileged apps with targetSdkVersion >= 28. |
Limited raw view of the filesystem: No direct access to paths like /sdcard/DCIM. |
Sharing files between applications also requires strong security practices and implementation. Setting app data as world accessible has been disallowed since targetSdkVersion >= 28 due to the inability to specify the desired recipient, and thus, malicious apps could potentially gain access to sensitive information from other apps.
To install an application on a device or upload it to the Play Store, the APK file must be signed. Signing the APK is crucial for security, as it protects the package from malicious modifications. Devices running Android 7.0 and earlier support JAR signing (v1), but this method does not offer complete protection—certain parts of the APK, such as ZIP metadata, are not covered by the signature.
Signature Scheme v2 was introduced in Android 7.0 and later to improve APK integrity and guard against unauthorized changes. Signature Scheme v3, introduced in Android 9, added support for including additional metadata in the signing block. Starting with Android 11, APK Signature Scheme v4 is used, which employs a Merkle hash tree calculated over all bytes of the APK and follows the structure of an fs-verity hash tree. The v4 signature is stored in a separate file and requires a corresponding v2 or v3 signature. The image below shows the flow of signature validation when an application is installed.
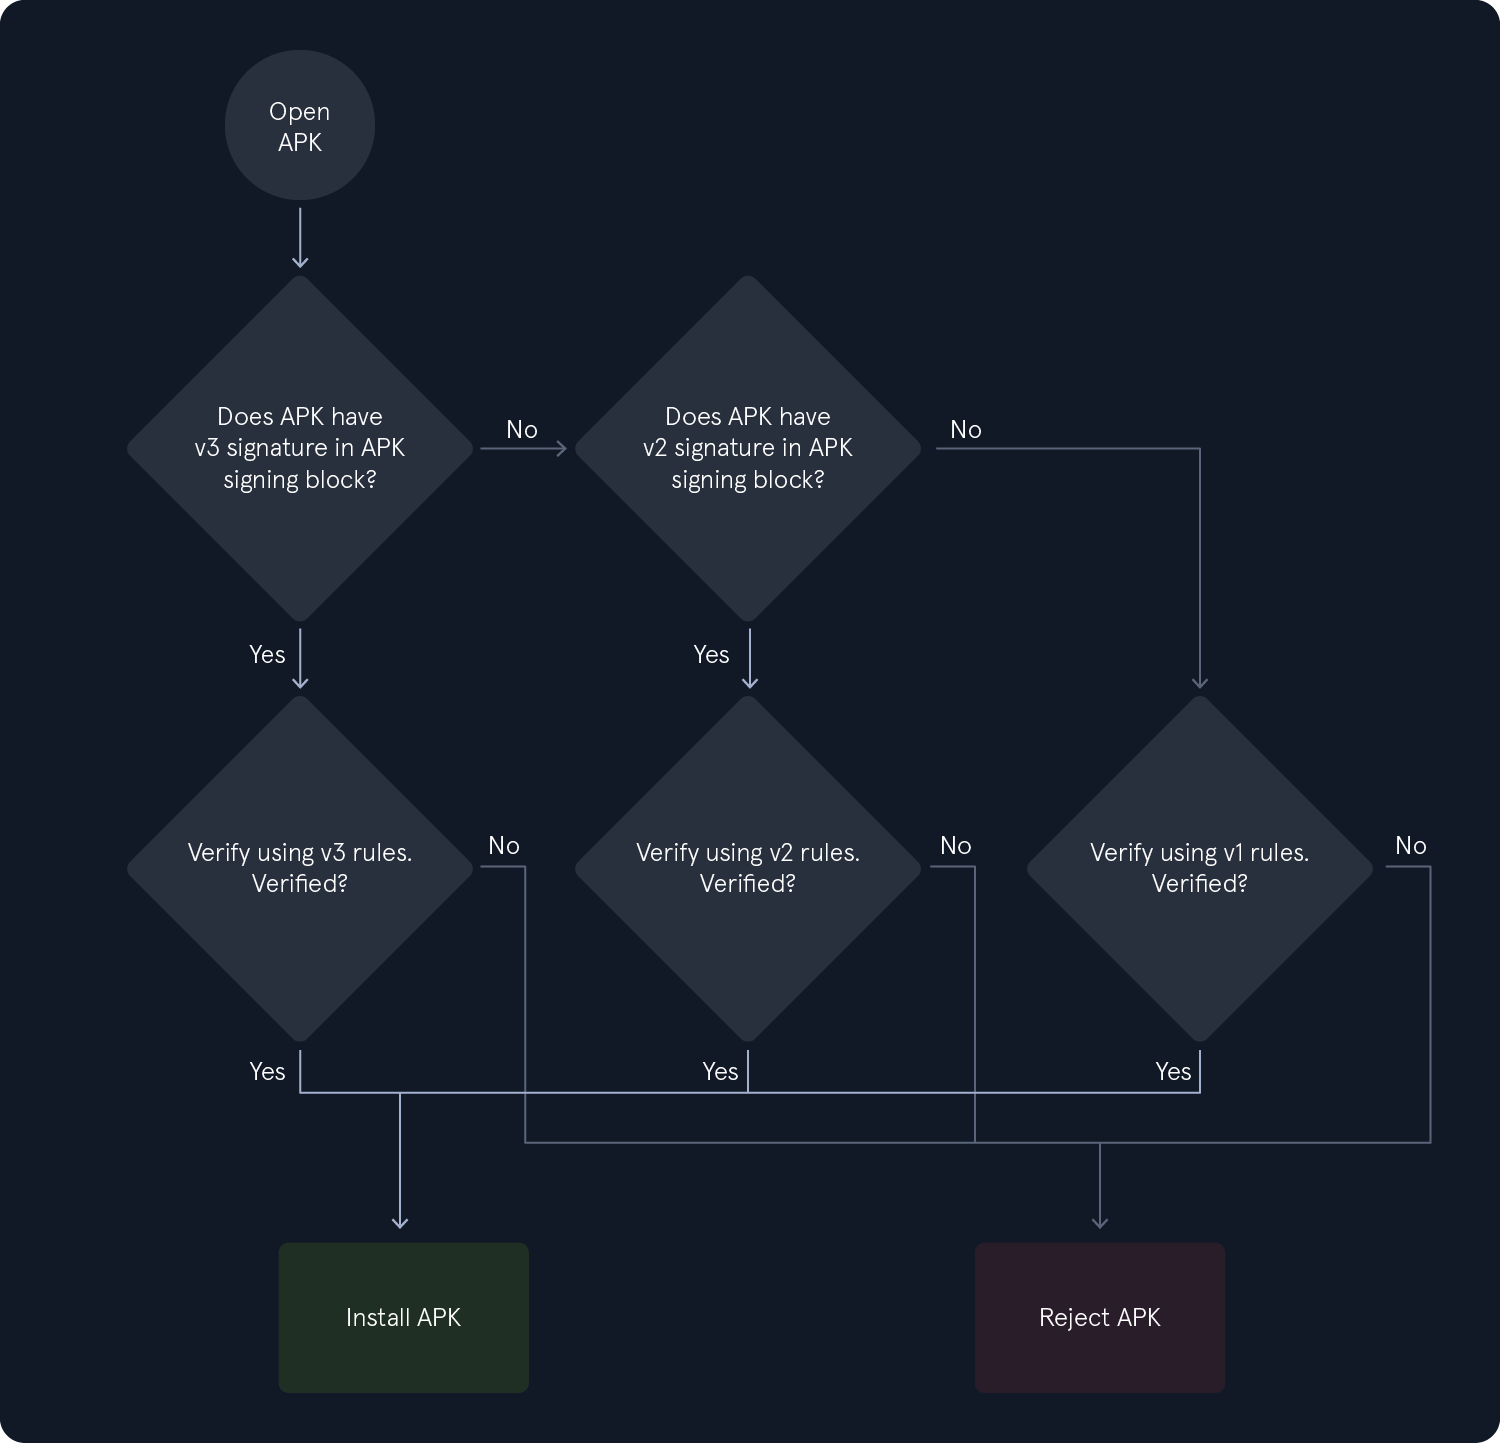
Signature v2 and v3 perform checks that invalidate the APK file if there are any modifications. This way, attacks like injecting DEX files into the APK file are prevented. Signature Scheme v1, however, is vulnerable to this kind of attack. The Janus vulnerability (CVE-2017-13156) allows malicious actors to inject DEX files into the APK-without affecting the signatures-in cases where the APK is signed using the Signature Scheme v1. As a result, they can install and run the modified app.
The malicious DEX file is prepended to the APK file, and the Android runtime accepts it as a valid update made to the earlier, legitimate version of the app. Then, the Dalvik VM will load the code of the DEX file. Android devices 5.0 < 8.1 that are signed using Signature Scheme v1 are affected by Janus.
Application signing can be performed in several ways:
| Signing Ways |
|---|
Android Studio, via the Generate Signed App Bundle / APK build option. |
The jarsigner / apksigner tools. |
| Play App Signing. |
The certificates that are used to sign an application are self-signed. One can sign an APK file with apksigner tool (Signature Scheme v4) using the following commands:
Signing an APK File
Android Security Features
root@htb[/htb]$ echo -e "password\npassword\njohn doe\ntest\ntest\ntest\ntest\ntest\nyes" > params.txt
root@htb[/htb]$ cat params.txt | keytool -genkey -keystore key.keystore -validity 1000 -keyalg RSA -alias john
root@htb[/htb]$ zipalign -p -f -v 4 myapp.apk myapp_signed.apk
root@htb[/htb]$ echo password | apksigner sign --ks key.keystore myapp_signed.apk
These commands accomplish the following for us:
| APK Signing Steps |
|---|
Creates a file, params.txt, with the necessary input data for keytool to generate a keypair. |
Pipes the contents of params.txt into keytool to automate the key generation process, storing the key in key.keystore. |
zipalign allows uncompressed files within myapp.apk to be accessed directly via mmap, creating an optimized application named myapp_signed.apk |
The final app is signed with apksigner, using the key stored in key.keystore and the password being echoed through the pipe |
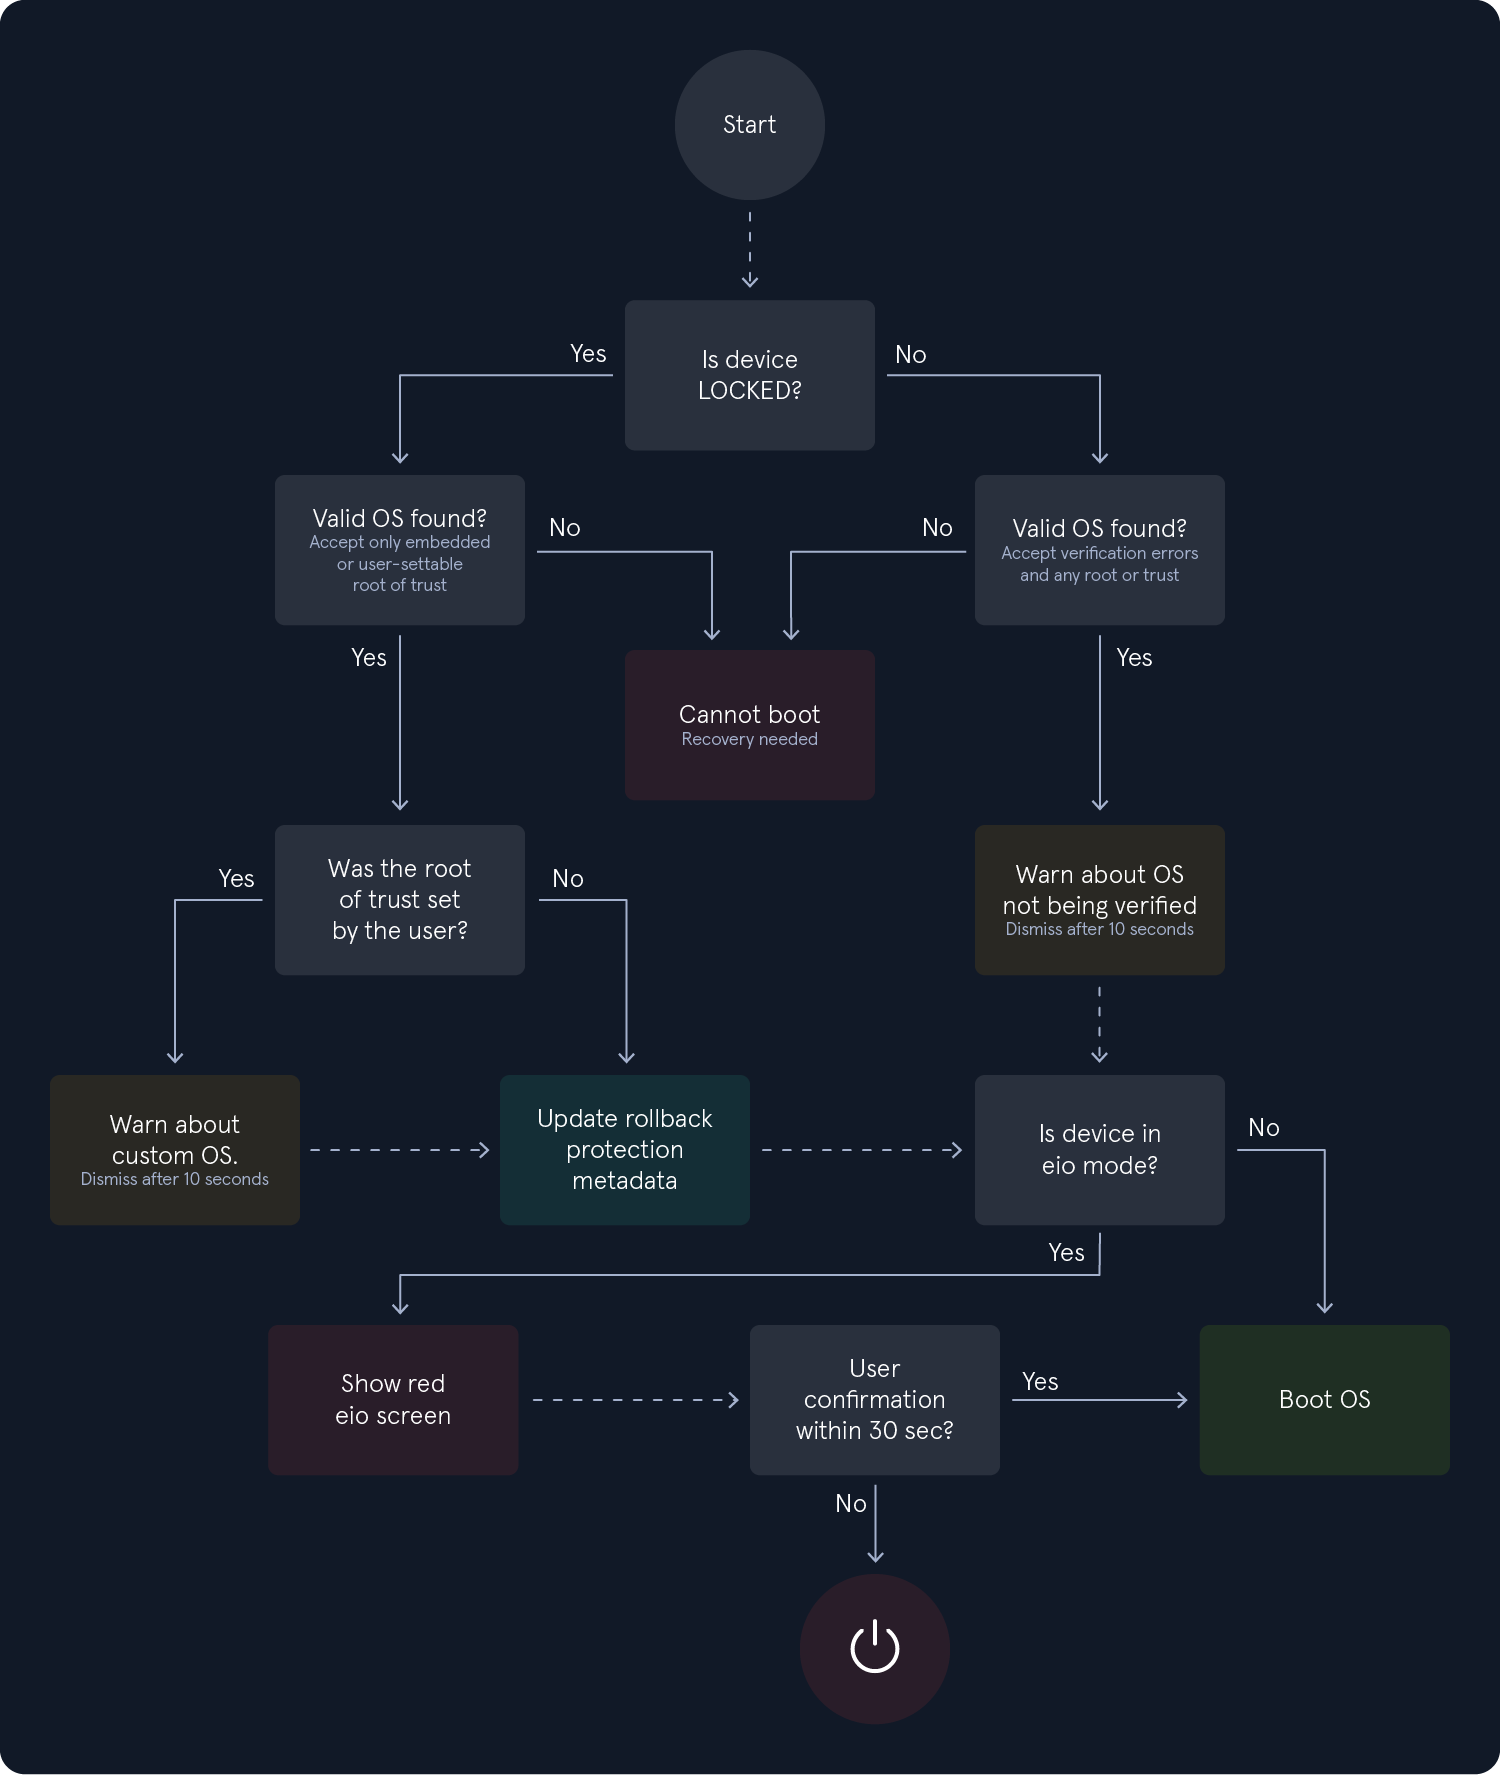
Verified Boot is an Android security feature that ensures the integrity of the operating system. This is achieved using a unique set of cryptographic keys to sign and verify the boot image and ensure that only the authorized parties can modify the system. While Android is booting up, each stage verifies the integrity and authenticity of the next stage, and if the signature is valid, then the device boots up normally. Otherwise, the device either won't boot, or it will provide the user with a message updating them that the device is tampered with. Apart from this, Verified Boot utilizes Rollback Protection to prevent exploits from becoming persistent. This is done by ensuring that Android is only updating to the newest versions. The recommended boot flow for a device is as follows:
Before proceeding with the questions, ensure that you have followed the steps provided in the sections Android Studio and Android Emulators -> Android Studio AVD, and have set up a virtual Android device. This device will be used throughout the remainder of the module and subsequent challenge questions.
The Android Package Kit file—commonly known as an APK—is the file format used by the Android operating system to distribute and install applications. An APK is essentially an archive that contains all the components needed for an Android app to run. Among its contents is the application's compiled code, stored in a single DEX (Dalvik Executable) file. When an Android application is compiled, the Java (or Kotlin) source code is first converted into Java bytecode, which is then transformed and optimized into a DEX file. These DEX files are executable and can be interpreted by the Dalvik Virtual Machine (DVM) or the Android Runtime (ART), depending on the device and Android version.
In addition to compiled code, APK files include resources such as assets, images, UI layouts, and the AndroidManifest.xml file—all of which are necessary for the application to function. APK files use the .apk extension and, since they are ZIP-based archives, they can be unpacked with standard tools such as the unzip command in Linux.
APK Structure
root@htb[/htb]$ unzip myapp.apk
root@htb[/htb]$ ls -l

total 27584
-rw-r--r--    1 bertolis  bertolis     4220 Jan  1  1981 AndroidManifest.xml
drwxr-xr-x   49 bertolis  bertolis     1568 May 10 13:36 META-INF
drwxr-xr-x    3 bertolis  bertolis       96 May 10 13:36 assets
-rw-r--r--    1 bertolis  bertolis  8285624 Jan  1  1981 classes.dex
drwxr-xr-x    9 bertolis  bertolis      288 May 10 13:36 kotlin
drwxr-xr-x    6 bertolis  bertolis      192 May 10 13:36 lib
drwxr-xr-x  545 bertolis  bertolis    17440 May 10 13:36 res
-rw-r--r--    1 bertolis  bertolis   922940 Jan  1  1981 resources.arsc
The files extracted from the APK are encoded, and neither the source code nor the configuration files are human-readable.
APK Structure
root@htb[/htb]$ vim AndroidManifest.xml
The image below shows the unzipped structure of an APK file:
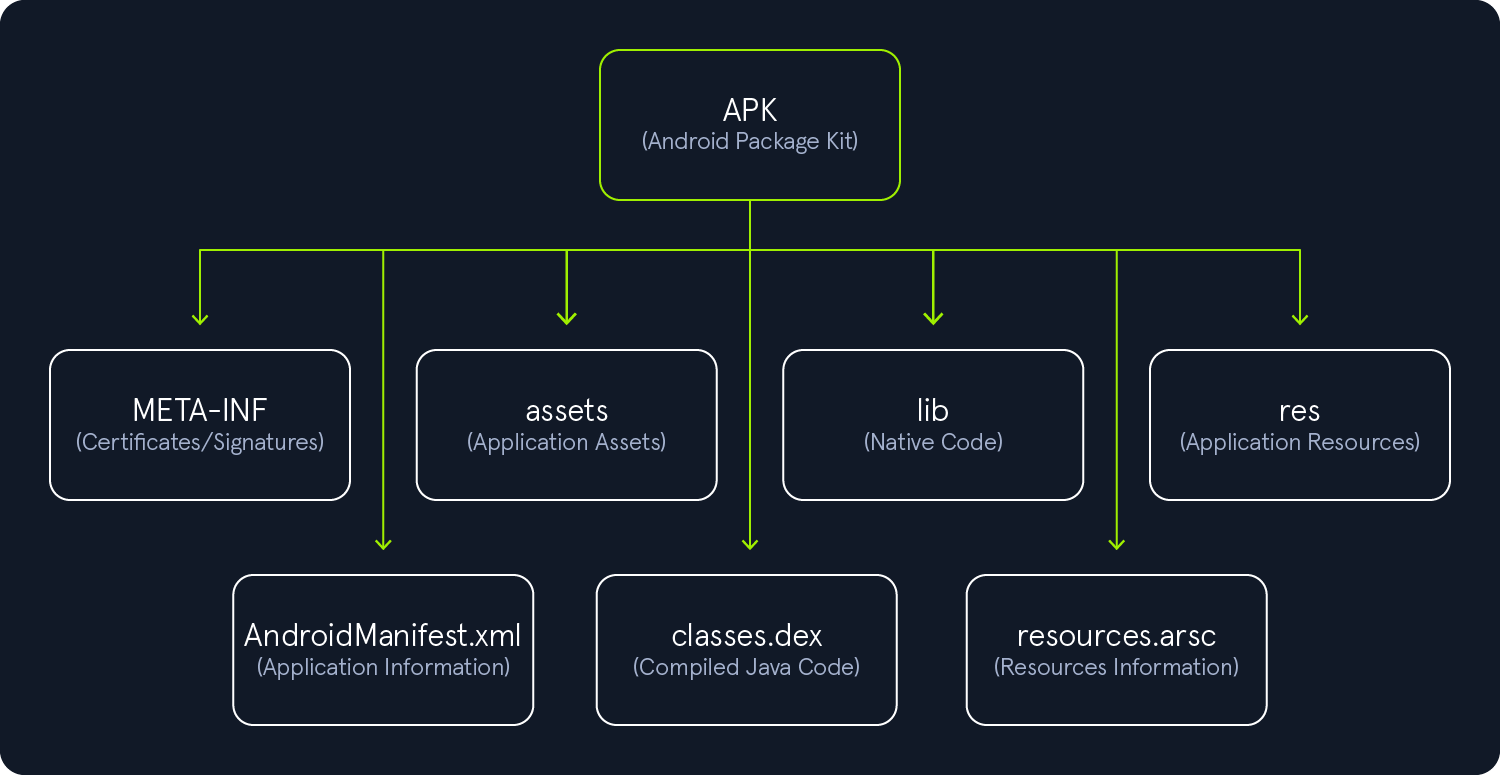
META-INF
This folder is generated when the application is signed, and it contains verification information. Any modification made to the APK file will lead to invalidation, and the APK will need to be resigned. Listing the content of this directory reveals the following files.
APK Structure
root@htb[/htb]$ ls -l META-INF/

total 664
-rw-r--r--  1 bertolis  bertolis   1103 Jan  1  1981 CERT.RSA
-rw-r--r--  1 bertolis  bertolis  77917 Jan  1  1981 CERT.SF
-rw-r--r--  1 bertolis  bertolis  77843 Jan  1  1981 MANIFEST.MF
<SNIP>
| File | Description |
|---|---|
CERT.RSA |
Contains the public key and the signature of CERT.SF. |
CERT.SF |
Contains a list of names/hashes of the corresponding lines in the MANIFEST.MF file. |
MANIFEST.MF |
Contains a list of names/hashes (usually SHA256 in Base64) for all the files of the APK, and is used to invalidate the APK if any of the files are modified. |
assets
This folder contains assets that developers bundle with the application, and can be retrieved by the AssetManager. These assets can be images, videos, documents, databases, and other raw files. Xamarin, Cordova, and React-Native applications will use this folder to save code and DLL's as well.
lib
This folder contains native libraries with compiled code targeting different device architectures. Android applications that use the Native Development Kit (NDK) may include components written in C or C++. When an app includes native libraries, they are stored in the lib directory as shared object files with the .so extension. Separate SO files are generated for each supported architecture, typically organized under subdirectories following this structure.
APK Structure
root@htb[/htb]$ ls -l lib/

total 0
drwxr-xr-x  3 bertolis  bertolis  96 May 10 13:36 arm64-v8a
drwxr-xr-x  3 bertolis  bertolis  96 May 10 13:36 armeabi-v7a
drwxr-xr-x  3 bertolis  bertolis  96 May 10 13:36 x86
drwxr-xr-x  3 bertolis  bertolis  96 May 10 13:36 x86_64
res
This folder contains predefined application resources that cannot be modified by the user at runtime, unlike assets. These resources include XML files defining color state lists, UI layouts, fonts, values, configurations for OS versions, screen orientations, network settings, and more.
APK Structure
root@htb[/htb]$ ls -l res/

<SNIP>
drwxr-xr-x 1 bertolis bertolis 10762 Jan 27 16:05 color
drwxr-xr-x 1 bertolis bertolis  6624 Jan 27 16:05 drawable
drwxr-xr-× 1 bertolis bertolis    30 Jan 27 16:05 raw
drwxr-xr-× 1 bertolis bertolis   466 Jan 27 16:05 xml
AndroidManifest.xml
The manifest file contains metadata about the application. It defines essential attributes and components that the system uses to manage the app, including:
| Components |
|---|
| Package name |
| SDK Version |
| Build Version |
| Permissions |
| NetworkSecurityConfig |
| Activities |
| Providers |
| Services |
classes.dex
This file contains all compiled Java (or Kotlin) classes in DEX (Dalvik Executable) format, which are executed by the Android Runtime (ART) on devices running Android 5.0 or higher, or by the Dalvik VM on earlier versions. Large applications may include multiple DEX files (enabled via multidex), named sequentially as classes2.dex, classes3.dex, and so on.
resources.arsc
This file contains precompiled resources that are used by the app at runtime. It maps resource identifiers in the code (e.g., R.string.app_name) to their actual values, such as strings, colors, layouts, and styles. It also includes a binary representation of XML resources. In some APKs, you may also find a kotlin/ folder, which exists in apps written in Kotlin and contains Kotlin-specific metadata used by the runtime and tooling.
Android Studio is an Integrated Development Environment (IDE) based on JetBrains' IntelliJ IDEA and is the official IDE for Android application development. Familiarity with the Android Studio project structure can provide valuable insight during reverse engineering. Android Studio is available for Windows, Linux, and macOS. On Windows and macOS, you can download the .exe and .dmg installers respectively, and follow the Setup Wizard to complete the installation. In this example, we will demonstrate how to install Android Studio on a Debian-based Linux distribution. Replace the version number in the link with the latest one, if necessary.
Android Studio
root@htb[/htb]$ wget https://redirector.gvt1.com/edgedl/android/studio/ide-zips/2024.3.1.14/android-studio-2024.3.1.14-linux.tar.gz
root@htb[/htb]$ tar xvzf android-studio-2024.3.1.14-linux.tar.gz
root@htb[/htb]$ sh android-studio/bin/studio.sh
Once the Setup Wizard starts, click Next on the first four windows to download the SDK and accept the License Agreement. Then, wait for the components to download and click Finish.
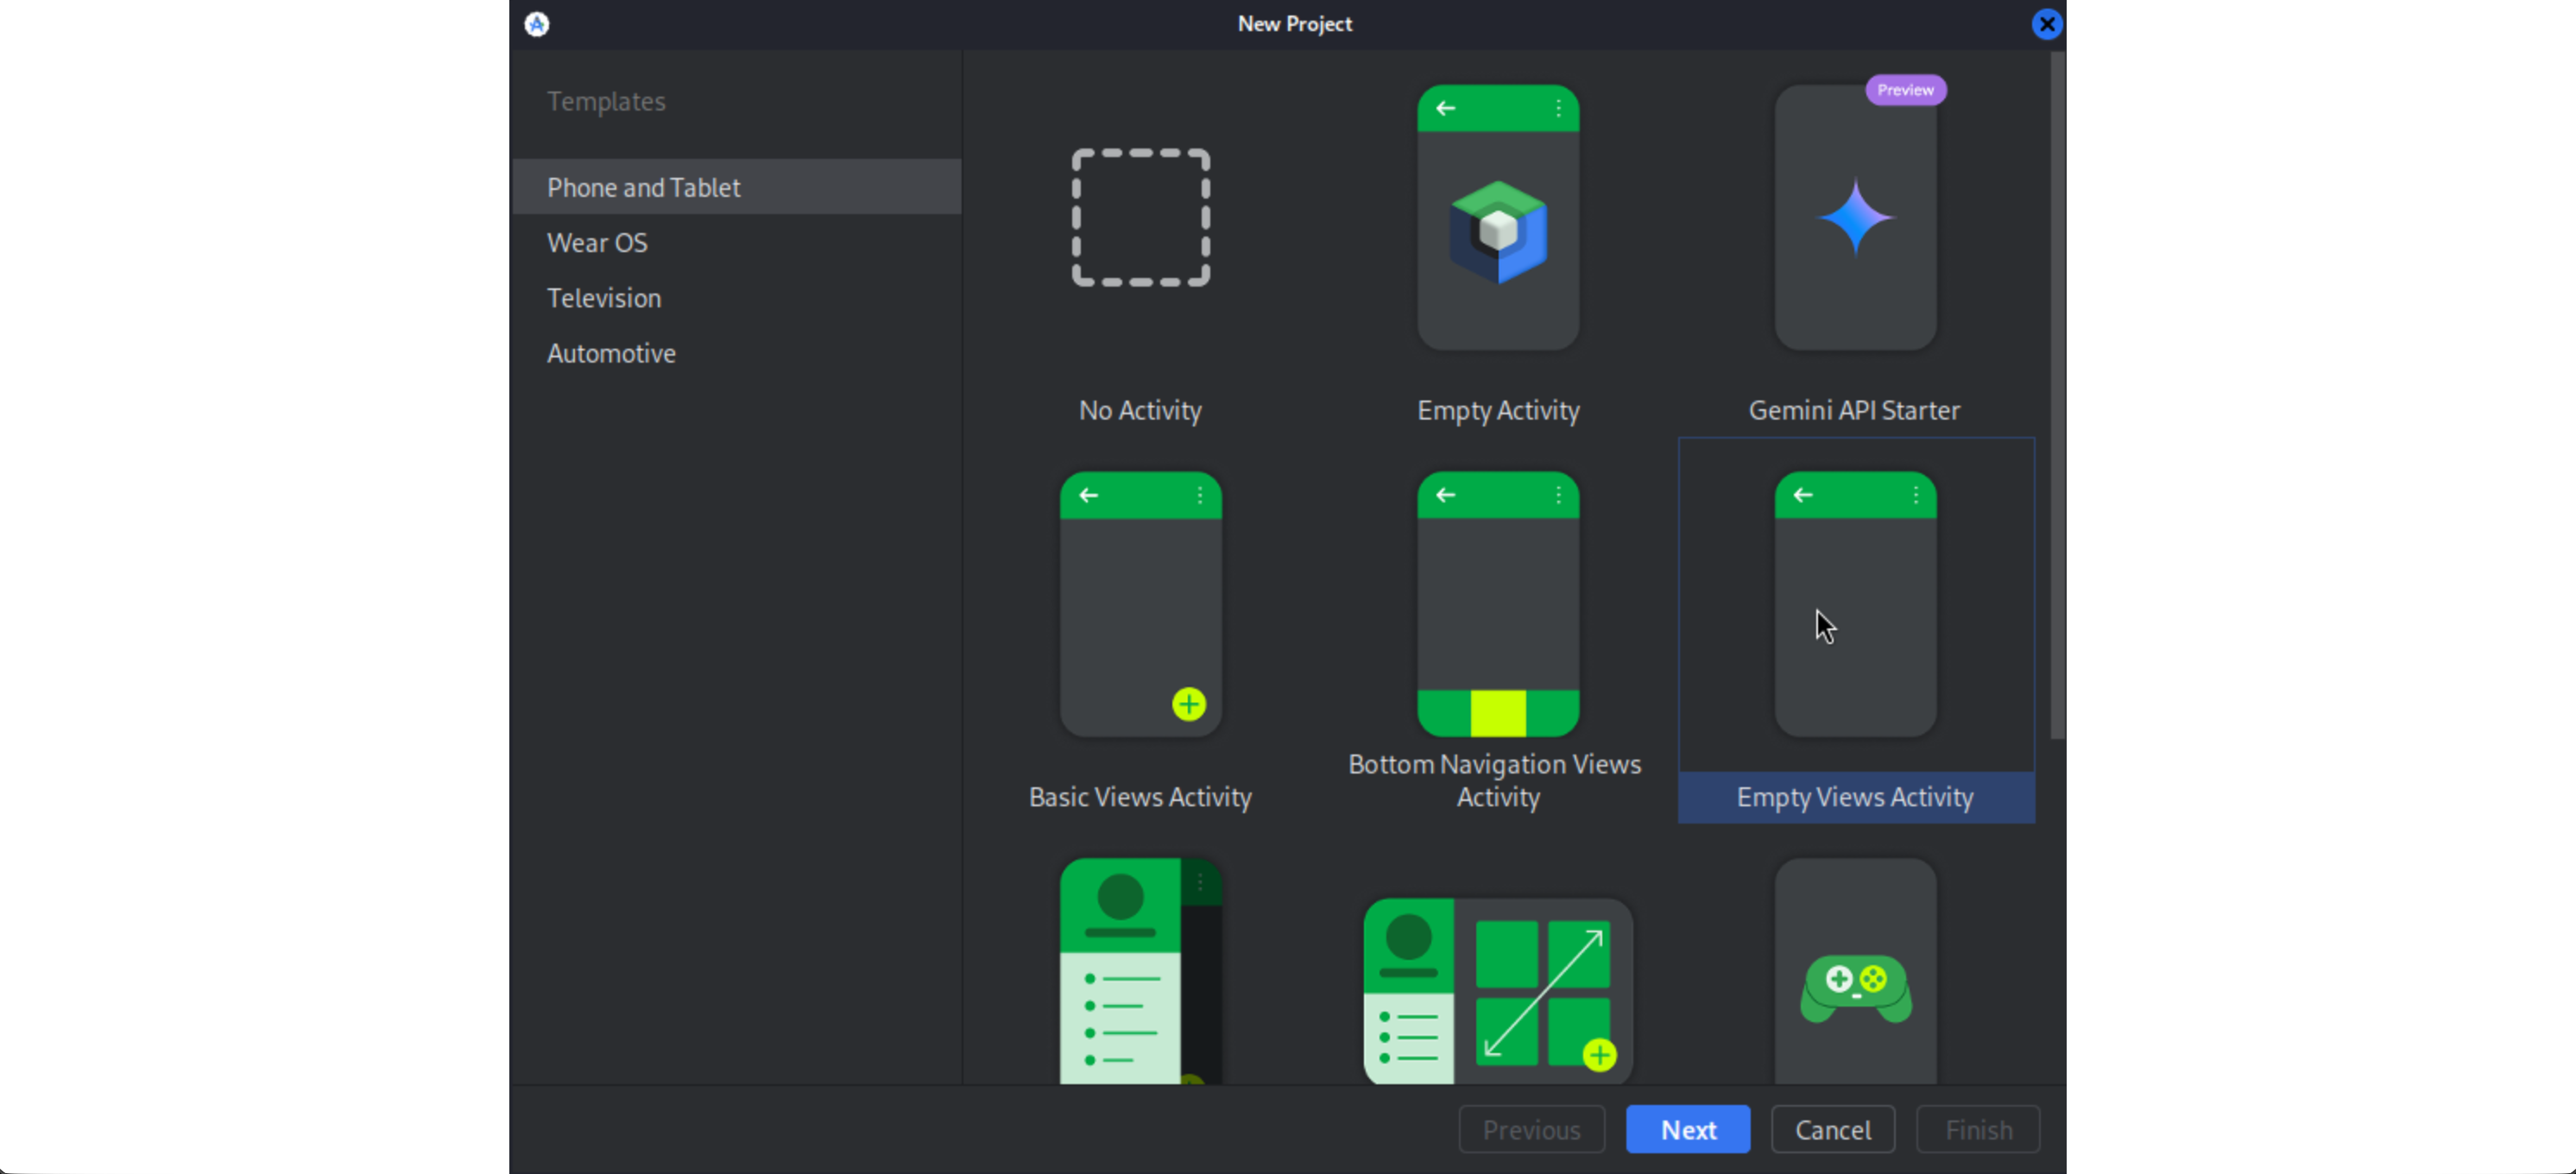
On the next window, click on the Create Project button to create a new project.
Select Empty Views Activity and choose Groovy DSL (build.gradle) in the Build configuration language option, and click Next.
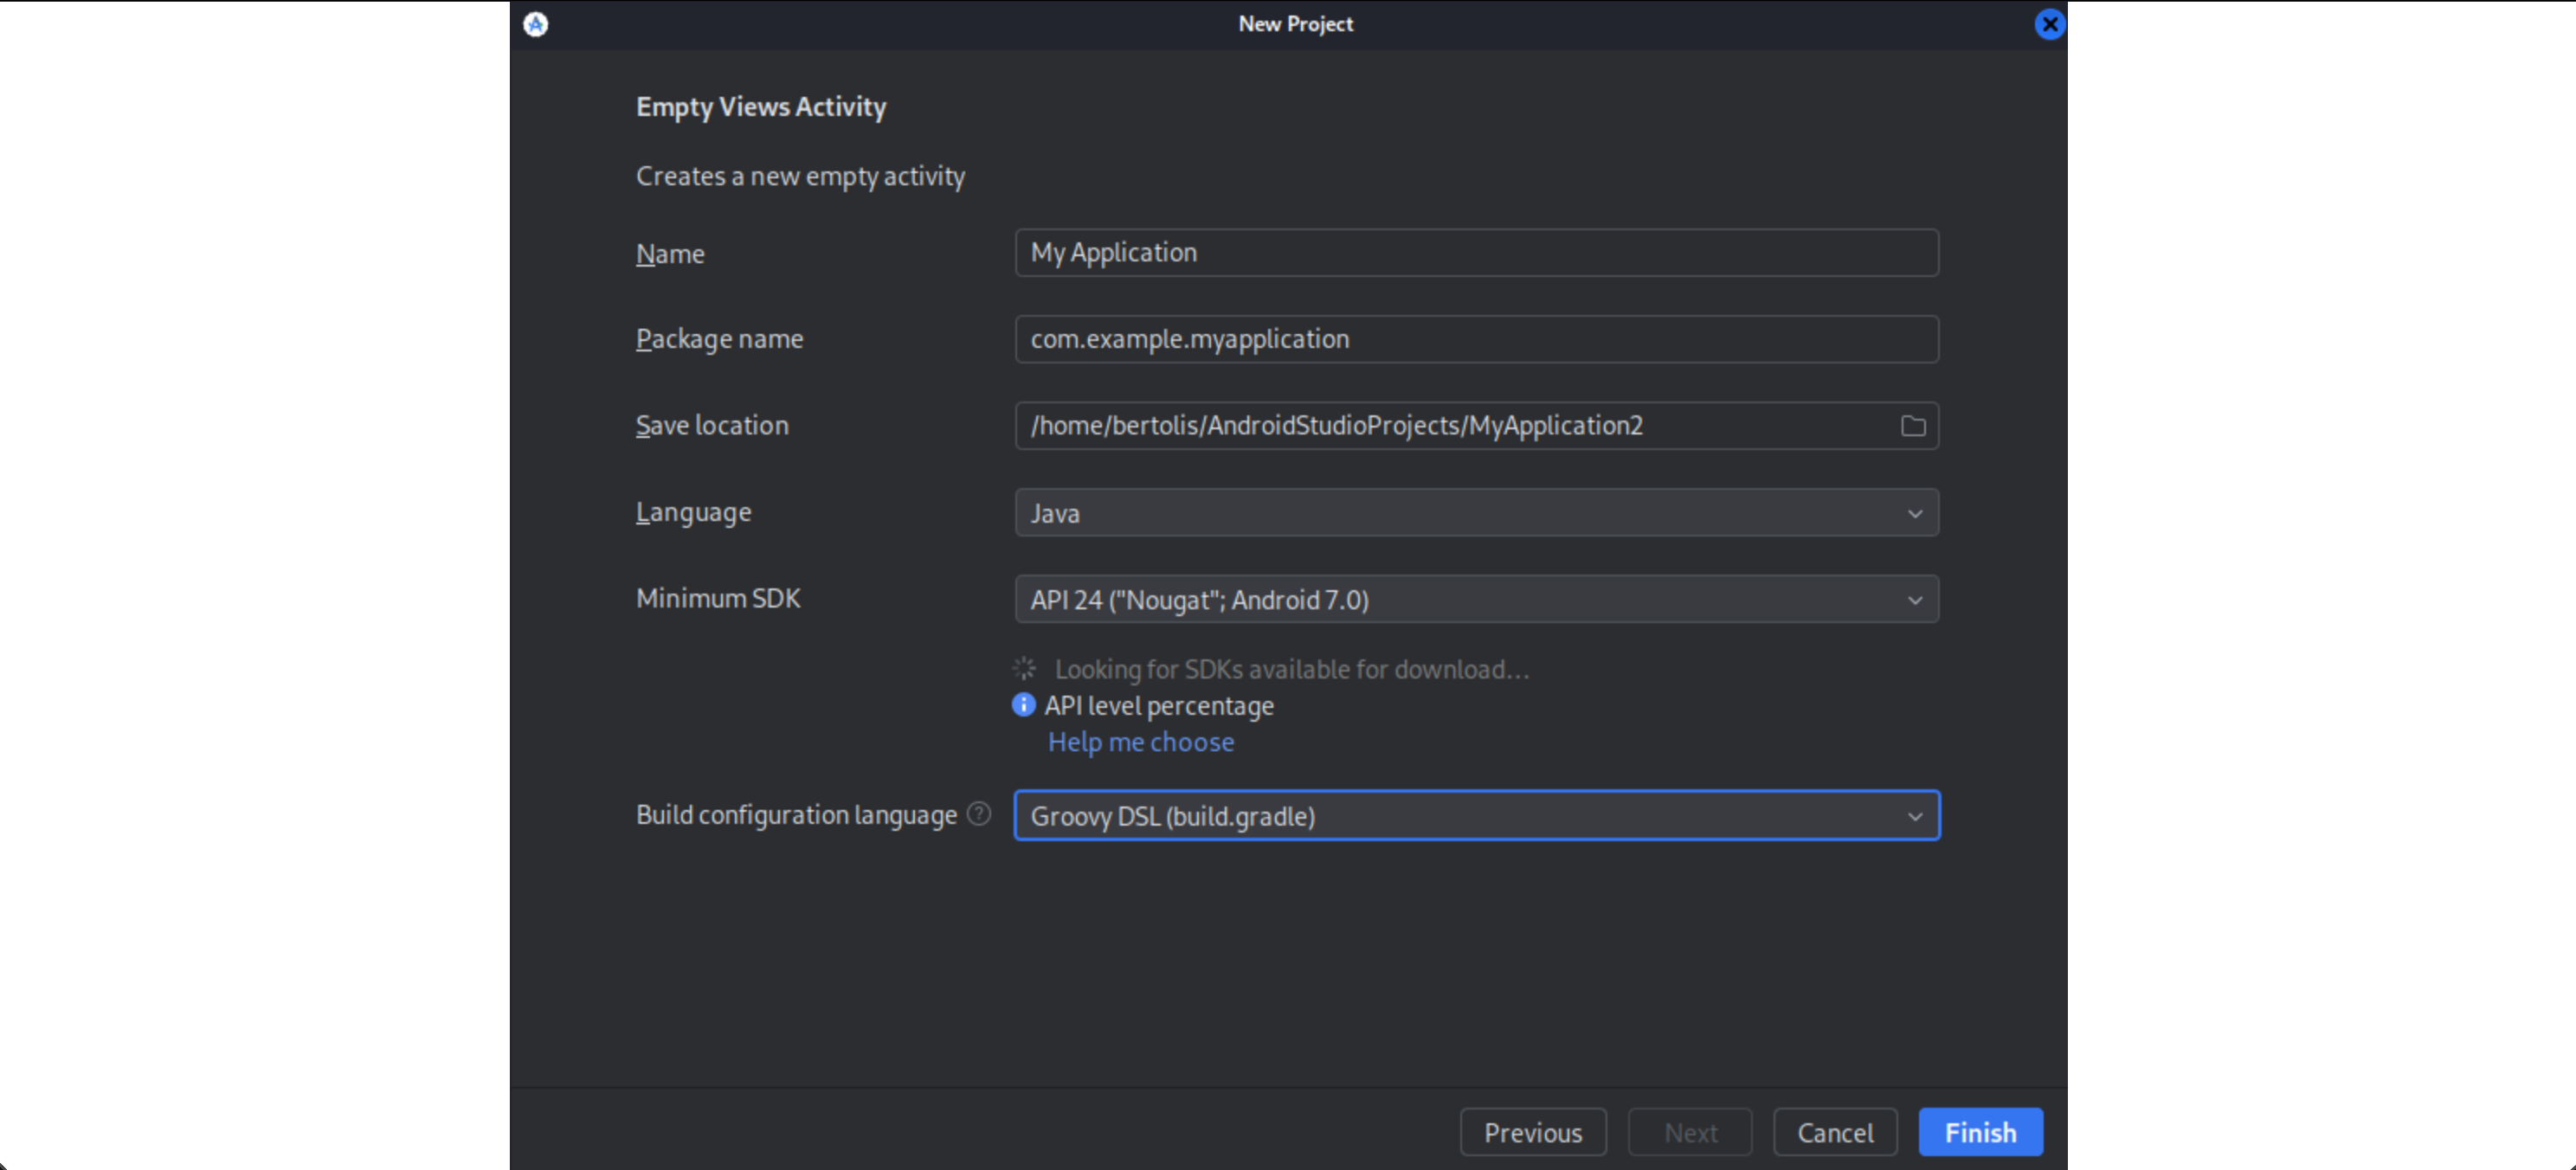
Finally, we give the app a name, select the programming language (Java in our case) and click Finish.
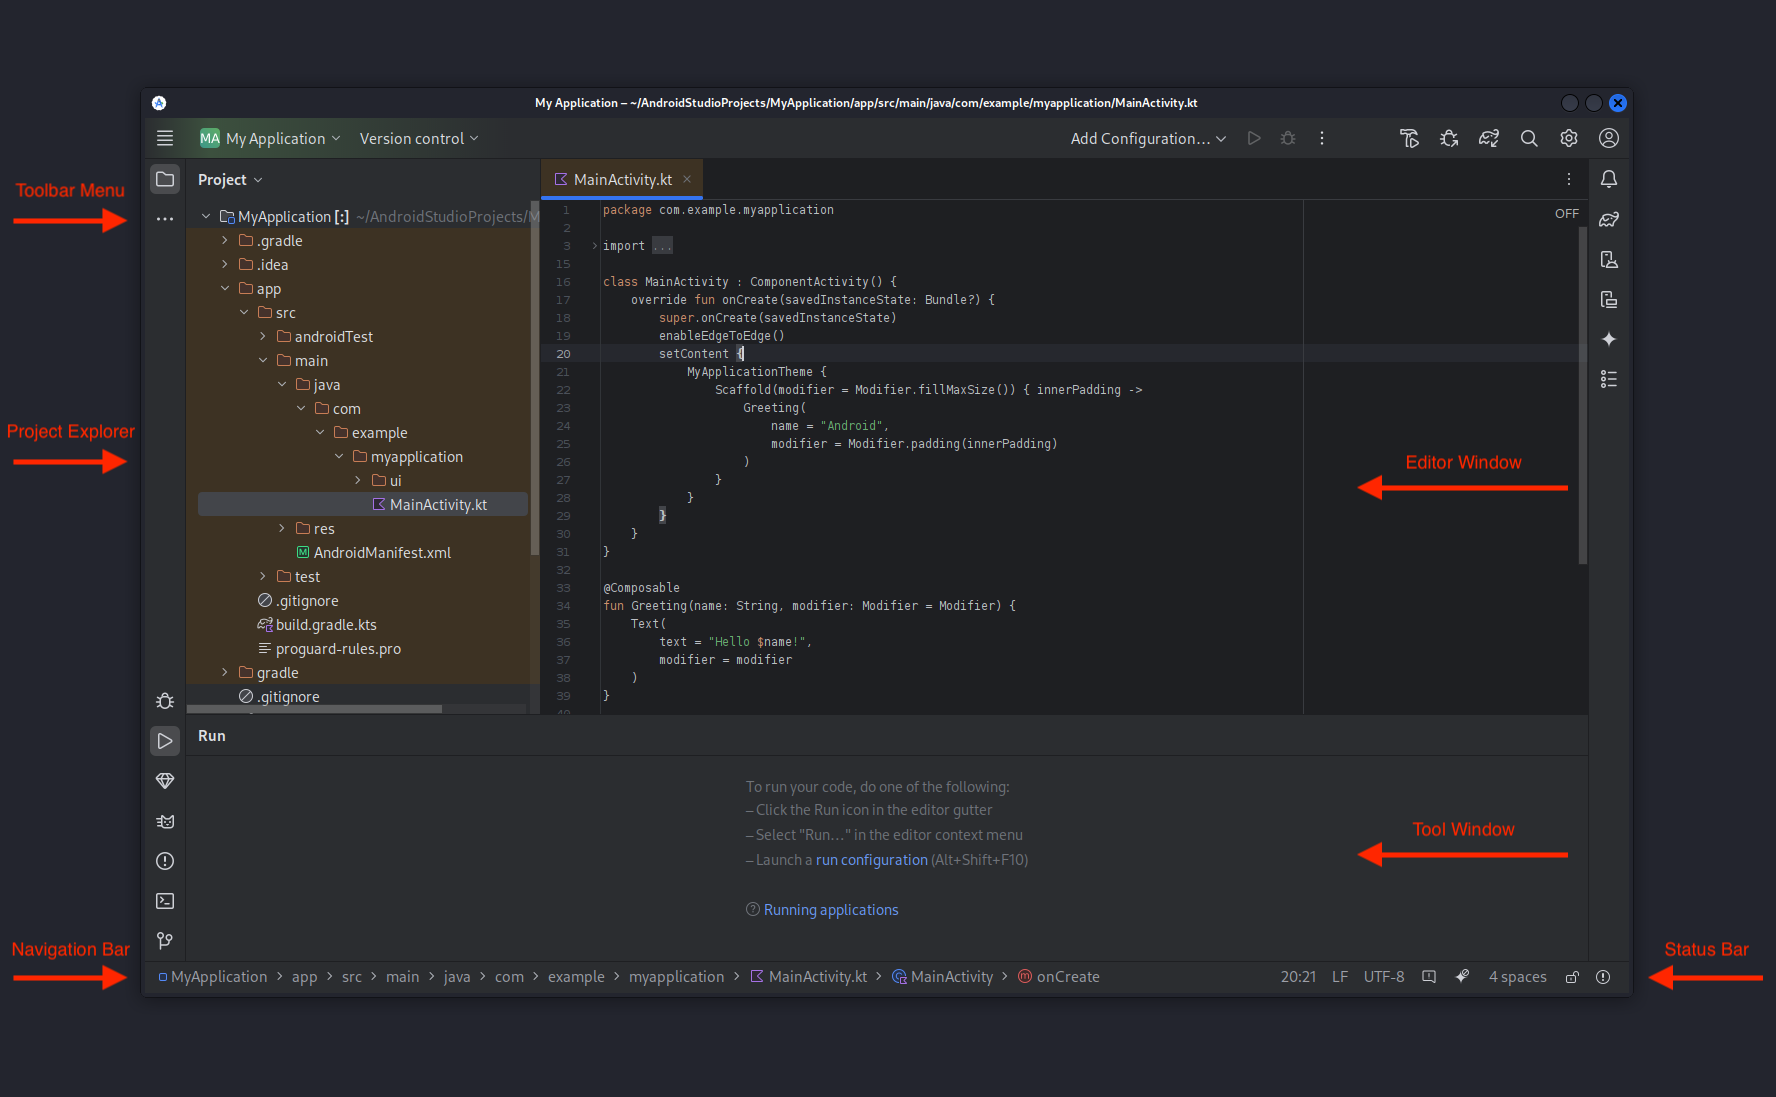
After clicking 'Finish', we wait for the indexing process to complete before proceeding with the following steps. The above setup configures the project to use Java as the default programming language.
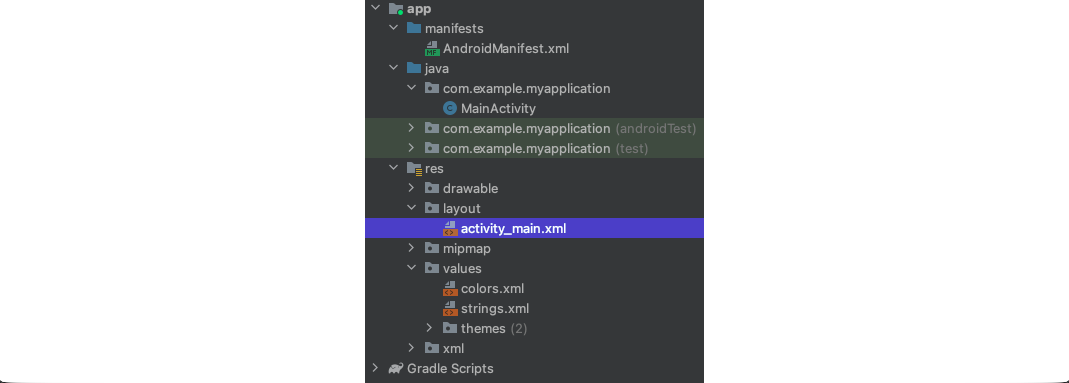
Once the project is created, we see the project structure.
Understanding the Android Studio project structure is essential for reverse engineering, as it provides insight into how the app is organized during development.
The project contains the following folders.
app
| Files | Description |
|---|---|
manifest |
Contains essential metadata about the app, including the package name, components (activities, services, etc.), permissions, network configuration, API level, and more. |
java |
Contains the application's Java source code. |
res |
Contains app resources such as UI strings, images, layout XML files, and other static assets used by the app. |
Gradle Scripts
| Files | Description |
|---|---|
build.gradle |
Defines build configurations for the project or module, including dependencies, build types, and whether code optimization tools (such as ProGuard) are enabled. |
proguard-rules.pro |
Specifies custom rules for ProGuard |
While we won't explore Gradle Scripts in detail in this module, it's important to understand that they form the foundation of Android Studio’s build system. For instance, Gradle can be configured to generate multiple APKs from a single project, each offering different features.
Depending on the technologies used, Mobile applications can be categorized into three basic types.
Native apps
Native apps are built specifically for a particular operating system. Android native apps are typically developed using Kotlin or Java. They are generally considered more secure than hybrid apps because they have direct access to platform-level security features and system APIs.
Web apps
Web apps, while similar in appearance to native apps, are developed to be responsive and accessible from mobile web browsers. They are typically built using HTML, CSS, and JavaScript. Web apps can be vulnerable to web-based attacks due to their reliance on web technologies and browser security.
Hybrid apps
Hybrid apps combine elements of both native and web apps and are designed to be cross-platform. They use WebViews to display web content within a native app container. While offering the flexibility of web apps, hybrid apps can also be vulnerable to web-based attacks, including cross-site scripting (XSS) attacks, weak SSL implementations, and more.
In the following sections, we'll see some examples of creating native and hybrid Android applications.
Native apps are software applications written in a specific programming language and tailored to run on a particular platform. In the context of Android, native apps are primarily developed using Java or Kotlin and built with Android Studio, typically leveraging components from the Android Software Development Kit (SDK).
Google, the tech giant who owns and develops Android, is using Kotlin as the default programming language for app development. However, Java is still a popular choice and many users prefer it over Kotlin. In the following steps, we will show how to create a simple application in Java. Since we have already created a new project, let's examine how the app layout is created and connected with the Java code and other resources. On the left side section under app/res/layout we select the activity_main.xml file.
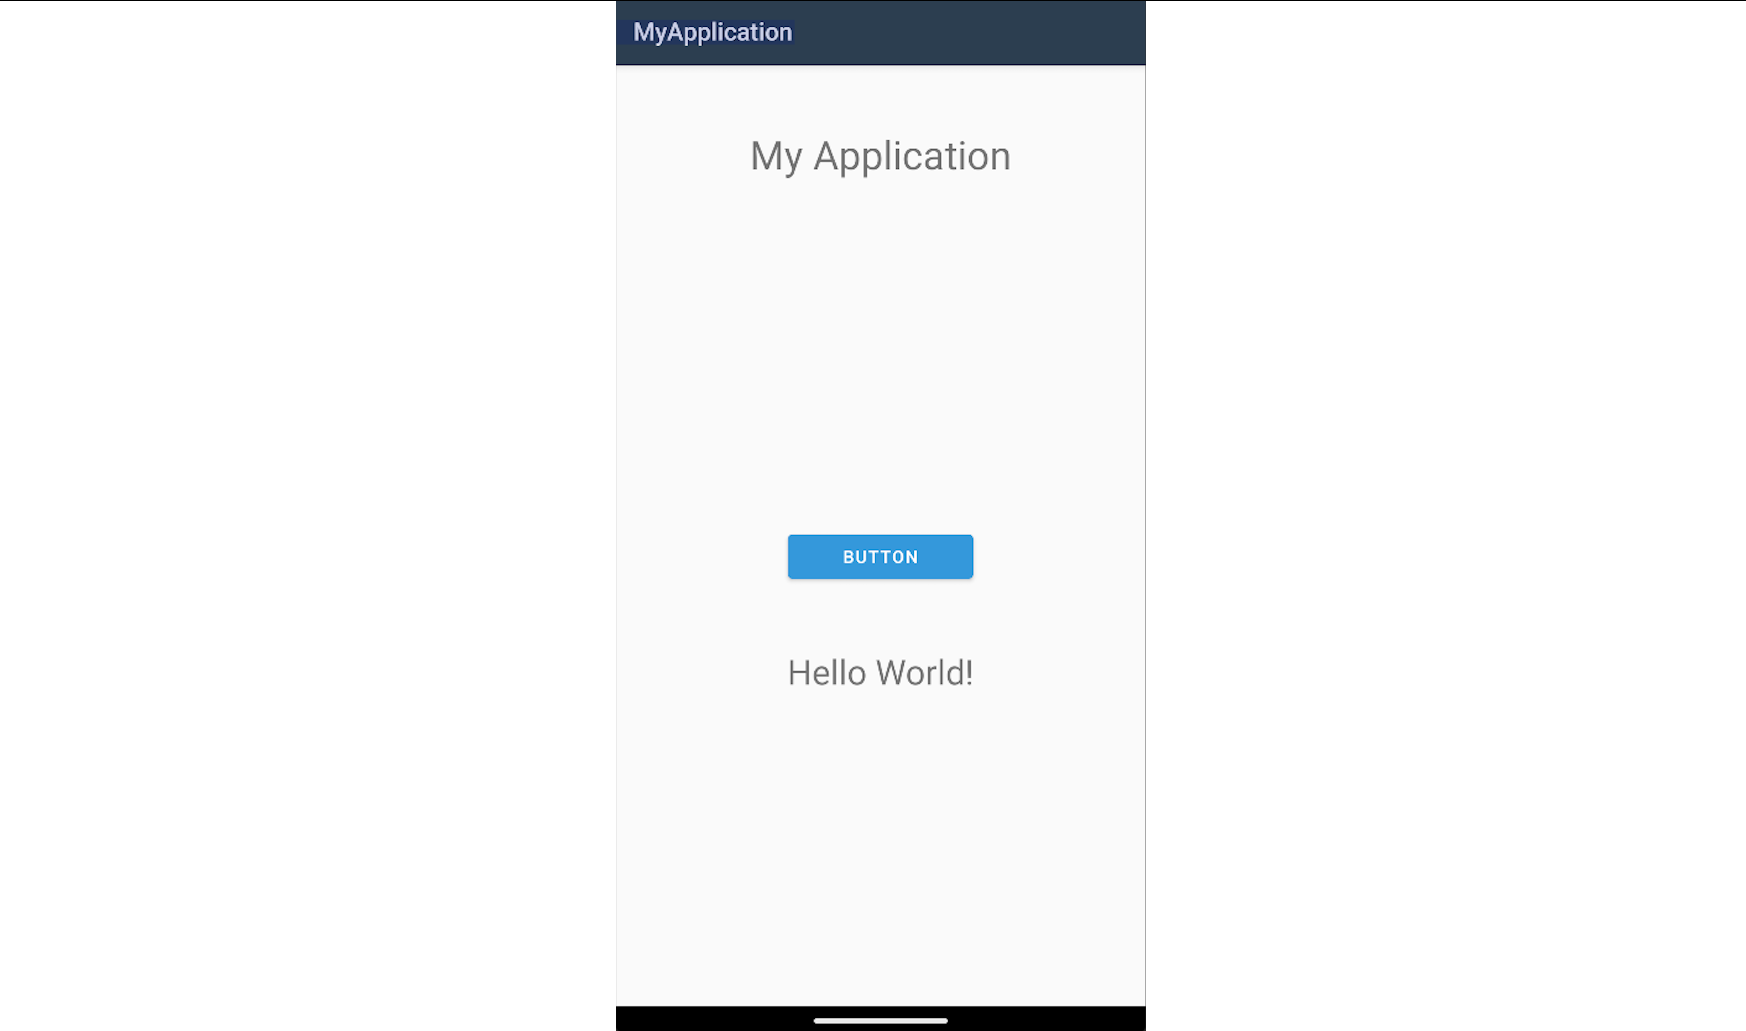
Layouts define the structure of the user interface of the application, and Android uses XML to create such layouts. In this file, activity_main.xml, we can add text, buttons, images, and other things that will be displayed to the user. The following snippet will create the layout of an application that prints a message on the screen when the button is tapped.
Code: xml
<?xml version="1.0" encoding="utf-8"?>
<androidx.constraintlayout.widget.ConstraintLayout xmlns:android="http://schemas.android.com/apk/res/android"
    xmlns:app="http://schemas.android.com/apk/res-auto"
    xmlns:tools="http://schemas.android.com/tools"
    android:layout_width="match_parent"
    android:layout_height="match_parent"
    tools:context=".MainActivity">

    <TextView
        android:id="@+id/title"
        android:layout_width="wrap_content"
        android:layout_height="wrap_content"
        android:text="My Application"
        android:textSize="32sp"
        app:layout_constraintBottom_toBottomOf="parent"
        app:layout_constraintEnd_toEndOf="parent"
        app:layout_constraintStart_toStartOf="parent"
        app:layout_constraintTop_toTopOf="parent"
        app:layout_constraintVertical_bias="0.097" />

    <Button
        android:id="@+id/button"
        android:layout_width="wrap_content"
        android:layout_height="wrap_content"
        android:text="Button"
        app:layout_constraintBottom_toBottomOf="parent"
        app:layout_constraintEnd_toEndOf="parent"
        app:layout_constraintStart_toStartOf="parent"
        app:layout_constraintTop_toBottomOf="@+id/title"
        app:layout_constraintVertical_bias="0.403" />

    <TextView
        android:id="@+id/message"
        android:layout_width="380dp"
        android:layout_height="31dp"
        android:text="@string/message"
        android:textSize="20sp"
        android:textAlignment="center"
        android:textIsSelectable="true"
        app:layout_constraintBottom_toBottomOf="parent"
        app:layout_constraintEnd_toEndOf="parent"
        app:layout_constraintStart_toStartOf="parent"
        app:layout_constraintTop_toBottomOf="@+id/button"
        app:layout_constraintVertical_bias="0.25" />

</androidx.constraintlayout.widget.ConstraintLayout>
The above snippet consists of three objects: two TextView and one Button. It is worth noticing the following attributes.
| Attribute | Description |
|---|---|
tools:context=".MainActivity |
Defines the Activity in which the layout will be used. This is primarily used in the layout editor for preview purposes and does not affect the runtime behavior of the app. |
android:id |
Assigns a unique identifier to the object, allowing it to be referenced in Java code (such asMainActivity.java) and other resources. The @+id prefix indicates it will be created as a new resource, whereas @id would be used if the resource were already defined. |
android:text |
Sets the text content of the TextView or Button. The value can be a hardcoded string, like android:text="My Application", or a reference to a string resource from the relative to the project file res/values/strings.xml. Referencing string resources is the recommended approach for localization and maintainability. The example below shows the contents of the strings.xml file used in this project. |
Code: xml
<resources>
    <string name="app_name">My Application</string>
    <string name="message">Hello World!</string>
</resources>
These values can also be accessed from the Java code using the R class. The R class, which is auto-generated by Android, contains the IDs of all the resources in the res/ directory. Familiarity with these procedures will give us a better understanding of the app during the process of reverse engineering. Let's now see the content of the file MainActivity.java, which contains the Java code of the app.
Code: java
package com.example.myapplication;

import androidx.appcompat.app.AppCompatActivity;

import android.os.Bundle;
import android.view.View;
import android.widget.Button;
import android.widget.TextView;

public class MainActivity extends AppCompatActivity {
    TextView message;
    Button button;

    @Override
    protected void onCreate(Bundle savedInstanceState) {
        super.onCreate(savedInstanceState);
        setContentView(R.layout.activity_main);

        message = (TextView)findViewById(R.id.message);
        button = (Button)findViewById(R.id.button);

        button.setOnClickListener(new View.OnClickListener() {
            @Override
            public void onClick(View v) {
                message.setText("Hello from Java!");
            }
        });
    }
}
The class MainActivity includes the method OnCreate(). This method is called when the activity is starting, thus everything inside will run automatically. The line setContentView(R.layout.activity_main); indicates that the activity_main.xml file will be used to set the layout of this activity. Method OnCreate() is also used for initializations since it runs when the activity starts. The variables message and button are initialized to point to the corresponding objects found in the activity_main.xml file.
Code: java
message = (TextView)findViewById(R.id.message);
button = (Button)findViewById(R.id.button);
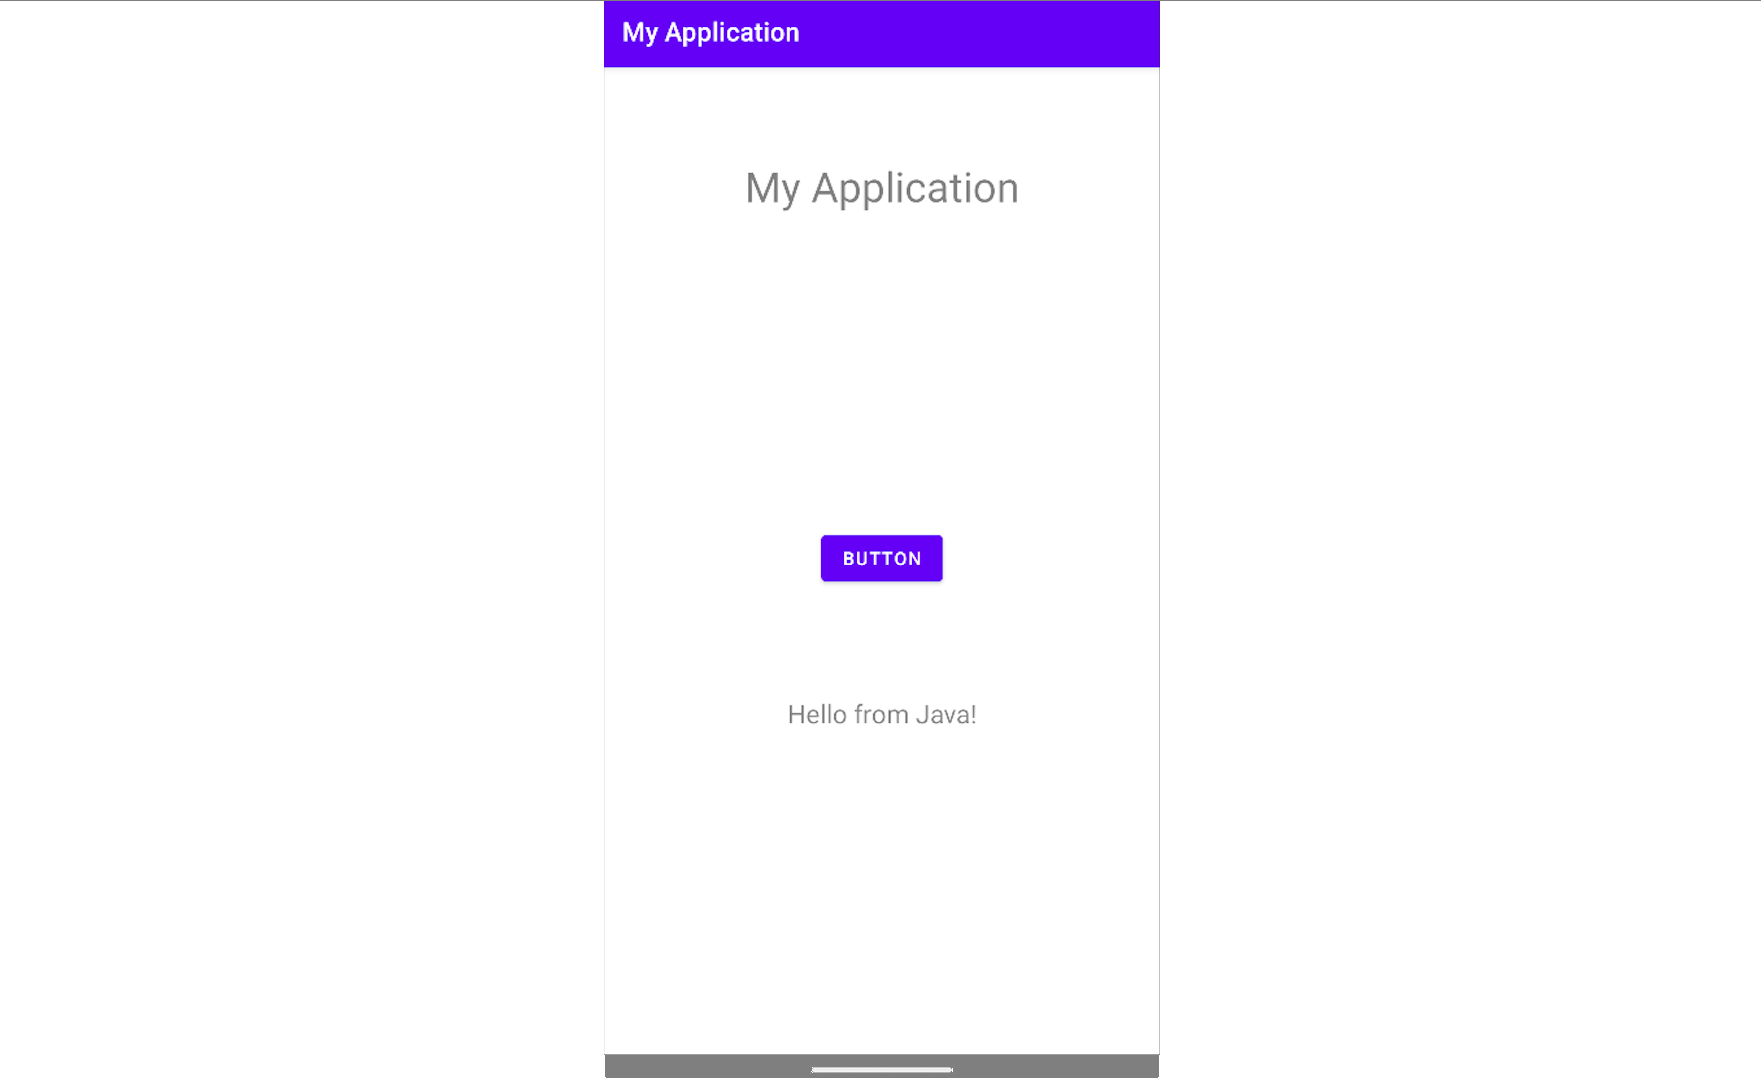
Using the R.java file, the R.id.message points to the android:id="@+id/message" attribute in the activity_main.xml file we saw earlier. Finally, the line message.setText("Hello from Java!"); will be executed as soon as the button is clicked, like the line button.setOnClickListener indicates. Once it's tapped, the text Hello from Java! will be set in the TextView.
The snippet below shows the same app written in Kotlin. To configure the project to use Kotlin as the default programming language, we must select Kotlin in the Language field on the New Project window while creating a new project in Android Studio. Then, optionally, we can also select Kotlin DSL (build.gradle.kts) in the Build configuration language field to utilize Kotlin syntax for Gradle build scripts.
Code: kotlin
package com.example.myapplication

import androidx.appcompat.app.AppCompatActivity
import android.os.Bundle
import android.widget.Button
import android.widget.TextView

class MainActivity : AppCompatActivity() {
    override fun onCreate(savedInstanceState: Bundle?) {
        super.onCreate(savedInstanceState)
        setContentView(R.layout.activity_main)

        val message = findViewById<TextView>(R.id.message)
        val button = findViewById<Button>(R.id.button)

        button.setOnClickListener {
            message.text = "Hello from Java!"
        }
    }
}
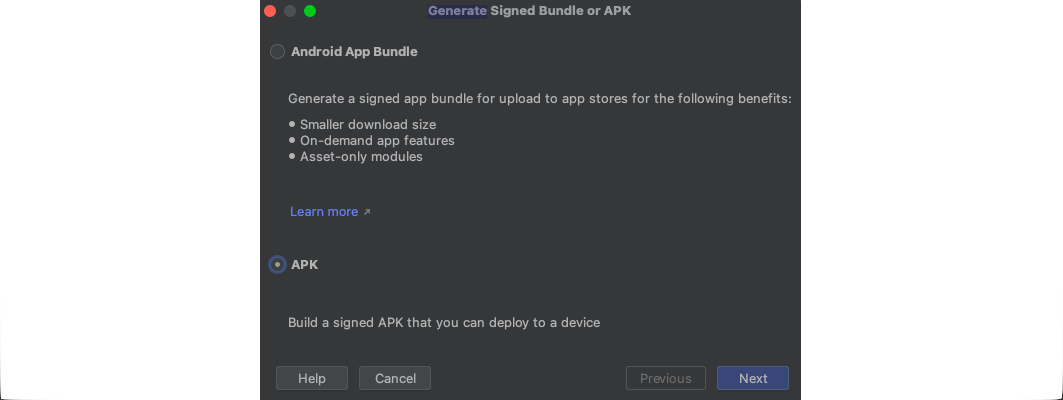
Although Kotlin and Java use different syntax, most tools will generate the same pseudocode when reverse engineering the app. This means that it's not necessary for us to master both programming languages. Once the app is developed, we can export a signed APK file ready for installation. Under Build -> Generate Signed Bundle / APK..., we select APK and click Next.
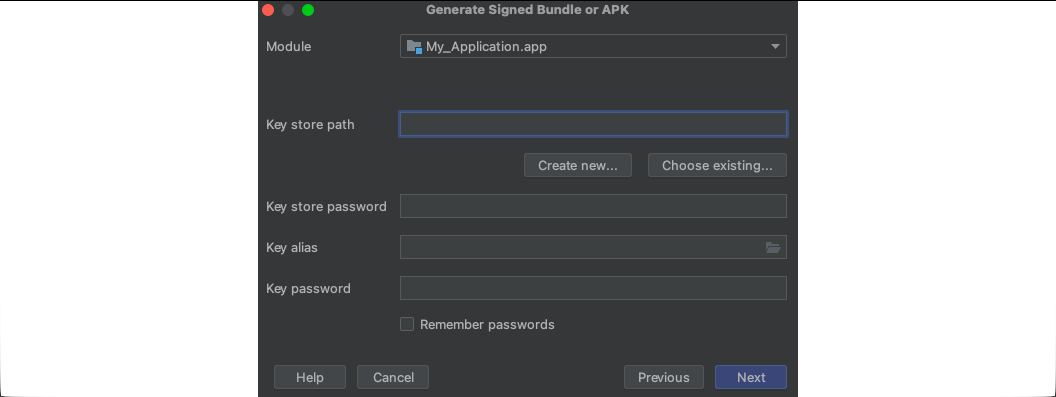
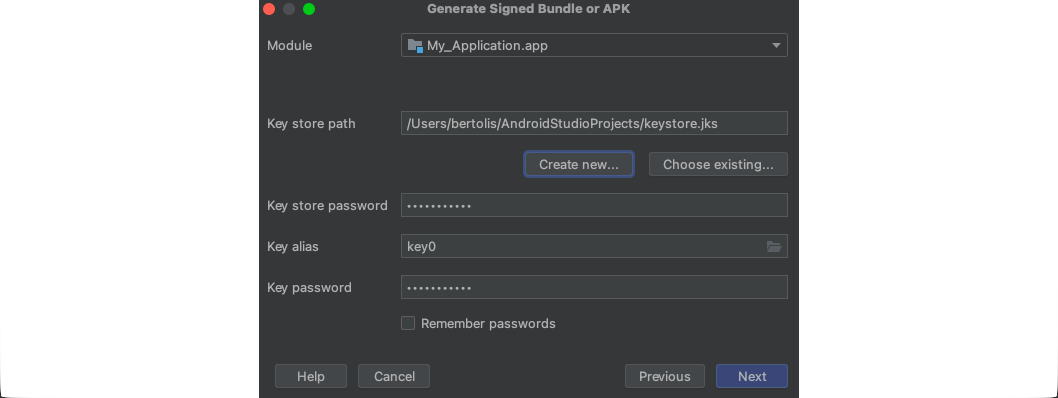
On the next window, we click Create new... to create a new key.
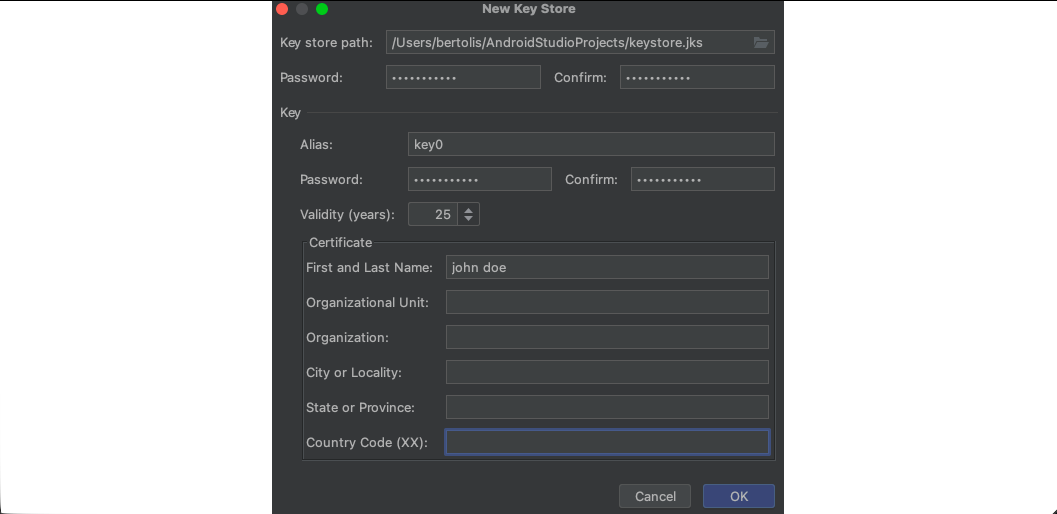
Then, we set the Key store path, Password, Alias, and First and Last Name, and click OK.
Once the key is created, we click Next.
Finally, we select the option release and click on Finish.
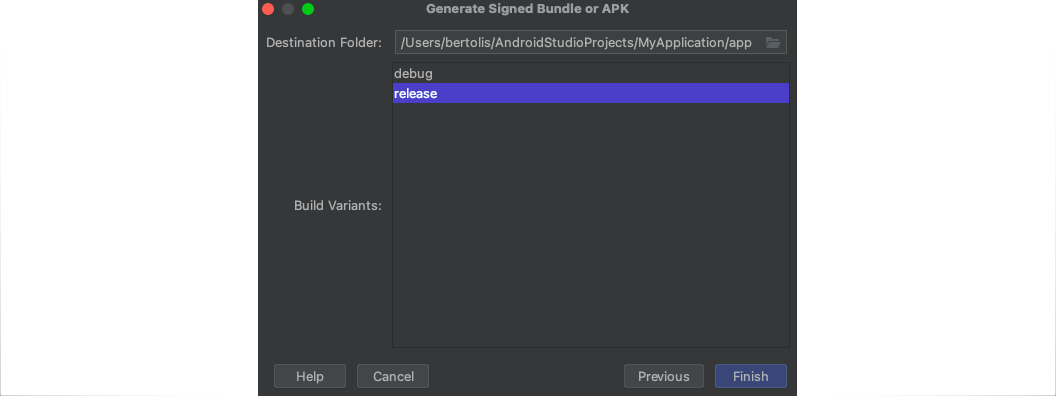
The signed APK file can be found under the directory ~/AndroidStudioProjects/MyApplication/app/release/, with the name app-release.apk.
Native Apps
root@htb[/htb]$ ls -l ~/AndroidStudioProjects/MyApplication/app/release/

total 8856
-rw-r--r--@ 1 bertolis  bertolis  4527105 May  3 01:44 app-release.apk
-rw-r--r--@ 1 bertolis  bertolis      379 May  3 01:44 output-metadata.json
We can rename and install the exported APK file directly on the device.
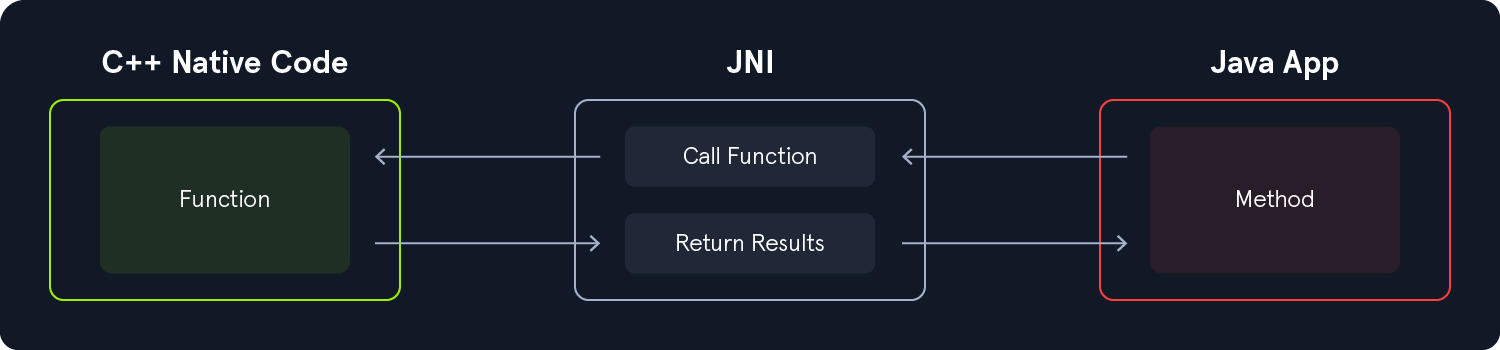
Native code is compiled to run on a specific processor architecture, which can give apps written in native code a performance advantage on compatible hardware. Android Studio supports the inclusion of native code through the Native Development Kit (NDK), which allows developers to write portions of the app in C or C++. This is often done to reduce latency, optimize for hardware capabilities, or in some cases harden the security of an application.
Native code is typically included in the application as shared libraries (.so files). These libraries can then be invoked from Java or Kotlin using the Java Native Interface (JNI). JNI is a framework that defines how managed code (Java/Kotlin) interacts with unmanaged native code (C/C++), enabling cross-language method calls and data exchange.
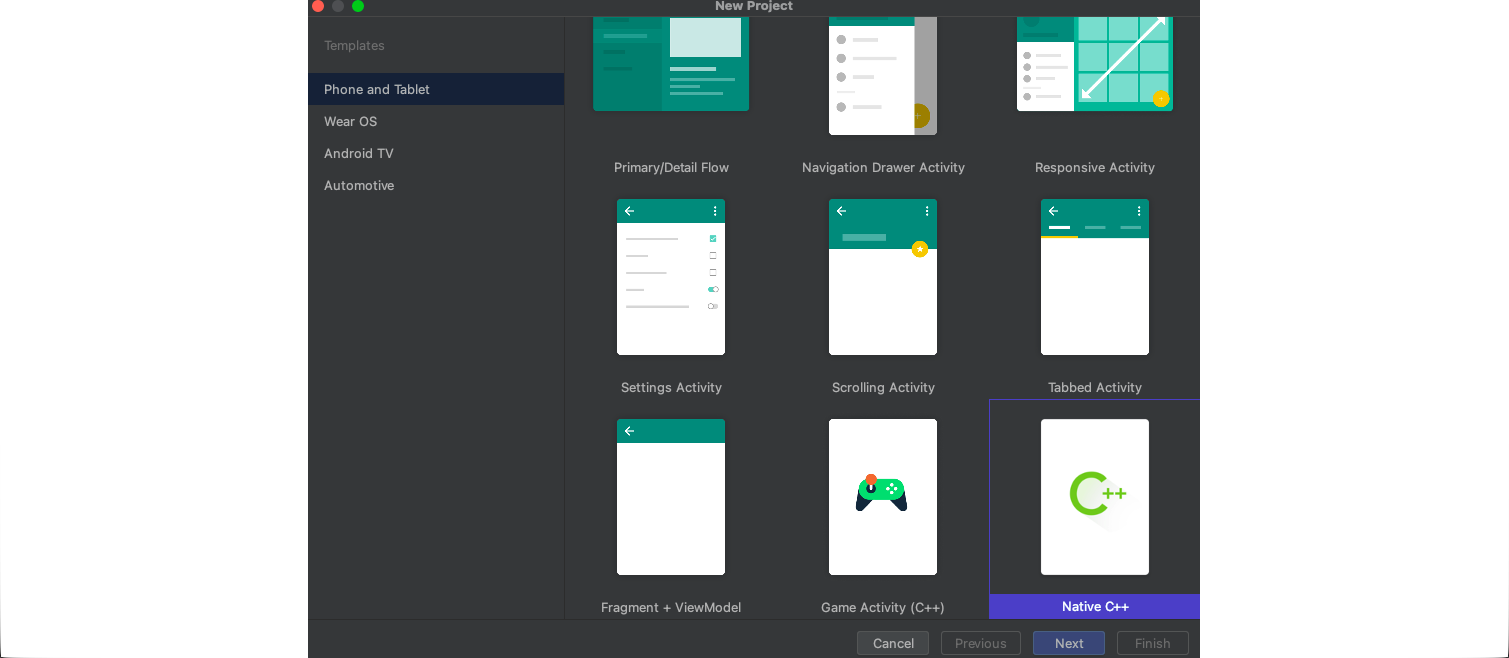
Let's create a Native C++ project to get more familiar with the way it works. To accomplish this, first launch Android Studio and navigate to New Project -> Native C++. Proceed to name your app, then in the following window under the C++ Standard section, select Toolchain Default from the dropdown menu. Finally, click Finish.
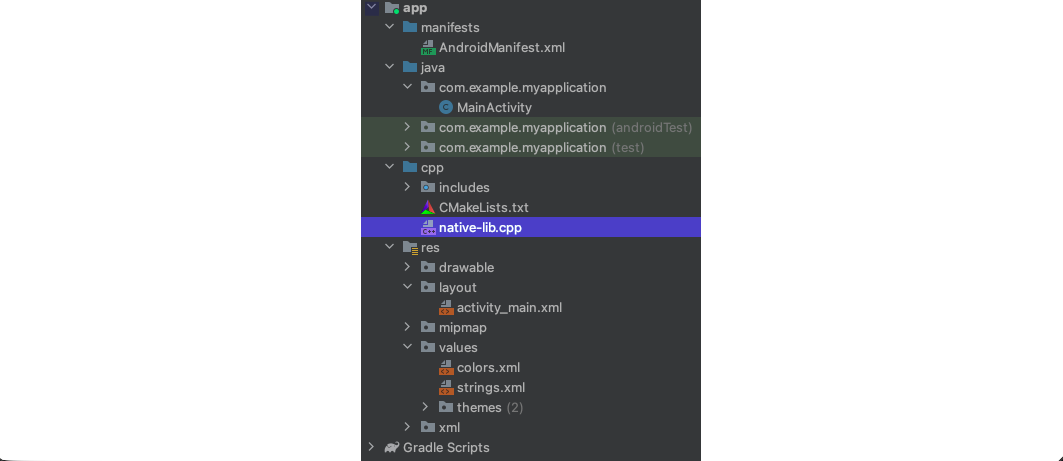
Once the project is created, we notice the native-lib.cpp file found under the App -> cpp folder in the left side section of Android Studio.
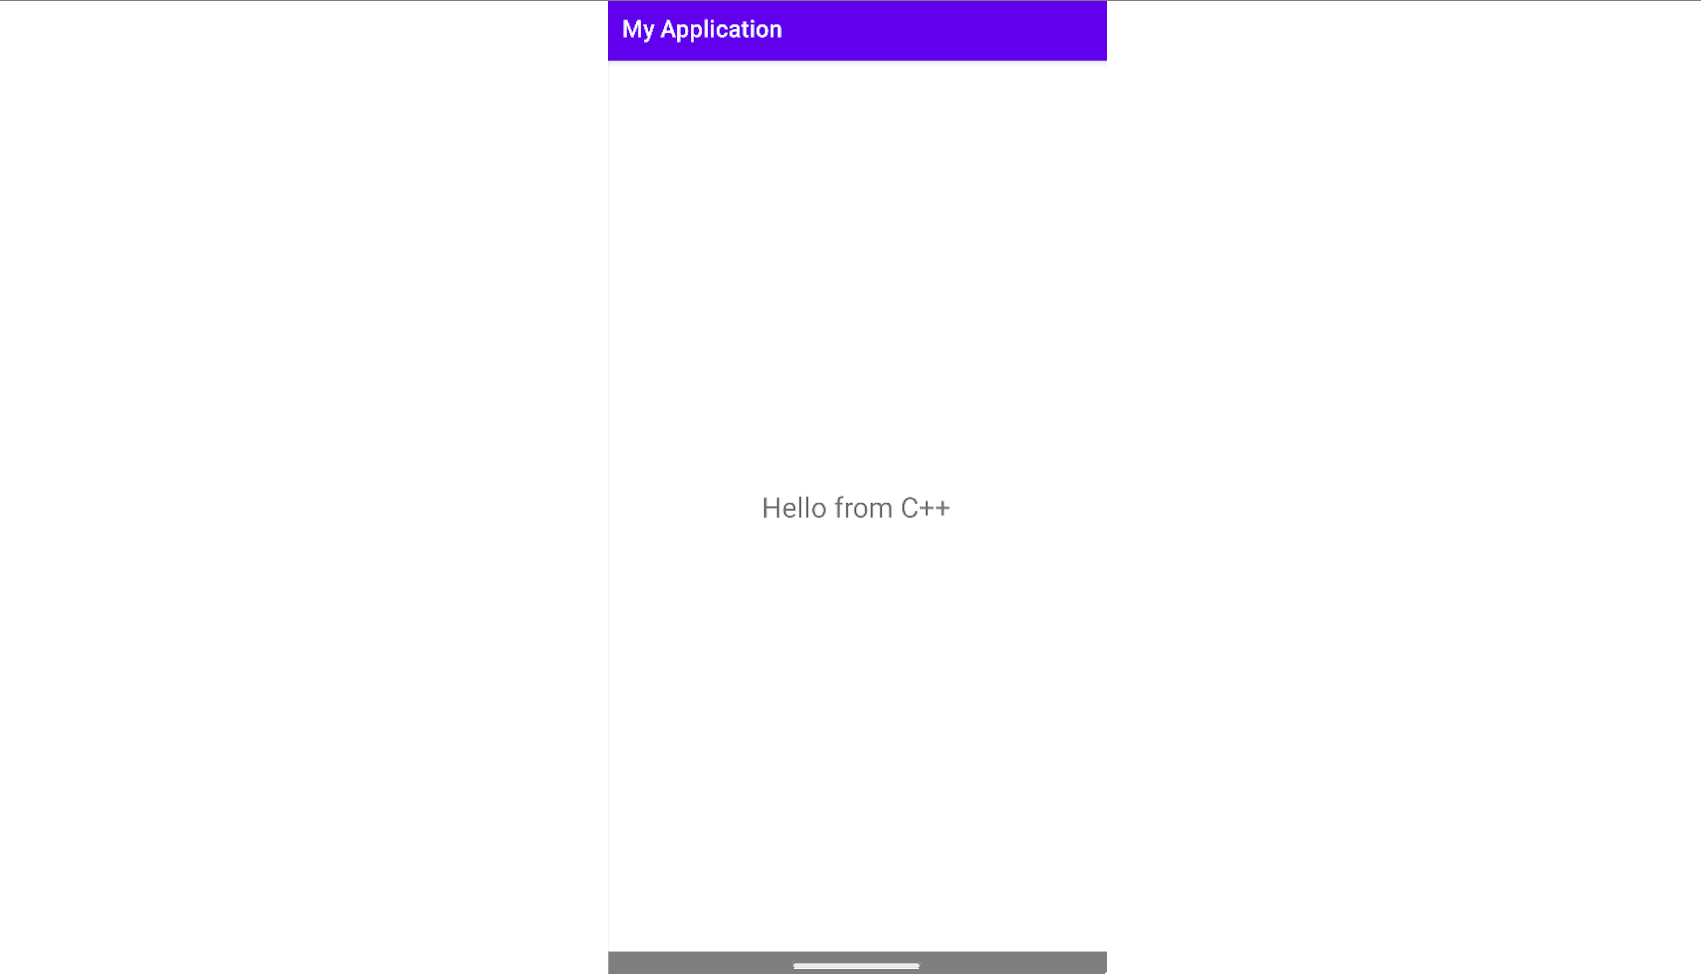
The following snippet of C++ code shows a function that returns the string Hello from C++.
Code: c
#include <jni.h>
#include <string>

extern "C" JNIEXPORT jstring JNICALL
Java_com_example_myapplication_MainActivity_stringFromJNI(
        JNIEnv* env,
        jobject /* this */) {
    std::string hello = "Hello from C++";
    return env->NewStringUTF(hello.c_str());
}
The function name Java_com_example_myapplication_MainActivity_stringFromJNI follows the JNI naming convention and indicates that it will be called from the MainActivity class. The line return env->NewStringUTF(hello.c_str()); returns a string to the Java layer. It's important to understand how this function handles calls from Java, as this pattern frequently appears during reverse engineering. Let’s also take a look at the MainActivity.java file to see how the native-lib.cpp library is loaded and how the native function is called.
Code: java
package com.example.myapplication;

import androidx.appcompat.app.AppCompatActivity;
import android.os.Bundle;
import android.view.View;
import android.widget.TextView;

public class MainActivity extends AppCompatActivity {
    TextView message;

    // Used to load the 'myapplication' library on application startup.
    static {
        System.loadLibrary("myapplication");
    }

    @Override
    protected void onCreate(Bundle savedInstanceState) {
        super.onCreate(savedInstanceState);
        setContentView(R.layout.activity_main);

        message = (TextView)findViewById(R.id.sample_text);
        message.setText(stringFromJNI());
    }

    /**
     * A native method that is implemented by the 'myapplication' native library,
     * which is packaged with this application.
     */
    public native String stringFromJNI();
}
Inside the MainActivity class we can see the line System.loadLibrary("myapplication");. This is where the library is loaded statically, defined by the name myapplication. Listing the content of the file App -> cpp -> CMakeLists.txt reveals the following snippet.
Code: cmake
add_library( # Sets the name of the library.
        myapplication

        # Sets the library as a shared library.
        SHARED

        # Provides a relative path to your source file(s).
        native-lib.cpp)
As we can see, the name of the file native-lib.cpp is set to myapplication. The CMakeLists.txt is used to describe the files of the native C++ project. Back to the MainActivity.java we can also see the line public native String stringFromJNI();, which indicates the declaration of the native method stringFromJNI(). This method returns the string Hello from C++ that we saw earlier in the native-lib.cpp file, and it is then printed on the screen through the TextView message object.
We are not limited to only loading a library statically. Libraries can be loaded while the application is running as well. The following snippet of code shows a class that loads the library while the app is running.
Code: java
public class Update {
    // Method declaration
    public native String stringFromJNI();

    // Copy the file locally and load it
    public String update(String path_sd_card, String filesDir){
        FileOutputStream outputStream;
        FileInputStream inputStream;

        try {
            inputStream = new FileInputStream(new File(path_sd_card + "/Download/libupgrade.so"));
            outputStream = new FileOutputStream(new File(filesDir + "/libupgrade.so"));

            FileChannel inChannel = inputStream.getChannel();
            FileChannel outChannel = outputStream.getChannel();
            inChannel.transferTo(0, inChannel.size(), outChannel);
            inputStream.close();
            outputStream.close();
        } catch (IOException e) {
            e.printStackTrace();
        }

        System.load(filesDir + "/libupgrade.so");

        // Returns the value of the function stringFromJNI() from the libupgrade.so file
        return stringFromJNI();
    }
}
After the file is copied into the application's home directory, the line System.load(filesDir + "/libupgrade.so"); loads the library. Bad code implementation could lead to remote command execution, a scenario we will see in a later module.
WebViews are components that allow developers to embed and display web content directly within an Android application. While powerful, improper use of WebView features can introduce serious security risks-a common issue in Android apps. Poor WebView implementation can expose the app to a wide range of vulnerabilities, such cross-site scripting (XSS) and local file inclusion (LFI). Because of this, the official Android documentation recommends using the system's default browser to deliver web content whenever possible, instead of embedding it with a WebView.
In recent Android versions, the default WebView configuration has become more restrictive, mitigating many common attacks by default. However, developers often enable advanced features (such as JavaScript execution or file access) that must be handled with extreme care to avoid introducing vulnerabilities.
In the next section, we’ll walk through creating a simple application using WebViews, HTML, CSS, and JavaScript to better understand how WebViews function. Before we begin, make sure to create a new project as described in the Android Studio section. The following XML snippet will define a WebView element inside the activity_main.xml layout file.
Code: xml
<WebView
        android:id="@+id/webview"
        android:layout_width="match_parent"
        android:layout_height="match_parent" />
Let's now create a reference that points to this object, in the MainActivity.java file.
Code: java
package com.example.myapplication;
import androidx.appcompat.app.AppCompatActivity;
import android.os.Bundle;
import android.webkit.WebView;
public class MainActivity extends AppCompatActivity {
@Override
protected void onCreate(Bundle savedInstanceState) {
super.onCreate(savedInstanceState);
setContentView(R.layout.activity_main);
WebView webview = (WebView) findViewById(R.id.webview);
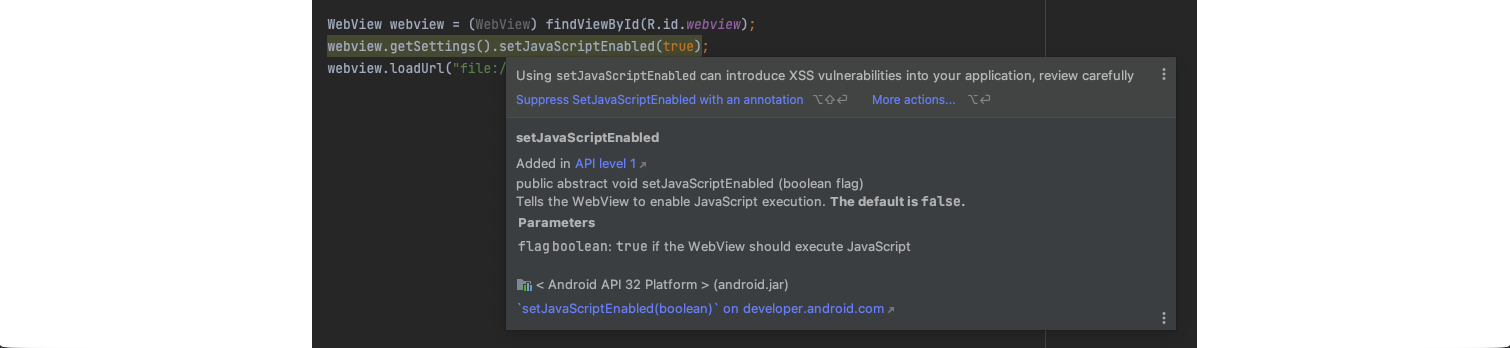
webview.getSettings().setJavaScriptEnabled(true);
webview.loadUrl("file:///android_asset/html/index.html");
}
}
The above code will create a reference to the WebView object and load the index.html file, which we are going to create next. The line webview.getSettings().setJavaScriptEnabled(true); means that the WebView is allowed to execute Javascript code, and this is where vulnerabilities can occur. Android Studio displays the following message if this feature is used in the code.
The HTML and Javascript files are usually placed under the folder app/assets (or from the Project view: app/src/main/assets). If the folder is missing, we can simply right-click on app and create a new folder named assets. The following is an example of a project structure that includes HTML, CSS, and Javascript.

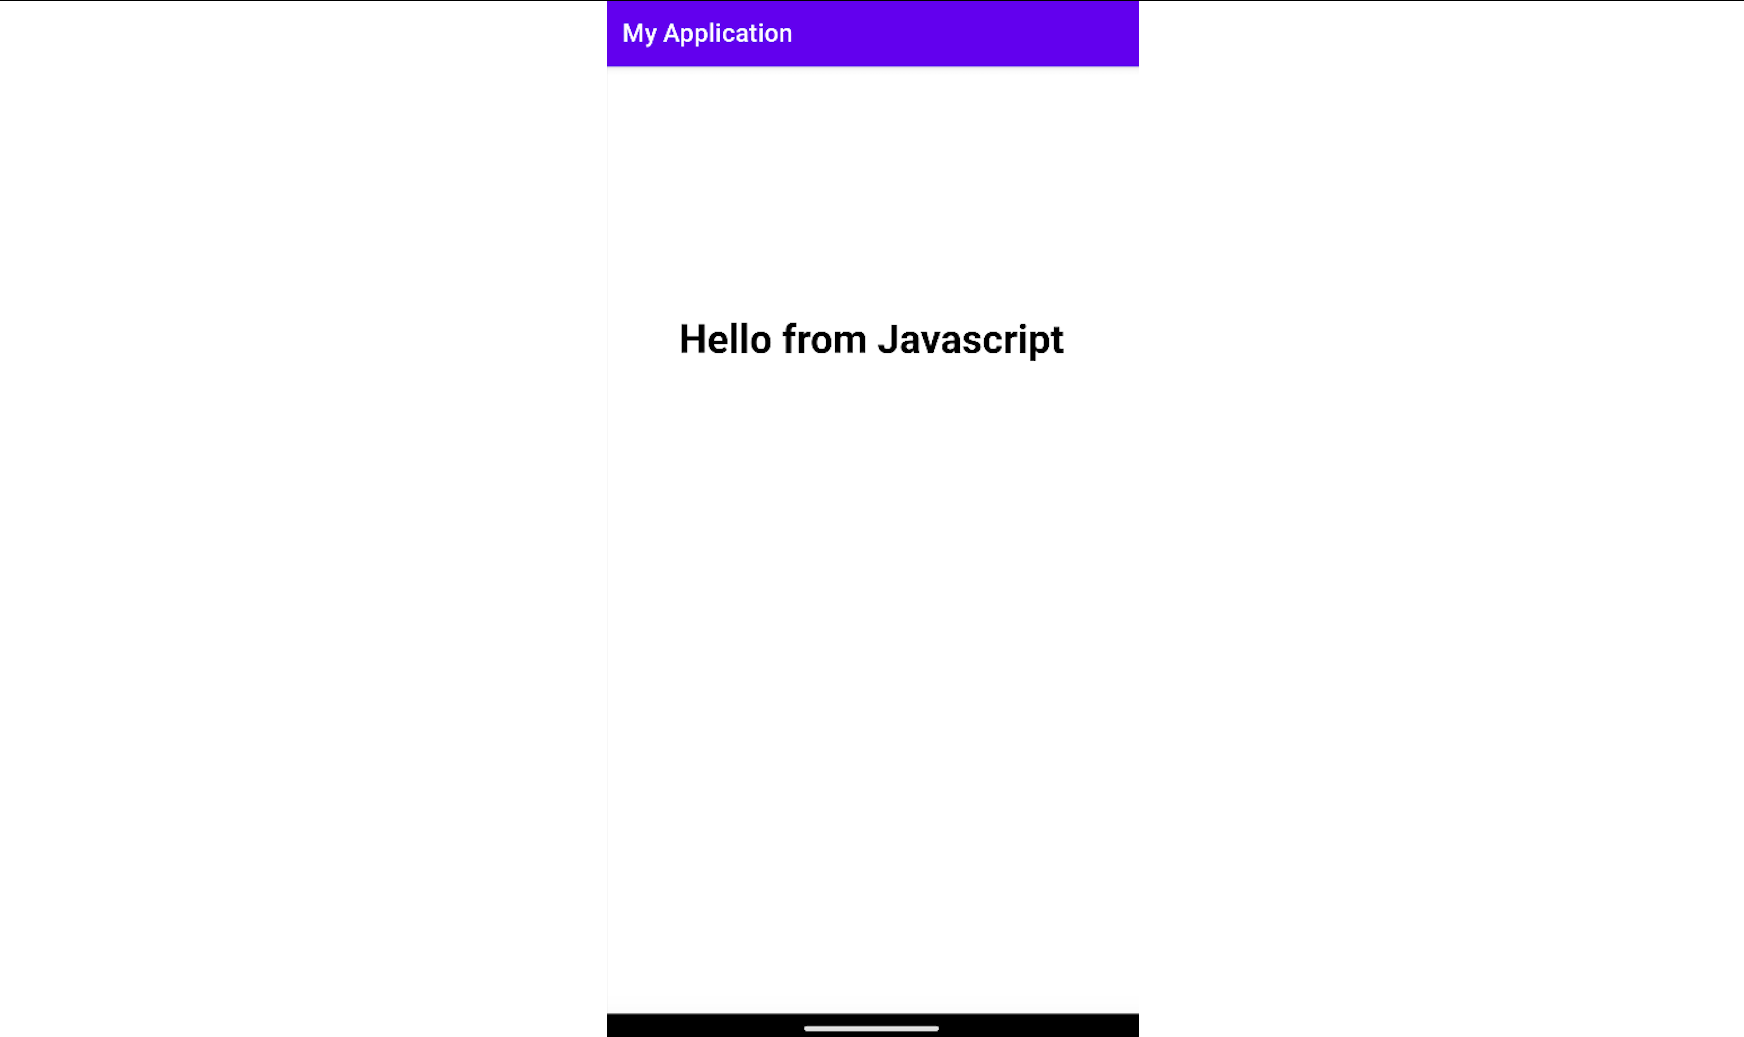
Here are the snippets of the index.html and the script.js files. The HTML code calls the Javascript function printMessage() which then prints the message Hello from Javascript to the screen.
Code: html
<html>
<head>
    <link rel="stylesheet" href="../css/style.css">
    <script src="../js/script.js"></script>
</head>
<body>
<h1>
    <script>printMessage()</script>
</h1>
</body>
</html>
Code: javascript
function printMessage() {
    document.write("Hello from Javascript");
}
WebViews can also load content from sources outside the local project. Assuming we want to load Google's home page in the app we just created, then the webview.loadUrl("file:///android_asset/html/index.html"); will change to webview.loadUrl("https://www.google.com/");.
The permission <uses-permission android:name="android.permission.INTERNET" /> also needs to be added to the AndroidManifest.xml file, before the <application> </application> tags.

The picture below shows the Google page embedded in the app we created.

\
Building Android applications from scratch can be challenging as it requires knowledge of multiple languages and tools. Consequently, Android developers often use frameworks to develop applications faster, with better code quality, and simpler maintainability. An application framework is a set of libraries that provides developers with a structured way to build applications using pre-built components and tools. These often include UI elements, security and authentication mechanisms, error handling, logging systems, and more. Different application frameworks are used across various IDEs (Integrated Development Environments) and programming languages, which increases the overall attack surface. As a result, different methodologies are required when performing application penetration testing. In the following sections, we’ll explore some examples of using the most popular application frameworks for Android development. These examples are only provided to enhance our understanding of the concepts, and you are not required to reproduce the steps.
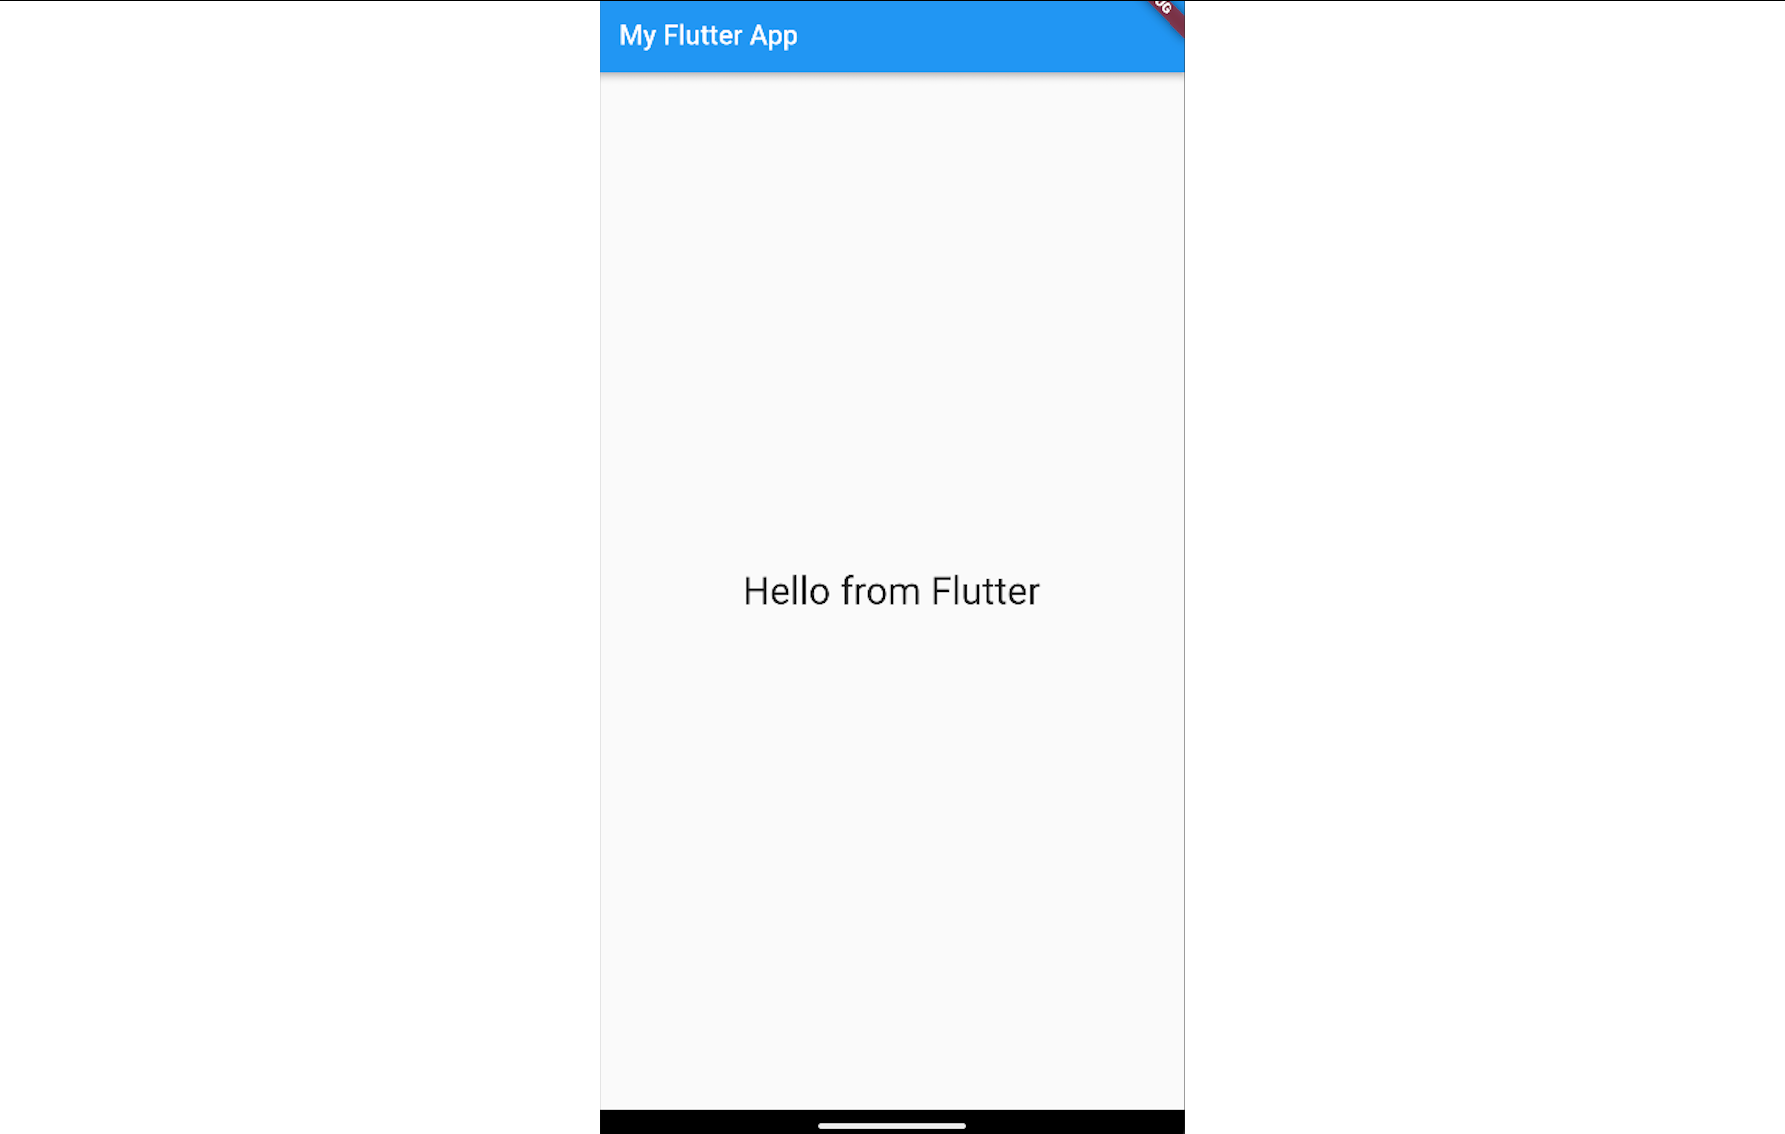
Flutter is an open-source mobile application framework developed by Google. With Flutter, developers can build applications in the Dart programming language, using customizable widgets that can be combined to create complex user interfaces. As a cross-platform application framework, development is possible for Android, iOS, Web, and Desktop applications providing high performance through compiled native code.
Flutter application development can be done by downloading the Flutter SDK from the official website and setting up an IDE (like Android Studio) with the Flutter and Dart plugins. In the following example, we will see a simple app created with Flutter and discuss the project's structure, so we can better understand it while performing static analysis in later sections. The following snippet is a simple Hello World application written in Dart.
Code: dart
import 'package:flutter/material.dart';

void main() => runApp(MyApp());

class MyApp extends StatelessWidget {
  @override
  Widget build(BuildContext context) {
    return MaterialApp(
      title: 'Hello World App',
      home: Scaffold(
        appBar: AppBar(
          title: Text('My Flatter App'),
        ),
        body: Center(
          child: Text(
            'Hello from Flutter',
            style: TextStyle(fontSize: 28),
          ),
        ),
      ),
    );
  }
}
The above snippet of code will print the text Hello from Flutter in the center of the screen.
In the screenshot below, we can see that the project structure includes directories that contain data responsible for compatibility with various platforms. Alongside them, we can also see the directory lib that contains the file main.dart. This is where the Dart code resides.

As we mentioned earlier, Flutter compiles the code natively, and thus the app will store the compiled C++ code in shared libraries (.so files). However, penetration testers can still decode and examine the resources during the static analysis using the appropriate tools. Incidentally, reading the code of an application that includes native components requires a different approach than analyzing a typical Android app written in Java or Kotlin. This is because the tools used to decompile Java bytecode into human-readable pseudocode are not effective for shared libraries (.so files) containing compiled C or C++ code. Analyzing these native binaries requires specialized tools and techniques, which will be covered in later sections.
Xamarin is a cross-platform application development framework that supports building Android, iOS, and desktop applications. Owned by Microsoft, Xamarin allows developers to create Android apps using C# as the primary programming language within Visual Studio. To get started, you can install the Mobile development with .NET workload in Visual Studio. The following snippet shows a simple "Hello World" application written in C# using Xamarin.
Code: c
using Android.App;
using Android.OS;
using Android.Runtime;
using Android.Widget;
using AndroidX.AppCompat.App;

namespace MyApplication
{
    [Activity(Label = "@string/app_name", Theme = "@style/AppTheme", MainLauncher = true)]
    public class MainActivity : AppCompatActivity
    {
        Button button;
        TextView message;

        protected override void OnCreate(Bundle savedInstanceState)
        {
            base.OnCreate(savedInstanceState);
            Xamarin.Essentials.Platform.Init(this, savedInstanceState);
            // Set our view from the "main" layout resource
            SetContentView(Resource.Layout.activity_main);

            message = FindViewById<TextView>(Resource.Id.message);
            button = FindViewById<Button>(Resource.Id.button);

            button.Click += (sender, args) =>
            {
                message.Text = "Hello World!";
            };
        }
        public override void OnRequestPermissionsResult(int requestCode, string[] permissions, [GeneratedEnum] Android.Content.PM.Permission[] grantResults)
        {
            Xamarin.Essentials.Platform.OnRequestPermissionsResult(requestCode, permissions, grantResults);
            base.OnRequestPermissionsResult(requestCode, permissions, grantResults);
        }
    }
}
The above application will print the message Hello World! on the screen once the button is pressed.
The screenshot below shows the project structure of a Xamarin application in Visual Studio.
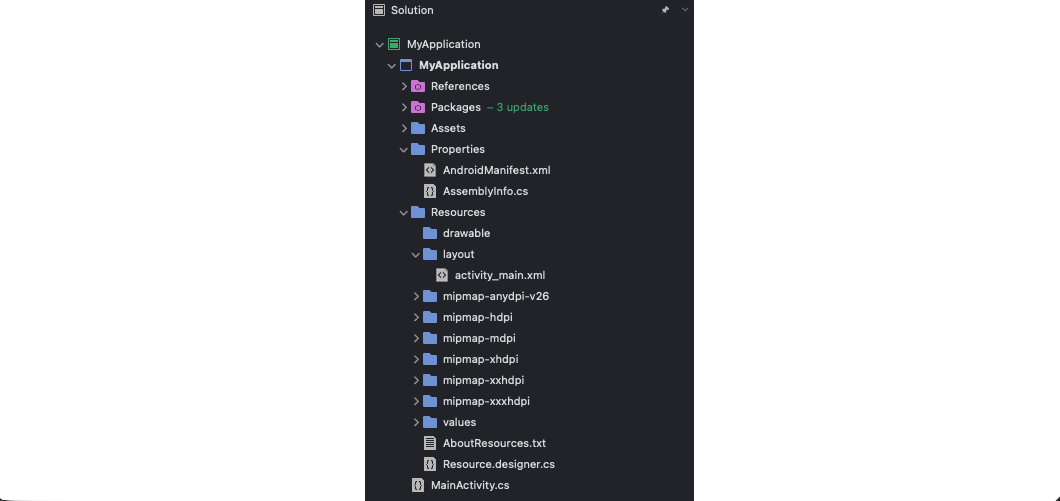
When creating a Xamarin app, the C# source code is compiled into Common Intermediate Language (CIL) using the .NET compiler. This intermediate code is then interpreted or just-in-time compiled into platform-specific machine code at runtime, depending on the target environment. Unlike native C++ code, which is compiled into shared libraries (.so files), Xamarin applications bundle their intermediate code as .NET assemblies (.dll files), often packaged inside a single file like assemblies.blob.
Since Xamarin apps contain intermediate code rather than native binaries, the reverse engineering process differs from analyzing native C++ or Java/Kotlin applications. The extracted .dll files can be loaded into .NET reverse engineering tools (such as ILSpy, dnSpy, or dotPeek) to recover readable pseudocode. These methodologies will be discussed in later sections.
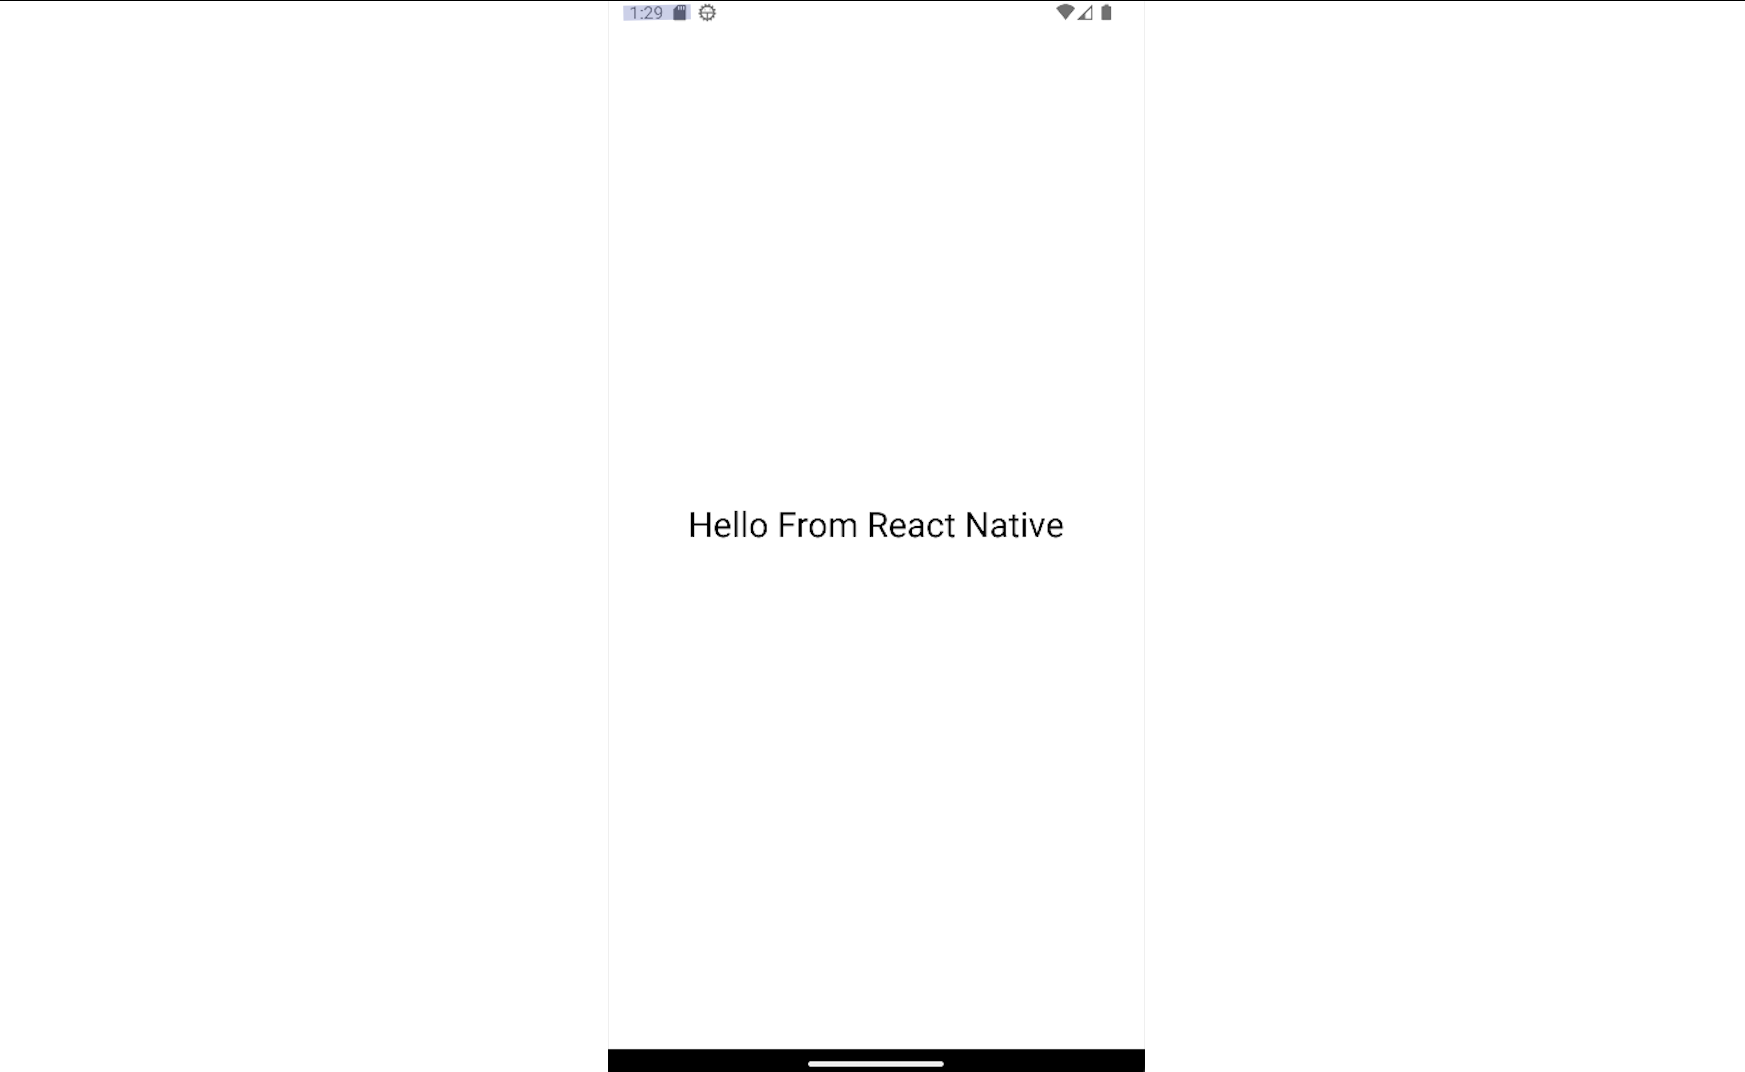
More application development frameworks can be used to create Android applications, with some of them being React Native, Apache Cordova (formerly PhoneGap), and Ionic. These frameworks can create hybrid cross-platform applications that run on Android, iOS, and web browsers using web-based technologies like Javascript, HTML, and CSS. We can install these frameworks using the NPM (Node Package Manager) command-line tool and start the development on Android Studio. Applications can then run on a Physical or virtual device. The following snippet is a simple Hello World using the React Native framework. This page will guide you through building and running a React Native app.
Code: react
import { StatusBar } from 'expo-status-bar';
import { StyleSheet, Text, View } from 'react-native';

export default function App() {
  return (
    <View style={styles.container}>
      <Text style={styles.text}>Hello From React Native</Text>
      <StatusBar style="auto" />
    </View>
  );
}

const styles = StyleSheet.create({
  container: {
    flex: 1,
    backgroundColor: '#fff',
    alignItems: 'center',
    justifyContent: 'center',
  },
  text: {
    fontSize: 28,
  },
});
The snippet above will print Hello From React Native on the screen.
When an application is developed using React Native, the majority of the application's logic and UI are written in JavaScript. The framework will also create the MainActivity and other necessary Java classes that act as the entry point for your application. When the application is prepared for release, the JavaScript code will be bundled into a standalone file called index.android.bundle. This file is optimized and minified to improve performance and reduce the overall size of the application. While reversing apps created with React Native, apart from analyzing the Java code to identify the necessary entry points, testers should also analyze the Javascript code bundled in the index.android.bundle file. Another thing testers should keep in mind is that the attack surface will be different than native apps. Apps created with such frameworks may be susceptible to web vulnerabilities since they use web technologies.
On the other hand, apps created with Cordova and Ionic frameworks use a WebView component to render the user interface and execute the application code, which is HTML, CSS, and JavaScript. When we build an app using Cordova or Ionic, the web assets (HTML, CSS, JavaScript files) are packaged within the application as part of the project structure and can be found during reverse engineering under the directories assets/www/ and assets/public/ accordingly. Reversing apps created with such frameworks will be further discussed in a later section.
Application components are the building blocks that define different parts of an Android application, such as the user interface and core functionality. These components are declared in the AndroidManifest.xml and can be used individually or in tandem with one another. Interprocess Communication (IPC) is a mechanism that allows for communication between applications or different processes within the same application. In the second case, applications usually consist of components that run in different processes, including Activities, Services, Broadcast Receivers, and Content Providers. As we mentioned in the previous sections, in Android each application runs in its own process, and thus, IPC has to make sure that applications have a way to communicate with each other when necessary. In the following paragraphs, we will discuss some of the most essential Application Components and Interprocess Communication mechanisms.
Activities are a fundamental application component, representing a single screen with a user interface and able to be presented in several modes, such as full-screen, floating, embedded, or multi-window. An Activity is the main component that allows the interaction between the user and the app, and can be started by other Activities, apps, or system events. Apart from managing and handling the application's user interface and interaction, Activities are also responsible for managing the app's lifecycle.
The lifecycle of an activity consists of six major stages called callbacks. The class below defines the entire lifecycle of an activity.
Code: java
 public class Activity extends ApplicationContext {
     protected void onCreate(Bundle savedInstanceState);
     protected void onStart();
     protected void onRestart();
     protected void onResume();
     protected void onPause();
     protected void onStop();
     protected void onDestroy();
 }
The system invokes the corresponding callback whenever an Activity enters a new state. Note that an application may only use some of the callbacks. The diagram below shows the lifecycle of an Activity.
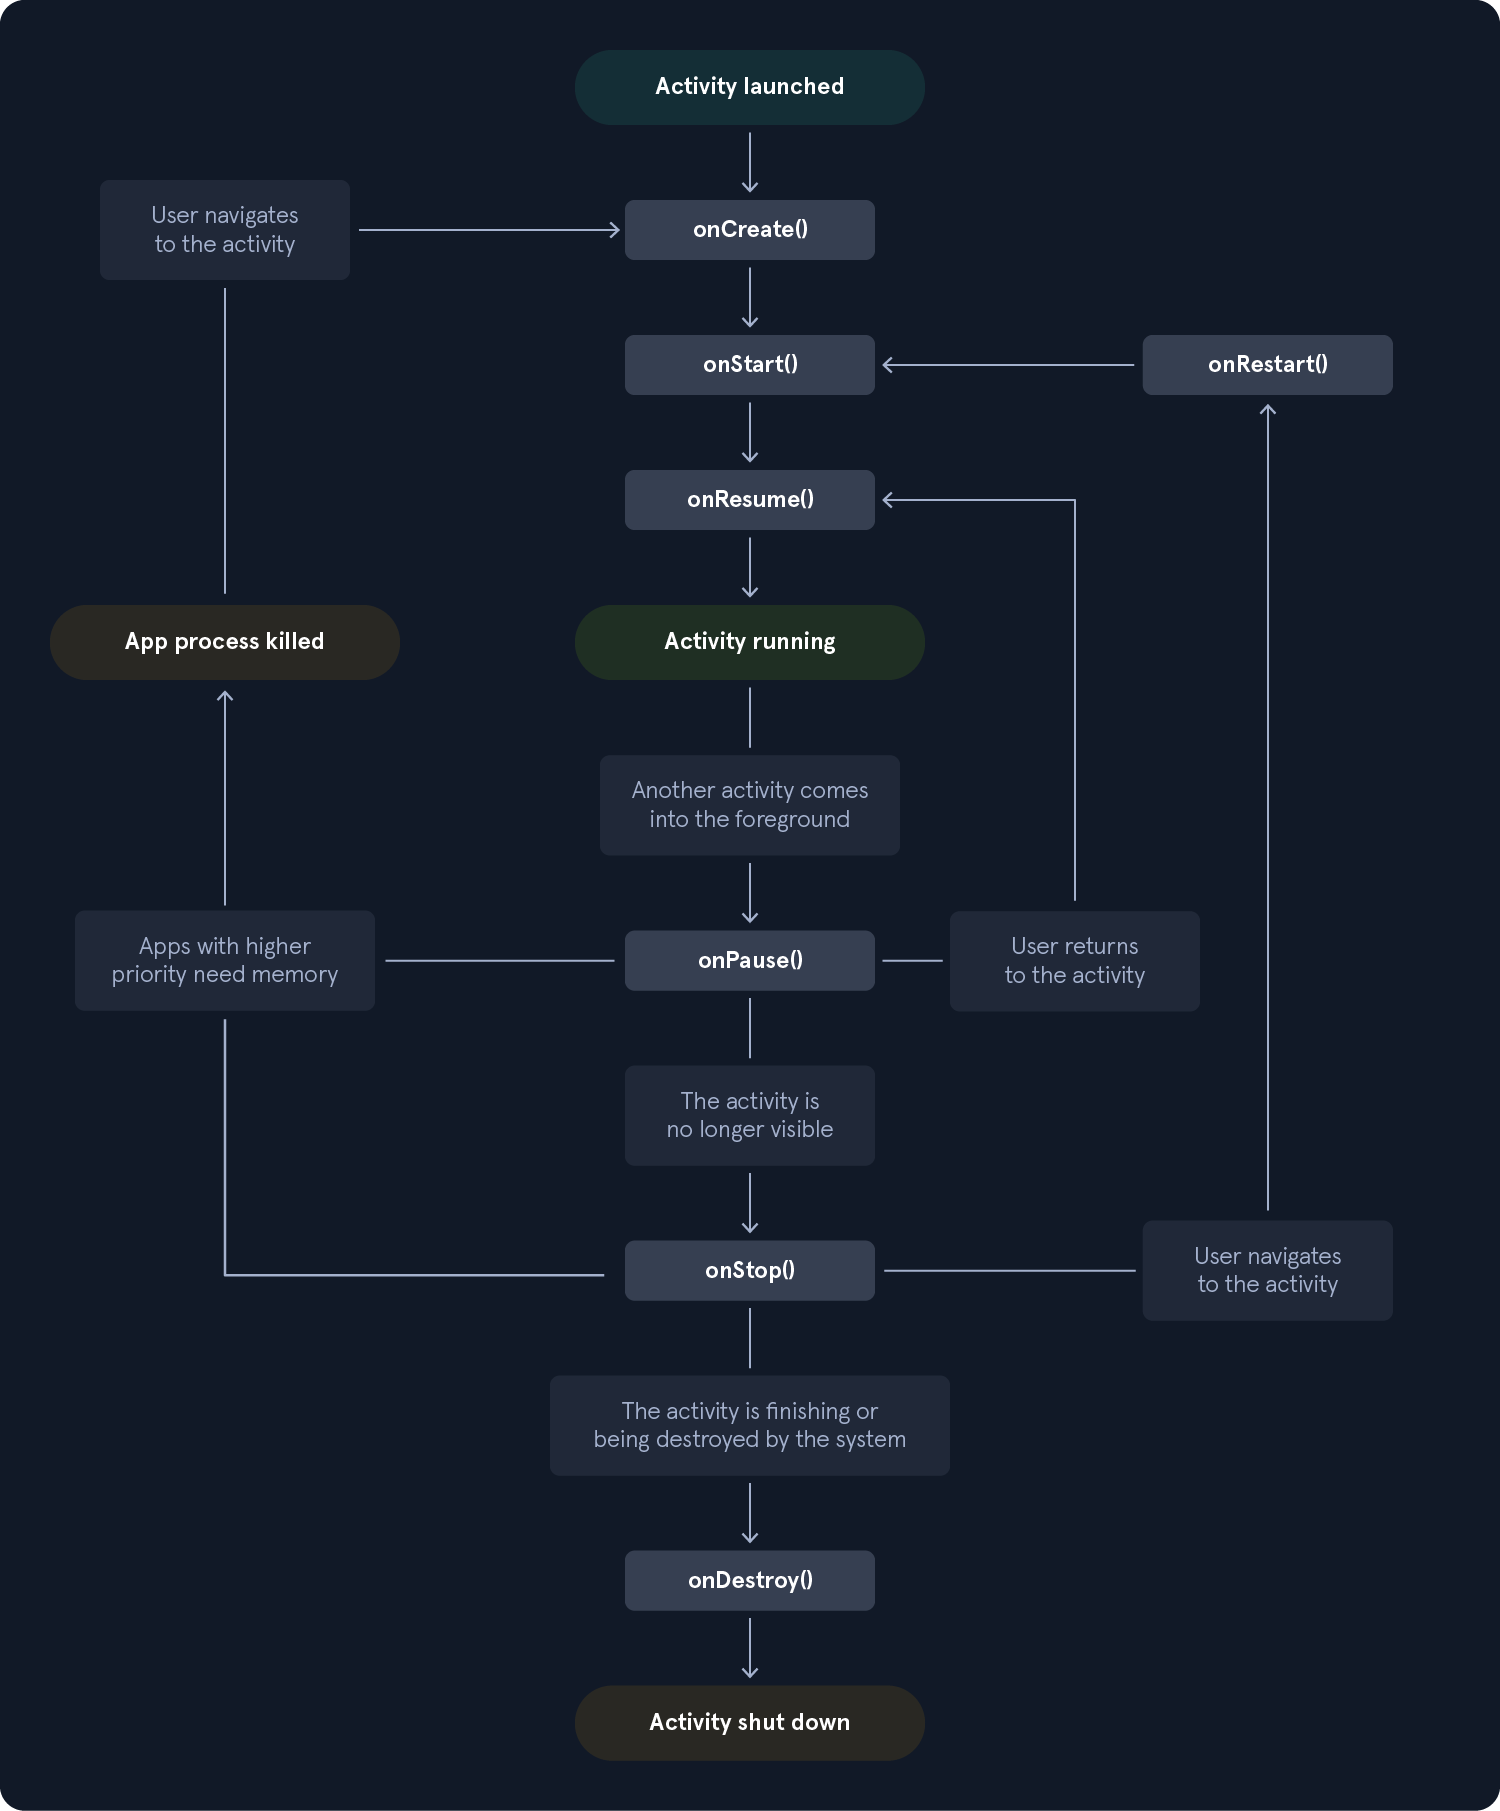
Next, we will describe the main stages of the activity lifecycle.
onCreate()
In this stage, the activity is first created, and developers can initialize tasks like setting up the user interface, binding data to views, and configuring listeners or handlers. When a new Android project is created, the Android Studio automatically generates the class MainActivity.java which contains the method onCreate(). This is the method called during this stage. The following snippet shows an example of the onCreate() method.
Code: java
@Override
protected void onCreate(Bundle savedInstanceState) {
    super.onCreate(savedInstanceState);
    setContentView(R.layout.activity_main);

        Toast.makeText(this, "This message will be displayed on the app start-up.", Toast.LENGTH_SHORT).show();
}
This method takes only one parameter, the Bundle savedInstanceState, which contains the activity's previously saved state. The above snippet will print the message on the screen as soon as the app starts. Since many initializations typically occur within this method (including the loading or initialization of sensitive information such as hard-coded credentials or keys), it serves as a key entry point for penetration testers during assessments. Another reason pentesters should pay attention during the examination of this method is that data is often passed as parameters whenever an activity is launched by an Intent, which we will see later in this section. This usually happens when the developer wants to send data from one activity to another, like session tokens or other values needed for the smooth operation of the application.
onStart()
Once the Created callback has been completed, it is always followed by the Started callback, where everything becomes visible to the user. The method onStart() is called when the activity is brought to the foreground and starts interacting with the user. At this point, resources are typically initialized in this lifecycle stage.
onResume()
Once the activity starts interacting with the user, the onResume() method will be called. Animations and other media, or interaction with the user, typically take place in this stage of the lifecycle. The Paused callback always follows this stage.
onPause()
If the user switches to another app or a dialog appears on top of the activity, it will no longer be active or focused. In this state, although the activity will remain visible to the user, any resource no longer needed is released. It is followed by the onResume() or the onStop() callbacks.
onStop()
At this point, the activity is no longer visible to the user and the resources are released. This activity is followed by either onRestart() or onDestroy().
onDestroy
At this point, if the system needs any memory or space resources, the activity will be destroyed to free them up. The activity will also be destroyed if the user chooses to close the activity.
onRestart()
In case the activity is restarting after having been stopped, the onRestart() will be called, followed by the onStart(). Initializations can be done again if needed at this point.
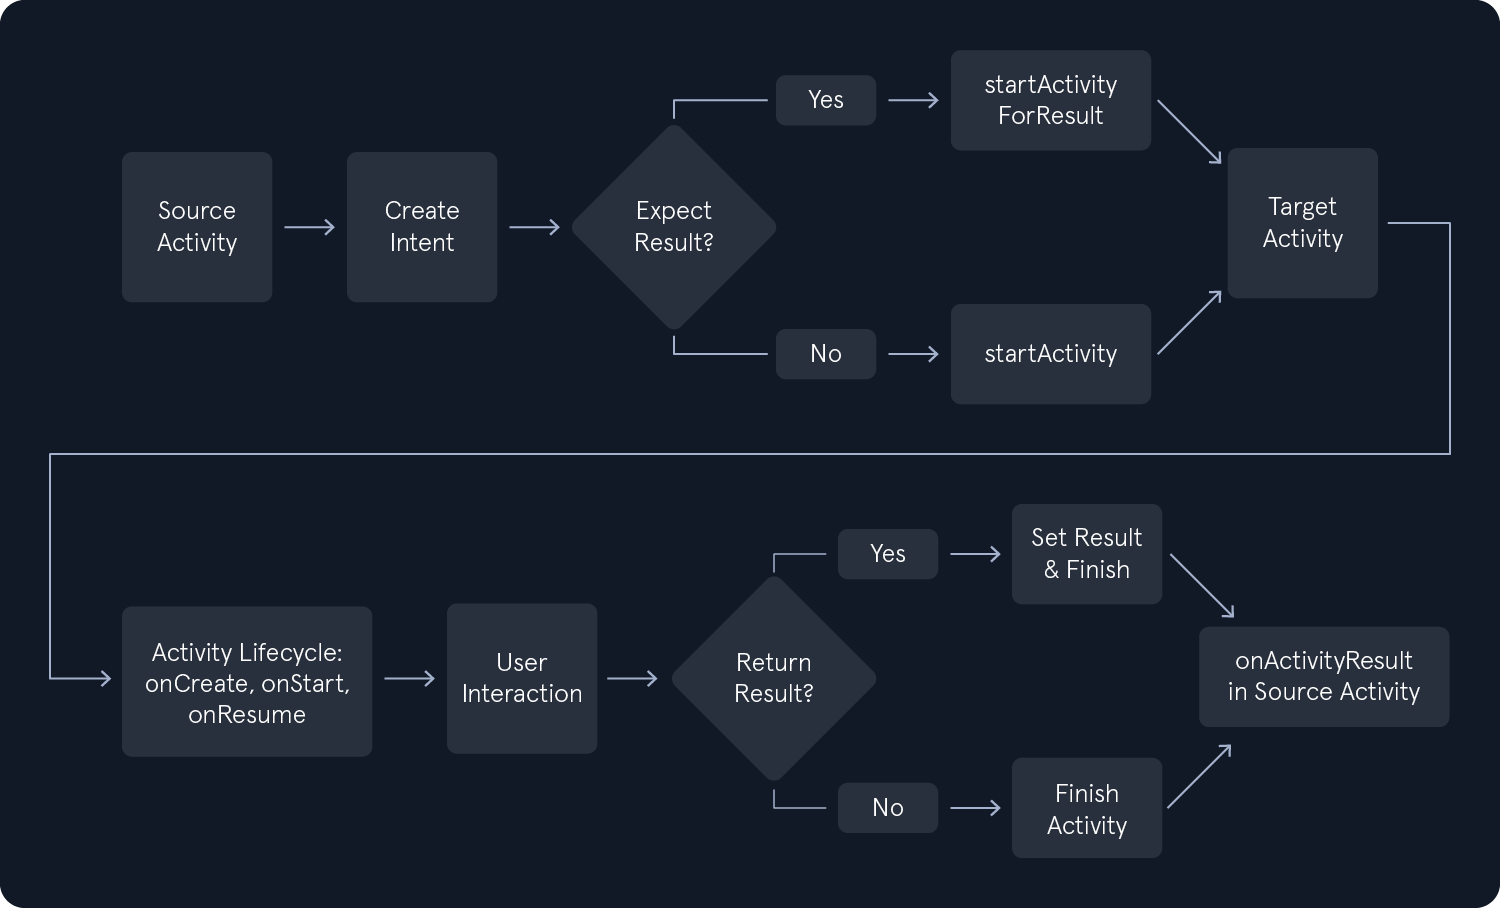
Launching an Activity in Android is a fundamental concept. An Activity represents a single screen with a user interface responsible for managing user interaction with the application. The following steps describe what is happening while launching an Activity.
Intent creation
To start an Activity programmatically, we first create an Intent object. Intents are messaging objects used to request an action from another component from the same or other applications. The target Activity and any other additional data required can be specified in the Intent object.
Code: java
// In the source Activity (e.g., MainActivity.java)
Intent intent = new Intent(this, TargetActivity.class);
// Optionally, you can add extra data to the Intent
intent.putExtra("key", "test");
As we can see, the parameter key with the value test has also been passed using the property putExtra().
Requesting Activity launch
Next, the startActivity() or startActivityForResult() is called from the source Activity, passing the Intent object as a parameter. The startActivity() is used to launch an Activity without expecting any result back, while startActivityForResult() is used when we expect results from the launched Activity.
Code: java
// For launching an Activity without expecting any result back
startActivity(intent);

// For launching an Activity and expecting a result back
int requestCode = 1; // A unique integer request code to identify the result
startActivityForResult(intent, requestCode);
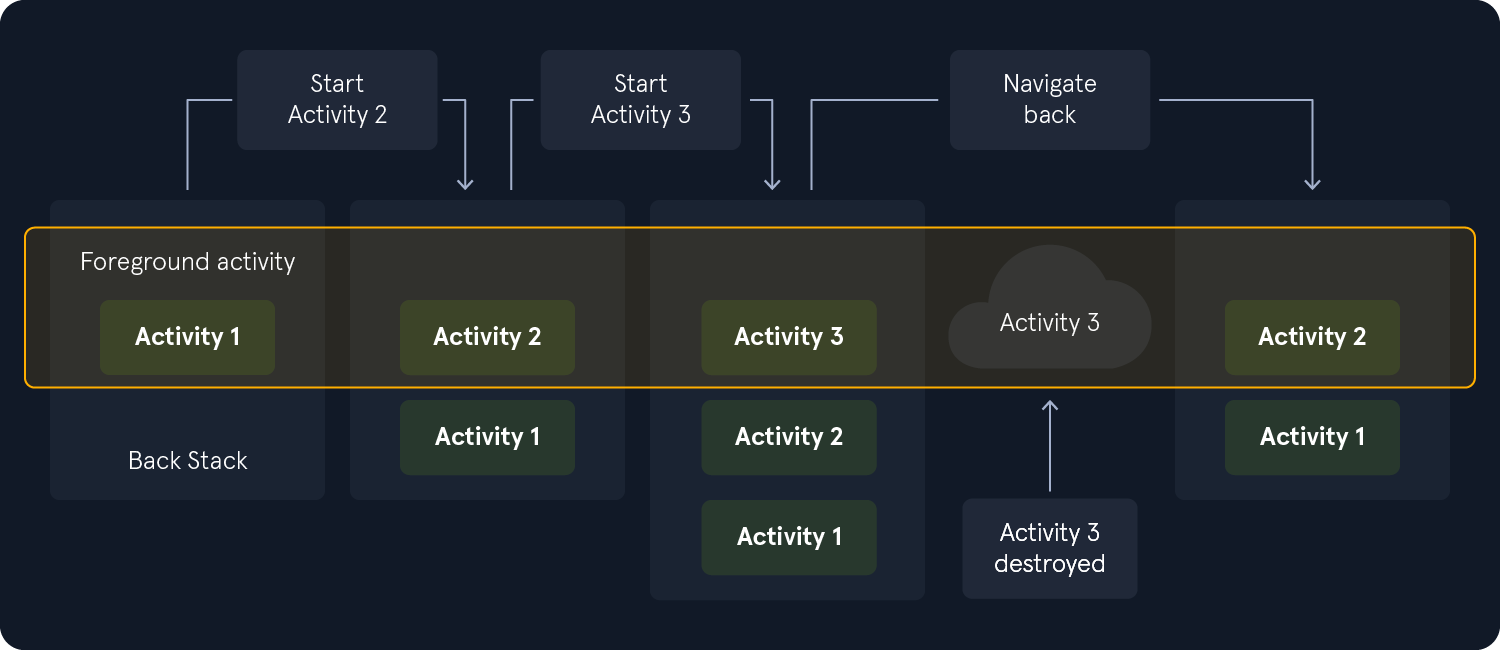
Activity stack management
The Android operating system maintains an Activity stack as part of the task that the app belongs to. When a new Activity is launched, it's placed on top of the stack and becomes the active Activity. The previous Activity is paused and remains in the stack. The following image shows the progress between activities and the current back stack at each point.
Activity lifecycle transitions
In this stage, the source Activity's onPause() method is called, and it becomes inactive. Meanwhile, the target Activity goes through a series of lifecycle methods, including onCreate(), onStart(), and onResume(), initializing its UI, setting up required resources, and starting any necessary background tasks. The necessary lifecycle methods should be implemented in the target Activity (e.g., TargetActivity.java).
Code: java
public class TargetActivity extends AppCompatActivity {

    @Override
    protected void onCreate(Bundle savedInstanceState) {
        super.onCreate(savedInstanceState);
        setContentView(R.layout.activity_target);

        // Get data from the Intent
        String data = getIntent().getStringExtra("key");
    }

    // Other lifecycle methods, like onStart(), onResume(), onPause(), onStop(), onDestroy()
}
User interaction
The new Activity becomes visible and users can interact. When the user decides to navigate back, the current Activity is popped from the stack and its onPause(), onStop(), and onDestroy() lifecycle methods are called. The previous Activity in the stack becomes active again, resuming its onRestart(), onStart(), and onResume() lifecycle methods. If the target Activity needs to return any results, the code in it will look like this.
Code: java
// Set result and finish the Activity
Intent resultIntent = new Intent();
resultIntent.putExtra("result_key", "result_value");
setResult(RESULT_OK, resultIntent);
finish();
Returning a result (optional)
If the launched Activity was started using startActivityForResult(), it can return results to the calling Activity. This is done by calling setResult() in the launched Activity, followed by finish(). The calling Activity will then receive the result in its onActivityResult() method, where it can process the data accordingly. In the source Activity, the method that handles the results would look like this.
Code: java
@Override
protected void onActivityResult(int requestCode, int resultCode, @Nullable Intent data) {
    super.onActivityResult(requestCode, resultCode, data);

    if (requestCode == 1) { // Match the request code used in startActivityForResult()
        if (resultCode == RESULT_OK && data != null) {
            String resultData = data.getStringExtra("result_key");
            // Process the result data
        }
    }
}
The following flowchart shows the above steps.
Apart from starting an activity by tapping the icon or through other applications, this can be done using ADB (Android Debug Bridge). Android Debug Bridge is a command-line tool that allows you to communicate with an Android device (emulator or physical device). It is primarily used for debugging, development, and testing purposes. Accessing Activities with the exported attribute set to true directly from ADB is possible, and this can sometimes raise security concerns.
In order to use an Activity properly, you must declare it in your app's manifest file. In Android, this file is called AndroidManifest.xml, and as we mentioned in previous sections, it is a configuration file that provides essential information about the application to the Android system. This information includes the app components, permissions, and other metadata. After creating a new Activity, it should be declared using the <activity> element as a child of the <application> element, as shown in the example below. The android:name attribute should contain the fully qualified Activity class name.
Code: xml
<manifest xmlns:android="http://schemas.android.com/apk/res/android"
    package="com.example.myapp">

    <application
        android:allowBackup="true"
        android:icon="@mipmap/ic_launcher"
        android:label="@string/app_name"
        android:roundIcon="@mipmap/ic_launcher_round"
        android:supportsRtl="true"
        android:theme="@style/AppTheme">

        <!-- Declare your Activity here -->
        <activity android:name=".MainActivity">
            <intent-filter>
                <action android:name="android.intent.action.MAIN" />

                <category android:name="android.intent.category.LAUNCHER" />
            </intent-filter>
        </activity>

        <!-- Declare other Activities if needed -->
        <!-- <activity android:name=".AnotherActivity" /> -->

    </application>

</manifest>
In the above snippet, the android.intent.action.MAIN action indicates that the MainActivity is the entry point of the app. This means it is the first Activity launched when the app starts. This action is typically used for the home screen of an app. While the activity name MainActivity is usually used as an entry point in Android applications, this name can be changed. Identifying the entry point of an application is very important during penetration testing since testers can better understand the application's flow, functionality, and overall structure, discover possible attack surfaces and eventually identify potential vulnerabilities and weaknesses. The second property, android.intent.category.LAUNCHER tells the Android system that this Activity should be listed in the system's app launcher. So when the user taps on the application's icon in the launcher, this Activity should be started.
Some activities may include the attribute exported. This attribute is used to specify whether other apps on the device can access an app component. The exported attribute can be set on <activity>, <service>, <receiver>, and <provider> elements in the AndroidManifest.xml file, and it accepts the boolean values true or false. Setting the exported attribute to true means that other apps on the device can access and invoke the app component. This configuration might expose the app to security risks. The following example shows an activity with the exported attribute set to true.
Code: xml
<manifest ...>
    <application ...>
        <activity
            android:name=".MyCustomActivity"
            android:exported="true">
            <!-- Intent filters if needed -->
        </activity>
    </application>
</manifest>
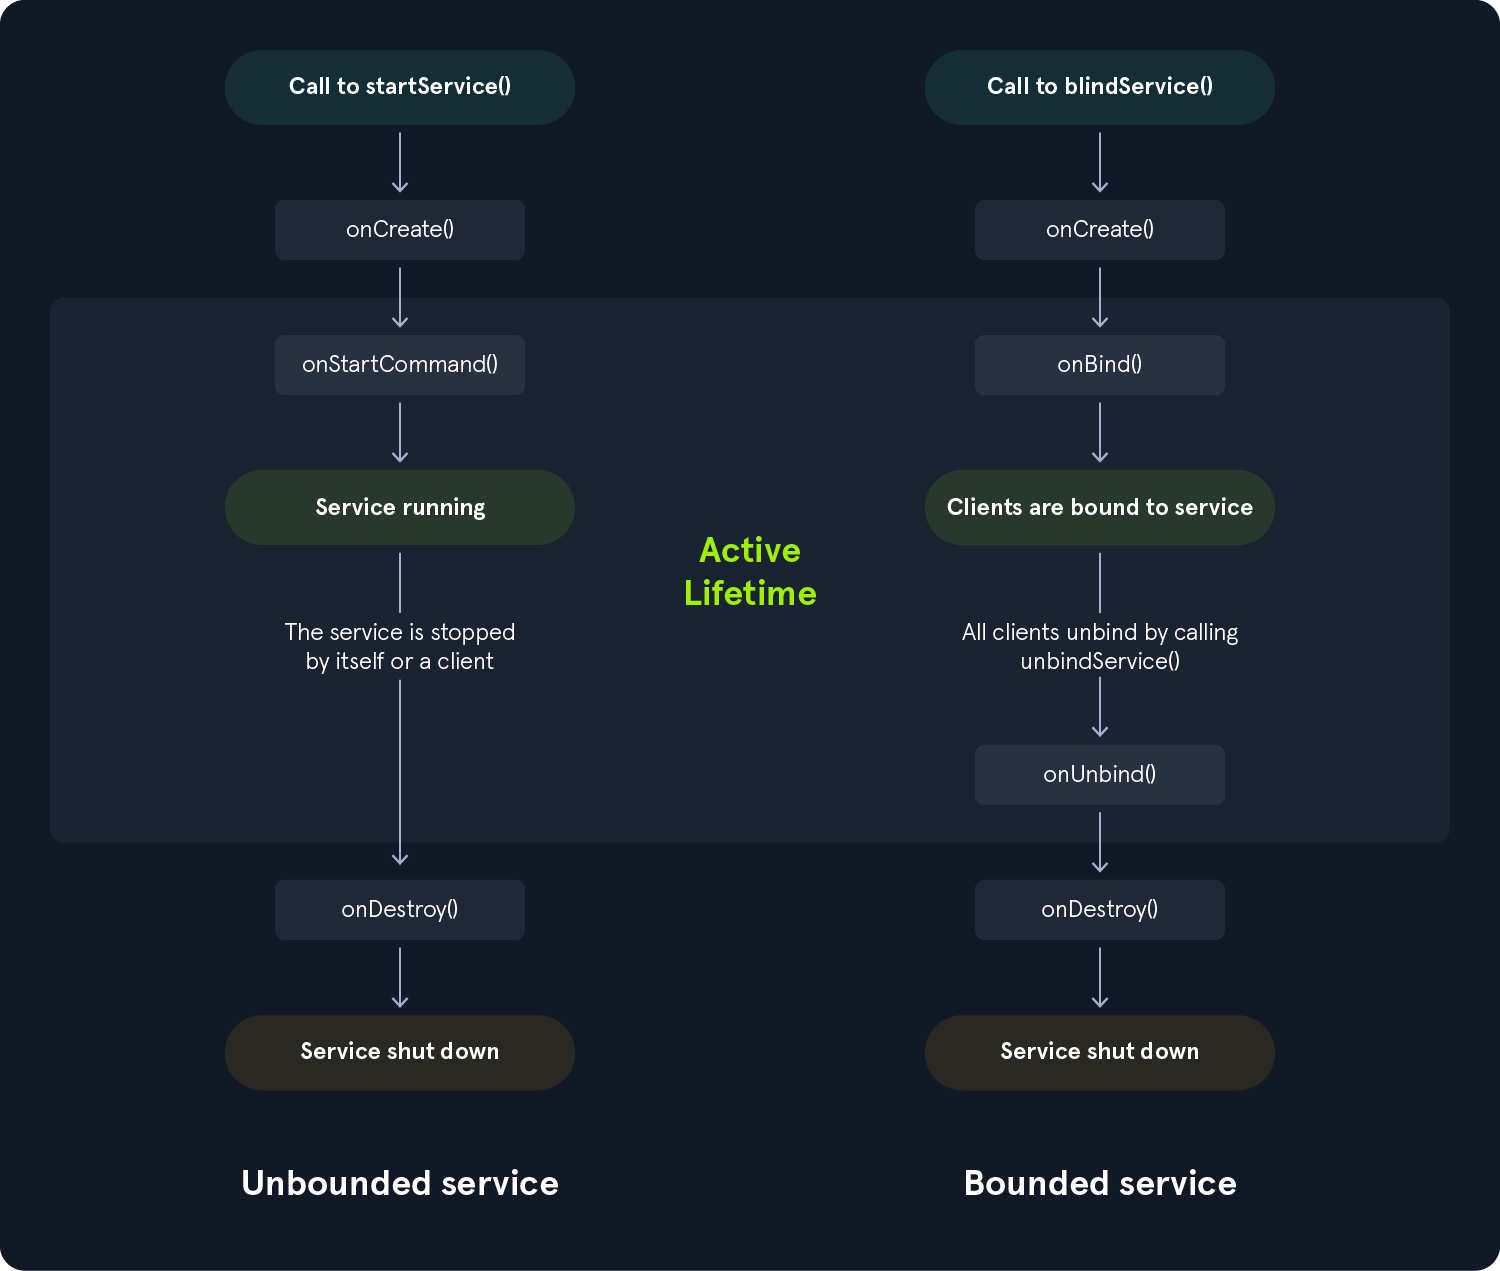
A Service is an Android application component that performs long-running operations in the background without providing a user interface. Services can be used for tasks like downloading files, playing music, or communicating with a remote server, and can continue working even after the user has left the app. There are three types of services in Android.
Foreground Service
Foreground services perform operations that require user attention. They will provide users with notifications and continue running, even when the app has no interaction or is minimized. Foreground services must display notifications to inform the users that the service is running. Examples of such services include media players and navigation apps. A foreground service can be started by calling the startService() method.
Background Service
Background services perform operations that do not require user interaction. Starting with Android API level 26 (Android 8.0 Oreo), background services are no longer allowed to run unless the application is in the foreground. This change was introduced to conserve system resources and optimize battery life.
Bound Service
Bound services allow other application components to bind to them by calling the bindService() method. They provide a client-server interface that enables components—even across different processes—to interact with the service using Interprocess Communication (IPC).
Services extend the Service class.
Code: java
public class ExampleService extends Service {
    int startMode;       // indicates how to behave if the service is killed
    IBinder binder;      // interface for clients that bind
    boolean allowRebind; // indicates whether onRebind should be used
    ...
    }
}
Similar to activities, services have lifecycle callback methods that must be implemented to monitor changes in their state. The following diagram shows the service's lifecycle callback methods. On the left, the service is created using startService(), while on the right, using bindService().
Services must be declared in the AndroidManifest.xml file.
Code: xml
<manifest ...>
    <application ...>
        <service android:name=".MyForegroundService"/>
        <service android:name=".MyBackgroundService"/>
    </application>
</manifest>
Broadcast Receivers can be considered as both Application Components and Interprocess Communication (IPC) mechanisms. As an IPC mechanism, Broadcast Receivers enable communication between different applications by sending and receiving Intents. These Intents can be sent by the Android system, other apps, or the app itself. As an Application Component, Broadcast Receivers are designed to respond to system-wide or custom events broadcasted by other applications. Broadcast Receivers can act as a messaging system between different components across the Android ecosystem. For example, the system broadcasts an event when the device starts charging. Similarly, an app can send a custom broadcast to let other apps know that new data has been downloaded. Broadcast Receivers extend the BroadcastReceiver class and override the onReceive() method to match a specified Intent Filter declared in the AndroidManifest.xml. The following example shows a Broadcast Receiver handling an event where the device is charging.
Code: java
public class MyBroadcastReceiver extends BroadcastReceiver {
    @Override
    public void onReceive(Context context, Intent intent) {
        String action = intent.getAction();

        if (action != null) {
            switch (action) {
                case Intent.ACTION_POWER_CONNECTED:
                    // Handle the power connected event
                    break;
                case Intent.ACTION_POWER_DISCONNECTED:
                    // Handle the power disconnected event
                    break;
                default:
                    // Handle other actions as needed
                    break;
            }
        }
    }
}
Broadcast Receivers also need to be declared in the AndroidManifest.xml file.
Code: xml
<manifest ...>
    <application ...>
        <receiver android:name=".MyBroadcastReceiver">
            <intent-filter>
                <action android:name="android.intent.action.ACTION_POWER_CONNECTED" />
                <action android:name="android.intent.action.ACTION_POWER_DISCONNECTED" />
            </intent-filter>
        </receiver>
    </application>
</manifest>
The following methods are used for sending broadcasts to different kinds of receivers.
| Method | Description |
|---|---|
sendOrderedBroadcast(Intent, String) |
Sends broadcasts to one receiver at a time. |
sendBroadcast(Intent) |
Sends broadcasts to all receivers in an undefined order. |
localBroadcastManager.sendBroadcast(intent) |
Send Intent broadcasts to local objects within your process. This method is deprecated since API 28, and LiveData is used instead. |
Similar to Activities, broadcasting messages through ADB is also possible, which will be discussed in later sections. Beginning with Android 8.0 (API level 26), the system imposes additional restrictions on manifest-declared receivers. Manifest can not be used to declare receivers for most implicit broadcasts (broadcasts that don't target your app specifically). However, exceptions exist and can be found here.
Content Providers can be considered as Application Components and Interprocess Communication (IPC) mechanisms. As an IPC mechanism, Content Providers enable communication between applications by allowing them to access, modify, or delete data using a consistent interface through the ContentResolver class. As an application component, Content Providers are responsible for managing and exposing data structures within or to other apps. At the same time, they allow data sharing between different components in the app or with external apps. In other words, they act as the intermediate between the app and its underlying data storage. Content Providers use a standardized API based on the CRUD (Create, Read, Update, Delete) operations to interact with data. The data handled by a Content Provider can be stored in multiple structures, including local SQLite databases, the device's internal or external storage, or even on a remote server.
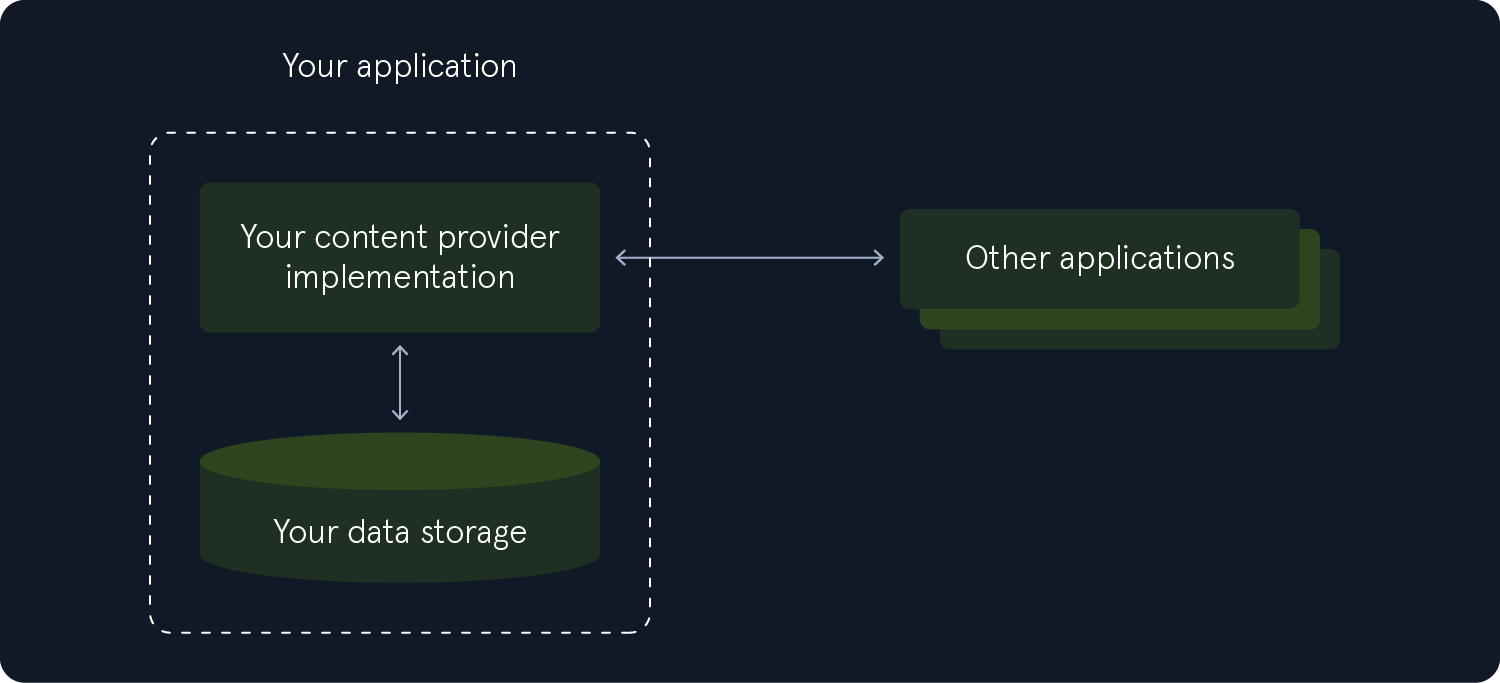
Accessing a ContentProvider is typically done asynchronously in the background using a CursorLoader to execute queries. The Activity or UI component initiates a request to the CursorLoader, which performs the query by accessing the ContentProvider via the ContentResolver. This approach keeps the UI responsive while executing the query. The process involves multiple components, as demonstrated in the following image.
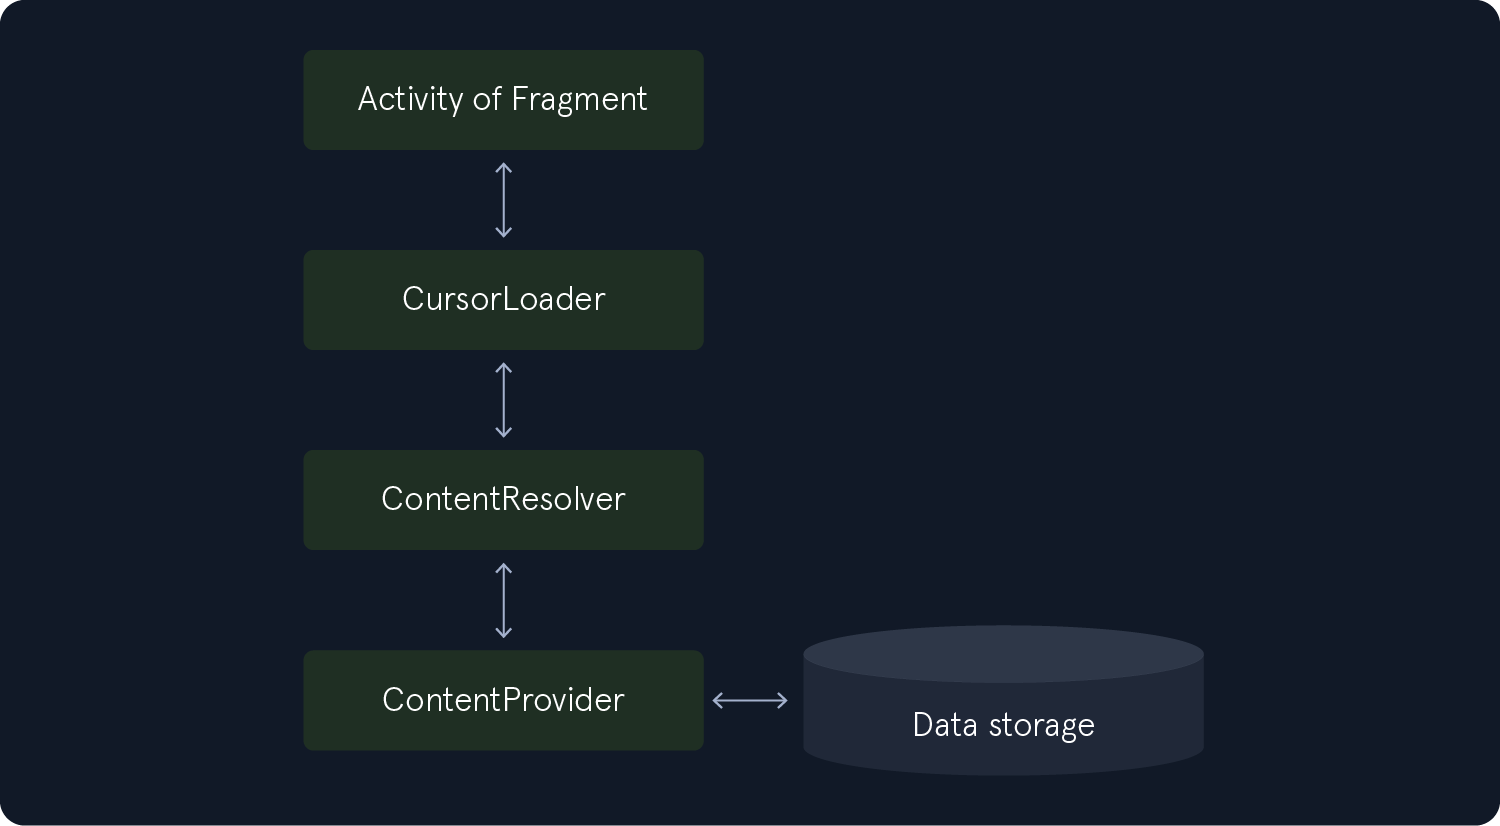
The following code snippet retrieves words and their locales from the User Dictionary Provider. A User Dictionary Provider is a ContentProvider in Android that manages the user's custom dictionary. To achieve this, it calls ContentResolver.query(), which in turn invokes the ContentProvider.query() method implemented by the User Dictionary Provider.
Code: java
// Queries the user dictionary and returns results
cursor = getContentResolver().query(
    UserDictionary.Words.CONTENT_URI,  // The content URI of the words table
    projection,                        // The columns to return for each row
    selectionClause,                   // Selection criteria
    selectionArgs,                     // Selection criteria
    sortOrder);                        // The sort order for the returned rows
Content Providers extend the ContentProvider class.
Code: java
public class MyContentProvider extends ContentProvider {
    // Implement required CRUD methods and other logic here
}
Content Providers, along with the permissions required to access the provider's data, must be declared in the AndroidManifest.xml file.
Code: xml
<manifest ...>
    <application ...>
        <provider
            android:name=".MyContentProvider"
            android:authorities="com.example.myapp.provider"
            android:exported="false" />
    </application>
</manifest>
Similar to Activities and Broadcast Receivers, Content Providers can be accessed using the Android Debug Bridge (ADB) through the terminal.
As mentioned in the previous section, Intents are messaging objects used by applications or the Android system to request actions from other components such as Activities, Services, and Broadcast receivers. While Intents are not primarily designed for Interprocess Communication (IPC), they may be used when an application wants to interact with a component (such as a service) that resides in a different process. There are three essential use cases for Intents, shown below with practical examples.
Starting an Activity
Intents are commonly used to launch new activities, passing data between components.
Code: java
/* Navigating from a list of contacts to a detailed view of the selected contact.
   In the source Activity (ContactListActivity.java), an explicit Intent tells
   Android to launch the target Activity (ContactDetailActivity.java) and passes
   the selected contact's ID as extra data. This allows the target activity to
   retrieve and display the correct contact details. */

Intent intent = new Intent(this, ContactDetailActivity.class);
intent.putExtra("contact_id", selectedContactId);
startActivity(intent);
Starting a Service
Services are used for background operations, and Intents are used to start or bind to them.
Code: java
/* Downloading a file in the background. This code starts a background Service
   (DownloadService) to handle a file download. An explicit Intent specifies the
   target Service class and attaches the file URL as extra data. The Service can
   then retrieve the URL from the Intent and begin the download operation in the
   background. */

Intent intent = new Intent(this, DownloadService.class);
intent.putExtra("file_url", fileUrl);
startService(intent);
Delivering a Broadcast
Broadcasts allow apps to send or listen for system-wide or app-specific events.
Code: java
/* Informing other components that the battery is low. This code sends a custom
   broadcast with the action string `com.example.ACTION_BATTERY_LOW`. Any component
   (within the same app or across apps) that has registered a BroadcastReceiver with
   a matching Intent filter will be notified when this broadcast is sent. */

Intent intent = new Intent("com.example.ACTION_BATTERY_LOW");
sendBroadcast(intent);
Next we will examine the two types of Intent IPC.
Explicit Intents
Explicit Intents are commonly used for navigating between activities within the same app or starting services. The target component (activity, service, or broadcast receiver) should be known and can be created by specifying the target component's class name in the Intent constructor.
Code: java
Intent intent = new Intent(this, TargetActivity.class);
startActivity(intent);
Implicit Intents
Implicit Intents are used when we don't know the exact target component, but know the action we want to perform and want the system to find a suitable component to handle the request. To create an implicit Intent, we must specify the action and the data (URI).
Code: java
Intent intent = new Intent(Intent.ACTION_VIEW);
intent.setData(Uri.parse("https://www.example.com"));
startActivity(intent);
In addition, Intents can also carry data between components in the form of key-value pairs called extras.
Code: java
Intent intent = new Intent(this, TargetActivity.class);
intent.putExtra("key", "value");
startActivity(intent);
The following image shows how an implicit intent is delivered through the system to start another activity.
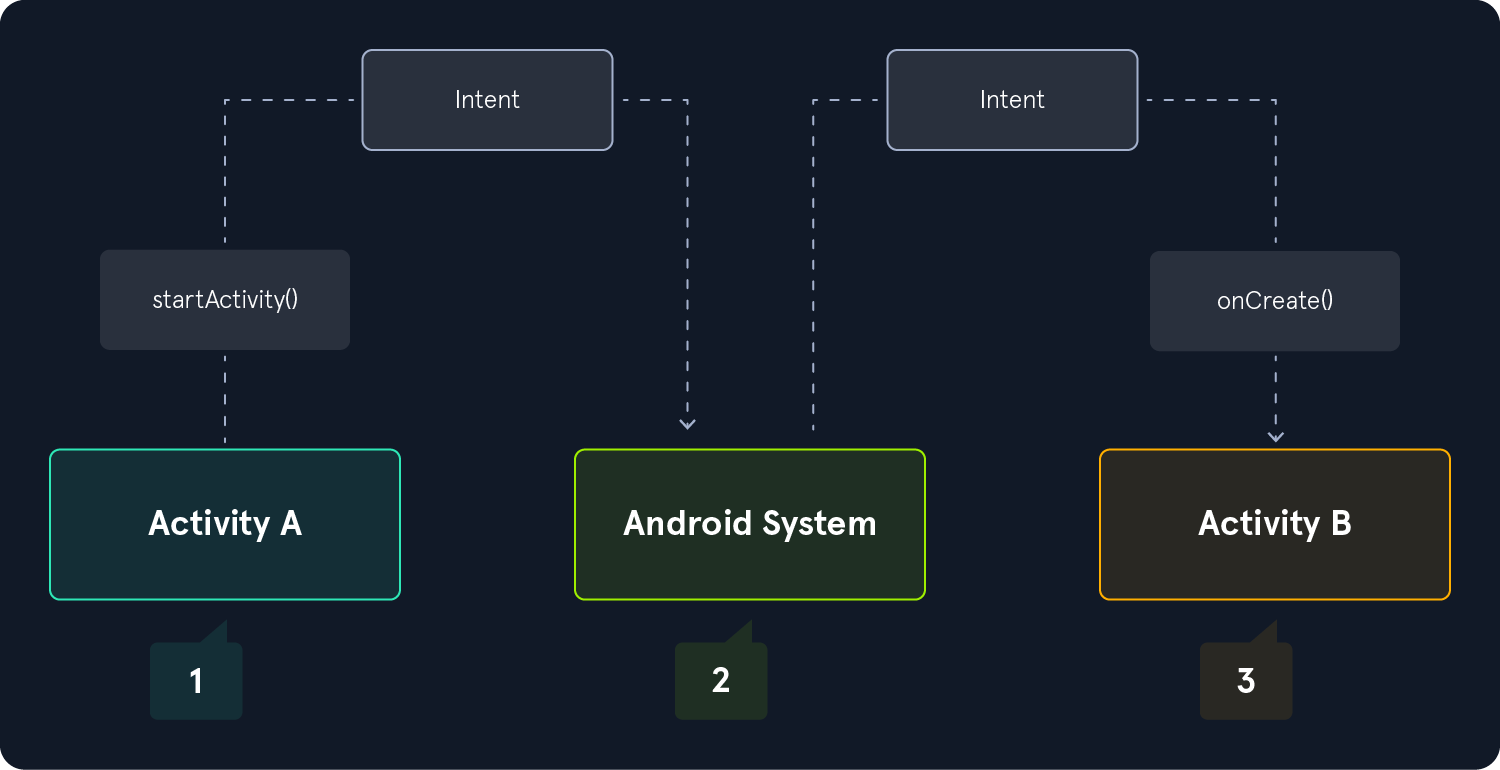
Much like Application Components, Intents can be created using the Android Debug Bridge (ADB) through the terminal. Understanding and analyzing Intents while assessing an application is crucial—not only for gaining insight into the app’s flow but also for identifying potential security bypasses.
The Binder is Android's core Interprocess Communication (IPC) mechanism, enabling efficient and secure communication between different processes. It is built on a Remote Procedure Call (RPC) model, allowing a client process to invoke methods on a remote object located in another process as if the object were local.
Throughout the following paragraphs, "remote service" refers to a service running within the same application but in a different process. Binders are typically used through a Service that implements an interface defined in an AIDL file, which specifies the methods, parameters, and return values for IPC. The Service provides the requested functionality, while the Binder facilitates communication between the client and the service. The following code snippets demonstrate how a Service uses Binders to communicate with a remote client.
ICalculator.aidl
Here we see snippet of the ICalculator.aidl file containing the method's declaration.
Code: java
interface ICalculator {
    int add(int a, int b);
}
Next, we have a snippet of the CalculatorService.java file, which creates the service and implements the interface defined in the AIDL file.
Code: java
public class CalculatorService extends Service {
    private final ICalculator.Stub binder = new ICalculator.Stub() {
        @Override
        public int add(int a, int b) {
            return a + b;
        }

    @Override
    public IBinder onBind(Intent intent) {
        return binder;
    }
}
MainActivity.java
We now come to a snippet of the MainActivity.java file connecting and binding to the remote service CalculatorService, and subsequently calling its methods. Connecting to a service involves establishing a link with the service to communicate and interact with it, while binding to a service establishes a long-lasting connection between a client (such as an Activity) and a service. This allows the client to interact with the service, invoke its methods, and receive results synchronously.
Code: java
// Connecting to the remote service
private ServiceConnection serviceConnection = new ServiceConnection() {
    @Override
    public void onServiceConnected(ComponentName name, IBinder service) {
        calculatorService = ICalculator.Stub.asInterface(service);
        performCalculations();
    }
        ...
};
....

// Binding to the remote service
@Override
protected void onCreate(Bundle savedInstanceState) {
    super.onCreate(savedInstanceState);
    setContentView(R.layout.activity_main);

    Intent intent = new Intent();
    intent.setComponent(new ComponentName("com.example.calculatorservice", "com.example.calculatorservice.CalculatorService"));
    bindService(intent, serviceConnection, Context.BIND_AUTO_CREATE);
}
...

// Calling the methods
private void performCalculations() {
    if (calculatorService == null) {
        return;
    }

    try {
        int additionResult = calculatorService.add(10, 5);

        // Use the results as needed, e.g., display them in the UI
        // ...

    } catch (RemoteException e) {
        e.printStackTrace();
    }
}
Binders are not declared in the manifest file directly, as they are a part of the Service implementation. However, if the Service runs in a different process, the attribute android:process should be specified in the AndroidManifest.xml file.
Code: xml
<manifest ...>
    <application ...>
        <service
            android:name=".MyService"
            android:process=":remote" />
    </application>
</manifest>
A Deep Link is an Interprocess Communication (IPC) mechanism that allows users to navigate directly to specific content within an app by tapping a URL found on a website, email, or any other location where links can be placed.
For example, a user might receive a promotional email about a flash sale on a specific product. Instead of directing the user to the website, the link opens the corresponding app to display the product. In some cases, if the app is not installed, the user is redirected to the app store to download and install it.The are two types of Deep Links, the Standard Deep Link, and the Android App Link.
Standard Deep Link
The example below demonstrates a website that provides deep links to list its computer products through the mobile app. The source code of the website looks like this:
Code: html
<div>
    <p>Buy our latest PC parts.</p>
    <a href="app://myapp/products/cpu"> </a>
</div>
In order for the above URL to open within the application, we must set up an intent filter in the Androidmanifest.xml file for the corresponding activity.
Code: xml
<activity android:name=".ProductsActivity">
    <intent-filter>
        <action android:name="android.intent.action.VIEW" />
        <category android:name="android.intent.category.DEFAULT" />
        <category android:name="android.intent.category.BROWSABLE" />
        <data android:scheme="app"
              android:host="myapp"
              android:pathPrefix="/products/" />
    </intent-filter>
</activity>
The table below provides a description of the most important elements of the above snippet.
| Element | Description |
|---|---|
<activity android:name=".ProductsActivity"> |
Defines the activity to be launched once the link is tapped. |
android:scheme="app" |
Sets the protocol. It defines the app (can be anything) part of the URL app://myapp/products/cpu included in the website. |
android:host="myapp" |
Sets the host. It defines the myapp (can be anything) part of the URL app://myapp/products/cpu included in the website. |
android:pathPrefix="/products/" /> |
Sets the path prefix. It defines the /products/ part of the URL app://myapp/products/cpu included in the website. |
Now that we have set up the intent filter properly, let's take a look at the following Java snippet to see how it handles the incoming intent.
Code: java
public class ProductActivity extends AppCompatActivity {
    @Override
    protected void onCreate(Bundle savedInstanceState) {
        super.onCreate(savedInstanceState);
        setContentView(R.layout.activity_planet);

        Intent intent = getIntent();
        String action = intent.getAction();
        Uri data = intent.getData();

        if (Intent.ACTION_VIEW.equals(action) && data != null) {
            String ProductName = data.getLastPathSegment();

              if (ProductName.equals("cpu")) {
                // Do something. For example, query the database for information on this product.
            }
        }
    }
}
In the above Java snippet, the if() statement checks if the value returned from the data.getLastPathSegment() method is equal to cpu. The value returned from the data.getLastPathSegment()method is actually the cpu part of the URL app://myapp/products/cpu.
This is how Android handles a Standard Deep Link. While deep linking is a powerful mechanism, security risks may arise from improper implementation. In the example above, the android:scheme attribute is set to app, and the android:host is set to myapp. However, Android does not enforce ownership verification for custom schemes, meaning any malicious app can declare itself as the default handler for that scheme, potentially leading to security vulnerabilities. To mitigate this risk, Android App Links should be used.
Android App Link
Assuming that the URL https://www.myapp.com/ leads to an existing website, the deep link in it would look like this.
Code: html
<div>
    <p>Buy our latest PC parts.</p>
    <a href="https://www.myapp.com/products/cpu"> </a>
</div>
Accordingly, the Androidmanifest.xml file will contain the following.
Code: xml
<activity android:name=".ProductsActivity">
    <intent-filter>
        <action android:name="android.intent.action.VIEW" />
        <category android:name="android.intent.category.DEFAULT" />
        <category android:name="android.intent.category.BROWSABLE" />
        <data android:scheme="https"
              android:host="www.myapp.com"
              android:pathPrefix="/products/" />
    </intent-filter>
</activity>
We notice that the android:scheme attribute is set to https, and the android:host is set to www.myapp.com. In this case, if the app that handles the deep link isn't installed, the link will open in a web browser listing the products. This is a feature added on Android 6.0 and higher, ensuring that only the verified domain owner can handle links to that domain within their app, and other potential malicious apps won't be able to handle this link.
On the other hand, bad programming could still lead to security issues. Imagine an application handling the URL https://www.myapp.com/home?uid=50&token=RLsB?19oYMAL6M5v. If the app doesn't verify the uid and token parameters passed in via the deep link, a malicious actor could craft their own link with different parameter values, leading to unauthorized access to another user's data. To enhance security when using Deep Links, it is suggested to use Android App Links (which ensure links are verified and securely handled) instead of generic Deep Links. Additionally, one should validate the input of parameters and avoid passing sensitive data through URLs.
Setting up the testing environment requires our host machine, an emulated Android device, and the tools we will use for the application penetration testing. In the following paragraphs, we will discuss various Android emulators and set up one we are going to be using during the next sections.
Android emulators are a vital tool for application penetration testers. They are programs allowing users to run Android applications and simulate the Android operating system on devices like personal computers. They are widely used for app development, testing, and gaming purposes. Android emulators are a cost-effective solution that allows testing applications on various devices and Android API levels without needing each physical device. Apart from this, emulators also provide most of the capabilities that a real device does, like simulating incoming phone calls and text messages, camera, Bluetooth, sensors, accessing the Google Play Store, and more. Penetration testers can benefit from emulators since they can simulate real-world scenarios and evaluate Android application vulnerabilities.
Most real Android devices use ARM or ARM64 CPU architecture, specifically designed for mobile devices and providing high-energy performance. However, Android emulators use x86 or x86_64 CPU architectures for better performance and compatibility with the host machine's hardware. Different CPU architectures can affect how exploits or vulnerabilities behave in emulated environments compared to real devices. In the following sections, we will use Android Virtual Device (AVD) for testing applications, which is included in the Android Studio IDE.
Android Studio's AVD is a fast and feature-rich emulator that allows us to test applications. It will help us run and debug applications developed with Android Studio in order to exploit other apps. Android Studio includes the AVD Manager, which simplifies creating, configuring, and managing Android Virtual Devices to simulate real-world scenarios. The following steps will show how to set up an Android Virtual Device (AVD) using Android Studio.
Note: It is not recommended to run the Android emulator within a Virtual Machine, as nested virtualization can cause significant performance delays.
Since we have already seen how to install Android Studio and create a new project, let's jump directly to creating the AVD. In a new Android project, navigate to Tools -> Device Manager.
On the right side of the Android Studio, the Device Manager window will pop up, containing a default virtual device (Pixel 3a XL API 33) that might be created while installing Android Studio. The following image shows an example of the Device Manager window, having many devices created.
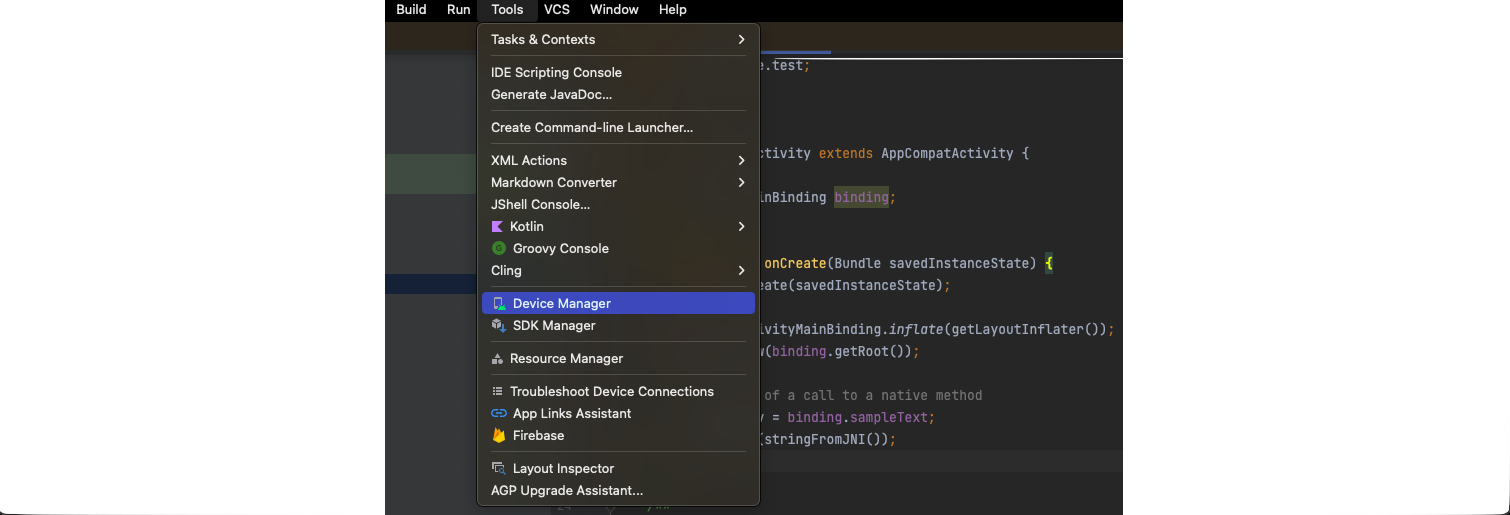
Let's see the process of creating a new device by clicking on the button under Tools -> Device Manager -> Create device. Along with other properties, an AVD contains a hardware profile that defines the characteristics of a device as shipped from the factory. The Device Manager comes pre-equipped with certain hardware profiles (e.g., Pixel devices), allowing users to define or tailor these profiles according to their requirements.

Navigating to the x86 Images we can see the different Android API levels. The Google Play logo in the Play Store column indicates that the device includes Google Play Store and access to other services. Assuming we select the Pixel 4 device, moving on to the next step, we are prompted to choose a system image.
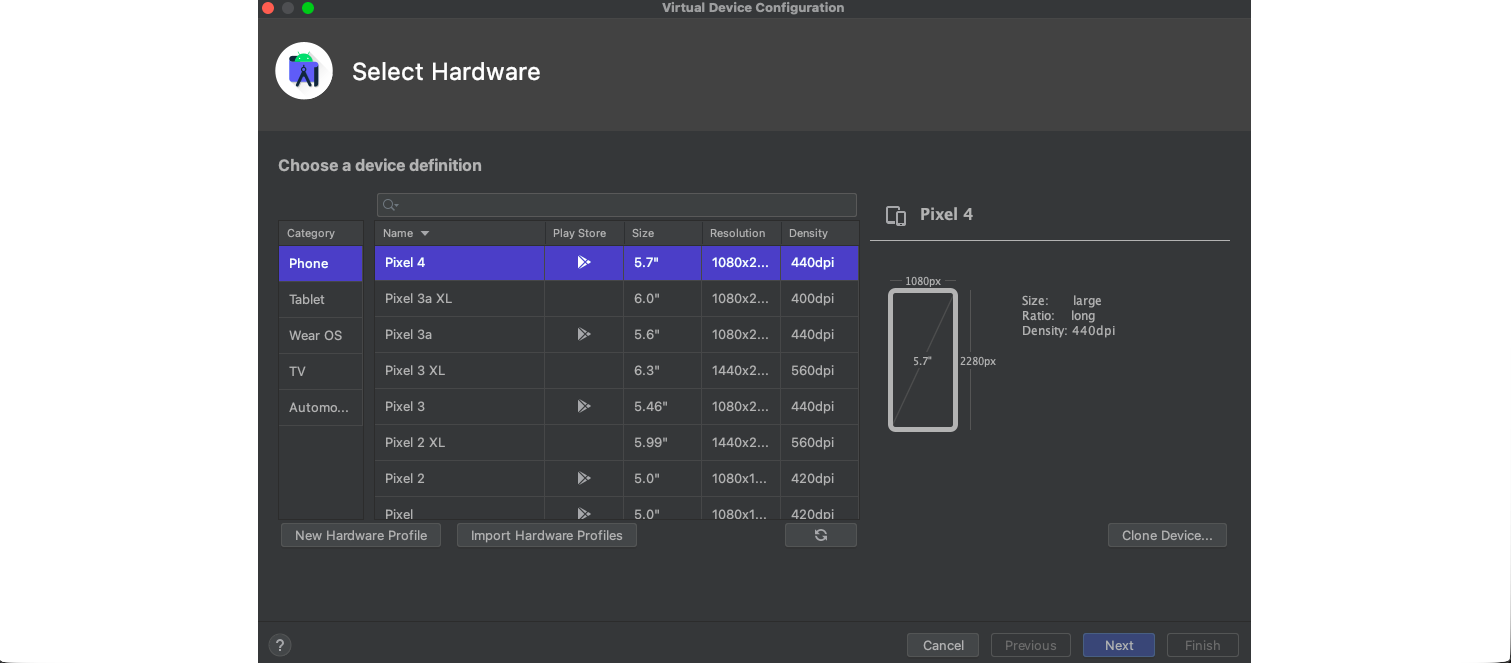
System images labeled with Google APIs provide access only to Google Play services, while images labeled with Google Play also provide a Google Play Store. If the download icon appears near the Release Name, the image is not installed, and we must download it. System images that include the Google Play Store are signed with a release key, and thus elevated privileges (root) are not supported. On the other hand, system images that only include Google APIs will allow elevated privileges (root) by using the ADB tool through the terminal. This is a necessary feature that we will utilize while conducting application penetration testing. Assuming we select the Tiramisu 33 x86_64 (Google APIs) image, moving on to the next step, we are prompted to give the AVD a name and verify the configurations.
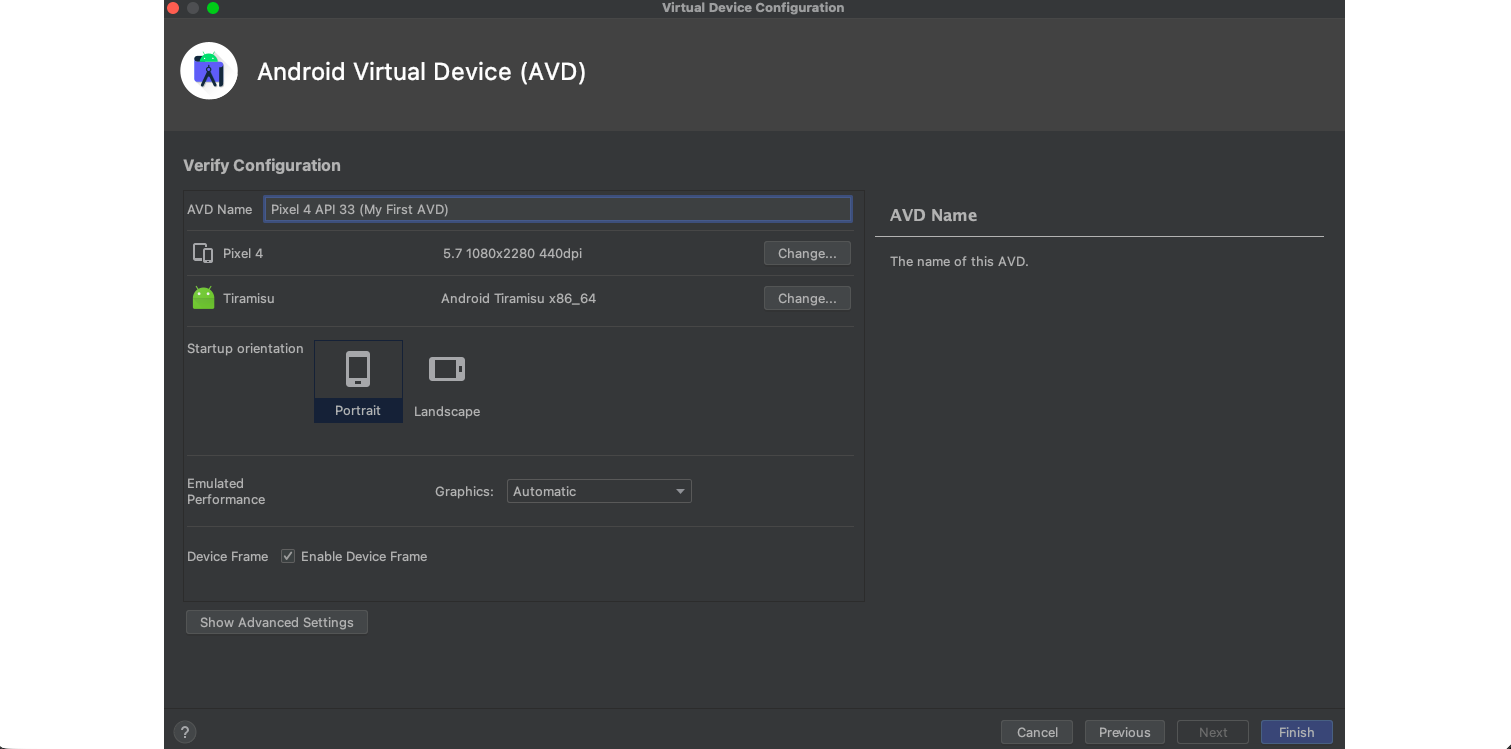
Once we click the Finish button and create the device, we can find it and start it in the Device Manager by clicking the Play button under the Actions tab.
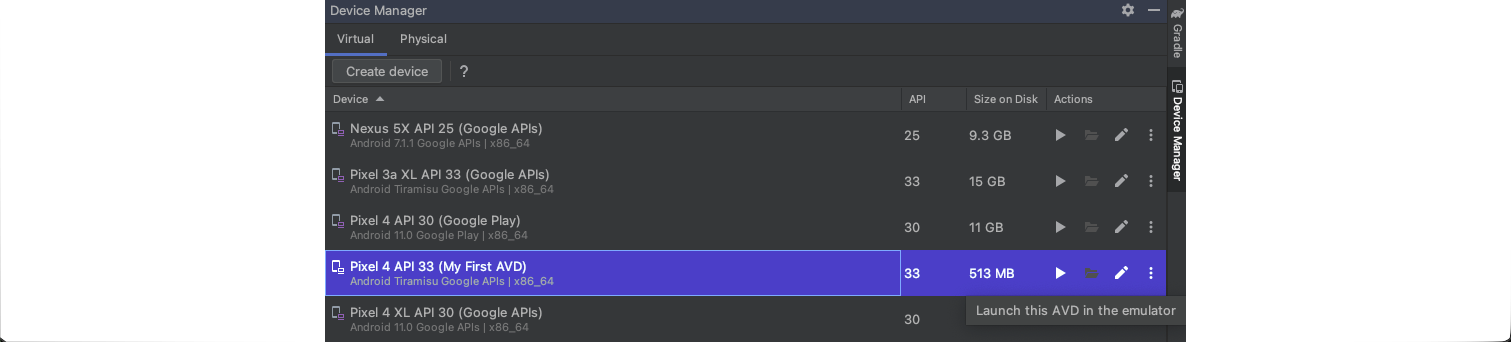
Once the emulator is launched, it will look like this.
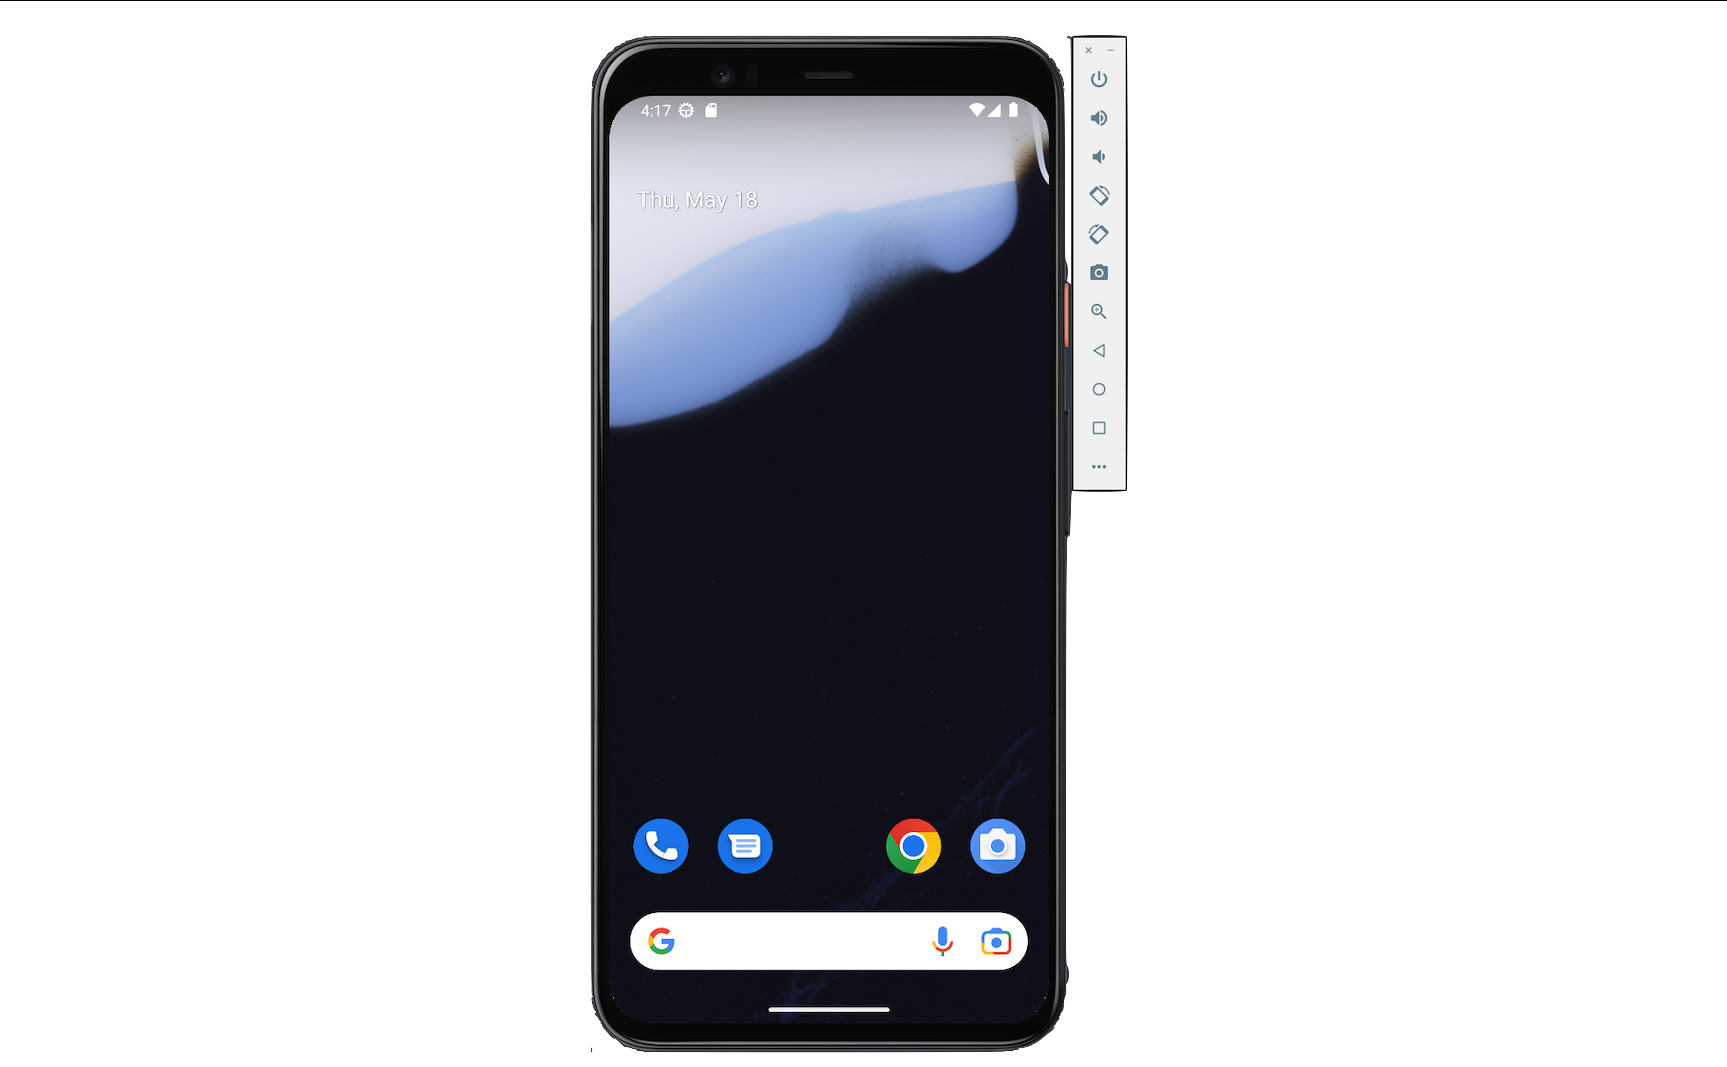
On the device's right side, there is a vertical menu bar. We can stop the emulator by clicking the x icon on the top. Finally, among other action buttons in the menu bar, there is a 3-dot icon that contains various device settings we can configure as the device is running.
Although Android Studio AVD is the emulator we will use throughout the following sections, several other emulators are available with unique features and capabilities. Some of the popular alternatives include the following emulators.
| Corellium |
|---|
| Supports a wide range of mobile devices including both Android and iOS operating systems. |
| Offers a web-based interface. |
| Provides integrated advanced debugging tools. |
| Enables users to take snapshots of the emulator. |
| Emulates both standard and rooted/jailbroken devices. |
| Genymotion |
|---|
| Designed for app developers and testers |
| Offers a wide range of virtual devices with different Android versions |
| Supports advanced features like camera, GPS, and accelerometer emulation |
| Integrates with development platforms like Android Studio and Xamarin |
| Available for Windows, macOS, and Linux |
| BlueStacks |
|---|
| Widely popular and user-friendly |
| Multi-instance feature for running multiple apps simultaneously |
| Integrates with gaming platforms like Twitch and Discord |
| NoxPlayer |
|---|
| Lightweight and efficient emulator |
| Supports gamepad, keyboard, and script recording |
| Offers advanced features like GPS spoofing and virtual location |
| MEmu Play |
|---|
| High performance and compatibility |
| Offers multiple Android versions |
| Allows multiple instances and easy app cloning |
| Keyboard mapping and joystick support |
| LDPlayer |
|---|
| Optimized for gaming and productivity apps |
| Customizable controls and graphics settings |
| Multi-instance support and synchronization |
Android Debug Bridge (ADB) is a versatile command-line tool that enables communication between a computer and a device. As a part of the Android SDK (Software Development Kit), it allows developers to perform tasks like installing and debugging applications, transferring files between the host computer and the device, and accessing the device through a shell. Android Debug Bridge is a client-server program that can be used on physical and emulated devices, and it includes the following three components.
| Components | Description |
|---|---|
The client |
It runs on the host machine and can be invoked from the terminal by issuing the adb command. |
The daemon (adbd) |
It runs as a background process on each device, and it is responsible for executing the commands in the device. |
The server |
It runs as a background process on the host machine, and it manages the communication between the client and the daemon. |
The following steps show how the ADB connection process works.
Step 1
The ADB client will start as soon as we issue an adb command in the terminal. When this happens, the client will check for an adb server process running on the host machine. If there isn't one, it starts the server process, which binds to the local TCP port 5037 and listens for commands sent from the adb client.
Step 2
The server then locates the connected emulators by scanning the odd-numbered ports from 5555 to 5585. Finally, it sets up the connection with the emulators that run an ADB daemon (adbd).
Step 3
Each emulator instance has a unique pair of ports to avoid conflicts when running multiple emulators simultaneously. These pairs are an even-numbered port for console connections and an odd-numbered port for ADB connections. In the console connection, we can issue commands to control the emulator using tools like telnet. In the ADB connections, we can perform various development and debugging tasks using the adb command. The following is an example of two connected emulators.
| Emulator | Service | Port |
|---|---|---|
Emulator 1 |
console | 5554 |
Emulator 1 |
adb | 5555 |
Emulator 2 |
console | 5556 |
Emulator 2 |
adb | 5557 |
Step 4
Once the connections are set up, we can use the adb command to access the emulators.
In the following paragraphs, we will see how to install and use ADB. The example below shows the installation process on three different operating systems.
Debian-based Linux
On Debian-based Linux, through the APT package manager:
Android Debug Bridge
root@htb[/htb]$ apt-get install adb
MacOS
On MacOS, through the Homebrew package manager:
Android Debug Bridge
root@htb[/htb]$ /bin/bash -c "$(curl -fsSL https://raw.githubusercontent.com/Homebrew/install/HEAD/install.sh)"
root@htb[/htb]$ brew update
root@htb[/htb]$ brew install android-platform-tools
Windows
On Windows, through the Scoop command-line installer.
Android Debug Bridge
C:\> Set-ExecutionPolicy RemoteSigned -Scope CurrentUser
C:\> iex (New-Object System.Net.WebClient).DownloadString('https://get.scoop.sh')
C:\> scoop bucket add extras
C:\> scoop install adb
ADB is also made available to us as part of the Android SDK Platform Tools package, available through Android Studio's SDK Manager. On Windows, the resulting platform tools including adb.exe are located at C:\Users\<username>\AppData\Local\Android\Sdk\platform-tools
Android Debug Bridge
Windows PowerShell
Copyright (C) Microsoft Corporation. All rights reserved.

Install the latest PowerShell for new features and improvements! https://aka.ms/PSWindows

PS C:\Windows\system32> cd C:\Users\Owner\AppData\Local\Android\Sdk\platform-tools

PS C:\Users\Owner\AppData\Local\Android\Sdk\platform-tools> ls


    Directory: C:\Users\Owner\AppData\Local\Android\Sdk\platform-tools


Mode                 LastWriteTime         Length Name
----                 -------------         ------ ----
-a----         5/17/2024  12:24 PM        5857056 adb.exe
-a----         5/17/2024  12:24 PM         108320 AdbWinApi.dll
-a----         5/17/2024  12:24 PM          73504 AdbWinUsbApi.dll
-a----         5/17/2024  12:24 PM         439072 etc1tool.exe
-a----         5/17/2024  12:24 PM        1807136 fastboot.exe
-a----         5/17/2024  12:24 PM          54560 hprof-conv.exe
-a----         5/17/2024  12:24 PM         242128 libwinpthread-1.dll
-a----         5/17/2024  12:24 PM         477472 make_f2fs.exe
-a----         5/17/2024  12:24 PM         477472 make_f2fs_casefold.exe
-a----         5/17/2024  12:24 PM           1157 mke2fs.conf
-a----         5/17/2024  12:24 PM         754464 mke2fs.exe
-a----         5/17/2024  12:24 PM        1110529 NOTICE.txt
-a----         5/17/2024  12:24 PM          18404 package.xml
-a----         5/17/2024  12:24 PM             38 source.properties
-a----         5/17/2024  12:24 PM        2838304 sqlite3.exe
We also recommend adding the location of adb.exe to your PATH environment variable, so it can be run from any directory when working with PowerShell/Command Prompt. For instructions on how to do this, check out this article.
To start the ADB server on the host computer, we can type the following command.
Android Debug Bridge
root@htb[/htb]$ adb start-server
Once the ADB is installed on our host computer and the emulator is started, we can start issuing ADB commands. As mentioned earlier, starting the ADB server can also be done by directly executing commands using the ADB client. Below are some useful ADB commands.
| Command | Description |
|---|---|
adb help |
List all commands. |
adb kill-server |
Kills the adb server. |
adb devices |
Lists connected devices. |
adb root |
Restarts adbd with root permissions. |
adb install <apk> |
Install app. |
adb push <local> <remote> |
Copy file/dir to device. |
adb pull <remote> <local> |
Copy file/dir from device. |
adb logcat [options] [filter] [filter] |
View device log. |
Let's list the connected devices using the following command.
Android Debug Bridge
root@htb[/htb]$ adb devices

List of devices attached
emulator-5554    device
The above command reveals one attached device using port 5554. Apart from providing interactive shell access to the emulated device, ADB can also be used non-interactively to execute commands from the host machine directly to the emulated device. The following adb command executes the whoami command inside the emulated device and prints the result to the terminal.
Android Debug Bridge
root@htb[/htb]$ adb shell whoami

shell
Let's issue the following command to get a shell in the emulated device.
Android Debug Bridge
root@htb[/htb]$ adb shell

emu64x:/ $
We can now start executing Linux commands inside the emulator.
Android Shell
Android Debug Bridge
emu64x:/sdcard $ ls -l /sdcard/

total 104
drwxrws--- 2 u0_a146  media_rw 4096 2023-04-28 17:30 Alarms
drwxrws--x 5 media_rw media_rw 4096 2023-04-28 17:29 Android
drwxrws--- 2 u0_a146  media_rw 4096 2023-04-28 17:30 Audiobooks
drwxrws--- 2 u0_a146  media_rw 4096 2023-04-28 17:30 DCIM
drwxrws--- 2 u0_a146  media_rw 4096 2023-04-28 17:30 Documents
drwxrws--- 2 u0_a146  media_rw 4096 2023-04-28 17:30 Download
drwxrws--- 3 u0_a146  media_rw 4096 2023-04-28 17:30 Movies
drwxrws--- 3 u0_a146  media_rw 4096 2023-04-28 17:30 Music
drwxrws--- 2 u0_a146  media_rw 4096 2023-04-28 17:30 Notifications
drwxrws--- 3 u0_a146  media_rw 4096 2023-04-28 17:30 Pictures
drwxrws--- 2 u0_a146  media_rw 4096 2023-04-28 17:30 Podcasts
drwxrws--- 2 u0_a146  media_rw 4096 2023-04-28 17:30 Recordings
drwxrws--- 2 u0_a146  media_rw 4096 2023-04-28 17:30 Ringtones
ADB can also provide the user with elevated privileges. The adb root command restarts the ADB daemon (adbd) on the Android emulator with root privileges. It gives elevated permissions to the user that allows for a wider range of command execution, as well as access to system files and directories that are typically restricted to regular users. Root access allows us to perform more in-depth debugging and testing during the application penetration testing. This said, running ADB as root is typically only available on emulators, as most production devices come with locked bootloaders and cannot be rooted without voiding the warranty. Also, as mentioned earlier in the Android Emulators section, only system images labeled with Google APIs will provide this feature. System images labeled with Google Play are signed with a release key, and elevated privileges (root) are not supported.
The following command will restart the adbd with root privillages.
Android Debug Bridge
root@htb[/htb]$ adb root

restarting adbd as root
Once it's restarted, we can execute the following command to confirm that we can run commands as the user root.
Android Debug Bridge
root@htb[/htb]$ adb shell whoami

root
Android Debug Bridge also allows us to install applications. Let's try to install the application we created in the section Native Apps using the following command.
Android Debug Bridge
root@htb[/htb]$ adb install myapp.apk

Performing Streamed Install
Success
Once installed, we can locate the app on the device and tap on it to start. Another useful command of ADB is the push and pull commands. Using these commands, we can transfer files from the host computer to the device and vice versa. To push files from the host to the device, we can execute the following command.
Android Debug Bridge
root@htb[/htb]$ adb push ./myapp.apk /sdcard/Download/

./myapp.apk: 1 file pushed, 0 skipped. 14.9 MB/s (4527105 bytes in 0.291s)
We can verify by listing the content of the directory /sdcard/Download/ in the device.
Android Debug Bridge
root@htb[/htb]$ adb shell ls -l /sdcard/Download/

total 4428
-rw-rw---- 1 u0_a146 media_rw 4527105 2023-05-03 01:44 myapp.apk
Similarly, we pull files from the device to the host by executing the following command.
Android Debug Bridge
root@htb[/htb]$ adb pull /sdcard/Download/myapp.apk .

/sdcard/Download/myapp.apk: 1 file pulled, 0 skipped. 78.9 MB/s (4527105 bytes in 0.055s)
Setting up ADB with a real Android device requires some extra steps on the device's side. After installing ADB on the host machine, we also have to enable USB Debugging on our Android device. To do this, we first have to go to Settings -> About phone or About device or About emulated device, find the Build number, and tap on it seven times. This will display the message You are now a developer!.
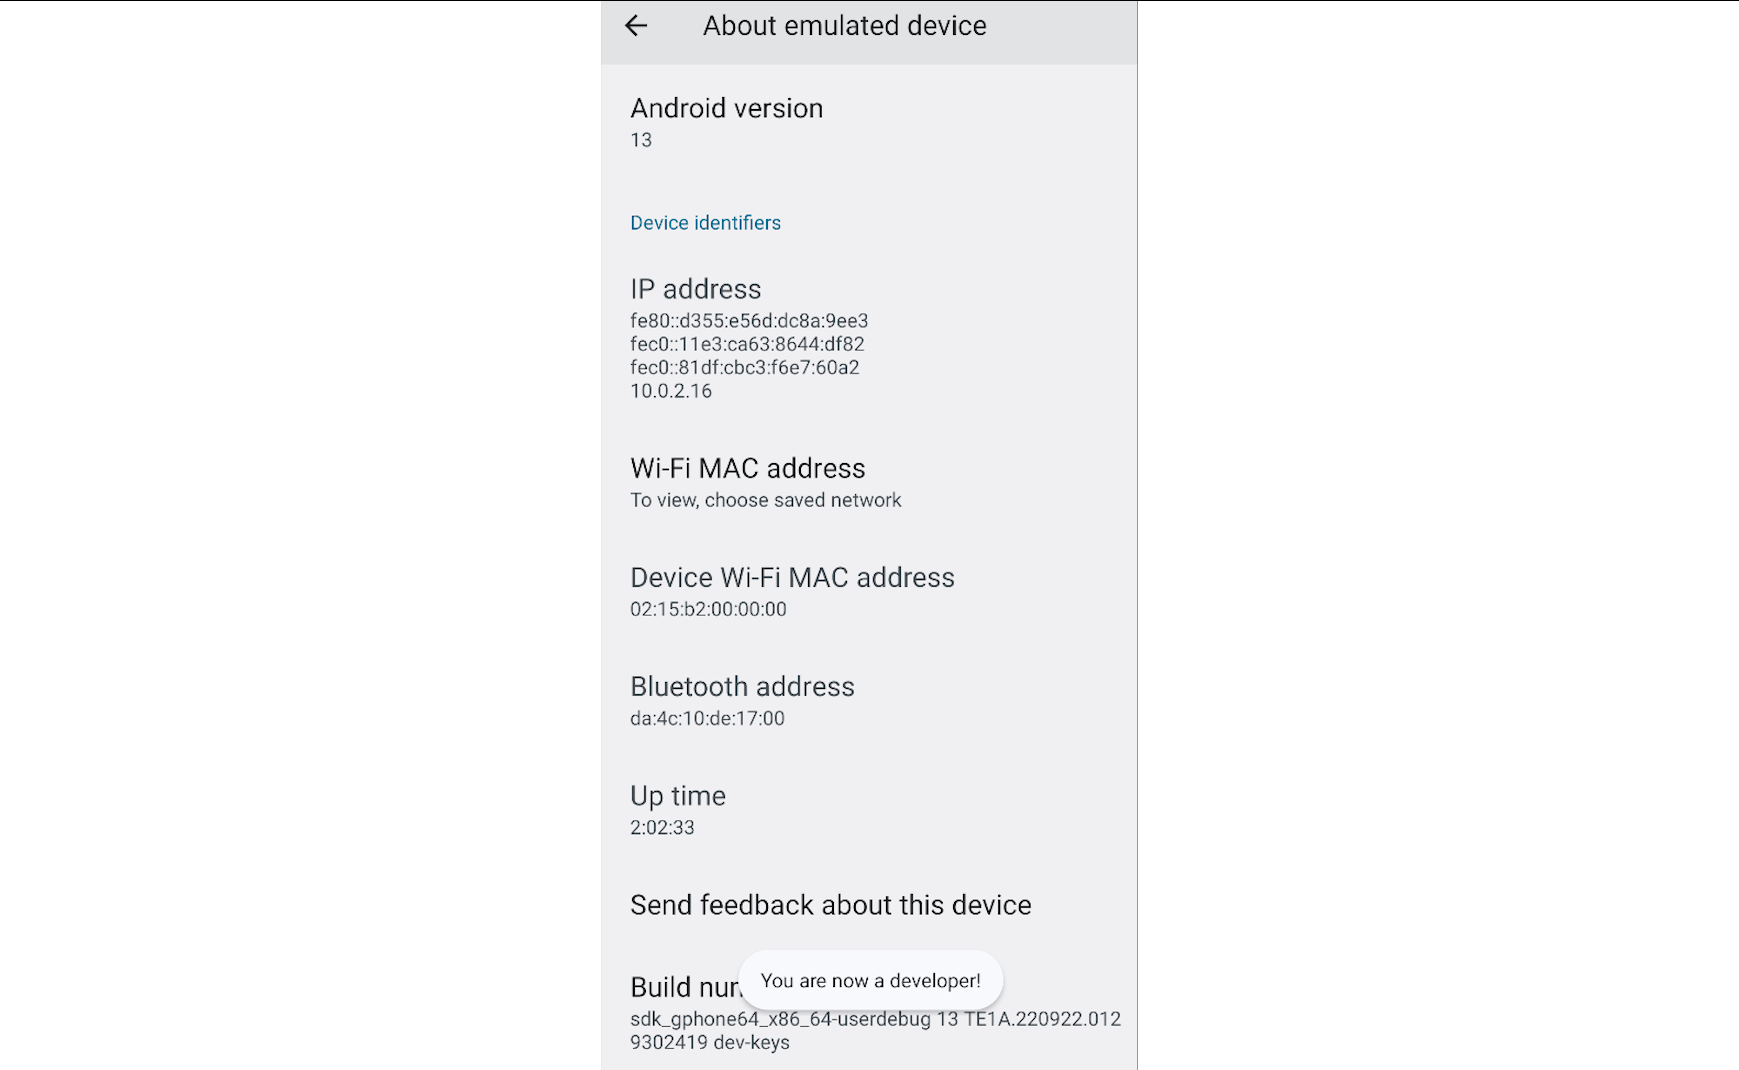
The Developer Options menu can be found under Settings -> Developer Options or Settings -> System -> Developer Options, depending on the Android version. After navigating to the path we mentioned earlier, the next step is to enable USB Debugging and confirm any prompts that appear.
Once enabled, we can connect the device to the computer using a USB cable. When prompted on the device, choose File transfer or MTP mode. We can confirm that the device is connected by executing the following command.
Android Debug Bridge
root@htb[/htb]$ adb devices

List of devices attached
1234567890ABCDEF    device
The device's serial number should be included in the output, indicating that ADB is successfully connected to your device. Finally, we can start executing adb commands from our host computer to the device.
Mobile applications and services are vital for both our personal and professional life, making them prime targets for malicious actors seeking sensitive data. Modern Android applications are widely used in commerce, healthcare, banking, education, and more. Beyond storing sensitive information, these applications often contain security vulnerabilities that could be exploited. Penetration testers and developers play a crucial role in identifying and mitigating these vulnerabilities, reducing risks such as fraud, malware infections, and data breaches. For companies launching new applications, ensuring security and compliance is essential to avoiding legal issues and protecting user data.
Mobile application penetration testing is the process of assessing an app's security by simulating real-world attack scenarios. This methodology helps identify vulnerabilities and ensures that applications remain resilient against threats. The following steps outline a structured, high-level approach that Android penetration testers should follow for a comprehensive security evaluation.
1. Planning and Environment Setup
| Objectives |
|---|
| Define the scope and objectives of the penetration test. |
| Obtain necessary permissions from the app owner or organization. |
| Set up the testing environment, including the necessary tools, operating systems, and emulators. |
2. Enumeration and Information Gathering
| Objectives |
|---|
| Gather information about the app and its architecture. |
| Understand the functionality of the application. |
| Enumerate any data structure the app uses that is stored in the local storage. |
3. Static Analysis
| Objectives |
|---|
| Understand the manifest file of the application. Review the app's components, permissions, and configurations. |
| Decompile and analyze the application's source code to understand the flow and find potential vulnerabilities. |
| Examine native or third-party libraries, frameworks, and dependencies the app uses. |
4. Dynamic Analysis
| Objectives |
|---|
| Monitor the application's behavior during runtime. Enumerate the local storage for files and data structures created after performing various functionalities. |
| Perform dynamic instrumentation to read the memory of the application during runtime. |
| Intercept network traffic and test the app for vulnerabilities such as authentication bypass and insecure data transmission. |
| Check for Server-Side attacks by analyzing API calls and looking for vulnerabilities such as injection and XSS attacks. |
5. Documenting and Reporting
| Objectives |
|---|
| Document the identified vulnerabilities, exploitation methods, impact, and potential risks. |
| Communicate the findings to the app owner or organization. |
| Provide recommendations for fixing vulnerabilities and mitigating security risks. |
The following list presents some of the most widely used tools for mobile app penetration testing , focusing on reverse engineering, dynamic analysis, code instrumentation, network traffic analysis, and digital forensics. Familiarity with these tools is essential for anyone practicing their Android application penetration testing skills.
ADB
A versatile command-line tool that allows communication with Android devices. This tool will let us enumerate the local storage of the device and the installation directory of the application, see the app logs while it is running, and install and run other apps and tools necessary for the steps of the dynamic analysis and instrumentation.
JADX
This tool allows us to reverse engineer an application and view its source code through a graphical interface. It provides the user with a Java-like pseudocode that is close enough to the actual code. It also decodes the encoded resources that are packed in the APK file, making the file configurations and the other assets readable to humans. This tool is an essential part of the process since the testers can understand how the app works and what technologies are used.
APKTool
This tool also allows reverse engineering Android applications. It will decompile the source code and decode the resources of the APK file. APKTool also enables us to edit the source code and configuration files, recompile the code, and build the APK file again. This is called application patching. The decompiled code provided to the user is a symbolic language called Smali. This language is not easy to read, but if combined with a tool that offers Java-like pseudocode like JADX, pentesters can efficiently understand and change the flow of the application to their benefit.
Ghidra
An open-source software reverse engineering (SRE) framework developed by the National Security Agency (NSA). It is used for disassembling, decompiling, and analyzing binaries. In Android application penetration testing, Ghidra is often used to analyze the native C++ libraries loaded to the application.
Burp Suite
A tool used for web application penetration testing. While we often see it used for testing websites, it can also be used for testing any web-based application communicating with a server, including Android. In the Android application, penetration testing will be mainly used to intercept and analyze HTTP/HTTPS requests.
Frida
A dynamic instrumentation toolkit used by developers, reverse engineers, and security researchers. It enables us to inject snippets of JavaScript or native code into the running processes of Android applications, allowing us to analyze and manipulate them during runtime.
Autopsy
An open-source digital forensics platform that can be used for various tasks, including Android forensics. Autopsy will help us investigate disk images of Android devices and let us search for files, databases, calls, messages, and logs, using the provided GUI.
Automated Android penetration testing tools are suitable for scanning common vulnerabilities. They offer a faster and cheaper solution than manual tools and processes, which provide more depth and vulnerability insights by combining human intelligence with automated tools.
MobSF
An automated security testing framework for Android, iOS, and Windows platforms that performs static, dynamic, and malware analysis on mobile applications.
Drozer
A comprehensive security and attack framework that allows us to assess the security of Android applications. It simulates various attack vectors and provides multiple tools to analyze, exploit, and debug Android applications.
Qark
A static code analysis tool that automates the discovery of security vulnerabilities in Android applications. It can also create Proof-of-Concept deployable APKs and ADB commands to exploit the vulnerabilities it finds.
Objection
A runtime mobile exploration toolkit that uses Frida to provide an easy environment for assessing Android and iOS application security. It automates several common tasks, such as bypassing SSL pinning, and users won't be needed to create custom scripts whenever they need to exploit common vulnerabilities.
Medusa
An extensible and modularized framework that automates processes and techniques practiced during the dynamic analysis of Android Applications. Medusa is based on Frida and can analyze and enumerate an app, attack common entry points, and automate processes like application patching, MITM attack, and more. Medusa can add and remove hooks for Java or Native methods and has more than 90 modules that can be combined.
Androbugs
Androbugs is an Android vulnerability analysis framework that automatically scans Android applications and checks for security issues and vulnerabilities.
It is crucial to remember that combining both manual and automated techniques usually results in a better evaluation. Recapping this module, we went through the most critical fundamental concepts necessary for understanding the methodologies that will follow in subsequent modules. We analyzed the structure of the Android OS and the architecture of applications, discussed the different types of apps, and examined examples of applications built with various frameworks. We studied their components and IPCs, and learned how to set up a testing environment and interact with emulators.
Following the Penetration Testing methodology discussed in this section, we are now ready to prepare for the next module, which regards Android Application Static Analysis. In this upcoming module, we will reverse engineer apps and study the source code to identify security issues and exploit vulnerabilities.